- Made by AppCoda
- Contact us / Support
- Tweet this book
- Preface
- 1. Building Adaptive User Interfaces
- 2. Creating Table View Sections and Index list with Diffable Data Source
- 3. Animating Table View Cells
- 4. Working with JSON and Codable
- 5. How to Integrate the Twitter and Facebook SDK for Social Sharing
- 6. Working with Email and Attachments
- 7. Sending SMS and MMS Using MessageUI Framework
- 8. How to Get Direction and Draw Route on Maps
- 9. Search Nearby Points of Interest Using Local Search
- 10. Audio Recording and Playback
- 11. Scan QR Code Using AVFoundation Framework
- 12. Working with URL Schemes
- 13. Building a Full Screen Camera with Gesture-based Controls
- 14. Video Capturing and Playback Using AVKit
- 15. Displaying Banner Ads using Google AdMob
- 16. Working with Custom Fonts
- 17. Working with AirDrop, UIActivityViewController and Uniform Type Identifiers
- 18. Building Grid Layouts Using Collection Views and Diffable Data Source
- 19. Interacting with Collection Views
- 20. Adaptive Collection Views Using UITraitCollection and Compositional Layout
- 21. Building a Weather Widget Using WidgetKit
- 22. Building Slide Out Sidebar Menus Using Objective-C Libraries
- 23. View Controller Transitions and Animations
- 24. Building a Slide Down Menu
- 25. Self Sizing Cells and Dynamic Type
- 26. XML Parsing, RSS and Expandable Table View Cells
- 27. Applying a Blurred Background Using UIVisualEffect
- 28. Using Touch ID and Face ID For Authentication
- 29. Building a Carousel-Like User Interface
- 30. Working with Parse
- 31. Parsing CSV and Preloading a SQLite Database Using Core Data
- 32. Connecting Multiple Annotations with Polylines and Routes
- 33. Using CocoaPods in Swift Projects
- 34. Building a Simple Sticker App
- 35. Building iMessage Apps Using Messages Framework
- 36. Building Custom UI Components Using IBDesignable and IBInspectable
- 37. Using Firebase for User Authentication
- 38. Google and Facebook Authentication Using Firebase
- 39. Using Firebase Database and Storage to Build an Instagram-like App
- 40. Building a Real-time Image Recognition App Using Core ML
- 41. Building AR Apps with ARKit and SpriteKit
- 42. Working with 3D Objects in Augmented Reality Using ARKit and SceneKit
- 43. Use Create ML to Train Your Own Machine Learning Model for Image Recognition
- 44. Building a Sentiment Classifier Using Create ML to Classify User Reviews
- 45. Working with Image Tracking Using ARKit
- Published with GitBook
Chapter 41
Building AR Apps with ARKit and SpriteKit
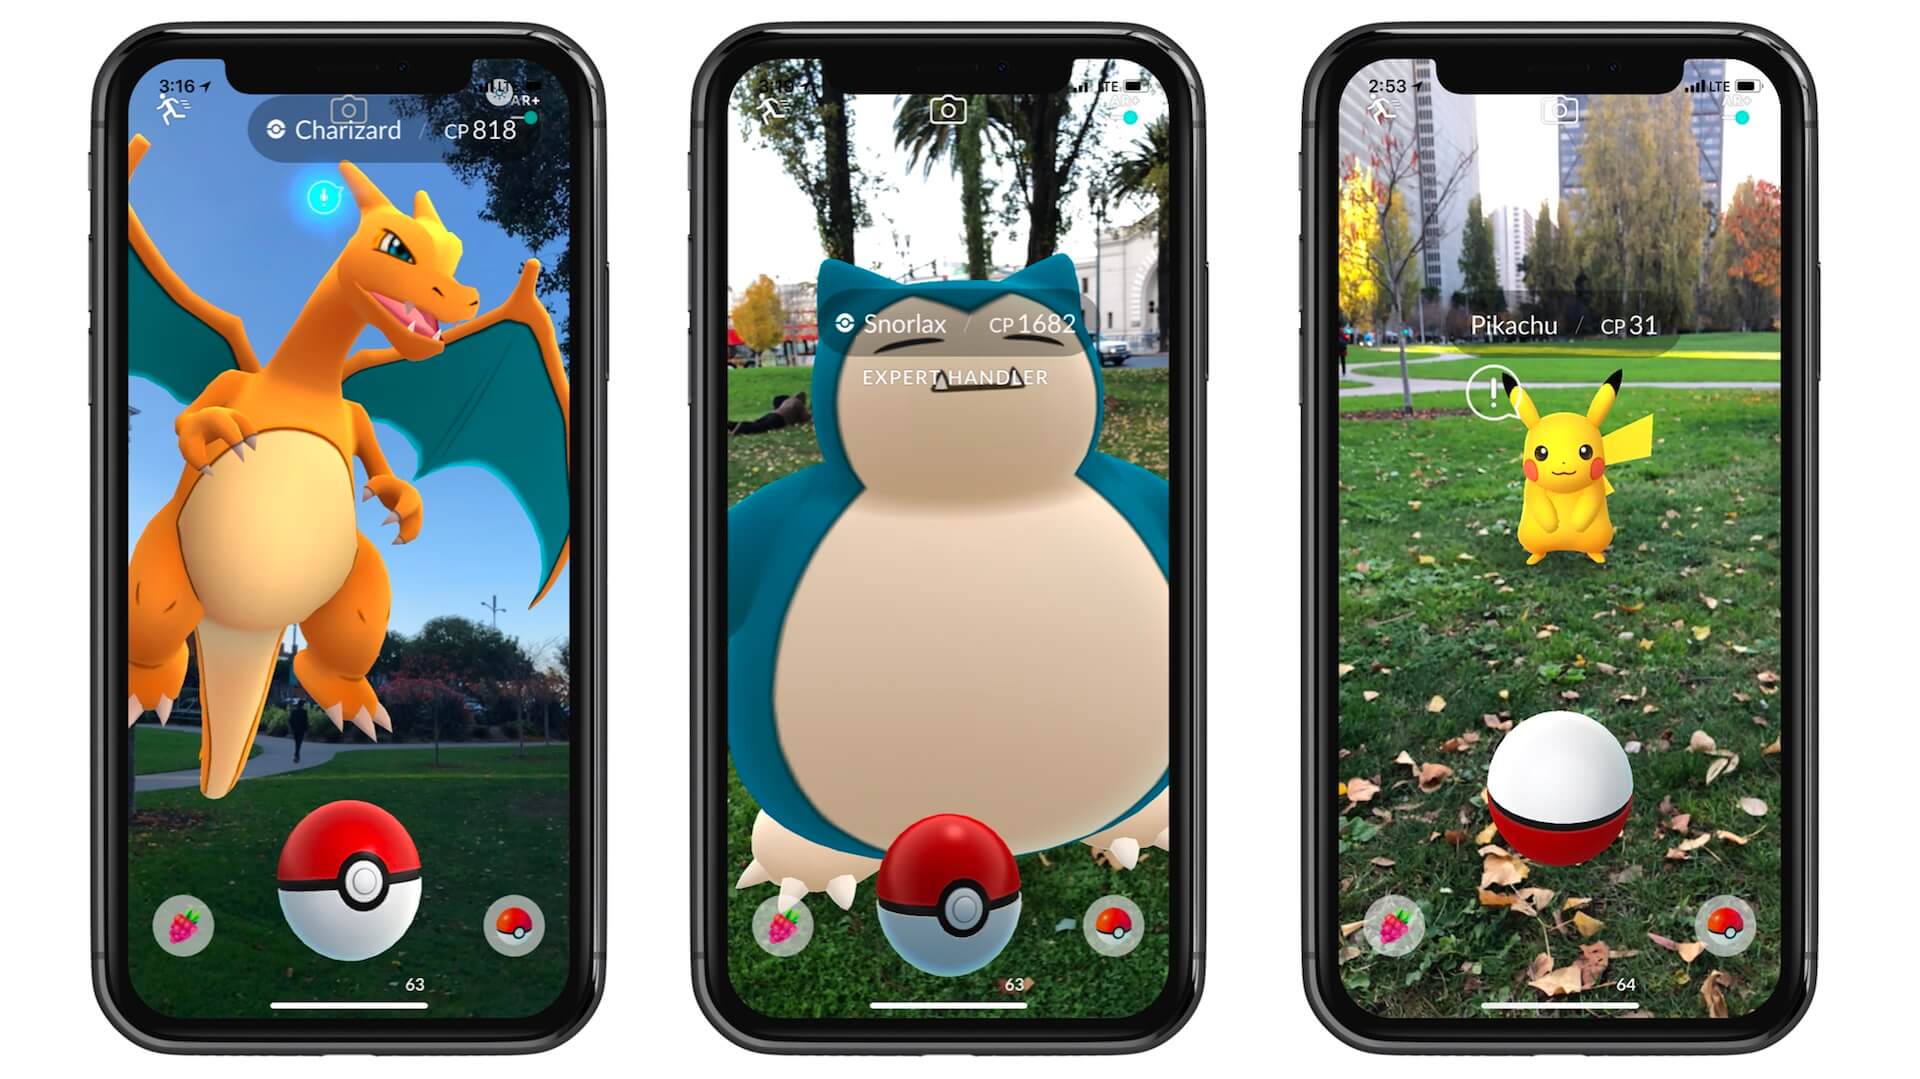
First things first, what is Augmented Reality? In brief, this means you can place virtual objects in a real-world environment. The very best example of AR application is Pokemon Go! At the time, this well-known game was not developed using ARKit, but it showcases one of the many applications of augmented reality.
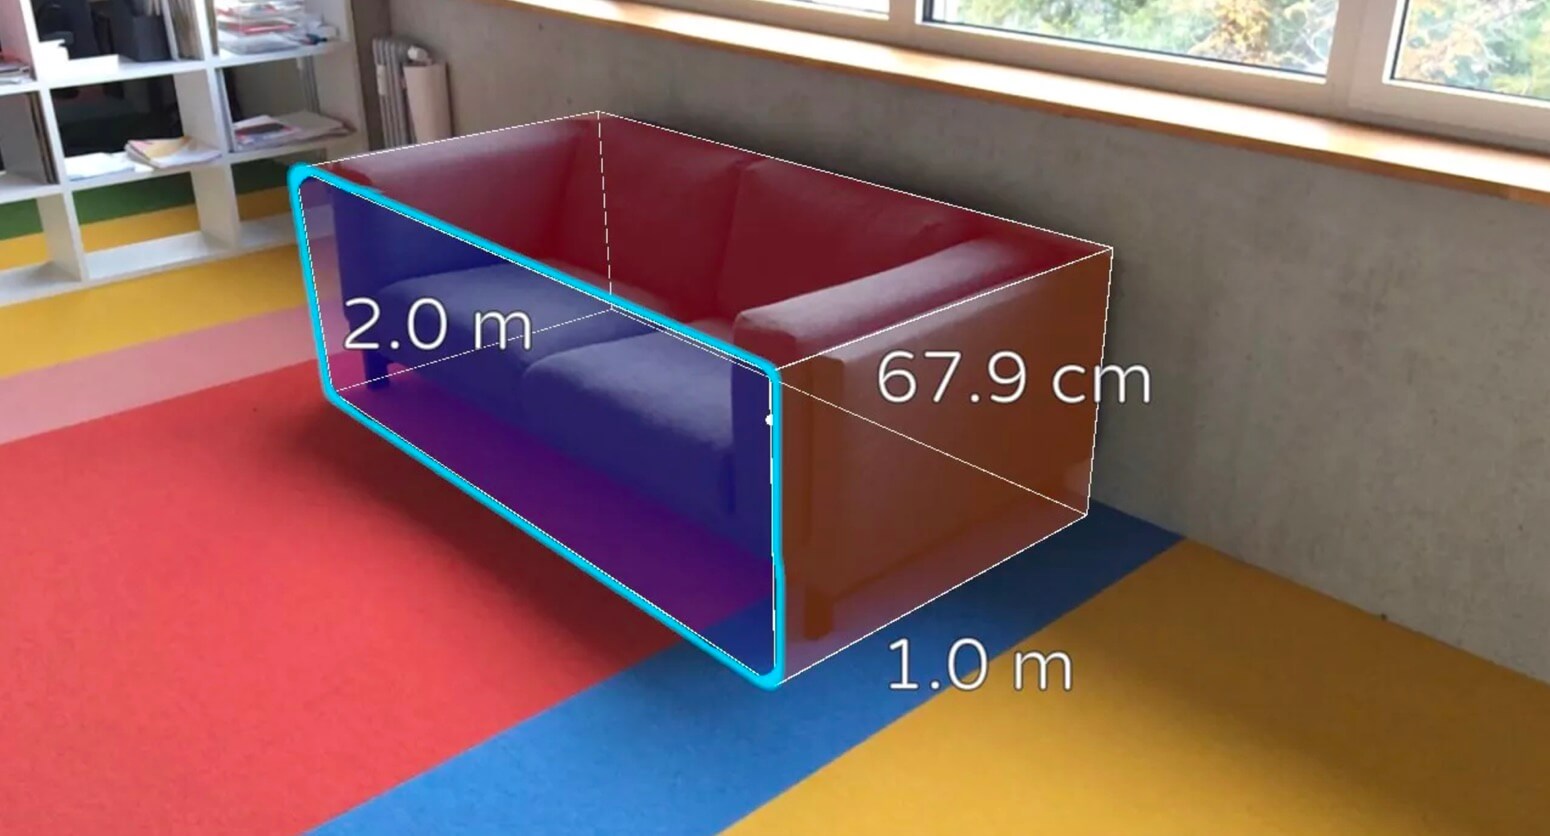
Another great example of AR application is the ARMeasure app (http://armeasure.com/) that allows users to measure nearly anything. You no longer need a physical ruler to measure an object, whether it's a suitcase or a photo frame hanging on a wall. Just point your iPhone's camera to the object you want to measure and the virtual ruler will do the measurement for you. If you haven't tried the app, I recommend you to check it out and play around with it.
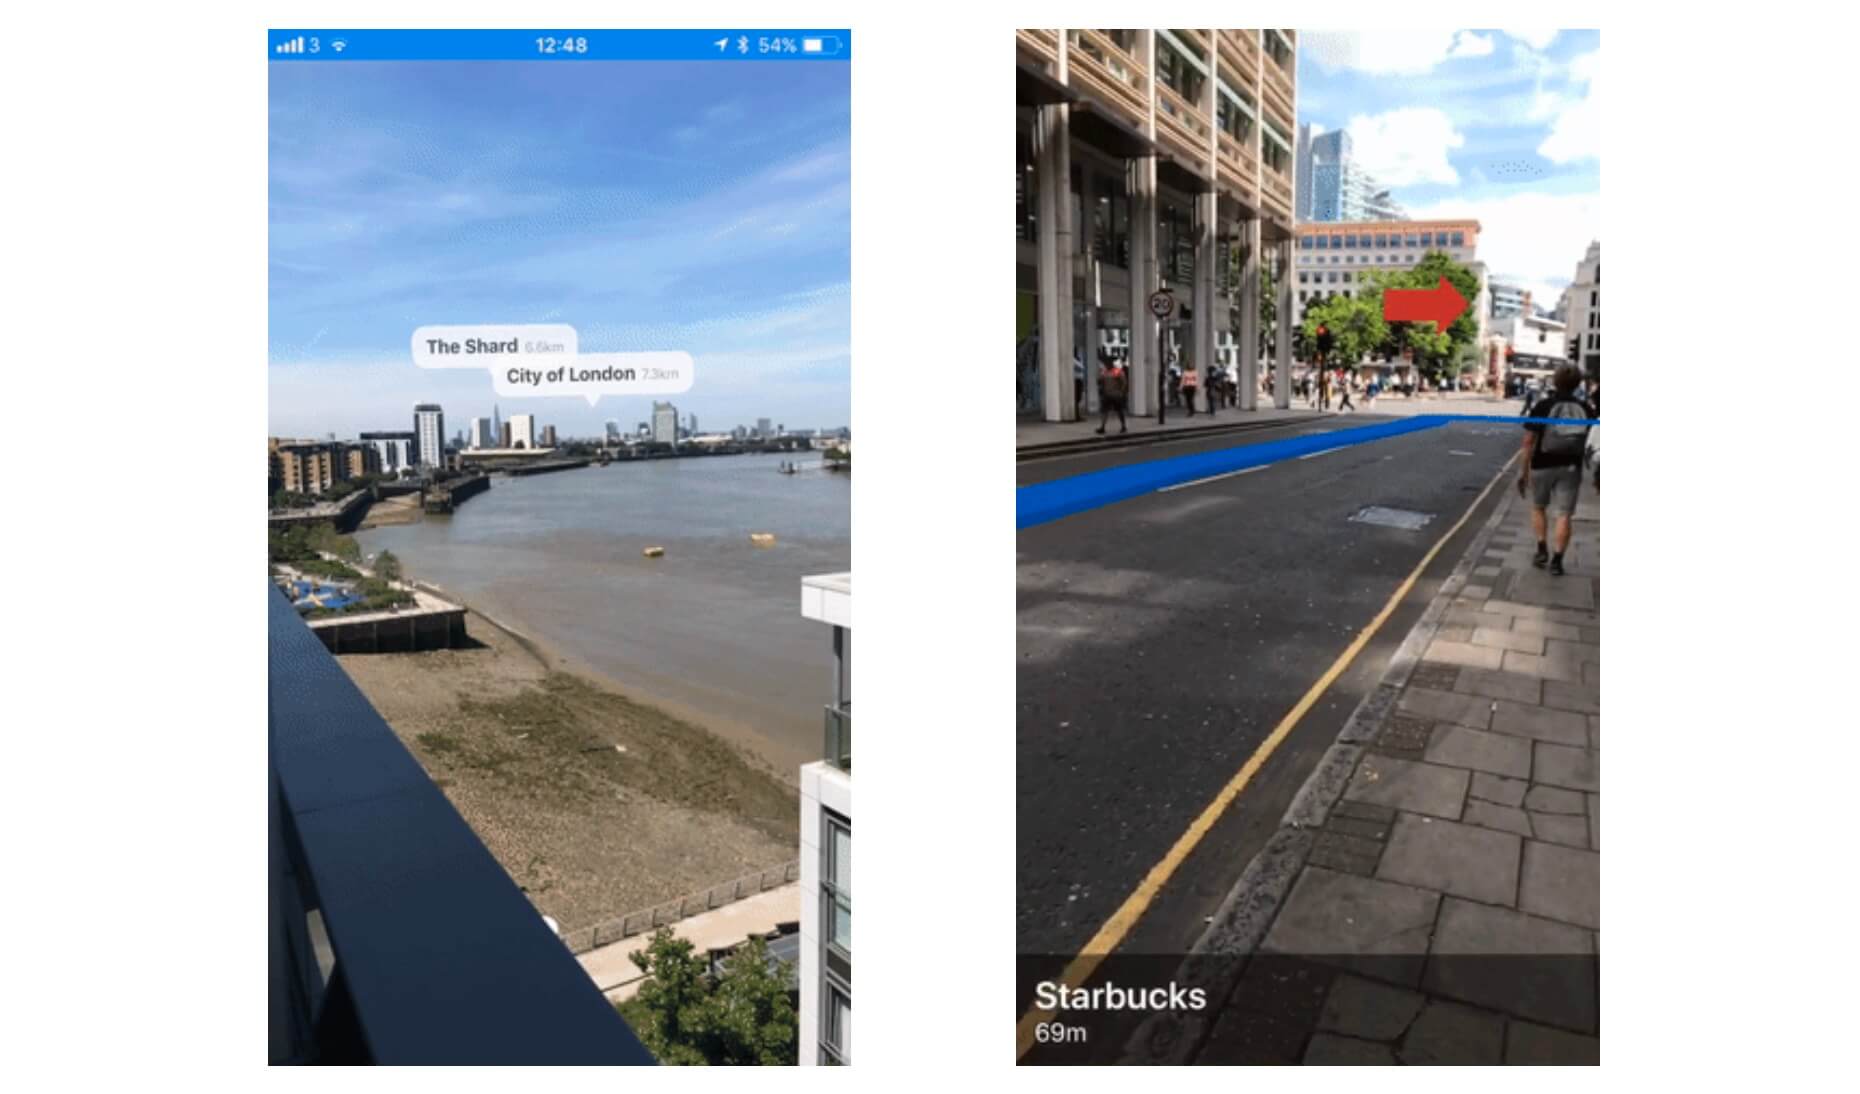
Amazing, right? There is no shortage of AR applications. Some AR applications integrate with other technologies to take the user experience to a whole next level. One example is the ARKit + CoreLocation application (https://github.com/ProjectDent/ARKit-CoreLocation), created by Andrew Hart.
While Google Maps or other map applications can show you the direction from point A to point B, the app demonstrates a whole different experience to show landmarks and directions by combining the power of AR and Core Location technologies. What's that building at the end of the street? Simply point the camera at that building, the app will give you the answer by annotating the landmark. Need to know how to get from here to there? The app shows you turn-by-turn directions displayed in augmented reality. Take a look at the figures below and check out the demo at https://github.com/ProjectDent/ARKit-CoreLocation. You will know what this app does and understand the power of combining AR and other technologies.
Note: Google launched a beta version of AR walking direction feature for Google Maps in August 2019. It's now called Live View in Google Maps.
Now that you have some basic ideas of AR, let's see how to build an AR app. We have already mentioned the term ARKit. The framework was first introduced in iOS 11 for building AR apps on iOS devices. Similar to all other frameworks, it comes along with Xcode. As long as you have Xcode installed, you will be able to develop ARKit apps.
Before we dive into ARKit, please take note that ARKit app can only run on the following devices, equipped with A9 processor (or up):
- iPhone 6s or later models
- iPad Pro, iPad mini (5th generation), iPad Air (3rd generation), and iPad (5th generation)
- iPhone SE
You can't test ARKit apps by using the built-in simulators. You have to use one of the compatible devices as listed above for testing. Therefore, try to prepare the device, otherwise, you can't test your app.
In this chapter, I'll give you a brief introduction to ARKit, which is the core framework for building AR apps on iOS. At the end of this chapter, you will walk away with a clear understanding of how ARKit works and how to accomplish the following using SpriteKit:
- Adding 2D objects into the real-world space
- Removing 2D objects from the space
- Interacting with virtual objects
Building Your First ARKit App
With the built-in template, Xcode has made it very easy for developers to create their first ARKit app. You don't even need to write a line of code. Let's have a try and you will understand what I mean in a minute.
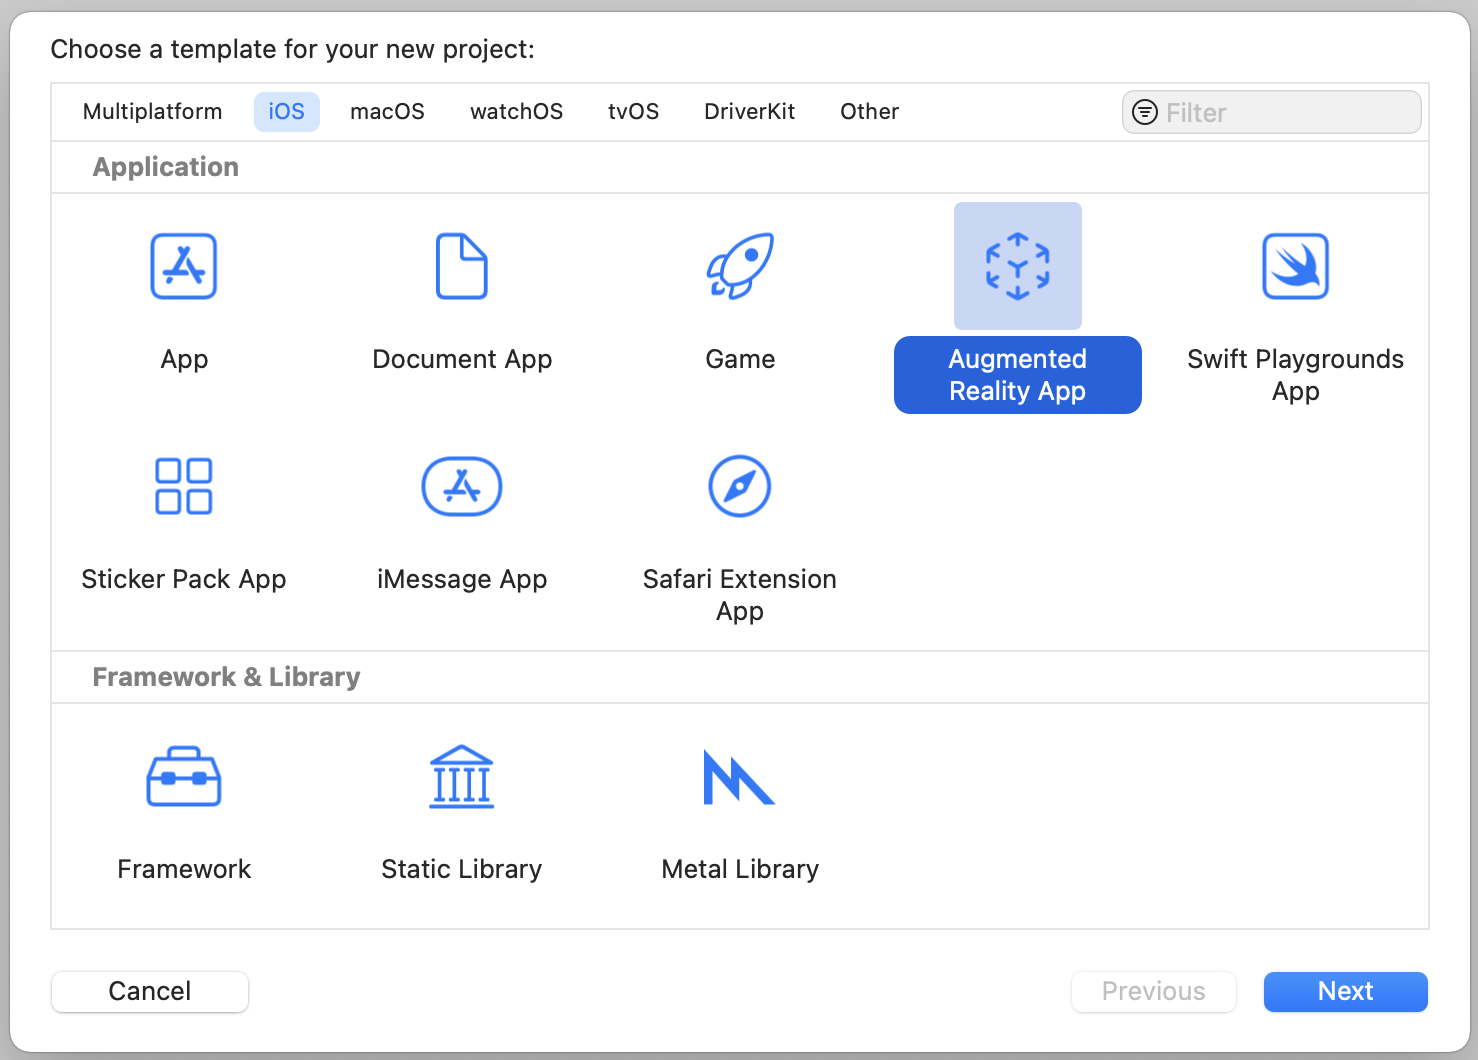
Now fire up Xcode and choose to create a new project. In the project template, select the Augmented Reality App template.
In the next screen, fill in the project information. You can name the product “ARKitDemo”, but please make sure you use an organization identifier different from mine. This is to ensure that Xcode generates an unique bundle identifier for you. For the Interface option, please choose Storyboard. The Content Technology option should be new to you. By default, it is set to SpriteKit.
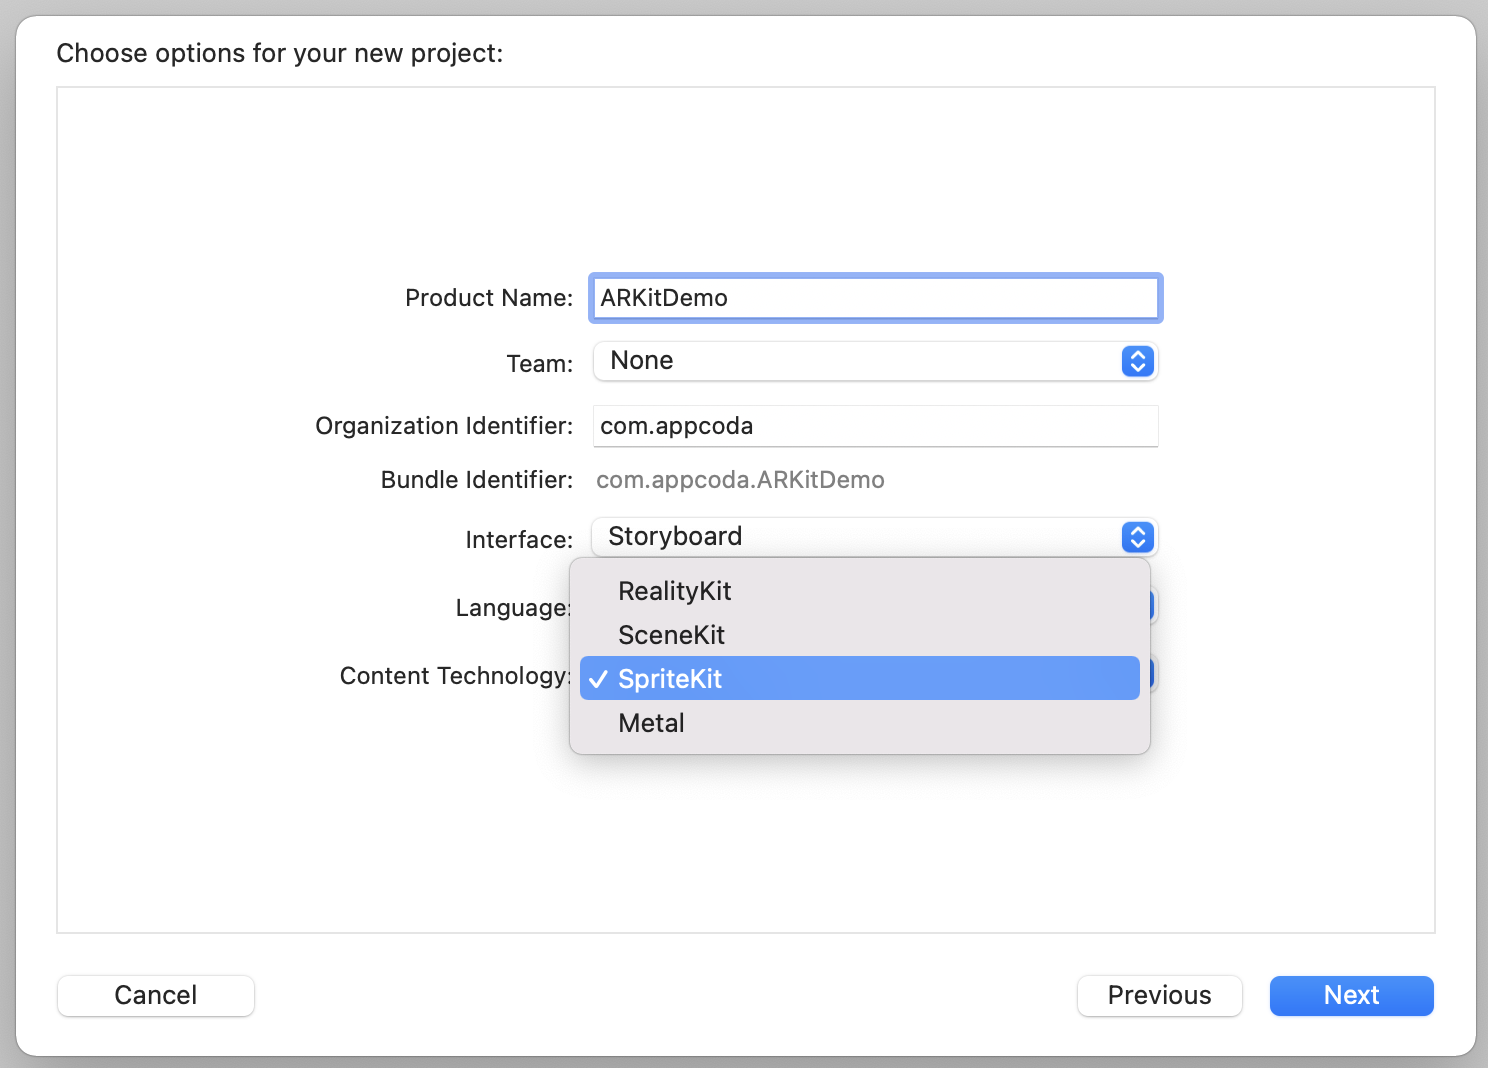
You probably have heard of SpriteKit, which is a framework for making 2D games, but wonder why is it here. Are we going to build a 2D game or an ARKit app?
One of the coolest things about ARKit is that it integrates well with Apple’s existing graphics rendering engines. SpriteKit is one of the rendering engines. You can also use SceneKit for rendering 3D objects or Metal for hardware-accelerated 3D graphics. For our first ARKit app, let's use SpriteKit as the content technology.
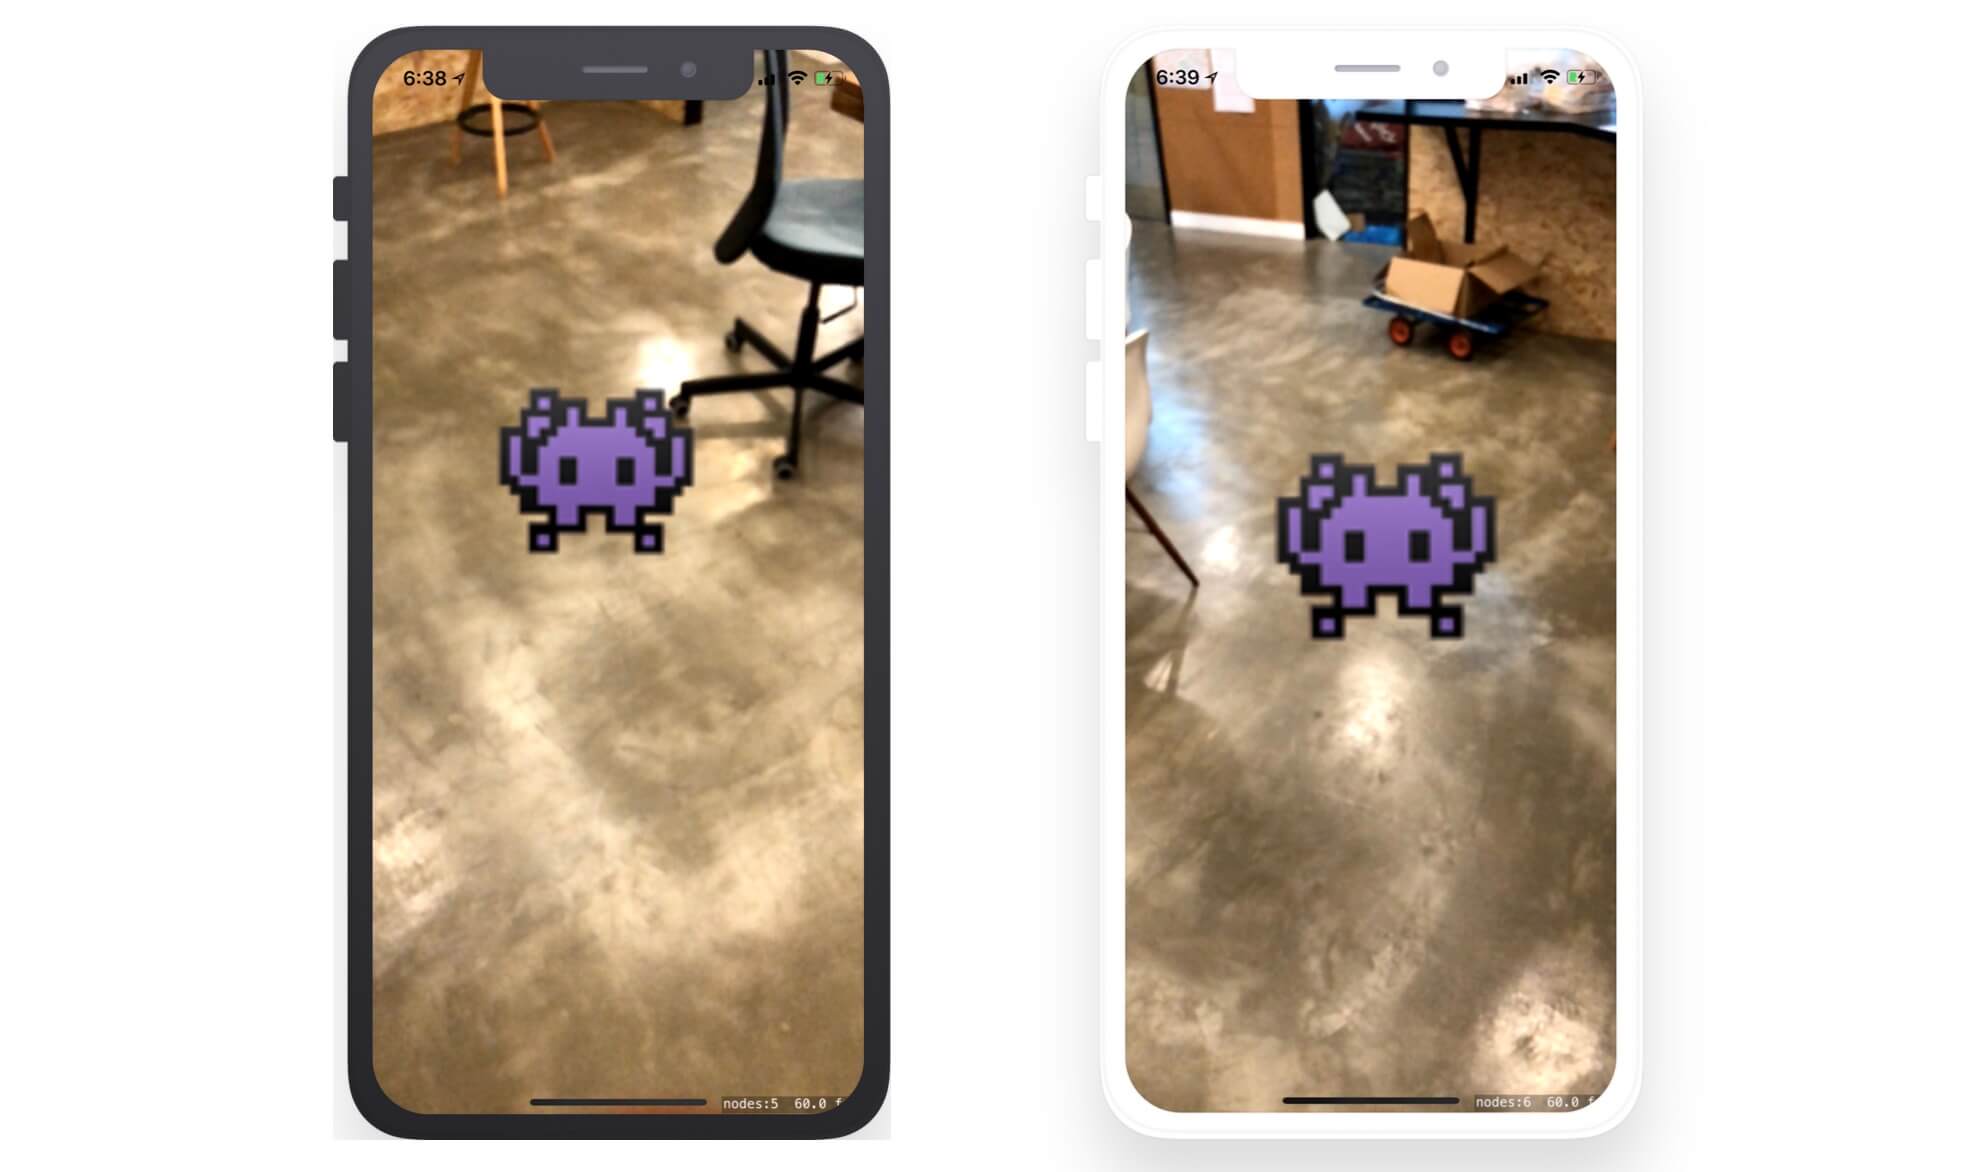
Once you save the project, you are ready to deploy the app to your iPhone. You don't need to change a line of code. The AR app template already generates the code you need for building your first ARKit app. Connect your iPhone to your Mac and hit the Run button to try out the ARKit app. It's a very simple app. Every time you tap on the screen, it displays an emoji character in augmented reality.
Understanding ARKit and the Sample Project
Cool, right? Now let's go back to the implementation and see how the sample code works.
Augmented reality is an illusion that the virtual objects are part of the real world. To make this possible, ARKit uses a technique known as Visual Inertial Odometry (VIO). When you point iPhone's camera in the real-world environment, ARKit analyzes both the camera sensor data and motion data to track the world around it. This allows developers to display virtual content in a real-world environment.
In doing so, ARKit maintains a virtual 3D coordinate system of the world. By placing virtual content on this coordinate space and combining the content with a live camera image, it gives an illusion that the virtual content is part of the real world (i.e. Augmented Reality).
ARKit Core Classes
To understand how ARKit works and how to use it, there are a number of core classes you should know.
ARSKView / ARSCNView - Depending on the content technology you choose, you use one of these two classes to render the AR experiences that position the virtual content in 3D space within the device's camera view. If you use SpriteKit, you use
ARSKViewto create 2D objects in real world. For rendering 3D objects, you will need to use SceneKit andARSCNViewis the view for rendering 3D objects. Whether you useARSKVieworARSCNView, the view automatically renders the live video feed from the camera as the scene background.ARSession - Every AR experience created by ARKit requires an
ARSessionobject. The view has anARSessionobject associated with it. This session object is responsible for managing motion data and camera image processing for the view's contents. It analyzes the captured images and synthesizes all these data to create the AR experience.ARFrame - When an ARSession is activated, it continuously captures video frames using the camera. Each frame is analyzed with the position-tracking information. All these data are stored in the form of
ARFrame. You can access the most-recently captured frame image by using thecurrentFrameproperty of an ARSession.ARWorldTrackingConfiguration - Similar to other session objects (e.g.
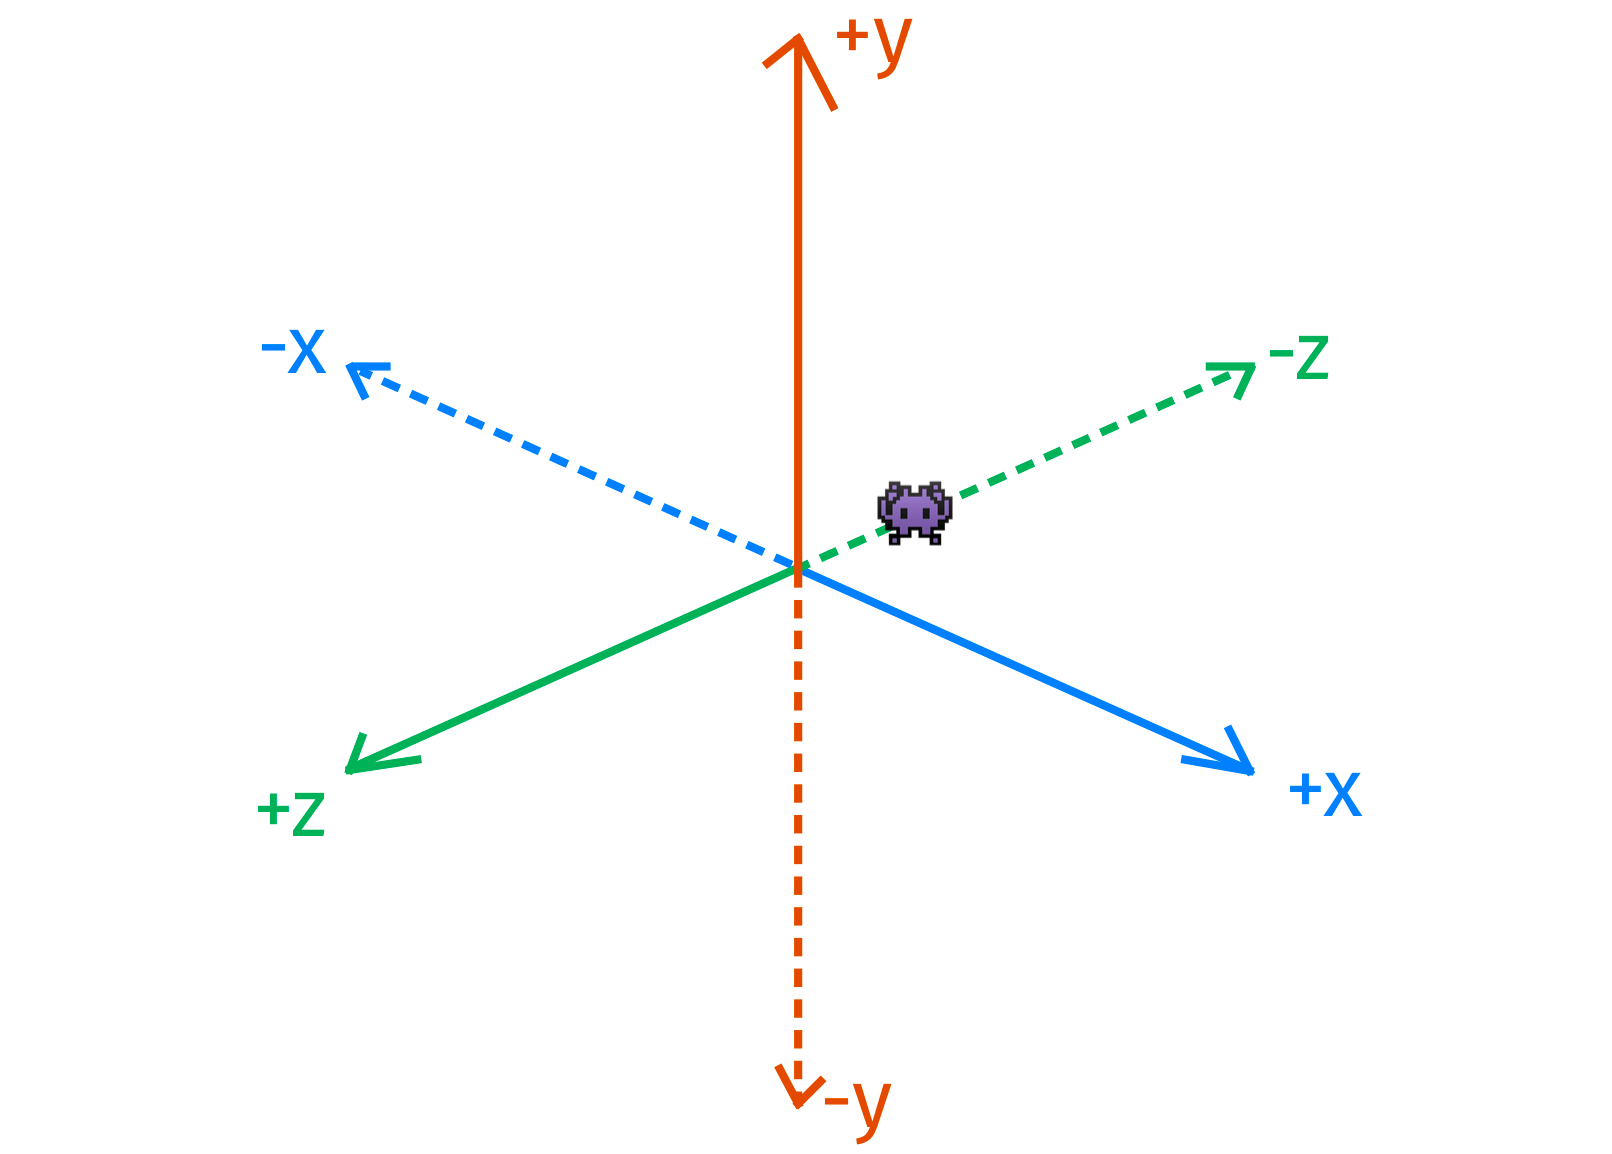
URLSession) you have worked with the iOS SDK, you have to provide anARSessionobject with a session configuration. There are three different configurations built into ARKit.ARWorldTrackingConfigurationis one of the built-in configurations that tracks a device's position and motion relative to the real world by using the rear camera. It also supports plane detection and hit testing. The class tracks the movement of the device with six-degrees of freedom (6DOF). That means the three rotation axes (roll, pitch, and yaw), and three translation axes (movement in x, y, and z). For devices with A9 processors (or up), they all support 6DOF. Earlier devices can only support three-degrees of freedom, which are the three rotation axes.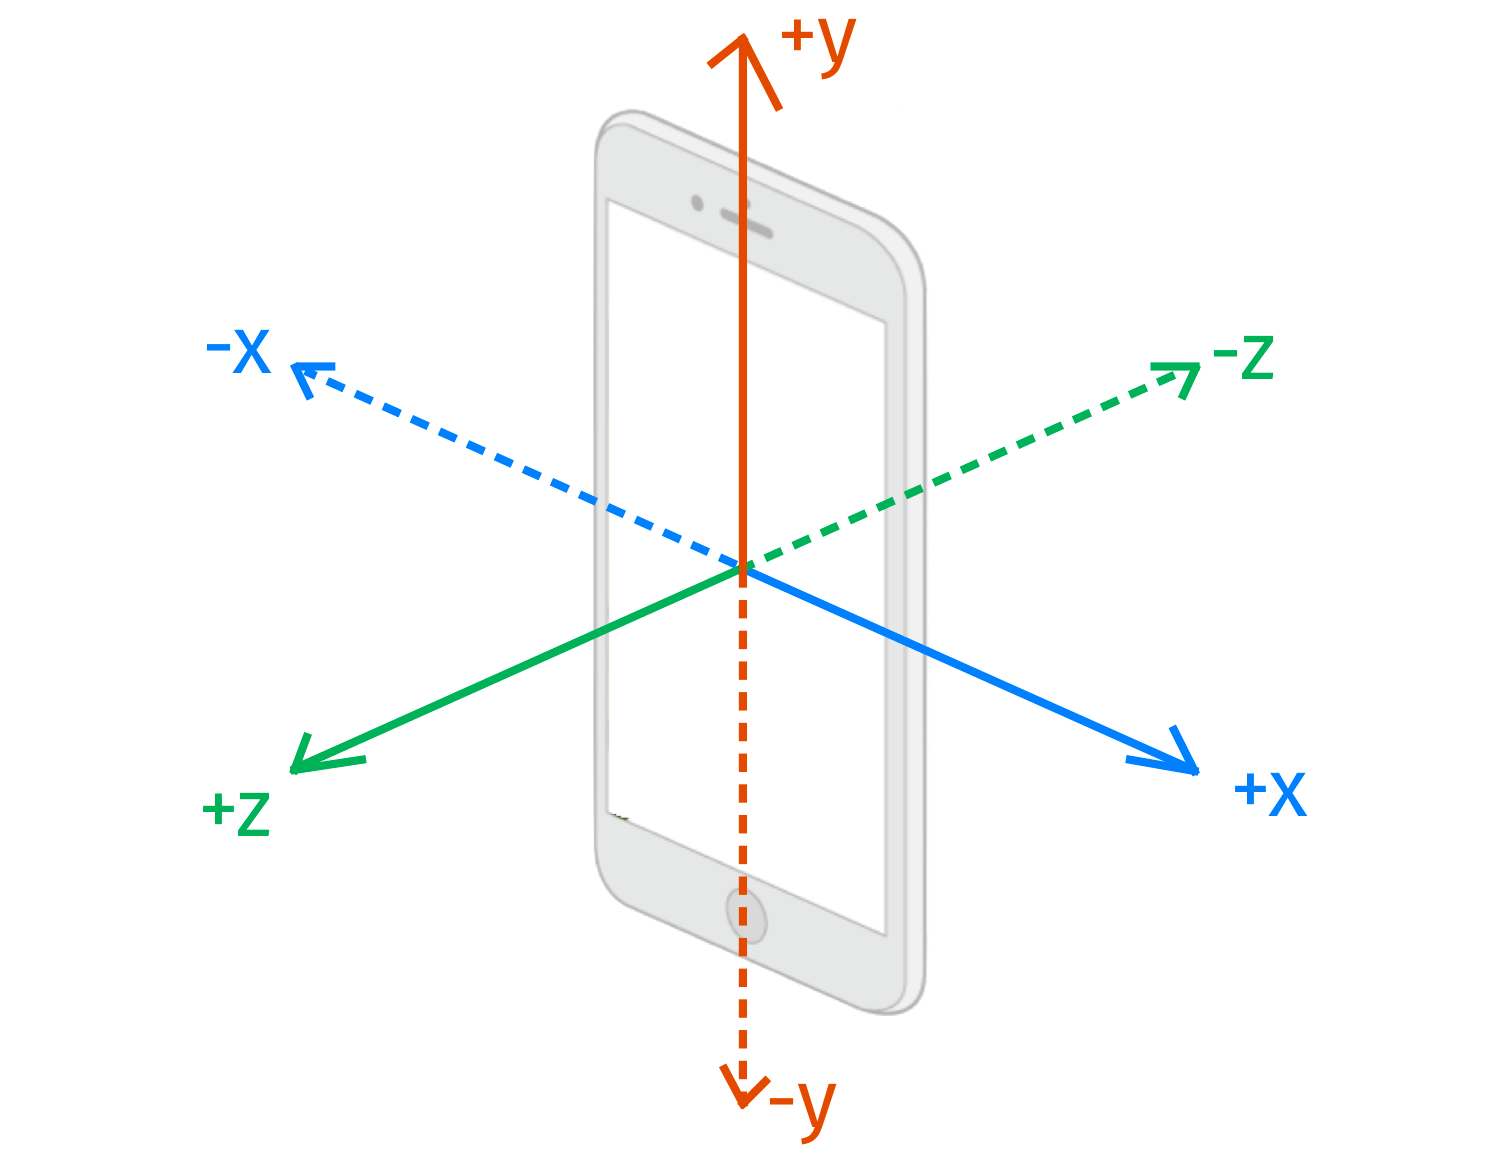
Figure 41.7. Three translation axes In most cases, you do not need to tweak the tracking configuration. But I have to mention a property named
worldAlignment. It controls how ARKit creates a scene coordinate system based on real-world device motion with the following possible options:- gravity - By default, it is set to
gravity. This AR coordinate system is mapped to the real-world space that the y-axis matches the direction of gravity (see figure 41.7). For most AR experience, this setting should be used. - gravityAndHeading - it is pretty similar to
gravitybut the axes are fixed to north/south and east/west. Forgravity, x and z directions are relative to the device's original heading. WhengravityAndHeadingis used, the X and Z axes are oriented to the compass heading. While the direction of the axes is related to the real-world directions, the location of the ARKit coordinate system's origin is still relative to the device. - camera - All axes are locked to match the orientation of the camera when
worldAlignmentis set tocamera. For example, if you run the demo app withworldAlignmentsets to this option, the emoji character will rotate when you turn your device sideway.
- gravity - By default, it is set to
- ARAnchor -
ARAnchorautomatically tracks the positions and orientations of real or virtual objects relative to the camera. To place a virtual object in an AR environment, you useARAnchor. You create anARAnchorobject and call itsadd(anchor:)method to add the object to the AR session.
How the Demo App Works
Now that you have some basic understanding of the core classes, let's dive into the demo project and see how it actually works.
First, let's look into Main.storyboard. This view controller was constructed by Xcode since we chose to use the ARKit app template at the very beginning. In the view controller, you should find an ARSKView because we selected to use SpriteKit as the content technology. This view renders the live video feed from the camera as the scene background.

Now, let's take a look at the ViewController class. In the viewWillAppear method, we instantiate ARWorldTrackingConfiguration and start creating the AR experience by using the configuration.
override func viewWillAppear(_ animated: Bool) {
    super.viewWillAppear(animated)

    // Create a session configuration
    let configuration = ARWorldTrackingConfiguration()

    // Run the view's session
    sceneView.session.run(configuration)
}
Once you call the run method, the AR session runs asynchronously. So, how was the emoji icon added to the augmented reality environment?
As mentioned before, we use SpriteKit as the content technology. The power of ARKit is that it automatically matches the coordinate space of SpriteKit to the real world. Therefore, if you are familiar with the framework, it is pretty easy to place 2D content in the real world. In the Scene.swift file, we create our own scene by inheriting from SKScene. To add a virtual object in the AR space, we override the touchesBegan method and add an ARAnchor object whenever the user taps on the screen:
override func touchesBegan(_ touches: Set<UITouch>, with event: UIEvent?) {
    guard let sceneView = self.view as? ARSKView else {
        return
    }

    // Create anchor using the camera's current position
    if let currentFrame = sceneView.session.currentFrame {

        // Create a transform with a translation of 0.2 meters in front of the camera
        var translation = matrix_identity_float4x4
        translation.columns.3.z = -0.2
        let transform = simd_mul(currentFrame.camera.transform, translation)

        // Add a new anchor to the session
        let anchor = ARAnchor(transform: transform)
        sceneView.session.add(anchor: anchor)
    }
}
As I have walked you through the core classes of ARKit, the code above is self-explanatory. However, you may be confused about the matrix operation especially if you totally forgot what you learned in college.
The goal is to place a 2D object 0.2 meters in front of the device's camera. Figure 41.9 illustrates where the emoji icon is going to position.
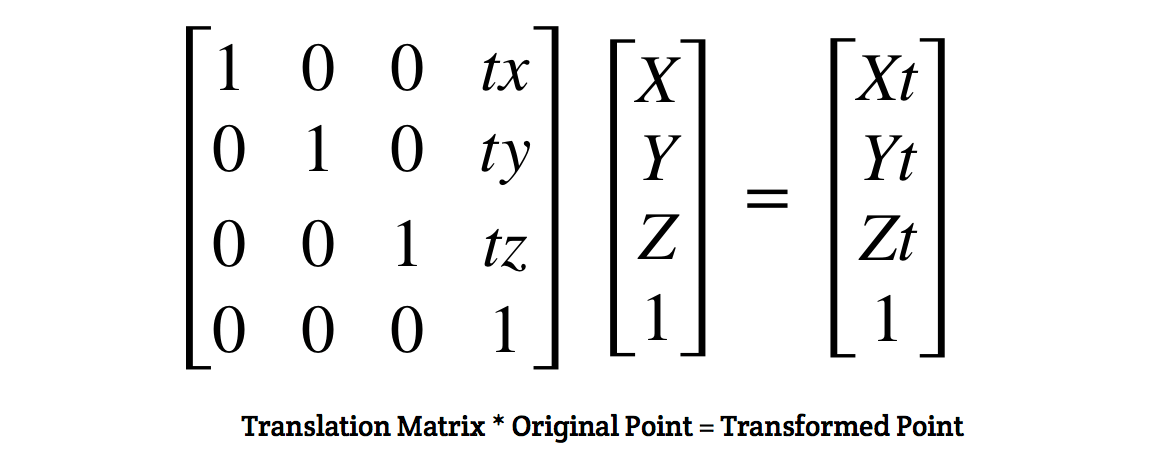
In order to do that, you have to refresh your knowledge of matrices. The transformation of an object in 3D space is represented by a 4x4 matrix. To move a point in 3D space, it can be calculated using the following equation:
To create a translation matrix, we first start with an identity matrix (see figure 41.11). In the code, we use the constant matrix_identity_float4x4, which is the representation of an identity matrix in Swift.

In order to place the object 0.2m in front of the camera, we have to create a translation matrix like this:
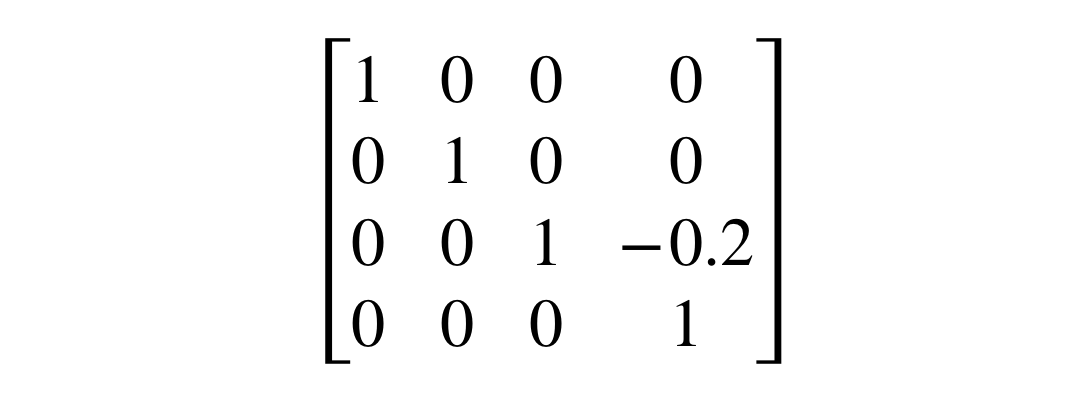
In Swift, we write the code like this:
translation.columns.3.z = -0.2
Since the first column has an index of 0, we change the z property of the column with index 3.
With the translation matrix in place, the final step is to compute the transformed point by multiplying the original point (i.e. currentFrame.camera.transform) with the translation matrix. In code, we write it like this:
let transform = simd_mul(currentFrame.camera.transform, translation)
simd_mul is a built-in function for performing matrix multiplication. Once we calculated the target position (i.e. transform), we create an ARAnchor object and add it to the AR session.
let anchor = ARAnchor(transform: transform)
sceneView.session.add(anchor: anchor)
Now, let's go back to the ViewController.swift file. The ViewController class, which adopts the ARSKViewDelegate protocol, is the delegate of the scene view. You have to implement the protocol in order to provide the SpriteKit content. Whenever you add a new ARAnchor object, the following method of the ARSKViewDelegate protocol will be called:
optional func view(_ view: ARSKView, nodeFor anchor: ARAnchor) -> SKNode?
Therefore, we implement the method to provide the 2D content, which is a label node filling with an Emoji icon:
func view(_ view: ARSKView, nodeFor anchor: ARAnchor) -> SKNode? {
    // Create and configure a node for the anchor added to the view's session.
    let labelNode = SKLabelNode(text: "👾")
    labelNode.horizontalAlignmentMode = .center
    labelNode.verticalAlignmentMode = .center
    return labelNode
}
Cool! This is pretty much how the ARKit demo app works.
Interacting with AR Objects
Now that you have a basic idea about how ARKit works, let's tweak the demo application a bit. When a user taps the emoji character, it will fade out and eventually disappear.
If you have some experience with SpriteKit, you know how to detect a touch. Update the touchesBegan method like this:
override func touchesBegan(_ touches: Set<UITouch>, with event: UIEvent?) {
    guard let sceneView = self.view as? ARSKView else {
        return
    }

    // Check if the user touches a label node
    if let touchLocation = touches.first?.location(in: self) {
        if let node = nodes(at: touchLocation).first as? SKLabelNode {

            let fadeOut = SKAction.fadeOut(withDuration: 1.0)
            node.run(fadeOut) {
                node.removeFromParent()
            }

            return
        }
    }

    // Create anchor using the camera's current position
    if let currentFrame = sceneView.session.currentFrame {

        // Create a transform with a translation of 0.2 meters in front of the camera
        var translation = matrix_identity_float4x4
        translation.columns.3.z = -0.2
        let transform = simd_mul(currentFrame.camera.transform, translation)

        // Add a new anchor to the session
        let anchor = ARAnchor(transform: transform)
        sceneView.session.add(anchor: anchor)
    }
}
We have added an additional block of code to check if the user taps on the emoji character. The following line of code retrieves the location of the touch:
if let touchLocation = touches.first?.location(in: self) {
Once we get the touch location, we verify if it hits the node with the emoji character:
if let node = nodes(at: touchLocation).first as? SKLabelNode {
If it does tap the emoji character, we execute a "fade out" animation and finally remove the node from the view.
As you can see, the whole code snippet is related to SpriteKit. As long as you have the knowledge of SpriteKit, you would know how to interact with the objects in AR space.
Exercise #1
Instead of displaying an Emoji character, tweak the demo app to show an image. You are free to use your own image. Alternatively, you can find tons of free game characters on opengameart.org. Personally, I used the fat bird (https://opengameart.org/content/fat-bird-sprite-sheets-for-gamedev) for this exercise. Your resulting screen should look like the one shown in the figure below:
If you are not very familiar with SpriteKit, here are a couple of tips:
We use
SKLabelNodeto create a label node. For images, you can useSKSpriteNodeandSKTextureto load the image. Here is an example:let texture = SKTexture(imageNamed: "fat-bird") let spriteNode = SKSpriteNode(texture: texture)To resize a sprite node, you can change its
sizeproperty like this:spriteNode.size = CGSize(width: spriteNode.size.width * 0.1, height: spriteNode.size.height * 0.1)
Exercise #2
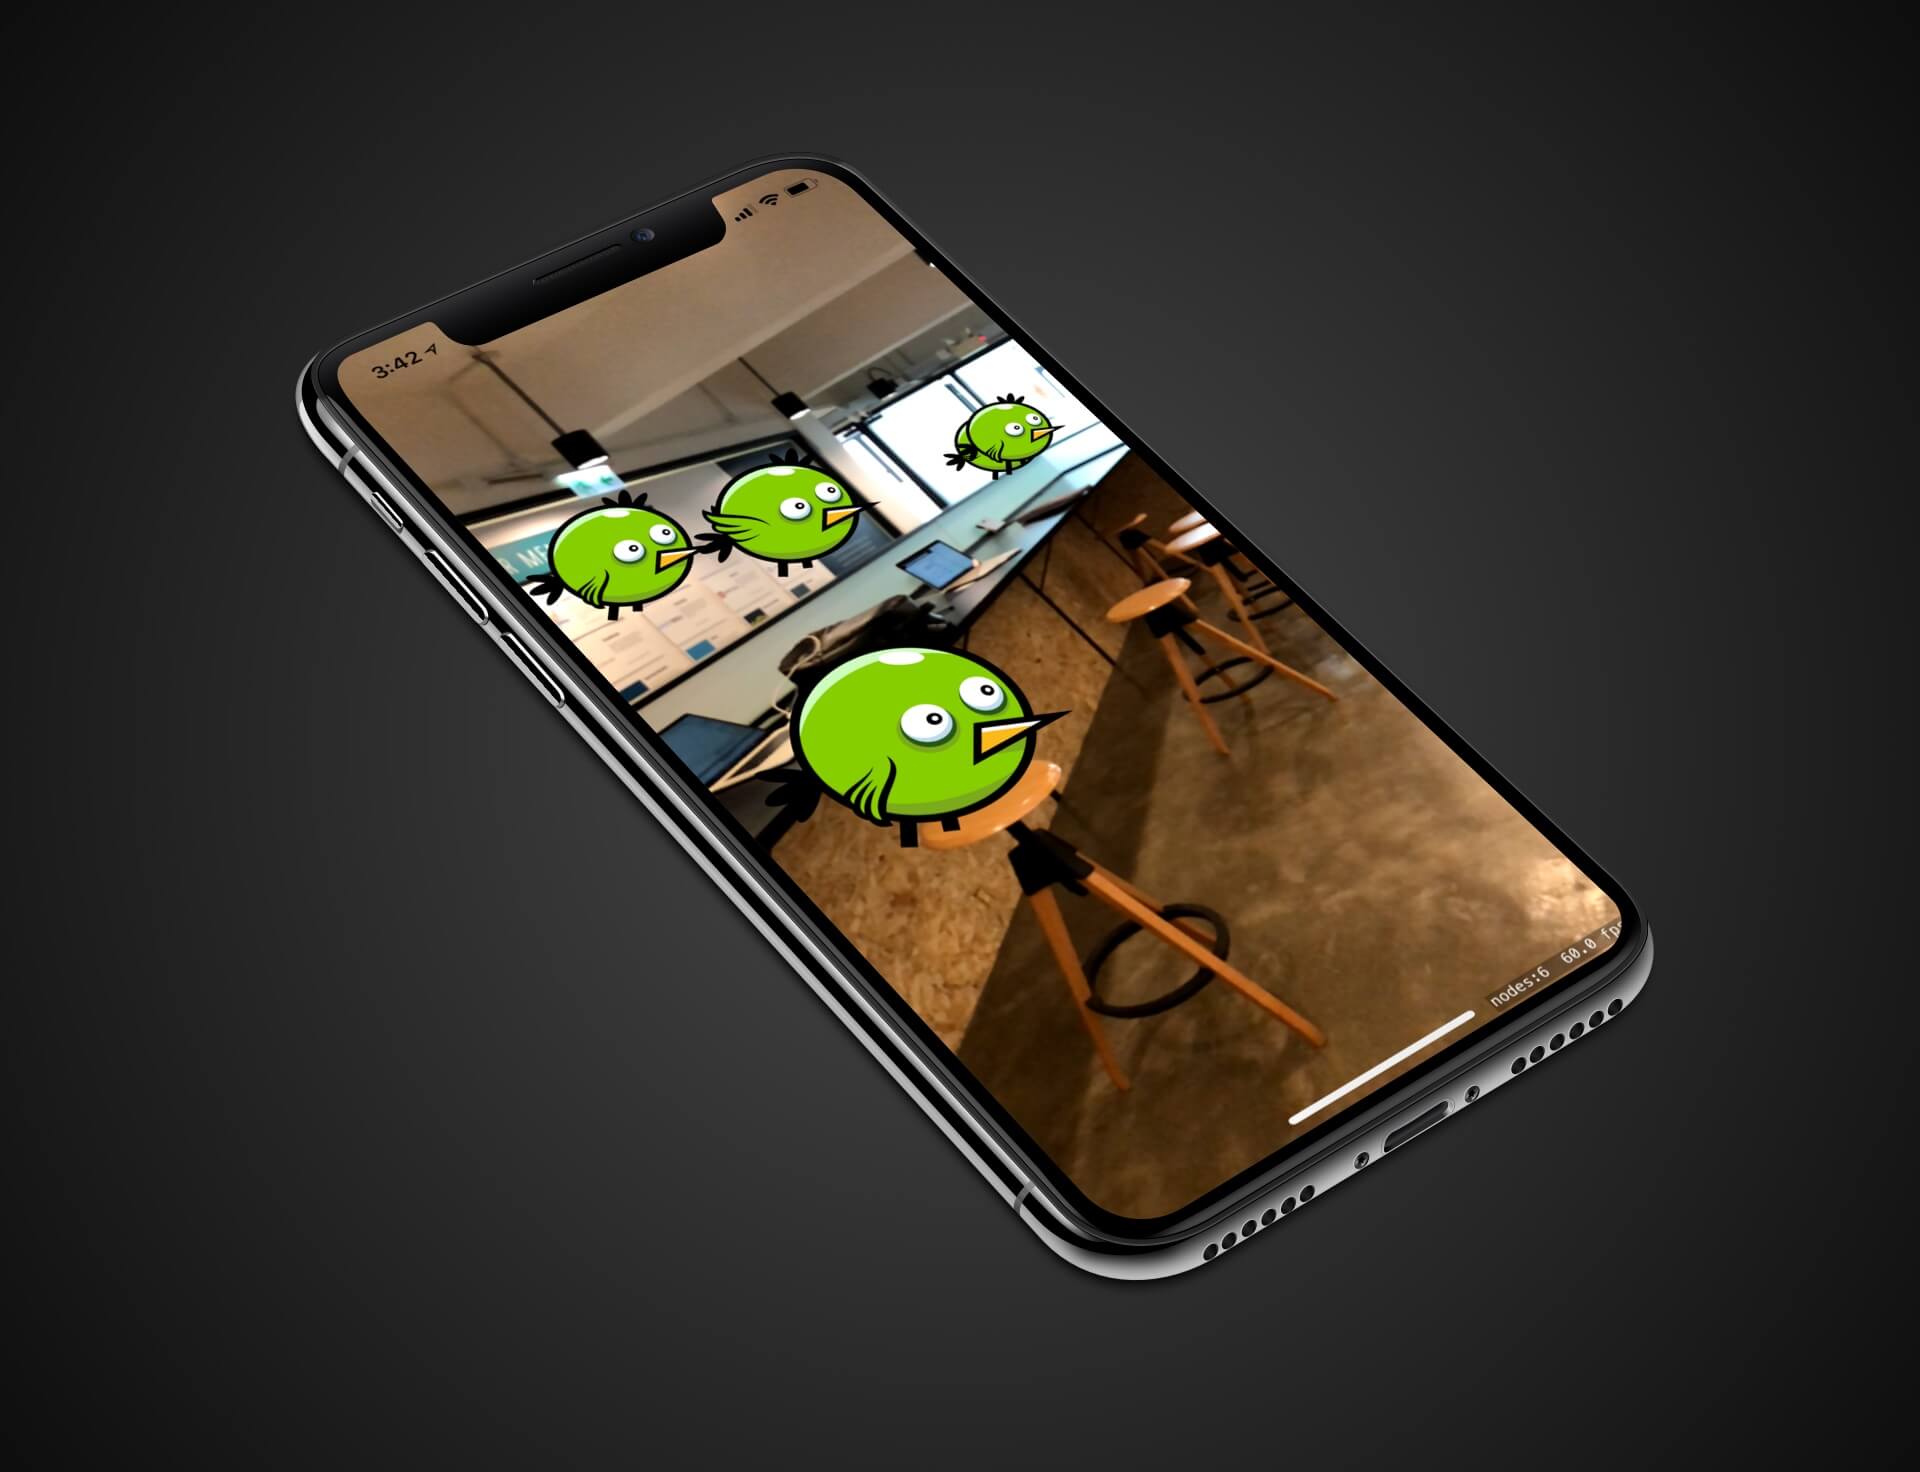
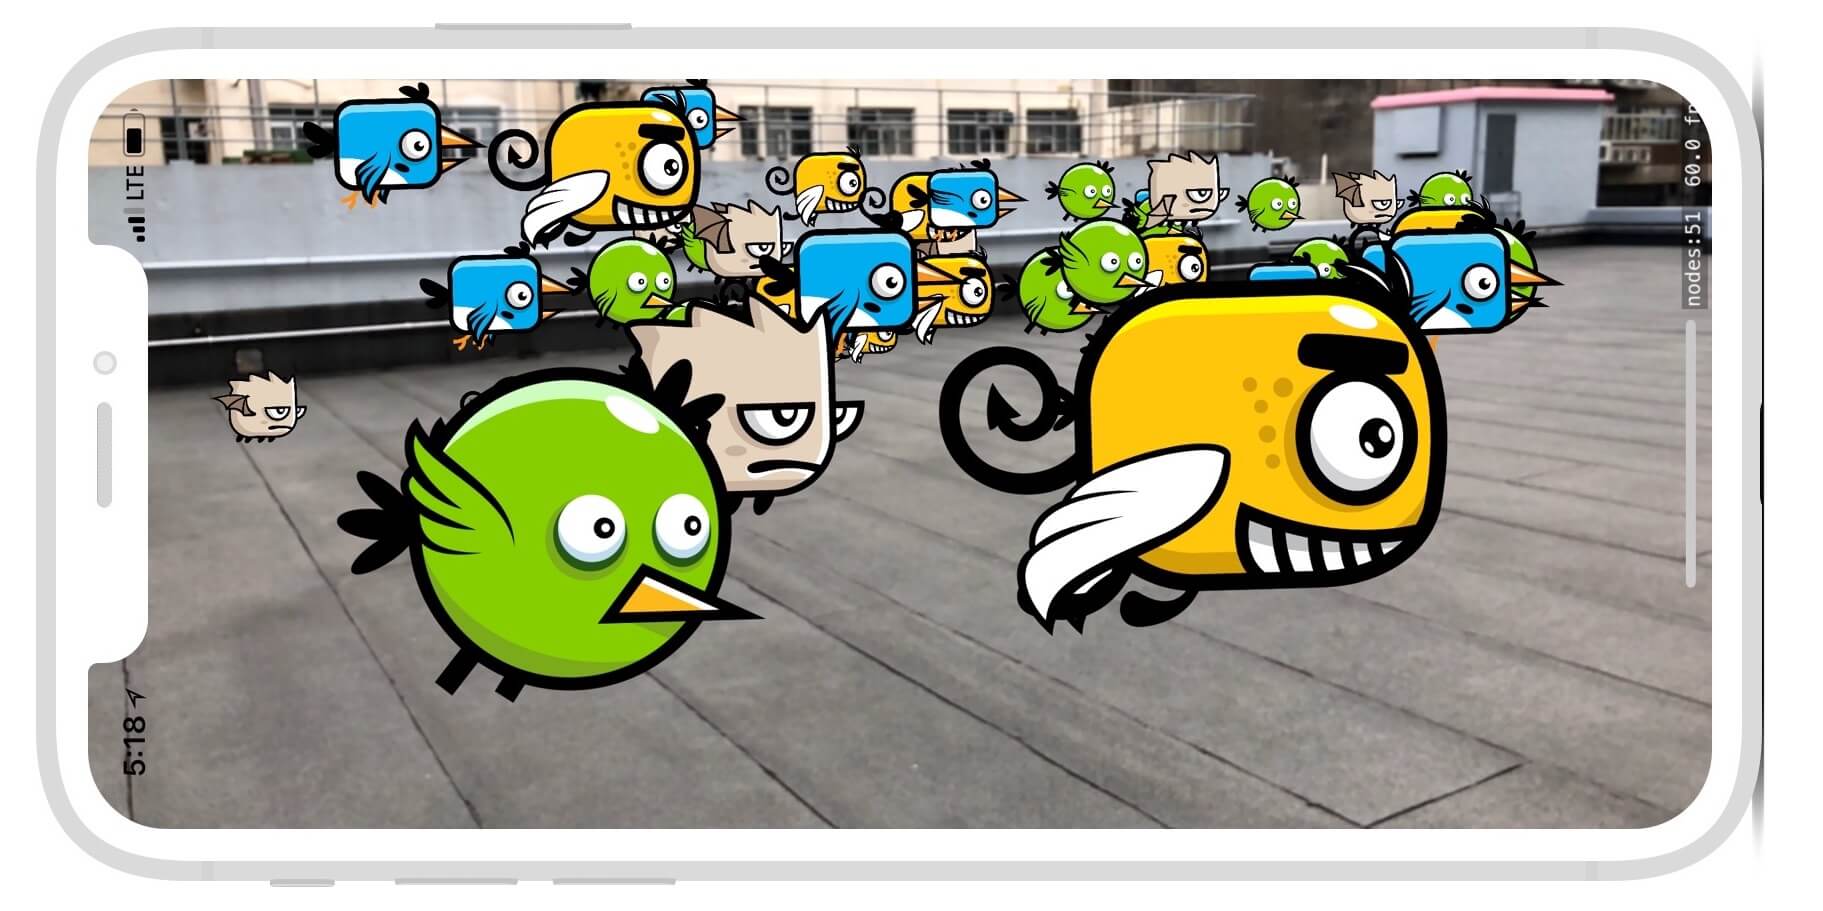
Let's continue to tweak the demo app to create a world having different types of birds. Assuming you've followed exercise #1, your app should now display a bird image when the user taps on the device's screen. Now you are required to implement the following enhancements:
First, add three more types of birds to the demo app. You can download the images of the birds using the link below:
- https://opengameart.org/content/game-character-blue-flappy-bird-sprite-sheets
- https://opengameart.org/content/flappy-grumpy-bird-sprite-sheets
- https://opengameart.org/content/flappy-monster-sprite-sheets
Tweak the demo app such that it randomly picks one of the bird images and shows it on screen whenever the user taps the device's screen.
If you look into the image packs you just downloaded, all come with a set of 8 images. By combining the set of images together, you can create a flying animation. As a hint, here is the sample code for creating the animation:
let flyingAction = SKAction.repeatForever(SKAction.animate(with: birdFrames, timePerFrame: 0.1))
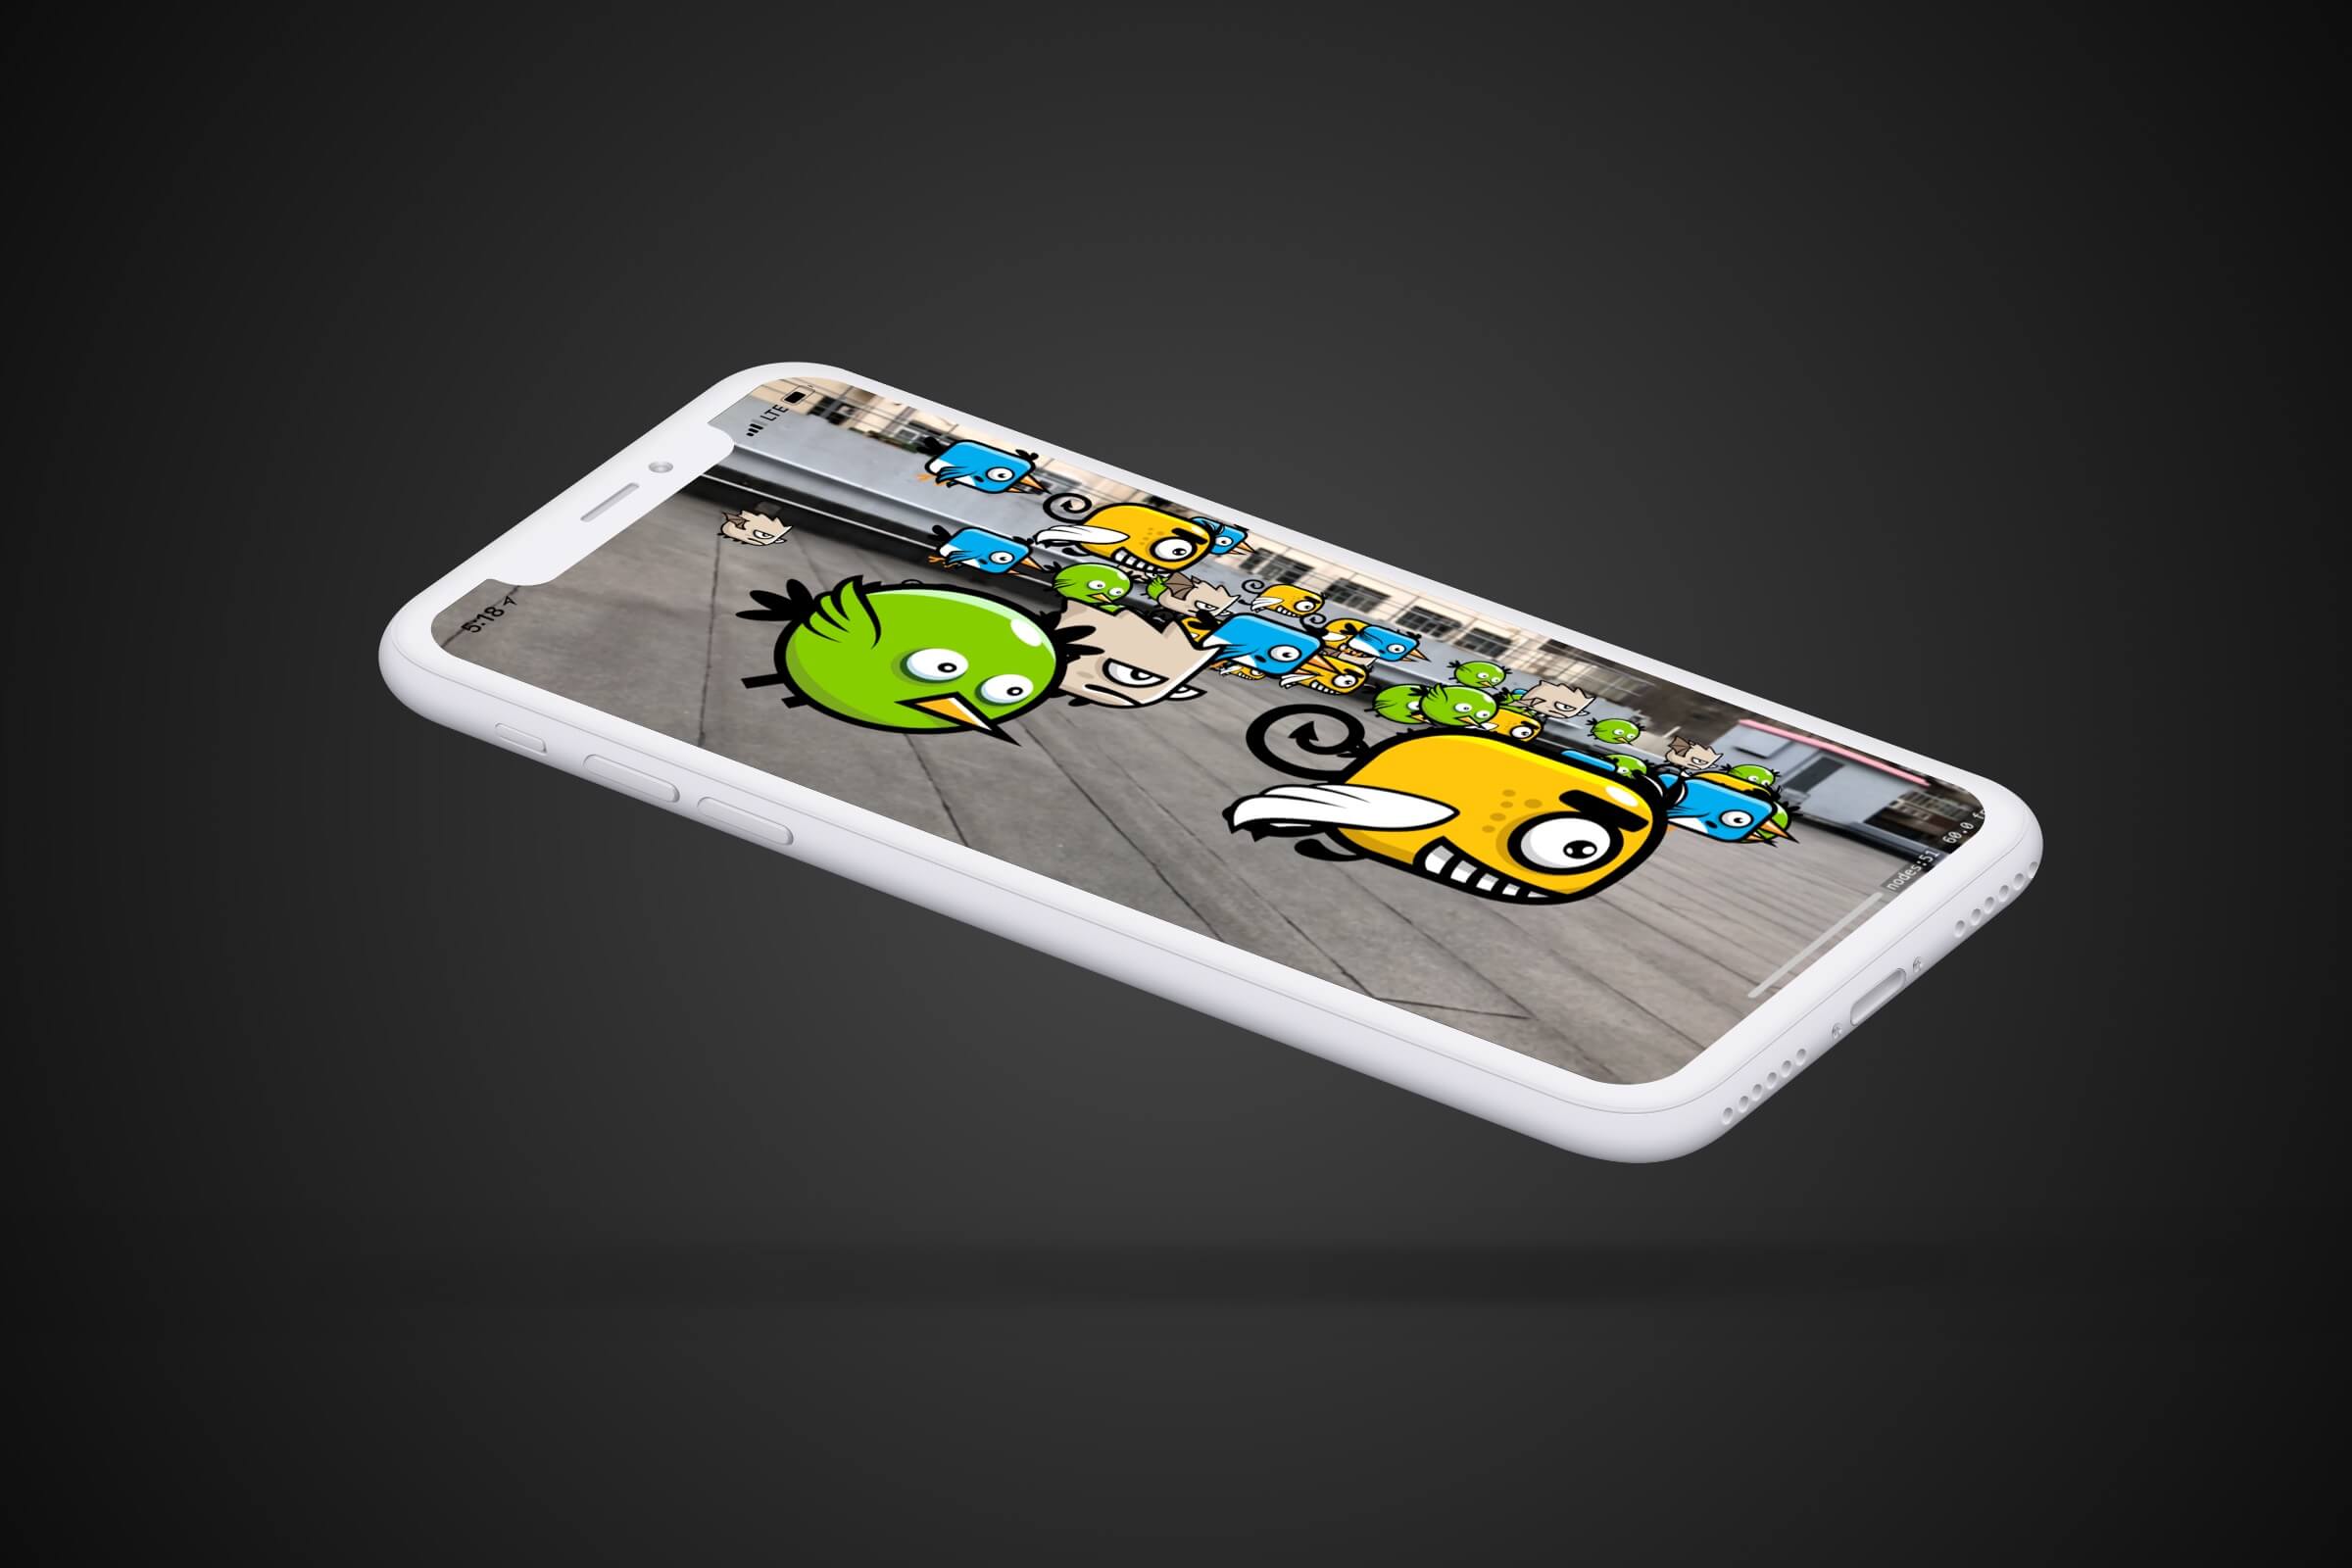
This exercise is more difficult than the previous one. Take some time to work on it. Figure 41.14 shows a sample screenshot of the complete app.
For reference, you can download the complete Xcode project of this chapter and the solution of the exercise below. But before you check out the solution, make sure you try hard to figure out the solution. Here are the download links:
- Complete Xcode Project (http://www.appcoda.com/resources/swift55/ARKitDemo.zip)
- Solution to Exercise (http://www.appcoda.com/resources/swift55/ARKitDemoExercise.zip)