- Made by AppCoda
- Contact us / Support
- Tweet this book
- Preface
- 1. Building Adaptive User Interfaces
- 2. Creating Table View Sections and Index list with Diffable Data Source
- 3. Animating Table View Cells
- 4. Working with JSON and Codable
- 5. How to Integrate the Twitter and Facebook SDK for Social Sharing
- 6. Working with Email and Attachments
- 7. Sending SMS and MMS Using MessageUI Framework
- 8. How to Get Direction and Draw Route on Maps
- 9. Search Nearby Points of Interest Using Local Search
- 10. Audio Recording and Playback
- 11. Scan QR Code Using AVFoundation Framework
- 12. Working with URL Schemes
- 13. Building a Full Screen Camera with Gesture-based Controls
- 14. Video Capturing and Playback Using AVKit
- 15. Displaying Banner Ads using Google AdMob
- 16. Working with Custom Fonts
- 17. Working with AirDrop, UIActivityViewController and Uniform Type Identifiers
- 18. Building Grid Layouts Using Collection Views and Diffable Data Source
- 19. Interacting with Collection Views
- 20. Adaptive Collection Views Using UITraitCollection and Compositional Layout
- 21. Building a Weather Widget Using WidgetKit
- 22. Building Slide Out Sidebar Menus Using Objective-C Libraries
- 23. View Controller Transitions and Animations
- 24. Building a Slide Down Menu
- 25. Self Sizing Cells and Dynamic Type
- 26. XML Parsing, RSS and Expandable Table View Cells
- 27. Applying a Blurred Background Using UIVisualEffect
- 28. Using Touch ID and Face ID For Authentication
- 29. Building a Carousel-Like User Interface
- 30. Working with Parse
- 31. Parsing CSV and Preloading a SQLite Database Using Core Data
- 32. Connecting Multiple Annotations with Polylines and Routes
- 33. Using CocoaPods in Swift Projects
- 34. Building a Simple Sticker App
- 35. Building iMessage Apps Using Messages Framework
- 36. Building Custom UI Components Using IBDesignable and IBInspectable
- 37. Using Firebase for User Authentication
- 38. Google and Facebook Authentication Using Firebase
- 39. Using Firebase Database and Storage to Build an Instagram-like App
- 40. Building a Real-time Image Recognition App Using Core ML
- 41. Building AR Apps with ARKit and SpriteKit
- 42. Working with 3D Objects in Augmented Reality Using ARKit and SceneKit
- 43. Use Create ML to Train Your Own Machine Learning Model for Image Recognition
- 44. Building a Sentiment Classifier Using Create ML to Classify User Reviews
- 45. Working with Image Tracking Using ARKit
- Published with GitBook
Chapter 22
Building Slide Out Sidebar Menus Using Objective-C Libraries
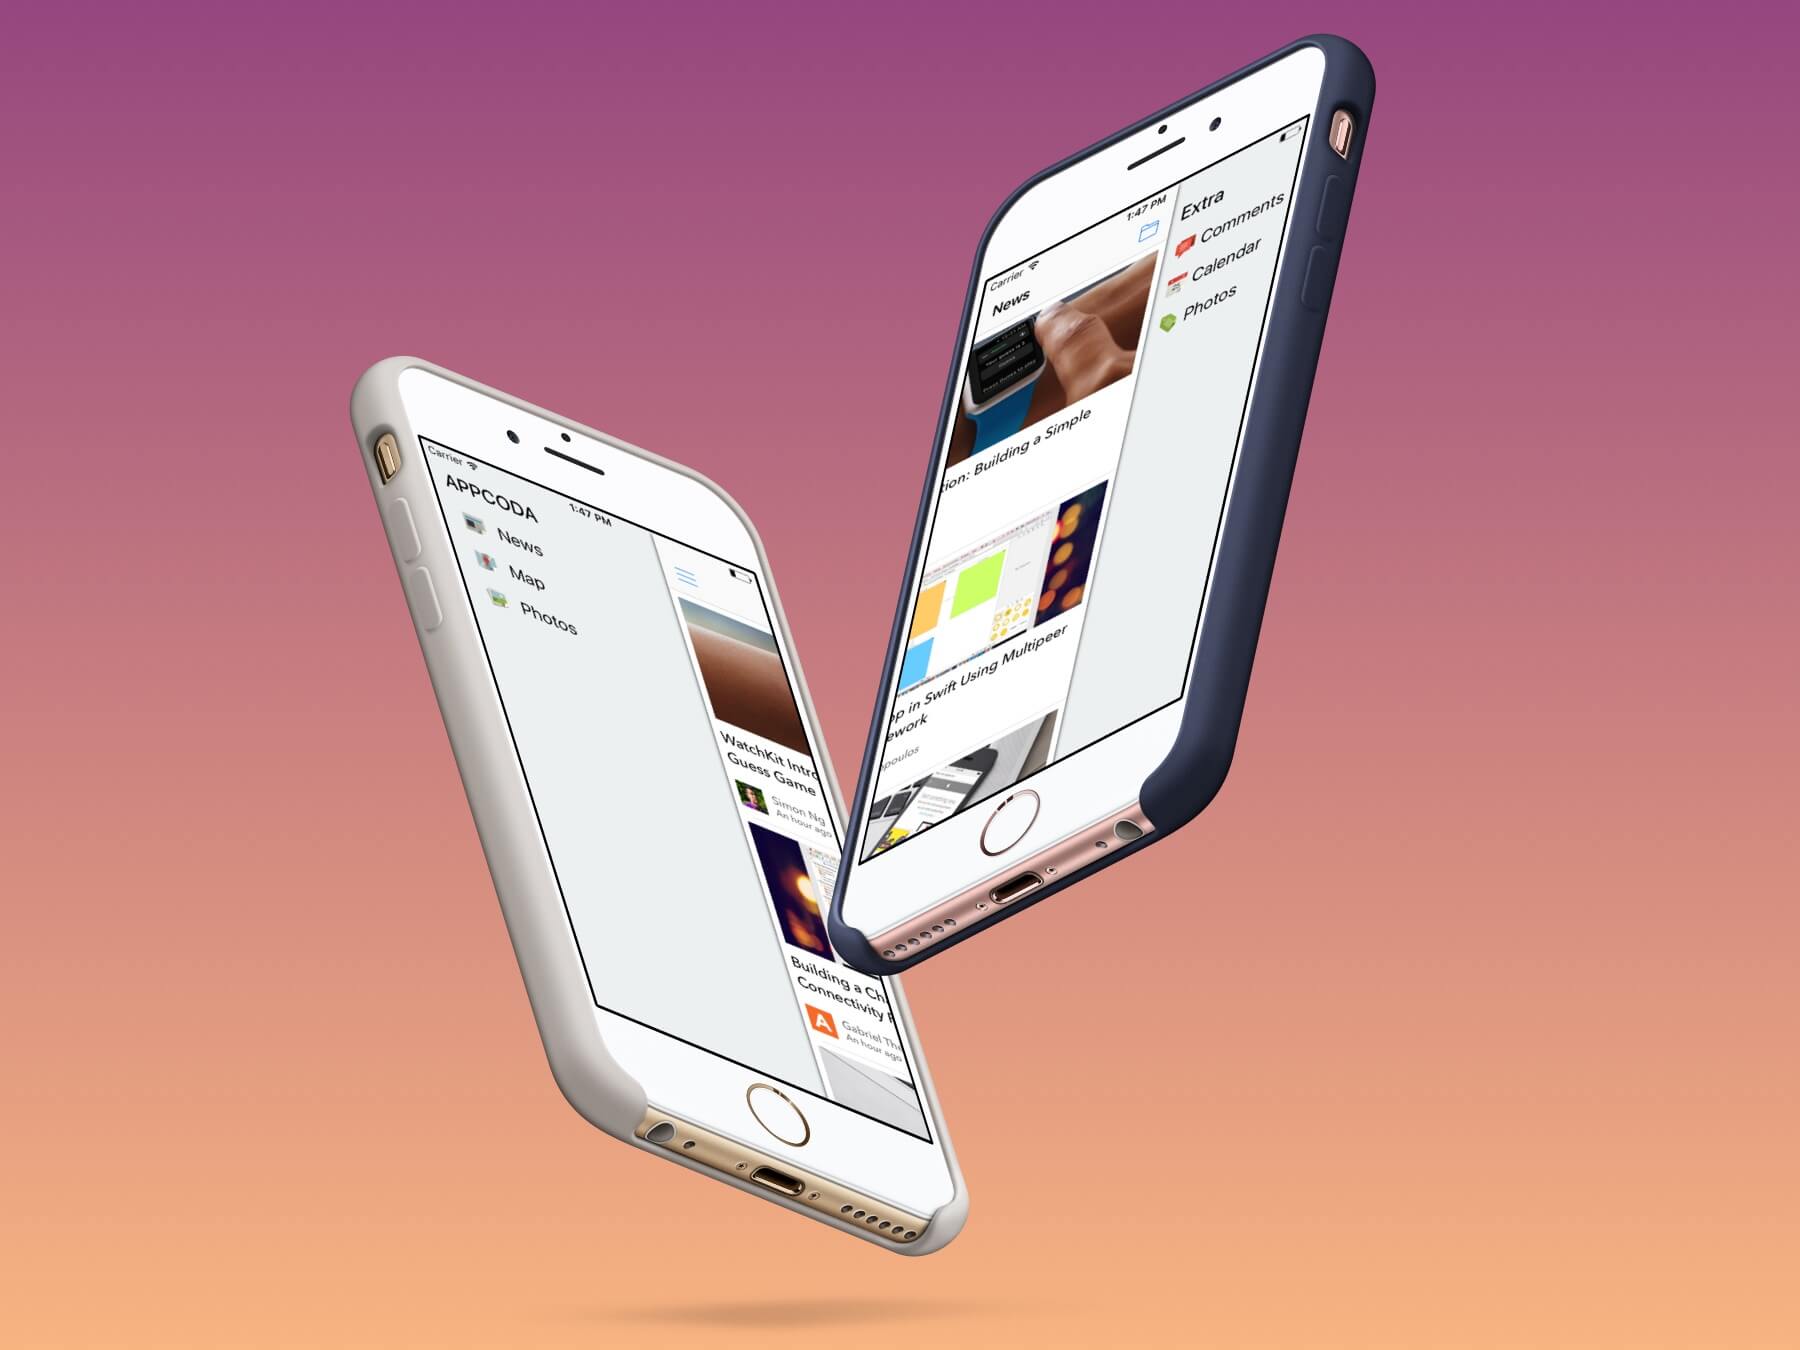
In this chapter, I will show you how to create a slide-out navigation menu similar to the one you find in the Gmail app. If you're unfamiliar with slide-out navigation menus, take a look at the figure above. Ken Yarmost (http://kenyarmosh.com/ios-pattern-slide-out-navigation/) gave a good explanation and defined it as follows:
Slide-out navigation consists of a panel that slides out from underneath the left or the right of the main content area, revealing a vertically independent scroll view that serves as the primary navigation for the application.
The slide-out sidebar menu (also known as a hamburger menu) has been around for a few years now. It was first introduced by Facebook in 2011. Since then it has become a standard way to implement a navigation menu. The slide-out design pattern lets you build a navigation menu in your apps but without wasting the screen real estate. Normally, the navigation menu is hidden behind the front view. The menu can then be triggered by tapping a list button in the navigation bar. Once the menu is expanded and becomes visible, users can close it by using the list button or simply swiping left on the content area.
In recent years, there were some debates (https://lmjabreu.com/post/why-and-how-to-avoid-hamburger-menus/) about this kind of menu that it doesn't provide a good user experience and less efficient. In most cases, you should prefer tab bars over sidebar menus for navigation. Being that said, you can still easily find this design pattern in some popular content-related apps, including Google Maps, LinkedIn, etc. The purpose of this chapter is not to discuss with you whether you should kill the hamburger menu. There are already a lot of discussions out there:
- Kill The Hamburger Button (http://techcrunch.com/2014/05/24/before-the-hamburger-button-kills-you/)
- Why and How to Avoid Hamburger Menus by Luis Abreu (https://lmjabreu.com/post/why-and-how-to-avoid-hamburger-menus/)
- Hamburger vs Menu: The Final AB Test (http://exisweb.net/menu-eats-hamburger)
So our focus in this chapter is on how. I want to show you how to create a slide-out sidebar menu using a free library.
You can build the sidebar menu from the ground up. But with so many free pre-built solutions on GitHub, we're not going to build it from scratch. Instead, we'll make use of a library called SWRevealViewController (https://github.com/John-Lluch/SWRevealViewController). Developed by John Lluch, this excellent library provides a quick and easy way to put up a slide-out navigation menu in your apps. Best of all, the library is available for free.
The library was written in Objective-C. This is also one of the reasons I chose this library, though it is a bit dated. By going through the tutorial, you will also learn how to use Objective-C in a Swift project.
A Glance at the Demo App
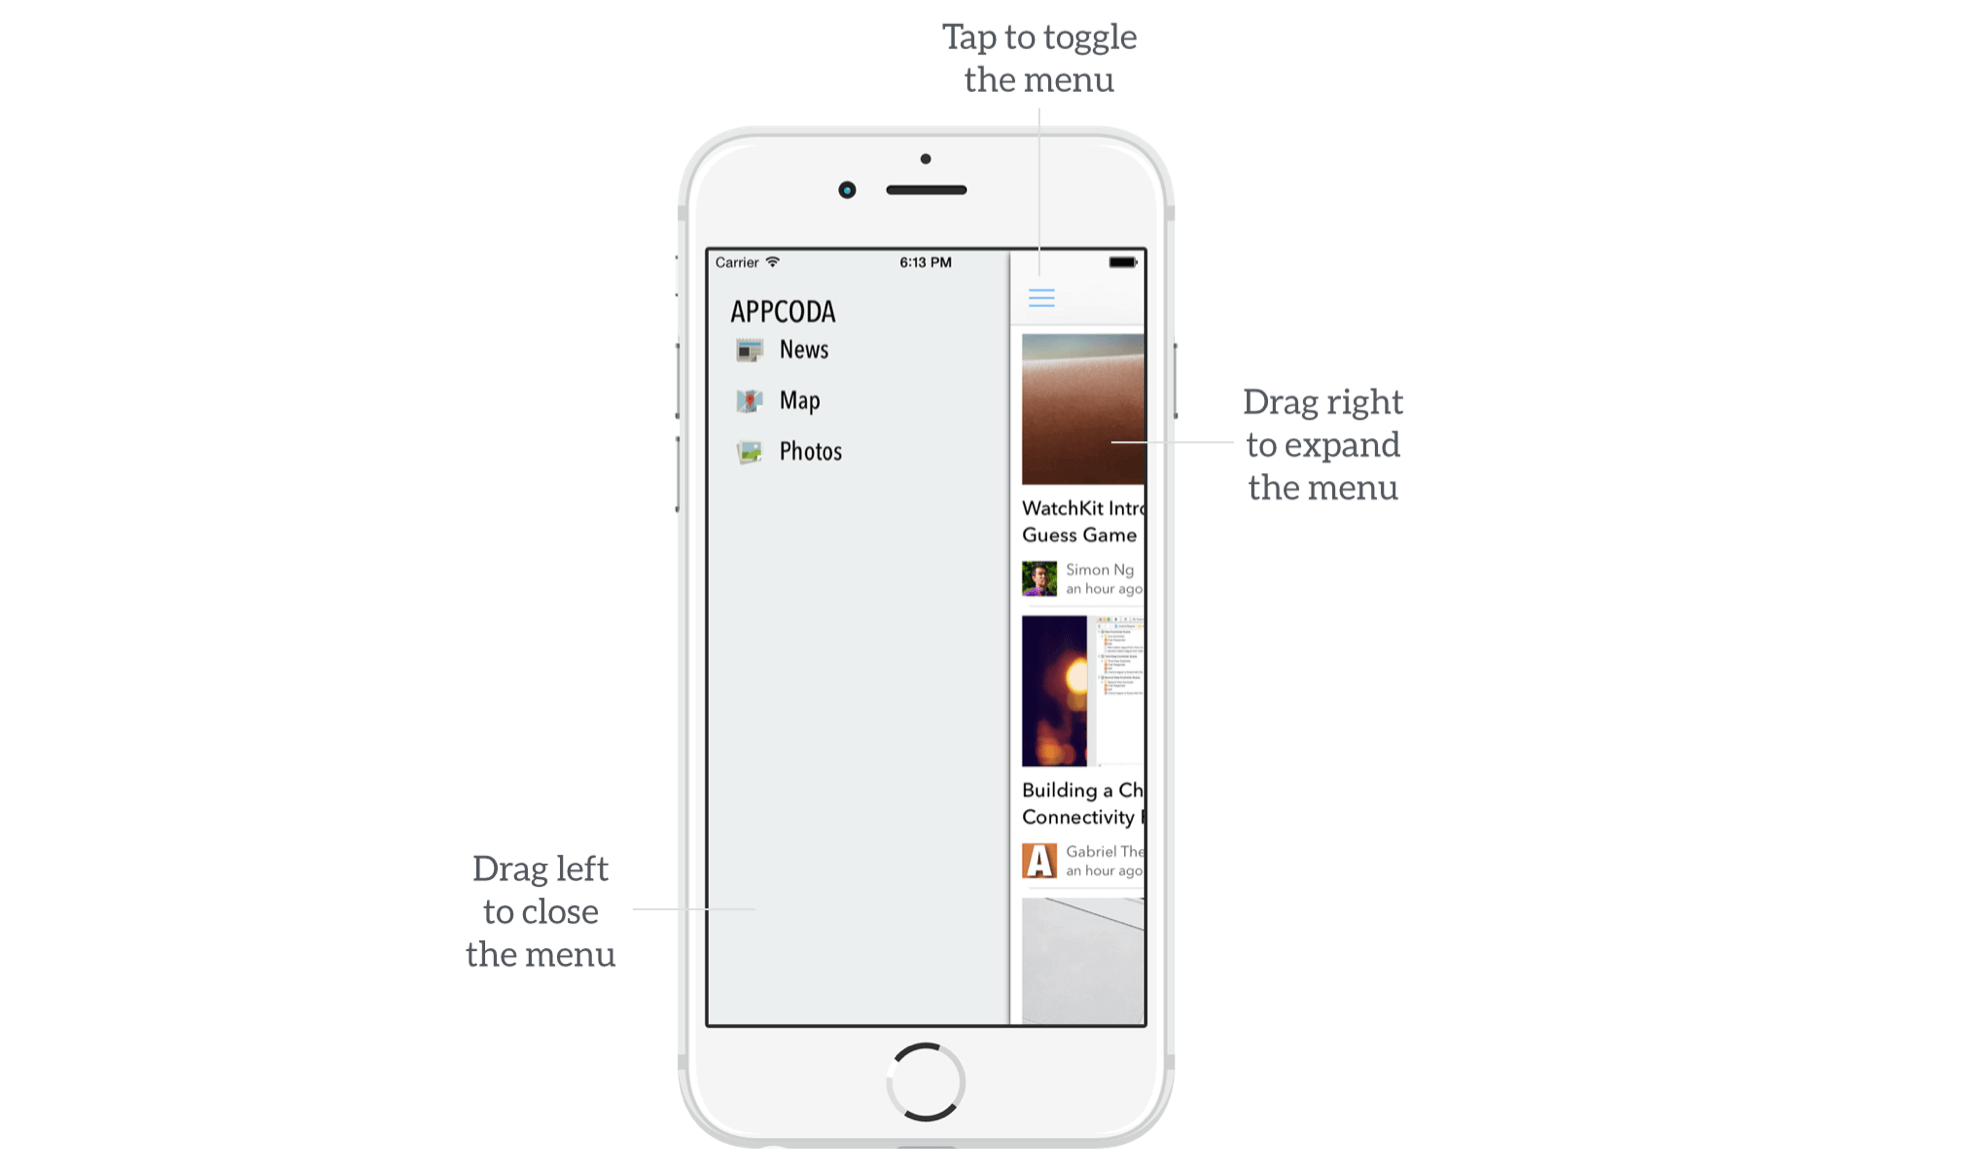
As usual, we'll build a demo app to show you how to apply SWRevealViewController. This app is very simple but not fully functional. The primary purpose of this app is to walk you through the implementation of the slide-out navigation menu. The navigation menu will work like this:
- The user triggers the menu by tapping the list button at the top-left of the navigation bar.
- The user can also bring up the menu by swiping right on the main content area.
- Once the menu appears, the user can close it by tapping the list button again.
- The user can also close the menu by dragging left on the content area.
Creating the Xcode Project
This chapter focuses on the sidebar implementation. If you want to save time and avoid building the project from scratch, you can download the Xcode project template from http://www.appcoda.com/resources/swift55/SidebarMenuStarter.zip.
The project comes with a pre-built storyboard with all the required view controllers. If you've downloaded the template, open the storyboard to take a look.
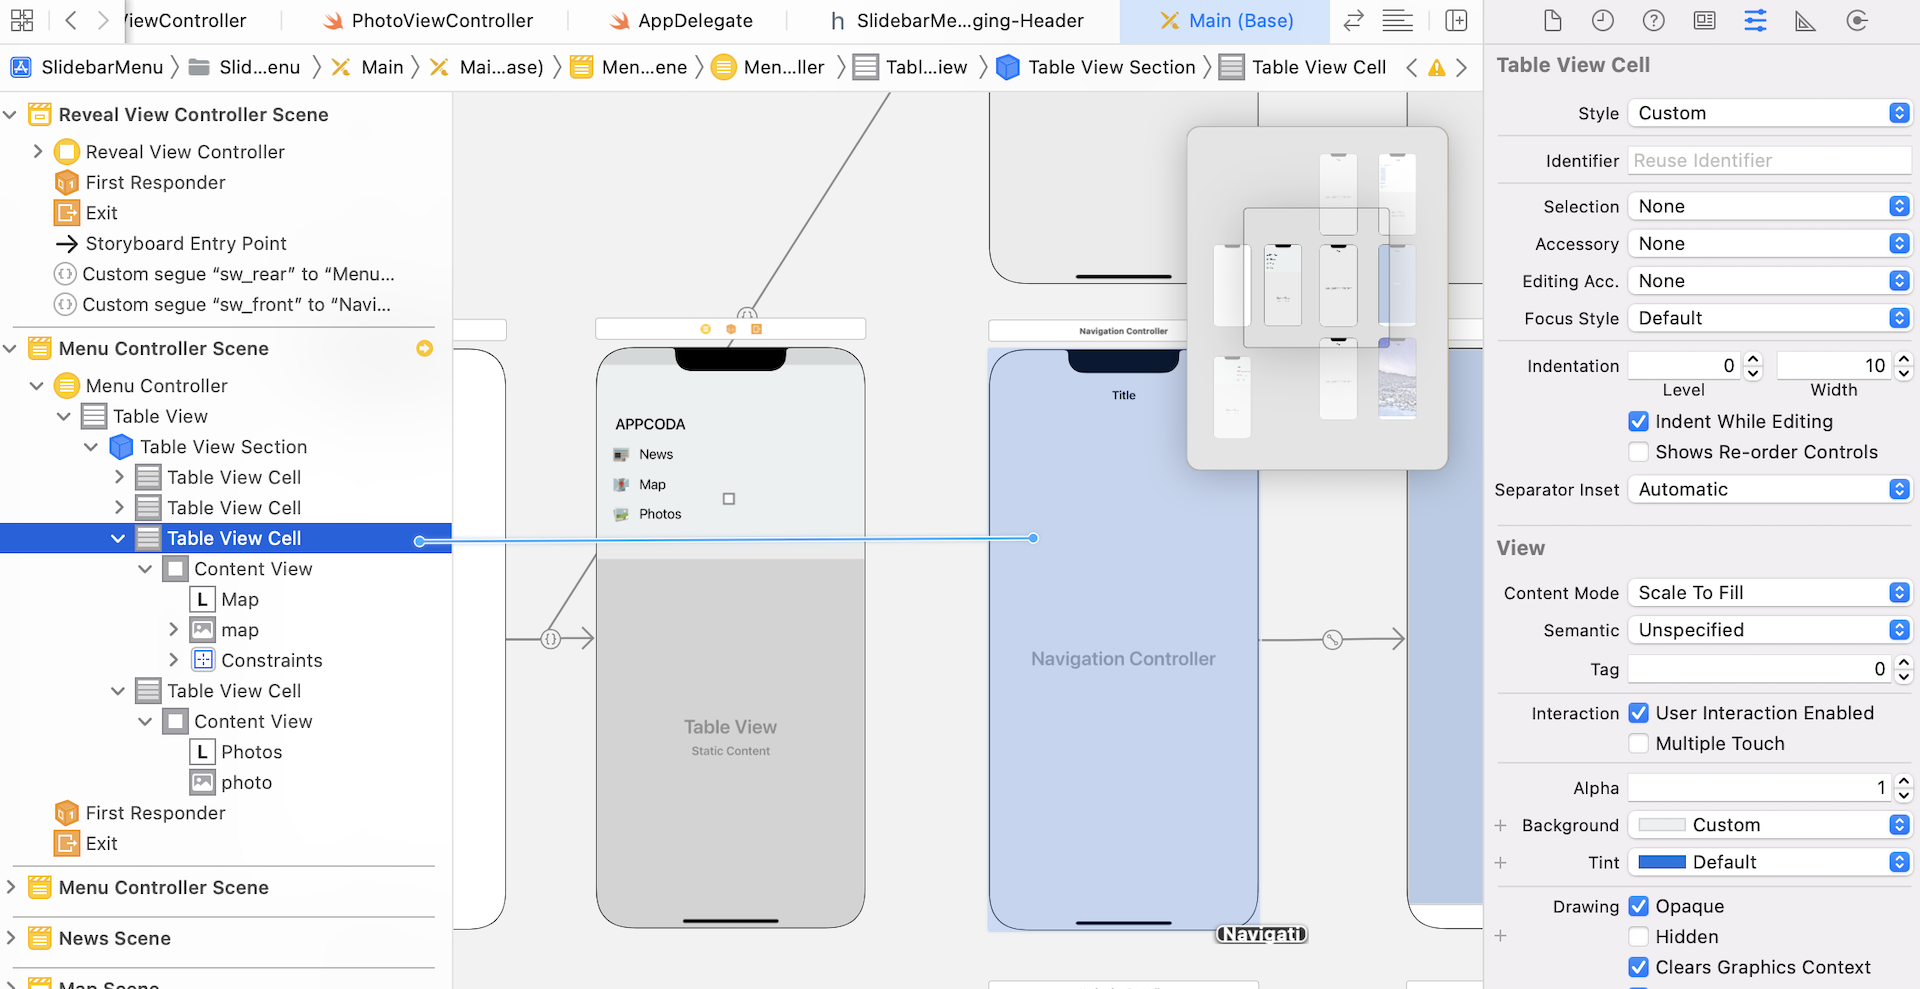
To use SWRevealViewController for building a sidebar menu, you create a container view controller, which is actually an empty view controller, to hold both the menu view controller and a set of content view controllers.
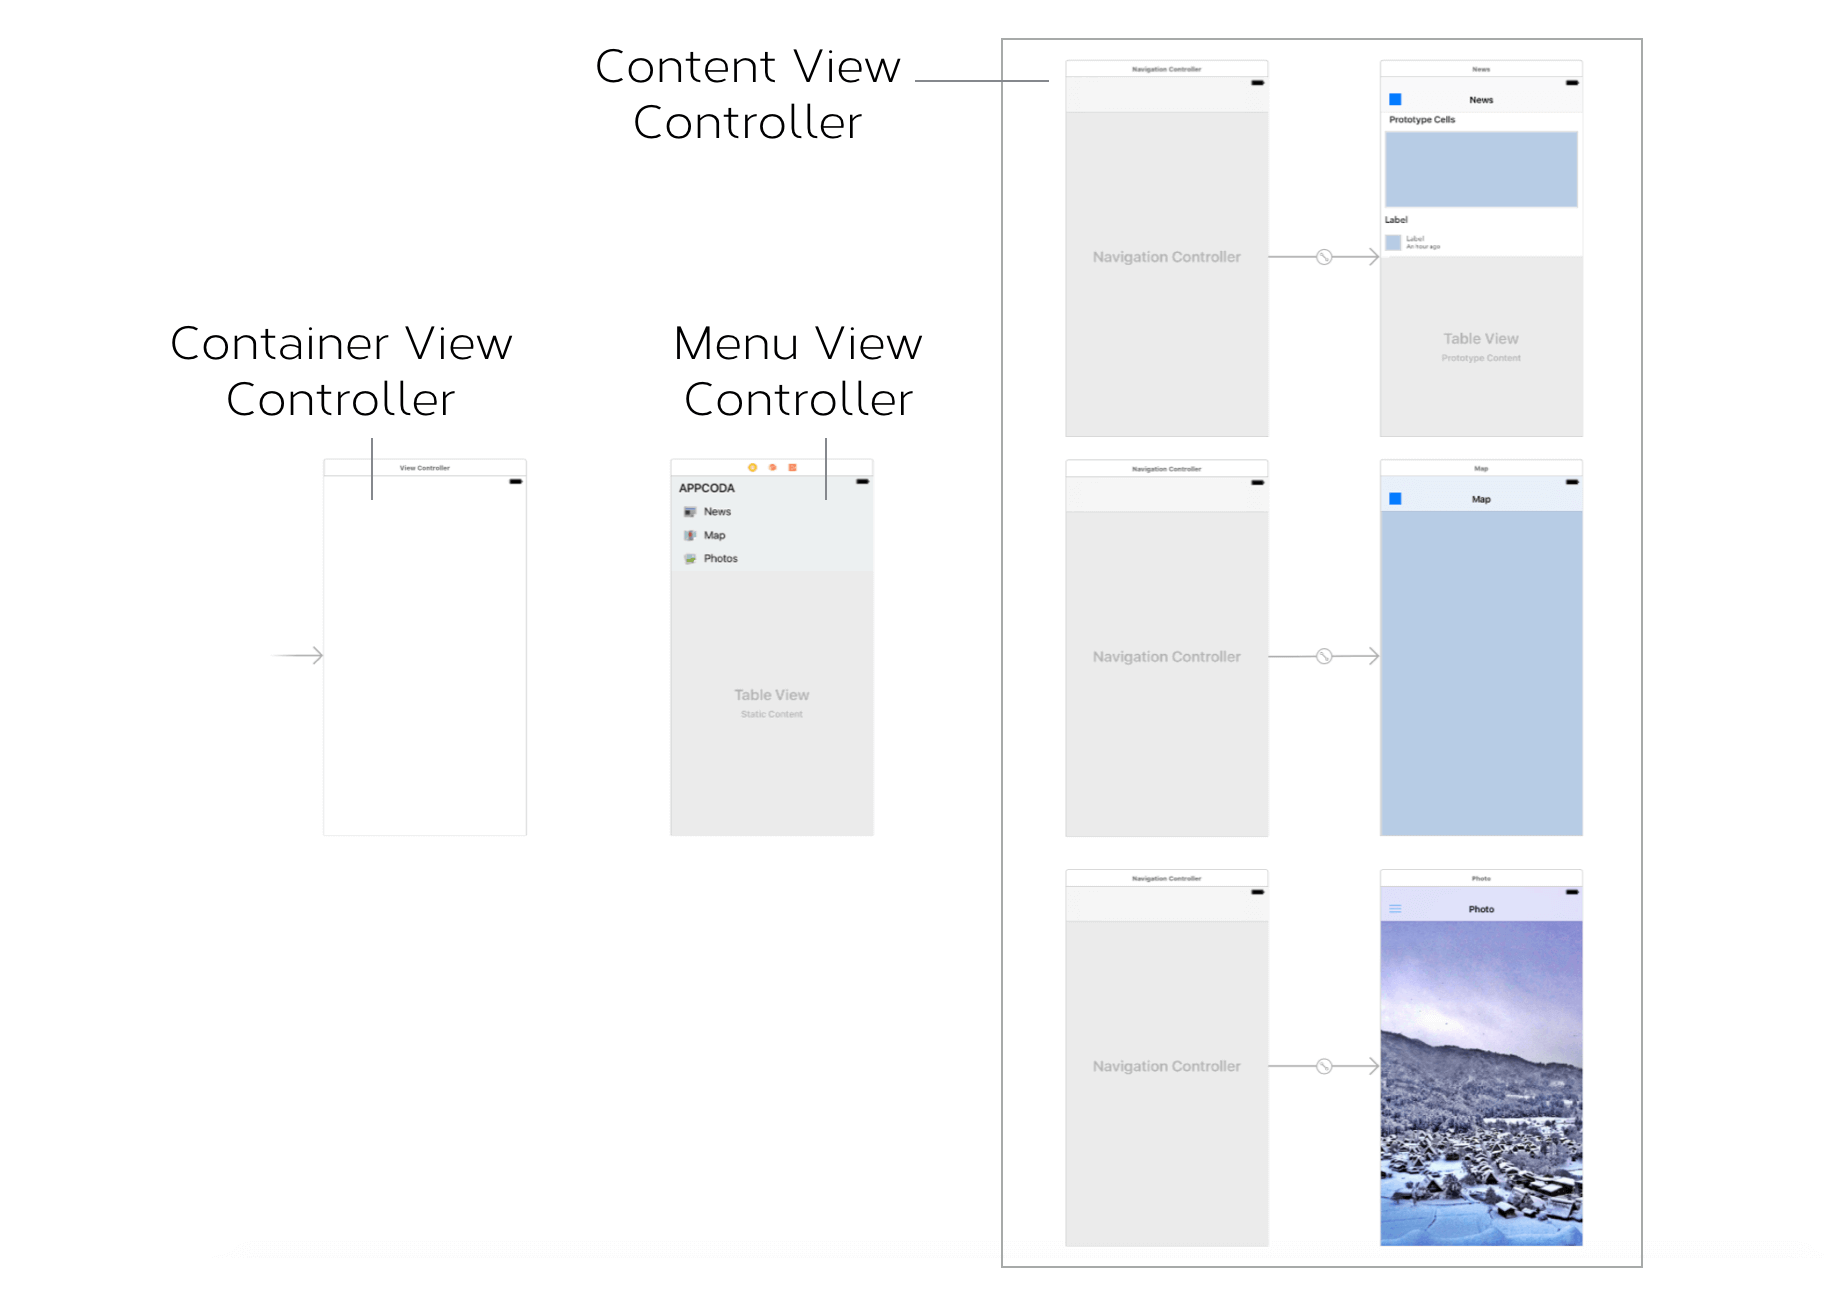
I have already created the menu view controller for you. It is just a static table view with three menu items. There are three content view controllers for displaying news, maps, and photos. For demo purposes, there are three content view controllers, and they show only static data. If you need to have a few more controllers, simply insert them into the storyboard.
All icons and images are included in the project template (credit: thanks to Pixeden for the free icons).
Using the SWRevealViewController Library
As mentioned, we'll use the free SWRevealViewController library to implement the slide-out menu. To begin, download the library from GitHub (https://github.com/John-Lluch/SWRevealViewController/archive/master.zip) and extract the zipped file - you should see the SWRevealViewController folder. In that folder, there are two files: SWRevealViewController.h and SWRevealViewController.m. If you don't have a background in Objective-C, you might wonder why the file extension is not .swift. As mentioned before, the SWRevealViewController library was written in Objective-C; the file extension differs from that of Swift's source file. We will add both files to the project.
In the project navigator, right-click SidebarMenu folder and select New Group. Name the group SWRevealViewController. Drag both files to the SWRevealViewController group. When prompted, make sure the Copy items if needed option is checked. As soon as you confirm to add the files, Xcode prompts you to configure an Objective-C bridging header.
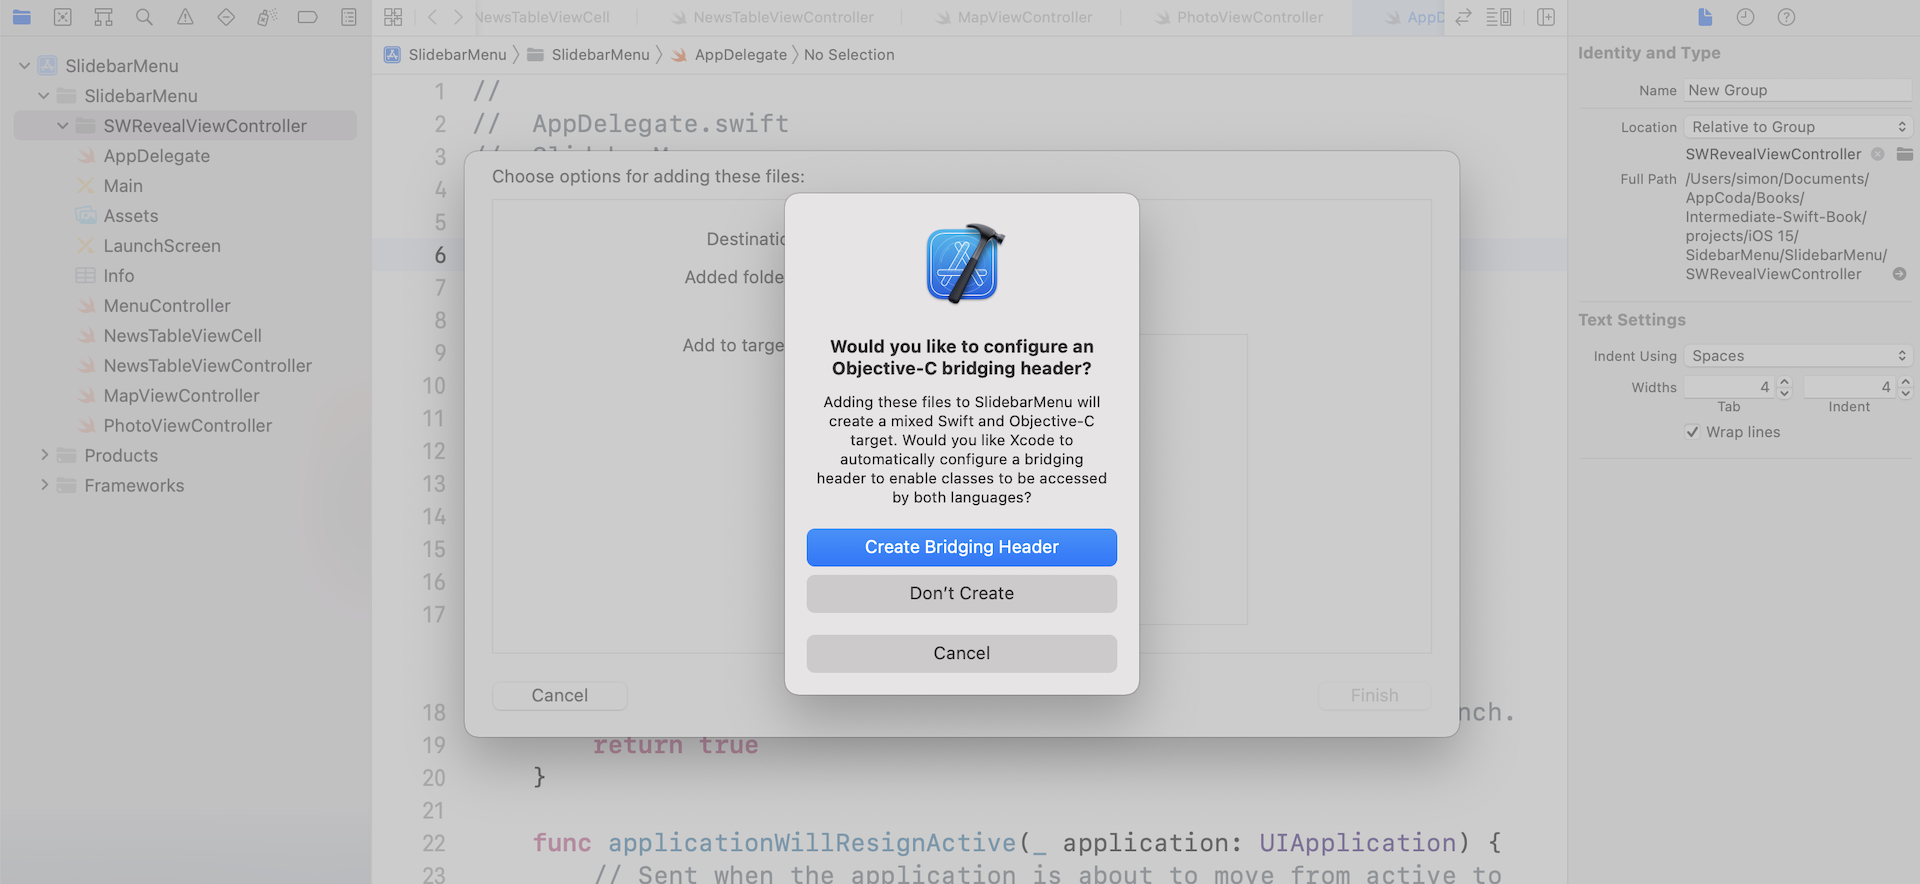
By creating the header file, you'll be able to access the Objective-C code from Swift. Click Create Bridging Header to proceed. Xcode then generates a header file named SidebarMenu-Bridging-Header.h under the SWRevealViewController folder.
Open the SidebarMenu-Bridging-Header.h and insert the following line:
#import "SWRevealViewController.h"
By adding the header file of SWRevealViewController, our Swift project will be able to access the Objective-C library. This is all you need to do when using an external library written in Objective-C.
Associate the Front View and Rear View Controller
The SWRevealViewController library provides built-in support for Interface Builder. When implementing a sidebar menu, all you need to do is associate the SWRevealViewController object with a front and a rear view controller using segues. The front view controller is the main controller for displaying content. In our storyboard, this is the navigation controller which associates with a view controller for presenting news. The rear view controller is the controller that shows the navigation menu. Here, it is the Sidebar View Controller.
Go to the Main storyboard. First, select the empty view controller (i.e. container view controller) and change its class to SWRevealViewController.
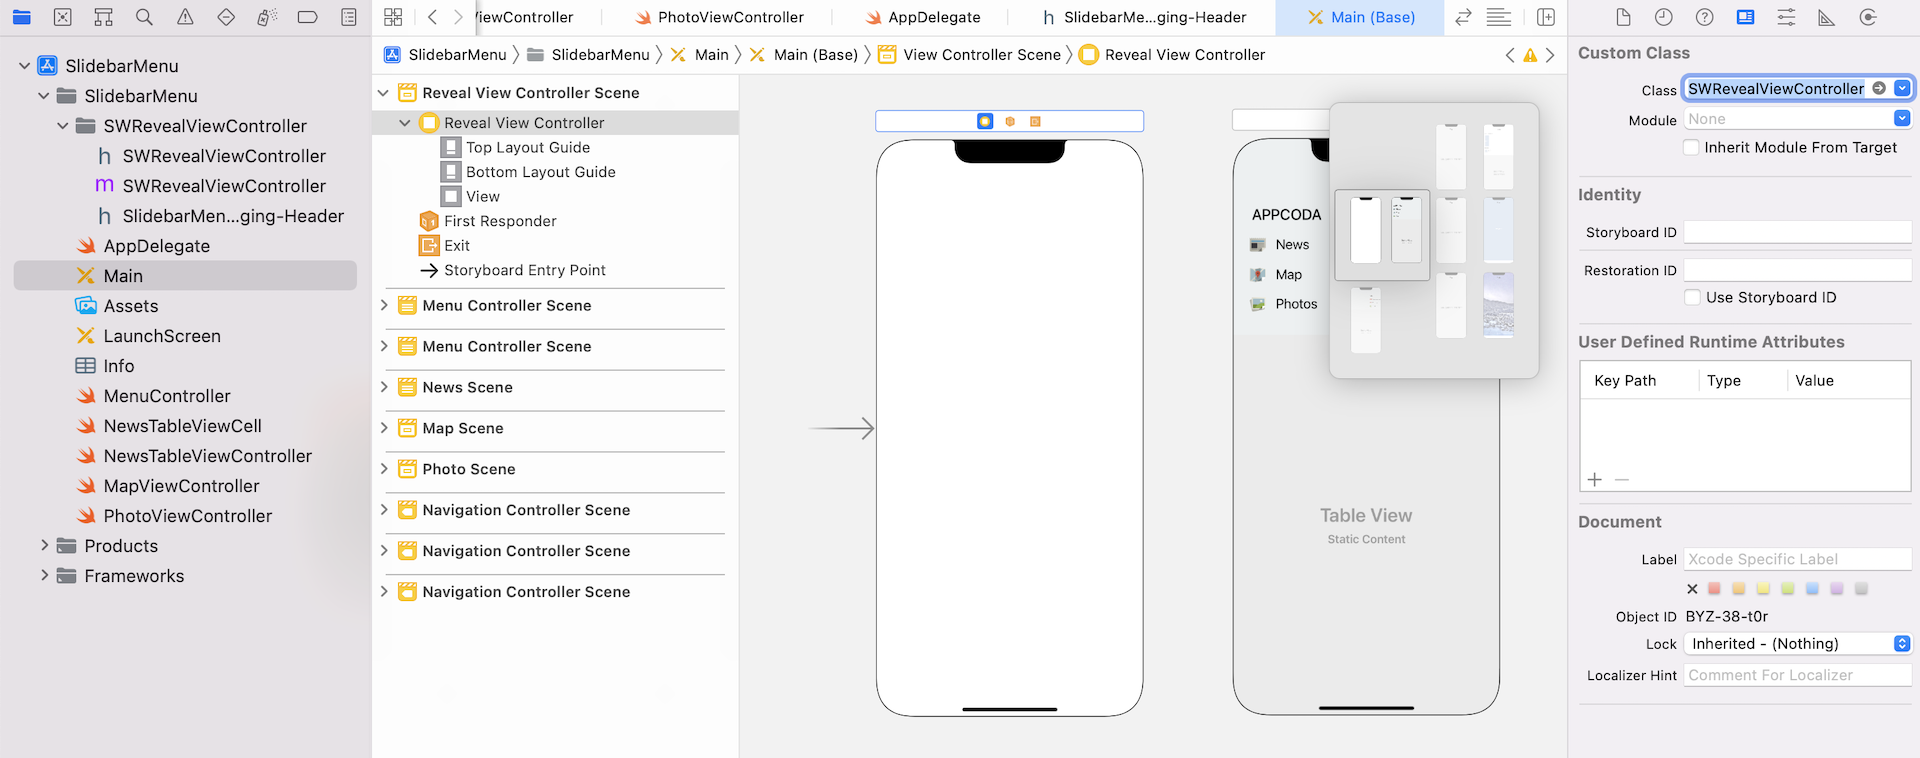
Next, control-drag from the Reveal View Controller to the Menu Controller. After releasing the button, you will see a context menu for segue selection. In this case, select reveal view controller set controller.
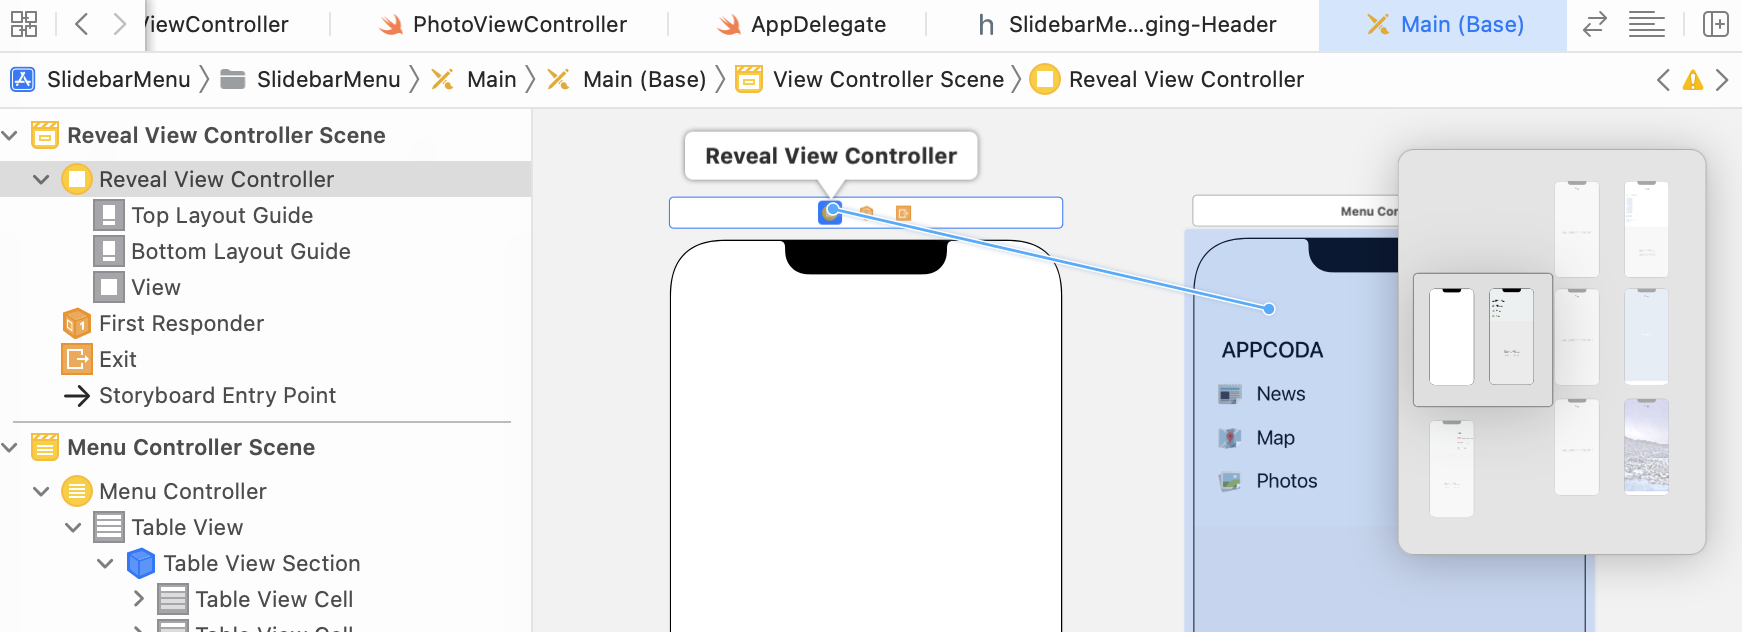
This defines a custom segue known as SWRevealViewControllerSetSegue. Select this segue and change its identifier to sw_rear under the Identity inspector. By setting the identifier, you tell SWRevealViewController that the menu controller is the rear view controller. This means that the sidebar menu will be hidden behind a content view controller.
Next, repeat the same procedures to connect SWRevealViewController with the navigation controller of the News View Controller. Again, select reveal view controller set controller when prompted.
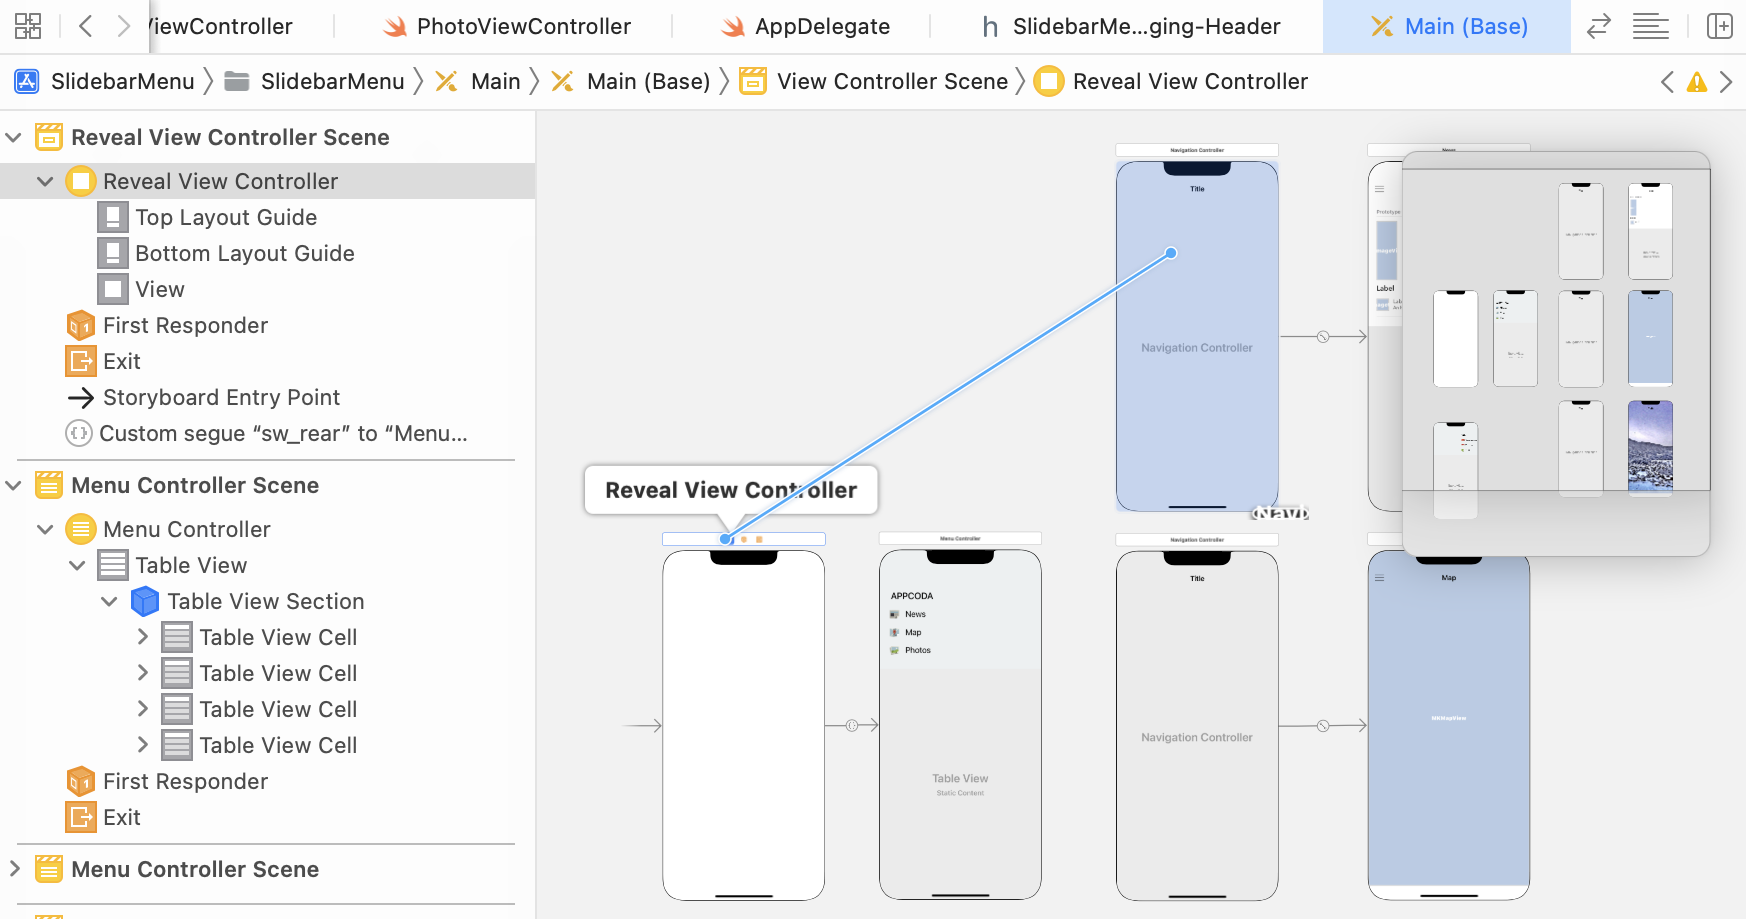
Set the identifier of the segue to sw_front. This tells the SWRevealViewController that the navigation controller is the front view controller.
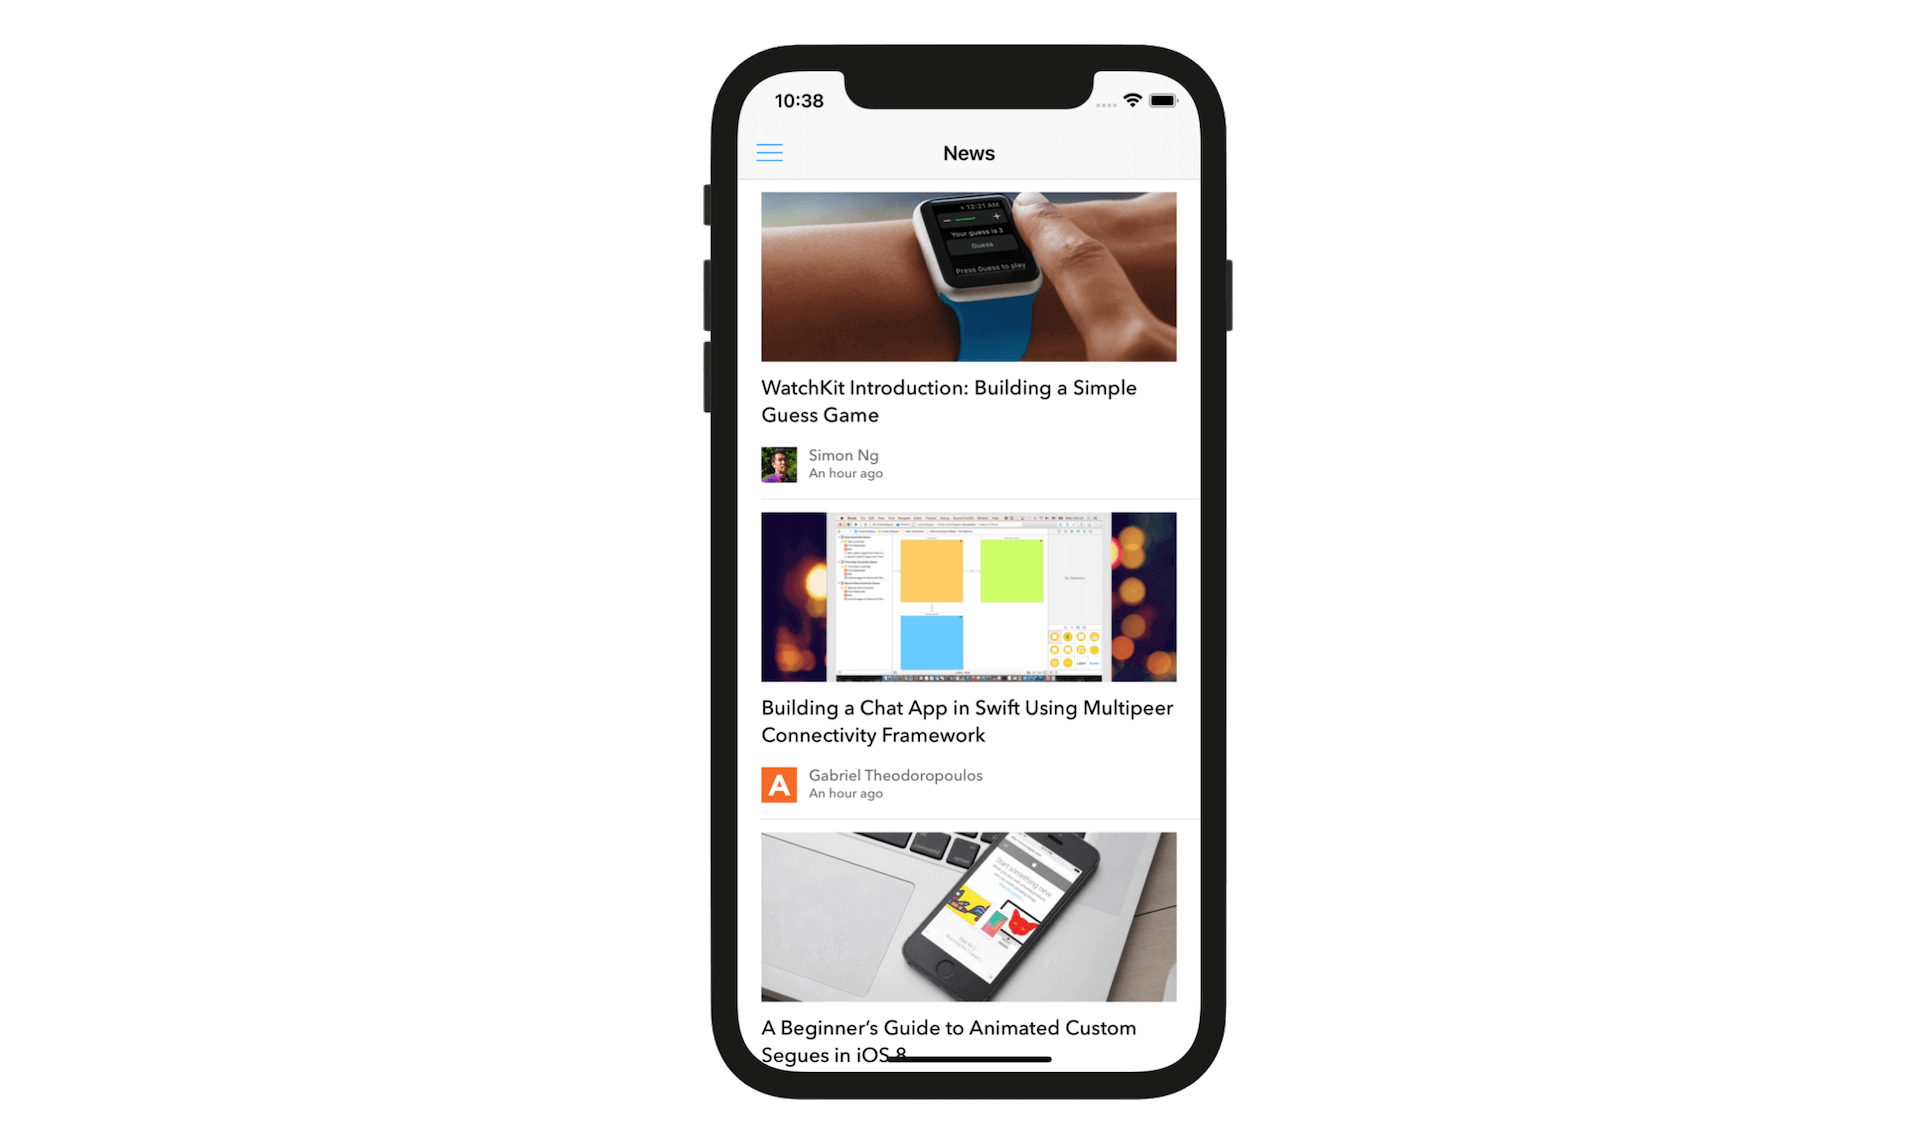
You can now compile the app and test it before moving on. At this point, your app should display the News view. However, you will not be able to pull out the sidebar menu when tapping the menu button (aka the hamburger button) because we haven't implemented an action method yet.
If your app works properly, let's continue with the implementation. If it doesn't work properly, go back to the beginning of the chapter and work through step-by-step to figure out where you went wrong.
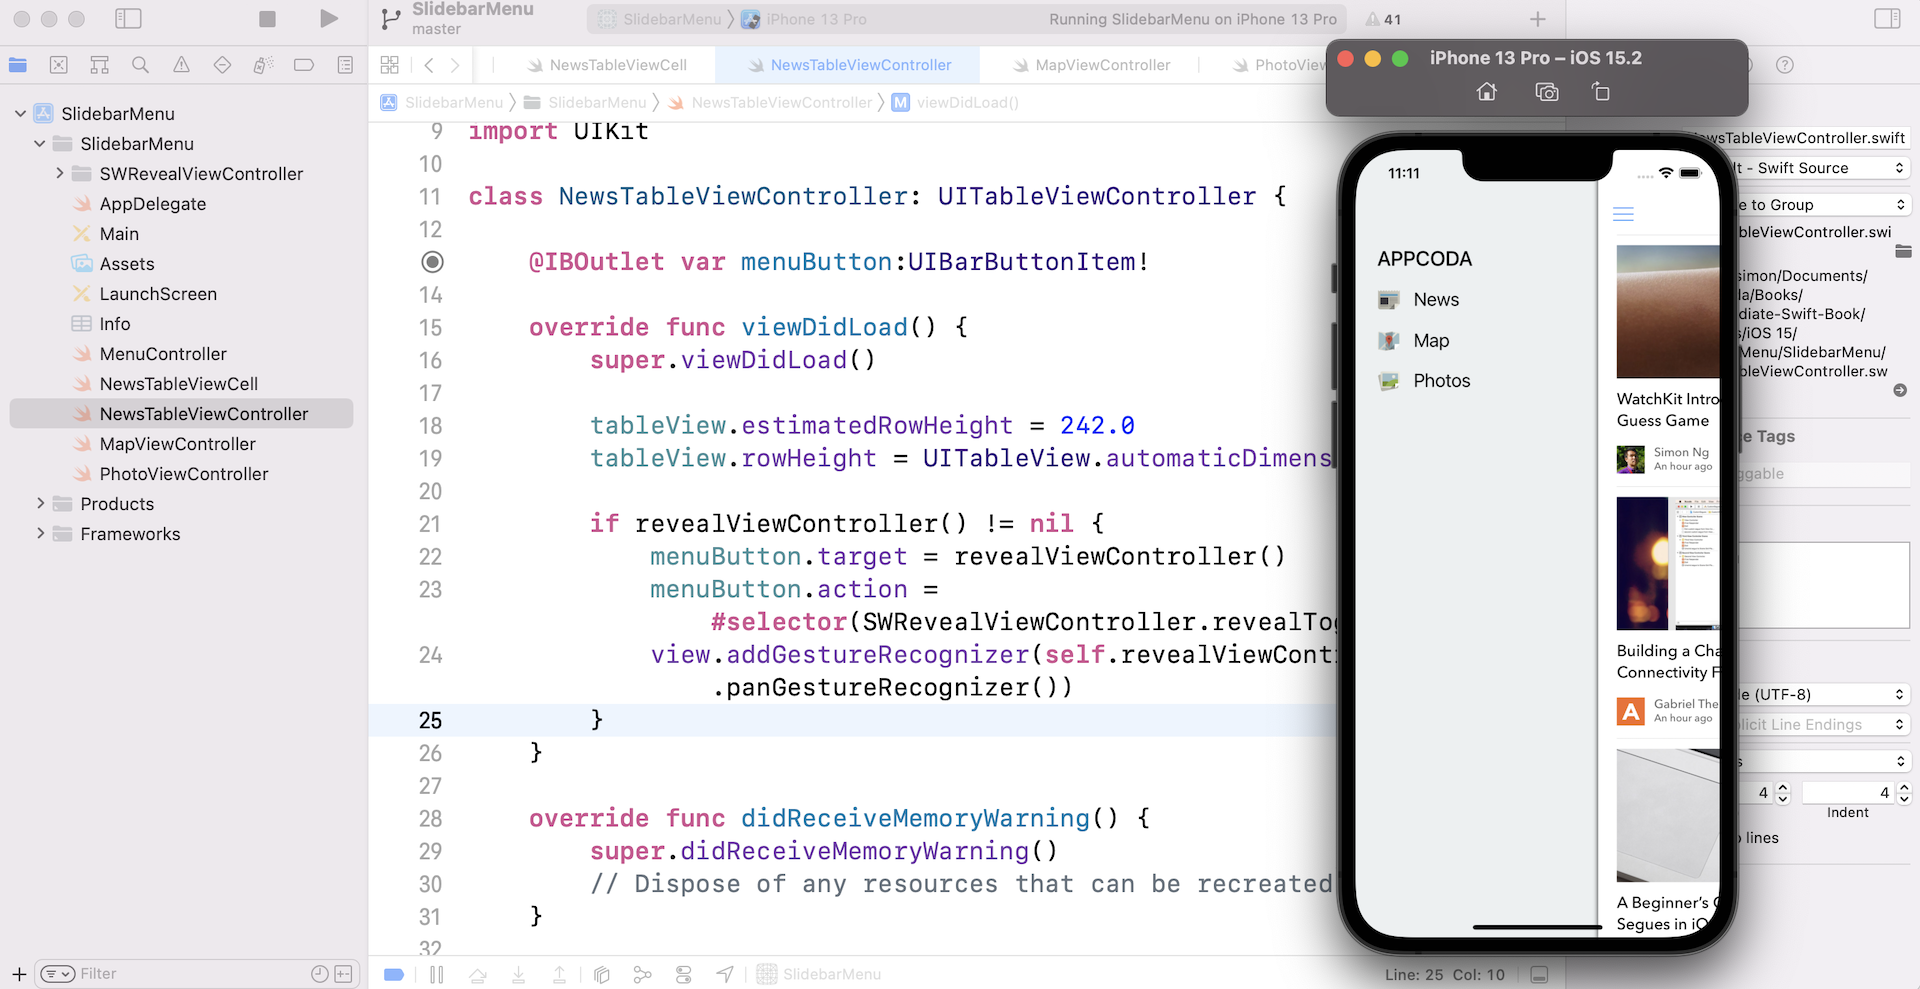
Open NewsTableViewController.swift, which is the controller class of News Controller. In the viewDidLoad method, insert the following lines of code:
if revealViewController() != nil {
    menuButton.target = revealViewController()
    menuButton.action = #selector(SWRevealViewController.revealToggle(_:))
    view.addGestureRecognizer(self.revealViewController().panGestureRecognizer())
}
The SWRevealViewController class provides a method called revealViewController() to get the parent SWRevealViewController from any child controller. It also provides the revealToggle(_:) method to handle the expansion and contraction of the sidebar menu. As you know, Cocoa uses the target-action mechanism for communication between a control and another object. We set the target of the menu button to the reveal view controller and action to the revealToggle(_:) method. So when the menu button is tapped, it will call the revealToggle(_:) method to display the sidebar menu.
Using Objective-C from Swift: The action property of the menu button accepts an Objective-C selector. An Objective-C selector is a type that refers to the name of an Objective-C method. In Swift, you need to specify the method name using the #selector syntax to construct a selector.
Lastly, we add a gesture recognizer. Not only can you use the menu button to bring out the sidebar menu, but the user can swipe the content area to activate the sidebar as well.
Cool! Let's compile and run the app in the simulator. Tap the menu button and the sidebar menu should appear. You can hide the sidebar menu by tapping the menu button again. You can also open the menu by using gestures. Try to swipe right in the content area and see what you get.
Handling Menu Item Selection
Now that you've already built a visually appealing sidebar menu, there's only one thing left. For now, we haven't defined any segues for the menu items. When you select any of the menu items, they will not transit to the corresponding view.
Okay, go back to Main storyboard. First, select the map cell. Control-drag from the map cell to the navigation controller of the map view controller, and then select the reveal view controller push controller segue under Selection Segue. Repeat the procedure for the News and Photos items, but connect them with the navigation controllers of the news view controller and photos view controller respectively.
The custom SWRevealViewControllerSeguePushController segue automatically handles the switching of the controllers. Similarly, insert the following lines of code in the viewDidLoad method of MapViewController.swift and PhotoViewController.swift to toggle the sidebar menu:
if revealViewController() != nil {
    menuButton.target = revealViewController()
    menuButton.action = #selector(SWRevealViewController.revealToggle(_:))
    view.addGestureRecognizer(self.revealViewController().panGestureRecognizer())
}
That's it! Hit the Run button and test out the app.
Customizing the Menu
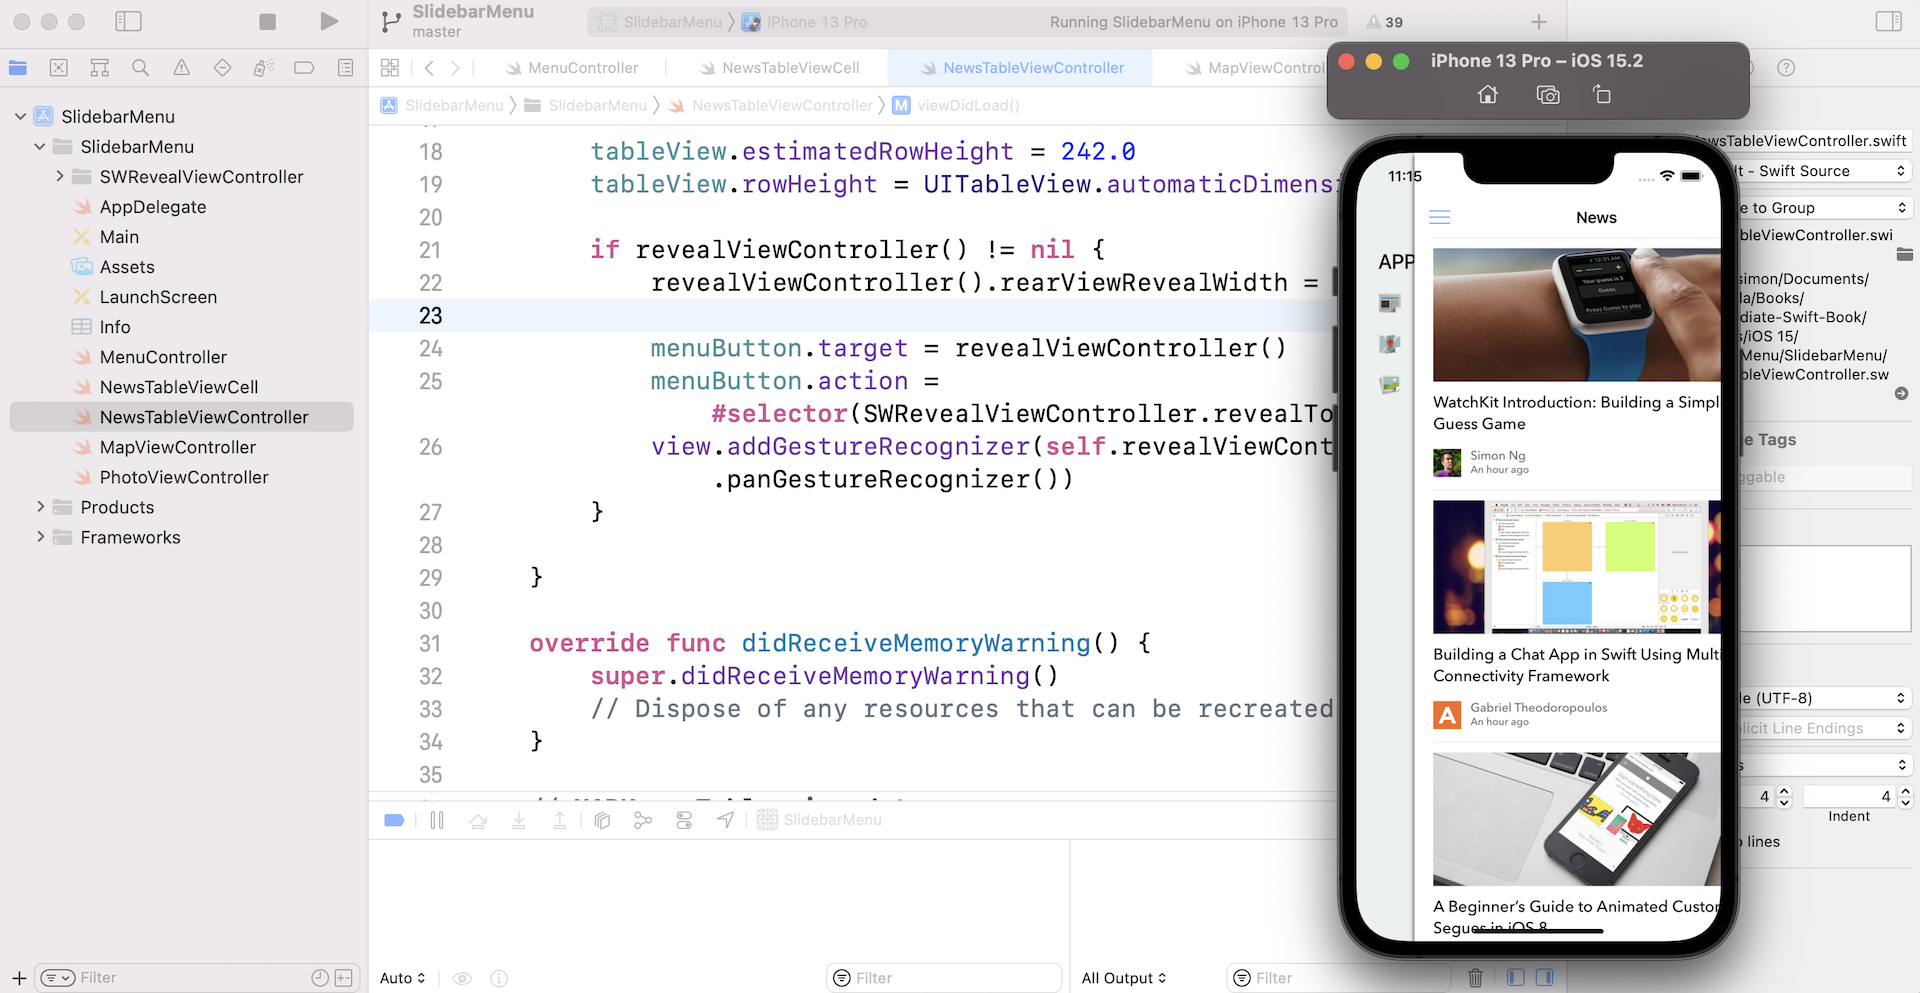
The SWRevealViewController class provides a number of options for configuring the sidebar menu. For example, if you want to change the width of the menu you can update the value of the rearViewRevealWidth property. Try to insert the following line of code in the viewDidLoad method of NewsTableViewController:
revealViewController().rearViewRevealWidth = 62
When you run the app, you should have a sidebar menu like the one shown below. You can look into the SWRevealViewController.h file to explore more customizable options.
Adding a Right Sidebar
Sometimes, you may need an extra sidebar. For example, the Facebook app allows users to swipe from the right to reveal a right sidebar, showing a list of the favorite contacts. With SWRevealViewController, it is quite simple to add an extra sidebar.
In the demo storyboard, it already comes with an Extra menu view controller. The procedures to add a right sidebar is very similar to what we have already done. The trick is to change the identifier of the segue from sw_rear to sw_right. Let's see how to get it done.
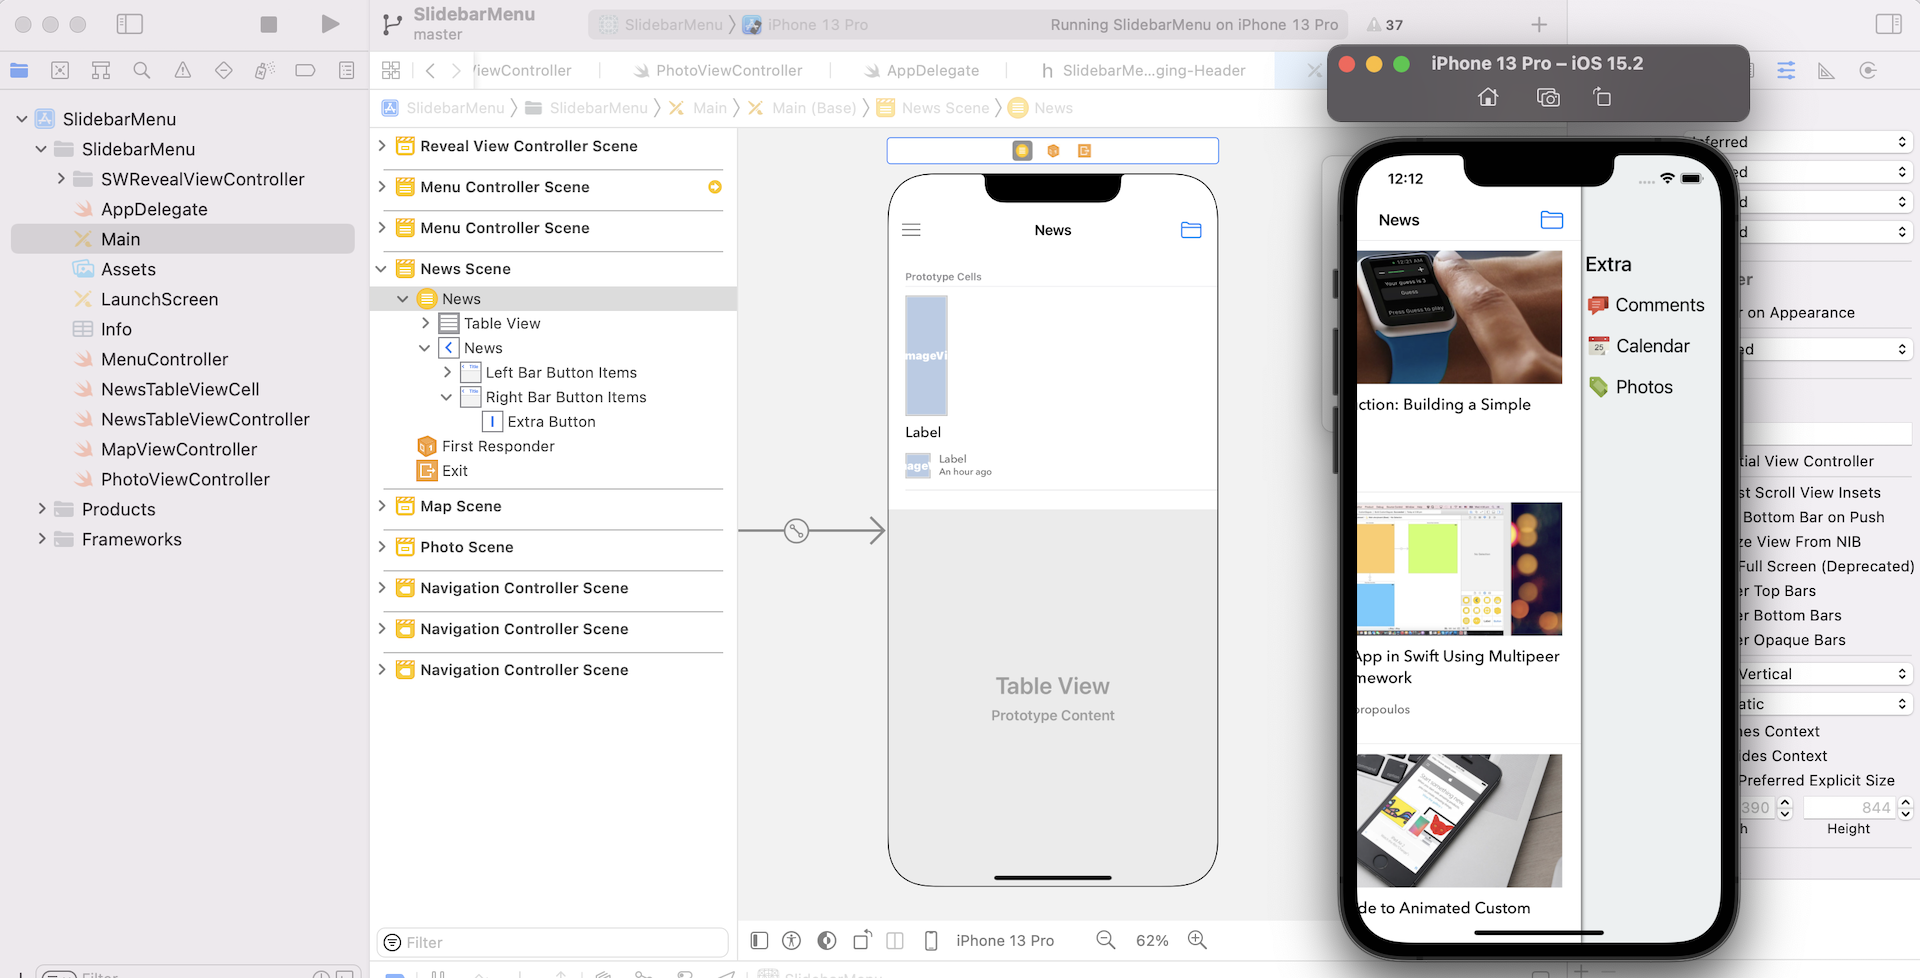
In Main storyboard, control-drag from SWRevealViewController to the Extra menu view controller. In the pop-over menu, select reveal view controller set controller. Then select the segue and go to the Identity inspector. Set the identifier to sw_right. This tells SWRevealViewController that the Extra menu view controller should slide from right.
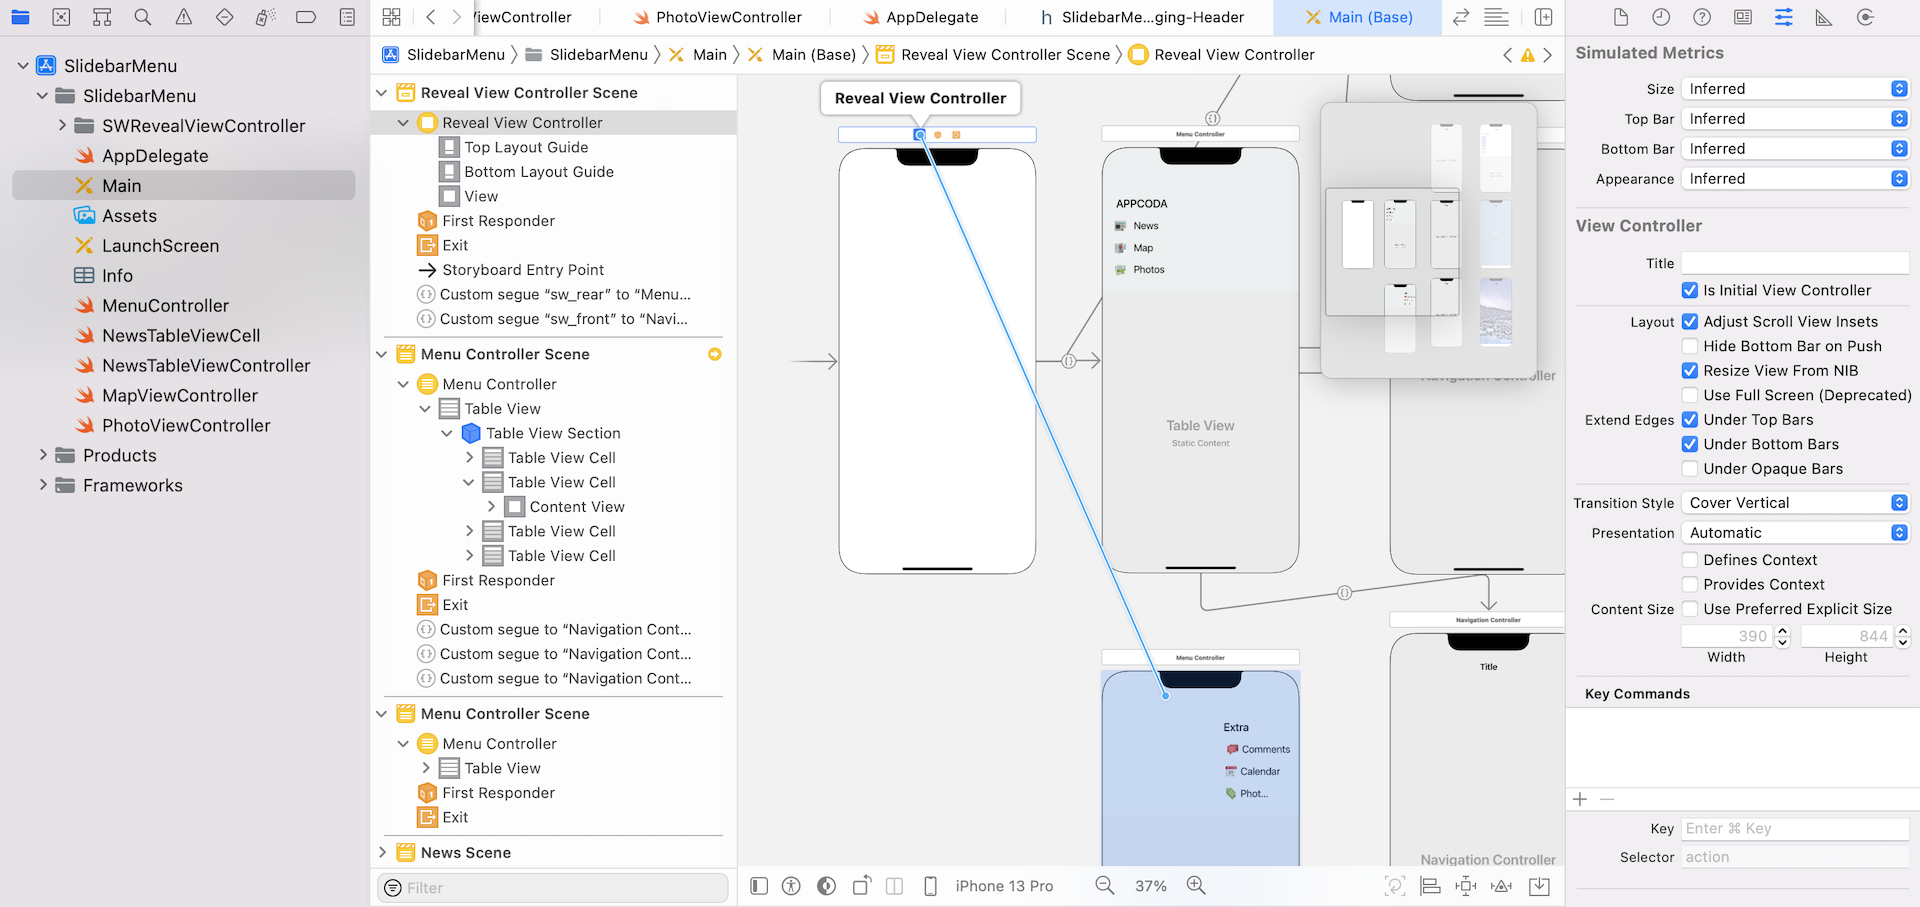
Now drag a bar button item to the News view controller, and place it on the right side of the navigation bar. In the Identity inspector, set the System Item option to Organize.
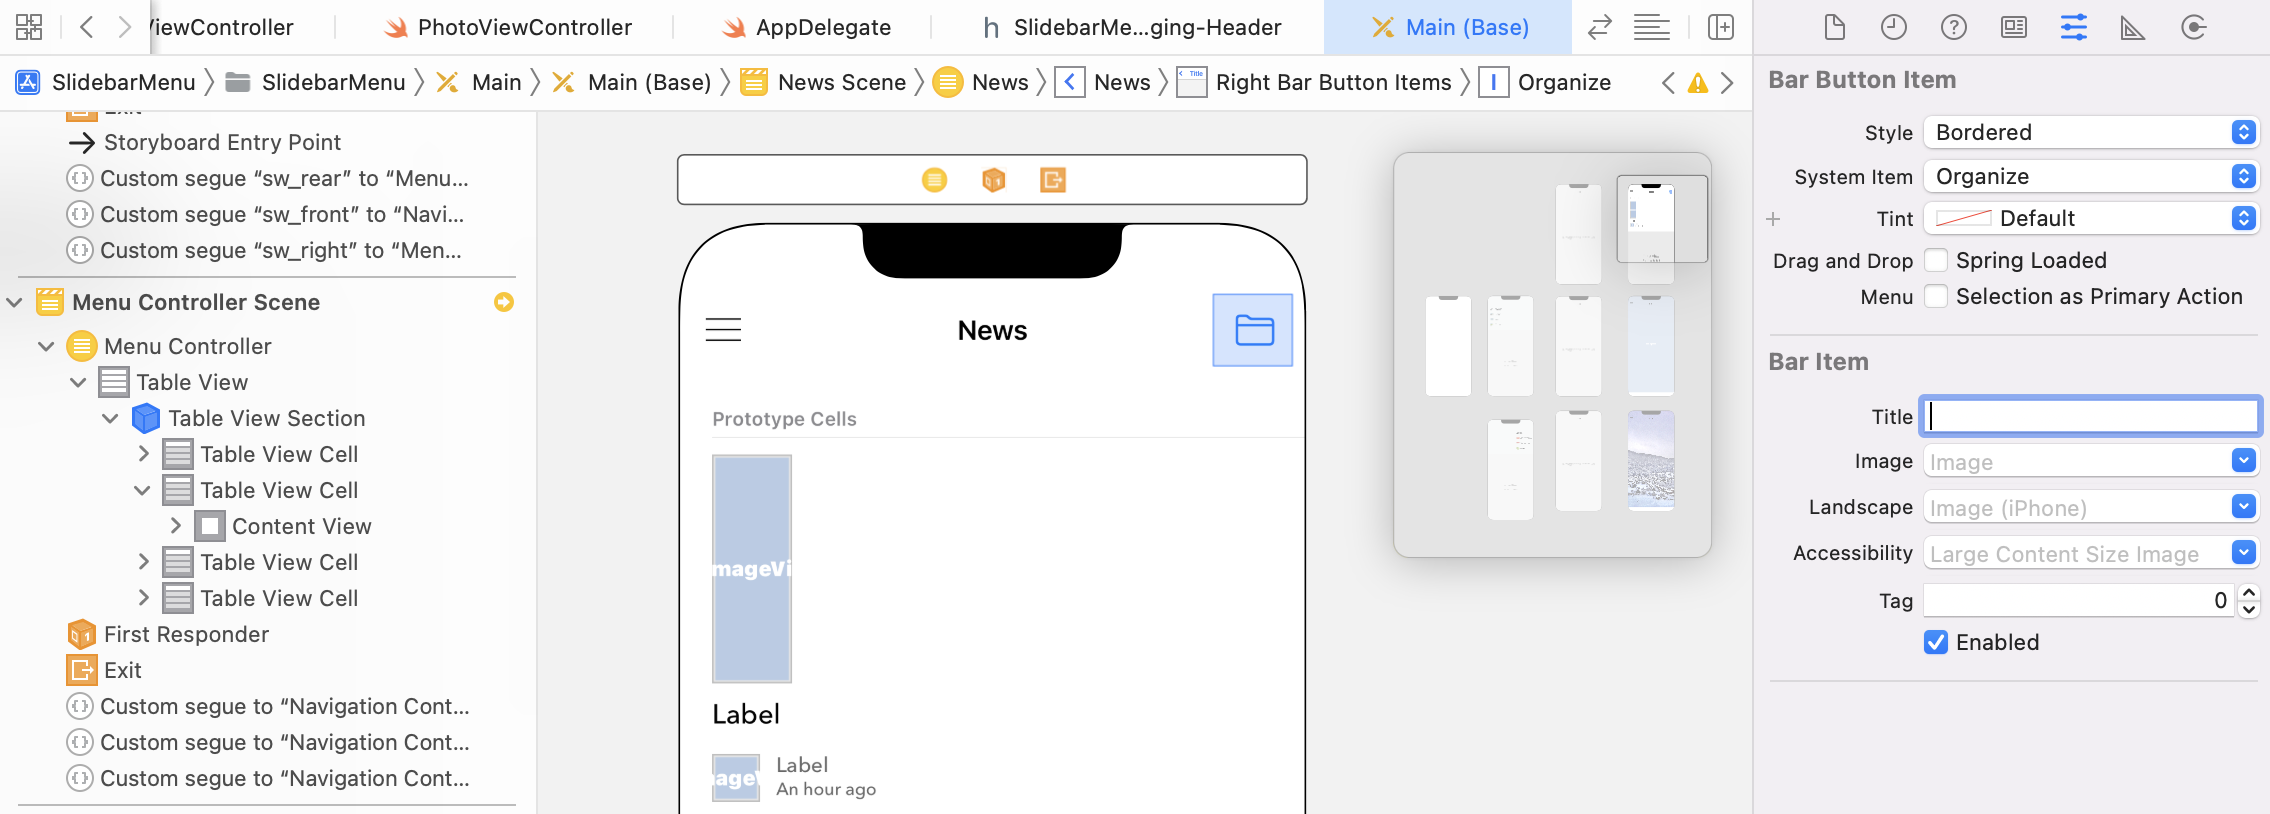
In the project navigator, select NewsTableViewController.swift. Declare an outlet variable for the bar button item:
@IBOutlet var extraButton: UIBarButtonItem!
In the viewDidLoad method, insert these lines of code right before the view.addGestureRecognizer method call:
revealViewController().rightViewRevealWidth = 150
extraButton.target = revealViewController()
extraButton.action = #selector(SWRevealViewController.rightRevealToggle(_:))
Here we change the width of the extra menu to 150 and set the corresponding target / action properties. Instead of calling the revealToggle(_:) method when the extra button is tapped, we call the rightRevealToggle(_:) method to display the menu from the right.
Lastly, go back to the storyboard. Connect the Organize button to the outlet variable. That's it! Run the project again. Now the app has a right sidebar.
Refactoring the Code with Swift Extensions
So far the code works great. But if you look closely at the code, you will find that the code snippet below is duplicated in multiple view controllers:
if revealViewController() != nil {
    menuButton.target = revealViewController()
    menuButton.action = #selector(SWRevealViewController.revealToggle(_:))

    revealViewController().rightViewRevealWidth = 150
    extraButton.target = revealViewController()
    extraButton.action = #selector(SWRevealViewController.rightRevealToggle(_:))

view.addGestureRecognizer(self.revealViewController().panGestureRecognizer())
}
If you're asked to add a new menu item and a new set of content view controllers, you will probably copy & paste the above code snippet to the new view controller.
The code will work as usual, but this is not a very good programming practice. Programming is not static. You always need to make changes due to the change of requirements or feature enhancement.
Consider the above code snippet, what if you need to change the value of the rightViewRevealWidth property from 150 to 100? You will have to modify the code in all the view controller classes that make use of the code snippet and update the value one by one. To be more exact, you will need to update the code in NewsTableViewController, MapViewController and PhotoViewController.
For ease of code management, we use to group reusable code in a common function. There are multiple ways to implement that. For example, you can create a super view controller with a common method of the above code snippet. Every view controller then extends from this super view controller. When you need to create a sidebar menu, you call the common method.
This is a viable solution, but there is a simpler way to do that. Swift provides a feature called extensions that allows developers to add functionalities to an existing class or structure. You declare an extension using the extension keyword. For example, to extend the functionality of UIButton, you write the code like this:
extension UIButton {
  // new functions go here
}
In the demo project, all the view controller classes extend from UIViewController. So we can extend its functionality to offer the sidebar menu.
Note: Please note that UITableViewController also extends from UIViewController.Let's first create a Swift file in the project. Right click
SlidebarMenu and choose New File.... Select Swift File and name it SidebarMenu.swift. After Xcode creates the file, update the content to the following:
import UIKit

extension UIViewController {

    func addSideBarMenu(leftMenuButton: UIBarButtonItem?, rightMenuButton: UIBarButtonItem? = nil) {
        if revealViewController() != nil {

            if let menuButton = leftMenuButton {
                menuButton.target = revealViewController()
                menuButton.action = #selector(SWRevealViewController.revealToggle(_:))
            }

            if let extraButton = rightMenuButton {
                revealViewController().rightViewRevealWidth = 150
                extraButton.target = revealViewController()
                extraButton.action = #selector(SWRevealViewController.rightRevealToggle(_:))
            }

            view.addGestureRecognizer(self.revealViewController().panGestureRecognizer())
        }
    }
}
Here we extend the functionality of UIViewController by adding a new method called addSideBarMenu. The method accepts two parameters: leftMenuButton and rightMenuButton. The body of the method is very similar to the code snippet we used before, so I will not go into that again. We just group the reusuable code in this common method, and make it available for any classes that extends from UIViewController.
With this common method, we can now modify the viewDidLoad method of NewsTableViewController, MapViewController, and PhotoViewController:
NewsTableViewController:
override func viewDidLoad() {
    super.viewDidLoad()

    tableView.estimatedRowHeight = 242.0
    tableView.rowHeight = UITableViewAutomaticDimension

    addSideBarMenu(leftMenuButton: menuButton, rightMenuButton: extraButton)
}
MapViewController:
override func viewDidLoad() {
    super.viewDidLoad()

    addSideBarMenu(leftMenuButton: menuButton)
}
PhotoViewController:
override func viewDidLoad() {
    super.viewDidLoad()

    addSideBarMenu(leftMenuButton: menuButton)
}
As all these controllers extend from UIViewController, they automatically enjoy the functionality we added to the UIViewController class. Instead of scattering the same code snippet in multiple classes, we centralize it in a single file.
addSideBarMenu.
It is not easy to get the code right the first time. Remember to refactor your code to make it better and better.
For reference, you can download the final project from http://www.appcoda.com/resources/swift55/SidebarMenu.zip.