- Made by AppCoda
- Contact us / Support
- Tweet this book
- Preface
- 1. Building Adaptive User Interfaces
- 2. Creating Table View Sections and Index list with Diffable Data Source
- 3. Animating Table View Cells
- 4. Working with JSON and Codable
- 5. How to Integrate the Twitter and Facebook SDK for Social Sharing
- 6. Working with Email and Attachments
- 7. Sending SMS and MMS Using MessageUI Framework
- 8. How to Get Direction and Draw Route on Maps
- 9. Search Nearby Points of Interest Using Local Search
- 10. Audio Recording and Playback
- 11. Scan QR Code Using AVFoundation Framework
- 12. Working with URL Schemes
- 13. Building a Full Screen Camera with Gesture-based Controls
- 14. Video Capturing and Playback Using AVKit
- 15. Displaying Banner Ads using Google AdMob
- 16. Working with Custom Fonts
- 17. Working with AirDrop, UIActivityViewController and Uniform Type Identifiers
- 18. Building Grid Layouts Using Collection Views and Diffable Data Source
- 19. Interacting with Collection Views
- 20. Adaptive Collection Views Using UITraitCollection and Compositional Layout
- 21. Building a Weather Widget Using WidgetKit
- 22. Building Slide Out Sidebar Menus Using Objective-C Libraries
- 23. View Controller Transitions and Animations
- 24. Building a Slide Down Menu
- 25. Self Sizing Cells and Dynamic Type
- 26. XML Parsing, RSS and Expandable Table View Cells
- 27. Applying a Blurred Background Using UIVisualEffect
- 28. Using Touch ID and Face ID For Authentication
- 29. Building a Carousel-Like User Interface
- 30. Working with Parse
- 31. Parsing CSV and Preloading a SQLite Database Using Core Data
- 32. Connecting Multiple Annotations with Polylines and Routes
- 33. Using CocoaPods in Swift Projects
- 34. Building a Simple Sticker App
- 35. Building iMessage Apps Using Messages Framework
- 36. Building Custom UI Components Using IBDesignable and IBInspectable
- 37. Using Firebase for User Authentication
- 38. Google and Facebook Authentication Using Firebase
- 39. Using Firebase Database and Storage to Build an Instagram-like App
- 40. Building a Real-time Image Recognition App Using Core ML
- 41. Building AR Apps with ARKit and SpriteKit
- 42. Working with 3D Objects in Augmented Reality Using ARKit and SceneKit
- 43. Use Create ML to Train Your Own Machine Learning Model for Image Recognition
- 44. Building a Sentiment Classifier Using Create ML to Classify User Reviews
- 45. Working with Image Tracking Using ARKit
- Published with GitBook
Chapter 7
Sending SMS and MMS Using MessageUI Framework
Not only designed for email, the MessageUI framework also provides a specialized view controller for developers to present a standard interface for composing SMS text messages within apps. While you can use the MFMailComposeViewController class for composing emails, the framework provides another class named MFMessageComposeViewController for handling text messages.
Basically the usage of MFMessageComposeViewController is very similar to the mail composer class. If you've read the previous chapter about creating emails with attachments, you will find it pretty easy to compose text messages. Anyway, I'll walk you through the usage of MFMessageComposeViewController class. Again we will build a simple app to walk you through the class.
Note: If you haven't read the previous chapter, I highly recommend you to take a look.
A Glance at the Demo App
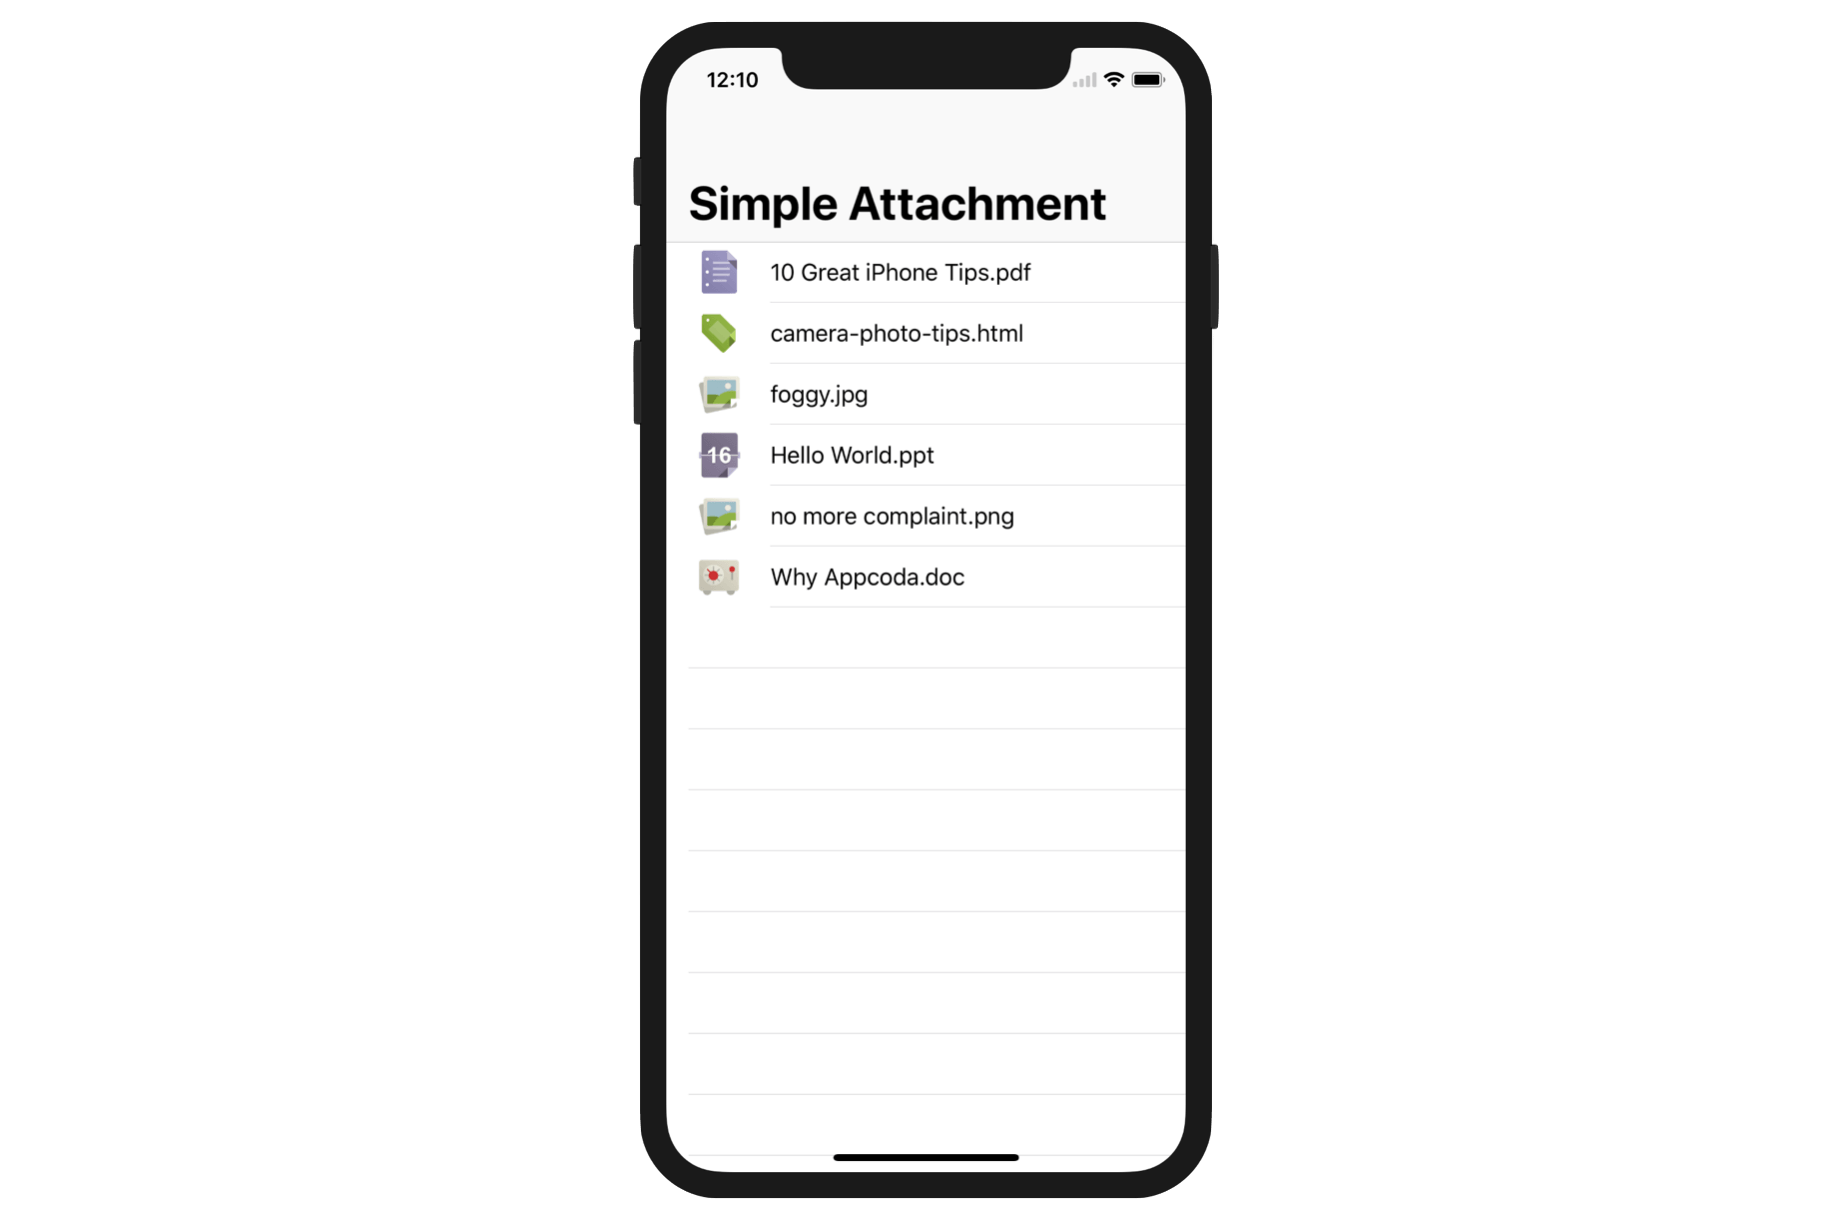
We'll reuse the previous demo app but tweak it a bit. The app still displays a list of files in a table view. However, instead of showing the mail composer, the app will bring up the message interface with a pre-filled message when a user taps any of the files.
Getting Started
To save you time from creating the Xcode project from scratch, you can download the project template from http://www.appcoda.com/resources/swift55/SMSDemoStarter.zip to begin with. I have pre-built the storyboard and already loaded the table data for you.
Implementing the Delegate
Open the AttachmentTableViewController.swift file. Add the following code to import the MessageUI framework:
import MessageUI
Similar to what we have done in the previous chapter, in order to use the message composer, we have to adopt the MFMessageComposeViewControllerDelegate protocol and implement the following method:
func messageComposeViewController(_ controller: MFMessageComposeViewController, didFinishWith result: MessageComposeResult)
The MFMessageComposeViewControllerDelegate protocol defines the method which will be called when a user finishes composing the message. We have to provide the implementation of the method to handle various situations:
- A user cancels the editing of an SMS.
- A user taps the send button and the SMS is sent successfully.
- A user taps the send button, but the SMS has failed to send.
Again, we will implement the protocol by using an extension. Insert the following code in AttachmentTableViewController.swift:
extension AttachmentTableViewController: MFMessageComposeViewControllerDelegate {
    func messageComposeViewController(_ controller: MFMessageComposeViewController, didFinishWith result: MessageComposeResult) {

        switch(result) {
        case MessageComposeResult.cancelled:
            print("SMS cancelled")

        case MessageComposeResult.failed:
            let alertMessage = UIAlertController(title: "Failure", message: "Failed to send the message.", preferredStyle: .alert)
            alertMessage.addAction(UIAlertAction(title: "OK", style: .default, handler: nil))
            present(alertMessage, animated: true, completion: nil)

        case MessageComposeResult.sent:
            print("SMS sent")

        @unknown default:
            print("Unknown error")
        }

        dismiss(animated: true, completion: nil)
    }
}
Here, we just display an alert message when the app fails to send a message. For other cases, we log the error to the console and dismiss the message composer.
Bring Up the Message Composer
When a user selects a file, we retrieve the selected file and call up a helper method to bring up the message composer. Insert the tableView(_:didSelectRowAtIndexPath:) method in the AttachmentTableViewController class:
override func tableView(_ tableView: UITableView, didSelectRowAt indexPath: IndexPath) {
    let selectedFile = filenames[indexPath.row]
    sendSMS(attachment: selectedFile)
}
The sendSMS method is the core method to initialize and populate the default content of the SMS text message. Create the method using the following code:
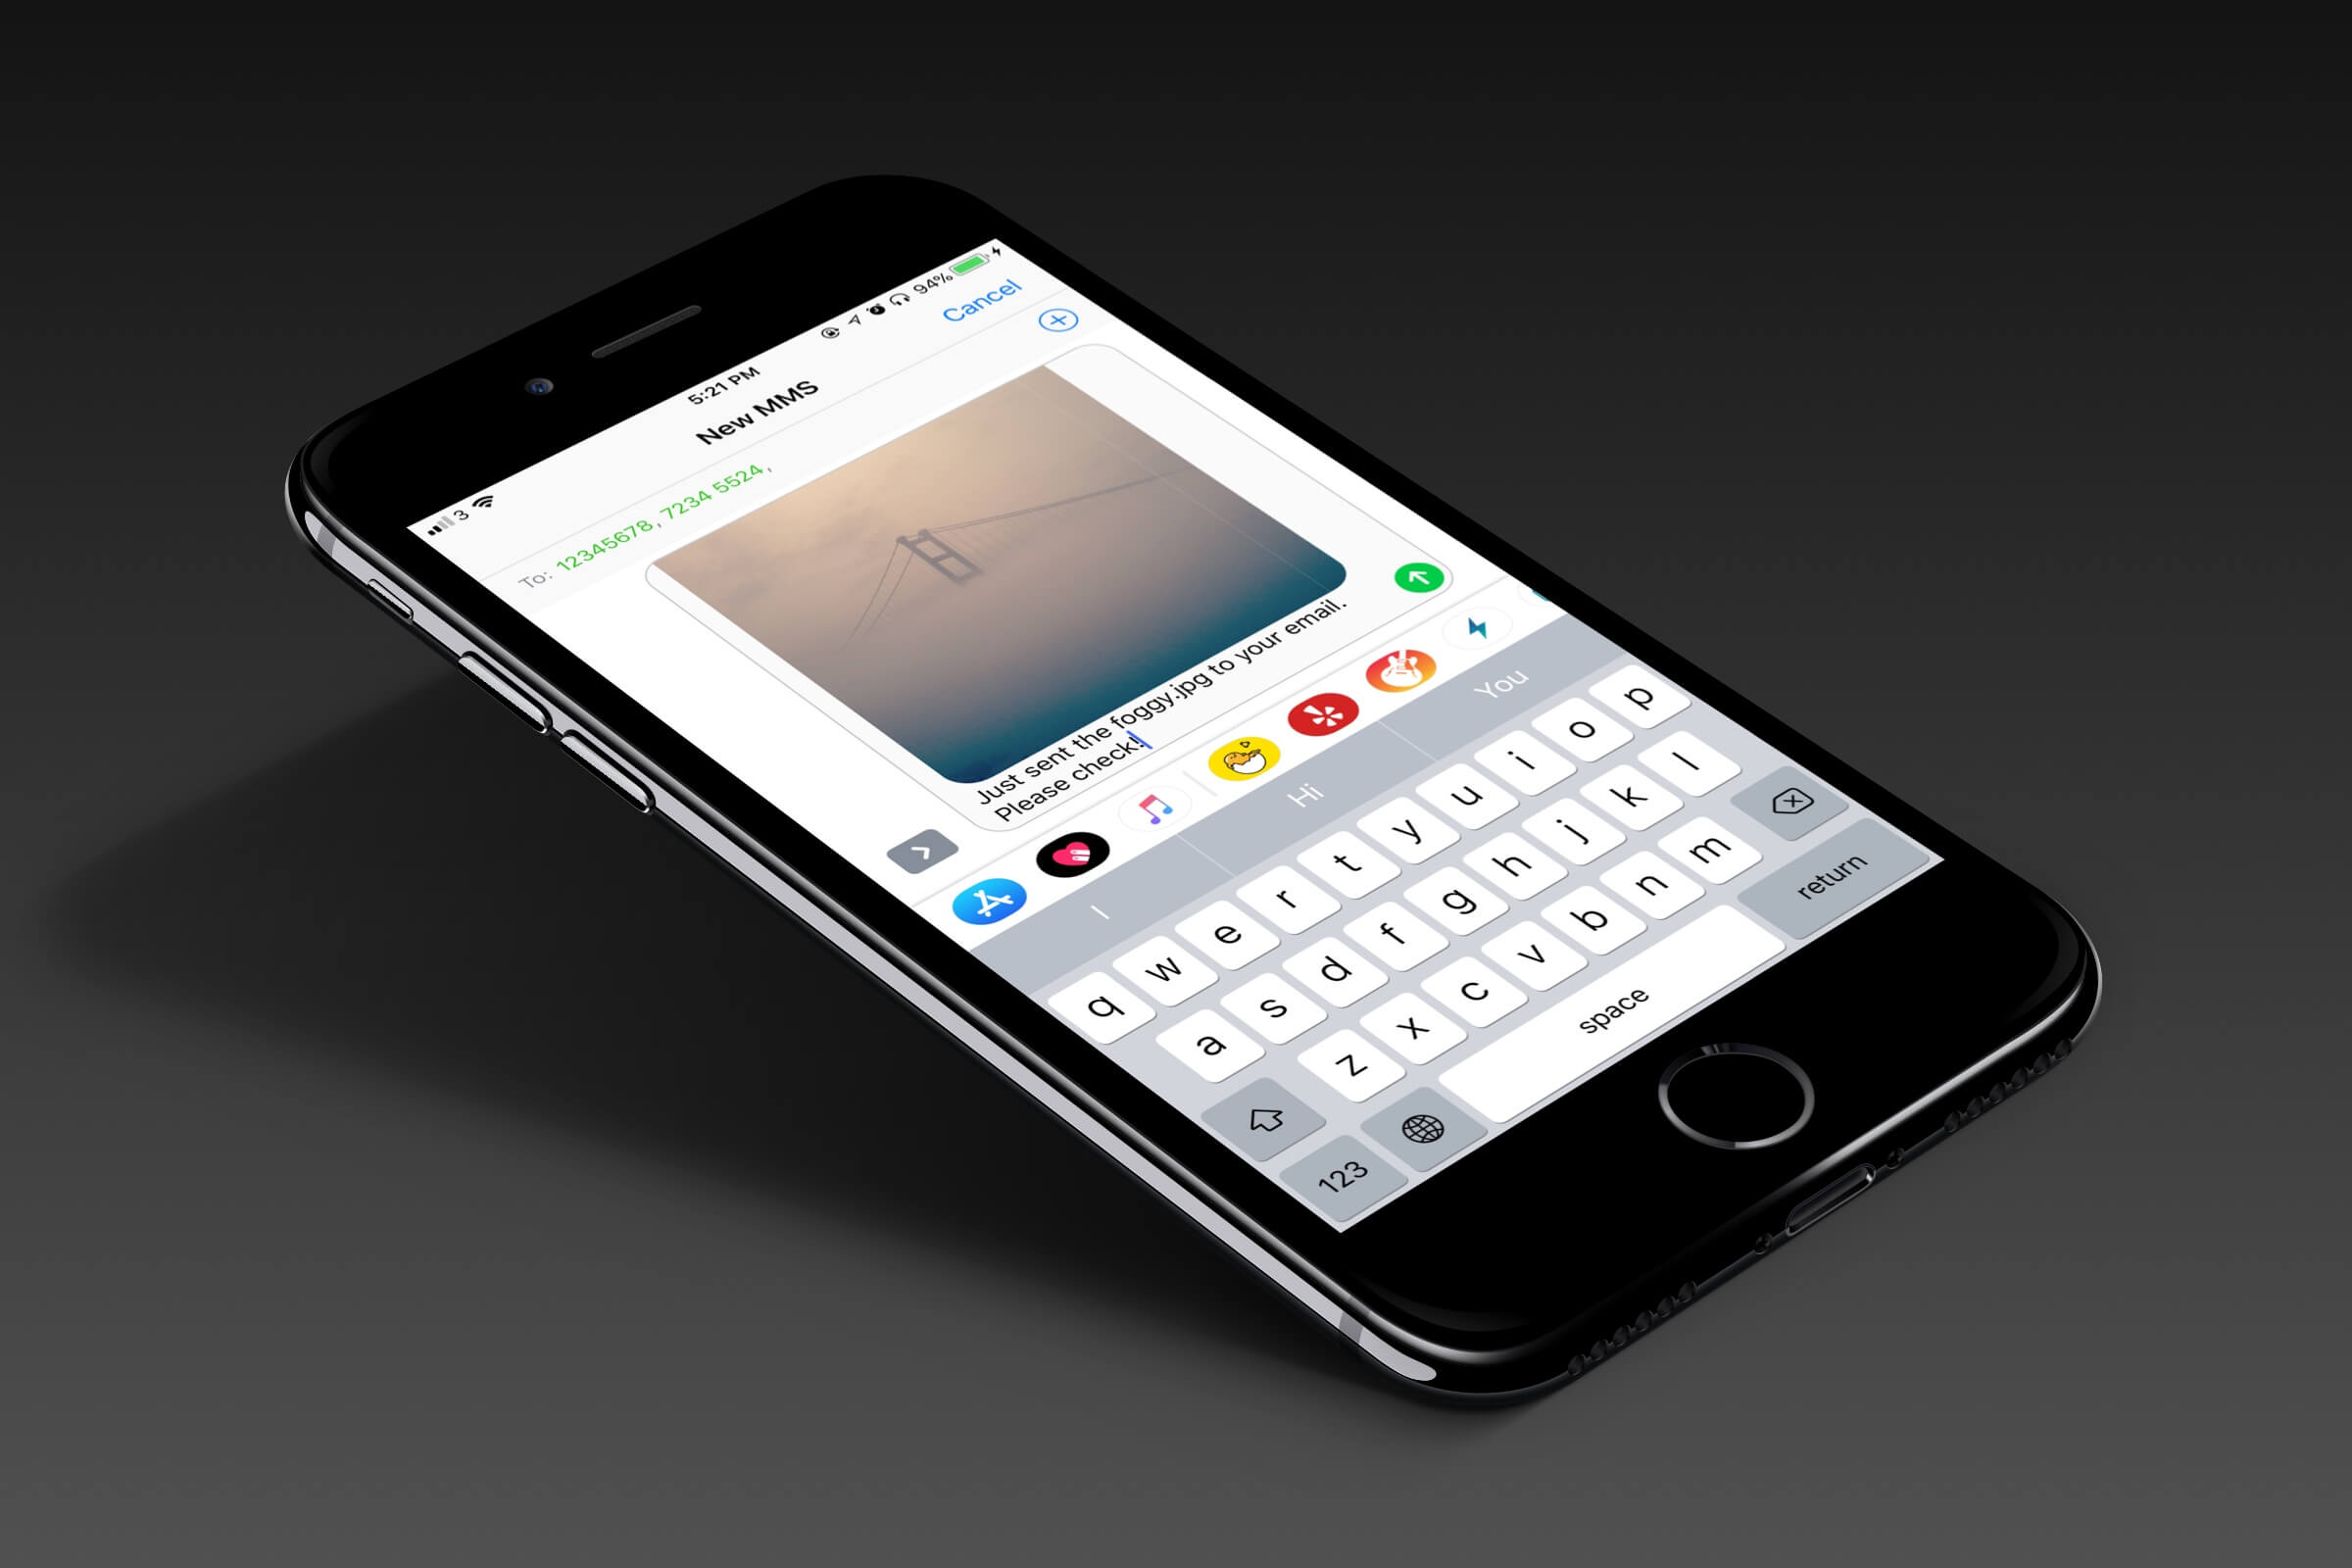
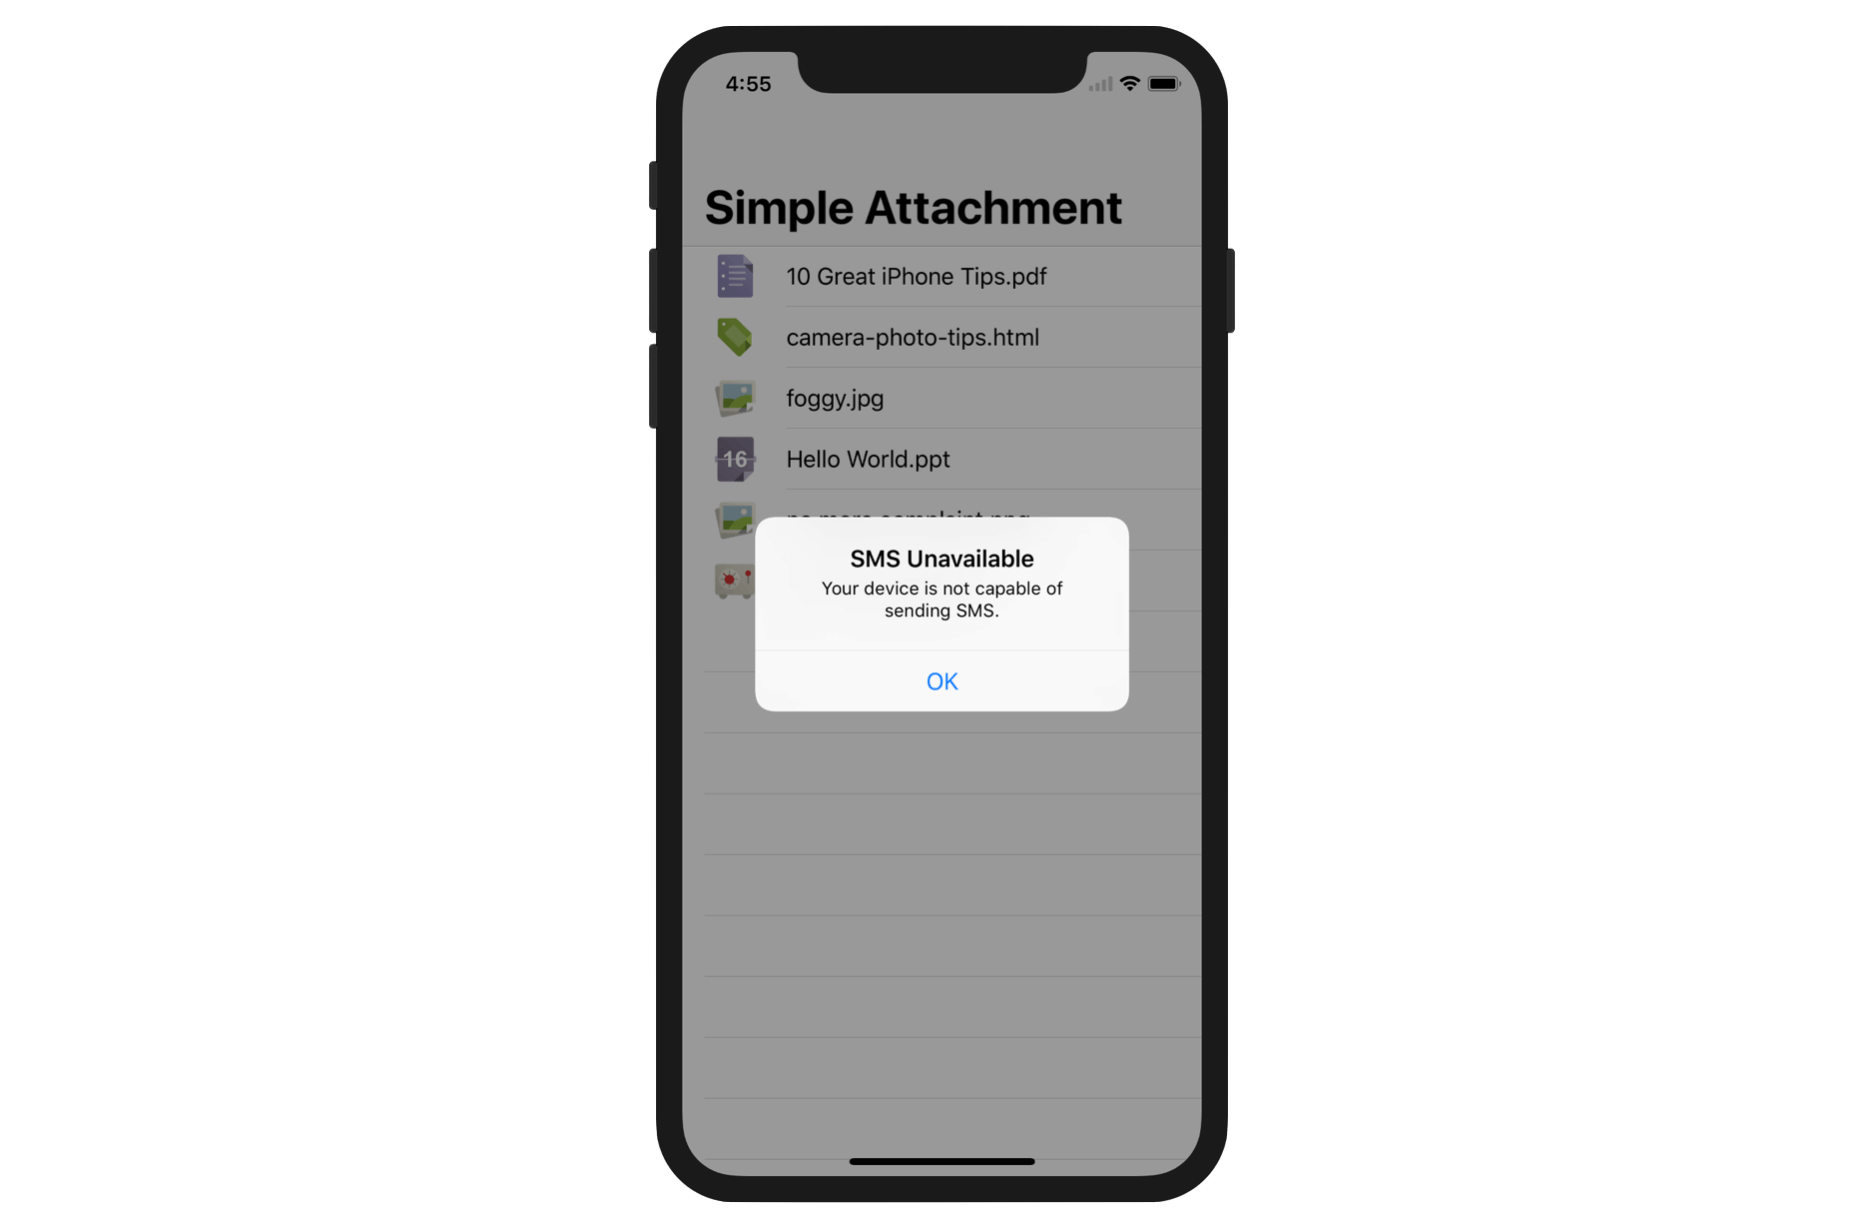
func sendSMS(attachment: String) {

    // Check if the device is capable of sending text message
    guard MFMessageComposeViewController.canSendText() else {
        let alertMessage = UIAlertController(title: "SMS Unavailable", message: "Your device is not capable of sending SMS.", preferredStyle: .alert)
        alertMessage.addAction(UIAlertAction(title: "OK", style: .default, handler: nil))
        present(alertMessage, animated: true, completion: nil)
        return
    }

    // Prefill the SMS
    let messageController = MFMessageComposeViewController()
    messageController.messageComposeDelegate = self
    messageController.recipients = ["12345678", "72345524"]
    messageController.body = "Just sent the \(attachment) to your email. Please check!"

    // Present message view controller on screen
    present(messageController, animated: true, completion: nil)
}
Though most of the iOS devices should be capable of sending a text message, you should be prepared for the exception. What if your app is used on an iPod touch with iMessages disabled or you're testing the app on the simulator? In this case, the device is not allowed to send a text message. So at the very beginning of the code, we verify whether or not the device is allowed to send text messages by using the canSendText method of MFMessageComposeViewController.
The rest of the code is very straightforward and similar to what we did in the previous chapter. We pre-populate the phone number of a couple of recipients in the text message and set the message body.
With the content ready, you can invoke present(_:animated:completion:) to bring up the message composer. That's it! Simple and easy.
Now, run the app and test it out. But please note you have to test the app on a real iOS device. If you use the simulator to run the app, it shows you an alert message.
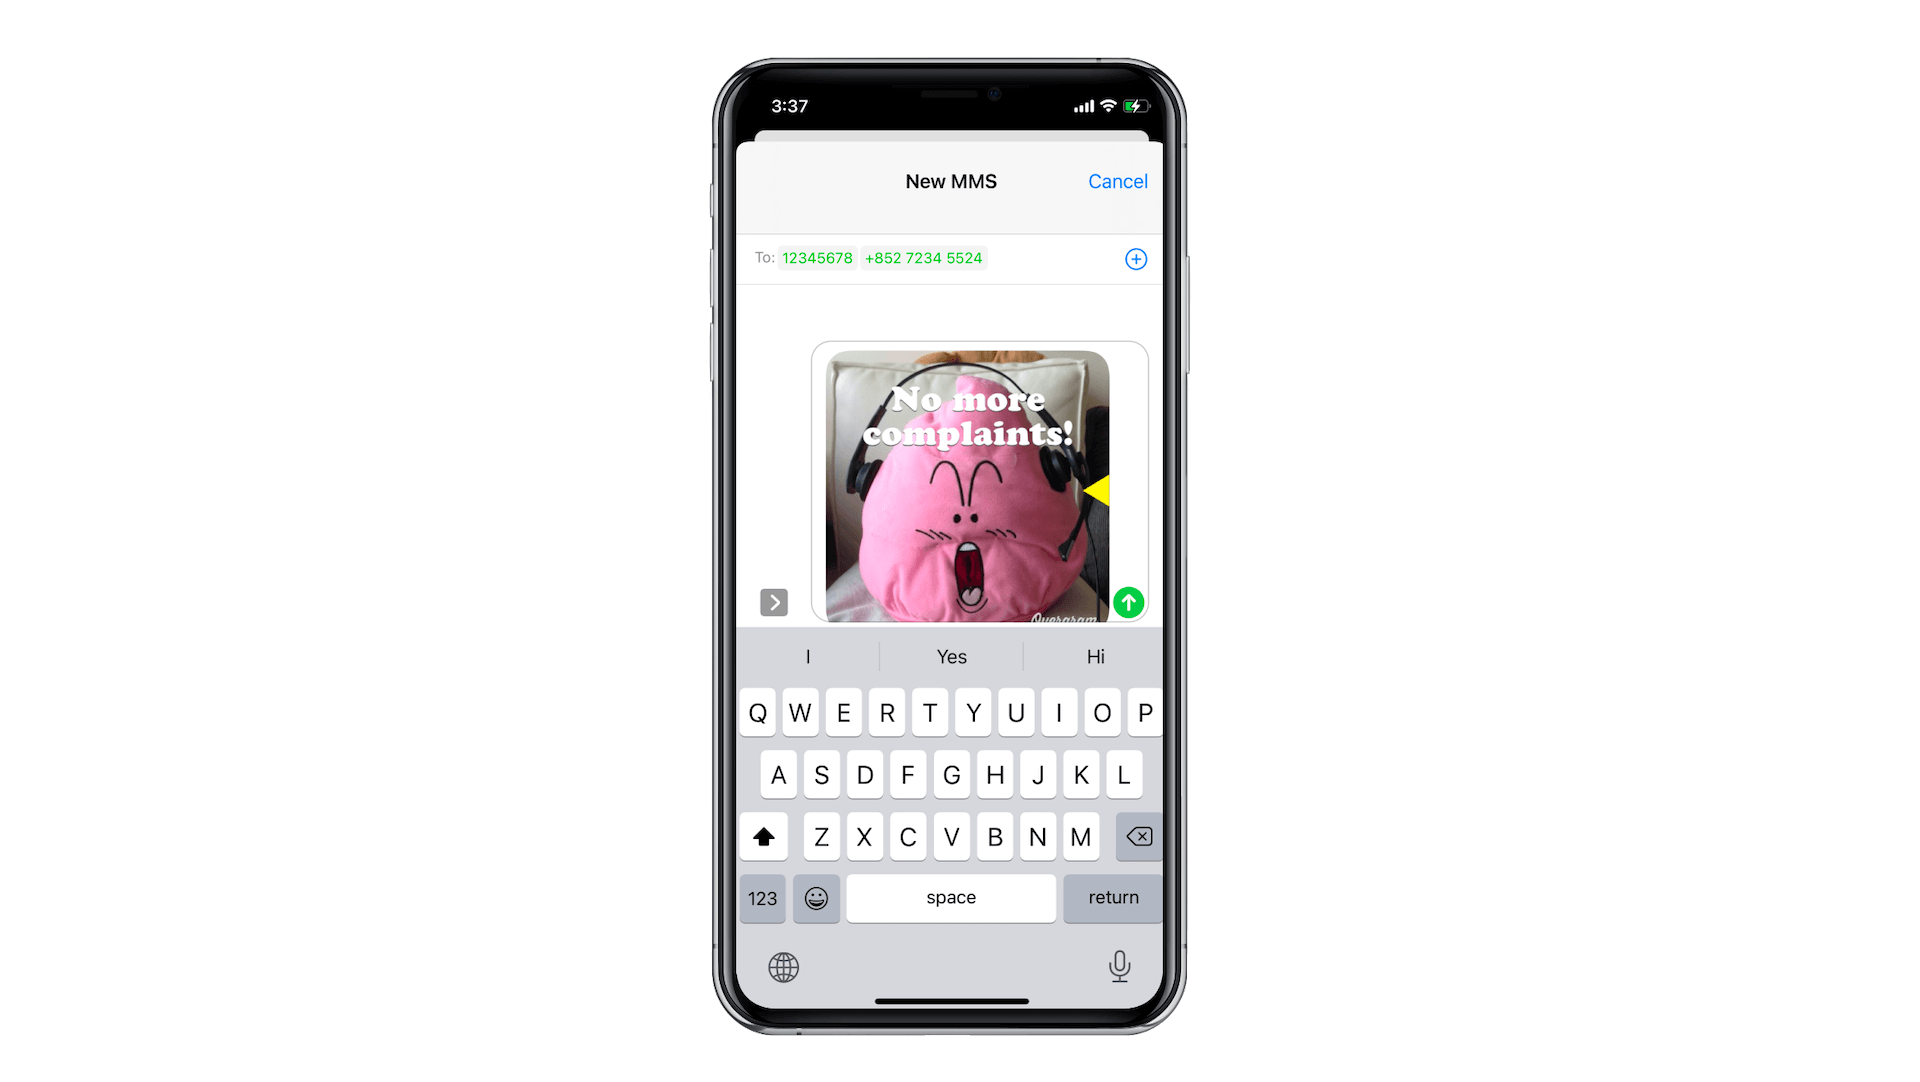
Sending MMS
Wait! The app can only send a text message. How about a file attachment? The MFMessageComposeViewController class also supports sending attachments via MMS. You can use the code below to attach a file.
// Adding file attachment
let fileparts = attachment.components(separatedBy: ".")
let filename = fileparts[0]
let fileExtension = fileparts[1]
let filePath = Bundle.main.path(forResource: filename, ofType: fileExtension)
let fileUrl = NSURL.fileURL(withPath: filePath!)
messageController.addAttachmentURL(fileUrl, withAlternateFilename: nil)
Just add the lines above in the sendSMS method and insert them before calling the present method. The code is self explanatory. We get the selected file and retrieve the actual file path using the path(forResource:ofType:) method of Bundle. Lastly, we add the file using the addAttachmentURL(_:withAlternateFilename:) method.
Quick note: I have explained the code snippet in details before. Please refer to the previous chapter for details.
What if You Don't Want In-App SMS
The above implementation provides a seamless integration of the SMS feature in your app. What if you just want to redirect to the default Messages app and send a text message? It's even simpler. You can do that by using a single line of code:
if let messageUrl = URL(string: "sms:123456789&body=Hello") {
    UIApplication.shared.open(messageUrl, options: [:], completionHandler: nil)
}
In iOS, you're allowed to communicate with other apps using a URL scheme. The mobile OS already comes with built-in support of the http, mailto, tel, and sms URL schemes. When you open an HTTP URL, iOS by default launches it using Safari. If you want to open the Messages app, you can use the SMS URL scheme and specify the recipient. Optionally, you can specify the default content in the body parameter.
Wrap Up
In this chapter, I showed you a simple way to send a text message within an app. For reference, you can download the full source code from http://www.appcoda.com/resources/swift55/SMSDemo.zip.