- Made by AppCoda
- Contact us / Support
- Tweet this book
- Preface
- 1. Building Adaptive User Interfaces
- 2. Creating Table View Sections and Index list with Diffable Data Source
- 3. Animating Table View Cells
- 4. Working with JSON and Codable
- 5. How to Integrate the Twitter and Facebook SDK for Social Sharing
- 6. Working with Email and Attachments
- 7. Sending SMS and MMS Using MessageUI Framework
- 8. How to Get Direction and Draw Route on Maps
- 9. Search Nearby Points of Interest Using Local Search
- 10. Audio Recording and Playback
- 11. Scan QR Code Using AVFoundation Framework
- 12. Working with URL Schemes
- 13. Building a Full Screen Camera with Gesture-based Controls
- 14. Video Capturing and Playback Using AVKit
- 15. Displaying Banner Ads using Google AdMob
- 16. Working with Custom Fonts
- 17. Working with AirDrop, UIActivityViewController and Uniform Type Identifiers
- 18. Building Grid Layouts Using Collection Views and Diffable Data Source
- 19. Interacting with Collection Views
- 20. Adaptive Collection Views Using UITraitCollection and Compositional Layout
- 21. Building a Weather Widget Using WidgetKit
- 22. Building Slide Out Sidebar Menus Using Objective-C Libraries
- 23. View Controller Transitions and Animations
- 24. Building a Slide Down Menu
- 25. Self Sizing Cells and Dynamic Type
- 26. XML Parsing, RSS and Expandable Table View Cells
- 27. Applying a Blurred Background Using UIVisualEffect
- 28. Using Touch ID and Face ID For Authentication
- 29. Building a Carousel-Like User Interface
- 30. Working with Parse
- 31. Parsing CSV and Preloading a SQLite Database Using Core Data
- 32. Connecting Multiple Annotations with Polylines and Routes
- 33. Using CocoaPods in Swift Projects
- 34. Building a Simple Sticker App
- 35. Building iMessage Apps Using Messages Framework
- 36. Building Custom UI Components Using IBDesignable and IBInspectable
- 37. Using Firebase for User Authentication
- 38. Google and Facebook Authentication Using Firebase
- 39. Using Firebase Database and Storage to Build an Instagram-like App
- 40. Building a Real-time Image Recognition App Using Core ML
- 41. Building AR Apps with ARKit and SpriteKit
- 42. Working with 3D Objects in Augmented Reality Using ARKit and SceneKit
- 43. Use Create ML to Train Your Own Machine Learning Model for Image Recognition
- 44. Building a Sentiment Classifier Using Create ML to Classify User Reviews
- 45. Working with Image Tracking Using ARKit
- Published with GitBook
Chapter 30
Working with Parse as Mobile Backends

Some of your apps may need to store data on a server. Take the TripCard app that we developed in the previous chapter as an example. The app stored the trip information locally using an array. If you were building a real-world app, you would not keep the data in that way. The reason is quite obvious: You want the data to be manageable and updatable without re-releasing your app on App Store. The best solution is put your data onto a backend server that allows your app to communicate with it in order to get or update the data. Here you have several options:
- You can come up with your own home-brewed backend server, plus server-side APIs for data transfer, user authentication, etc.
- You can use CloudKit (which was introduced in iOS 8) to store the data in iCloud.
- You can make use of a third-party Backend as a Service provider (BaaS) to manage your data.
The downside of the first option is that you have to develop the backend service on your own. This requires a different skill set and a huge amount of work. As an iOS developer, you may want to focus on app development rather than server side development. This is one of the reasons why Apple introduced CloudKit, which makes developers' lives easier by eliminating the need to develop their own server solutions. With minimal setup and coding, CloudKit empowers your app to store data (including structured data and assets) in its new public database, where the shared data would be accessible by all users of the app. CloudKit works pretty well and is very easy to integrate (note: it is covered in the Beginning iOS Programming with Swift book). However, CloudKit is only available for iOS. If you are going to port your app to Android that utilizes the shared data, CloudKit is not a viable option.
Parse is one of the BaaS that works across nearly all platforms including iOS, Android, Windows phone and web application. By providing an easy-to-use SDK, Parse allows iOS developers to easily manage the app data on the Parse cloud. This should save you development costs and time spent creating your own backend service. The service is free (with limits) and quick to set up.
If you haven't heard of Parse, it is better to understand its history.
Parse was acquired by Facebook in late April 2013. Since then, it has grown into one of the most popular mobile backends. Unfortunately, Facebook considered to shut down the service and no longer provides the Parse cloud to developers. For now, you can still use Parse as your mobile backend. It comes down to these two solutions:
- Install and host your own Parse servers - Although the Parse's hosted service will be retired on January 28, 2017, Facebook released an open source version of the Parse backend called Parse Server. Now everyone can install and host their own Parse servers on AWS and Heroku. The downside of this approach is that you will have to manage the servers yourself. For indie developers or those who do not have any backend management experience, this is not a perfect option.
- Use Parse hosting service - Some companies such as SashiDo.io and Back4App now offers managed Parse servers. In other words, they help you install the Parse servers, and host them for you. You do not need to learn AWS/Heroku or worry about the server infrastructure. These companies just manage the Parse cloud servers for you. It is very similar to the Parse hosted backend provided by Facebook but delivered by third-party companies. In this tutorial, I will use Back4App's Parse hosting service, simply because it is free to use. After you understand how
In this chapter, I will walk you through the integration process of Parse using Back4app. We will use the TripCard app as a demo and see how to put its trip data onto the Parse cloud. To begin with, you can download the TripCard project from http://www.appcoda.com/resources/swift55/ParseDemoStarter.zip.
If you haven't read chapter 29, I highly recommend you to check it out first. It will be better to have some basic understandings of the demo app before you move on.
I hope I have made everything clear. Let's get started.
Creating Your App on Parse
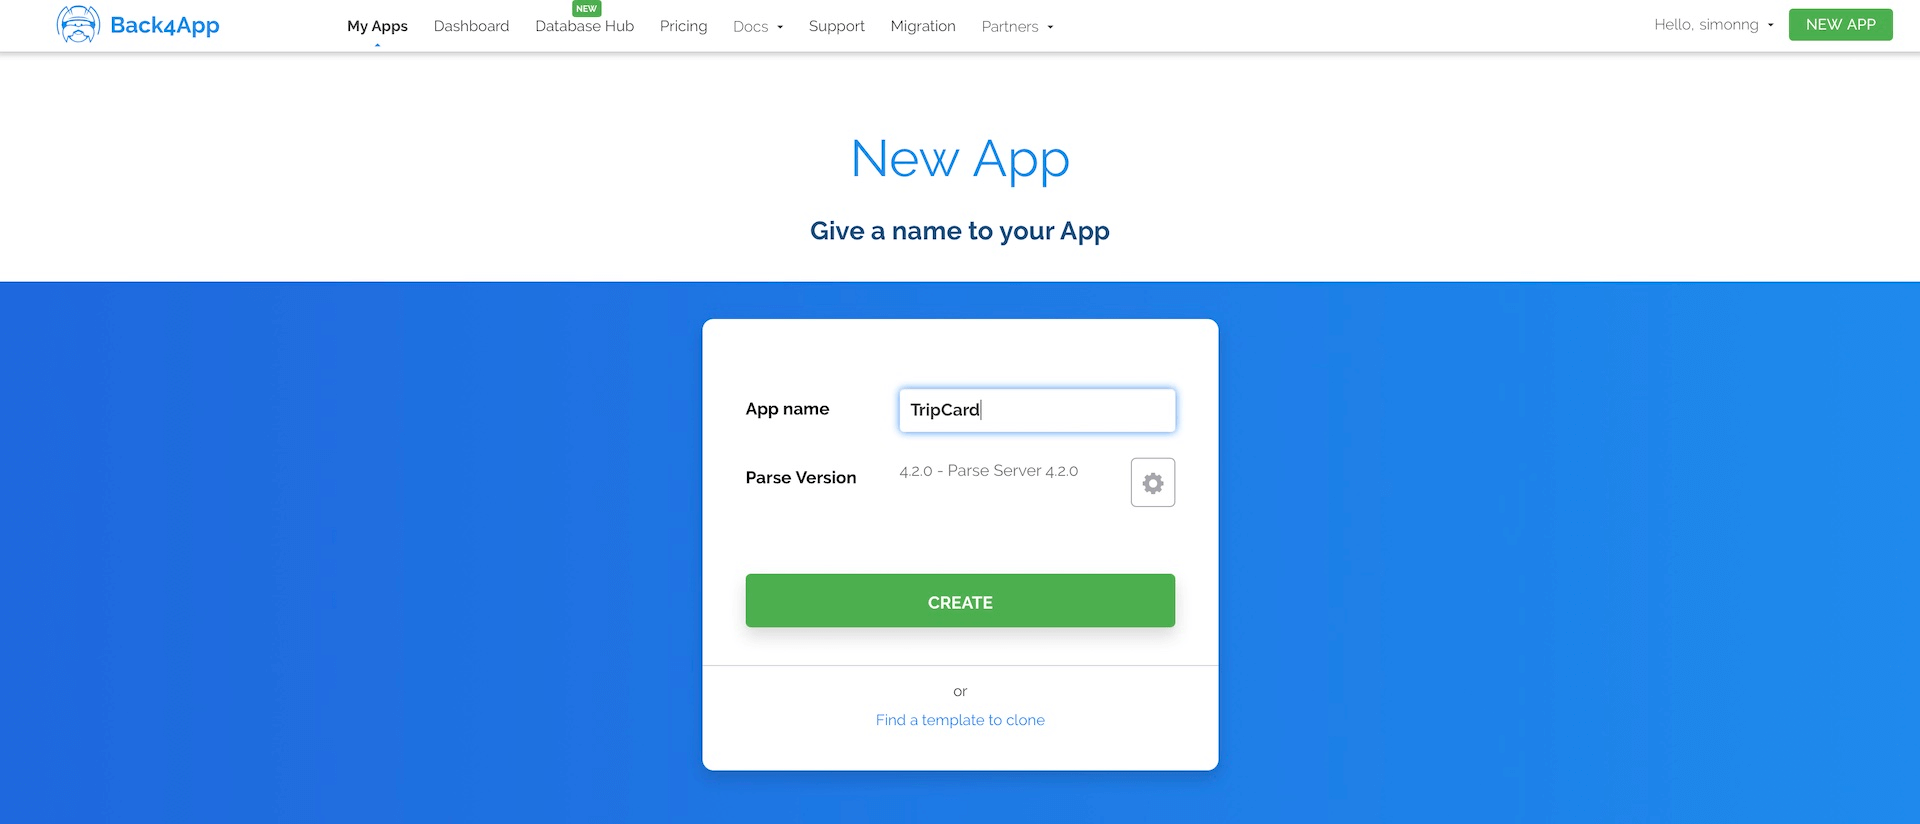
First, you have to sign up for a free account on http://back4app.com. Once you sign up the account, you'll be brought to a dashboard. From there, click the Build new app button to create a new application. Simply use TripCard as the app name and click Create.
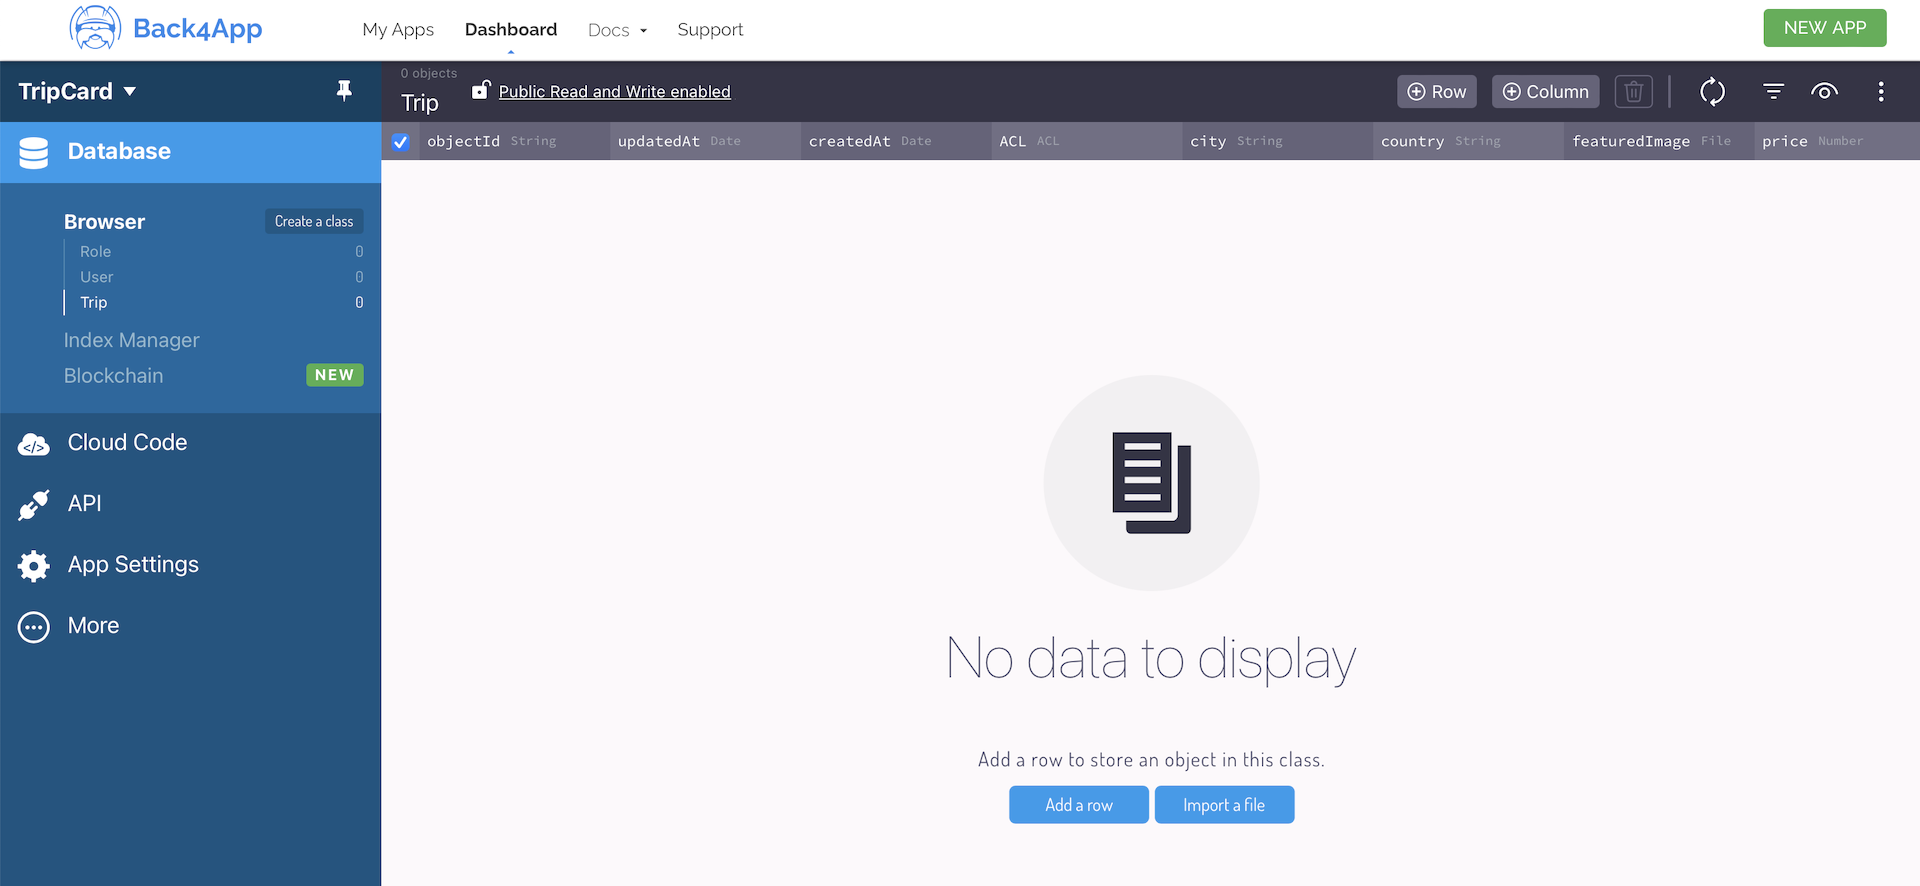
Once the app is created, you will be brought to the Database screen. That said, like the Parse cloud, Back4app offers various backend services including app template, and push notification.
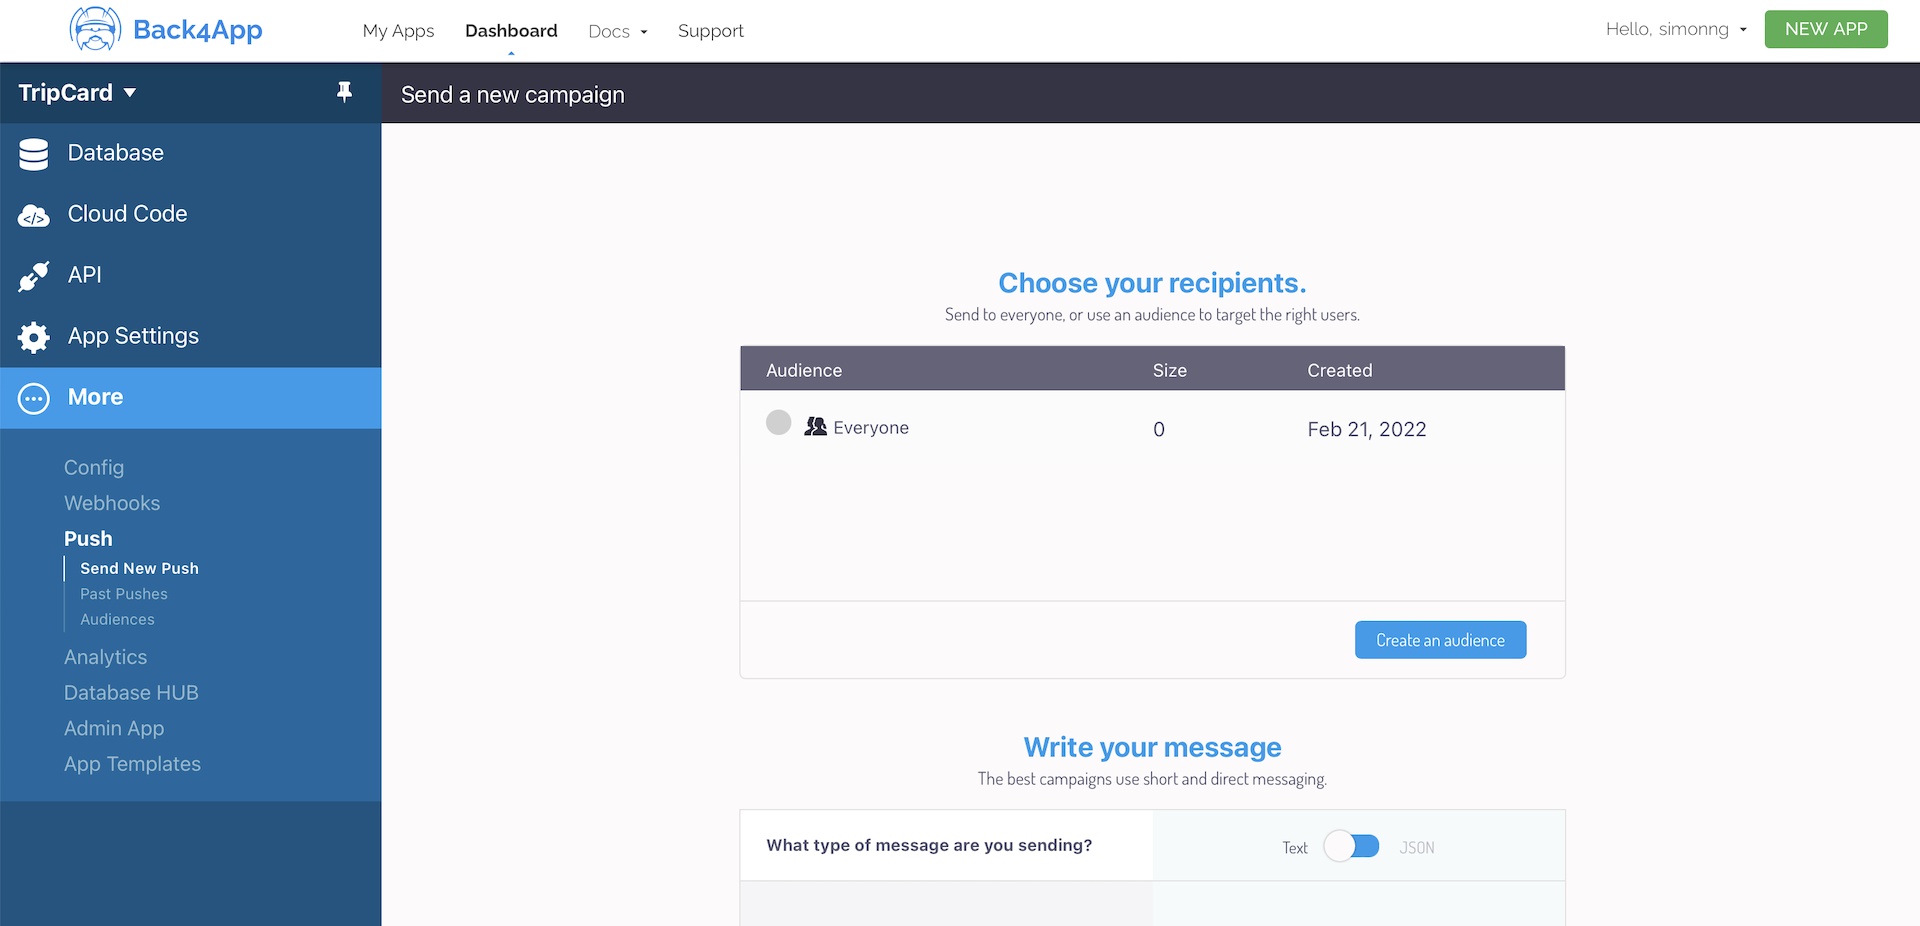
What we will focus on in this chapter is the Database service. To manage the data of your Parse app, click Database to access the Parse dashboard.
Setting up Your Data
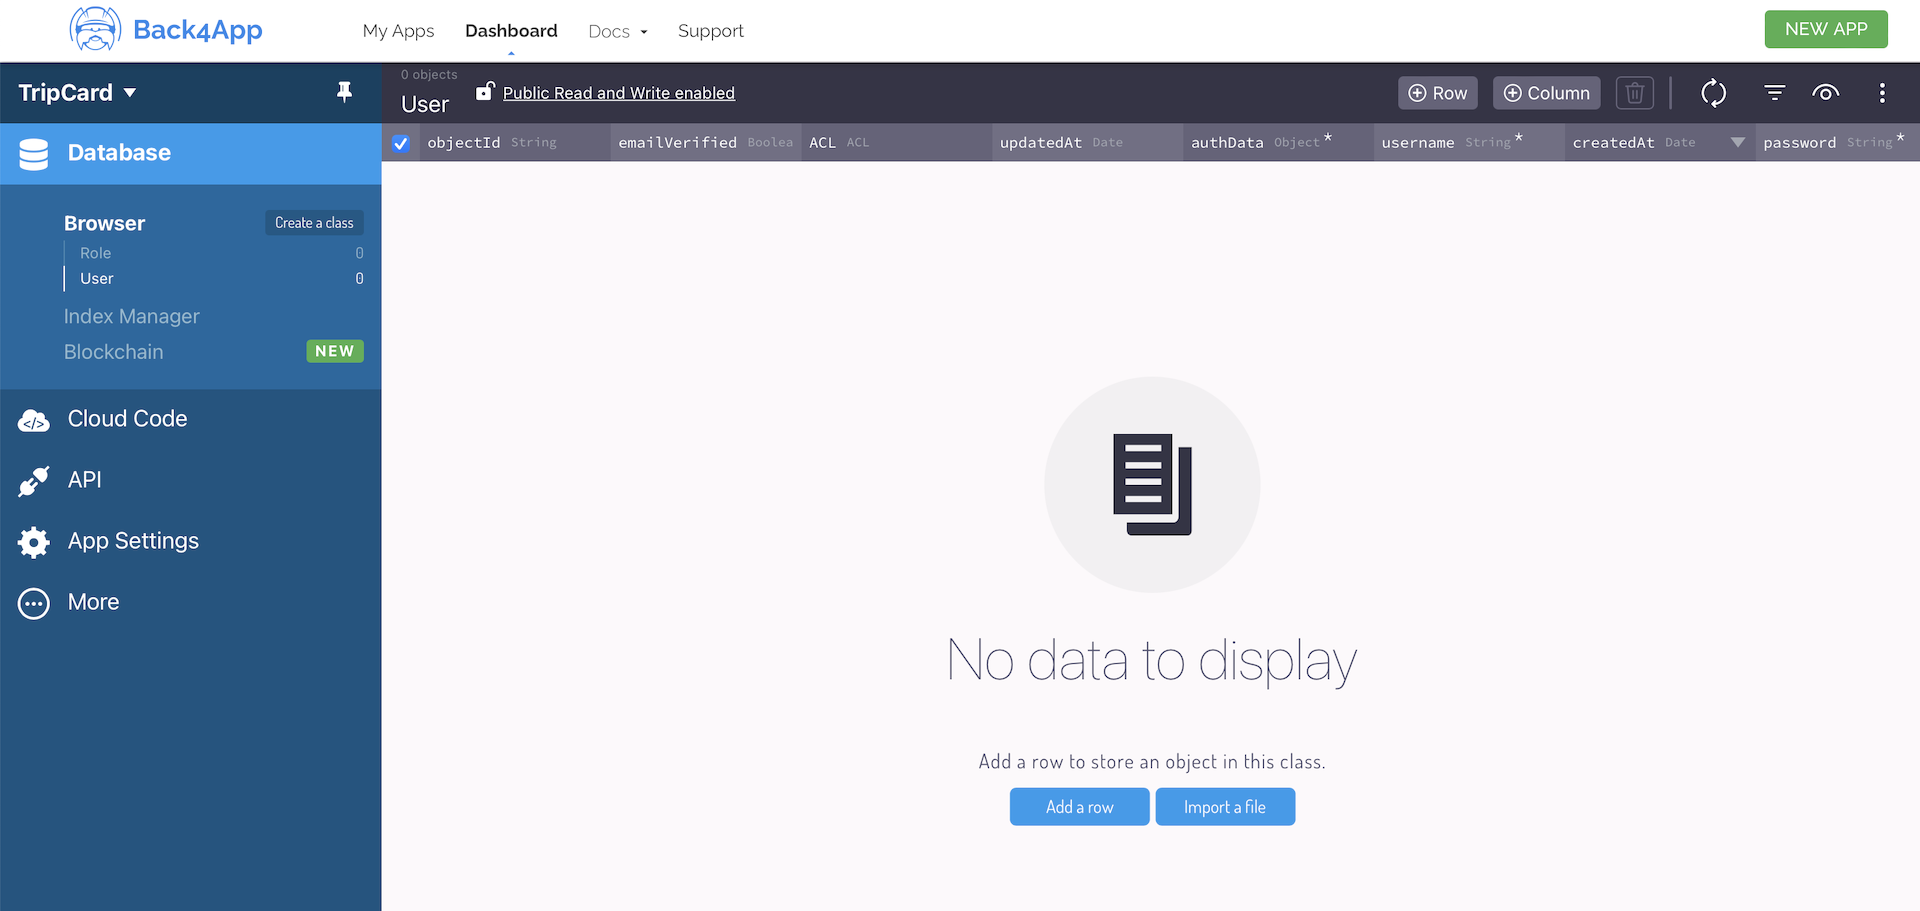
The Parse dashboard lets developers manage their Parse app and data in a graphical UI. By default, the data browser shows no data. It is quite obvious because you do not have any data in the TripCard app.
You will need to create and upload the trip data manually. Before that, however, you will have to define a Trip class in the data browser. The Trip class defined in Parse is the cloud version of the counterpart class that we have declared in our code. Each property of the class (e.g. city) will be mapped to a table column of the Trip class defined in Parse.
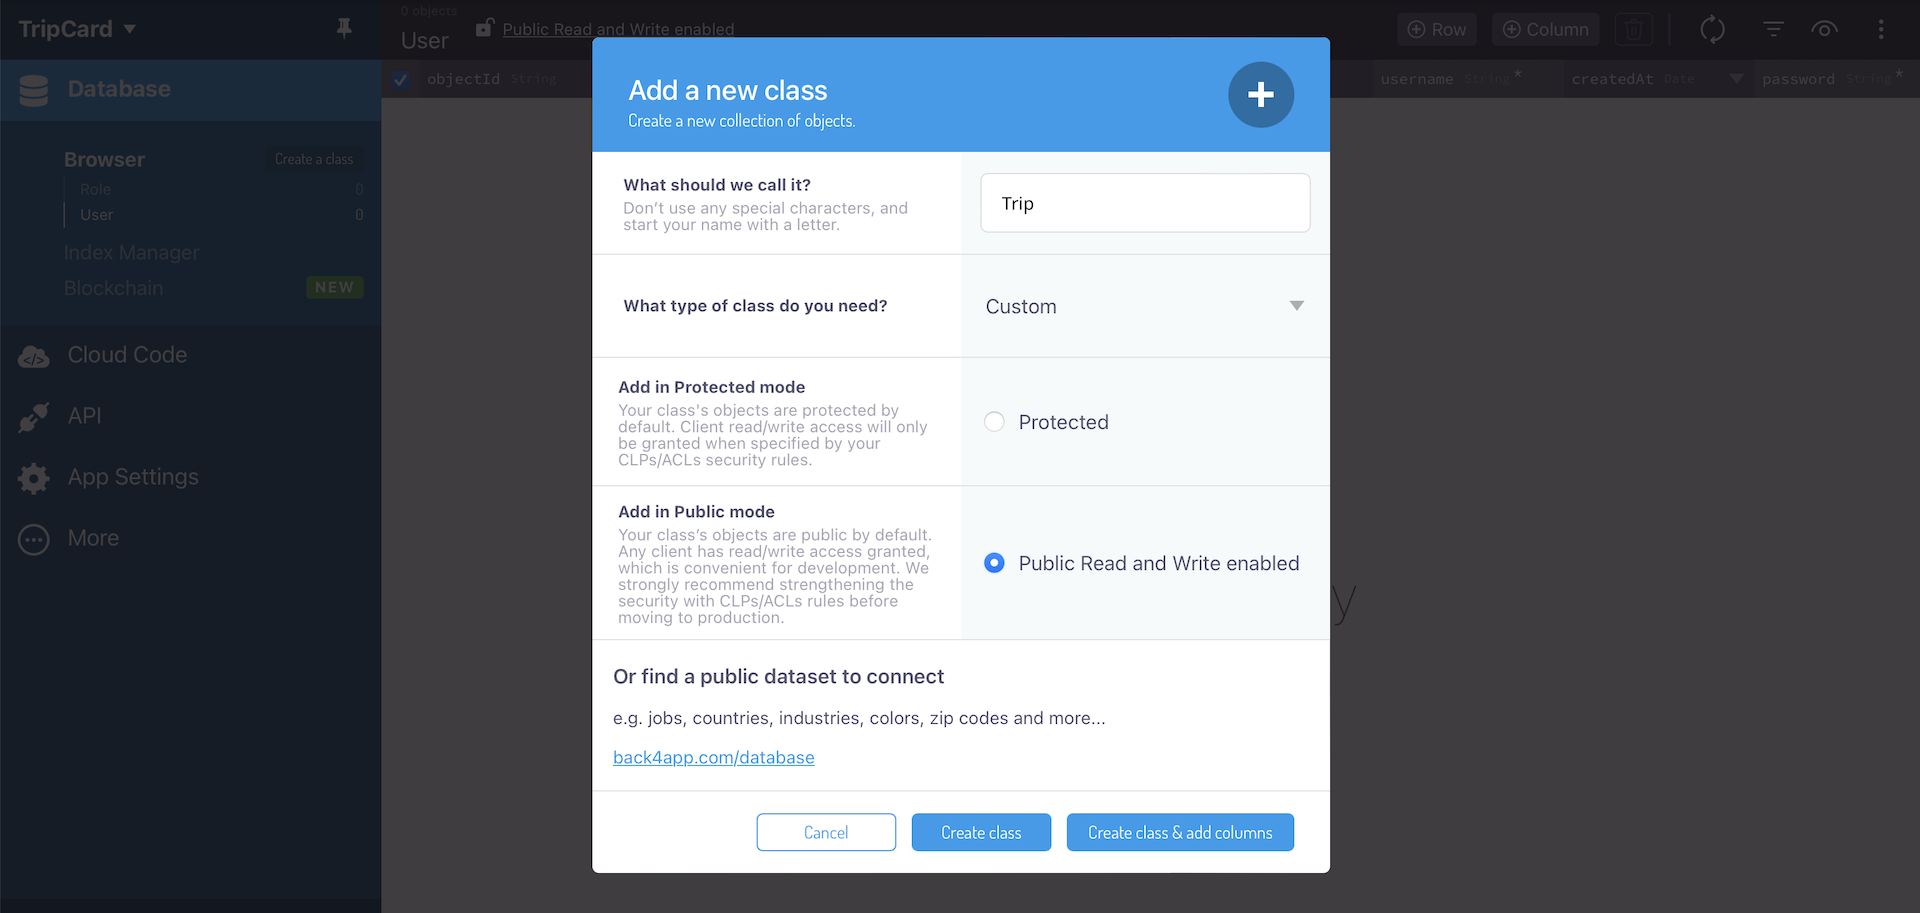
Now click the Create a class button on the side menu to create a new class. Set the name to Trip, type to Custom, and enable Public Read and Write. Then click Create class to proceed. Once created, you should see the class under the Browser section of the sidebar menu.
In the TripCard app, a trip consists of the following properties:
- Trip ID
- City
- Country
- Featured image
- Price
- Total number of days
- isLiked
With the exception of the trip ID, each of the properties should be mapped to a corresponding column of the Trip class in the data browser. Select the Trip class and click the Add a new column button to add a new column.
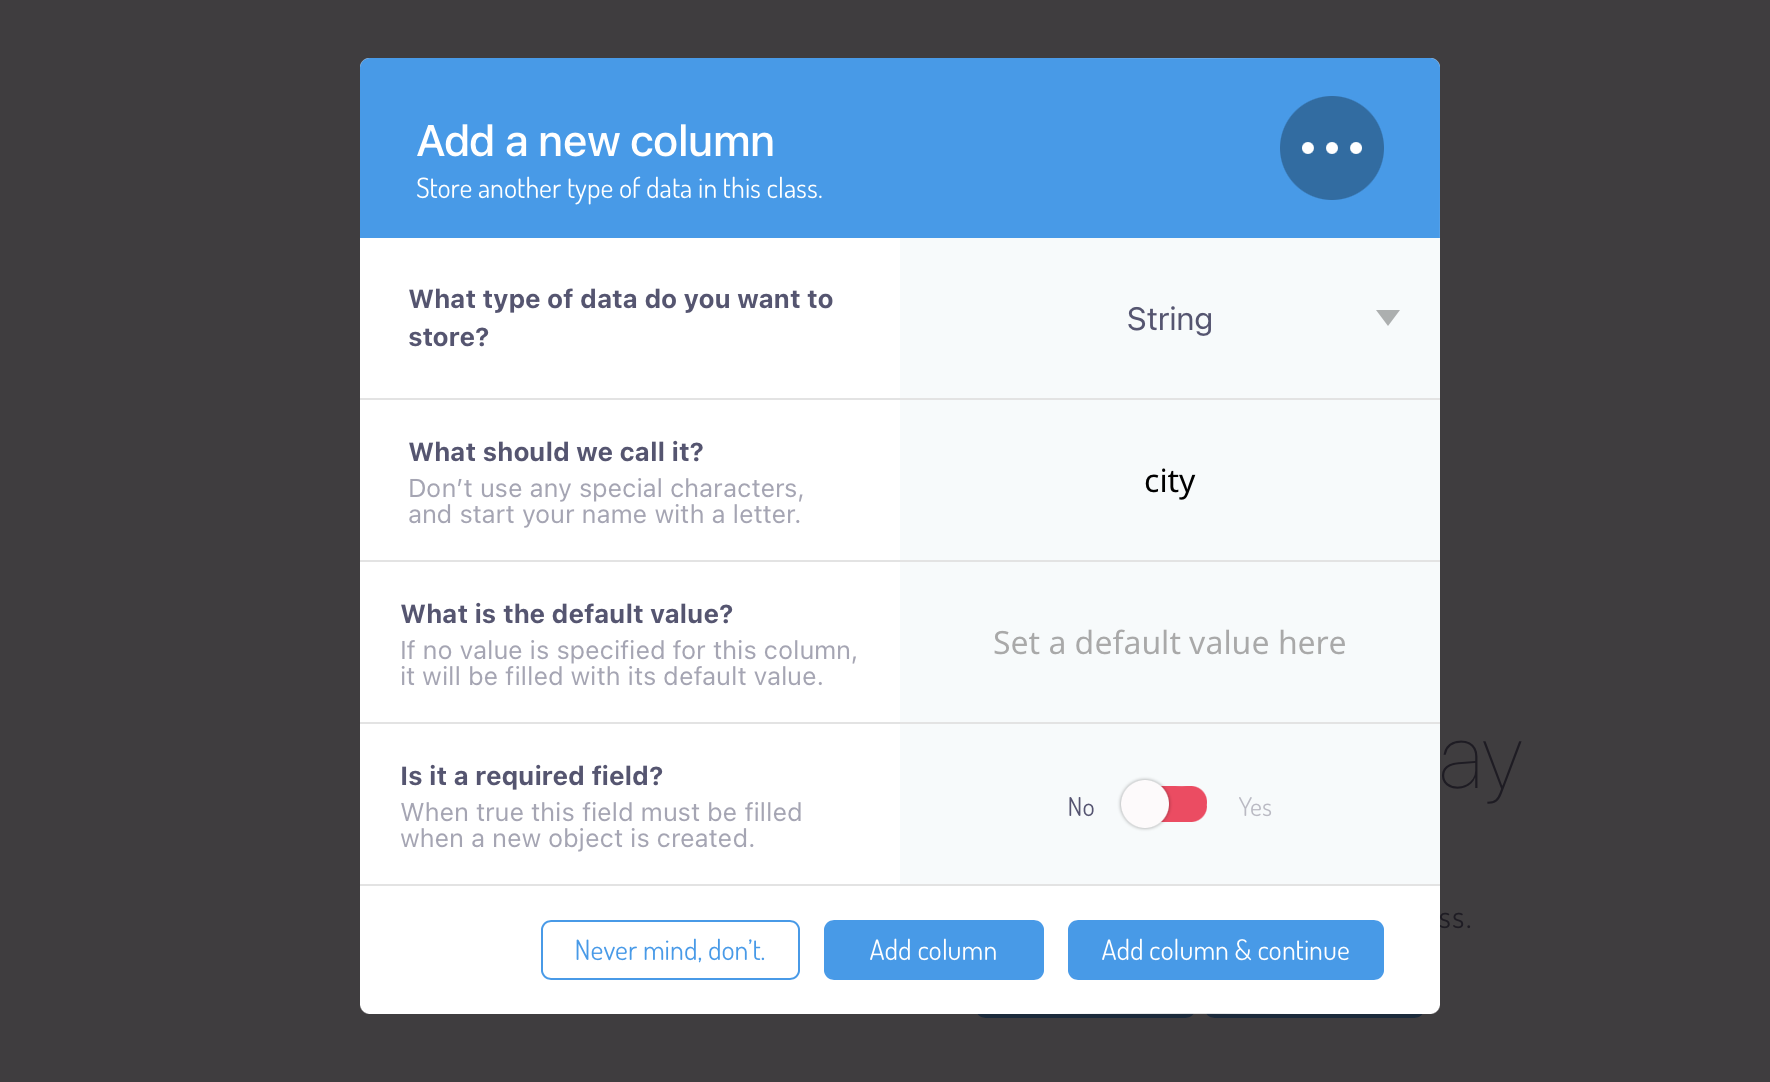
When prompted, set the column name to city and type to String. Repeat the above procedures to add the rest of properties with the following column names and types:
- Country: Set the column name to
countryand type toString. - Featured image: Set the column name to
featuredImageand type toFile. TheFiletype is used for storing binary data such as image. - Price: Set the column name to
priceand type toNumber. Optionally, you can set the default value to0. - Total number of days: Set the column name to
totalDaysand type toNumber. Optionally, you can set the default value to0. - isLiked: Set the column name to
isLiked, type toBoolean, and the default value tofalse.
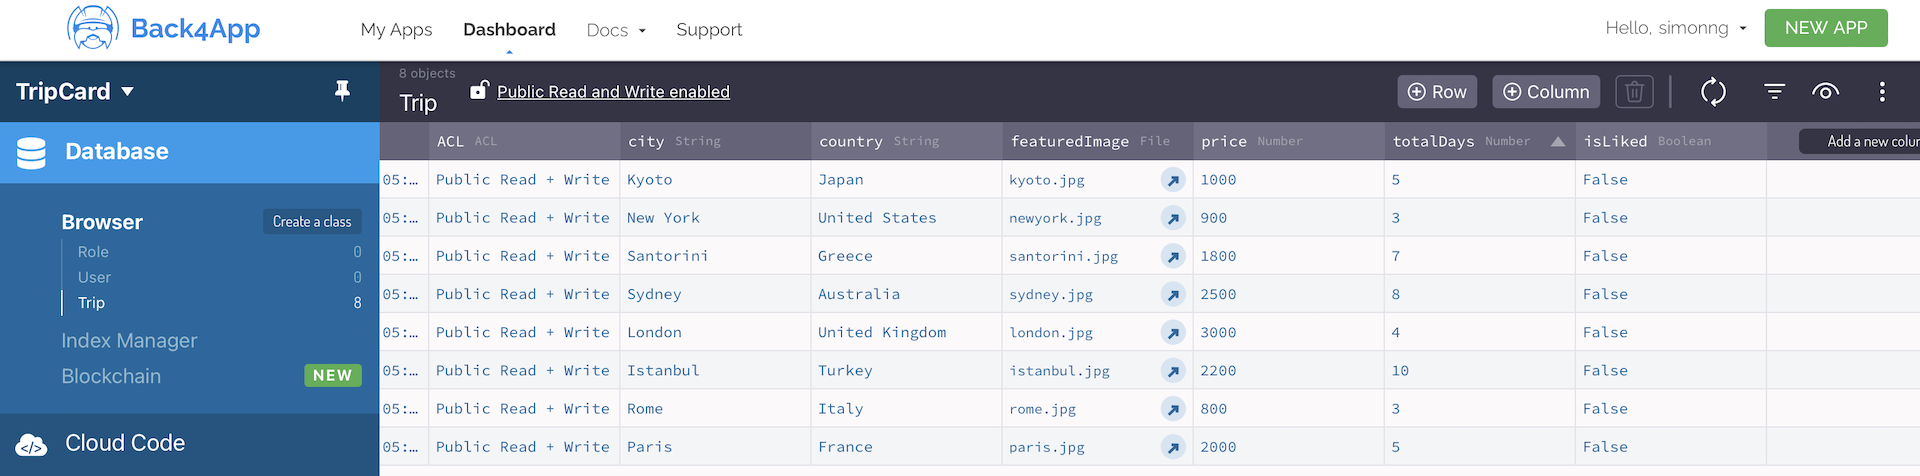
Once you have added the columns, your table should look similar to the screenshot below.
You may wonder why we do not create a column for the trip ID. As you can see from the table, there is a default column named objectId. For each new row (or object), Parse automatically generates a unique ID. We will simply use this ID as the trip ID.

You may also be wondering how we can convert the data stored in the Parse cloud to objects in our code? The Parse SDK is smart enough to handle the translation of native types. For instance, if you retrieve a String type from Parse, it will be translated into a String object in the app. We will discuss this in details later.
Now let's add some trip data into the data browser.
Click the Add a Row button to create a new row. Each row represents a single Trip object. You only need to upload the image of a trip and fill in the city, country, price, totalDays and isLiked columns. For the objectId, createdAt and updatedAt columns, the values will be generated by Parse.
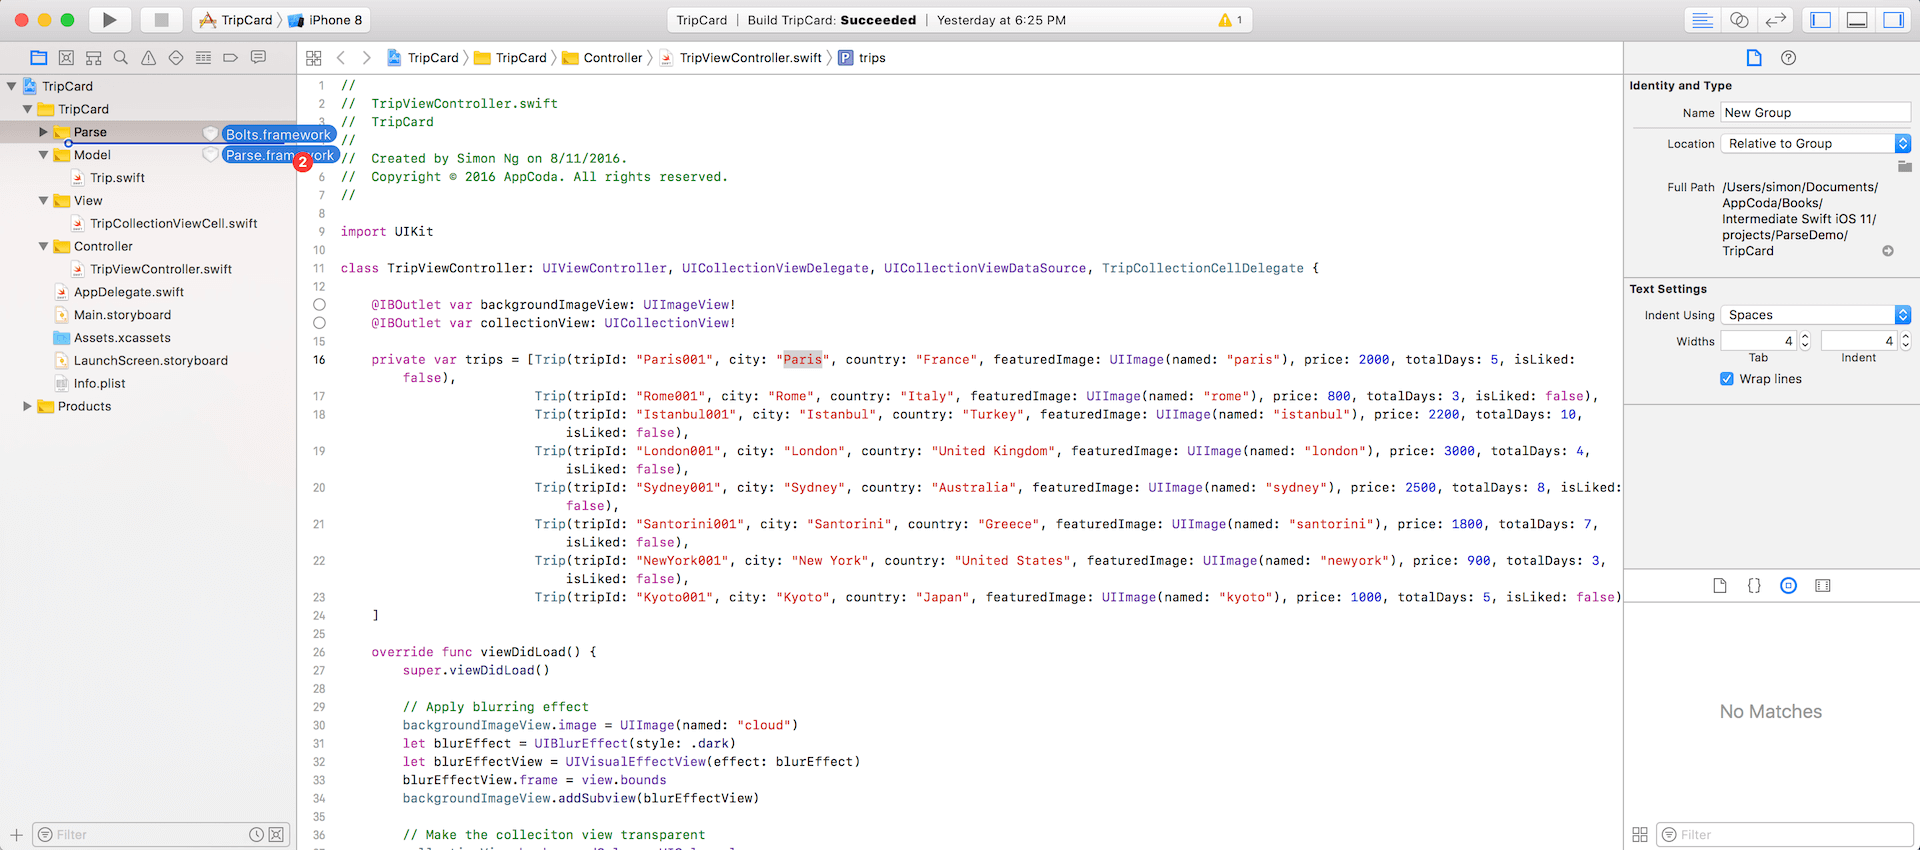
If you look into TripViewController.swift, the trips array is defined as follows:
private var trips = [Trip(tripId: "Paris001", city: "Paris", country: "France", featuredImage: UIImage(named: "paris"), price: 2000, totalDays: 5, isLiked: false),
Trip(tripId: "Rome001", city: "Rome", country: "Italy", featuredImage: UIImage(named: "rome"), price: 800, totalDays: 3, isLiked: false),
Trip(tripId: "Istanbul001", city: "Istanbul", country: "Turkey", featuredImage: UIImage(named: "istanbul"), price: 2200, totalDays: 10, isLiked: false),
Trip(tripId: "London001", city: "London", country: "United Kingdom", featuredImage: UIImage(named: "london"), price: 3000, totalDays: 4, isLiked: false),
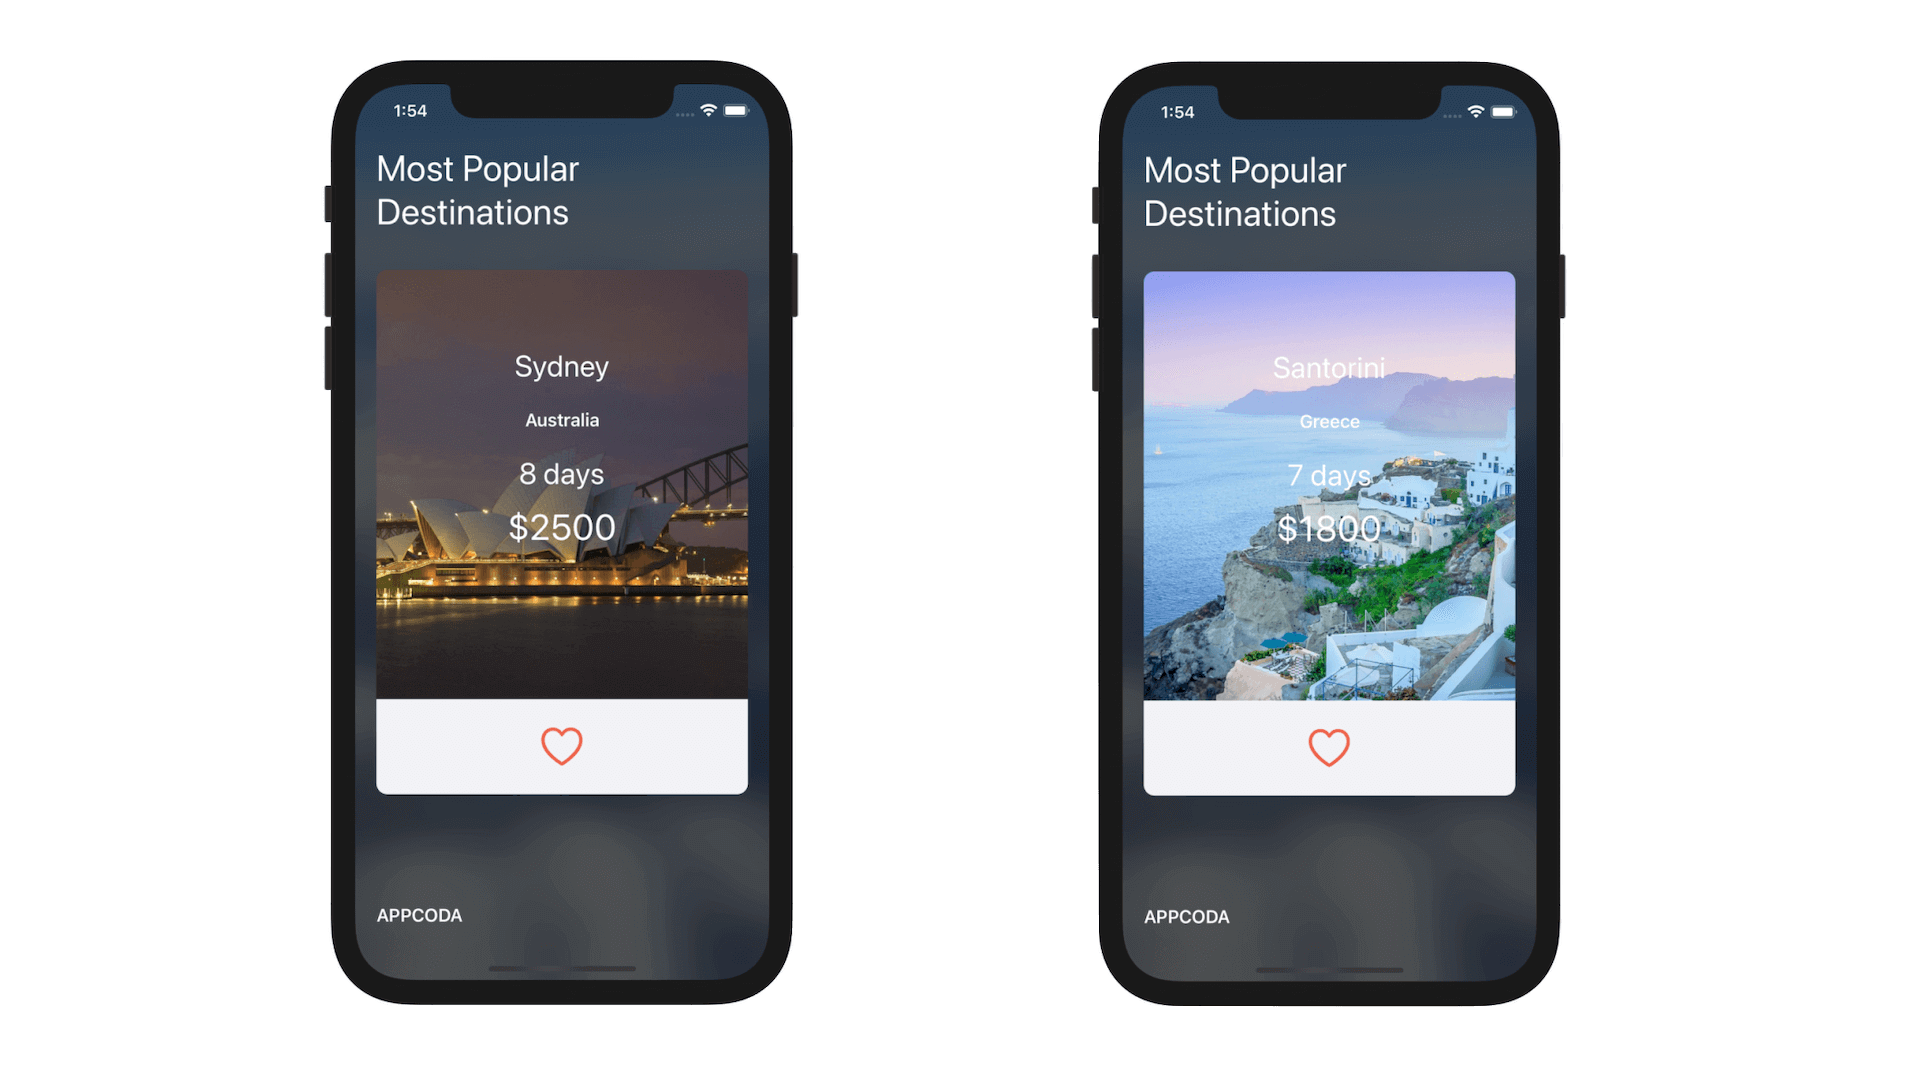
Trip(tripId: "Sydney001", city: "Sydney", country: "Australia", featuredImage: UIImage(named: "sydney"), price: 2500, totalDays: 8, isLiked: false),
Trip(tripId: "Santorini001", city: "Santorini", country: "Greece", featuredImage: UIImage(named: "santorini"), price: 1800, totalDays: 7, isLiked: false),
Trip(tripId: "NewYork001", city: "New York", country: "United States", featuredImage: UIImage(named: "newyork"), price: 900, totalDays: 3, isLiked: false),
Trip(tripId: "Kyoto001", city: "Kyoto", country: "Japan", featuredImage: UIImage(named: "kyoto"), price: 1000, totalDays: 5, isLiked: false)
]
To put the first item of the array into Parse, fill in the values of the row like this:

This is very straightforward. We just map the property of the Trip class to the column values of its Parse counterpart. Just note that Parse stores the actual image of the trip in the featuredImage column. You should have to upload the paris.jpg file by clicking the Upload file button.
Note: You can find the images in the TripCard/Assets.xcassets folder of the ParseDemo project.Repeat the above procedures and add the rest of the trip data. You will end up with a screen similar to this:
Configuring the Xcode Project for Parse
Now that you have configured the trip data on the Parse cloud, we will start to integrate the TripCard project with Parse. The very first thing to do is to install the Parse SDK. You can either install it using CocoaPods (which is the recommended way) or manually.
Using CocoaPods
Assuming you have CocoaPods installed on your Mac, open Terminal app and change to your TripCard project folder. Type pod init to create the Podfile and edit it like this:
target 'TripCard' do
  # Comment the next line if you're not using Swift and don't want to use dynamic frameworks
  use_frameworks!

  # Pods for TripCard
  pod 'Parse'

end
To install the Parse SDK using CocoaPods, you just need to specify the Parse pod in the configuration file. Save the file, go back to Terminal and type:
pod install
CocoaPods should automatically download the Parse SDK and all the required libraries.
Manual Installation
Note: This section is for your reference only. If you've used CocoaPods to install the SDK, you can skip this section.
For some reasons, if you prefer to install the SDK manually, you can download the Parse SDK for iOS from https://github.com/parse-community/Parse-SDK-iOS-OSX/releases. Download the latest release and unzip the file, and drag both Bolts.framework and Parse.framework into the TripCard project. Optionally, you can create a new group called Parse to better organize the files. When prompted, make sure you enable the Copy items if needed option and click Finish to proceed.
The Parse SDK depends on other frameworks in iOS SDK. You will need to add the following libraries to the project:
- AudioToolbox.framework
- CFNetwork.framework
- CoreGraphics.framework
- CoreLocation.framework
- MobileCoreServices.framework
- QuartzCore.framework
- Security.framework
- StoreKit.framework
- SystemConfiguration.framework
- libz.tbd
- libsqlite3.tbd
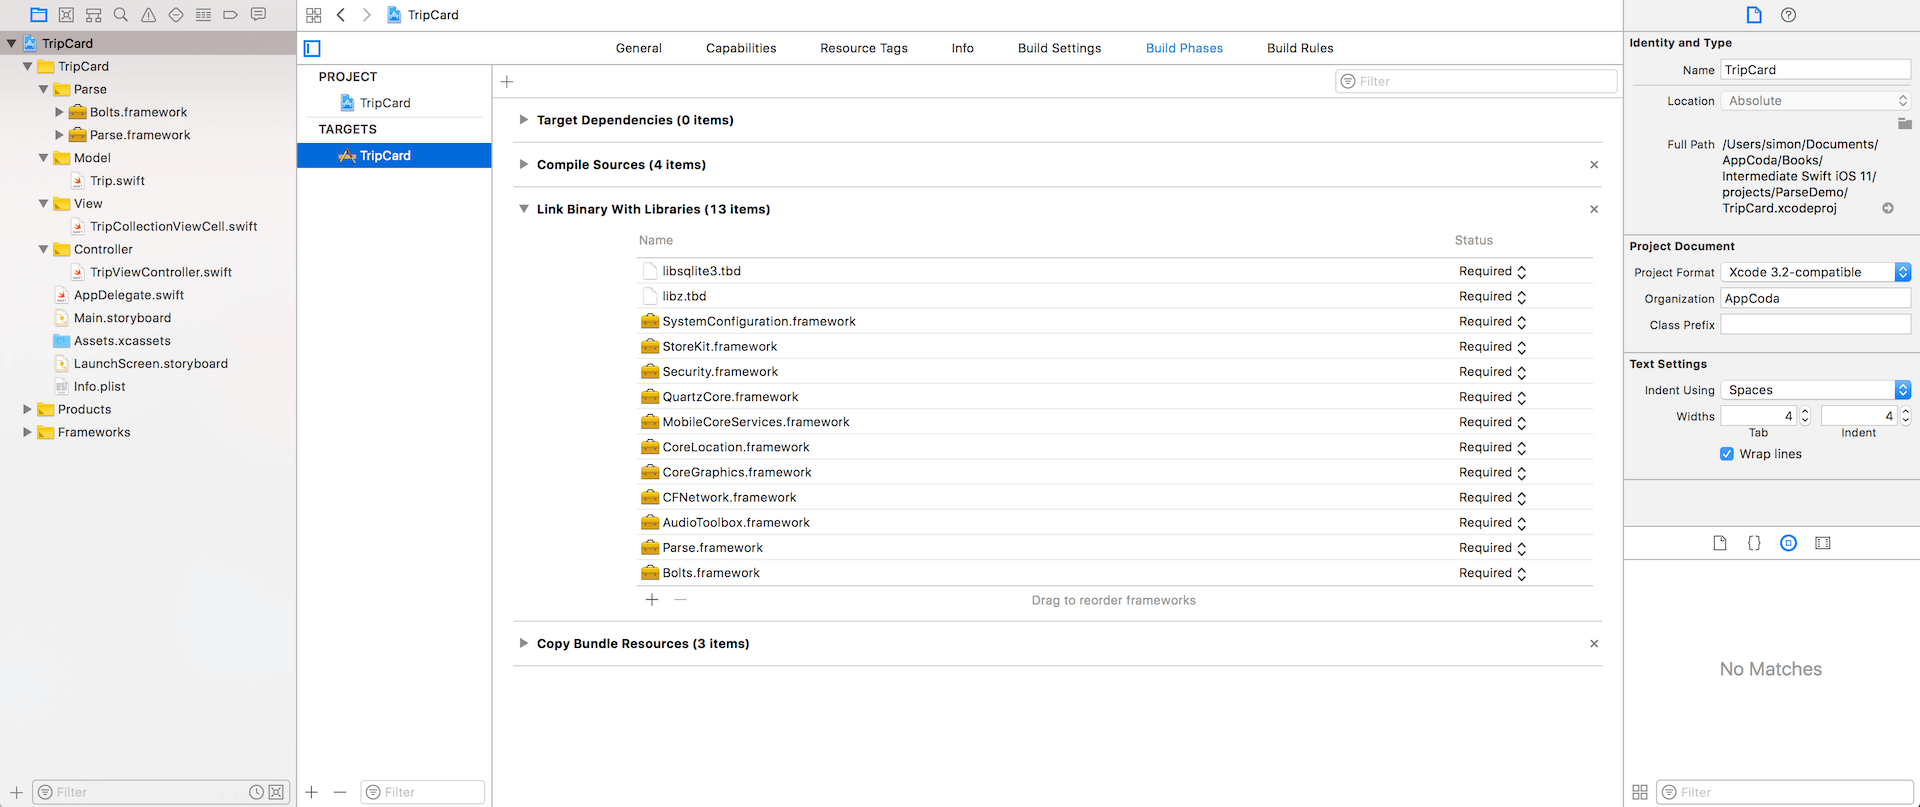
Select the TripCard project in the project navigator. Under the TripCard target, select Build Phases and expand the Link Binary with Libraries. Click the + button and add the above libraries one by one.
Connecting with Parse
To access your app data on Parse, you first need to find out the Application Key and the Client Key. In the dashboard, choose Security & Keys under App Settings.
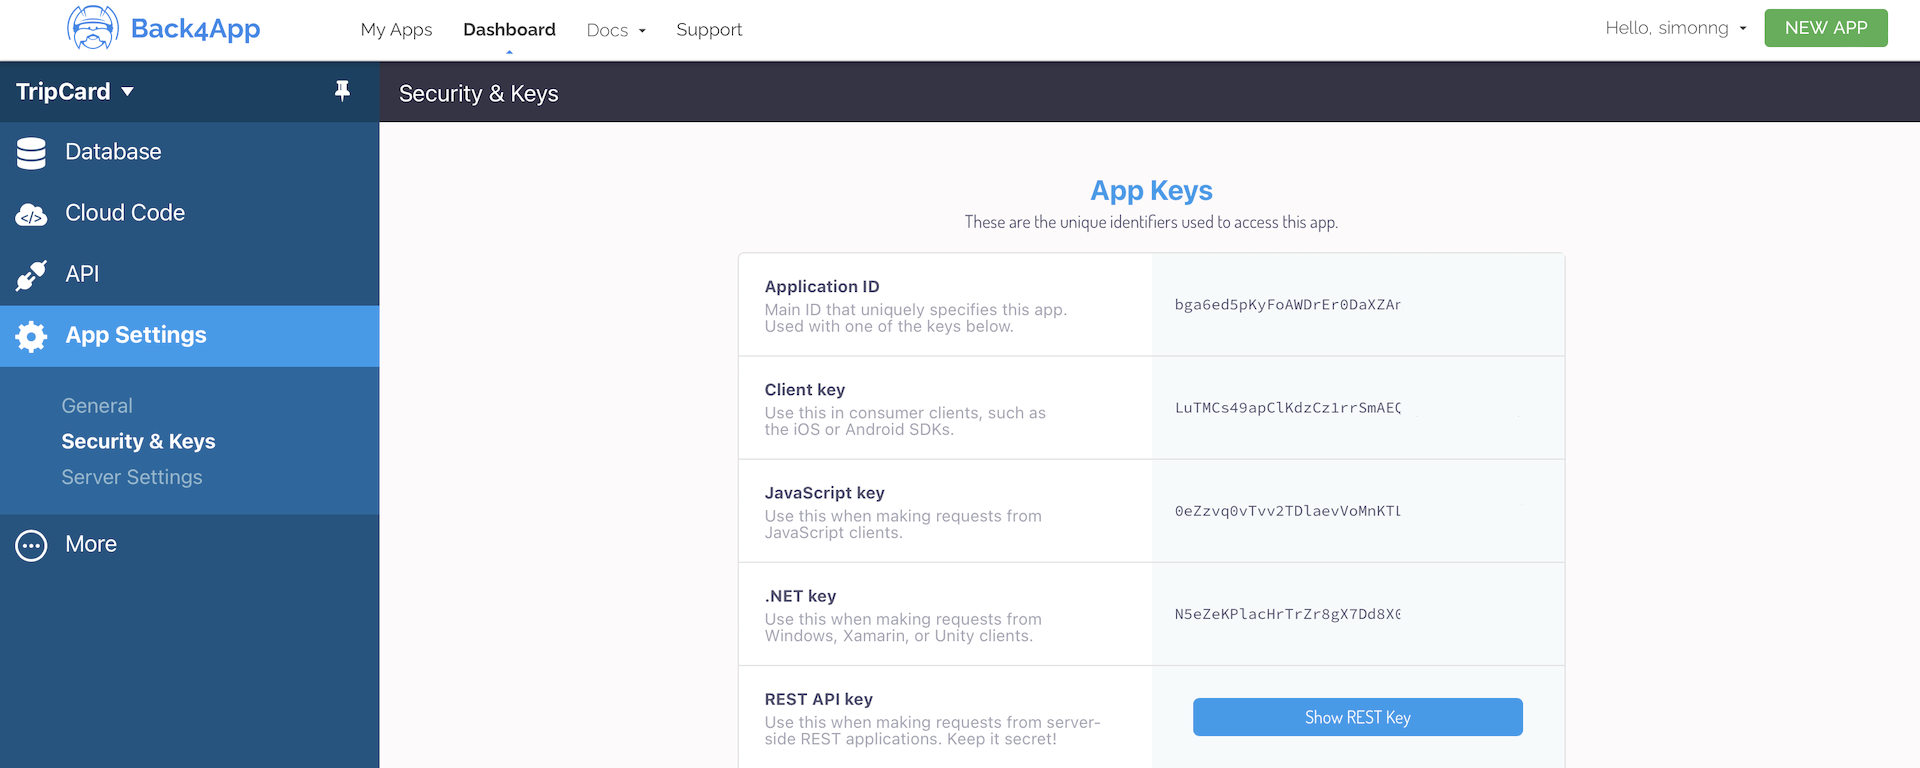
Here you can reveal the application ID and client key. Remember to keep these keys safe, as one can access your Parse data with them.
If you haven't opened the project, please open TripCard.xcworkspace and select AppDelegate.swift. Insert an import statement at the very beginning to import the Parse framework:
import Parse
Next, add the following code in the application(_:didFinishLaunchingWithOptions:) method to initialize Parse:
// Initialize Parse.
let configuration = ParseClientConfiguration {
    $0.applicationId = "EY92PTkGk4j1IjMqF0oe1G5upt7Gp7C1JCs6gb5G"
    $0.clientKey = "QwnzKSN6TPGeoXOQuwJ0zfvM0oD786hXUeZSHESO"
    $0.server = "https://parseapi.back4app.com"
}
Parse.initialize(with: configuration)
Note that you should replace the Application ID and the Client Key with your own keys. With just a couple lines of code, your app is ready to connect to Parse. Try to compile and run it. If you get everything correct, you should be able to run the app without any error.
Retrieving Data from Parse
Now we are ready to modify the TripCard app to pull data from the Parse cloud. We'll first replace the trips array with the cloud data. To do that, you will have to retrieve the Trip objects that were just created on Parse.
The Parse SDK provides a class called PFQuery for retrieving a list of objects (PFObjects) from Parse. The general usage is like this:
let query = PFQuery(className: "Trip")
query.findObjectsInBackground { (objects, error) in
    if let error = error {
        print("Error: \(error) \(error.localizedDescription)")
        return
    }

    if let objects = objects {
        // Do something
    }
}
You create a PFQuery object with a specific class name that matches the one created on Parse. For example, for the TripCard app, the class name is Trip. By calling the findObjectsInBackground method of the query object, the app will go up to Parse and retrieve the available Trip objects. The method works in an asynchronous manner. When it finishes, the block of code will be called and you can perform additional processing based on the returned results.
With a basic understanding of data retrieval, we will modify the TripCard app to get the data from the Parse cloud.
First, open the TripViewController.swift file and change the declaration of trips array to this:
private var trips = [Trip]()
Instead of populating the array with static data, we initialize an empty array. Later we will get the trip data from Parse at runtime and save them into the array.
If you look into the Trip structure (i.e. Trip.swift), you may notice that the featuredImage property is of the type UIImage. As we have defined the featuredImage column as a File type on Parse, we have to change the type of the featuredImage property accordingly. This will allow us to convert a PFObject to a Trip object easily.
The corresponding class of a File type in Parse, that lets you store application files (e.g. images) in the cloud, is PFFileObject. Now open Trip.swift and update it to the following:
import UIKit
import Parse

struct Trip: Hashable {
    var tripId = ""
    var city = ""
    var country = ""
    var featuredImage: PFFileObject?
    var price: Int = 0
    var totalDays: Int = 0
    var isLiked = false

    init(tripId: String, city: String, country: String, featuredImage: PFFileObject!, price: Int, totalDays: Int, isLiked: Bool) {
        self.tripId = tripId
        self.city = city
        self.country = country
        self.featuredImage = featuredImage
        self.price = price
        self.totalDays = totalDays
        self.isLiked = isLiked
    }

    init(pfObject: PFObject) {
        self.tripId = pfObject.objectId!
        self.city = pfObject["city"] as! String
        self.country = pfObject["country"] as! String
        self.price = pfObject["price"] as! Int
        self.totalDays = pfObject["totalDays"] as! Int
        self.featuredImage = pfObject["featuredImage"] as? PFFileObject
        self.isLiked = pfObject["isLiked"] as! Bool
    }

    func toPFObject() -> PFObject {
        let tripObject = PFObject(className: "Trip")
        tripObject.objectId = tripId
        tripObject["city"] = city
        tripObject["country"] = country
        tripObject["featuredImage"] = featuredImage
        tripObject["price"] = price
        tripObject["totalDays"] = totalDays
        tripObject["isLiked"] = isLiked

        return tripObject
    }
}
Here we added another initialization method for PFObject and a helper method called toPFObject. In the method, we change the type of featuredImage from UIImage to PFFile. For the purpose of convenience, we create a new initialization method for PFObject and another method for PFObject conversion.
Next, open the TripViewController.swift file and insert the following import statement:
import Parse
Then add the following method:
func loadTripsFromParse() {
    // Clear up the array
    trips.removeAll(keepingCapacity: true)

    // Pull data from Parse
    let query = PFQuery(className: "Trip")
    query.findObjectsInBackground { (objects, error) -> Void in

        if let error = error {
            print("Error: \(error) \(error.localizedDescription)")
            return
        }

        if let objects = objects {
            objects.forEach { (object) in
                // Convert PFObject into Trip object
                let trip = Trip(pfObject: object)
                self.trips.append(trip)
            }
        }

        self.updateSnapshot()

    }
}
The loadTripsFromParse method is created for retrieving trip information from Parse. At the very beginning, we clear out the trips array so as to have a fresh start. We then pull the trip data from the Parse cloud using PFQuery. If the objects are successfully retrieved from the cloud, we convert each of the PFObjects into Trip objects and append them to the trips array. Lastly, we call the updateSnapshot() method to reload the collection view.
For the configureDataSource() method, you will need to change the following line of code from:
cell.imageView.image = trip.featuredImage
to:
// Load image in background
cell.imageView.image = UIImage()
if let featuredImage = trip.featuredImage {
    featuredImage.getDataInBackground { (imageData, error) in
        if let tripImageData = imageData {
            cell.imageView.image = UIImage(data: tripImageData)
        }
    }
}
The trip images are no longer bundled in the app. Instead, we will pull them from the Parse cloud. The time required to load the images varies depending on the network speed. This is why we handle the image download in the background. Parse stores files (such as images, audio, and documents) in the cloud in the form of PFFile. We use PFFile to reference the featured image. The class provides the getDataInBackground method to perform the file download in background. Once the download completes, we load it onto the screen.
Finally, insert this line of code in the viewDidLoad method to start the data retrieval:
loadTripsFromParse()
Now you are ready to go! Hit the Run button to test the app. Make sure your computer/device is connected to the Internet. The TripCard app should now retrieve the trip information from Parse. Depending on your network speed, it will take a few seconds for the images to load.
Refreshing Data
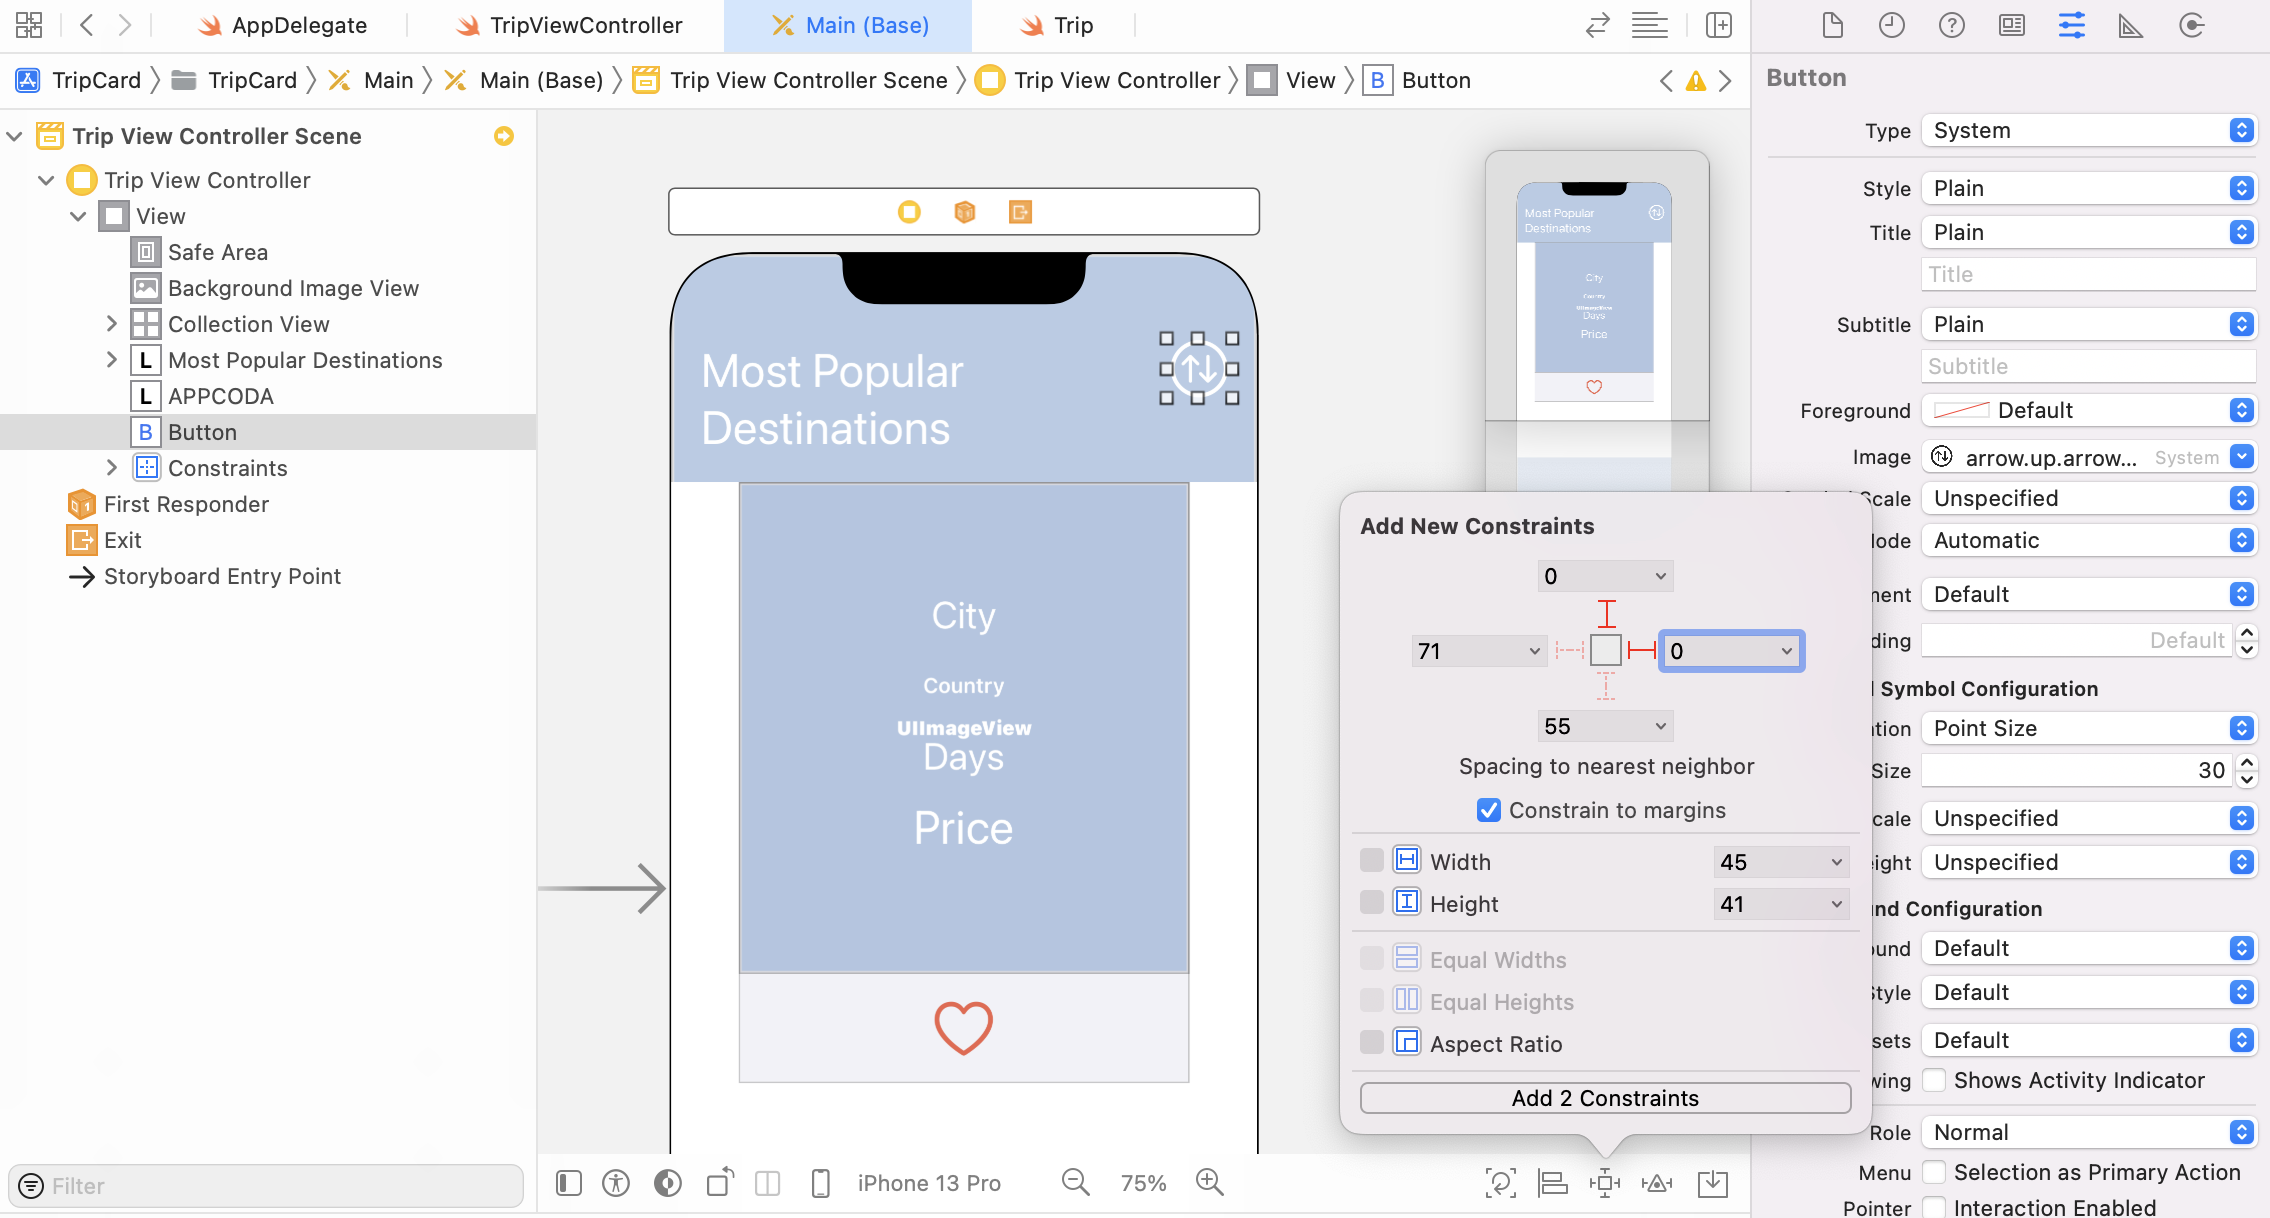
Currently, there is no way to refresh the data. Let's add a button to the Trip View Controller in the storyboard. When a user taps the button, the app will go up to Parse and refresh the trip information.
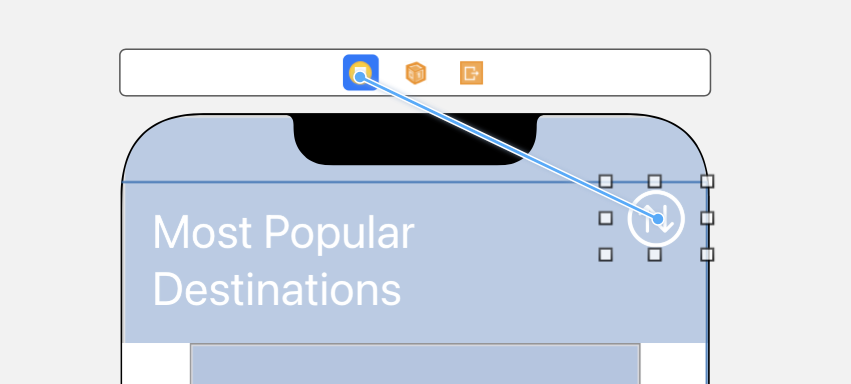
The project template already bundled a reload image for the button. Open the Main storyboard and drag a button object to the view controller. Set its image to arrow.up.arrow.down.circle and tint color to white. Resize the icon by change the configuration option to Point Size and set its point size to 30. Finally, click the Add New Constraints button of the auto layout menu to add the layout constraints (see figure 30.13).
Next, insert an action method in

Next, insert an action method in TripViewController.swift:
@IBAction func reloadButtonTapped(sender: Any) {
    loadTripsFromParse()
}
Go back to the storyboard and associate the refresh button with this action method. Control-drag from the reload button to the view controller button in the dock. After releasing the buttons, select reloadButtonTappedWithSender:.
Now run the app again. Once it's launched, go to the Parse dashboard and add/remove a new trip. Your app should now retrieve the new trip when the refresh button is tapped.

Caching for Speed and Offline Access
Try to close the app and re-launch it. Every time when it is launched, the app starts to download the trips from the Parse backend. What if there is no network access? Let's give it a try. Disable your iPhone or the simulator's network connection and run the app again. The app will not be able to display any trips with the following error in the console:
2021-01-27 14:09:55.896490+0800 TripCard[61245:12080032] Connection 1: received failure notification
2021-01-27 14:09:55.896572+0800 TripCard[61245:12080032] Connection 1: failed to connect 1:50, reason -1
2021-01-27 14:09:55.896645+0800 TripCard[61245:12080032] Connection 1: encountered error(1:50)
.
.
.
2021-01-27 14:10:01.035792+0800 TripCard[61245:12080046] [Error]: The Internet connection appears to be offline. (Code: 100, Version: 1.19.1)
2021-01-27 14:10:01.041338+0800 TripCard[61245:12080046] [Error]: Network connection failed. Making attempt 3 after sleeping for 6.397498 seconds.
There is a better way to handle this situation. Parse has a built-in support for caching that makes it a lot easier to save query results on local disk. In case if the Internet access is not available, your app can load the result from local cache.
Caching also improves the app's performance. Instead of loading data from Parse every time when the app runs, it retrieves the data from cache upon startup.
In the default setting, caching is disabled. However, you can easily enable it by writing a single line of code. Add the following code to the loadTripsFromParse method after the initialization of PFQuery:
query.cachePolicy = PFCachePolicy.networkElseCache
The Parse query supports various types of cache policy. The networkElseCache policy is just one of them. It first loads data from the network, then if that fails, it loads results from the cache.
Now compile and run the app again. After you run it once (with WiFi enabled), disable the WiFi or other network connections and launch the app again. This time, your app should be able to show the trips even if the network is unavailable.
Updating Data on Parse
When you like a trip by tapping the heart button, the result is not saved to the Parse cloud because we haven't written any code for pushing the updates to the cloud.
With the Parse SDK, it is pretty simple to update a PFObject. Recalled that each PFObject comes with a unique object ID, all you need to do is to set some new data to an existing PFObject and then call the saveInBackground method to upload the changes to the cloud. Based on the object ID, Parse updates the data of the specific object.
Open TripViewController.swift and update the didLikeButtonPressed method, like this:
extension TripViewController: TripCollectionCellDelegate {

    func didLikeButtonPressed(cell: TripCollectionViewCell) {
        if let indexPath = collectionView.indexPath(for: cell) {
            trips[indexPath.row].isLiked = trips[indexPath.row].isLiked ? false : true
            cell.isLiked = trips[indexPath.row].isLiked

            // Update the trip on Parse
            trips[indexPath.row].toPFObject().saveInBackground(block: { (success, error) -> Void in
                if (success) {
                    print("Successfully updated the trip")
                } else {
                    print("Error: \(error?.localizedDescription ?? "Unknown error")")
                }
            })
        }
    }

}
In the if let block, the first line of code is to set the isLiked property of the corresponding Trip object to true when a user taps the heart button.
To upload the update to the Parse cloud, we first call the toPFObject method of the selected Trip object to convert itself to a PFObject. If you look into the toPFObject method of the Trip class, you will notice that the trip ID is set as the object ID of the PFObject. This is how Parse identifies the object to update.
Once we have the PFObject, we simply call the saveInBackground method to upload the changes to Parse.
That's it.
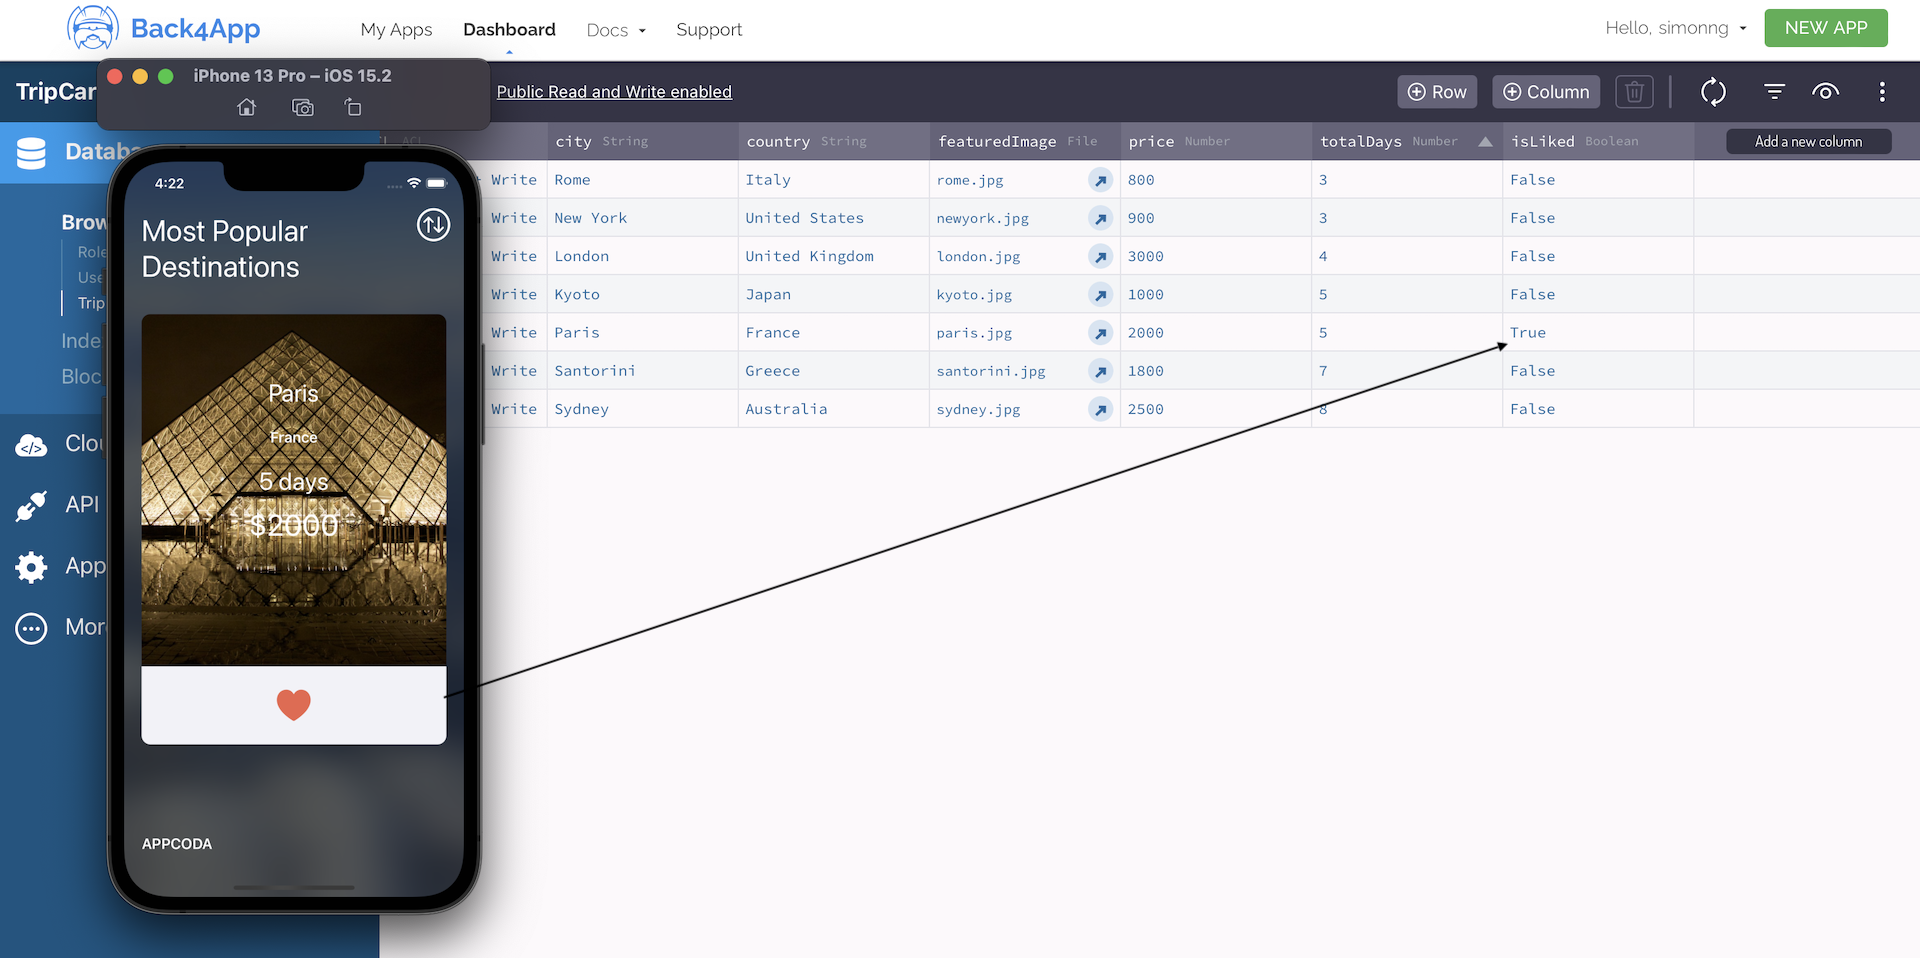
You can now run the app again. Tap the heart button of a trip and go up to the data browser of Parse. You should find that the isLiked value of the selected trip (say, Santorini) is changed to true.
Deleting Data from Parse
Similarly, PFObject provides various methods for object deletion. In short, you call up the deleteInBackground method of the PBObject class to delete the object from Parse.
Currently, the TripCard app does not allow users to remove a trip. We will modify the app to let users swipe up a trip item to delete it. First, switch over to the Main storyboard and add a trash button in the cell. You can set the image of the button to trash.

Next, modify the TripCollectionViewCell.swift file and update the TripCollectionCellDelegate protocol like this:
protocol TripCollectionCellDelegate {
    func didLikeButtonPressed(cell: TripCollectionViewCell)
    func didTrashButtonPressed(cell: TripCollectionViewCell)
}
We added one more method for the trash button. In the TripCollectionViewCell class, create a new action method:
@IBAction func trashButtonTapped(sender: AnyObject) {
    delegate?.didTrashButtonPressed(cell: self)
}
When the trash button is tapped, this method will be called, which will then invoke the didTrashButtonPressed method of the delegate.
Now switch over to TripViewController.swift and implement the added method of the protocol in the extension:
func didTrashButtonPressed(cell: TripCollectionViewCell) {

    guard let indexPath = collectionView.indexPath(for: cell) else {
        return
    }

    guard let selectedTrip = self.dataSource.itemIdentifier(for: indexPath) else {
        return
    }

    // Delete the trip
    trips[indexPath.row].toPFObject().deleteInBackground(block: { (success, error) -> Void in
        if (success) {
            var snapshot = self.dataSource.snapshot()
            snapshot.deleteItems([selectedTrip])
            self.dataSource.apply(snapshot)

        } else {
            print("Error: \(error?.localizedDescription ?? "Unknown error")")
            return
        }

    })

}
We first find out which trip object the user has selected. Then we call the deleteInBackground method to delete it from Parse. If the operation completes successfully, we remove the item from the collection view by updating the snapshot.
Lastly, switch back to the Main storyboard and connect the action method with the trash button.
Great! You've implemented the delete feature. Hit the Run button to launch the app and try to delete a record from Parse.
Summary
I hope that this chapter gave you an idea about how to connect your app to the cloud. In this chapter, we use Back4app.com as the Parse backend, which frees you from configuring and managing your own Parse servers. It is not a must to use back4app.com. There are quite a number of Parse hosting service providers you can try it out such as SashiDo.io.
The startup cost of using a cloud is nearly zero. And, with the Parse SDK, it is very simple to add a cloud backend for your apps. If you think it's too hard to integrate your app with the cloud, think again! And begin to consider implementing your existing apps with some cloud features.
For reference, you can download the final project from http://www.appcoda.com/resources/swift55/ParseDemo.zip.