- Made by AppCoda
- Contact us / Support
- Tweet this book
- Preface
- 1. Building Adaptive User Interfaces
- 2. Creating Table View Sections and Index list with Diffable Data Source
- 3. Animating Table View Cells
- 4. Working with JSON and Codable
- 5. How to Integrate the Twitter and Facebook SDK for Social Sharing
- 6. Working with Email and Attachments
- 7. Sending SMS and MMS Using MessageUI Framework
- 8. How to Get Direction and Draw Route on Maps
- 9. Search Nearby Points of Interest Using Local Search
- 10. Audio Recording and Playback
- 11. Scan QR Code Using AVFoundation Framework
- 12. Working with URL Schemes
- 13. Building a Full Screen Camera with Gesture-based Controls
- 14. Video Capturing and Playback Using AVKit
- 15. Displaying Banner Ads using Google AdMob
- 16. Working with Custom Fonts
- 17. Working with AirDrop, UIActivityViewController and Uniform Type Identifiers
- 18. Building Grid Layouts Using Collection Views and Diffable Data Source
- 19. Interacting with Collection Views
- 20. Adaptive Collection Views Using UITraitCollection and Compositional Layout
- 21. Building a Weather Widget Using WidgetKit
- 22. Building Slide Out Sidebar Menus Using Objective-C Libraries
- 23. View Controller Transitions and Animations
- 24. Building a Slide Down Menu
- 25. Self Sizing Cells and Dynamic Type
- 26. XML Parsing, RSS and Expandable Table View Cells
- 27. Applying a Blurred Background Using UIVisualEffect
- 28. Using Touch ID and Face ID For Authentication
- 29. Building a Carousel-Like User Interface
- 30. Working with Parse
- 31. Parsing CSV and Preloading a SQLite Database Using Core Data
- 32. Connecting Multiple Annotations with Polylines and Routes
- 33. Using CocoaPods in Swift Projects
- 34. Building a Simple Sticker App
- 35. Building iMessage Apps Using Messages Framework
- 36. Building Custom UI Components Using IBDesignable and IBInspectable
- 37. Using Firebase for User Authentication
- 38. Google and Facebook Authentication Using Firebase
- 39. Using Firebase Database and Storage to Build an Instagram-like App
- 40. Building a Real-time Image Recognition App Using Core ML
- 41. Building AR Apps with ARKit and SpriteKit
- 42. Working with 3D Objects in Augmented Reality Using ARKit and SceneKit
- 43. Use Create ML to Train Your Own Machine Learning Model for Image Recognition
- 44. Building a Sentiment Classifier Using Create ML to Classify User Reviews
- 45. Working with Image Tracking Using ARKit
- Published with GitBook
Chapter 39
Using Firebase Database and Storage to Build an Instagram-like App

First things first, I highly recommend you to read the previous two chapters if you haven't done so. Even though most of the chapters are independent, this chapter is tightly related to the other two Firebase chapters.
Assuming you have done that, you should understand how to use Firebase for user authentication. This is just one of the many features of the mobile development platform. In this chapter, we will explore two popular features of Firebase: Database and Storage. Again, I will walk you through with a project demo. We will build a simple version of Instagram with a public image feed.
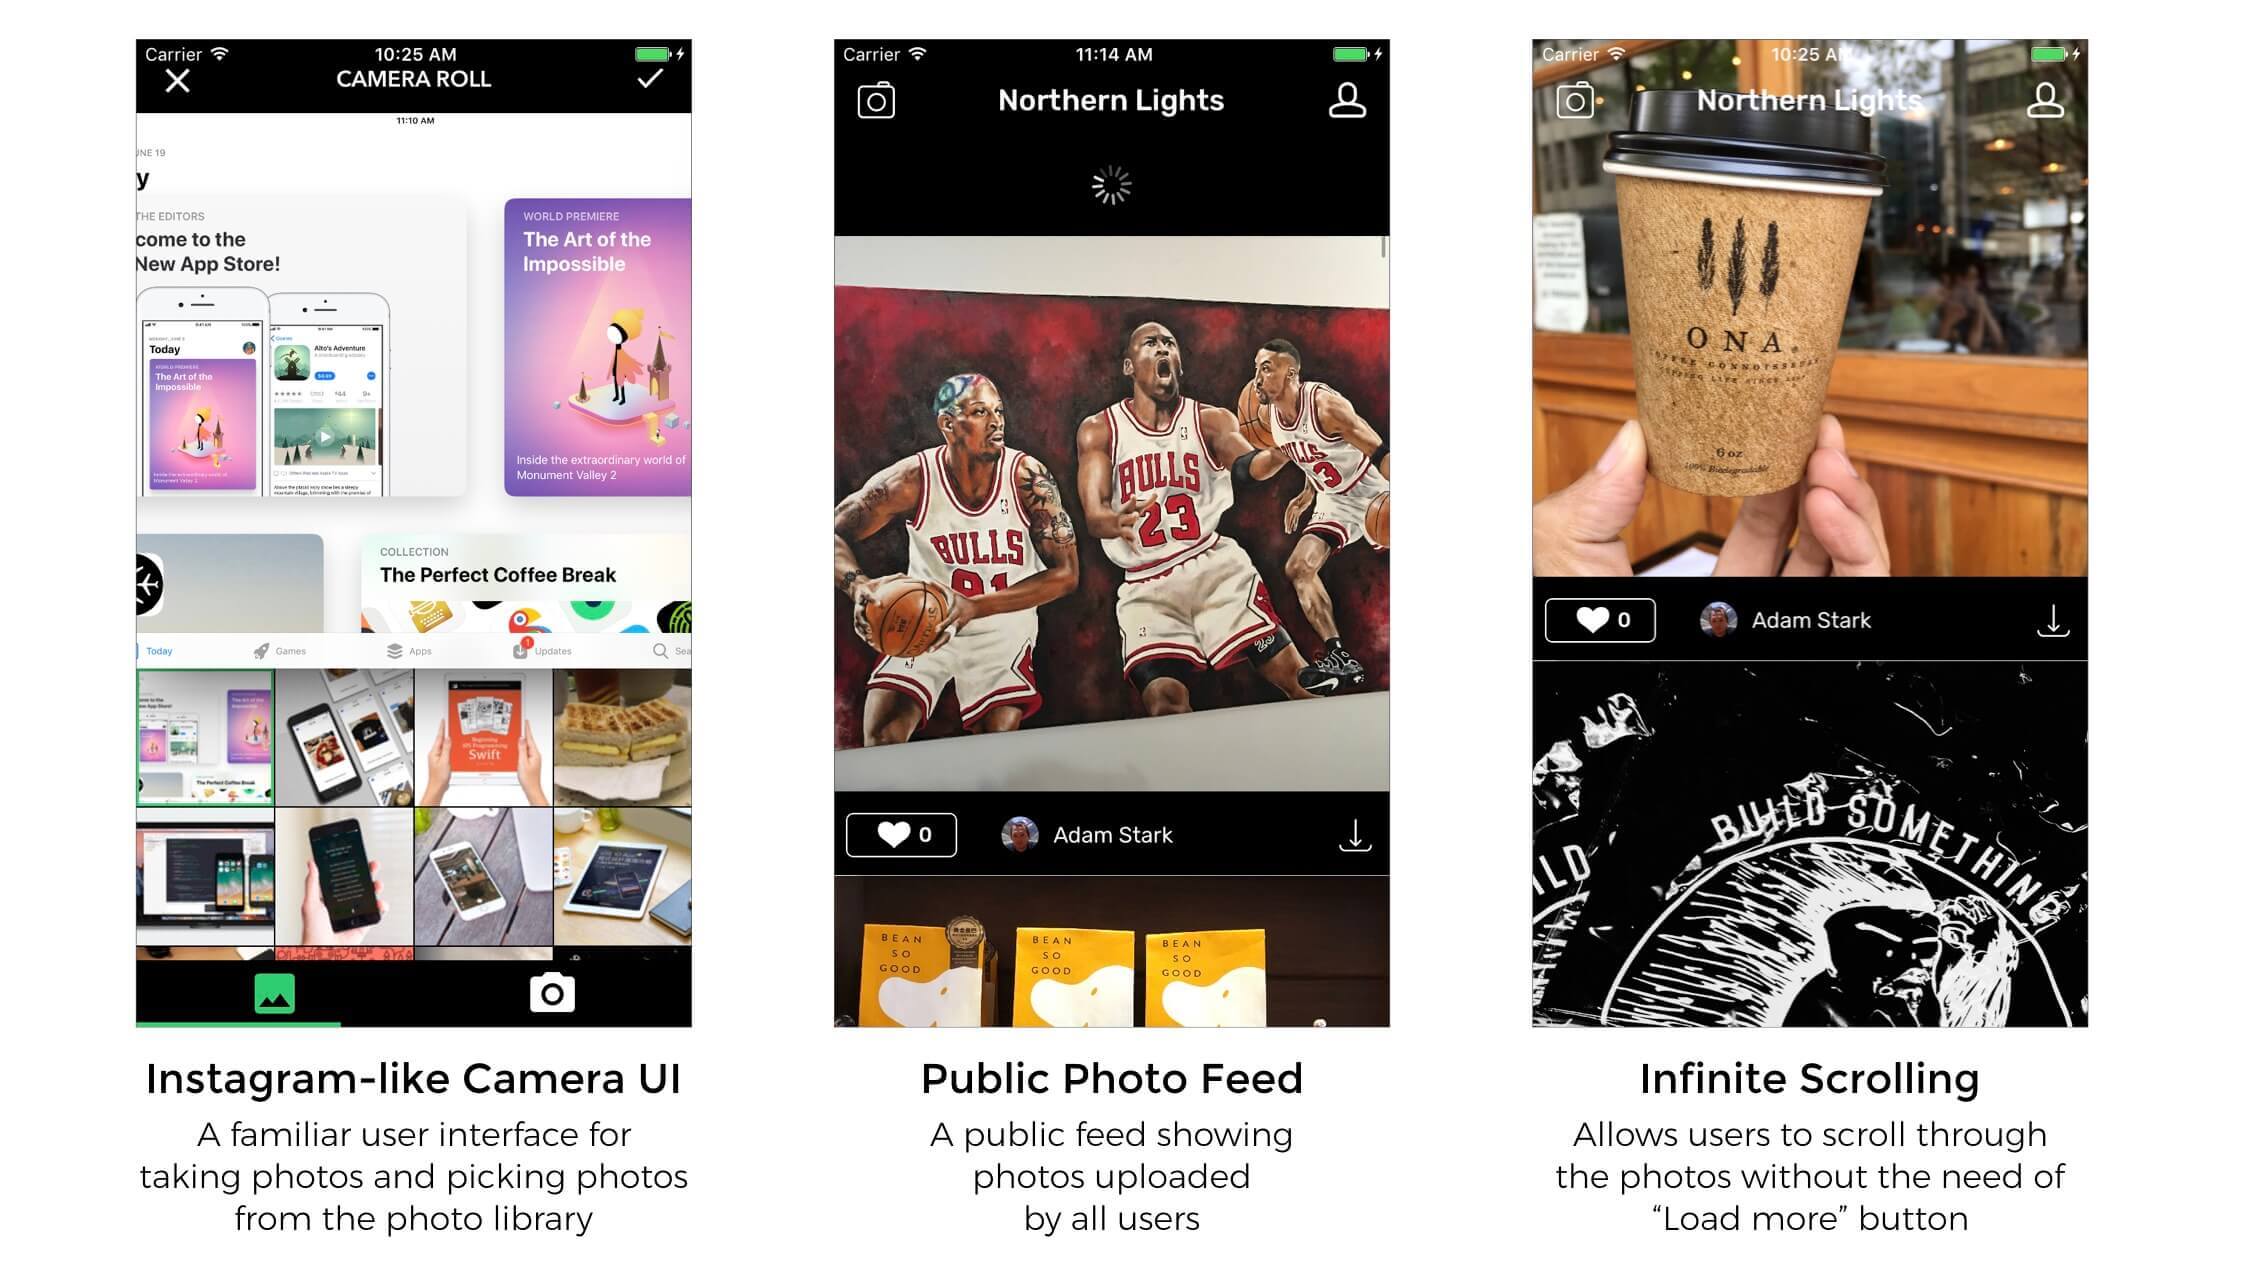
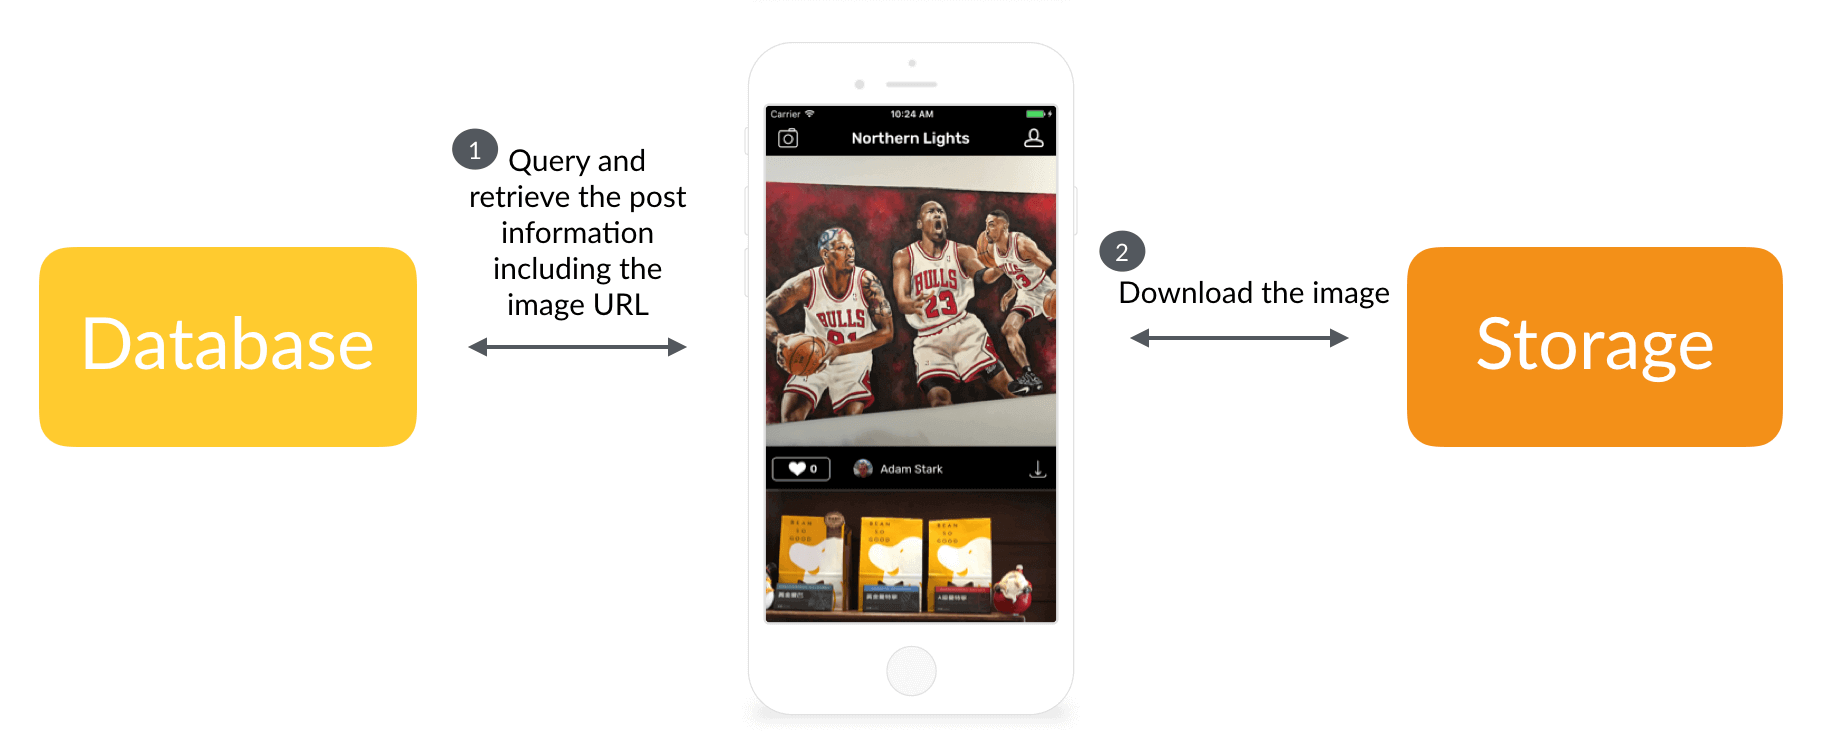
Figure 39.1 shows the demo app. As an app user, you can publish photos to the public feed. At the same time, you can view photos uploaded by other users. It is pretty much the same as what Instagram does but we strip off some of the features such as followers.
By building this Instagram-like app, you will learn a ton of new things:
- How to create an Instagram-like camera UI using a third-party library called ImagePicker
- How to use Firebase Database to save data (e.g. post information) and structure the JSON data in Firebase database
- How to use Firebase Storage to store images
- How to work with Firebase Database and Storage for data upload and download
- How to limit the number of records retrieved from Firebase Database
- How to implement infinite scrolling in table views
Cool, right? Let's get started.
Setting up the Starter Project
In chapter 37 and 38, you already built a project that supports user authentication through email/password and Google/Facebook login. We will build on top of that project to further implement the photo feed. However, in order to ensure we are on the same page, please download the starter project (http://www.appcoda.com/resources/swift55/FirebaseStorageDemoStarter.zip) before moving on.
The starter project is exactly the same as the one we have worked on previously, except that the table view controller of the home screen is now changed from a static table to a dynamic one.
I have also added two new .swift files for the table view controller:
FeedTableViewController.swift- theFeedTableViewControllerclass now provides an empty implementation of the table view.PostCell.swift- the custom class for the table view cell. In the class, you will find a number of outlet variables (e.g.photoImageView). Each of the outlets has been connected with the corresponding UI component of the custom cell.
Before moving to the next section, please make sure you replace the GoogleService-Info.plist file and bundle identifier of the project with your own. If you forgot the procedures, go back to chapter 37 to check out the details. I also recommend you to test the starter project by building it once. This is to ensure the project can be compiled without errors. When you run the app, you should be able to login with your test accounts (as you configured in chapter 37/38) and access a blank home screen.
Building the Camera Interface
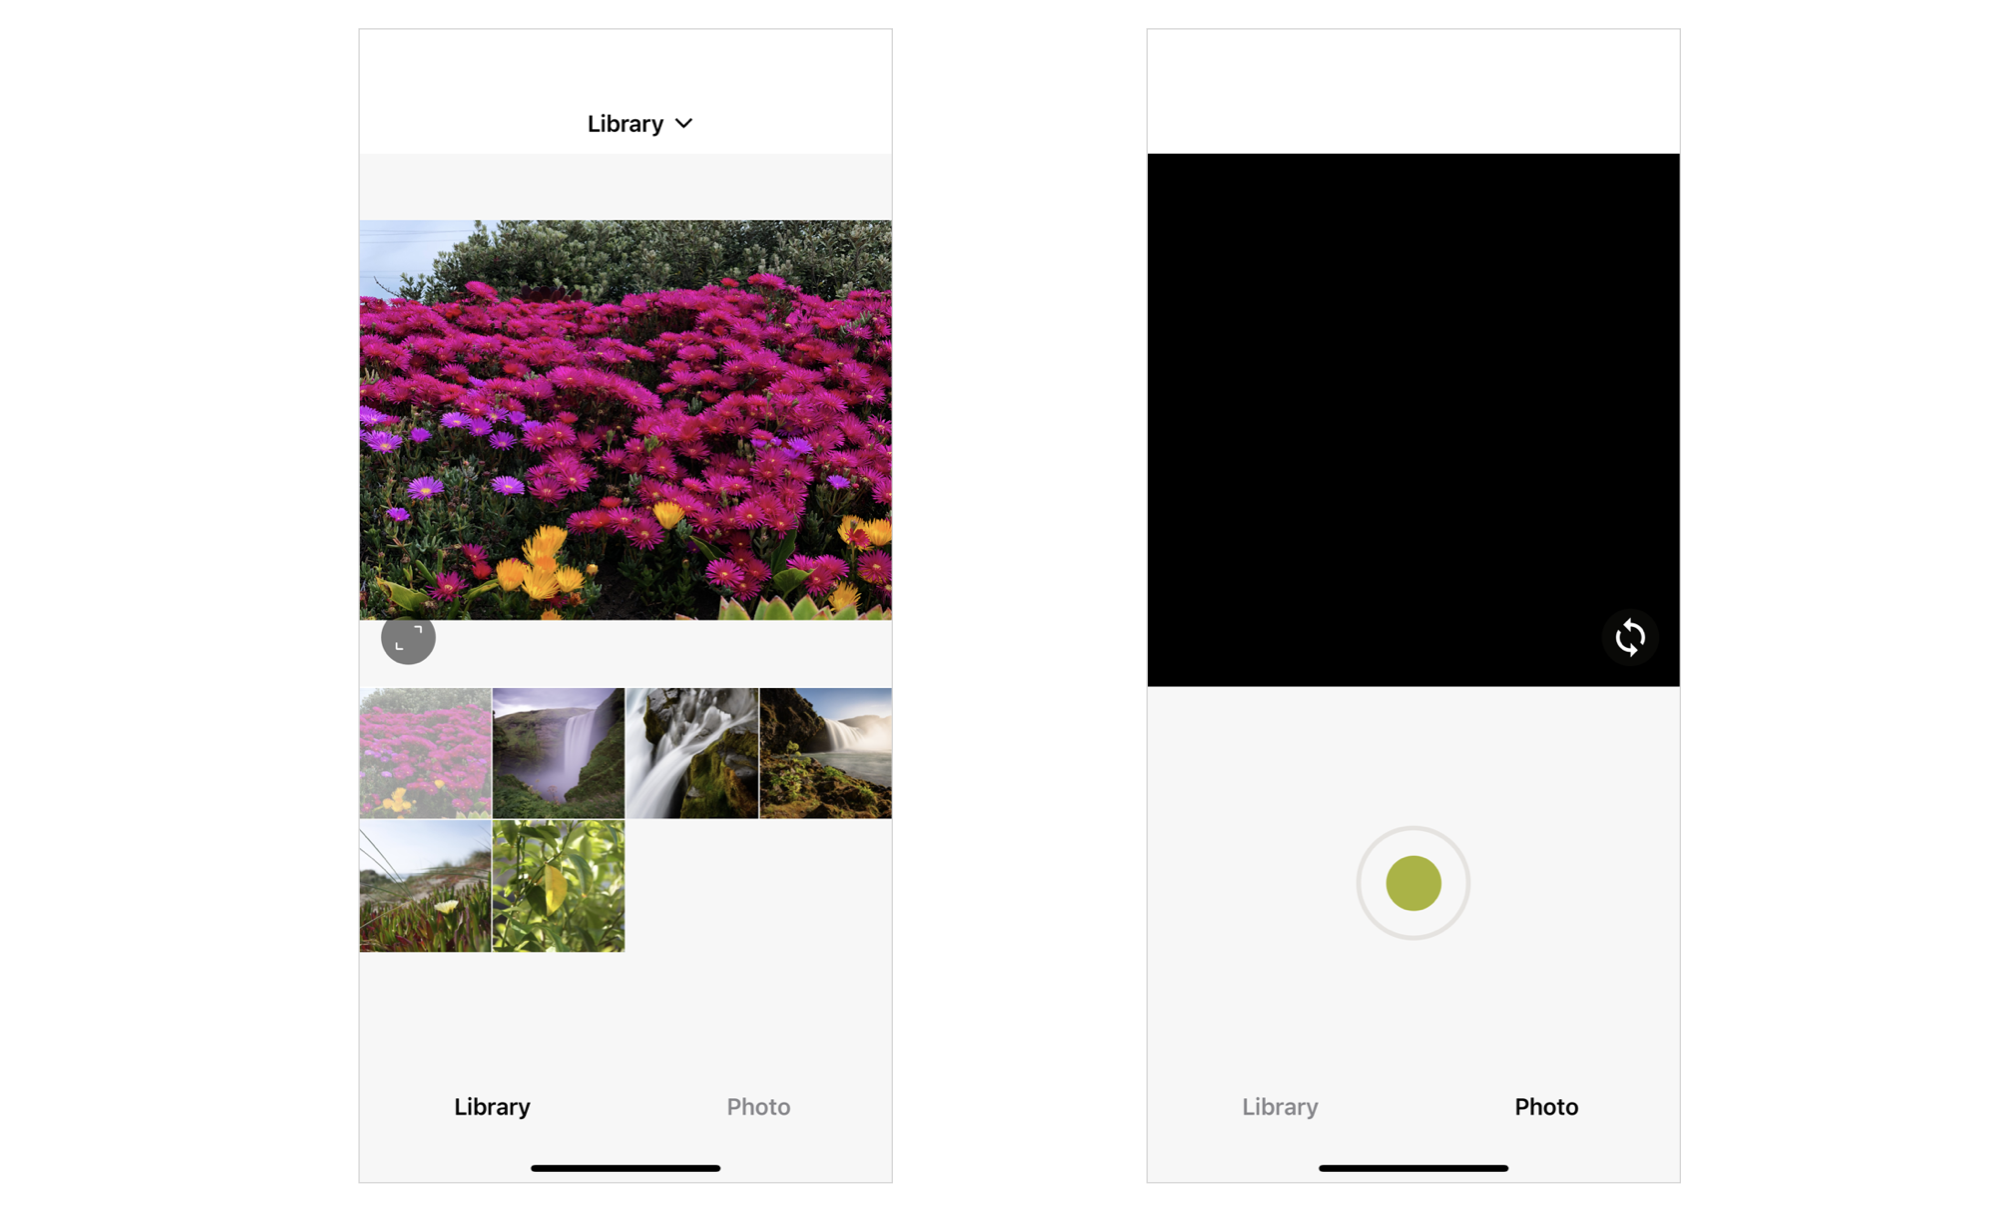
Now that you have the starter project ready, let's begin with the camera interface before diving into Firebase. When the user taps the Camera button, it brings up an Instagram-like camera interface for the user to choose a photo from his/her photo library. Through the same interface, the user can easily take a picture.
The iOS SDK has a built-in class named UIImagePickerController for accessing photo library and managing the camera interface. You certainly can use the class to implement the camera feature. However, I want to provide a custom camera UI that users can easily switch between the camera and the photo library. How can we implement that?
- One option is to build a custom camera from scratch.
- The other option is to make use of some existing Swift libraries.
In this demo, we will opt for the second approach by using an open source library called YPImagePicker. You can find the library at https://github.com/Yummypets/YPImagePicker.
Note: There are quite a lot of discussions about whether we should use third-party libraries in Xcode projects lately. Some said we should always write our own code instead of using a third-party library. Here I am not going to discuss this issue, and it's not usually a simple right or wrong answer. It depends on your project background, requirements and other criteria.
YPImagePicker is a very easy-to-use library that allows developers to create an Instagram-like photo browser with just a few lines of code.
YPImagePicker is an instagram-like photo/video picker for iOS written in pure Swift. It is feature-rich and highly customizable to match your App's requirements.
- Developer of YPImagePicker
Installing YPImagePicker
Like using other third-party libraries, the easiest way to integrate YPImagePicker into our Xcode project is through Swift Package Manager. In Xcode, choose File > Add Packages.... Key in the following repository URL:
https://github.com/Yummypets/YPImagePicker
Once you hit Add Package, Xcode should load the YPImagePicker package. Choose Add package to add the library to your Xcode project.
Using YPImagePicker
YPImagePicker is simple to use, as it claimed. You just need to write a few line of code, and you'll have an all-in-one camera in the app. Let's see how it is done.
First, insert an import statement at the beginning of the FeedTableViewController.swift file to import the library:
import YPImagePicker
In the FeedTableViewController class, create an action method for the camera button:
// MARK: - Camera

@IBAction func openCamera(_ sender: Any) {

    let picker = YPImagePicker()

    picker.didFinishPicking { [unowned picker] items, _ in
        picker.dismiss(animated: true, completion: nil)
    }

    present(picker, animated: true, completion: nil)

}
In brief, here are the main procedures to use ImagePicker:
- Instantiate an instance of
YPImagePicker. - Call the
didFinishPickingmethod and handle the photo selection in the completion handler. Meanwhile, we just dismiss the image picker. - Next, we call the
presentmethod to bring up the camera UI.
As you can see, it just takes a few lines of code to create the Instagram-like camera interface.
Editing Info.plist
Apple requires every app to ask for user permission before accessing the user's photo library or the device's camera. You have to add two keys in Info.plist to explain why the app needs to use the camera and photo library.
Open Info.plist and add two new rows:
- Set one's key to "Privacy - Camera Usage Description", and its value to "for capturing photos" (or whatever you want).
- Set another key to "Privacy - Photo Library Usage Description", and its value to "for you to choose photos to upload".

Connect the Action Method
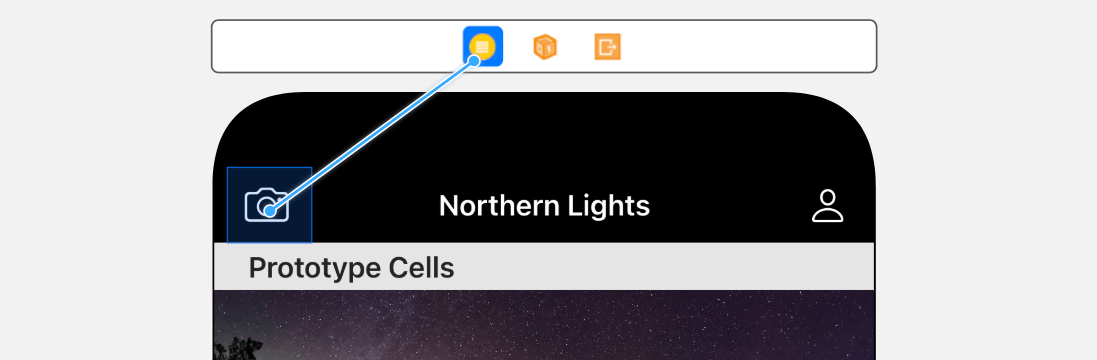
Lastly, switch to the Main.storyboard and select the feed table view controller. Add a bar button item to the left of the navigation bar. In the Attributes inspector, set its image to camera.
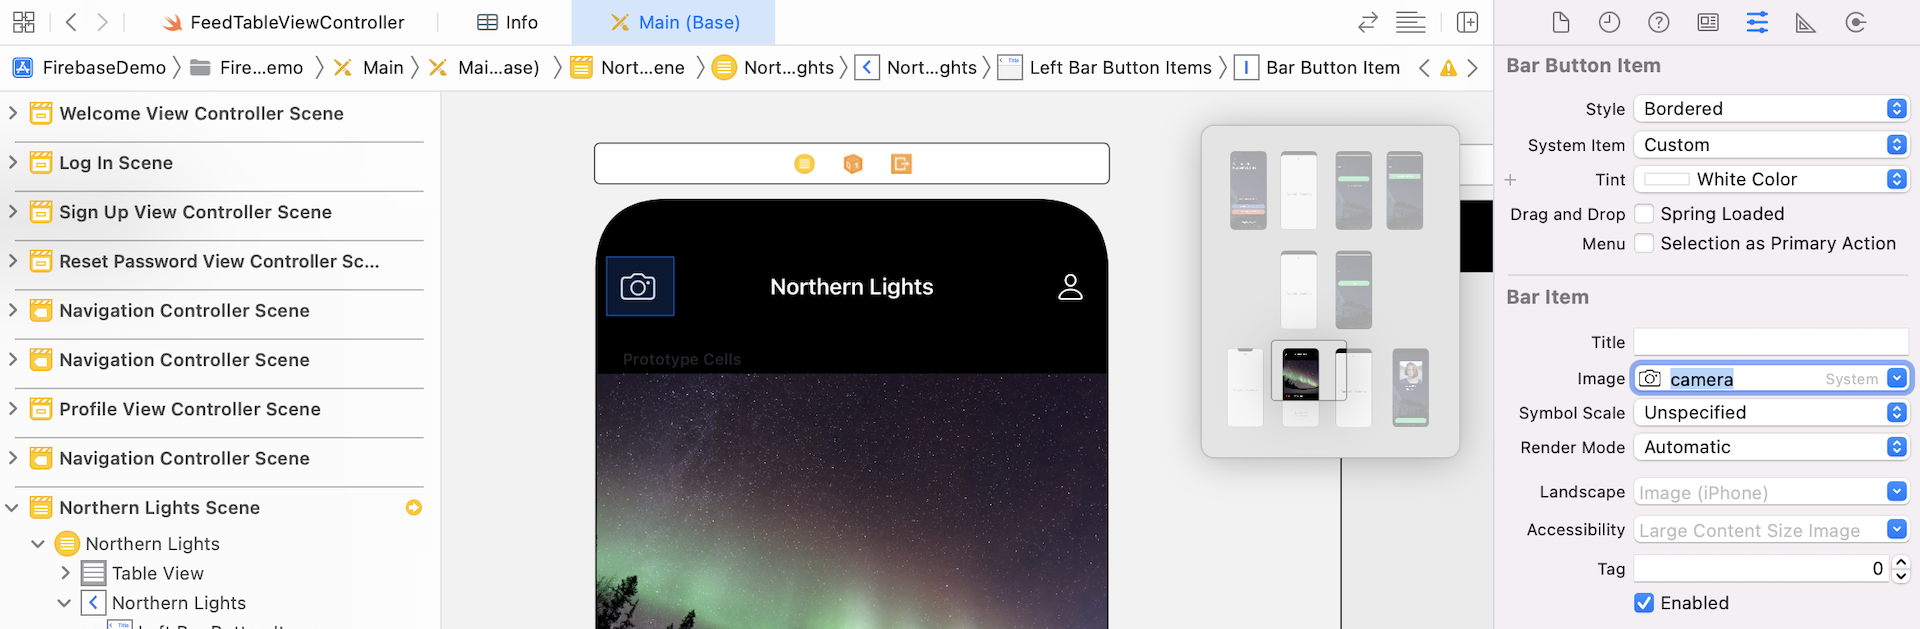
Next, connect the camera button with the openCamera method we just created.
Now build and run the app. Log into the app and then tap the camera button. You should be able to bring up the photo library/camera. For first time use, the app should prompt you for permission. If you choose to allow the access, the app should show you the photos in the photo library. In case if you run the app on a real device, you should be able to take photos using the built-in camera.
A Quick Overview of Firebase Database
With the camera UI ready, it comes to the core part of this chapter. Let's talk about the two main features of Firebase: Database and Storage.
When Firebase was first started, its core product was a realtime database. Since Google acquired Firebase in late 2014, Firebase was gradually rebranded as a mobile application platform that offers a suite of development tools and backend services such as notification, analytics, and user authentication. Realtime Database and Storage are now just two core products of Firebase.

In this section, we will dive into these two Firebase products, and see how to build a cloud-based app using Realtime Database and Storage.
Understanding how Data is Structured in Firebase
So, what's Firebase Realtime Database? Here is the official description from Google:
The Firebase Realtime Database is a cloud-hosted NoSQL database that lets you store and sync data between your users in realtime.
You may know Parse or CloudKit. Both are mobile backend that lets you easily store and manage application data in the cloud. Firebase is similar to this kind of backend services. However, the way how the data is structured or stored is totally different.
If you have some database background, it is quite straightforward for you to understand the data structure of Parse or CloudKit. You create a table with multiple columns, and each record is a row in the table. Consider if you are going to store the photo posts of the demo using Parse, you will probably create a Post table with columns like user, image and votes.

The data representation is quite intuitive, even for beginners, because it is similar to an Excel table.
However, Firebase Realtime Database doesn't store data like that. As the company said, Firebase Database is a cloud-hosted NoSQL database. The approach to data management of NoSQL database is completely different from that of traditional relational database management systems (RDBMS).
Unlike SQL database, NoSQL database (or Firebase Database) has no tables or records. Data is stored as JSON in key-value pairs. You don't have to create the table structure (i.e. columns) before you're allowed to add the records since NoSQL does not have the record concept. You can save the data in key-value pairs in the JSON tree at any time.
Further reading: I will not go into the details of NoSQL database. If you are interested in learning more about NoSQL, please take a look at these articles:

- NoSQL Databases: An Overview (https://www.thoughtworks.com/insights/blog/nosql-databases-overview)

- NoSQL Databases Explained (https://www.mongodb.com/nosql-explained)
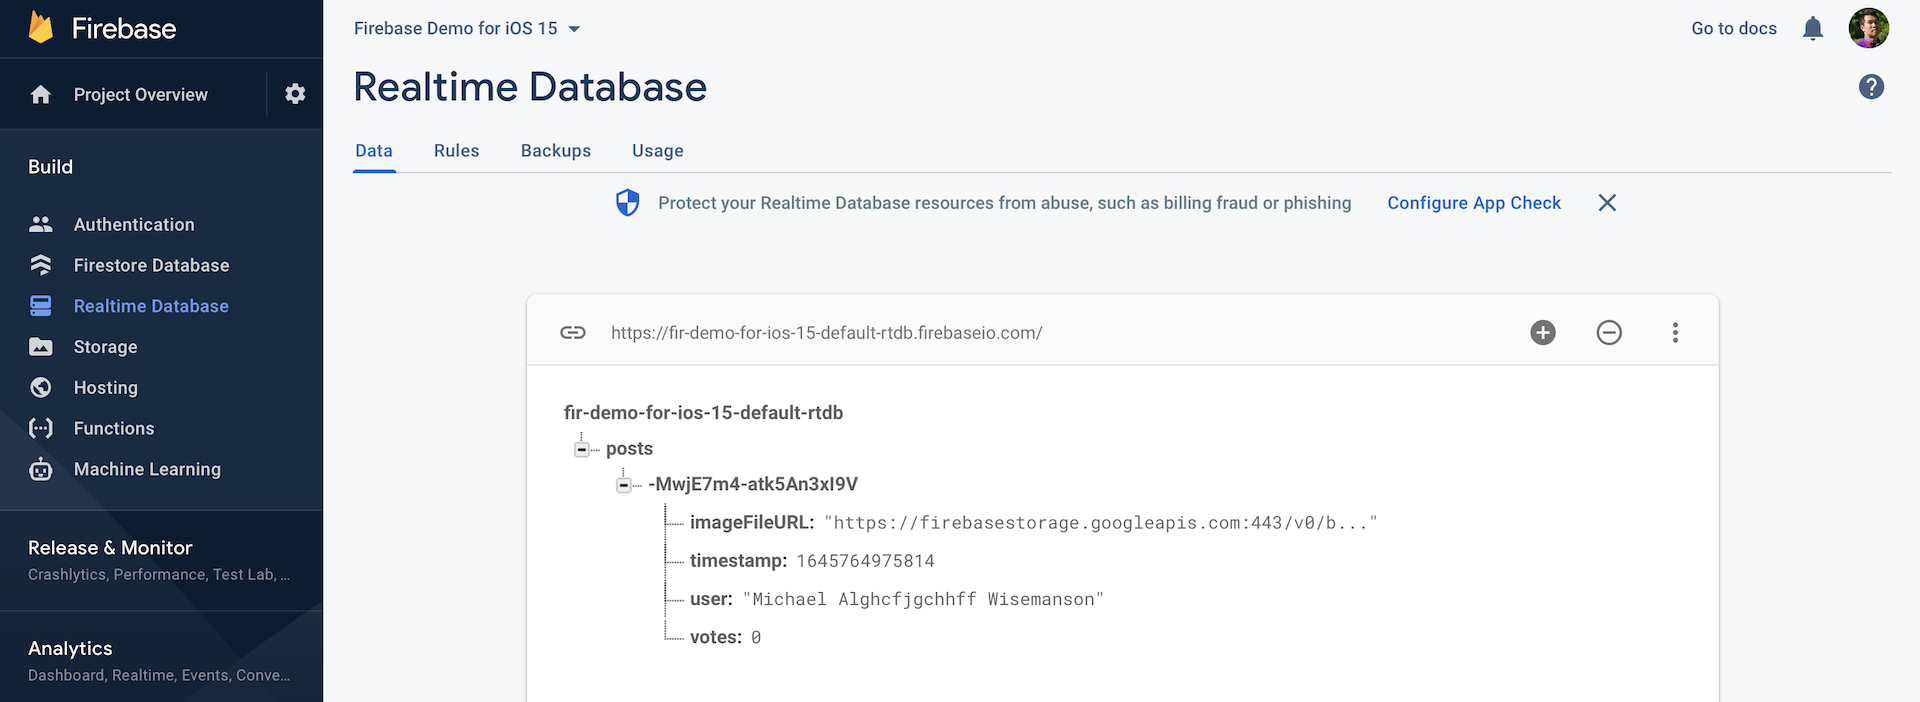
To give you a better idea, here is how the Post objects are structured in Firebase database.
{
  "posts" : {
    "-KmLSIrasVfvGDsvtYs1" : {
      "imageFileURL" : "https://firebasestorage.googleapis.com/v0/b/northlights-3d71f.appspot.com/o/photos%2F-KmLSIrasVfvGDsvtYs1.jpg?alt=media&token=123216de-8997-40a9-b9ae-c0784fa491c7",
      "timestamp" : 1497172886765,
      "user" : "Simon Ng",
      "votes" : 0
    },
    "-KmLSNCxkCC8T2xQgL9F" : {
      "imageFileURL" : "https://firebasestorage.googleapis.com/v0/b/northlights-3d71f.appspot.com/o/photos%2F-KmLSNCxkCC8T2xQgL9F.jpg?alt=media&token=2dacbf67-8bce-416b-9731-2c972d8a8012",
      "timestamp" : 1497172904579,
      "user" : "Simon Ng",
      "votes" : 2
    },
    "-KmMnVzKB-f3ZIZvAf9K" : {
      "imageFileURL" : "https://firebasestorage.googleapis.com/v0/b/northlights-3d71f.appspot.com/o/photos%2F-KmMnVzKB-f3ZIZvAf9K.jpg?alt=media&token=1f8659e5-1d18-42a5-a2fb-12fa55167644",
      "timestamp" : 1497195485301,
      "user" : "Adam Stark",
      "votes" : 3
    },
    "-KmMr6v7kX8eScNHlFsq" : {
      "imageFileURL" : "https://firebasestorage.googleapis.com/v0/b/northlights-3d71f.appspot.com/o/photos%2F-KmMr6v7kX8eScNHlFsq.jpg?alt=media&token=5572fd21-ced3-4d63-8727-e6f419d07104",
      "timestamp" : 1497196431352,
      "user" : "Shirley Jones",
      "votes" : 0
    }
}
Each child node of the Posts node is similar to a record of the Post table in Parse. As you can see, all data is stored in key-value pairs.
"-KmLSIrasVfvGDsvtYs1" : {
      "imageFileURL" : "https://firebasestorage.googleapis.com/v0/b/northlights-3d71f.appspot.com/o/photos%2F-KmLSIrasVfvGDsvtYs1.jpg?alt=media&token=123216de-8997-40a9-b9ae-c0784fa491c7",
      "timestamp" : 1497172886765,
      "user" : "Simon Ng",
      "votes" : 0
    }
Firebase Database supports the following native data types:
NSStringNSNumberNSDictionaryNSArray
Further reading: Building a properly structured Firebase database requires quite a bit of planning. You can take a look at this article about how to structure your data in Firebase Database:

- Structure Your Database (https://firebase.google.com/docs/database/ios/structure-data)
Understanding Firebase Storage
You may wonder why we store the image's URL in the example above, instead of the image itself. The reason is that you can't save binary data or images directly into Firebase Database.
Unlike Parse, Firebase does not store images in its database. Instead, it has another product called Storage, which is specifically designed for storing files like images and videos.
Like our demo app, if your app needs to store images on Firebase Database, you will first need to upload your image to Firebase Storage. And then, you retrieve the download URL of that image, and save it back to Firebase Database for later retrieval.
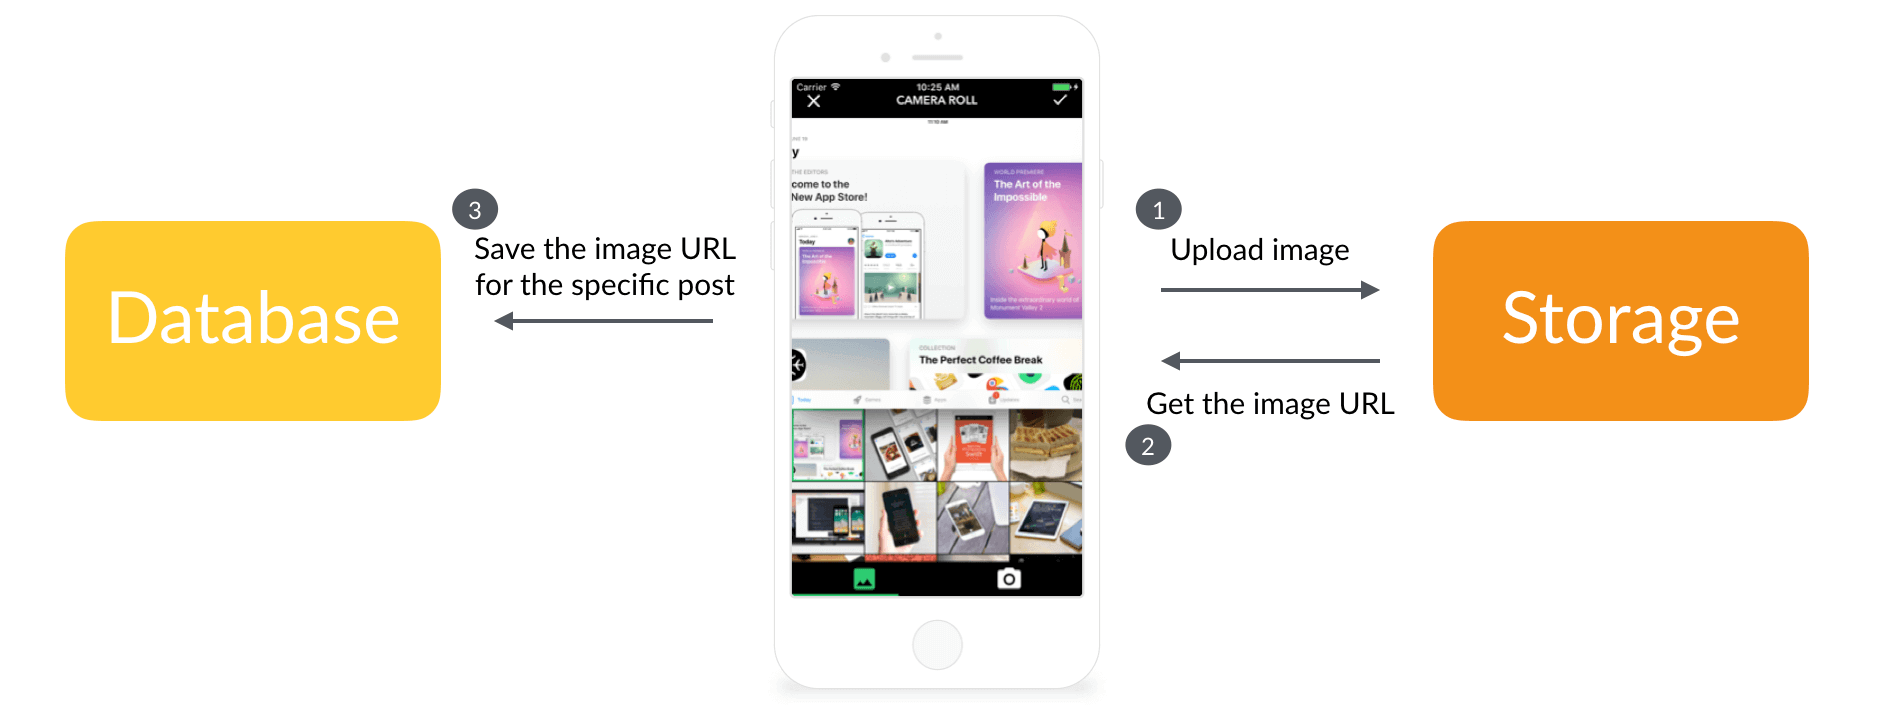
So, when your app displays a post with images, you first retrieve the post information from Firebase Database. With the image URL obtained, you go up to Firebase Storage to download the image, and then display it in the app.
Okay, I hope you now have some basic concepts of Firebase Database and Storage. The approach described in this section will be applied in our demo. I understand it will take you some time to figure out how to structure data as JSON objects, especially you are from relational database background.
Just take your time, revisit this section and check out the resources to strengthen your understanding.
Installing Firebase Database and Storage
Now it's time to get back to work. Let's start with the SDK installation.
As usual, we will use Swift Package Manager to install the required libraries of Firebase Database and Storage to our Xcode project.
Go up to the Xcode menu and choose File > Add Packages.... Key in the following repository URL:
https://github.com/firebase/firebase-ios-sdk
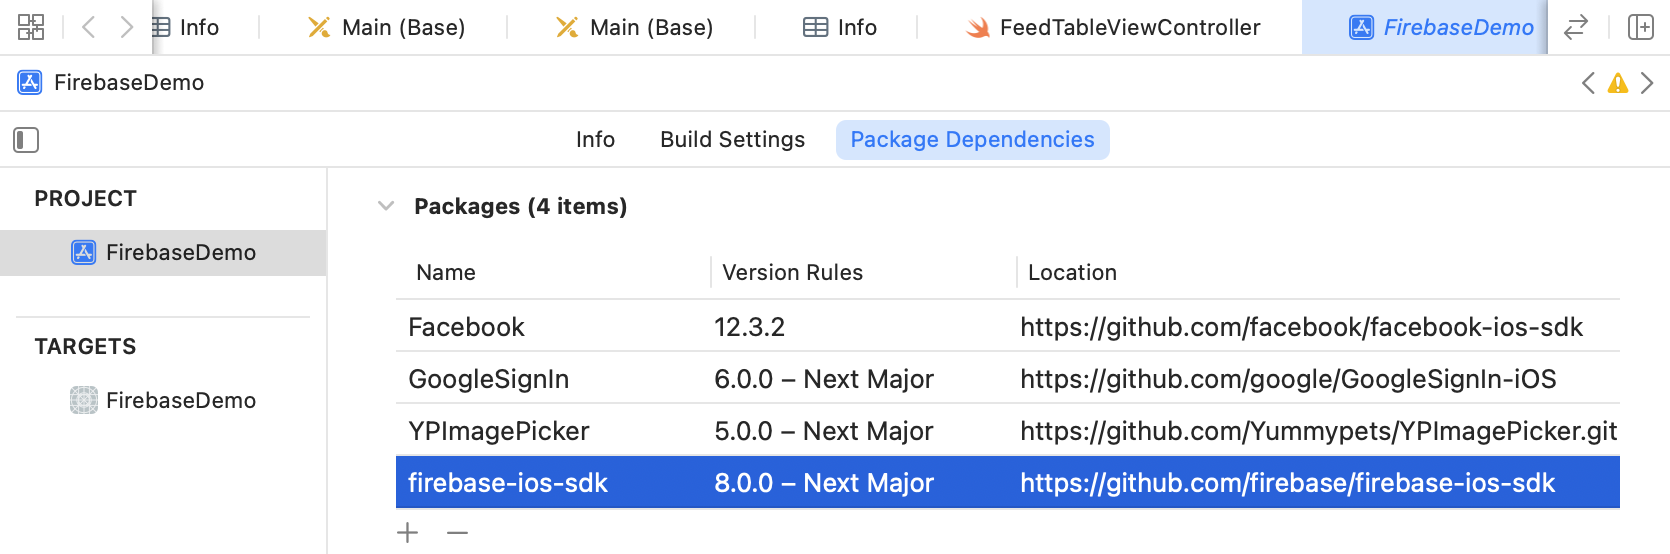
Xcode should load the available packages available in the Firebase iOS SDK. Select FirebaseAnalytics, FirebaseAuth, FirebaseDatabase, and FirebaseStorage. Choose Add Package to install the packages.
If Xcode can't display the packages, please remove the existing firebase-ios-sdk package and try the above procedures again. You can go to the FirebaseDemo configuration and find the package in the Package Dependencies tab. To remove the package, select firebase-ios-sdk and hit the - button.
After that, build the project once to ensure everything works fine.
Publishing a Post
As explained earlier, when a user selects and publishes a photo using the demo app, the photo will be first uploaded to Firebase Storage. With the returned image URL, we save the post information to Firebase Database. Regarding the post informati on, it includes:
- Post ID - a unique identifier to identify the post
- Image File URL - the URL of the image, which is returned by Firebase Storage
- User - the name of the user who publishes the photo
- Votes - the total number of upvotes (note: we will not discuss the upvote function in this chapter)
- Timestamp - the timestamp indicating when the photo was published
I know you already have a lot of questions in your head. Say, how can we upload the image from our app to Firebase Storage? How can we retrieve the image URL from Firebase Storage? How can we generate a unique post ID?
Resizing the Image
Let me start with the simple one - resizing the image.
Photos captured using the built-in camera are of high resolution with size over 1MB. To speed up the photo upload (as well as, download), I want to limit the resolution of the image and scale it down (if needed) before uploading it to Firebase Storage.
To do that, we will build an extension for UIImage. Extension in Swift is a powerful feature that lets you extend the feature of an existing class, structure, enumeration, or protocol type. Here, we are going to add a new method called scale(newWidth:) for the UIImage class using extensions.
Now go back to Xcode. In the project navigator, right click FirebaseDemo folder and choose New Group. Name the group Util. This is an optional step, but I want to better organize our Swift files.
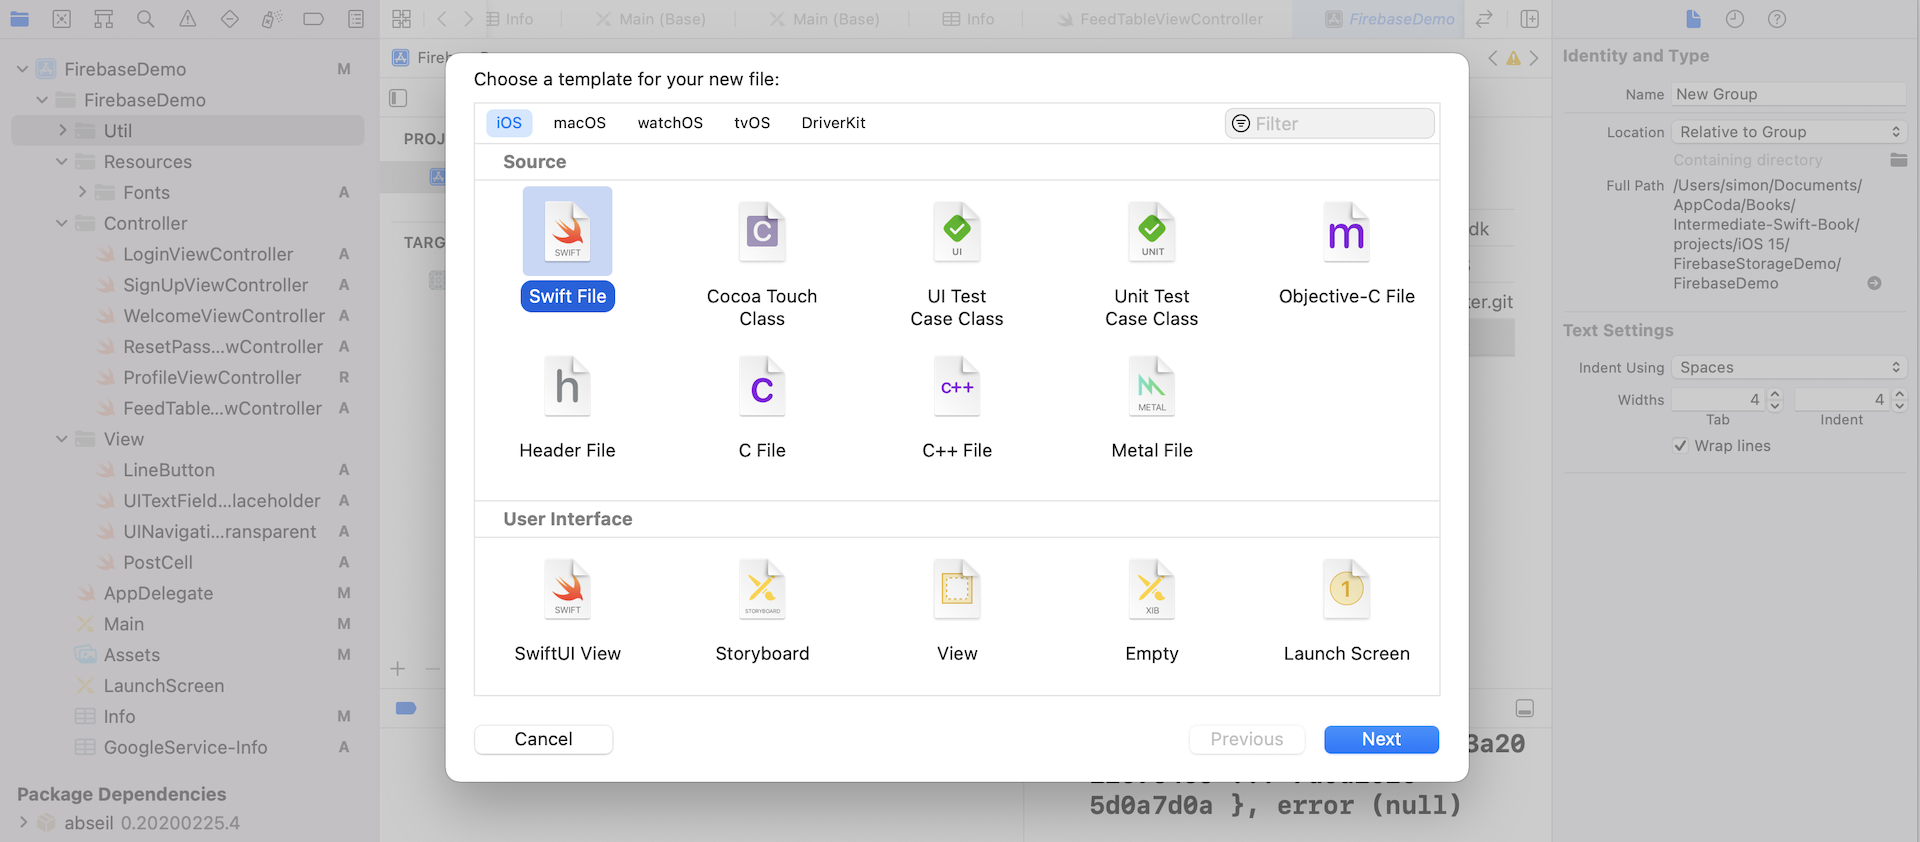
Next, right click Util folder, and select New file…. Choose the Swift file template and name the file UIImage+Scale.swift.
Once the file is created, replace it with the following code snippet:
import UIKit

extension UIImage {
    func scale(newWidth: CGFloat) -> UIImage {

        // Make sure the given width is different from the existing one
        if self.size.width == newWidth {
            return self
        }

        // Calculate the scaling factor
        let scaleFactor = newWidth / self.size.width
        let newHeight = self.size.height * scaleFactor
        let newSize = CGSize(width: newWidth, height: newHeight)

        UIGraphicsBeginImageContextWithOptions(newSize, false, 0.0);
        self.draw(in: CGRect(x: 0, y: 0, width: newWidth, height: newHeight))

        let newImage: UIImage? = UIGraphicsGetImageFromCurrentImageContext()
        UIGraphicsEndImageContext()

        return newImage ?? self
    }
}
This method takes the given width and resizes the image accordingly. We calculate the scaling factor based on the new width, so that we can keep the image's aspect ratio. Lastly, we create a new graphics context with the new size, draw the image and get the resized image.
Now that you have added a new method for the UIImage class, you can use it just like any other method in the original UIImage class:
let scaledImage = image.scale(newWidth: 960.0)
Uploading Files to Firebase Storage
Whether you write data to Firebase Database or Storage, it all starts with a database/storage reference. This reference serves as the entry point for accessing the database/storage.
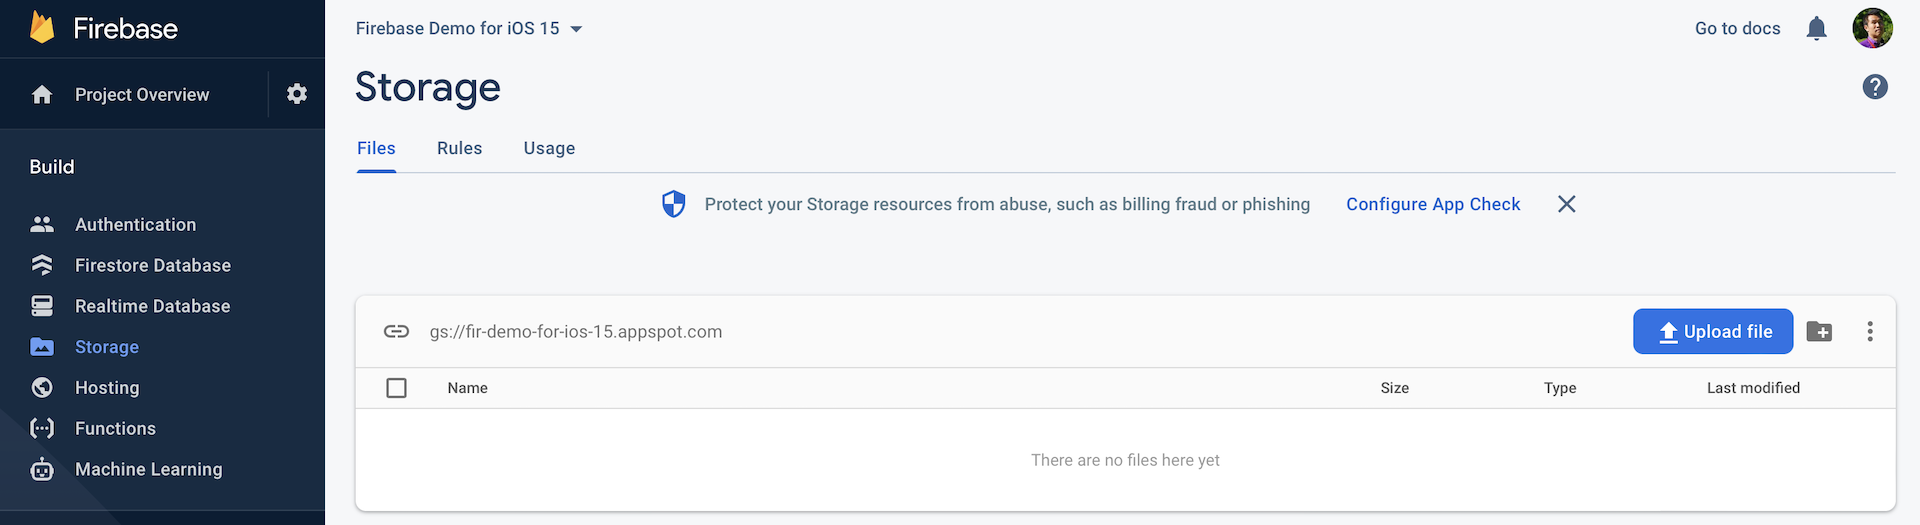
If you go up to the Firebase console (https://console.firebase.google.com), choose your Firebase application > Storage. Click Get Started to proceed. Follow the instruction to create the storage in test mode. You will then have a unique URL for your own storage (e.g. gs://fir-demo-for-ios-15.appspot.com). All your files and folders will be saved under that location, which is known as a Google Cloud Storage bucket.
There is a Rules option in the menu. If you go into the Rules section, you will see something like this:
rules_version = '2';
service firebase.storage {
  match /b/{bucket}/o {
    match /{allPaths=**} {
      allow read, write: if
          request.time < timestamp.date(2022, 3, 26);
    }
  }
}
Firebase Storage seamlessly integrates with its authentication service that we covered in chapter 37. For testing purpose, it is configured to allow all read/write access. Firebase provides a declarative security language that allows you to modify the access rules. To learn more about how to configure the security rules, you can refer to this guide (https://firebase.google.com/docs/storage/security/start). For our demo, we will keep it unchanged.
So how can you write data to Firebase Storage?
The Firebase SDK provides the Storage framework that lets you interact with the cloud storage for file upload and download. To obtain a reference to the storage location of your application, you get an instance of the Storage class and call the reference() method to retrieve the root Firebase Storage location.
Storage.storage().reference()
What if you want to create something like a sub-folder? You call a child method with the name of your sub-folder. This creates a new reference pointing to a child object of the root storage location.
Storage.storage().reference().child("photos")
To upload a file (say, JPG image) to Storage, you instantiate a StorageMetadata object to specify the file's content type. And then, you call the putData method of the storage reference to upload the data (here, it is the image data). The data will be uploaded asynchronously to the location of the storage reference.
// Create the file metadata
let metadata = StorageMetadata()
metadata.contentType = "image/jpg"

// Prepare the upload task
let uploadTask = imageStorageRef.putData(imageData, metadata: metadata) {
  metadata, error in

  // Handle the error and metadata
}
In the completion handler, you can check if the upload is successful or not.
To monitor the progress of the upload, you attach an observer to the upload task. Here is an example:
let observer = uploadTask.observe(.progress) { snapshot in

    let percentComplete = 100.0 * Double(snapshot.progress!.completedUnitCount) / Double(snapshot.progress!.totalUnitCount)
    print("Uploading \(imageKey).jpg... \(percentComplete)% complete")
}
The observer listens for the .progress event. If you need to display the progress of the upload task, you can add this observer to display the upload status.
The final question is: how can you retrieve the URL of the saved photo?
When an event is fired up, Firebase will pass you a snapshot of the task. You can access its metadata property that contains the download URL of the file.
snapshot.metadata?.downloadURL()?.absoluteString
Saving Data to Firebase Database
Before you can save data to Firebase Realtime Database, you have to first create your own data. In the Firebase console, choose Realtime Database and then click Create Database. Follow the instructions to create the database. For the security rules option, you can choose Start in Test Mode for testing purpose.
The way of writing data to Firebase Database is very similar to that of Storage. Instead of using the Storage framework, we use the Database framework.
Again, you first get a reference to the database of your Firebase application:
Database.database().reference()
You normally will not save your objects directly to the root location of the database. Say, in our case, we will not save each of the photo posts to the root location. Instead, we want to create a child key named posts, and save all the post objects under that path. To create and get a reference for the location at a specific relative path, you call the child method with the child key like this:
Database.database().reference().child("posts")
With the reference, it is very easy to save data to the database. You call the setValue() method of the reference object and specify the dictionary object you want to save:
let post: [String : Any] = ["imageFileURL" : imageFileURL, "votes" : Int(0), "user" : displayName, "timestamp" : timestamp]

postDatabaseRef.setValue(post)
We have discussed how we're going to structure the post data in earlier sections. The JSON tree looks like something like this:
{
  "posts" : {
    "-KmLSIrasVfvGDsvtYs1" : {
      "imageFileURL" : "https://firebasestorage.googleapis.com/v0/b/northlights-3d71f.appspot.com/o/photos%2F-KmLSIrasVfvGDsvtYs1.jpg?alt=media&token=123216de-8997-40a9-b9ae-c0784fa491c7",
      "timestamp" : 1497172886765,
      "user" : "Simon Ng",
      "votes" : 0
    },
    "-KmLSNCxkCC8T2xQgL9F" : {
      "imageFileURL" : "https://firebasestorage.googleapis.com/v0/b/northlights-3d71f.appspot.com/o/photos%2F-KmLSNCxkCC8T2xQgL9F.jpg?alt=media&token=2dacbf67-8bce-416b-9731-2c972d8a8012",
      "timestamp" : 1497172904579,
      "user" : "Simon Ng",
      "votes" : 2
    },

    ...
}
Each of the posts has a unique ID for identification, and is saved under the /posts path. Here, one question is: how can you generate and assign a unique ID?
There are various ways to do that. You can implement your own algorithm, but Firebase has provided an API for generating a new child location using a unique key. For instance, when you need to add a new post to the /posts location, you can call the childByAutoId method:
let postDatabaseRef = Database.database().reference().child("posts").childByAutoId
Firebase will generate a unique key for you and return you with the generated location (e.g. /posts/-KmLSNCxkCC8T2xQgL9F).
With this location reference, you can save the post information under that location by calling setValue. Here is an example:
let postDatabaseRef = Database.database().reference().child("posts").childByAutoId
let post: [String : Any] = ["imageFileURL" : imageFileURL, "votes" : Int(0), "user" : displayName, "timestamp" : timestamp]

postDatabaseRef.setValue(post)
Implementing Photo Upload
Now, let's combine all the things we just learned together and build the upload function of the app.
Open FeedTableViewController.swift, and add the import statement:
import Firebase
import FirebaseStorage
Next, update the openCamera method like this:
@IBAction func openCamera(_ sender: Any) {

    var config = YPImagePickerConfiguration()
    config.colors.tintColor = .black
    config.wordings.next = "OK"
    config.showsPhotoFilters = false

    let picker = YPImagePicker(configuration: config)

    picker.didFinishPicking { [unowned picker] items, _ in

        guard let photo = items.singlePhoto
            else {
            picker.dismiss(animated: true, completion: nil)

            return
        }

        // Generate a unique ID for the post and prepare the post database reference
        let postDatabaseRef = Database.database().reference().child("posts").childByAutoId()

        guard let imageKey = postDatabaseRef.key else {

            return
        }

        // Use the unique key as the image name and prepare the storage reference
        let imageStorageRef = Storage.storage().reference().child("photos").child("\(imageKey).jpg")

        // Resize the image
        let scaledImage = photo.image.scale(newWidth: 640.0)

        guard let imageData = scaledImage.jpegData(compressionQuality: 0.9) else {

            return
        }

        // Create the file metadata
        let metadata = StorageMetadata()
        metadata.contentType = "image/jpg"

        // Prepare the upload task

        let uploadTask = imageStorageRef.putData(imageData, metadata: metadata) { metadata, error in

            if error != nil {
                print(error.debugDescription)
                return
            }

            picker.dismiss(animated: true, completion: nil)

            imageStorageRef.downloadURL { (url, error) in

                guard let displayName = Auth.auth().currentUser?.displayName else {
                    return
                }

                guard let url = url else {
                    return
                }

                // Add a reference in the database
                let imageFileURL = url.absoluteString
                let timestamp = Int(Date().timeIntervalSince1970 * 1000)

                let post: [String : Any] = ["imageFileURL" : imageFileURL,
                                            "votes" : Int(0),
                                            "user" : displayName,
                                            "timestamp" : timestamp
                                            ]

                postDatabaseRef.setValue(post)

            }
        }


        let observer = uploadTask.observe(.progress) { snapshot in

            let percentComplete = 100.0 * Double(snapshot.progress!.completedUnitCount) / Double(snapshot.progress!.totalUnitCount)
            print("Uploading \(imageKey).jpg... \(percentComplete)% complete")
        }

    }

    present(picker, animated: true, completion: nil)

}
To recap, this method is called after the user taps the camera button for choosing a photo from the photo library or taking a picture. After the user takes a photo or select one from the photo library, we retrieve the selected photo and upload it to Firebase.
The code snippet is almost the same as what we have discussed in the earlier sections. But I want to highlight a few things:
When creating the
YPImagePickerinstance, we configure it to disable photo filters and change the wordings to "OK."We use
items.singlePhototo retrieve the selected photo.We use the unique key generated by
childByAutoId()as the image's name. This makes sure the image filename is unique.let imageStorageRef = Storage.storage().reference().child("photos").child("\(imageKey).jpg")We generate a timestamp for each post, which indicates when the post is published. Later, we will display the most recent posts in the feed. This timestamp is very useful for ordering the post list in reverse chronological order (i.e. the most recent post shows first).
let timestamp = Int(Date().timeIntervalSince1970 * 1000)
Now build and run the app to have a test. After the app launches, tap the camera icon and choose a photo. Once you confirm, the app should upload the photos to Firebase and go back to the home screen.
For now, we haven't implemented the download function. Therefore, the home screen is still blank after your upload. However, if you look at the console, it should see something like this:
Uploading -MwjE7m4-atk5An3xI9V.jpg... 0.004698850661128288% complete
Uploading -MwjE7m4-atk5An3xI9V.jpg... 100.0% complete
This indicates the upload task has completed. Furthermore, you can go back to the Firebase console and check out your Firebase app. Look into the Storage option. You should find that the images are stored in the photos folder.

Switch over to the Database option. You can also find that all your post objects are put under the /posts path. If you click the + button, you can reveal the details of each post. The value of imageFileURL is the download URL of the image. You can copy the link and paste it in any browser window to verify the image.
For later testing, I suggest you to upload at least 15 photos.
Reading Data from Firebase Database
We've talked about upload. How about reading data from the cloud database? The Firebase Database framework provides both the observeSingleEventOfType and observe methods for developers to retrieve data. These methods are event-based, meaning that they both listen for a certain event. When that event is fired, the callback function will be invoked with a snapshot containing all data retrieved. You can then further process the data for display.
For example, to retrieve all the posts under /posts path, this is the code snippet you need:
let postDatabaseRef = Database.database().reference().child("posts")
postDatabaseRef.observeSingleEvent(of: .value, with: { (snapshot) in

    print("Total number of posts: \(snapshot.childrenCount)")
    for item in snapshot.children.allObjects as! [DataSnapshot] {
        let postInfo = item.value as? [String: Any] ?? [:]

        print("-------")
        print("Post ID: \(item.key)")
        print("Image URL: \(postInfo["imageFileURL"] ?? "")")
        print("User: \(postInfo["user"] ?? "")")
        print("Votes: \(postInfo["votes"] ?? "")")
        print("Timestamp: \(postInfo["timestamp"] ?? "")")
    }

})
The snapshot variable contains all the posts retrieved from /posts path. The childrenCount property tells you the total number of objects available. All the post objects are stored in snapshot.children.allObjects as an array of dictionaries. The key of each dictionary object is the post ID. The value of that is another dictionary containing the post information.
You can insert the code snippet above in the viewDidLoad method of FeedTableViewController to have a test. Even though we haven't populated the data in the table view, you should be able to see something like this in the console:
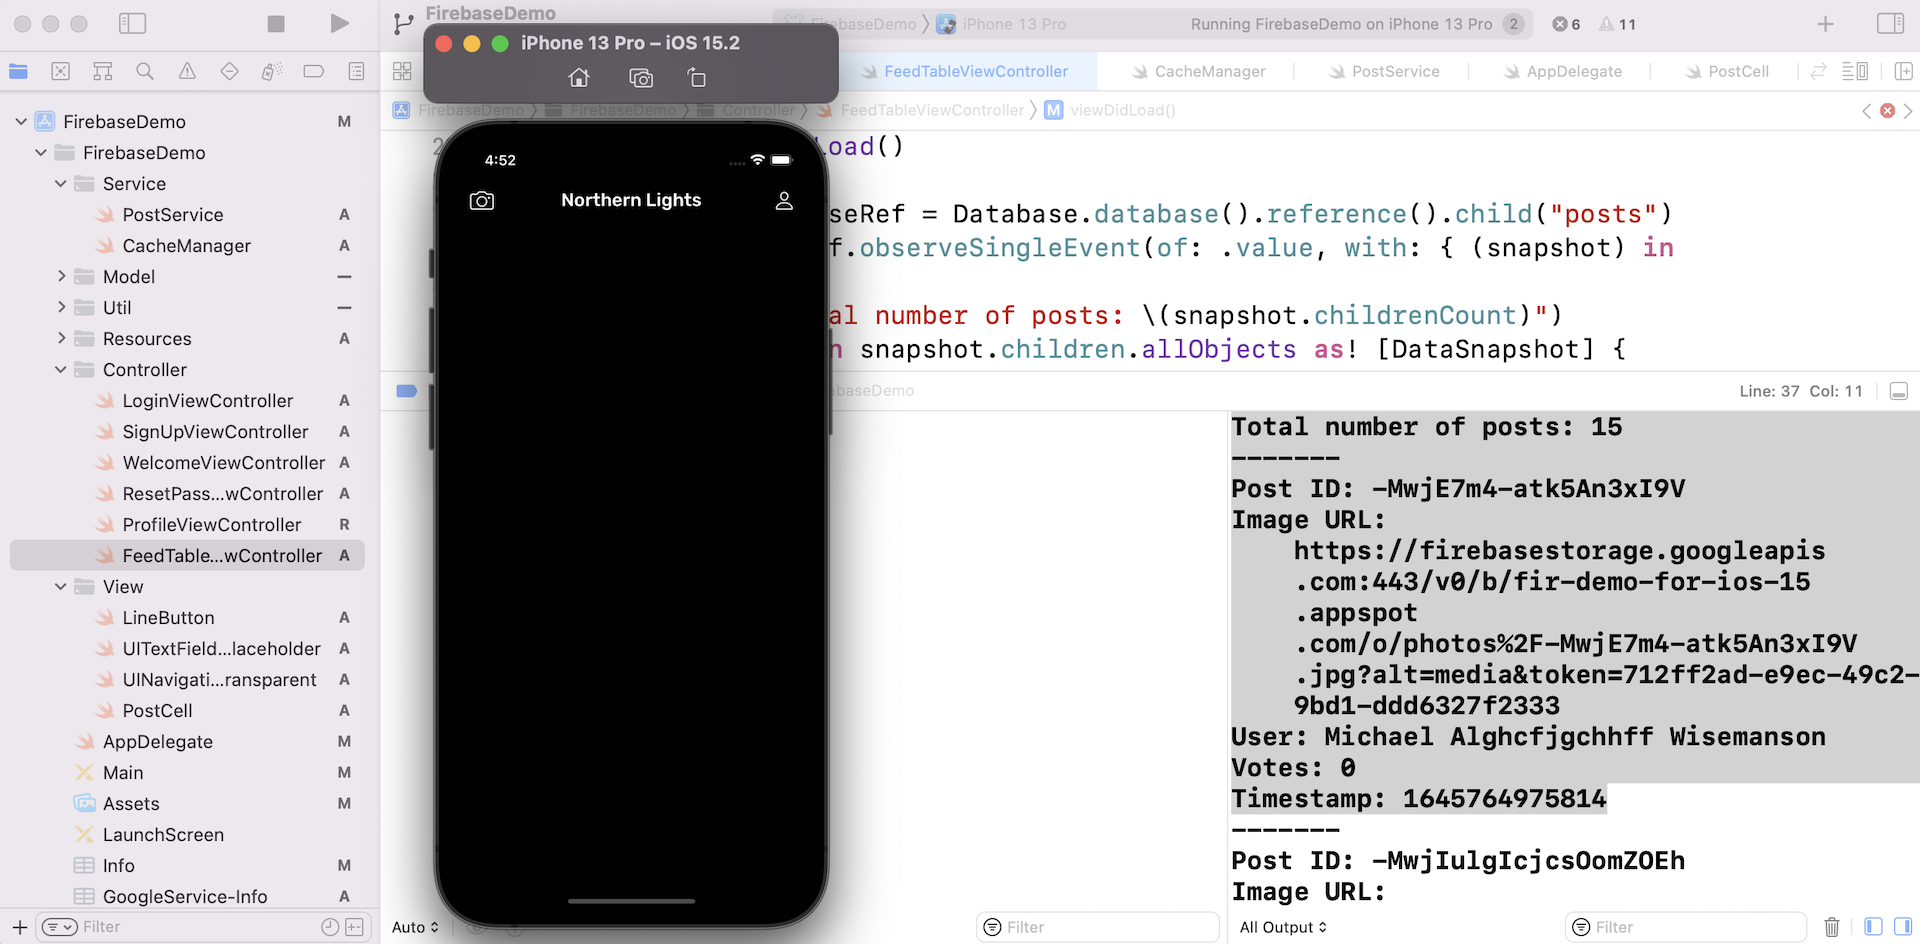
This is the way you retrieve data from Firebase Database.
The Database framework also provides the queryOrdered method to retrieve the JSON objects in a certain order. For example, to get the post objects in chronlogical order, you can write the following line of code:
let postDatabaseRef = Database.database().reference().child("posts").queryOrdered(byChild: "timestamp")
The above call to the queryOrdered(byChild:) method specifies the child key to order the results by. Here it is the timestamp. This query will get the posts in chronological order.
Consider that your database has stored over 10,000 posts, you will probably aware that there is a potential issue here. As your users publish more posts to the database, it will take a longer time to download all the posts.
To prevent the potential performance issues, it would be better to set a limit for the posts to be retrieved. Firebase provides the queryLimited(toFirst:) and queryLimited(toLast:) methods to set a limit. For example, if you want to get the first 10 posts of a query, you can use the queryLimited(toFirst:) method:
Database.database().reference().child("posts").queryLimited(toFirst: 10)
You can combine both queryOrdered and queryLimited methods together to form a more complex query. Say, for the demo app, we have to show the 5 most recent posts after the app is launched. We can write the query like this:
var postQuery = Database.database().reference().child("posts").queryOrdered(byChild: "timestamp")
postQuery = postQuery.queryLimited(toLast: 5)
We specify that the post objects should be ordered by timestamp. Since Firebase can only sort things in ascending order, the most recent post (with a larger value of timestamp) is the last object of an array. So we use queryLimited(toLast: 5) to retrieve the last 5 objects, which represents the 5 most recent posts.
Refactoring Our Code
Now that you have implemented the upload feature, you should also have some ideas about how to retrieve posts from Firebase.
Instead of jumping straight into coding, let's step back a little bit and review the code once again. If you look into the openCamera function and compare with the code for data retrieval we just discussed, you will find a lot of things in common.
For example, the database / storage reference should be able to be referred by any classes or methods:
let postDatabaseRef = Database.database().reference().child("posts").childByAutoId()

.
.
.

// Use the unique key as the image name and prepare the storage reference
let imageStorageRef = Storage.storage().reference().child("photos").child("\(imageKey).jpg")
Whether for writing or reading data, we need to have a reference to Firebase Database (or Storage). I foresee the following lines of code will be written everywhere whenever we need to interact with Firebase.
Database.database().reference()
Database.database().reference().child("posts")
Storage.storage().reference().child("photos")
Secondly, it is the dictionary object holding the post data. It will also be used everywhere.
let post: [String : Any] = ["imageFileURL" : imageFileURL,
                            "votes" : Int(0),
                            "user" : displayName,
                            "timestamp" : timestamp
When writing post data to Firebase, we have to create a dictionary object of post information. Conversely, when we retrieve data from Firebase, we have to save the dictionary object and extract the post information from that object.
For now, we hardcode the key, and do not have a model class for a post. Obviously, hardcoding the key in our code is prone to error.
Lastly, the code of the openCamera function is mostly related to data upload. Let me ask you. What if you have another button or class which also needs to upload a photo? Will you just duplicate the same code snippet to that button or class? You can do that but this is not a good programming practice and will make your code less manageable.
When you plan to copy and paste the same piece of code from one class to another, always ask yourself: What if you need to modify that piece of code in the future? If the same piece of code is scattered across several classes, you will have to modify every piece of the code. This will be a disaster.
Base on what we have reviewed, there are a couple of changes that can make our code better and more manageable:
- Create a model structure to represent a post. This structure can take a dictionary object of the post, and convert it into a more meaningful
Postobject. - Create a service class to manage all the interactions between Firebase database and storage. I want to centralize all the upload and download functions of Firebase database into a single service class. Whenever you need to read/write data to the Firebase cloud, you refer to this service class and call the appropriate method. This will prevent code duplication.
These are some of the high-level changes. Now let's dive in and refactor our existing code.
Creating the Model
First, we start with the model structure. In order to better organize the project, create a folder in project navigator by right clicking the FirebaseDemo folder and choose New Group. Name the group Model.
Next, right click Model and then select New File…. Choose the Swift File template and name the file Post.swift. Replace its content like this:
import Foundation

struct Post {

    // MARK: - Properties

    var postId: String
    var imageFileURL: String
    var user: String
    var votes: Int
    var timestamp: Int

    // MARK: - Firebase Keys

    enum PostInfoKey {
        static let imageFileURL = "imageFileURL"
        static let user = "user"
        static let votes = "votes"
        static let timestamp = "timestamp"
    }

    // MARK: - Initialization

    init(postId: String, imageFileURL: String, user: String, votes: Int, timestamp: Int = Int(Date().timeIntervalSince1970 * 1000)) {
        self.postId = postId
        self.imageFileURL = imageFileURL
        self.user = user
        self.votes = votes
        self.timestamp = timestamp
    }

    init?(postId: String, postInfo: [String: Any]) {
        guard let imageFileURL = postInfo[PostInfoKey.imageFileURL] as? String,
            let user = postInfo[PostInfoKey.user] as? String,
            let votes = postInfo[PostInfoKey.votes] as? Int,
            let timestamp = postInfo[PostInfoKey.timestamp] as? Int else {

                return nil
        }

        self = Post(postId: postId, imageFileURL: imageFileURL, user: user, votes: votes, timestamp: timestamp)
    }
}
The Post structure represents a basic photo post. It has various properties, such as imageFileURL, for storing the post information. The keys used in Firebase Database are constants. So we create an enum named PostInfoKey to store the key names. For any reason we need to alter the key name in the future, this is the single file we have to change.
Furthermore, we have created two initialization methods. When you initialize an instance of Post, you can pass each of the required properties including post ID, image file URL, user and the number of votes. Alternatively, you can simply pass the dictionary object of the post to create an instance.
Creating the Service Class
Now let's move on to the service class. Again in the project navigator, right click the FirebaseDemo folder and choose New Group. Name the group Service. Right click the Service folder and select New File…. Use the Swift file template and name the file PostService.swift.
Once the file has been created, replace the content like this:
import Foundation
import Firebase
import FirebaseDatabase
import FirebaseStorage

final class PostService {

    // MARK: - Properties

    static let shared: PostService = PostService()

    private init() { }

    // MARK: - Firebase Database References

    let BASE_DB_REF: DatabaseReference = Database.database().reference()

    let POST_DB_REF: DatabaseReference = Database.database().reference().child("posts")

    // MARK: - Firebase Storage Reference

    let PHOTO_STORAGE_REF: StorageReference = Storage.storage().reference().child("photos")

}
To recap, this service class is created to centralize the access of the Firebase Database/Storage reference, and the upload/download operations.
Therefore, in the class, we declare three constants:
- Database reference for accessing the root database location
- Database reference for accessing the
/postslocation - Storage reference for accessing the
/photosfolder
In the code above, we apply the Singleton pattern for designing the PostService class. The singleton pattern is very common in the iOS SDK and can be found everywhere in the Cocoa Touch frameworks (e.g. UserDefaults.standard, UIApplication.shared, URLSession.shared). Singleton guarantees that only one instance of a class is instantiated. At any time of the application lifecycle, we want to have only a single PostService to refer to. This is why we apply the Singleton pattern here.
To write a Singleton in Swift, we define the init() method as private to prevent other objects from creating an instance of the class. To let other objects use PostService, we provide a static shared property that contains the instance of PostService.
final class PostService {

    static let shared: PostService = PostService()

    private init() { }
}
Later, if you need to use PostService, you can access the property like this:
PostService.shared.POST_DB_REF
Now it's time to refactor the code related to post upload. We are going to create a general method for uploading photos to Firebase. Insert a new method called uploadImage in the PostService structure:
func uploadImage(image: UIImage, completionHandler: @escaping () -> Void) {

    // Generate a unique ID for the post and prepare the post database reference
    let postDatabaseRef = POST_DB_REF.childByAutoId()

    // Use the unique key as the image name and prepare the storage reference
    guard let imageKey = postDatabaseRef.key else {
        return
    }

    let imageStorageRef = PHOTO_STORAGE_REF.child("\(imageKey).jpg")

    // Resize the image
    let scaledImage = image.scale(newWidth: 640.0)

    guard let imageData = scaledImage.jpegData(compressionQuality: 0.9) else {
        return
    }

    // Create the file metadata
    let metadata = StorageMetadata()
    metadata.contentType = "image/jpg"

    // Prepare the upload task
    let uploadTask = imageStorageRef.putData(imageData, metadata: metadata) { metadata, error in

        if error != nil {
            print(error.debugDescription)
            return
        }

        imageStorageRef.downloadURL { (url, error) in

            guard let displayName = Auth.auth().currentUser?.displayName else {
                return
            }

            guard let url = url else {
                return
            }

            // Add a reference in the database
            let imageFileURL = url.absoluteString
            let timestamp = Int(Date().timeIntervalSince1970 * 1000)

            let post: [String : Any] = ["imageFileURL" : imageFileURL,
                                        "votes" : Int(0),
                                        "user" : displayName,
                                        "timestamp" : timestamp
                                        ]

            postDatabaseRef.setValue(post)

        }

        completionHandler()
    }

    let observer = uploadTask.observe(.progress) { snapshot in

        let percentComplete = 100.0 * Double(snapshot.progress!.completedUnitCount) / Double(snapshot.progress!.totalUnitCount)
        print("Uploading \(imageKey).jpg... \(percentComplete)% complete")
    }

}
As you can see, the body of the method is nearly the same as the code in the openCamera method except that:
- We refer to the database reference constants defined in
PostService. - We no longer hardcode the key of the post dictionary. Instead, we refer to the constants defined in
PostInfoKeyof thePoststructure. - The method has a parameter called
completionHandler, which is a closure. The caller of this method can pass a function, that will be executed after the post has been uploaded.
Modifying the Existing Code
Now that we have created both the model and service classes, let's modify the openCamera of the FeedTableViewController class to make use of the new classes.
Update the method like this:
func doneButtonDidPress(_ imagePicker: ImagePickerController, images: [UIImage]) {

    // Get the first images
    guard let image = images.first else {
        dismiss(animated: true, completion: nil)

        return
    }

    // Upload image to the cloud
    PostService.shared.uploadImage(image: image) {
        self.dismiss(animated: true, completion: nil)
    }

}
That's it! You can build and run the project to have a test. From the user perspective, everything is exactly the same as before.
However, the code now looks much cleaner, and is easier to maintain.
Implementing the Post Feed
With a well organized code structure, it is time to continue to work on the download feature.
We have already discussed how we can read data from Firebase, and retrieve the post objects. Let's first create a new method in PostService for downloading the recent posts. I foresee this method will be used for these two situations:
- When the app is first launched, the method will be used to retrieve the 5 most recent posts.
- The app has a pull-to-refresh feature for refreshing the photo feed. In this case, we want to retrieve the posts newer than the most recent post in the post feed.
To fulfill the requirements mentioned above, this method is designed to accept three parameters:
start- It will have an optionalstartparameter that takes a timestamp. If the caller of the method specifies the timestamp, we will retrieve the post objects with a timestamp newer than the given value.limit- The maximum number of post objects to be retrieved.completionHandler- a closure to be executed after the post objects are retrieved. We will pass an array of posts (in reverse chronological order) as the parameter of the closure.
Now open the PostService.swift file, and create the method getRecentPosts:
func getRecentPosts(start timestamp: Int? = nil, limit: UInt, completionHandler: @escaping ([Post]) -> Void) {

    var postQuery = POST_DB_REF.queryOrdered(byChild: Post.PostInfoKey.timestamp)
    if let latestPostTimestamp = timestamp, latestPostTimestamp > 0 {
        // If the timestamp is specified, we will get the posts with timestamp newer than the given value
        postQuery = postQuery.queryStarting(atValue: latestPostTimestamp + 1, childKey: Post.PostInfoKey.timestamp).queryLimited(toLast: limit)
    } else {
        // Otherwise, we will just get the most recent posts
        postQuery = postQuery.queryLimited(toLast: limit)
    }

    // Call Firebase API to retrieve the latest records
    postQuery.observeSingleEvent(of: .value, with: { (snapshot) in

        var newPosts: [Post] = []
        for item in snapshot.children.allObjects as! [DataSnapshot] {
            let postInfo = item.value as? [String: Any] ?? [:]

            if let post = Post(postId: item.key, postInfo: postInfo) {
                newPosts.append(post)
            }
        }

        if newPosts.count > 0 {
            // Order in descending order (i.e. the latest post becomes the first post)
            newPosts.sort(by: { $0.timestamp > $1.timestamp })
        }

        completionHandler(newPosts)

    })

}
You should be familiar with part of the code. The idea is that we build a query with using POST_DB_REF and retrieve the posts in chronological order. If no timestamp is given, we simply call queryLimited(toLast:) to get the most recent posts.
Note: You may wonder why we call queryLimited(toLast:) instead of queryLimited(toFirst:). Firebase sorts the posts in chronological order. If you consider the posts as an array of objects, the first item will be the oldest post, while the most recent post will be the last item of the array. Hence, we use queryLimited(toLast:) to get the most recent posts.When the caller of the method passes us a
timestamp, we will retrieve the post objects with timestamp larger than the given value. So we build a query like this:
postQuery = postQuery.queryStarting(atValue: latestPostTimestamp + 1, childKey: Post.PostInfoKey.timestamp).queryLimited(toLast: limit)
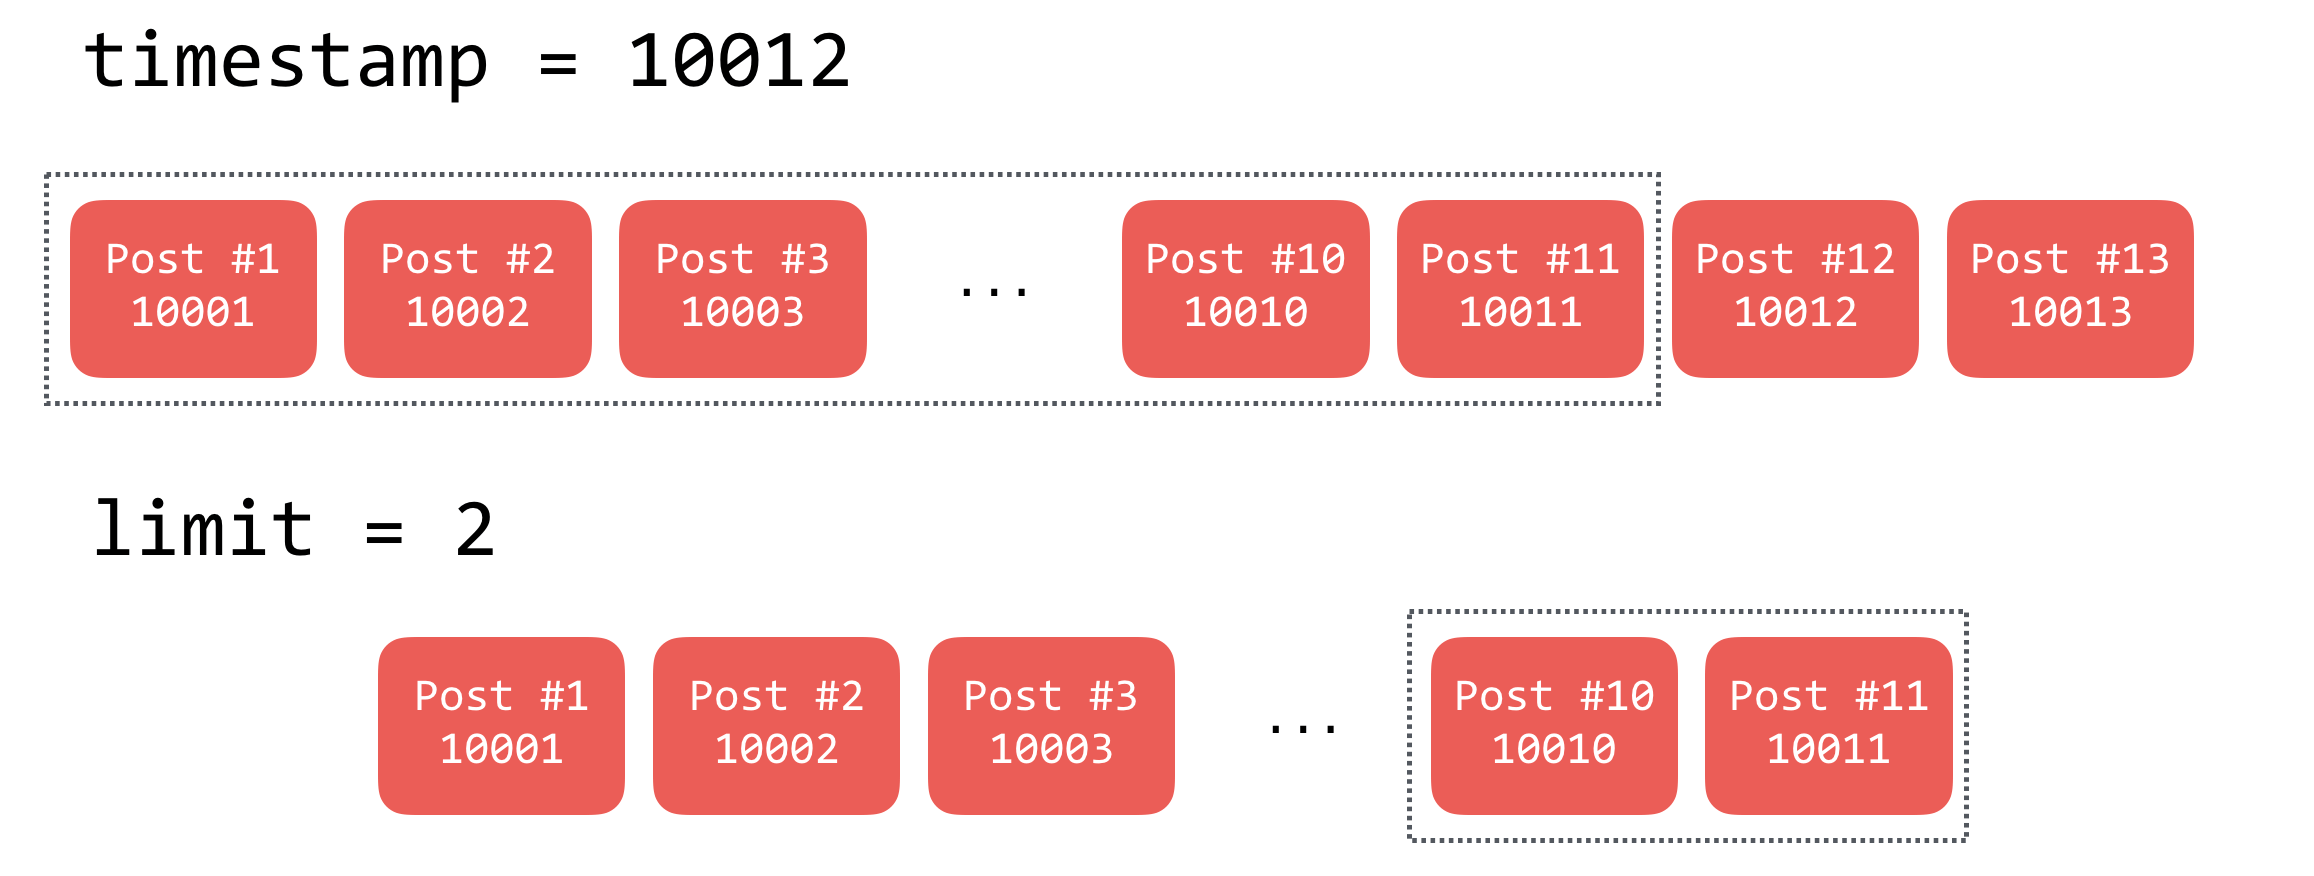
The queryStarting(atValue:) method is used to generate a reference to a limited view of the data. Here only those posts with the value of timestamp larger than the given timestamp will be included in the result of the query.
Figure 39.19 shows you an example. Assuming there are just two posts displayed in the post feed, the most recent post has the timestamp 10002. When you call queryStarting(atValue: 10002 + 1), it will retrieve all the posts with a timestamp value greater than and equal to 10003.
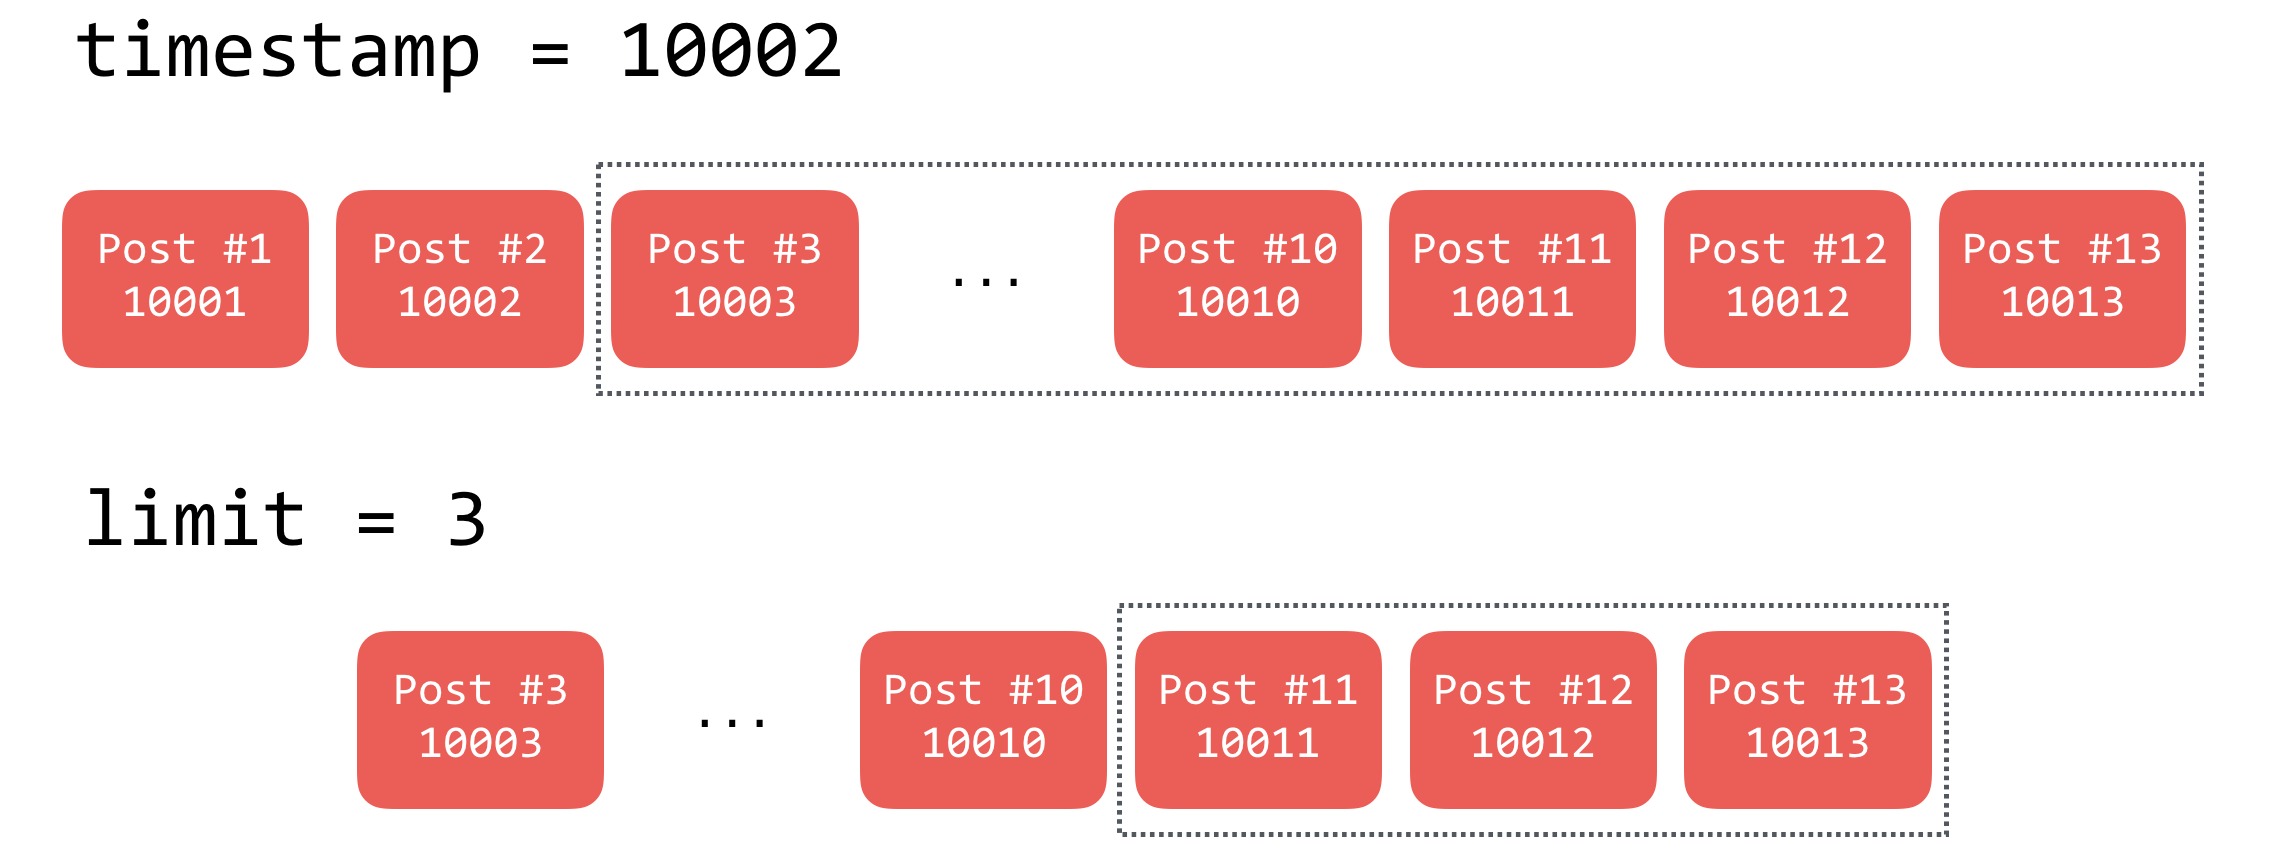
In the query, we also combine the queryLimited method to limit the total number of posts retrieved. Say, if we set the limit to 3, only the 3 most recent posts will be downloaded.
After the query is prepared, we call observeSingleEvent to execute the query and retrieve the post objects. All the objects returned are saved in the newPosts array. Since Firebase sorts the posts in chronological order, we order it into an array of Post object in reverse chronological order. In other words, the most recent post becomes the first object in the array.
newPosts.sort(by: { $0.timestamp > $1.timestamp })
Lastly, we call the given completionHandler and pass it the array of posts for further processing.
In the next section, we will discuss how to populate the posts in FeedTableViewController. That said, if you can't wait to test the method, update the viewDidLoad method of the FeedTableViewController class like below:
override func viewDidLoad() {
    super.viewDidLoad()

    PostService.shared.getRecentPosts(limit: 3) { (newPosts) in

        newPosts.forEach({ (post) in
            print("-------")
            print("Post ID: \(post.postId)")
            print("Image URL: \(post.imageFileURL)")
            print("User: \(post.user)")
            print("Votes: \(post.votes)")
            print("Timestamp: \(post.timestamp)")
        })
    }
}
Run the app, and you will see messages similar to the following after your login:
Post ID: -L-aAYItxhmVeFv_EUff
Image URL: https://firebasestorage.googleapis.com/v0/b/fir-clouddemo-cdfff.appspot.com/o/photos%2F-L-aAYItxhmVeFv_EUff.jpg?alt=media&token=8624ef61-b3cc-4894-b1a0-0ece9d13ac38
User: Simon Ng AppCoda
Votes: 0
Timestamp: 1512469052775

...
This indicates the method is already working and retrieving the 3 most recent posts from your Firebase database.
Populating Photos into the Table View
I assume you understand how to work with UITableView and UITableViewController, so this section will be much easier compared the previous section.
To populate the posts in the table view, we have to implement a few things:
- Override the required methods of
UITableViewDataSourceto display the post content. - The table view cell should be able to download the photo from the given image URL in the background.
- To improve the table view performance, we will cache the images in memory after they are downloaded.
Building the Cache Manager
Let's start with point 3 and implement the cache manager. The iOS SDK has provided a handy class called NSCache for caching objects in key-value pairs. We will create a CacheManager class to centralize the cache management of the posts.
In the project navigator, right click the Service folder and choose New File…. Select the Swift File template and name the file CacheManager.swift.
Insert the following code snippet in the file:
enum CacheConfiguration {
    static let maxObjects = 100
    static let maxSize = 1024 * 1024 * 50
}

final class CacheManager {

    static let shared: CacheManager = CacheManager()
    private static var cache: NSCache<NSString, AnyObject> = {
        let cache = NSCache<NSString, AnyObject>()
        cache.countLimit = CacheConfiguration.maxObjects
        cache.totalCostLimit = CacheConfiguration.maxSize

        return cache
    }()

    private init() { }

    func cache(object: AnyObject, key: String) {
        CacheManager.cache.setObject(object, forKey: key as NSString)
    }

    func getFromCache(key: String) -> AnyObject? {
        return CacheManager.cache.object(forKey: key as NSString)
    }
}
NSCache has two properties for managing the cache size. You can define the maximum number of objects and the maximum size of the objects it can hold. For this, we define a CacheConfiguration enum holding constants for these two values.
Similar to PostService, the CacheManager class is a singleton. It has an instance of NSCache that can hold up to 100 objects with a size limit of 50MB.
The class provides two methods for adding an object to cache, and retrieving an object from the cache by specifying the key of the object.
Displaying the Post Information and Downloading the Post Image in PostCell
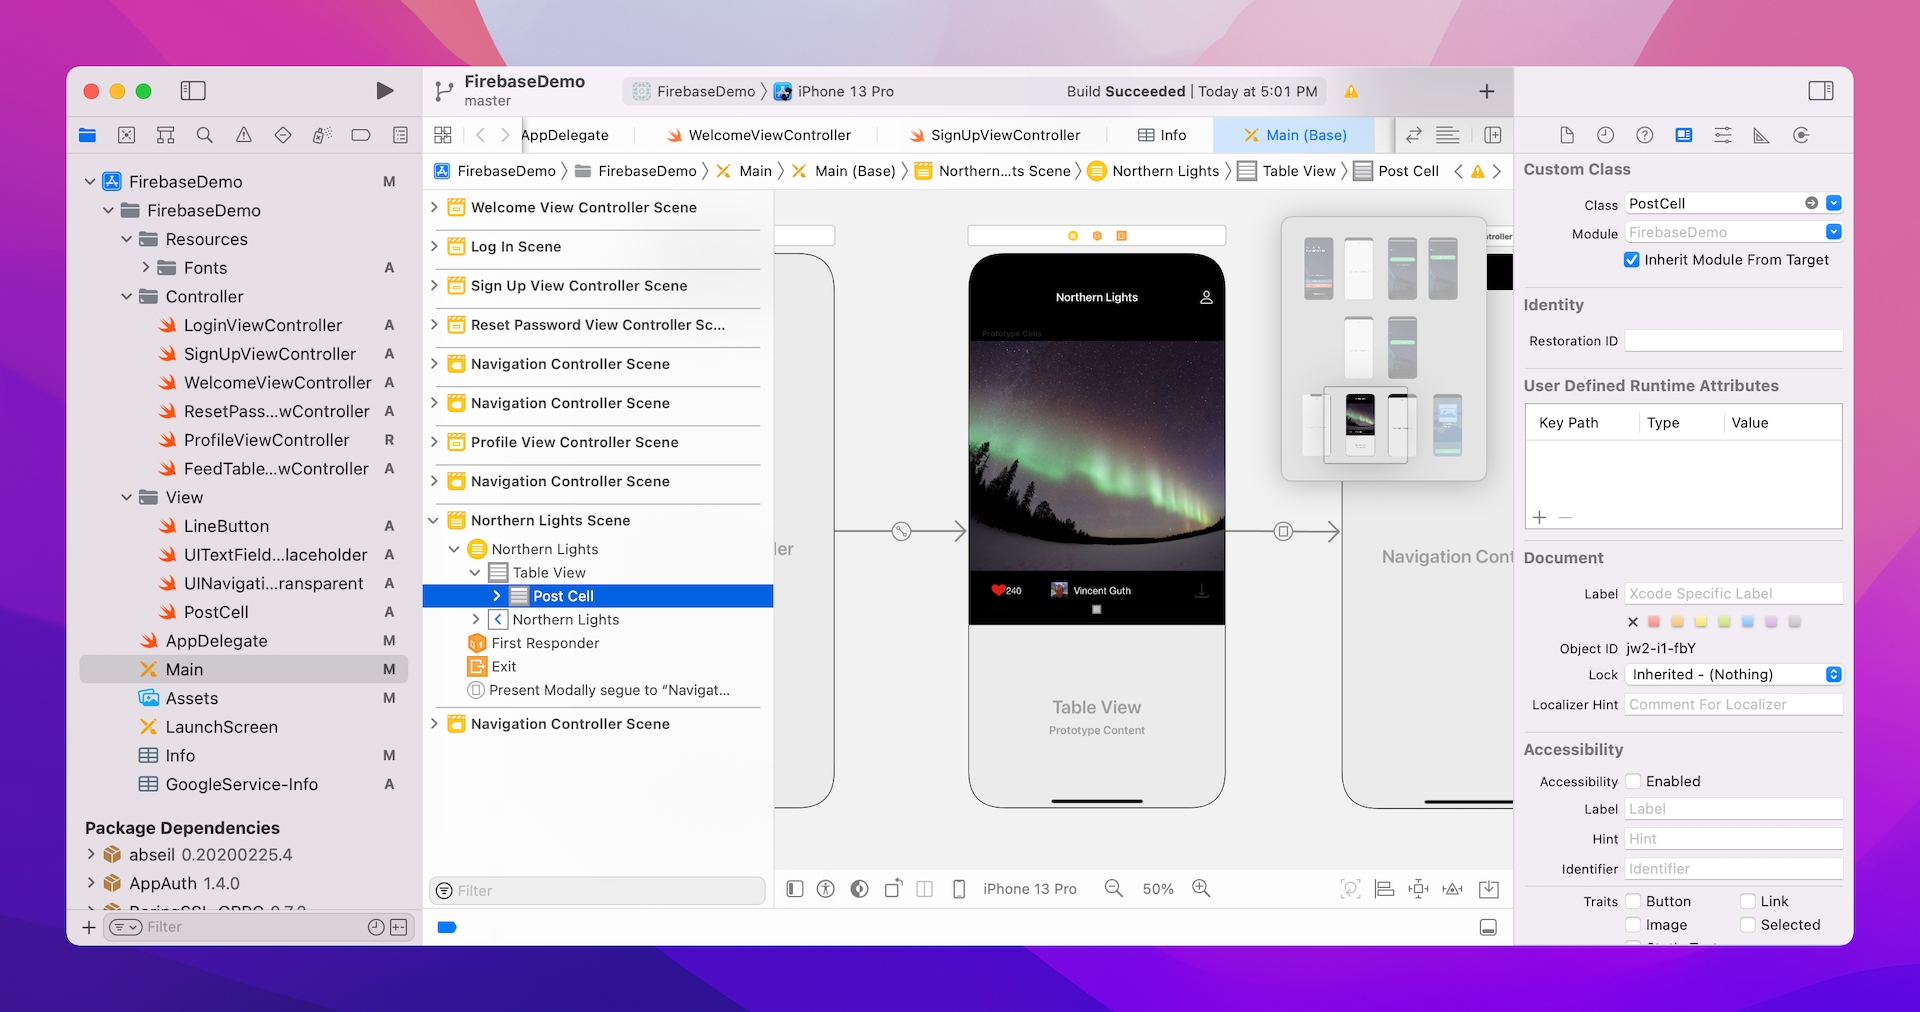
With the cache implementation ready, let's now update the PostCell class to implement the image download. PostCell is a custom class of the prototype cell in FeedTableViewController.
To configure the cell for a particular post, we will create a configure method that takes in a Post object. Insert the following code in the PostCell class:
func configure(post: Post) {

    // Set the cell style
    selectionStyle = .none

    // Set name and vote count
    nameLabel.text = post.user
    voteButton.setTitle("\(post.votes)", for: .normal)
    voteButton.tintColor = .white

    // Reset image view's image
    photoImageView.image = nil

    // Download post image
    if let image = CacheManager.shared.getFromCache(key: post.imageFileURL) as? UIImage {
        photoImageView.image = image

    } else {
        if let url = URL(string: post.imageFileURL) {

            let downloadTask = URLSession.shared.dataTask(with: url, completionHandler: { (data, response, error) in

                guard let imageData = data else {
                    return
                }

                OperationQueue.main.addOperation {
                    guard let image = UIImage(data: imageData) else { return }

                    self.photoImageView.image = image

                    // Add the downloaded image to cache
                    CacheManager.shared.cache(object: image, key: post.imageFileURL)
                }

            })

            downloadTask.resume()
        }
    }
}
The first few lines of the code above set the publisher's name of the photo, and the vote count.
The given post object contains the image's URL. We first check if it can found in the cache. If that is true, we display the image right away. Otherwise, we go up to Firebase and download the image by creating a dataTask of URLSession.
Implementing the UITableViewDataSource Methods for Displaying the Post Cells
Now that we have both the cache manager and the post cell ready, let's implement the required methods of UITableViewDataSource to display the post cells.
Go back to FeedTableViewController.swift and declare two properties in the class:
var postfeed: [Post] = []
fileprivate var isLoadingPost = false
The postfeed property keeps all the current posts (in reverse chronological order) for displaying in the table view. By default, it is empty. The isLoadingPost property indicates whether the app is downloading posts from Firebase. It will be used later for implementing infinite scrolling.
Note: In Swift, it provides various access modifier such as public, private, internal for controlling the access of a type.Next, create an extension offileprivatewas first introduced in Swift 3 to restrict the access of an entity to its own defining source file. Here,isLoadingPostcan only be accessed by entities defined in the FeedTableViewController.swift file.
FeedTableViewController to override the default implementation of these methods:
// MARK: - UITableViewDataSource Methods

extension FeedTableViewController {

    override func tableView(_ tableView: UITableView, cellForRowAt indexPath: IndexPath) -> UITableViewCell {

        let cell = tableView.dequeueReusableCell(withIdentifier: "Cell", for: indexPath) as! PostCell

        let currentPost = postfeed[indexPath.row]
        cell.configure(post: currentPost)

        return cell
    }

    override func tableView(_ tableView: UITableView, numberOfRowsInSection section: Int) -> Int {
        return postfeed.count
    }

    override func numberOfSections(in tableView: UITableView) -> Int {
        return 1
    }
}
The code above is very straightforward. It is just a standard implementation for populating data in the table view. We specify the total number of rows to display and tell each cell what to display in the tableView(_:cellForRowAt:) method.
As you may notice, there is one important thing that is missing. We haven't retrieved the posts from Firebase.
Now add two new methods named loadRecentPosts and displayNewPosts in the FeedTableViewController class:
// MARK: - Managing Post Download and Display

fileprivate func loadRecentPosts() {

    isLoadingPost = true

    PostService.shared.getRecentPosts(start: postfeed.first?.timestamp, limit: 10) { (newPosts) in

        if newPosts.count > 0 {
            // Add the array to the beginning of the posts arrays
            self.postfeed.insert(contentsOf: newPosts, at: 0)
        }

        self.isLoadingPost = false

        self.displayNewPosts(newPosts: newPosts)

    }
}

private func displayNewPosts(newPosts posts: [Post]) {
    // Make sure we got some new posts to display
    guard posts.count > 0 else {
        return
    }

    // Display the posts by inserting them to the table view
    var indexPaths:[IndexPath] = []
    self.tableView.beginUpdates()
    for num in 0...(posts.count - 1) {
        let indexPath = IndexPath(row: num, section: 0)
        indexPaths.append(indexPath)
    }
    self.tableView.insertRows(at: indexPaths, with: .fade)
    self.tableView.endUpdates()
}
In the loadRecentPosts method, we call the getRecentPosts method of PostService to get the 10 most recent posts. We then pass the posts to another new method displayNewPosts for display.
To insert the new posts into the table view, we use the insertRows method of UITableView, along with the beginUpdates() and endUpdates() to perform a batch insertions.
We are almost done.
The final thing is to modify the viewDidLoad method to call loadRecentPosts().
override func viewDidLoad() {
    super.viewDidLoad()

    // Load recent posts
    loadRecentPosts()
}
You've made it! It is time to hit the Run button to try out the app. If you have everything correctly, the app should show you the 10 most recent posts.

Fixing the Image Loading Issues
If you scroll the table view at normal speed, the app works pretty well. Now re-run the app. This time, try to scroll the table view very quickly. You will probably discover an undesirable behaviour, especially your network speed is slow. The image of the reused cells got overwritten twice (or even more) before showing the final image.
The app is functionally correct. At the end of the loading, the cells display the correct images. You just experience a minor flickering effect.
What happens here? Figure 39.21 explains why there is an image loading issue.
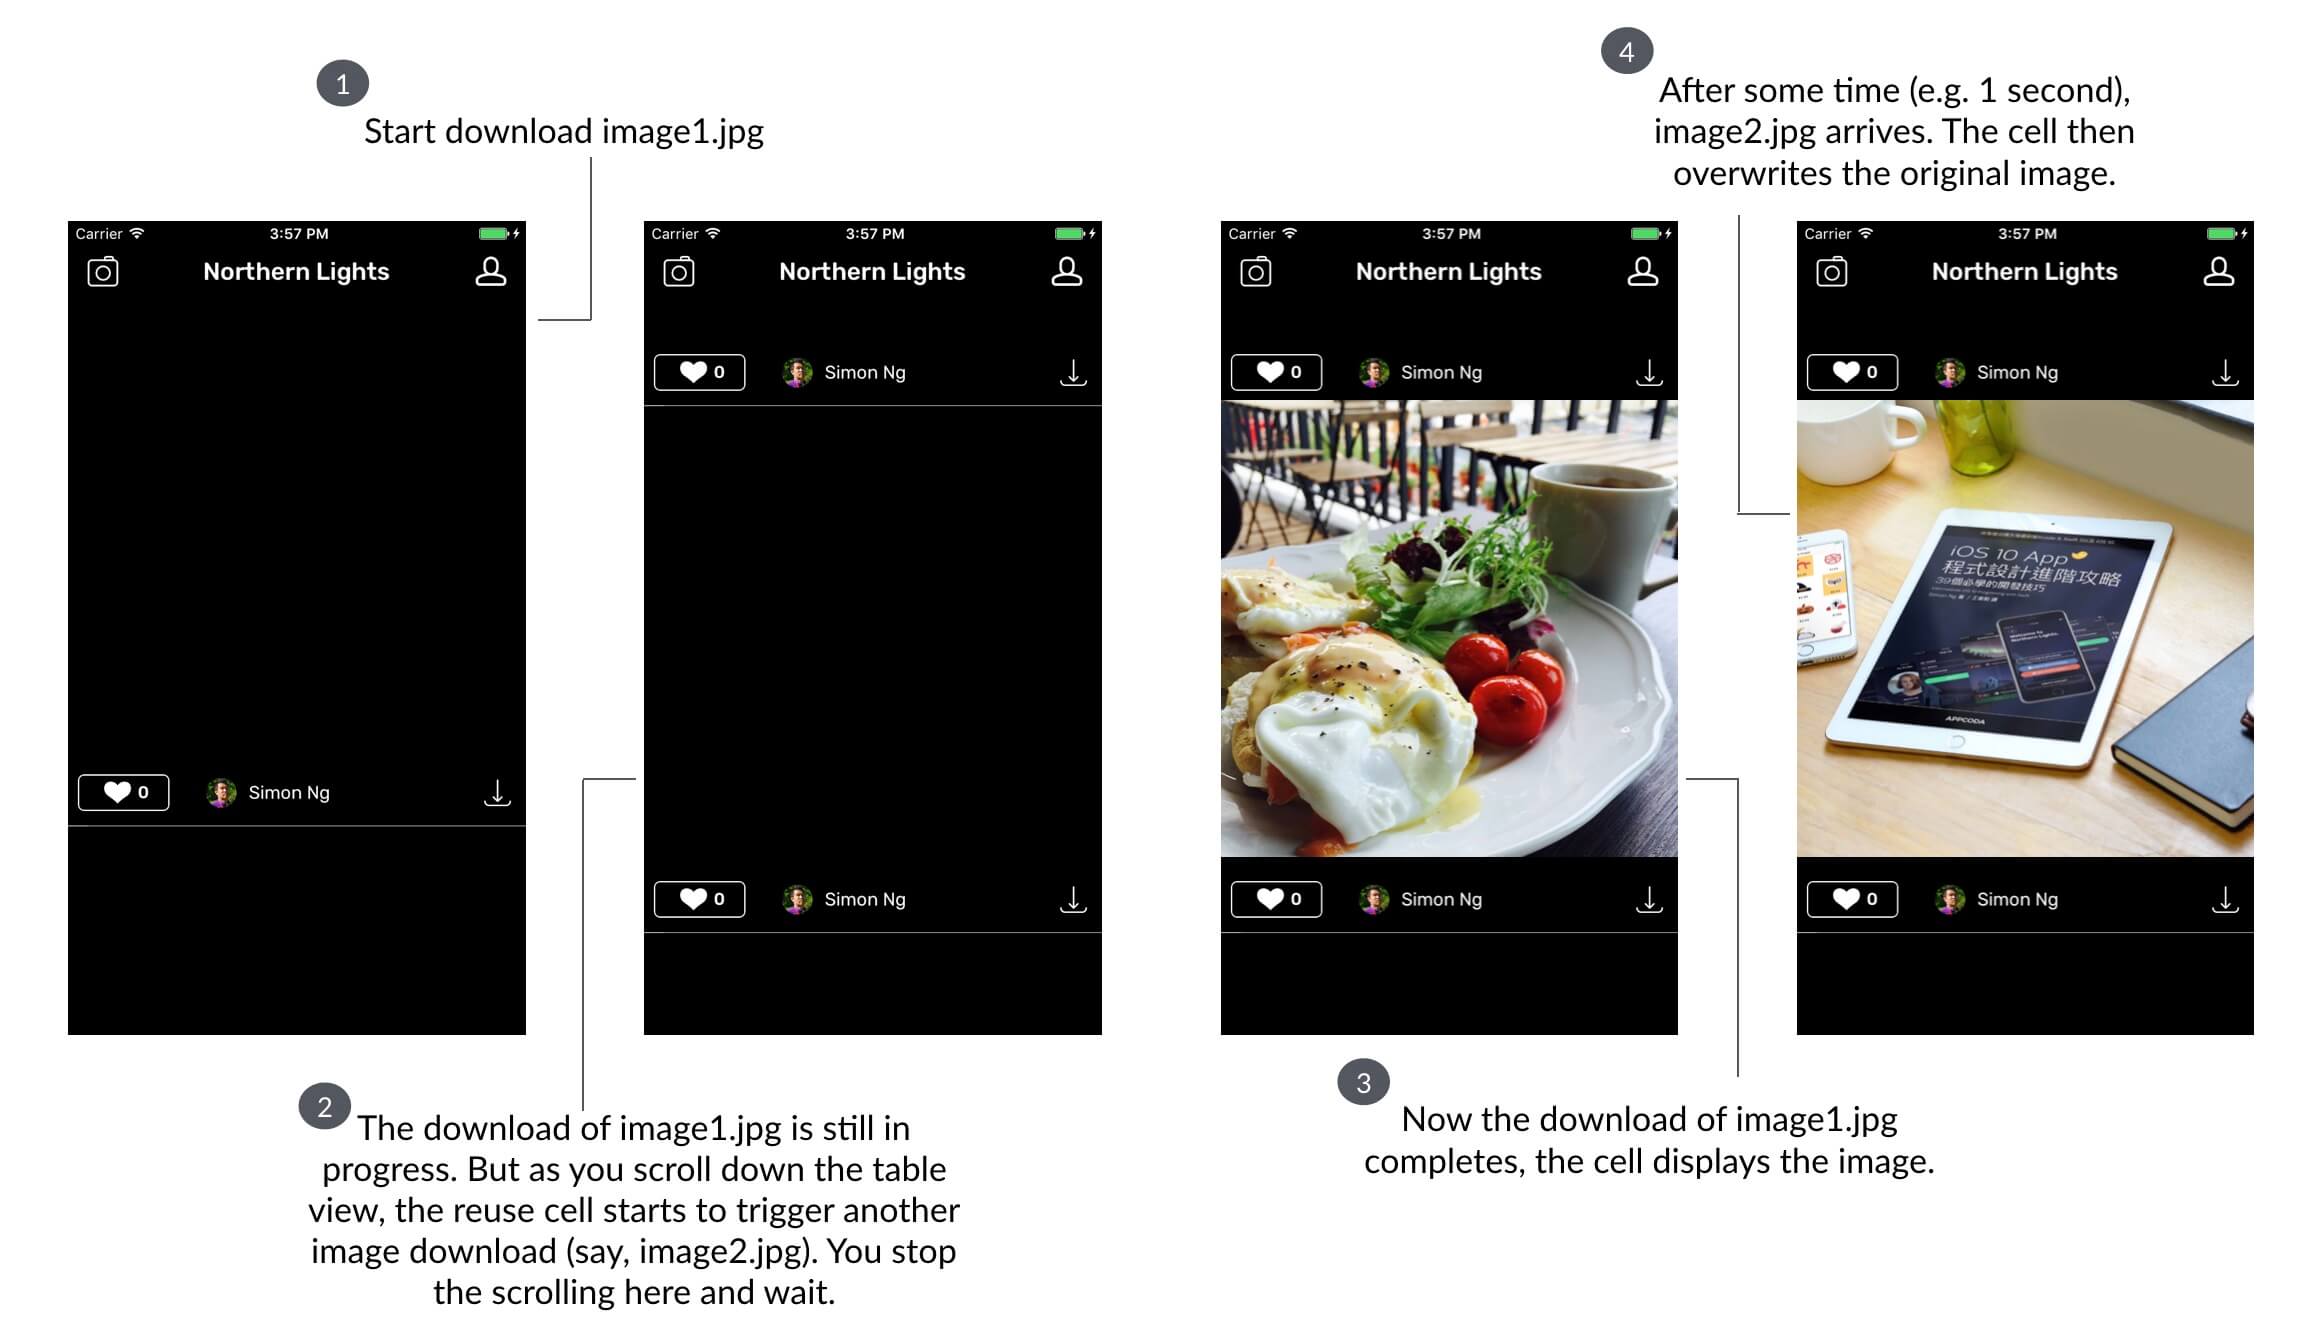
Cell reuse in table views is a way to optimize resources and keep the scrolling smooth. However, you will have to take special care of situations like this.
How can you resolve this issue?
There are multiple ways to fix the issue. Let me show you one of the simple solutions.
First, think again about the root cause of the issue. Stop here, don't look at the solution. I really want you to think.
Okay, let's take a look at figure 39.21 again. Let me call that reuse cell Cell A. When the app starts, Cell A starts to download image1.jpg. The user quickly scrolls down the table view and reaches another cell. This cell reuses Cell A for rendering the cell's content, and it triggers another download operation for image2.jpg. Now we have two download tasks in progress. When the download of image1.jpg completes, Cell A immediately displays the image.
Wait, do you smell a problem here?
The reuse version of Cell A is supposed to display image2.jpg instead of image1.jpg. So even the download of image1.jpg completes, the cell shouldn't display the image. It should only display image2.jpg.
To resolve the issue, what we can do is to add a verification right before displaying the cell's image. Each of the cells should only display the image it supposes to be displayed.
Now open PostCell.swift to modify some of the code. To let the cell know which post image it is responsible for, declare a new property to save the current post:
private var currentPost: Post?
At the beginning of the configure method, insert the following lines to set the value of currentPost:
// Set current post
currentPost = post
Lastly, replace this line of code defined in addOperation:
self.photoImageView.image = image
With:
if self.currentPost?.imageFileURL == post.imageFileURL {
    self.photoImageView.image = image
}
In the completion handler of the download task, we add a simple verification to ensure that we only display the right image. For the image that is not supposed to be displayed by the current cell, we just keep it in the cache.
That is how we fix the undesirable behaviour of the cells. You can now test the app again to ensure the image loading issue is resolved.
Pull to Refresh the Post Feed
Do you spot another problem with the app?
Yes! After you upload a photo, the post feed doesn't refresh to load your photo.
To fix that, update the following code in the openCamera method of FeedTableViewController from:
PostService.shared.uploadImage(image: photo.image) {
    picker.dismiss(animated: true, completion: nil)
}
To
PostService.shared.uploadImage(image: photo.image) {
    picker.dismiss(animated: true, completion: nil)
    self.loadRecentPosts()
}
All you need to do is to call the loadRecentPosts() method to load the latest posts.
We also want to provide the Pull-to-refresh feature for users to refresh the feed anytime they want. I believe you're very familiar with this build-in control (i.e. UIRefreshControl).
In the FeedTableViewController class, update the viewDidLoad method to set up pull-to-refresh:
override func viewDidLoad() {
    super.viewDidLoad()

    // Configure the pull to refresh
    refreshControl = UIRefreshControl()
    refreshControl?.backgroundColor = UIColor.black
    refreshControl?.tintColor = UIColor.white
    refreshControl?.addTarget(self, action: #selector(loadRecentPosts), for: UIControl.Event.valueChanged)

    // Load recent posts
    loadRecentPosts()
}
We instantiate an instance of UIRefreshControl, configure its color, and specify which method to call when the user triggers pull-to-refresh.
Once you add the code snippet, Xcode indicates there is an error.
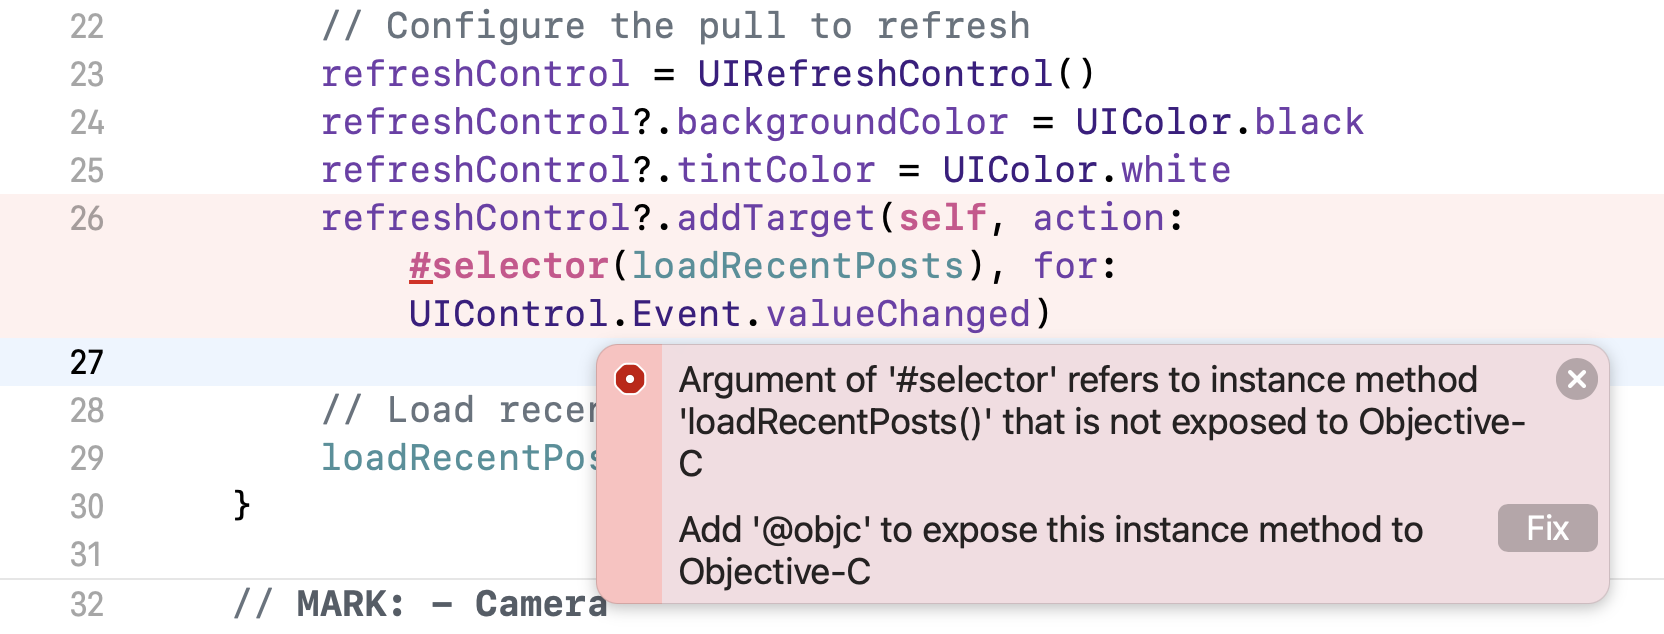
The problem is the selector. Selectors are a feature of Objective-C and can only be used with methods that are exposed to the dynamic Objective-C runtime. What Xcode is complaining is that loadRecentPosts is not exposed to Objective-C. All you need to do is to add the @objc attribute in the method declaration. Replace your loadRecentPosts() method with the following code:
 @objc fileprivate func loadRecentPosts() {

    isLoadingPost = true

    PostService.shared.getRecentPosts(start: postfeed.first?.timestamp, limit: 10) { (newPosts) in

        if newPosts.count > 0 {
            // Add the array to the beginning of the posts arrays
            self.postfeed.insert(contentsOf: newPosts, at: 0)
        }

        self.isLoadingPost = false

        if let _ = self.refreshControl?.isRefreshing {
            // Delay 0.5 second before ending the refreshing in order to make the animation look better
            DispatchQueue.main.asyncAfter(deadline: DispatchTime.now() + 0.5, execute: {
                self.refreshControl?.endRefreshing()
                self.displayNewPosts(newPosts: newPosts)
            })
        } else {
            self.displayNewPosts(newPosts: newPosts)
        }

    }
}
In additional to the @objc attribute, we also modify the method to support pull to refresh. As you can see, before calling displayNewPosts, we check if the refresh control is active. If yes, we call its endRefreshing() method to disable it.
Okay, hit Run to test the app. To test the pull-to-refresh feature, you better deploy the app to two devices (or 1 device + 1 simulator). While one device publishes new posts, the other device can try out the pull-to-refresh feature.
Infinite Scrolling in Table Views
Presently, the app can only display the 10 most recent posts when it is first loads up. It is quite sure that your database would have more than 10 photos.
So, how can the user view the old posts or photos?
When you scroll to the end of the table, some apps display a Load more button for users to load more content. Some apps, like Facebook and Instagram, automatically load new content as you approach the bottom of the table view. This later feature is usually known as infinite scrolling.
For the demo app, we will implement infinite scrolling for the post feed.
Let's begin with the PostService class. In order to load older posts, we will create a new method named getOldPosts for this purpose:
func getOldPosts(start timestamp: Int, limit: UInt, completionHandler: @escaping ([Post]) -> Void) {

    let postOrderedQuery = POST_DB_REF.queryOrdered(byChild: Post.PostInfoKey.timestamp)
    let postLimitedQuery = postOrderedQuery.queryEnding(atValue: timestamp - 1, childKey: Post.PostInfoKey.timestamp).queryLimited(toLast: limit)

    postLimitedQuery.observeSingleEvent(of: .value, with: { (snapshot) in

        var newPosts: [Post] = []
        for item in snapshot.children.allObjects as! [DataSnapshot] {
            print("Post key: \(item.key)")
            let postInfo = item.value as? [String: Any] ?? [:]

            if let post = Post(postId: item.key, postInfo: postInfo) {
                newPosts.append(post)
            }
        }

        // Order in descending order (i.e. the latest post becomes the first post)
        newPosts.sort(by: { $0.timestamp > $1.timestamp })

        completionHandler(newPosts)

    })

}
Similar to the implementation of getRecentPosts, the method takes in a timestamp, limit and completionHandler. What this method does is that it retrieves posts older than the given timestamp. Let me give you an example as illustrated in figure 39.23. Assuming post #12 is the last post displayed in the table view, we call getOldPosts with the timestamp of post #12 to retrieve some older posts.
This method first gets all the post objects with a timestamp smaller (i.e. older) than the given timestamp. If you refer to the code above, this is achieved by the postOrderedQuery.queryEnding(atValue:) method.
The limit parameter controls the maximum number of posts objects to be retrieved. Say, the limit is set to 2, we only get last two objects.
Now that we have prepared the service method, how can we implement infinite scrolling in the table view? A better question is how do we know the user approaches the last item of the table view?
The tableView(_:willDisplay:forRowAt:) method of the UITableViewDelegate protocol is perfect for this purpose:
optional func tableView(_ tableView: UITableView,
            willDisplay cell: UITableViewCell,
               forRowAt indexPath: IndexPath)
Whenever the table view is about to draw a cell for a particular row, this method will be called.
In the extension of FeedTableViewController, implement the method like this:
override func tableView(_ tableView: UITableView, willDisplay cell: UITableViewCell, forRowAt indexPath: IndexPath) {

    // We want to trigger the loading when the user reaches the last two rows
    guard !isLoadingPost, postfeed.count - indexPath.row == 2 else {
        return
    }

    isLoadingPost = true

    guard let lastPostTimestamp = postfeed.last?.timestamp else {
        isLoadingPost = false
        return
    }

    PostService.shared.getOldPosts(start: lastPostTimestamp, limit: 3) { (newPosts) in
        // Add new posts to existing arrays and table view
        var indexPaths:[IndexPath] = []
        self.tableView.beginUpdates()
        for newPost in newPosts {
            self.postfeed.append(newPost)
            let indexPath = IndexPath(row: self.postfeed.count - 1, section: 0)
            indexPaths.append(indexPath)
        }
        self.tableView.insertRows(at: indexPaths, with: .fade)
        self.tableView.endUpdates()

        self.isLoadingPost = false
    }
}
At the beginning of the method, we verify if the user has almost reached the end of the table. If the result is positive and the app is not loading new posts, we call getOldPosts of the PostService class to retrieve the older posts, and insert them into the table view.
That's it! Build and run the project to try it out. The app keeps showing you new posts as you scroll the table, until all posts are displayed.
Index Your Data in Firebase
Congratulations! You've made it this far. The post feed has been implemented with infinite scrolling. Everything just works.
However, if you look into the console, it keeps showing you the following message when querying data from Firebase:
2022-02-25 16:10:15.399817+0800 FirebaseDemo[78782:5663574] 8.12.1 - [Firebase/Database][I-RDB034028] Using an unspecified index. Your data will be downloaded and filtered on the client. Consider adding ".indexOn": "timestamp" at /posts to your security rules for better performance
Firebase lets you query your data without indexing. But indexing can greatly improve the performance of your queries.
For our queries, we tell Firebase to order the post objects by timestamp. The warning message shown above informs you that you should tell Firebase to index the timestamp key at /posts.
To index the data, you can define the indexes via the .indexOn rule in your Firebase Realtime Database Rules. Now open Safari and access the Firebase console (https://console.firebase.google.com). In your Firebase application, choose the Realtime Database option and then select the Rules tab.
Update the rules like this:
{
  "rules": {
    ".read": "now < 1648310400000",  // 2022-3-27
    ".write": "now < 1648310400000",  // 2022-3-27
    "posts": {
      ".indexOn": ["timestamp"]
    }
  }
}
By adding the .indexOn rule for the timestamp key, it tells Firebase to optimize queries for timestamp. Hit the Publish button to save the changes.

If you re-run your app, the warning message disappears. As your data grows, this index will definitely help you speed up your queries.
Summary
This is a huge chapter. We cover a lot of stuff in this single chapter. By now, I hope you fully understand how to use Firebase as your mobile backend. The NoSQL database of Firebase is very powerful and efficient. If you come from the world of SQL database, it will take you some time to digest the material. Just don't get discouraged, I know you will appreciate the beauty of Firebase database.
For further reading, refer to the official document of Firebase at https://firebase.google.com/docs/database/.
The full project of the demo app can be downloaded from http://www.appcoda.com/resources/swift55/FirebaseStorageDemo.zip.