- Made by AppCoda
- Contact us / Support
- Tweet this book
- Preface
- 1. Building Adaptive User Interfaces
- 2. Creating Table View Sections and Index list with Diffable Data Source
- 3. Animating Table View Cells
- 4. Working with JSON and Codable
- 5. How to Integrate the Twitter and Facebook SDK for Social Sharing
- 6. Working with Email and Attachments
- 7. Sending SMS and MMS Using MessageUI Framework
- 8. How to Get Direction and Draw Route on Maps
- 9. Search Nearby Points of Interest Using Local Search
- 10. Audio Recording and Playback
- 11. Scan QR Code Using AVFoundation Framework
- 12. Working with URL Schemes
- 13. Building a Full Screen Camera with Gesture-based Controls
- 14. Video Capturing and Playback Using AVKit
- 15. Displaying Banner Ads using Google AdMob
- 16. Working with Custom Fonts
- 17. Working with AirDrop, UIActivityViewController and Uniform Type Identifiers
- 18. Building Grid Layouts Using Collection Views and Diffable Data Source
- 19. Interacting with Collection Views
- 20. Adaptive Collection Views Using UITraitCollection and Compositional Layout
- 21. Building a Weather Widget Using WidgetKit
- 22. Building Slide Out Sidebar Menus Using Objective-C Libraries
- 23. View Controller Transitions and Animations
- 24. Building a Slide Down Menu
- 25. Self Sizing Cells and Dynamic Type
- 26. XML Parsing, RSS and Expandable Table View Cells
- 27. Applying a Blurred Background Using UIVisualEffect
- 28. Using Touch ID and Face ID For Authentication
- 29. Building a Carousel-Like User Interface
- 30. Working with Parse
- 31. Parsing CSV and Preloading a SQLite Database Using Core Data
- 32. Connecting Multiple Annotations with Polylines and Routes
- 33. Using CocoaPods in Swift Projects
- 34. Building a Simple Sticker App
- 35. Building iMessage Apps Using Messages Framework
- 36. Building Custom UI Components Using IBDesignable and IBInspectable
- 37. Using Firebase for User Authentication
- 38. Google and Facebook Authentication Using Firebase
- 39. Using Firebase Database and Storage to Build an Instagram-like App
- 40. Building a Real-time Image Recognition App Using Core ML
- 41. Building AR Apps with ARKit and SpriteKit
- 42. Working with 3D Objects in Augmented Reality Using ARKit and SceneKit
- 43. Use Create ML to Train Your Own Machine Learning Model for Image Recognition
- 44. Building a Sentiment Classifier Using Create ML to Classify User Reviews
- 45. Working with Image Tracking Using ARKit
- Published with GitBook
Chapter 14
Video Capturing and Playback Using AVKit
Previously, we built a simple camera app using the AVFoundation framework. You are not limited to using the framework for capturing still images. By changing the input and the output of AVCaptureSession, you can easily turn the simple camera app into a video-capturing app.
In this chapter, we will develop a simple video app that allows users to record videos. Not only will we explore video capturing, but I will also show you a framework known as AVKit. The framework can be used to play video content in your iOS app. You will discover how easy it is to integrate AVKit into your app for video playback.
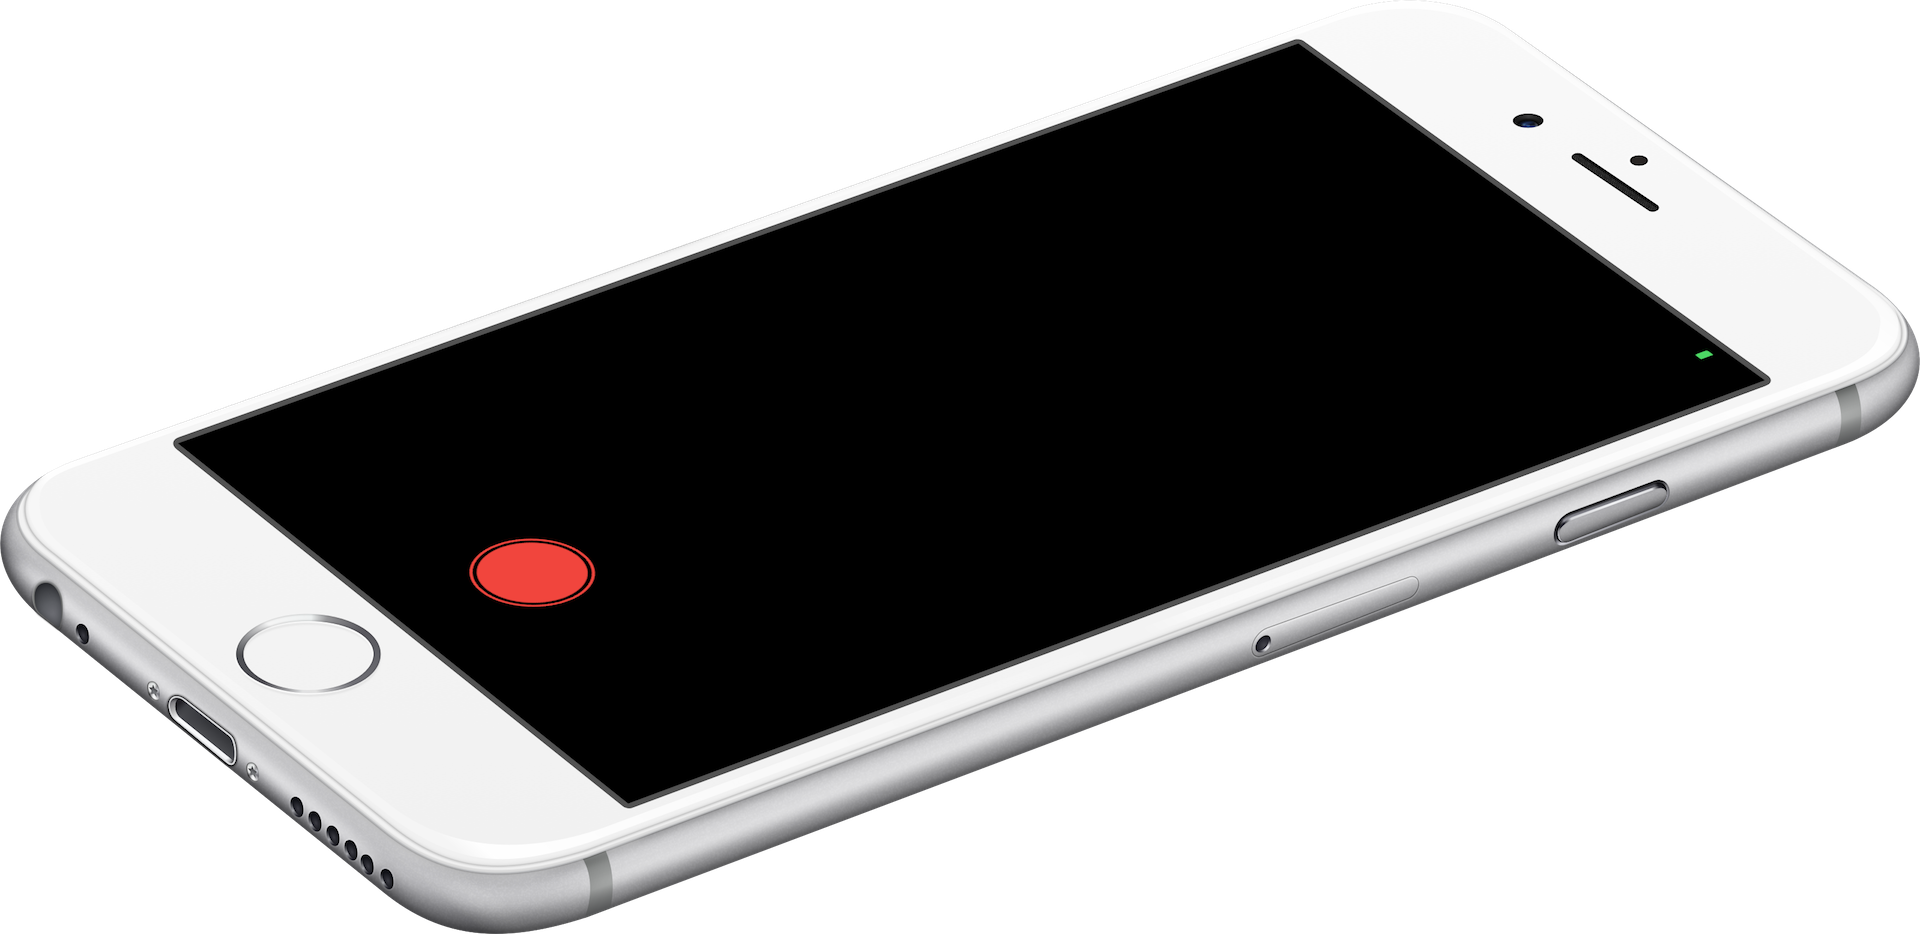
To get started, download the starter project from http://www.appcoda.com/resources/swift55/SimpleVideoCamStarter.zip. The starter project is very similar to the one you worked on in the previous chapter. If you run the project, you will see a blank screen with a red button (which is the record button) at the bottom part of the screen.
Configuring a Session
Similar to image capturing, the first thing to do is import the AVFoundation framework and prepare the AVCaptureSession object. In the SimpleVideoCamController.swift file, insert the following statement at the beginning of the file:
import AVFoundation
And, declare an instance variable of AVCaptureSession:
let captureSession = AVCaptureSession()
Let's create a configure() method to handle all the configurations:
private func configure() {
    // Preset the session for taking photo in full resolution
    captureSession.sessionPreset = AVCaptureSession.Preset.high
}
Here, we define the session and preset it to AVCaptureSession.Preset.high, which indicates a high quality output. Alternatively, you can set the value to AVCaptureSession.Preset.low, which is suitable for capturing videos that can be shared over WiFi. If you need to share the video over a 3G network, you may set the value to low.
Selecting the Input Device
Next, we have to find out the camera devices for shooting videos. First declare the following instance variable in the SimpleVideoCamController class:
var currentDevice: AVCaptureDevice!
Then, insert the following code in the configure() method:
// Get the back-facing camera for capturing videos
guard let device = AVCaptureDevice.default(.builtInWideAngleCamera, for: .video, position: .back) else {
    print("Failed to get the camera device")
    return
}

currentDevice = device

// Get the input data source
guard let captureDeviceInput = try? AVCaptureDeviceInput(device: currentDevice) else {
    return
}
If you've read the previous chapter, you may find the code looks very similar. We use the AVCaptureDevice.default to retrieve the default camera for capturing videos.
The AVCaptureDevice.default function is designed to find the default capture devices matching a specific device type (such as a microphone or wide-angle camera), supported media types for capture (such as audio, video, or both), and position (front- or back-facing). Here we want to find the built-in wide camera, which is back-facing.
With the camera device, we then create an instance of AVCaptureDeviceInput as the data input source.
Configuring an Output Device
The input device is ready, let's see how to configure the output device. Declare the following variable in the SimpleVideoCamController class for the device output:
var videoFileOutput: AVCaptureMovieFileOutput!
Insert the following code in the configure() method:
// Configure the session with the output for capturing video
videoFileOutput = AVCaptureMovieFileOutput()
Here, we create an instance of AVCaptureMovieFileOutput. This output is used to save data to a QuickTime movie file. AVCaptureMovieFileOutput provides a couple of properties for controlling the length and size of the recording. For example, you can use the maxRecordedDuration property to specify the longest duration allowed for the recording. In this demo, we just use the default settings.
Coordinating the Input and Output using the Capture Session
Now that you have configured both input and output, the next step is to assign them to the capture session so that it can coordinate the flow of data between them. Continue to insert the following lines of code in the configure() method:
// Configure the session with the input and the output devices
captureSession.addInput(captureDeviceInput)
captureSession.addOutput(videoFileOutput)
Creating a Preview Layer and Starting the Session
With the session configured, it's time to create a preview layer for the camera preview. First, declare an instance variable:
var cameraPreviewLayer: AVCaptureVideoPreviewLayer?
Continue to insert the following code in the configure() method:
// Provide a camera preview
cameraPreviewLayer = AVCaptureVideoPreviewLayer(session: captureSession)
view.layer.addSublayer(cameraPreviewLayer!)
cameraPreviewLayer?.videoGravity = AVLayerVideoGravity.resizeAspectFill
cameraPreviewLayer?.frame = view.layer.frame

// Bring the camera button to front
view.bringSubviewToFront(cameraButton)
captureSession.startRunning()
You use AVCaptureVideoPreviewLayer to display video as it is being captured by an input device. The layer is then added to the view's layer to display on the screen. AVLayerVideoGravity.resizeAspectFill indicates that the video's aspect ratio should be preserved and filled the layer's bounds.
This is pretty much the same as what we implemented in the Camera app.
When you add the preview layer to the view, it will cover the record button. To unhide the button, we simply bring it to the front. Lastly, we call the startRunning method of the session to start capturing data. If you compile and run the app on a real device, you should see the camera preview. However, the app is not ready for video capturing yet.
Let's continue to implement the feature.
Saving Video Data to a Movie File
The recording process starts when the user taps the red button. While the app is in recording mode, the camera button is animated to indicate the recording is in progress. Once the user taps the button again, the animation stops and the video is saved to a file.
In order to keep track of the status (recording / non-recording) of the app, we first declare a Boolean variable to indicate whether video recording is taking place:
var isRecording = false
Now the output of the session is configured for capturing data to a movie file. However, the saving process will not start until the startRecordingToOutputFileURL method of AVCaptureMovieFileOutput is invoked. Presently, the capture method is empty. Update the method with the following code:
@IBAction func capture(sender: AnyObject) {

    if !isRecording {
        isRecording = true

        UIView.animate(withDuration: 0.5, delay: 0.0, options: [.repeat, .autoreverse, .allowUserInteraction], animations: { () -> Void in
            self.cameraButton.transform = CGAffineTransform(scaleX: 0.5, y: 0.5)
        }, completion: nil)

        let outputPath = NSTemporaryDirectory() + "output.mov"
        let outputFileURL = URL(fileURLWithPath: outputPath)
        videoFileOutput?.startRecording(to: outputFileURL, recordingDelegate: self)
    } else {
        isRecording = false

        UIView.animate(withDuration: 0.5, delay: 1.0, options: [], animations: { () -> Void in
            self.cameraButton.transform = CGAffineTransform(scaleX: 1.0, y: 1.0)
        }, completion: nil)
        cameraButton.layer.removeAllAnimations()
        videoFileOutput?.stopRecording()
    }
}
In the above code, we first check if the app is doing any recordings. If not, we initiate video capturing. Once recording starts, we create a simple animation for the button to indicate recording is in progress. If you've read Chapter 16 of the Beginning iOS Programming book, the animate(withDuration:delay:options:animations:completion:) method shouldn't be new to you. What's new to you are the animation options. Here I want to create a pulse animation for the button. In order to create such an effect, here is what needs to be done:
- First, reduce the size of the button by 50%
- Then grow the button to the original size
- Keep repeating step #1 and #2
If we write the above steps in code, this is the code snippet you need:
UIView.animate(withDuration: 0.5, delay: 0.0, options: [.repeat, .autoreverse, .allowUserInteraction], animations: { () -> Void in
                self.cameraButton.transform = CGAffineTransform(scaleX: 0.5, y: 0.5)
                }, completion: nil)
For step #1, we use CGAffineTransform to scale down the button. With UIView animation, the button will reduce its size by half smoothly.
For step #2, we use the .autoreverse animation option to run the animation backward. The button will grow to its original size.
To repeat step #1 and #2, we specify the .repeat animation option to repeat the animation indefinitely. While animating the button, the user will still be able to interact with it. This is why we also specify the .allowUserInteraction option.
Now let's get back to the code for saving video data. The AVCaptureMovieFileOutput class provides a convenient method called startRecording to capture data to a movie file. All you need to do is specify an output file path and the delegate object.
videoFileOutput?.startRecording(to: outputFileURL, recordingDelegate: self)
Here, we save the video to the temporary folder (NSTemporaryDirectory()) with the file name output.mov.
Once the recording is completely written to the movie file, it will notify the delegate object by calling the following method of the AVCaptureFileOutputRecordingDelegate protocol:
func fileOutput(_ output: AVCaptureFileOutput, didFinishRecordingTo outputFileURL: URL, from connections: [AVCaptureConnection], error: Error?)
As SimpleVideoCamController is set as the delegate object, create an extension to adopt the AVCaptureFileOutputRecordingDelegate protocol like this:
extension SimpleVideoCamController: AVCaptureFileOutputRecordingDelegate {
    func fileOutput(_ output: AVCaptureFileOutput, didFinishRecordingTo outputFileURL: URL, from connections: [AVCaptureConnection], error: Error?) {
        guard error == nil else {
            print(error ?? "")
            return
        }
    }
}
For now we just print out any errors to the console. Later, we will further implement this method for video playback.
Before you're going to test the app, there are a couple of things we need to do. First, insert a line of code in the viewDidLoad() method to call configure():
override func viewDidLoad() {
    super.viewDidLoad()

    configure()
}
Secondly, remember to edit the Info.plist file to specify the reason why you need to access the device's camera. Otherwise, you will end up with the following error:
[access] This app has crashed because it attempted to access privacy-sensitive data without a usage description. The app's Info.plist must contain an NSCameraUsageDescription key with a string value explaining to the user how the app uses this data.
Open Info.plist and insert a row for the key Privacy - Camera Usage Description. You can specify your own reason in the value field.
Now, you may have a quick test for the app. When you tap the record button, the app will start recording video (indicated by an animated button). Tapping the button again will stop the recording.
Using AVKit for Video Playback
Now that the app should be able to capture a video and save it to a movie file, the next question is how can you play the video in your app? The iOS SDK provides the AVKit framework for handling video playback. If you have some experience with older versions of the iOS SDK, you might be using MPMoviePlayerController in your applications for displaying video content. You are now encouraged to replace it with the new AVPlayerViewController.
AVKit is a very simple framework on iOS. Basically, you just need to use a class named AVPlayerViewController to handle the video playback. The class is a subclass of UIViewController with additional features for displaying video content and playback controls. The heart of the AVPlayerViewController class is the player property, which provides video content to the view controller. The player is of the type AVPlayer, which is a class from the AVFoundation framework for controlling playback. To use AVPlayerViewController for video playback, you just need to set the player property to an AVPlayer object.
Apple has made it easy for you to integrate AVPlayerViewController in your apps. If you go to the Interface Builder and open the Object library, you will find an AVPlayerViewController object. You can drag the object to the storyboard and connect it with other view controllers.
Okay, let's continue to develop the video camera app.
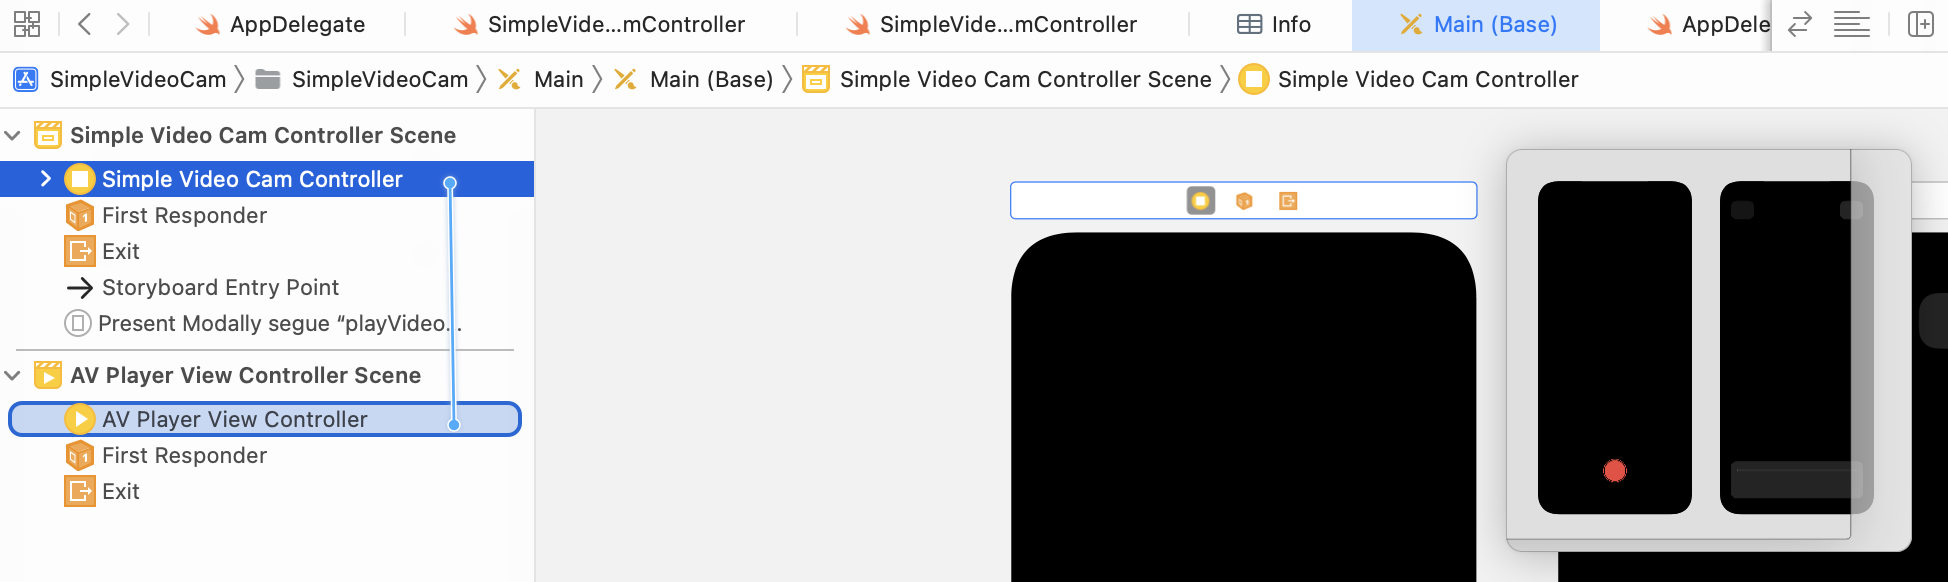
First, open Main storyboard and drag an AVPlayerViewController object to the storyboard.
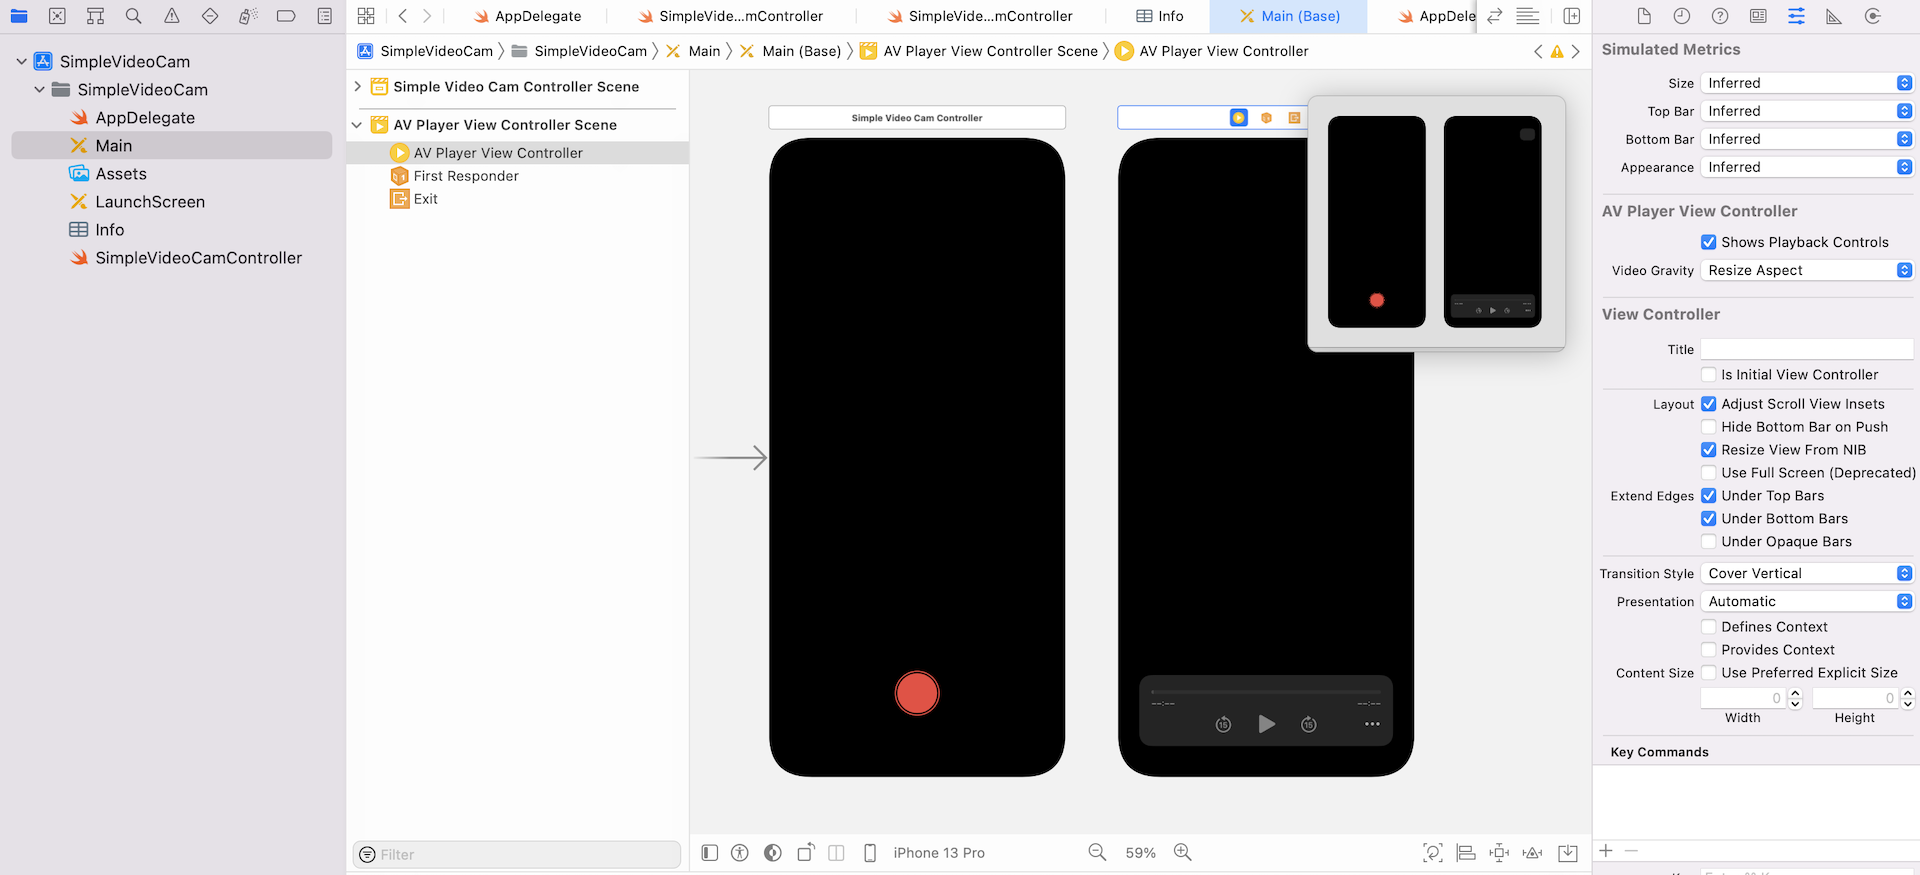
Next, connect the Simple Video Cam Controller to the AV Player View Controller using a segue. In the Document Outline, control-drag from the Simple Video Cam Controller to the AV Player View Controller. When prompted, select Present Modally as the segue type. Select the segue and go to Attributes inspector. Set the identifier of the segue to playVideo.
Implement the AVCaptureFileOutputRecordingDelegate Protocol
Now that you have created the UI of AVPlayerController, the real question is: when will we bring it up for video playback? For the demo app, we'll play the movie file right after the user stops the recording.
As mentioned earlier, AVCaptureMovieFileOutput will call the fileOutput(_:didFinishRecordingTo:from:error:) method of the delegate object, once the video has been completely written to a movie file.
The SimpleVideoCamController is now assigned as the delegate object, which has adopted the AVCaptureFileOutputRecordingDelegate protocol. However, we haven't provided any detailed implementation to take care of the video playback. Now let's do it.
Open the SimpleVideoCamController.swift file, import AVKit:
import AVKit
Next, update the delegate method of the extension like this:
extension SimpleVideoCamController: AVCaptureFileOutputRecordingDelegate {
    func fileOutput(_ output: AVCaptureFileOutput, didFinishRecordingTo outputFileURL: URL, from connections: [AVCaptureConnection], error: Error?) {
        guard error == nil else {
            print(error ?? "")
            return
        }

        performSegue(withIdentifier: "playVideo", sender: outputFileURL)
    }
}
And then insert the following segue method in the SimpleVideoCamController class:
override func prepare(for segue: UIStoryboardSegue, sender: Any?) {
    if segue.identifier == "playVideo" {
        let videoPlayerViewController = segue.destination as! AVPlayerViewController
        let videoFileURL = sender as! URL
        videoPlayerViewController.player = AVPlayer(url: videoFileURL)
    }
}
When a video is captured and written to a file, the above method is invoked. We simply determine if there are any errors and bring up the AV Player View Controller by calling the performSegue(withIdentifier:sender:) method with the video file URL.
In the performSegue(withIdentifier:sender:) method, we pick the video file URL and create an instance of AVPlayer with the URL. Setting the player property with the AVPlayer object is all you need to perform video playback. AVFoundation then takes care of opening the video URL, buffering the content and playing it back.
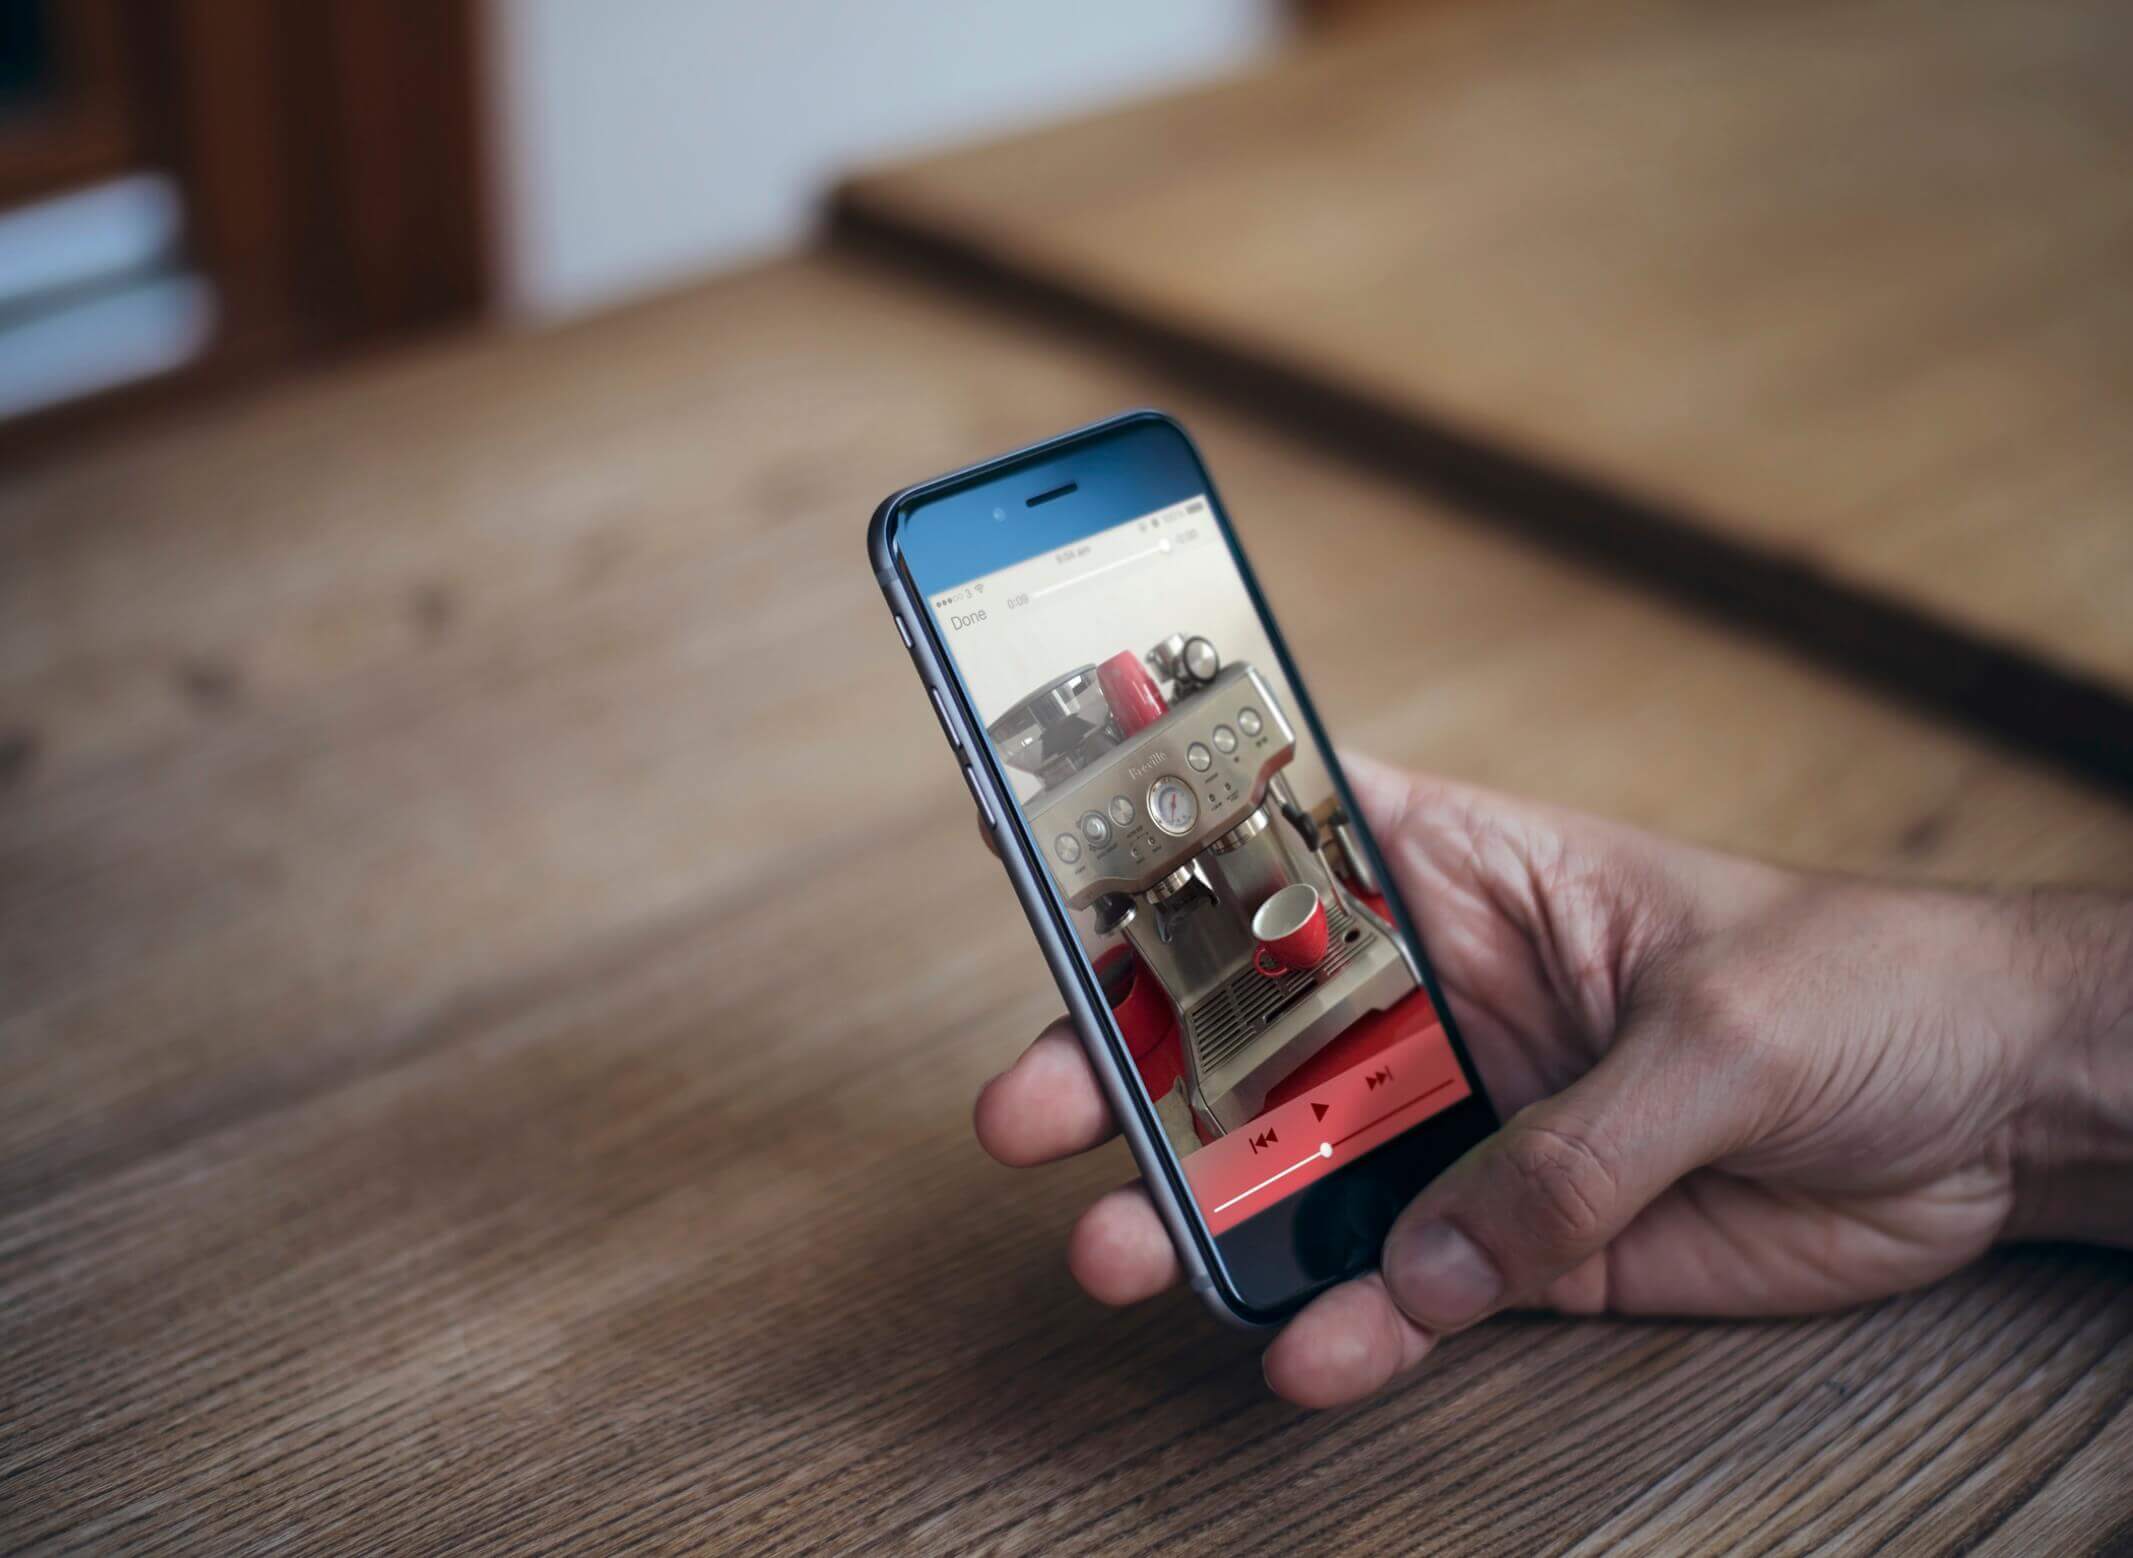
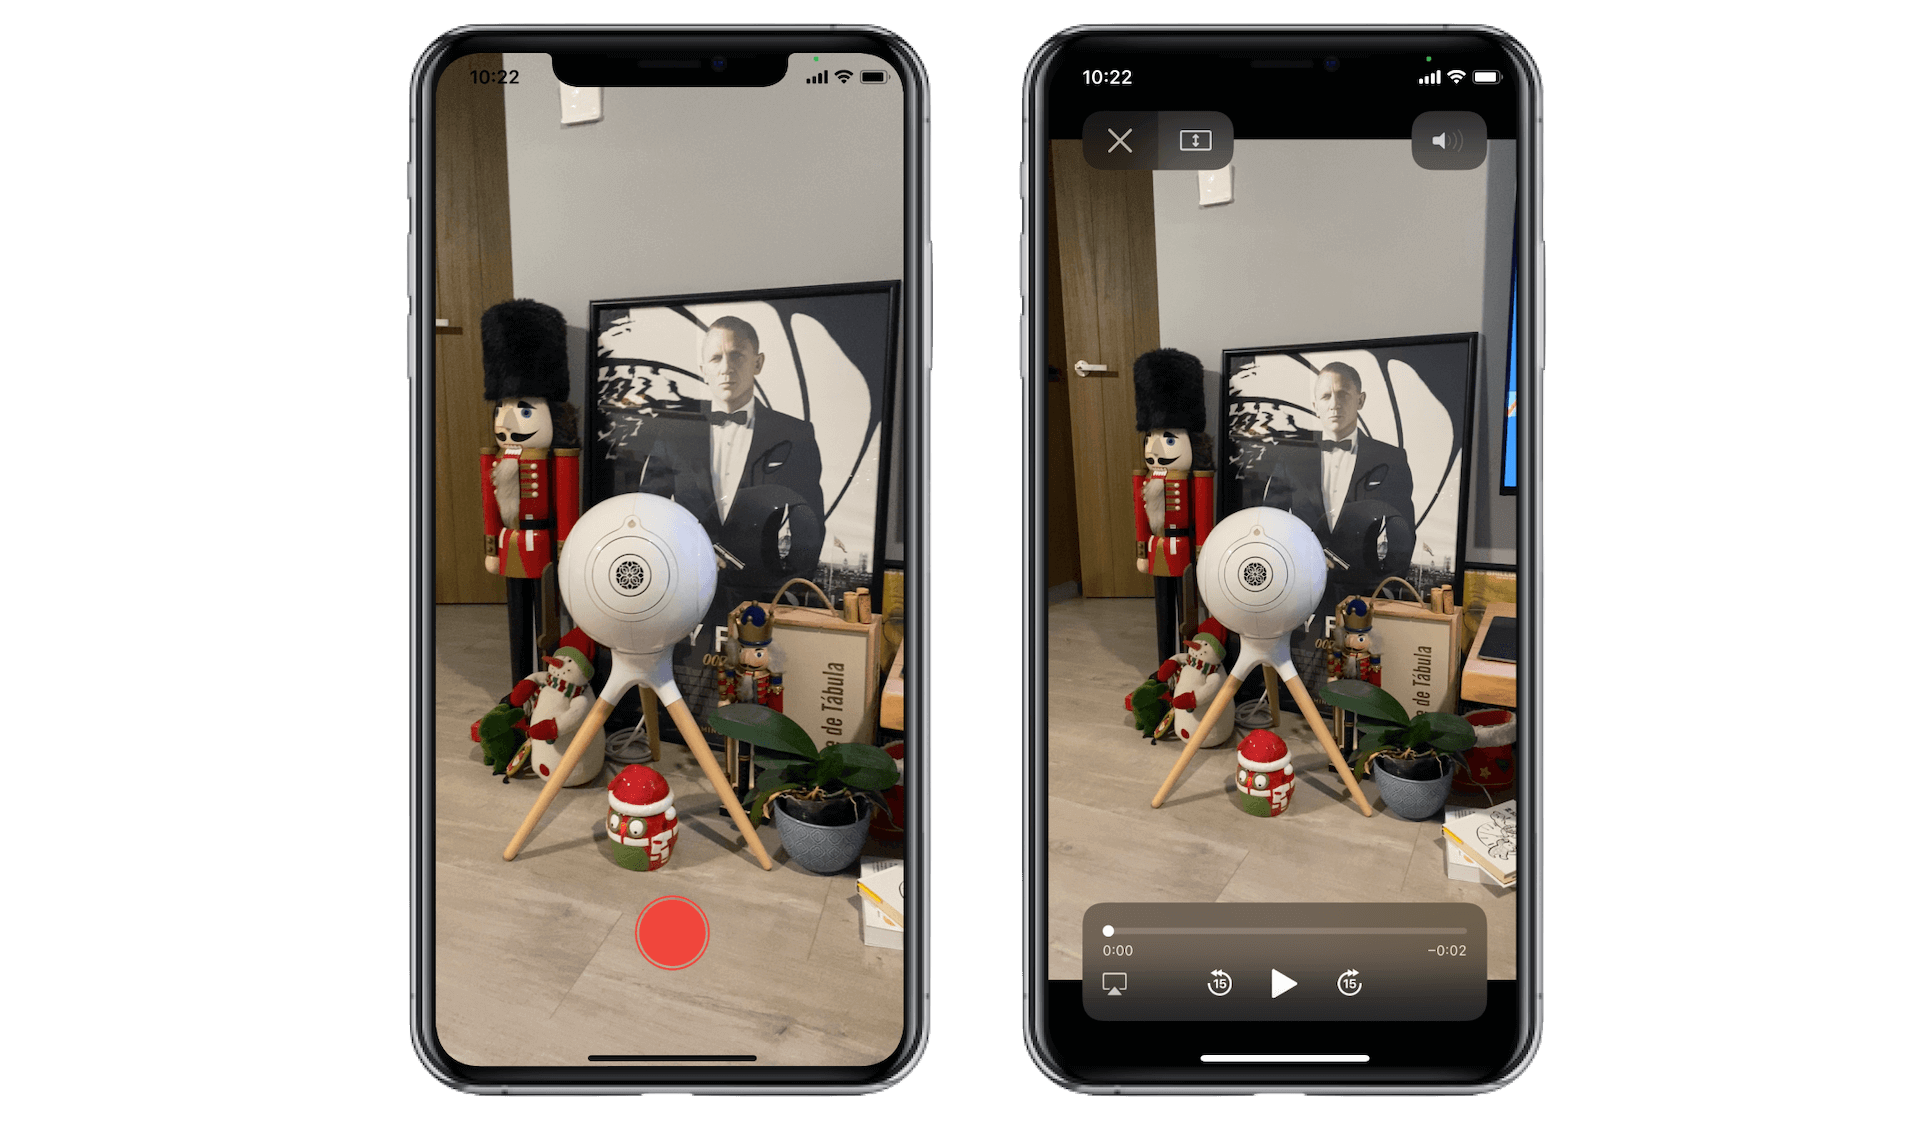
Now you're ready to test the video camera app. Hit Run and capture a video. Once you stop the video capturing, the app automatically plays the video in the AV Player View Controller.
For reference, you can download the Xcode project from http://www.appcoda.com/resources/swift55/SimpleVideoCam.zip.