- Made by AppCoda
- Contact us / Support
- Tweet this book
- Preface
- 1. Building Adaptive User Interfaces
- 2. Creating Table View Sections and Index list with Diffable Data Source
- 3. Animating Table View Cells
- 4. Working with JSON and Codable
- 5. How to Integrate the Twitter and Facebook SDK for Social Sharing
- 6. Working with Email and Attachments
- 7. Sending SMS and MMS Using MessageUI Framework
- 8. How to Get Direction and Draw Route on Maps
- 9. Search Nearby Points of Interest Using Local Search
- 10. Audio Recording and Playback
- 11. Scan QR Code Using AVFoundation Framework
- 12. Working with URL Schemes
- 13. Building a Full Screen Camera with Gesture-based Controls
- 14. Video Capturing and Playback Using AVKit
- 15. Displaying Banner Ads using Google AdMob
- 16. Working with Custom Fonts
- 17. Working with AirDrop, UIActivityViewController and Uniform Type Identifiers
- 18. Building Grid Layouts Using Collection Views and Diffable Data Source
- 19. Interacting with Collection Views
- 20. Adaptive Collection Views Using UITraitCollection and Compositional Layout
- 21. Building a Weather Widget Using WidgetKit
- 22. Building Slide Out Sidebar Menus Using Objective-C Libraries
- 23. View Controller Transitions and Animations
- 24. Building a Slide Down Menu
- 25. Self Sizing Cells and Dynamic Type
- 26. XML Parsing, RSS and Expandable Table View Cells
- 27. Applying a Blurred Background Using UIVisualEffect
- 28. Using Touch ID and Face ID For Authentication
- 29. Building a Carousel-Like User Interface
- 30. Working with Parse
- 31. Parsing CSV and Preloading a SQLite Database Using Core Data
- 32. Connecting Multiple Annotations with Polylines and Routes
- 33. Using CocoaPods in Swift Projects
- 34. Building a Simple Sticker App
- 35. Building iMessage Apps Using Messages Framework
- 36. Building Custom UI Components Using IBDesignable and IBInspectable
- 37. Using Firebase for User Authentication
- 38. Google and Facebook Authentication Using Firebase
- 39. Using Firebase Database and Storage to Build an Instagram-like App
- 40. Building a Real-time Image Recognition App Using Core ML
- 41. Building AR Apps with ARKit and SpriteKit
- 42. Working with 3D Objects in Augmented Reality Using ARKit and SceneKit
- 43. Use Create ML to Train Your Own Machine Learning Model for Image Recognition
- 44. Building a Sentiment Classifier Using Create ML to Classify User Reviews
- 45. Working with Image Tracking Using ARKit
- Published with GitBook
Chapter 5
How to Integrate the Twitter and Facebook SDK for Social Sharing
With the advent of social networks, I believe you want to provide social sharing in your apps. This is one of the many ways to increase user engagement. In the past, Apple provided a framework known as Social Framework that lets developers integrate their apps with some common social networking services such as Facebook and Twitter. The framework gives you a standard composer to create posts for different social networks and shields you from learning the APIs of the social networks. You don't even need to know how to initiate a network request or handle single sign-on. The Social Framework simplifies everything. You just need to write a few lines of code to bring up the composer for users to tweet or publish Facebook posts within your app.
However, the Social framework no longer supports Facebook and Twitter in iOS 11 (or up). In other words, if you want to provide social sharing feature in your app, you have to integrate with the SDKs provided by these two companies.
In this chapter, I will walk you through the installation procedures and usage of the APIs. Again, we will work on a simple demo app.
Create the Demo Project and Design the Interface
To begin, you can download the starter project from http://www.appcoda.com/resources/swift55/SocialSharingStarter.zip. This simple app just displays a list of restaurants on the main screen. When a user swipes a cell and taps the Share button, the app allows the user to share the selected restaurant on Facebook and Twitter.
I have already written some of the code for you, so that we can focus on understanding the Social framework. But it deserves a mention for the following lines of code in the share method of the SocialTableViewController class:
// Get the selected row
let buttonPosition = sender.convert(CGPoint.zero, to: tableView)
guard let indexPath = tableView.indexPathForRow(at: buttonPosition) else {
    return
}
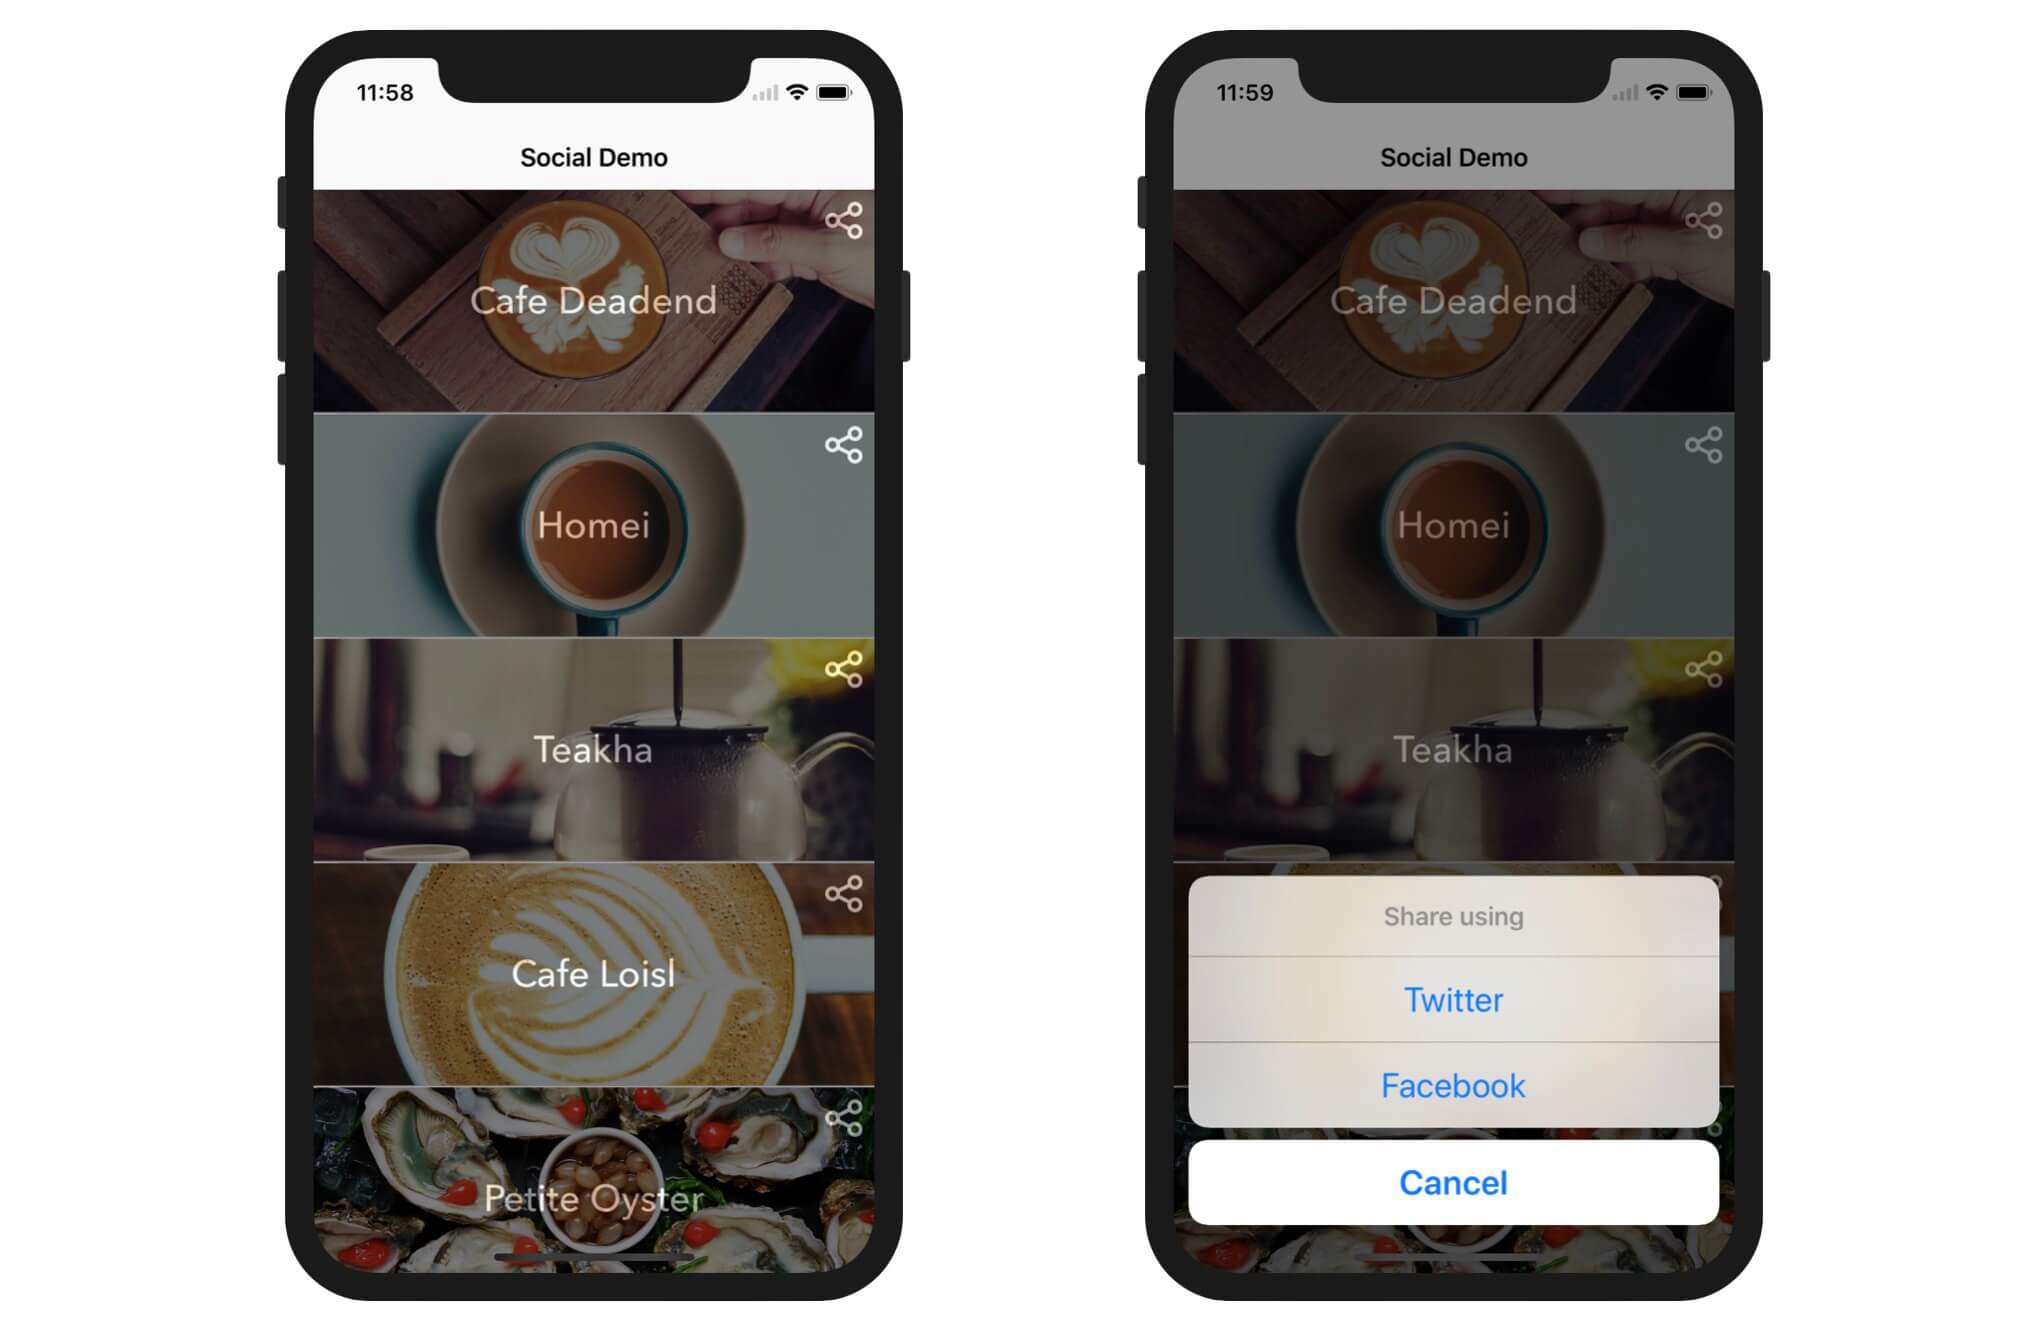
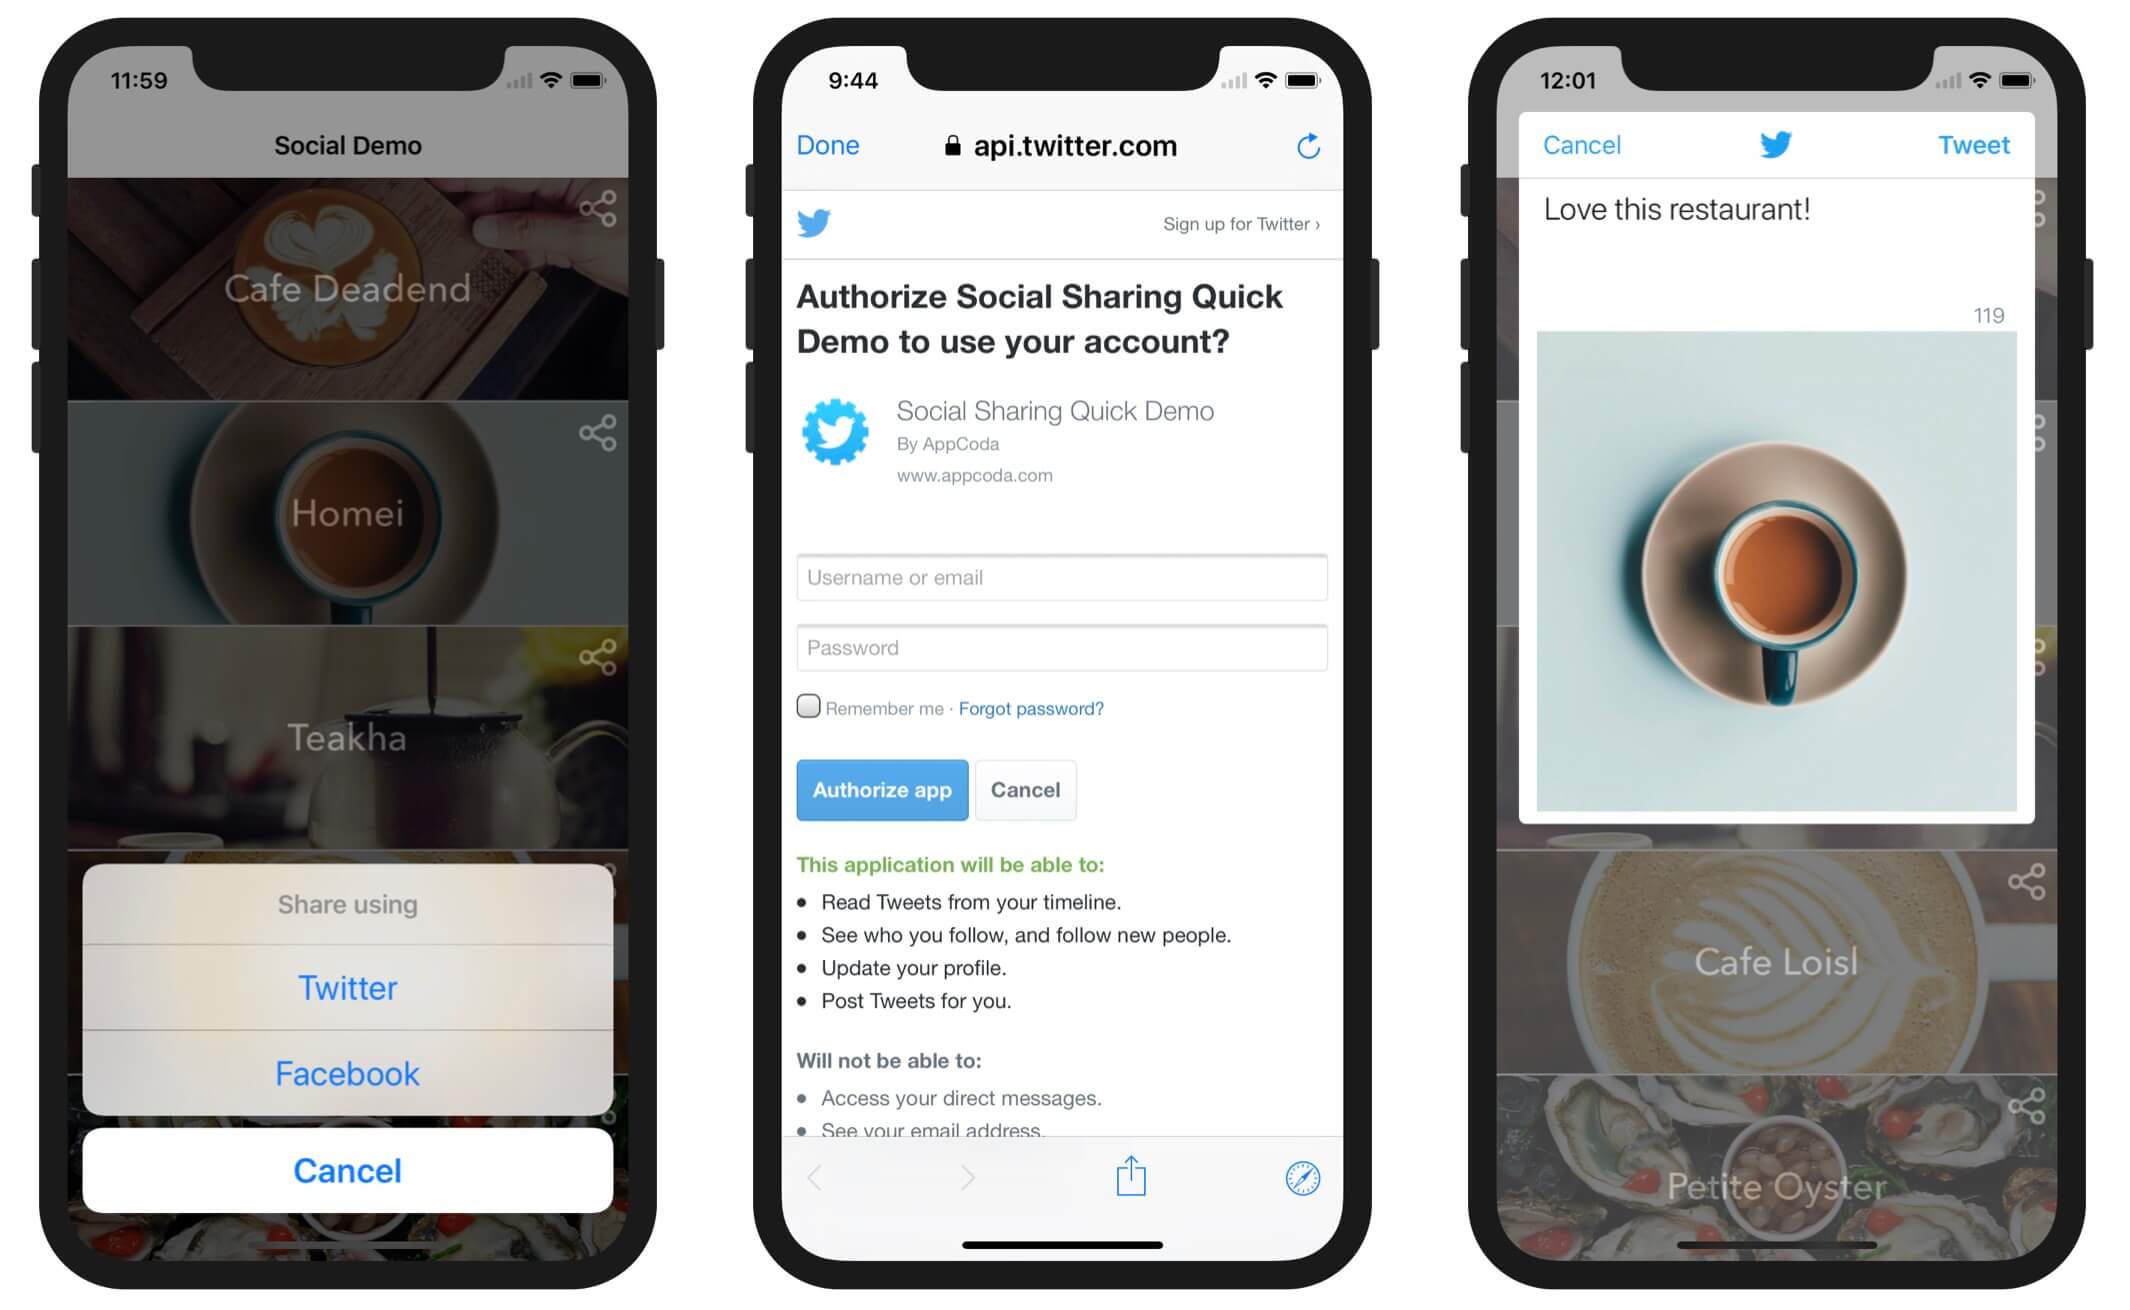
If you refer to figure 5.1, each of the cells has a share button. When any of the buttons are tapped, it invokes the share action method. One common question is: how do you know at which row the share button has been tapped?
There are multiple solutions for this problem. One way to do it is use the indexPathForRow(at:) method to determine the index path at a given point. This is how we did it in the starter project. We first convert the coordinate of the button position to that of the table view. Then we get the index path of the cell by calling the indexPathForRow(at:) method.
Okay, I am a bit off the topic here. Let's go back to the implementation of the social sharing feature.
The sharing feature has not been implemented in the starter project. This is what we're going to work on.
Assumption: I assume that you understand how UIAlertController works. If not, you can refer to our beginner book or the official documentation.
Implementing the Facebook Sharing
Let's begin with the social sharing feature for Facebook. Facebook provides the Facebook SDK for Swift so that iOS developers can integrate with their services like Facebook Login and Share dialogs.
Installing the Facebook SDK
Before we dive into the implementation part, we have to first install the Facebook SDK. The easiest way to do it is by using CocoaPods. If you haven't installed CocoaPods on your Mac, please read chapter 33 first. It will give you an overview of CocoaPods and teach you how it works.
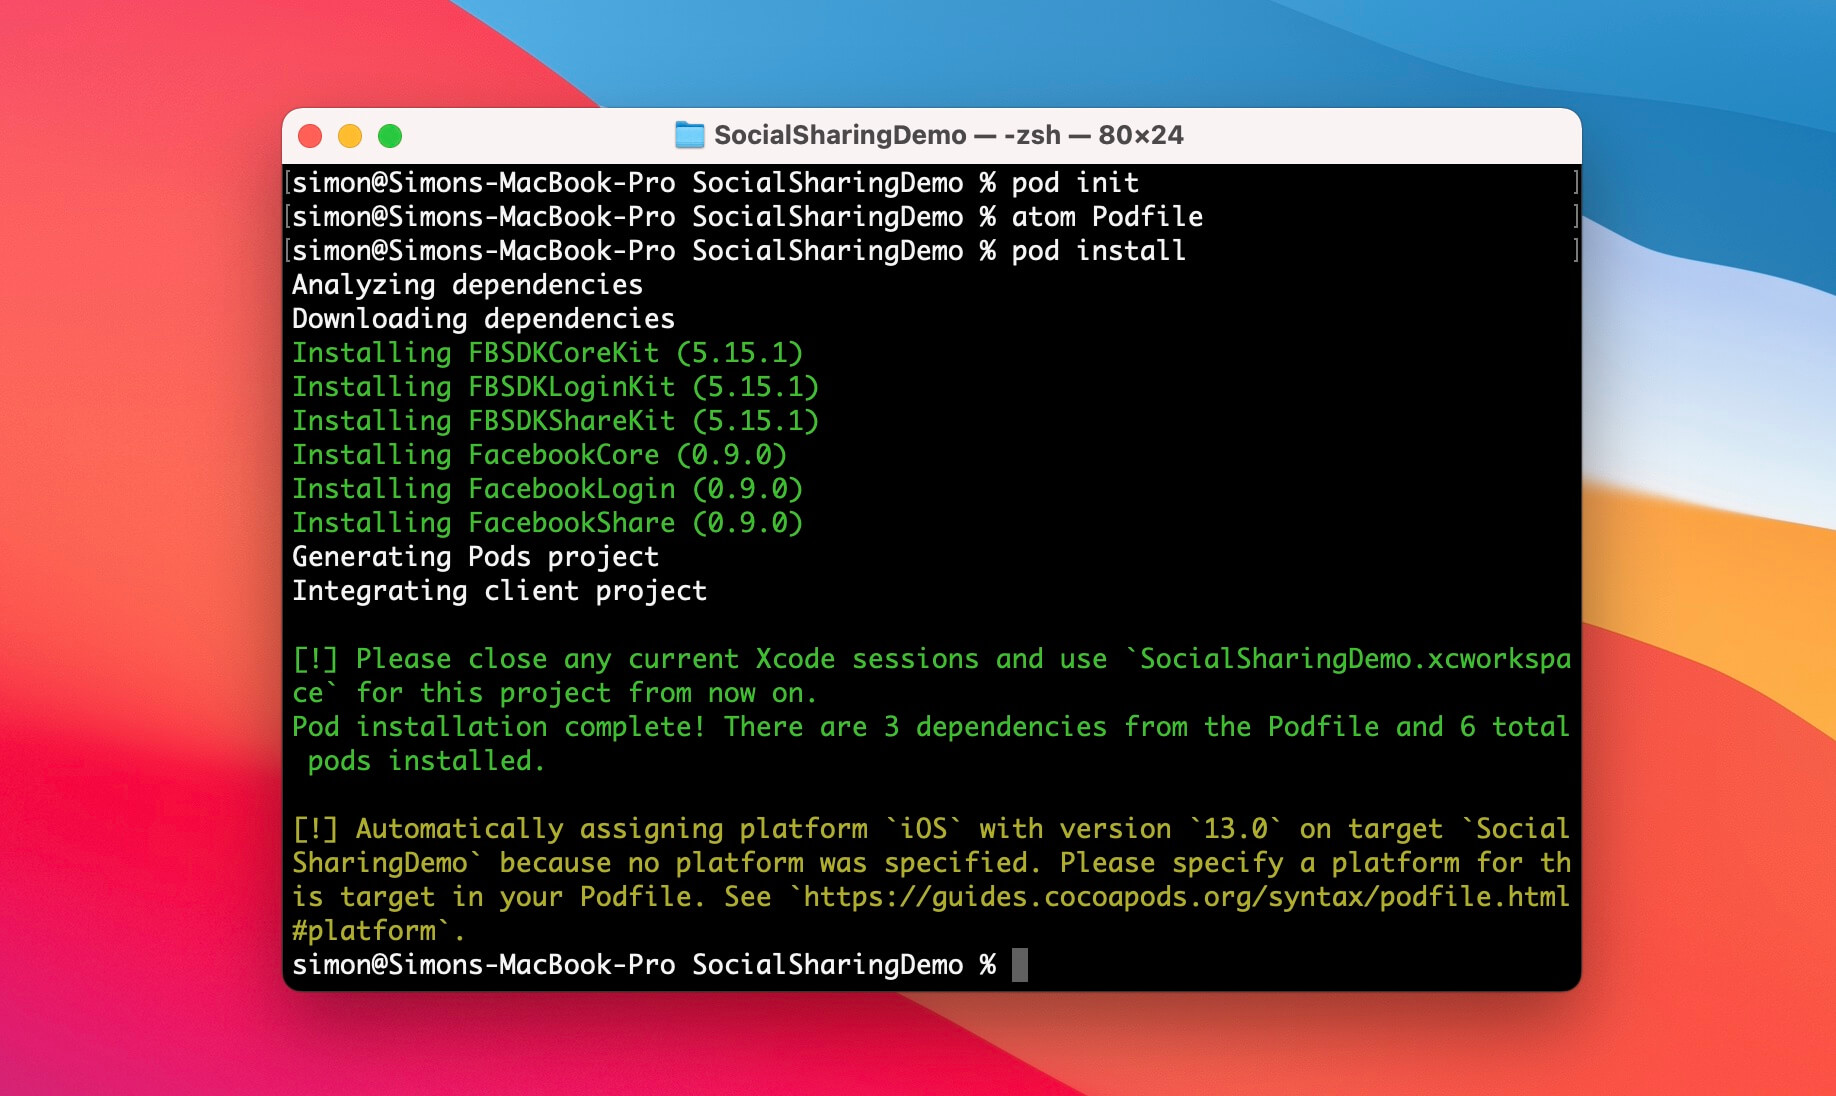
Assuming you have CocoaPods installed, open Terminal and change to your starter project folder. Type the following command to create the Podfile:
pod init
Then edit the Podfile like this:
target 'SocialSharingDemo' do
  # Comment the next line if you're not using Swift and don't want to use dynamic frameworks
  use_frameworks!

  # Pods for SocialSharingDemo
  pod 'FacebookCore'
  pod 'FacebookLogin'
  pod 'FacebookShare'

end
In the configuration, we specify to use FacebookCore, FacebookLogin and FacebookShare pods. Now save the configuration file and run the following command in Terminal:
pod install
CocodPods will then download the required libraries for you and integrate them with the Xcode project. When finish, please make sure to open the SocialSharingDemo.xcworkspace file in Xcode.
Setting a New Facebook App
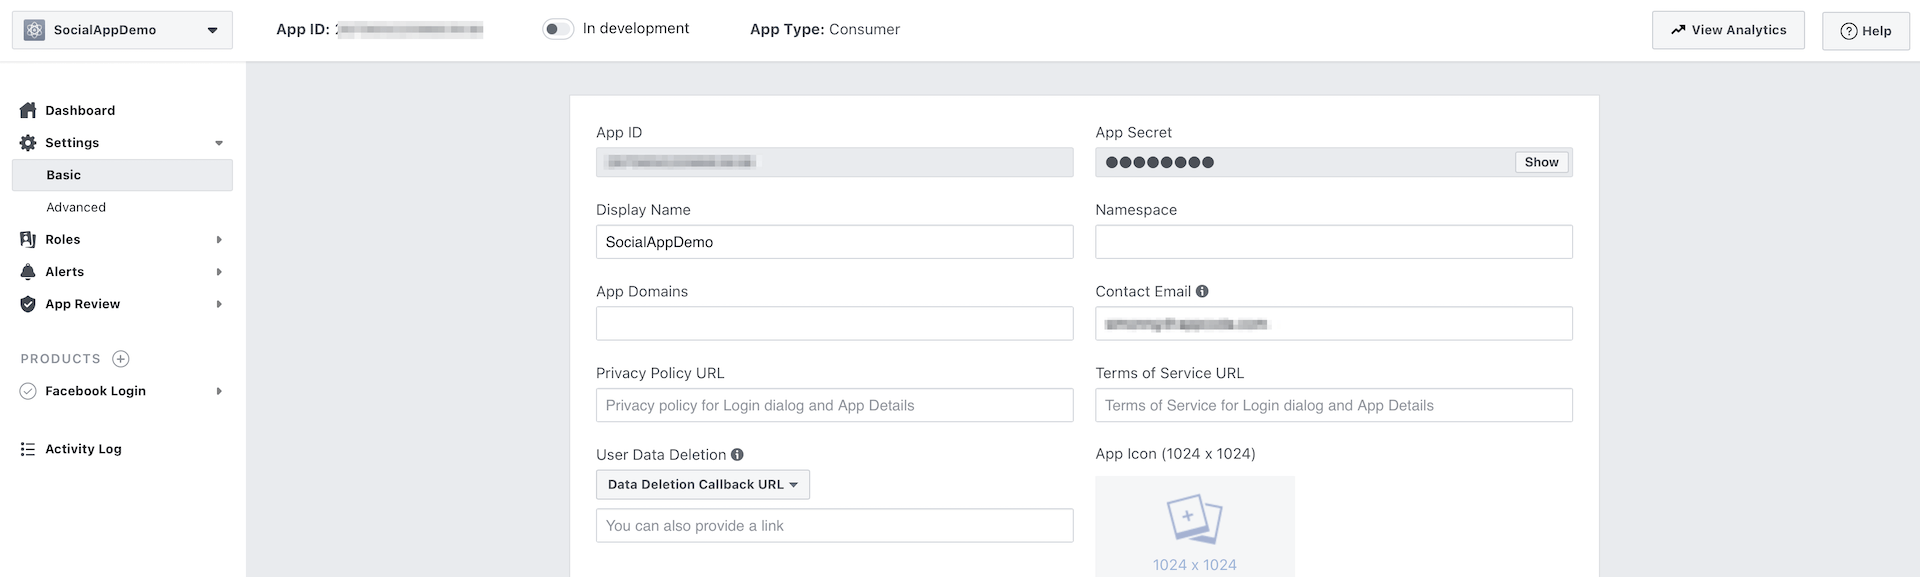
Before you write code to integrate with the Facebook platform, it is required to set up a new Facebook app. Go to Facebook for Developers site (https://developers.facebook.com/), log in with your Facebook account and choose My Apps. In the next screen, choose Create app. You will be prompted to select the app type. Choose Build Connected Experiences.

Next, set the App Display Name to SocialAppDemo. You will also need to provide your contact email. Optionally, you can connect the app to your Business Manager account if you have one. This should bring you to the dashboard of your new app.
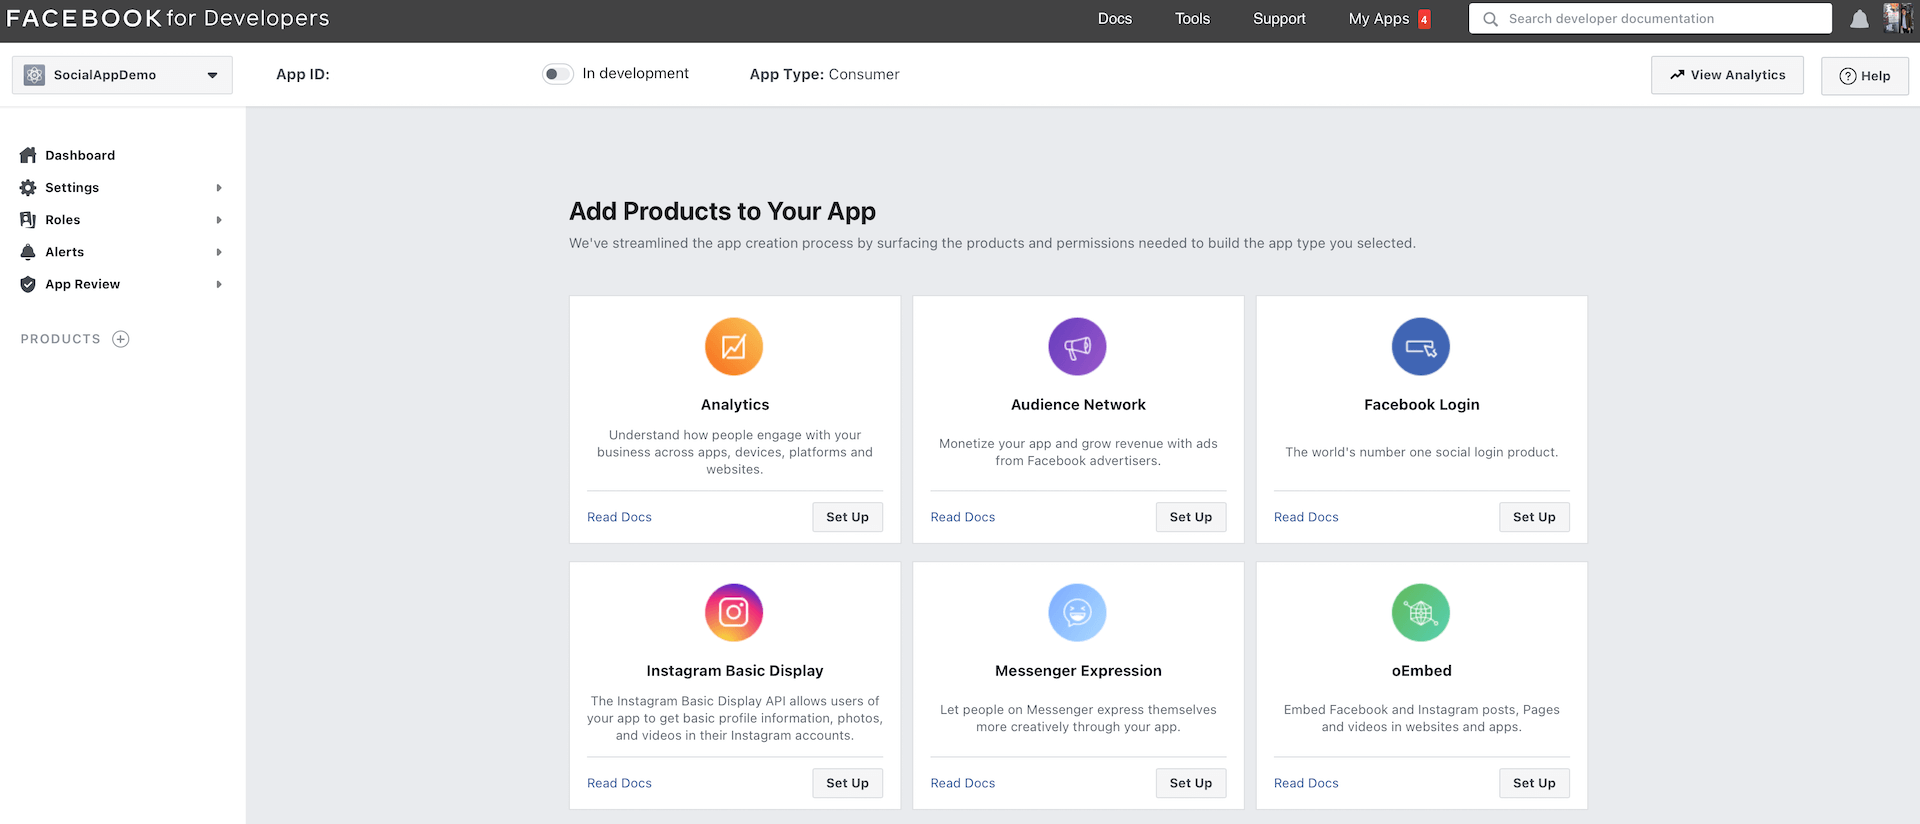
Click Settings and then Basic to reveal your App ID. You will need to use this ID when configuring your Xcode project.
Configuring the Xcode Project
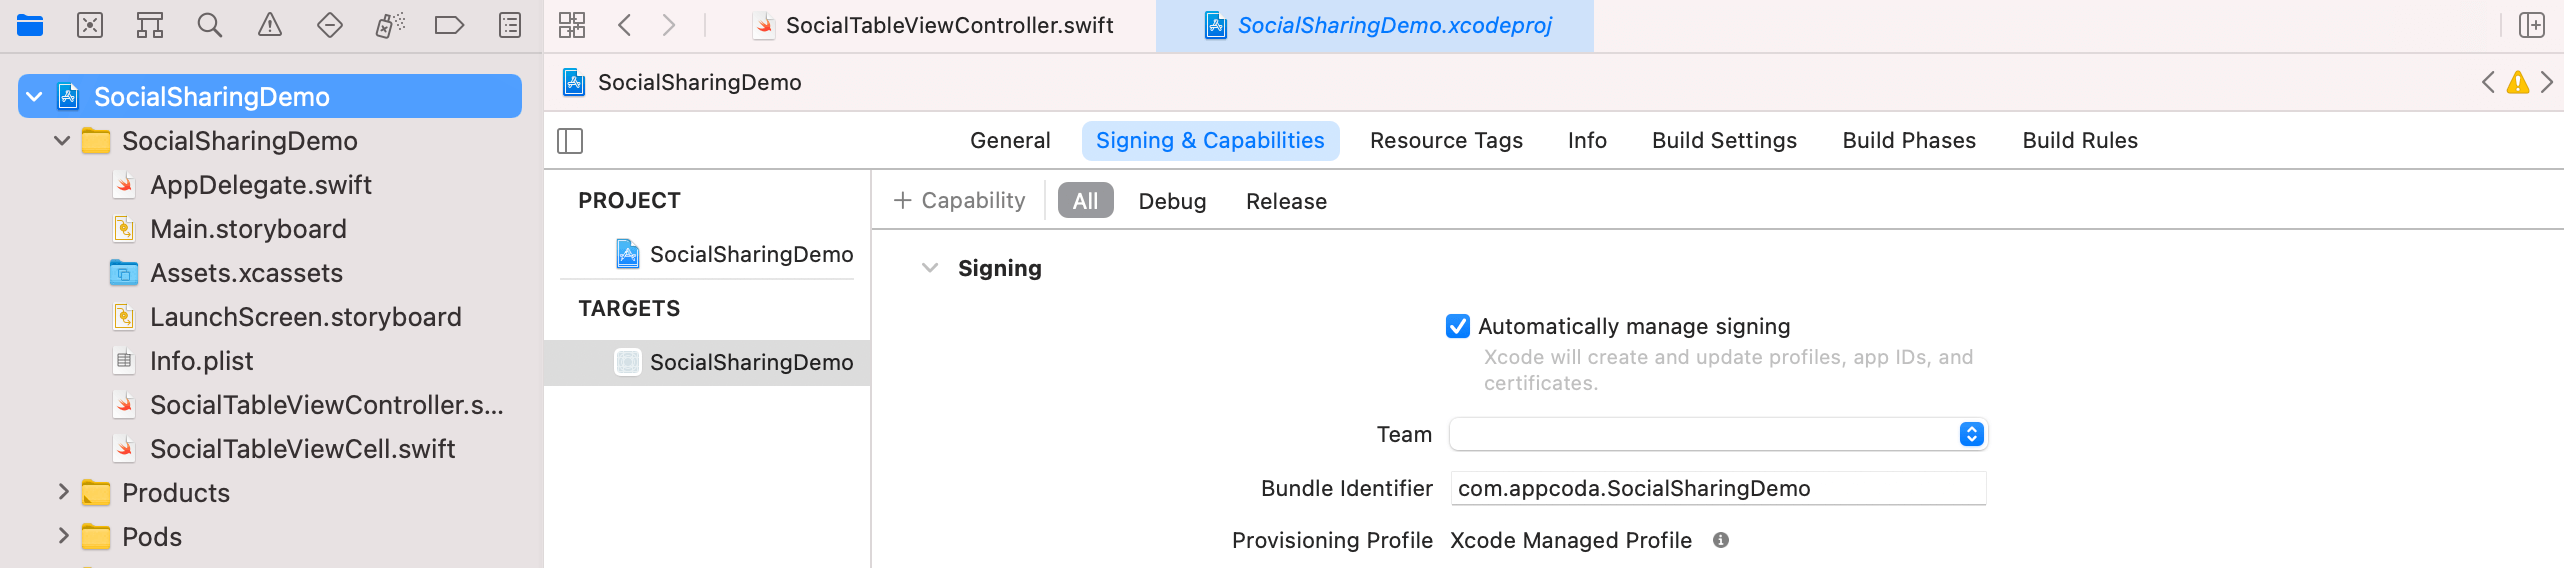
Now that you've configured your Facebook app for iOS, it is time to move on to the actual implementation. Go back to your Xcode project. First, please review your bundle ID and make sure it is set to your own ID. You will need to deploy the app to a real device with Facebook app installed. This is why you have to use an unique identifier.
There is one more configuration before we dive into the Swift code. In project navigator, right click the Info.plist file and choose Open as > Source code. This will open the file, which is actually an XML file, in text format.
Insert the following XML snippet before the </dict> tag:
<key>CFBundleURLTypes</key>
<array>
    <dict>
        <key>CFBundleURLSchemes</key>
        <array>
            <string>fb137896523578923</string>
        </array>
    </dict>
</array>
<key>FacebookAppID</key>
<string>137896523578923</string>
<key>FacebookDisplayName</key>
<string>Social Sharing Demo</string>
<key>LSApplicationQueriesSchemes</key>
<array>
    <string>fbapi</string>
    <string>fb-messenger-api</string>
    <string>fbauth2</string>
    <string>fbshareextension</string>
</array>
The snippet above is my own configuration. Yours should be different from mine, so please make the following changes:
- Change the App ID (
137896523578923) to your own ID. You can reveal this ID in the dashboard of your Facebook app. - Change
fb137896523578923to your own URL scheme. Replace it withfb{your app ID}. - Optionally, you can change the display name of the app (i.e. Social Sharing Demo) to your own name.
The Facebook APIs read the configuration specified in Info.plist for connecting your Facebook app. You have to ensure the App ID matches the one you created in the earlier section.
The LSApplicationQueriesSchemes key specifies the URL schemes your app can use with the canOpenURL: method of the UIApplication class. If the user has the official Facebook app installed, it may switch to the app for login purpose. In such case, it is required to declare the required URL schemes in this key, so that Facebook can properly perform the app switch.
Using the Facebook API
Now that we have completed the configuration, it is time to dive into the code. Open SocialTableViewController.swift and look into the share action method. You should find the code snippet shown below that instantiates the UIAlertAction instances of Twitter and Facebook actions.
// Display the share menu
let shareMenu = UIAlertController(title: nil, message: "Share using", preferredStyle: .actionSheet)
let twitterAction = UIAlertAction(title: "Twitter", style: .default, handler: nil)
let facebookAction = UIAlertAction(title: "Facebook", style: .default, handler: nil)
let cancelAction = UIAlertAction(title: "Cancel", style: .cancel, handler: nil)

shareMenu.addAction(twitterAction)
shareMenu.addAction(facebookAction)
shareMenu.addAction(cancelAction)

self.present(shareMenu, animated: true, completion: nil)
For all the UIAlertAction instances, the handler is set to nil. Now we will first implement the facebookAction for users to share a photo.
Because we are going to use the Facebook Share framework, the first thing you have to do is import the FacebookShare framework. Place the following statement at the very beginning of the SocialTableViewController class:
import FacebookShare
Next, update the facebookAction variable to the following:
let facebookAction = UIAlertAction(title: "Facebook", style: .default) { (action) in

    let selectedImageName = self.restaurantImages[indexPath.row]

    guard let selectedImage = UIImage(named: selectedImageName) else {
        return
    }

    let photo = SharePhoto(image: selectedImage, userGenerated: false)
    let content = SharePhotoContent()
    content.photos = [ photo ]

    let shareDialog = ShareDialog(fromViewController: self, content: content, delegate: nil)
    shareDialog.show()

}
Before testing the app, let's go through the above code line by line. First, we find out the selected image and use a guard statement to validate if we can load the image. To share a photo using the Facebook framework, you have to create a SharePhoto object with the selected image and then instantiate a SharePhotoContent object for the photo
The ShareDialog class is a very handy class for creating a share dialog with the specified content. Once you call its show() method, it will automatically show the appropriate share dialog depending on the type of content and the device's application. For example, if the device has the native Facebook app installed, the ShareDialog class will direct the user to the Facebook app for sharing.
Now you are ready to test the app. In order to share photos, it is required for the device to have the native Facebook app installed. Therefore, remember to deploy the app to a real device with the Facebook app installed and test out the share feature.

While this demo shows you how to initiate a photo share, the Facebook Share framework supports other content types such as links and videos. Say, if you want to share a link, you can replace the content variable like this:
let content = ShareLinkContent()
content.contentURL = URL(string: "https://www.appcoda.com")!
You use the LinkShareContent class to create a link share. For details of other content types, you can refer to the official documentation (https://developers.facebook.com/docs/swift/sharing/content-types).
Implementing the Twitter Sharing
Now it's time to implement the Twitter button. Twitter also provides the SDK for composing tweets on iOS, which is known for Twitter Kit for iOS. Not only can you use the kit for creating tweets, you are allowed to display tweets and integrate with Twitter Login. In this chapter, we will focus on the tweet composer.
Installing the Twitter Kit
Twitter requires that all API requests be authenticated with tokens. Thus, you have to apply an API key for your app on Twitter's developer dashboard. Visit https://apps.twitter.com/ and click the Create Project button.
Please note that you need to apply for a Twitter Developer account before you're allowed to create an app.
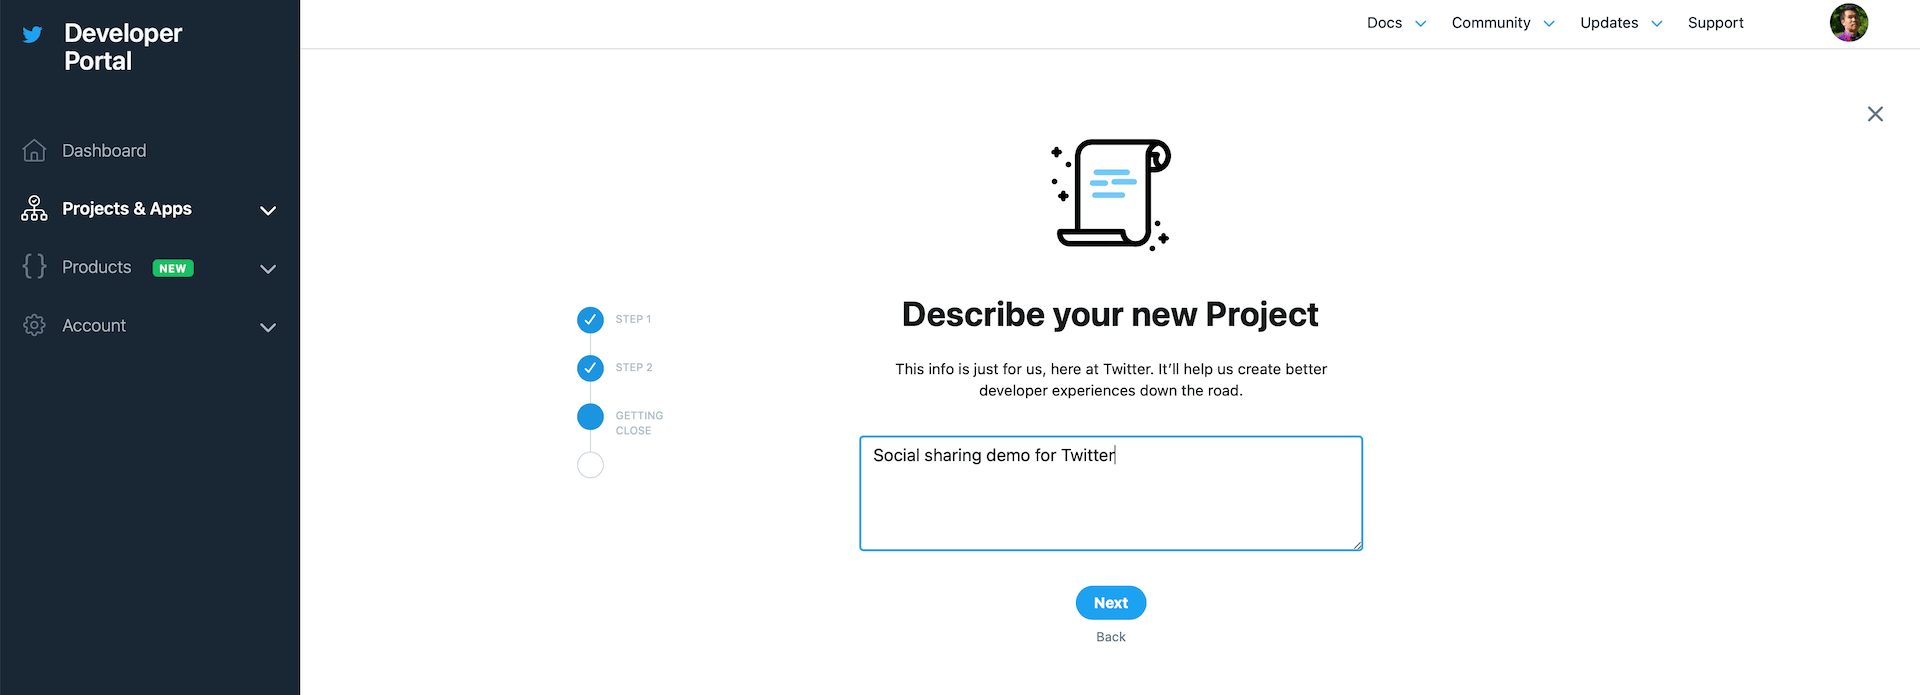
Assuming you're able to create a new app, fill in the app details to create the app including the app name, app description, and other required fields.
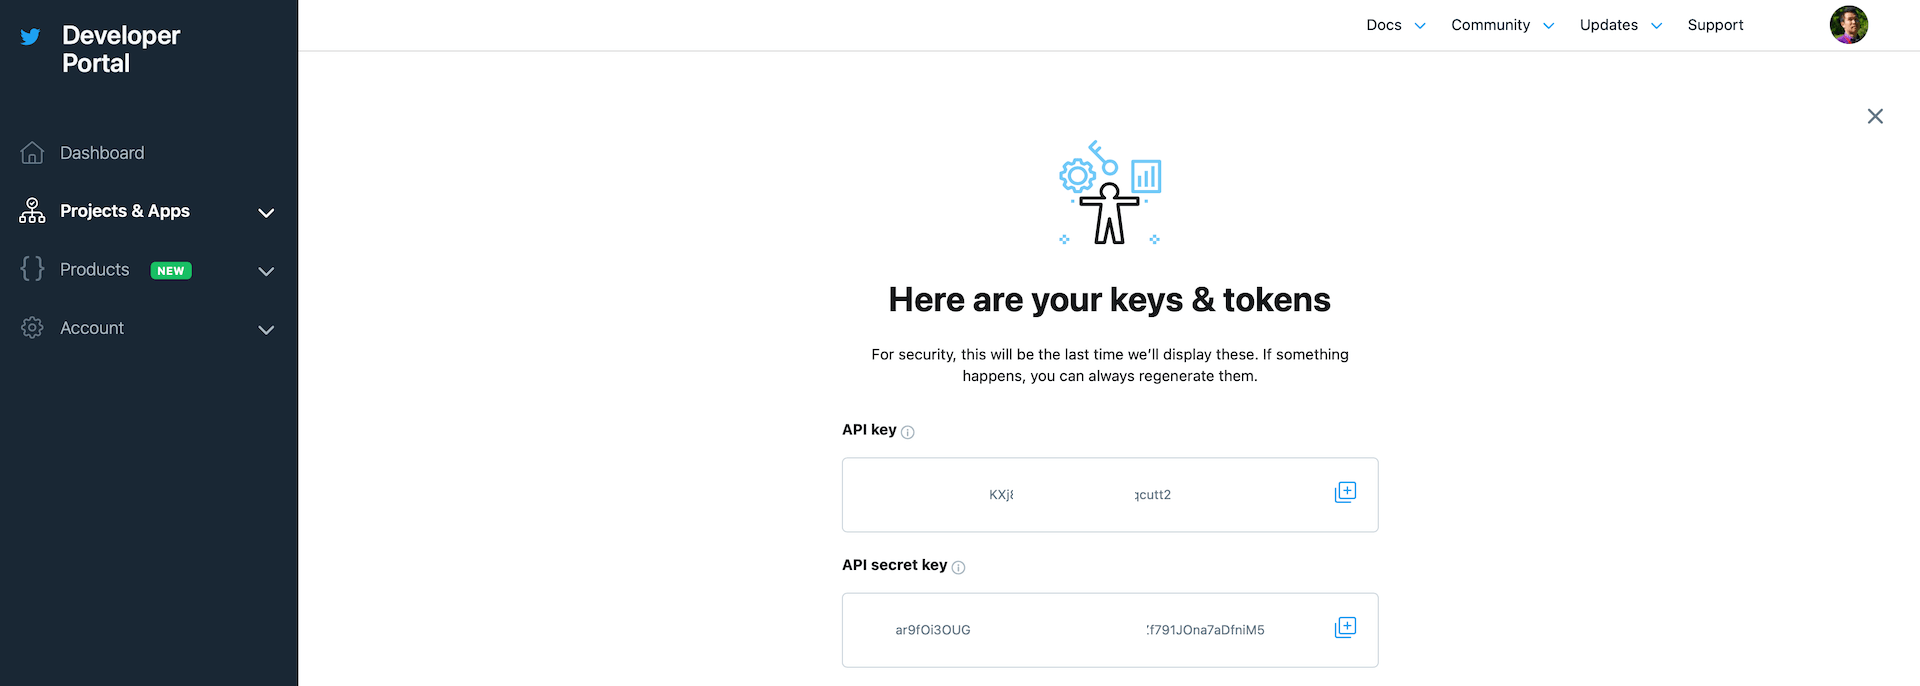
Once the application is created, you will have your application's API key and secret. Later, you will need these keys in the project configuration.
Before we move to the coding part, go back to App Details and set the Callback URL to twitterkit-<consumer-key>:// where
Installing Twitter Kit Using CocoaPods
Similar to the installation of the Facebook SDK, the easiest way to install the Twitter Kit is through CocoaPods. Assuming you have CocoaPods installed on your Mac, open Terminal and go to your Xcode project folder. Edit the Podfile like this:
target 'SocialSharingDemo' do
  # Comment the next line if you're not using Swift and don't want to use dynamic frameworks
  use_frameworks!

  # Pods for SocialSharingDemo
  pod 'FacebookCore'
  pod 'FacebookLogin'
  pod 'FacebookShare'

  # Pods for Twitter
  pod 'TwitterKit'

end
Here we just insert the line pod 'TwitterKit' in the file. Save the changes and then type the following command to install the Twitter Kit:
pod install
Now you are ready to code. Remember to open the SocialSharingDemo.xcworkspace file using Xcode.
Configuring the Info.plist
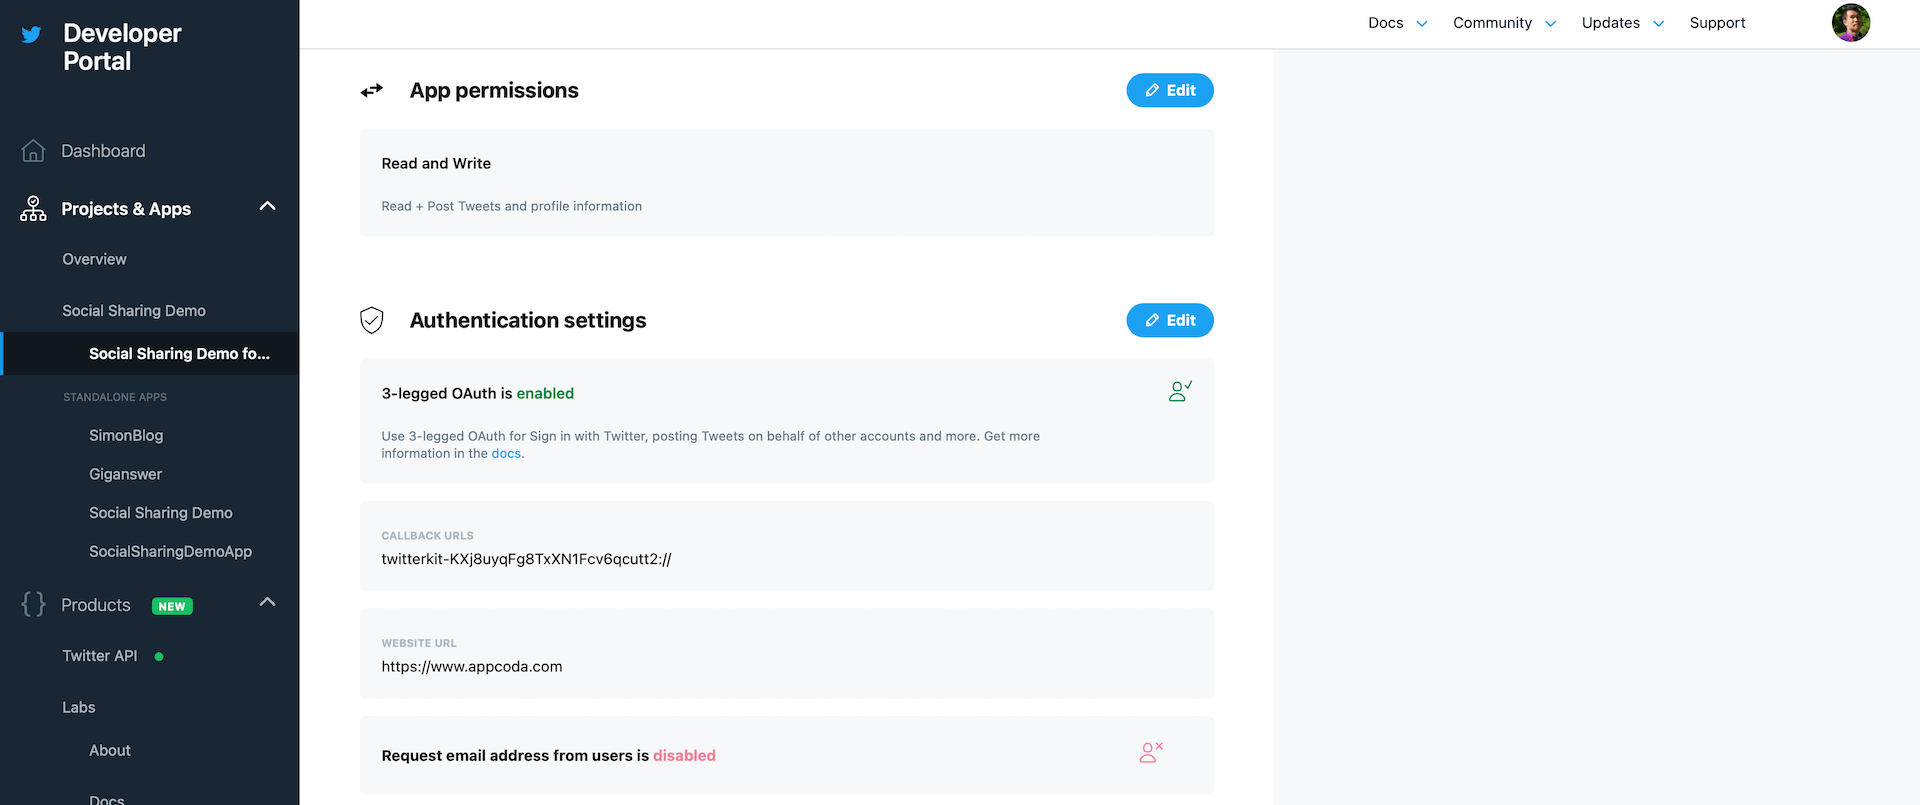
TwitterKit looks for a URL scheme in the format of twitterkit-<consumerKey>, where consumerKey is your application's API key. To define this URL scheme, open Info.plist and insert the following configure before the </dict> tag:
<key>CFBundleURLTypes</key>
<array>
    <dict>
        <key>CFBundleURLSchemes</key>
        <array>
            <string>twitterkit-KXj8uyqFg8TxXN1Fcv6qcutt2</string>
        </array>
    </dict>
</array>
Please make sure you replace my API key with yours. If you forget your API key, you can refer to the Twitter developer dashboard to find it.
Also, please update the key LSApplicationQueriesSchemes with the following values:
<key>LSApplicationQueriesSchemes</key>
<array>
    <string>fbapi</string>
    <string>fb-messenger-api</string>
    <string>fbauth2</string>
    <string>fbshareextension</string>
    <string>twitter</string>
    <string>twitterauth</string>
</array>
We just added two new entries for Twitter to LSApplicationQueriesSchemes. If you do not add these entries, your app will not be able to open the Twitter app for authentication.
Using the Twitter Kit
Now that you have everything configured, let's dive into the coding part. Open the AppDelegate.swift file and insert the import statement to import the Twitter Kit framework:
import TwitterKit
Update the application(_:willFinishLaunchingWithOptions:) method like this:
func application(_ application: UIApplication, didFinishLaunchingWithOptions launchOptions: [UIApplicationLaunchOptionsKey: Any]?) -> Bool {

    TWTRTwitter.sharedInstance().start(withConsumerKey:"vm4dasvZYI2nDorQC9ziNOEXv", consumerSecret:"8QJVWWl4HuWK1MDfdvUjC6M5JuaXxv6FqPLqRfe3y9O2FoZOsE")

    return true
}
Again, please make sure you replace the consumer key and secret with yours.
In the same class, insert the following method:
func application(_ app: UIApplication, open url: URL, options: [UIApplication.OpenURLOptionsKey : Any] = [:]) -> Bool {
    return TWTRTwitter.sharedInstance().application(app, open: url, options: options)
}
If the user hasn't logged on Twitter with his/her account, the Twitter Kit will automatically bring up a web interface to prompt for the login. Alternatively, if the user has the Twitter app installed on the device, it will switch over to the Twitter app to ask for permission. Once the login completes, the method is called to register the callback URL. The line of the code simply passes along the redirect URL to Twitter Kit.
Now open the SocialTableViewController.swift file and import the Twitter Kit:
import TwitterKit
In the share method, replace twitterAction with the following code:
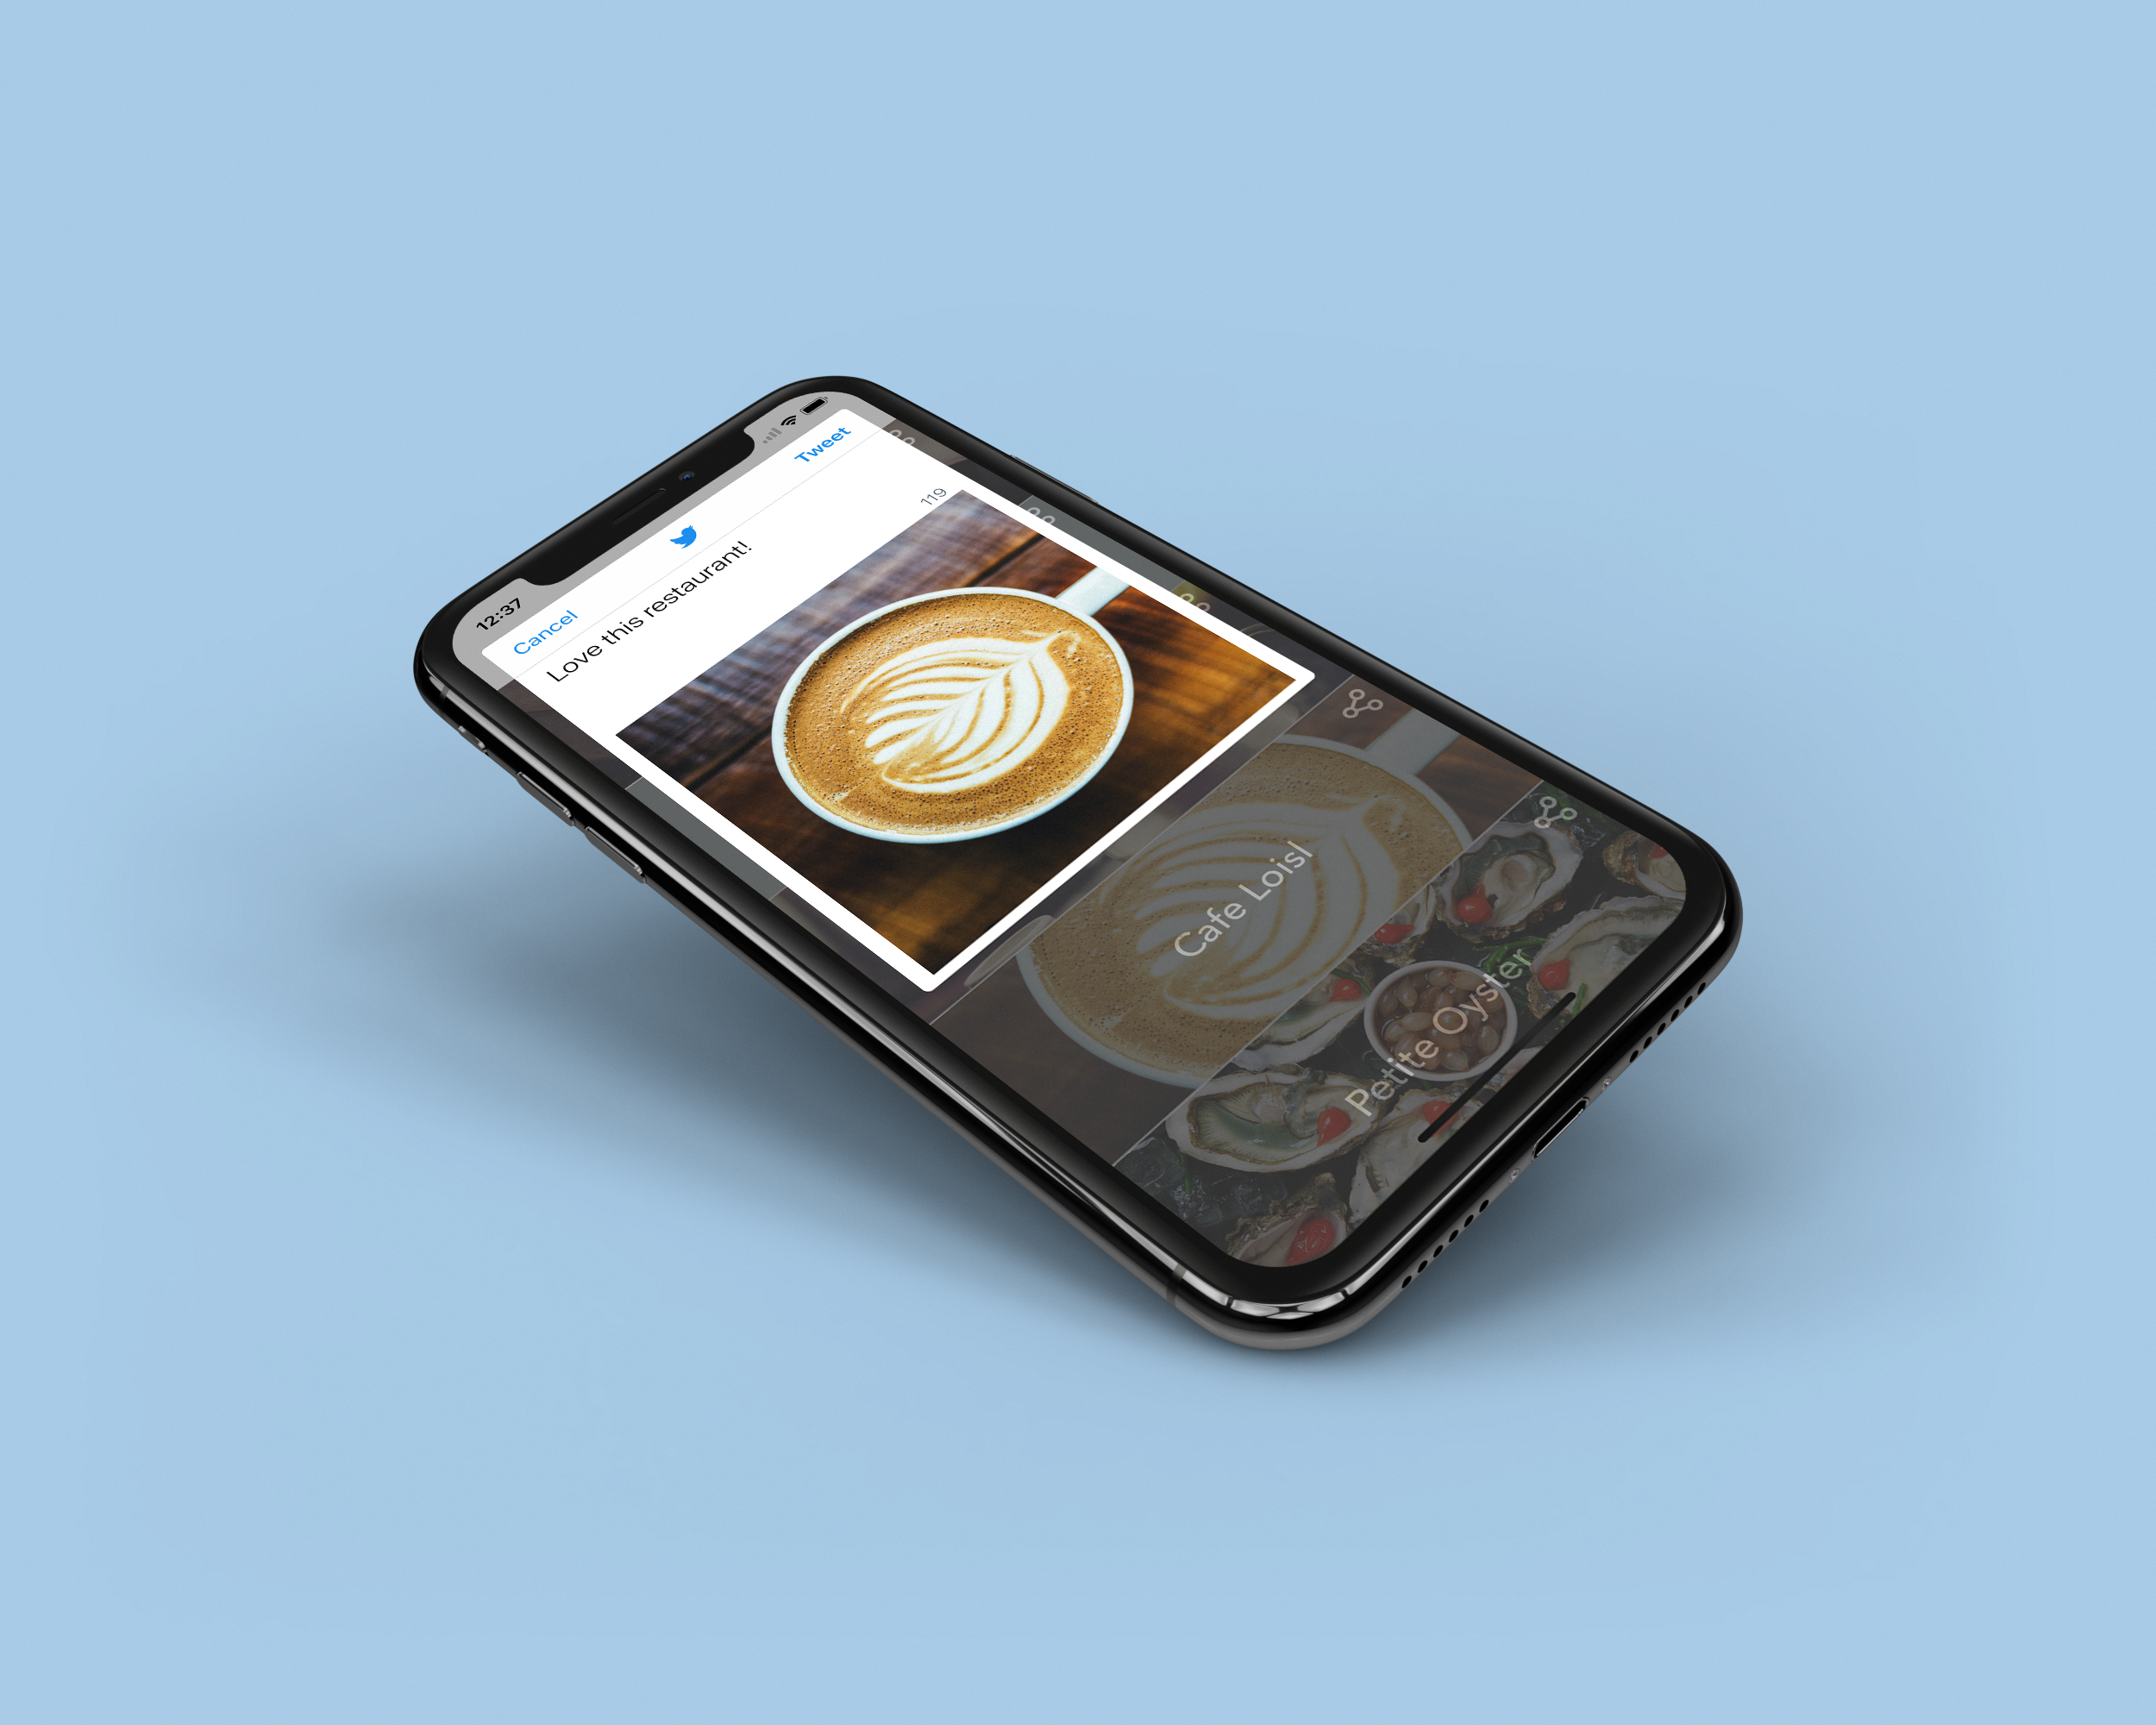
let twitterAction = UIAlertAction(title: "Twitter", style: .default) { (action) in

    let selectedImageName = self.restaurantImages[indexPath.row]

    guard let selectedImage = UIImage(named: selectedImageName) else {
        return
    }

    let composer = TWTRComposer()

    composer.setText("Love this restaurant!")
    composer.setImage(selectedImage)

    composer.show(from: self, completion: { (result) in
        if (result == .done) {
            print("Successfully composed Tweet")
        } else {
            print("Cancelled composing")
        }
    })

}
To let users compose a tweet, you just need to create an instance of TWTRComposer. Optionally, you can set the initial text and image. In the code above, we set the initial image to the image of the selected restaurant. Lastly, we call the show method to bring up the composer. That's all you need to do. The Twitter Kit will automatically check if the user has logged in to Twitter. If not, it will ask the user for username and password. The composer interface will only be displayed when the user has successfully logged into Twitter.
That's it! You can now test the app using the built-in simulator or deploy it to your device.
Summary
With the demise of the Twitter and Facebook integration from the Social framework, it takes you extra to integrate with these social network services. However, as you can see from this chapter, the procedures and APIs are not complicated. If you're building your app, there is no reason why you shouldn't incorporate these social features.
For reference, you can download the complete Xcode project from http://www.appcoda.com/resources/swift55/SocialSharingDemo.zip.