- Made by AppCoda
- Contact us / Support
- Tweet this book
- Preface
- 1. Building Adaptive User Interfaces
- 2. Creating Table View Sections and Index list with Diffable Data Source
- 3. Animating Table View Cells
- 4. Working with JSON and Codable
- 5. How to Integrate the Twitter and Facebook SDK for Social Sharing
- 6. Working with Email and Attachments
- 7. Sending SMS and MMS Using MessageUI Framework
- 8. How to Get Direction and Draw Route on Maps
- 9. Search Nearby Points of Interest Using Local Search
- 10. Audio Recording and Playback
- 11. Scan QR Code Using AVFoundation Framework
- 12. Working with URL Schemes
- 13. Building a Full Screen Camera with Gesture-based Controls
- 14. Video Capturing and Playback Using AVKit
- 15. Displaying Banner Ads using Google AdMob
- 16. Working with Custom Fonts
- 17. Working with AirDrop, UIActivityViewController and Uniform Type Identifiers
- 18. Building Grid Layouts Using Collection Views and Diffable Data Source
- 19. Interacting with Collection Views
- 20. Adaptive Collection Views Using UITraitCollection and Compositional Layout
- 21. Building a Weather Widget Using WidgetKit
- 22. Building Slide Out Sidebar Menus Using Objective-C Libraries
- 23. View Controller Transitions and Animations
- 24. Building a Slide Down Menu
- 25. Self Sizing Cells and Dynamic Type
- 26. XML Parsing, RSS and Expandable Table View Cells
- 27. Applying a Blurred Background Using UIVisualEffect
- 28. Using Touch ID and Face ID For Authentication
- 29. Building a Carousel-Like User Interface
- 30. Working with Parse
- 31. Parsing CSV and Preloading a SQLite Database Using Core Data
- 32. Connecting Multiple Annotations with Polylines and Routes
- 33. Using CocoaPods in Swift Projects
- 34. Building a Simple Sticker App
- 35. Building iMessage Apps Using Messages Framework
- 36. Building Custom UI Components Using IBDesignable and IBInspectable
- 37. Using Firebase for User Authentication
- 38. Google and Facebook Authentication Using Firebase
- 39. Using Firebase Database and Storage to Build an Instagram-like App
- 40. Building a Real-time Image Recognition App Using Core ML
- 41. Building AR Apps with ARKit and SpriteKit
- 42. Working with 3D Objects in Augmented Reality Using ARKit and SceneKit
- 43. Use Create ML to Train Your Own Machine Learning Model for Image Recognition
- 44. Building a Sentiment Classifier Using Create ML to Classify User Reviews
- 45. Working with Image Tracking Using ARKit
- Published with GitBook
Chapter 42
Working with 3D Objects in Augmented Reality Using ARKit and SceneKit
In the previous chapter, you learned how to use SpriteKit to work with 2D objects in AR space. With 2D AR, you can overlay a flat image or a label in the real environment. However, do you notice one behaviour that seems weird to you? When you move your phone around, the emoji character (or the bird) always faces you. You can't look the bird from behind!
This is normal when you put a 2D object in a 3D space. The object will always face the viewer. If you want to move around the object and see how it looks from the side (or the back), you will need to work with 3D objects. In order to do that, you will need to implement the AR app using SceneKit instead of SpriteKit.
By pairing ARKit with the SceneKit framework, developers can add 3D objects to the real world. In this chapter, we will look into SceneKit and see how we can work with 3D objects. In brief, you will understand the following concepts and be able to create an ARKit app with SceneKit after going through the chapter:
- Understand how to pair SceneKit with ARKit
- Learn where to find free/premium 3D models
- Learn how to convert 3D models to SceneKit compatible format and import them into Xcode project
- Understand how to add 3D objects to AR environment
- Learn how to detect a horizontal plane and put virtual 3D objects on it
Cool! Let's get started.
The ARKit Demo App
Similar to what we have done in the earlier chapter, you can easily create a 3D AR app by using the built-in template. You don't even need to write a line of code. If you choose to create a new project using the Augmented Reality App template and select SceneKit as the content technology, Xcode will automatically generate a demo app for you.
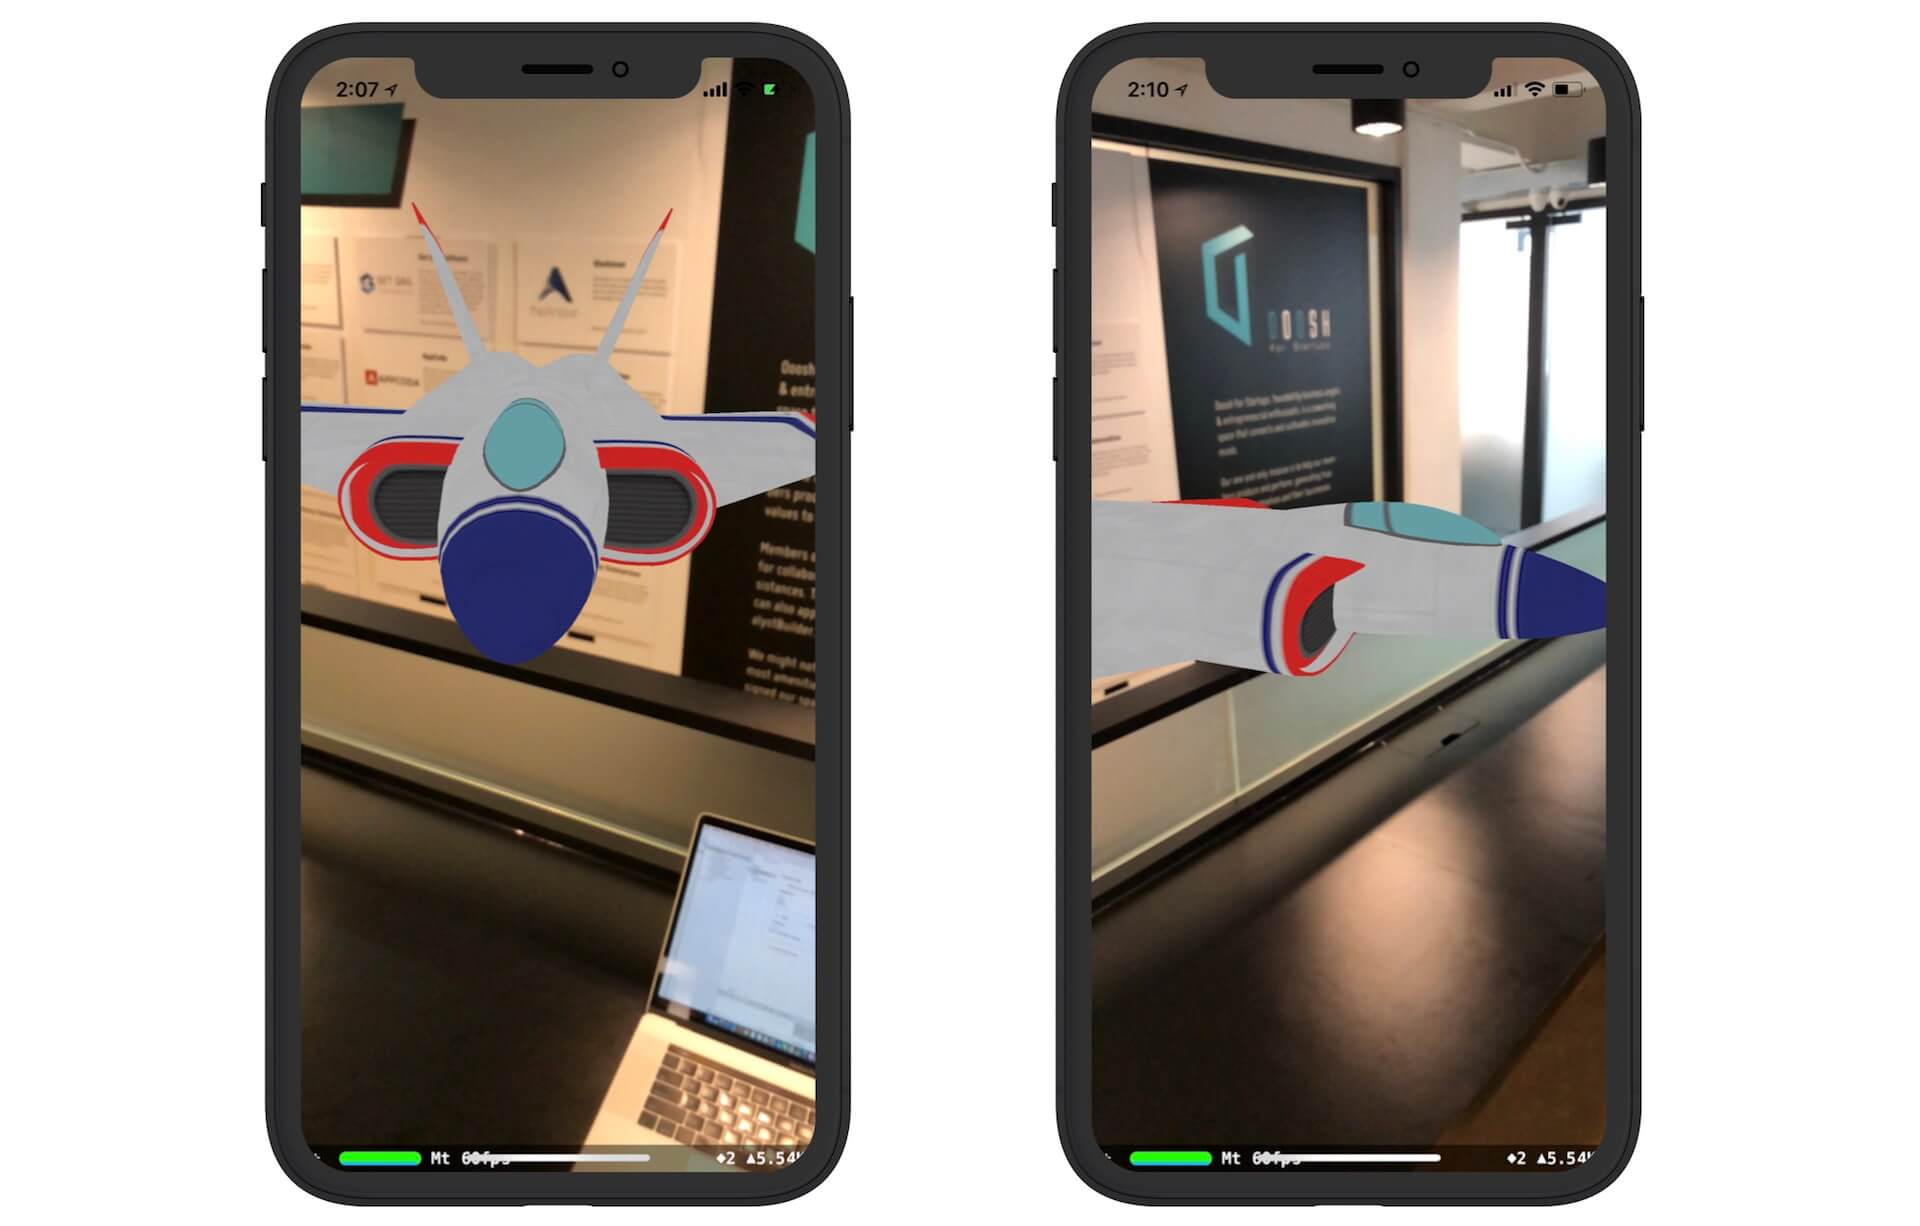
Deploy and run the project on a real iPhone/iPad. You will see a jet aircraft floating in the AR space. You can move your phone around the virtual object. Since it's now a 3D object, you can see how the object looks from behind or the sides.
Understanding SceneKit and Scene Editor
While I am going to show you how to create an ARKit app from scratch, let's dive a little bit deeper and look into the code of the demo project.
We will start with the ViewController.swift file. If you have read the previous chapter, the code should be very familiar to you. One thing that you may wonder is how the app renders the 3D object.
SceneKit, which was first released along with iOS 8, is the content technology behind this AR demo for rendering 3D graphics. The framework allows iOS developers to easily integrate 3D graphics into your apps without knowing the low-level APIs such as Metal and OpenGL. By pairing with ARKit, SceneKit further lets you work with 3D objects in the AR environment.
All SceneKit classes begin with SCN (e.g. SCNView). For its AR counterpart, it is further prefixed with AR (e.g. ARSCNView). At the beginning of ViewController.swift, it has an outlet variable that connects with the ARSCNView object in the storyboard:
@IBOutlet var sceneView: ARSCNView!
Similar to ARSKView, the ARSCNView object is responsible for rendering the AR experiences that blend virtual 3D objects with the real world environment. To place 3D virtual objects in the real world, you can create an ARAnchor object and add it to the AR session. This is similar to what you have done with SpriteKit.
SceneKit, however, offers you another way to place virtual objects by using a scene graph. If you look into the viewDidLoad() method of ViewController, you will find that the demo app loads a scene file to create a SCNScene object. This object is then assigned to the AR view's scene.
// Create a new scene
let scene = SCNScene(named: "art.scnassets/ship.scn")!

// Set the scene to the view
sceneView.scene = scene
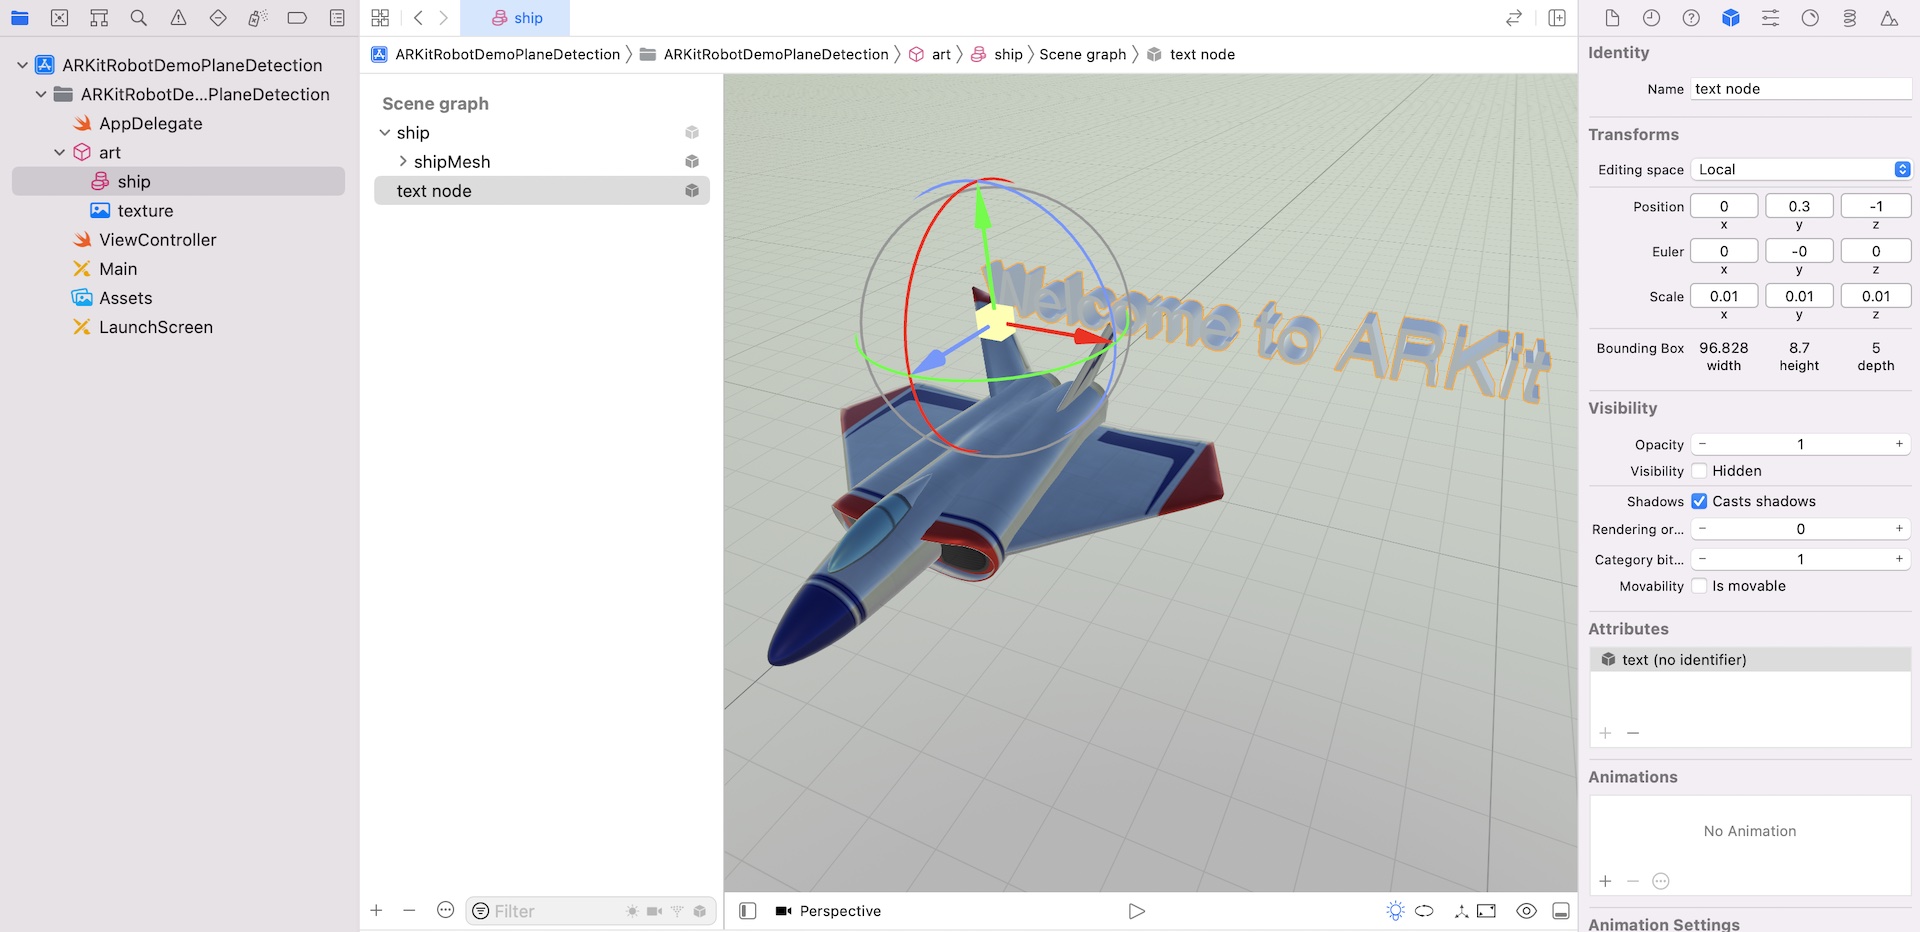
This is where the magic happens. ARKit automatically matches the SceneKit space to the real world and places whatever virtual objects found in the scene file. If you open the ship.scn file of the scene assets, you will find a 3D-model of a jet aircraft, which was located in front of the three-axis. This is the exact model rendered in the AR app.

You can click the Scene Graph View button to reveal the scene graph. As you can see, a scene is actually comprised of multiple nodes. And, the hierarchical tree of nodes forms what-so-called Scene Graph.
In the scene graph above, the ship node contains both shipMesh and emitter nodes. Under the Node inspector, you can reveal the name (i.e. identity) and the attributes of the node. For example, the position of the ship node is set to (0, 0, 0). This is why the jet aircraft renders right in front of your device's camera when you launched the demo app.
Let's have a quick test. Change the value of the z axis from 0 to -1 and test the app again. This will place the aircraft 1 meter from your device's camera.
There is nothing fancy here. In the previous chapter, we programmatically set the position of a sprite node. Now you can do it by using the scene editor. Of course, if you prefer, you can change the position of a node using code. Later this chapter, I will show you the code.
Let's continue to explore the scene editor. Click the + button to open the Object library. You should be very familiar with this feature. However, instead of showing some UIKit components, the object library now provides you with common components (e.g. Box, Sphere) of SceneKit.
Now, let's drag the 3D Text object to the scene and place it near the aircraft. You can use this object to render 3D text in the AR environment. To set the content, choose the Attributes inspector and set the Text field to Welcome to ARKit. Then go back to the Node inspector and change the values of the Transforms section to the following:
- Position - Set x to
0, y to0.3, and z to-1. This will place the 3D text above the aircraft. - Scale - Set the value of x, y, and z to
0.01. This default size of the text is too big. By setting the values of scale to 0.01, this will scale down its size.
It's time to test the app again. Compile the project and deploy the app to your iPhone. When the app is launched, you should see the jet aircraft and the 3D text.
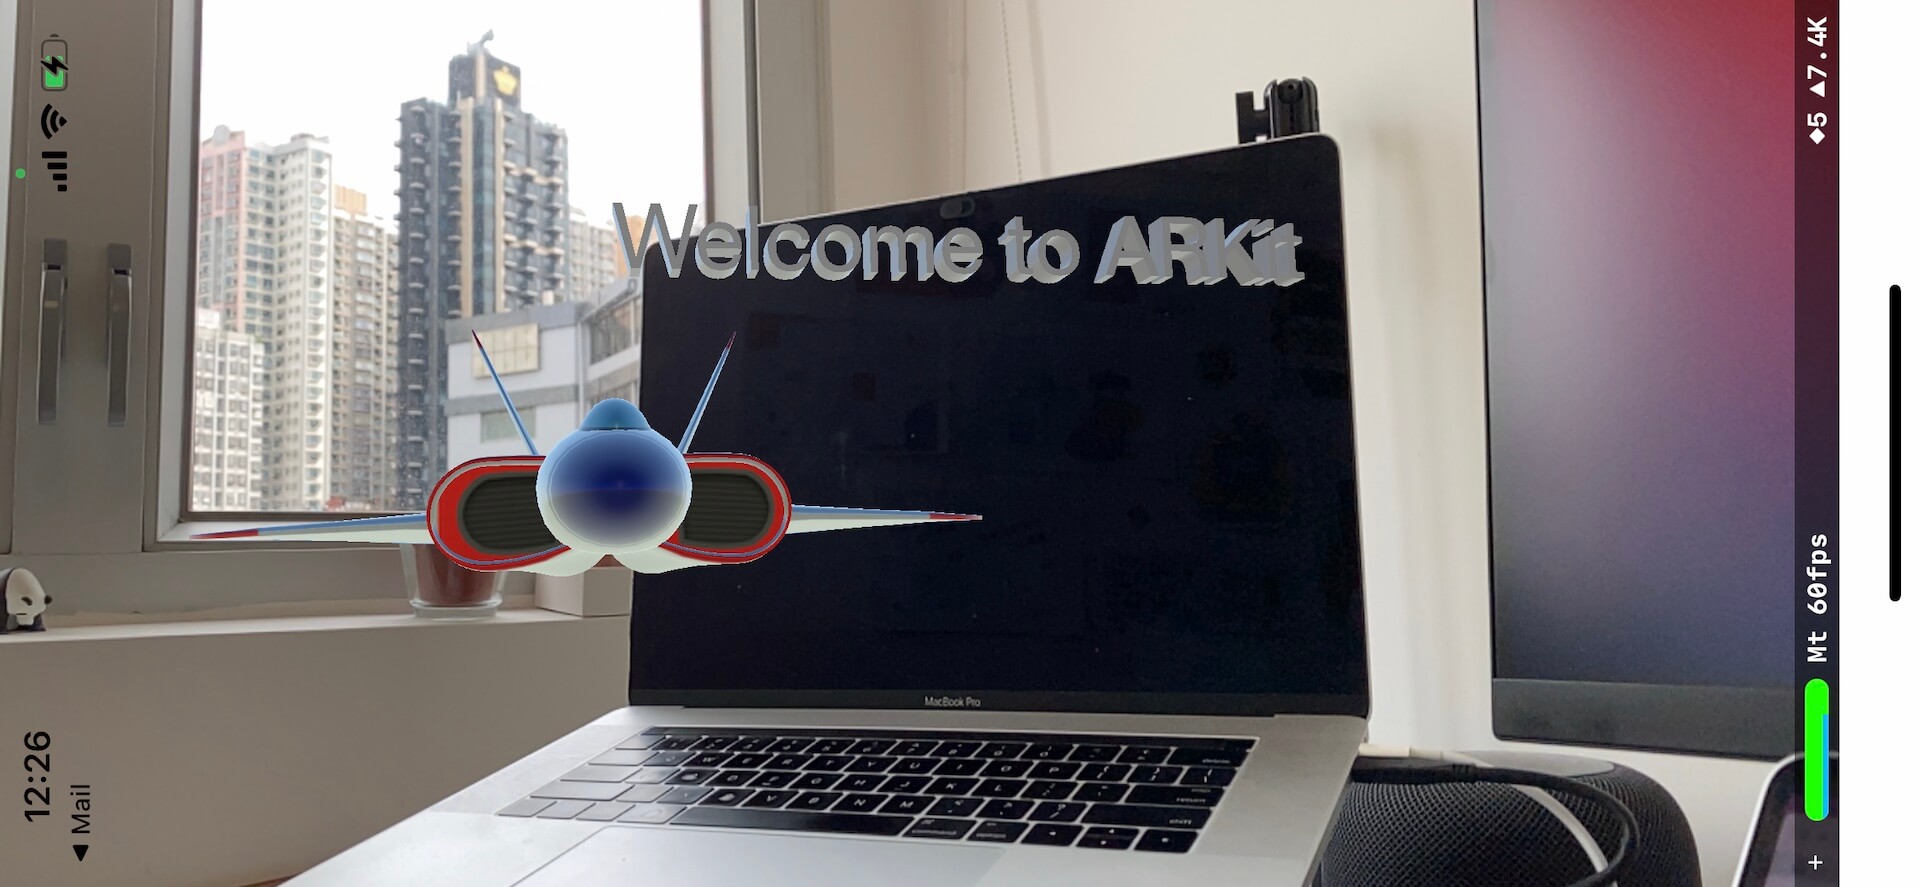
Cool, right? The scene editor allows you to edit your scene without writing a line of code. Whichever components you put in the scene file, ARKit will blend the virtual objects and put them in the real world.
This is pretty much how the ARKit demo app works. I recommend you to play around with the scene editor. Try to add some other objects and edit the properties. This will further help you understand the concept.
Building Your ARKit App from Scratch
I introduced you the basics of SceneKit by walking you through the demo app. Wouldn't it be great if you can learn how to build your own ARKit app from scratch without using the built-in template? This is what I want to show you in the rest of the chapter. Specifically, you will learn the following stuff:
- How to create an ARKit app using the Single View Application template
- How to import a 3D model into Xcode projects
- How to detect a plane using ARKit
- How to place multiple virtual 3D objects on the detected plane
Okay, let's get started.
Where do You Find the 3D Objects?
Before diving into the code, the very first question you may have is where to find the 3D models. If you know 3D graphics design, chances are that you already have created some 3D characters or objects. What if you don't know anything about 3D object creation? You probably like to get some 3D models from these online resources:
- SketchFab (https://sketchfab.com)
- TurboSquid (https://www.turbosquid.com)
- Google Poly (https://poly.google.com)
Not all models are free for download, but there is no shortage of free models. Of course, if budget is not a big concern, you can also purchase premium models from the above websites.
When you include a scene file in DAE or Alembic format in your Xcode project, Xcode automatically converts the file to SceneKit’s compressed scene format for use in the built app. The compressed file retains its original
.daeor.abcextension.- Apple's documentation (https://developer.apple.com/documentation/scenekit/scnscenesource)
The 3D objects are usually available in OBJ, FBX and DAE format. In order to load a 3D object into the ARKit app, Xcode needs to read your 3D object file in a SceneKit supported format. Therefore, if you download a 3D object file in OBJ/FBX format, you will need to convert it into one of the SceneKit-compatible formats.
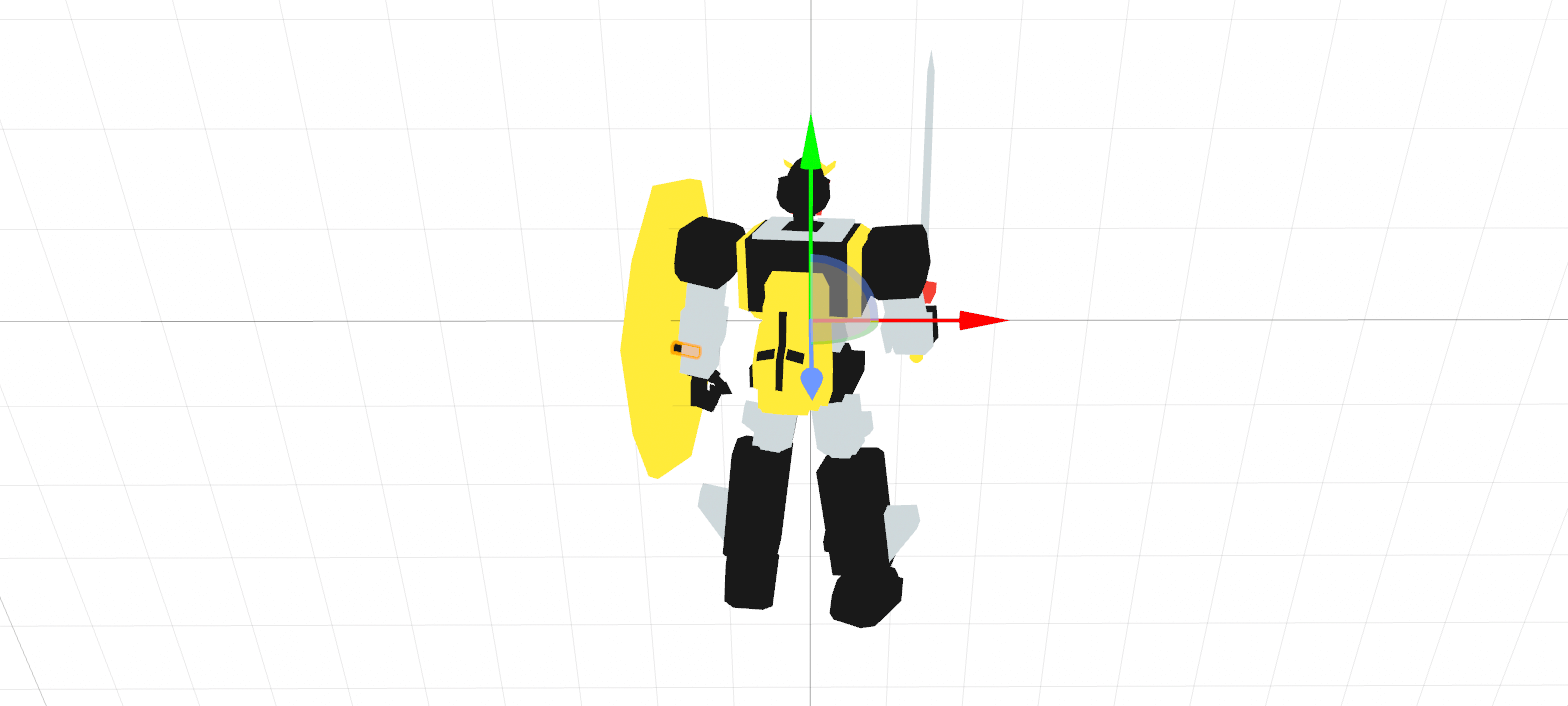
As an example, go to https://poly.google.com/view/8WyS_yhFbX1 and download the 3D model of a robot. I will show how to use Blender to convert the file format. Later, we will also use this model in our ARKit app. When you hit the Download button, choose OBJ file to retrieve the file in OBJ format. If the link doesn't work for you, you can download the OBJ file from https://www.appcoda.com/resources/swift53/robot3dmodel.zip.
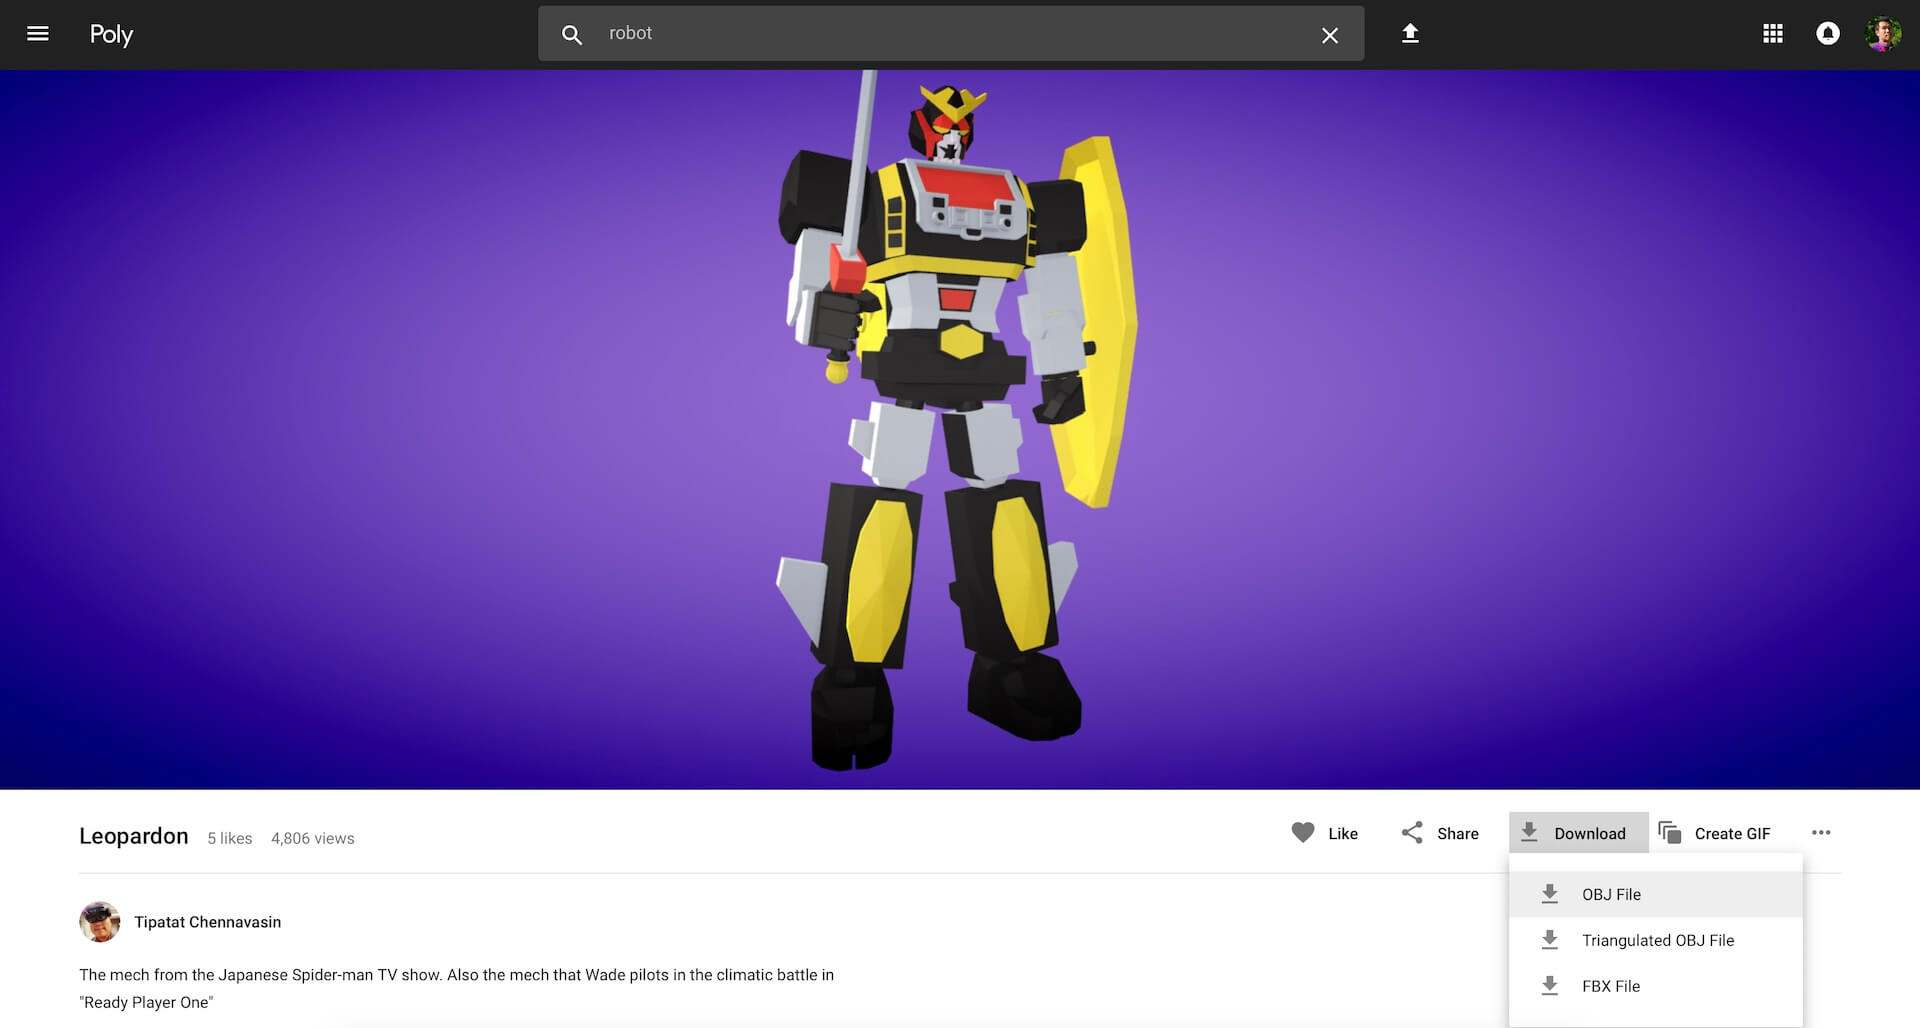
After decompressing the zip archive, you should find two files:
- model.obj - this is the model of the robot.
- materials.mtl - this file describes the texture used by the model.
To convert these files into SceneKit supported format, we will use an open source 3D graphics creation software called Blender. Now fire up Safari and point it to https://www.blender.org. The software is free for download and available for Mac, Windows, and Linux.
Once you install Blender, fire it up and you'll see a default Blender file. Go up to the Blender menu. Click File > Import > Wavefront (.obj). Navigate to the folder containing the model files and choose to import the model.obj file.
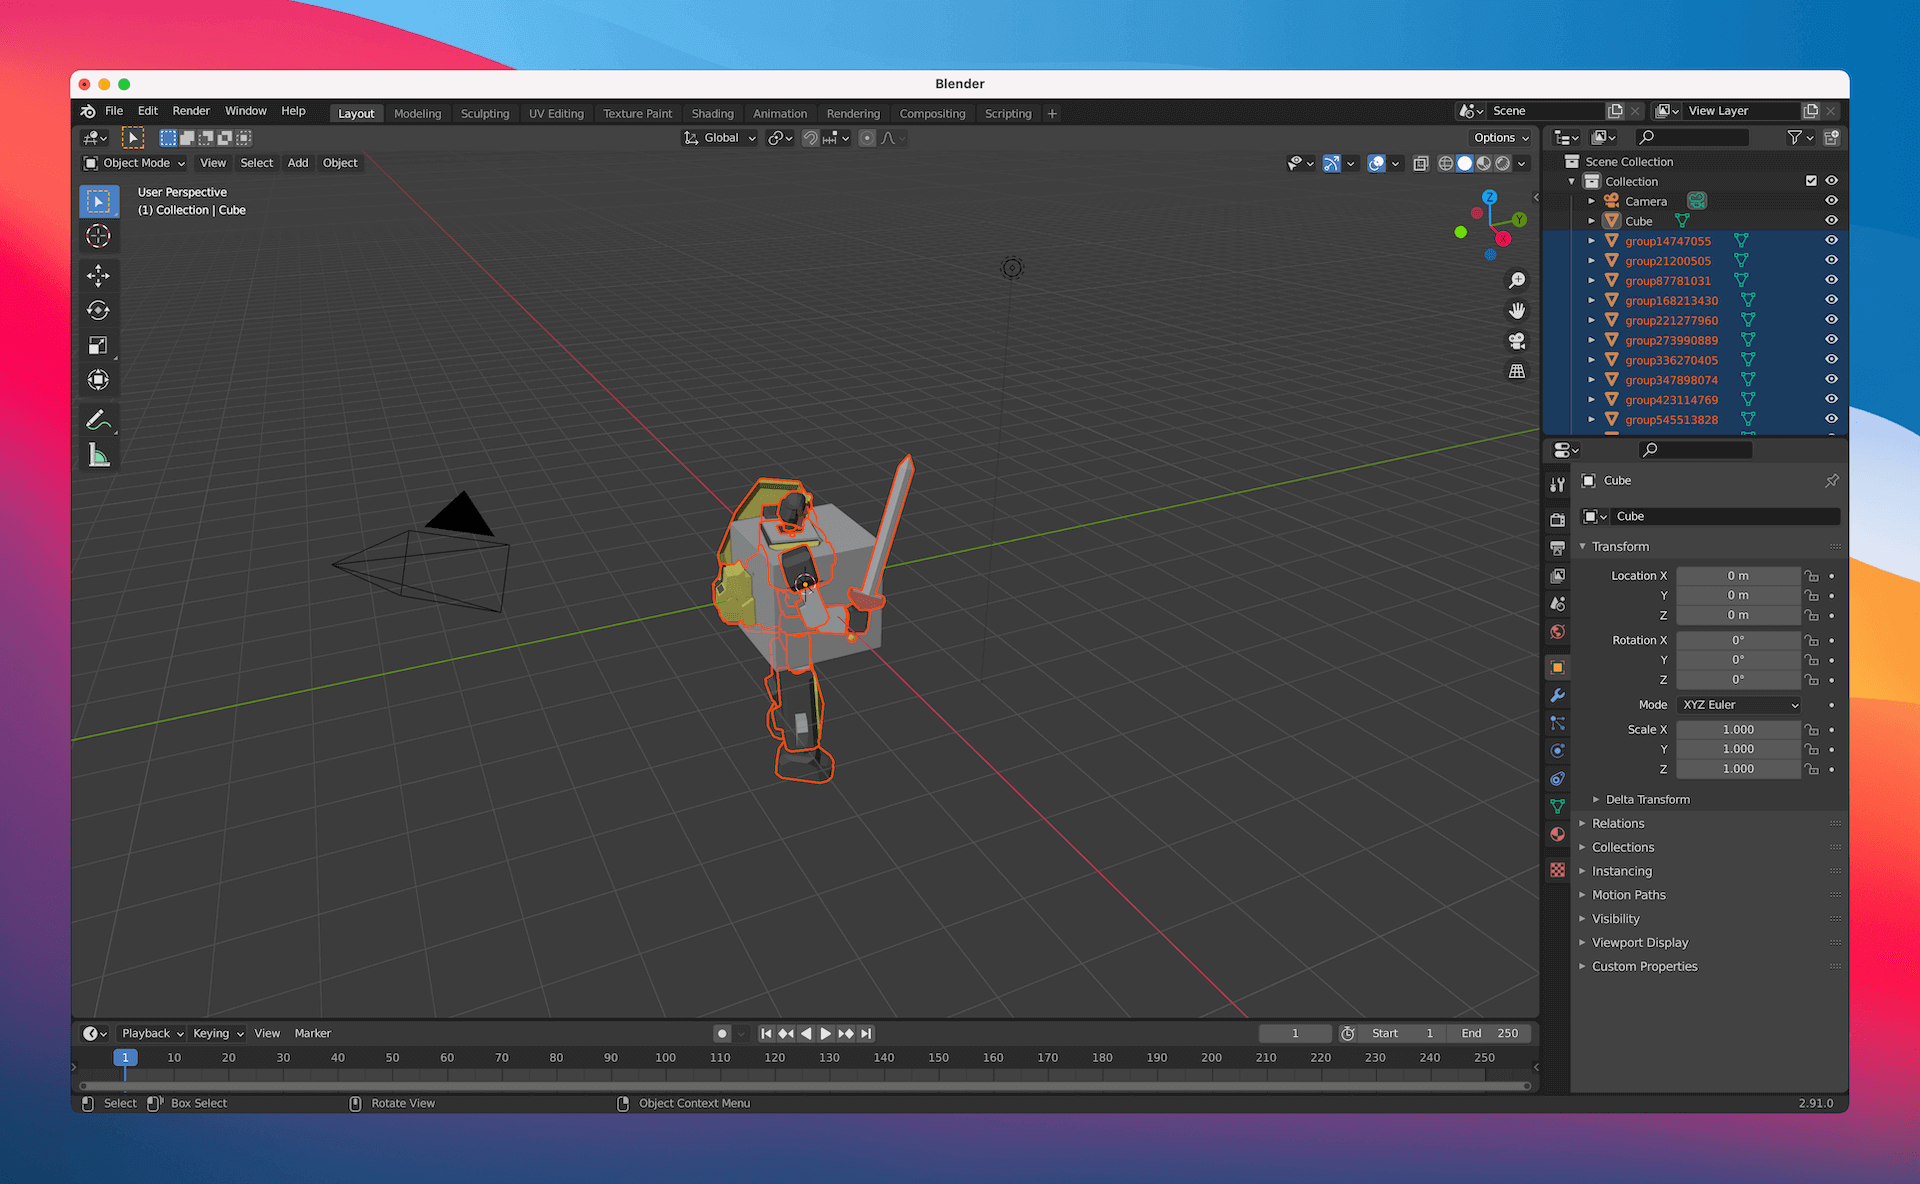
You should notice that the body of the robot is bounded by a cube. Blender automatically adds a cube whenever you import a model. For this project, we do not need the cube. So, right-click Cube under the All Scenes section and choose Delete to remove it.

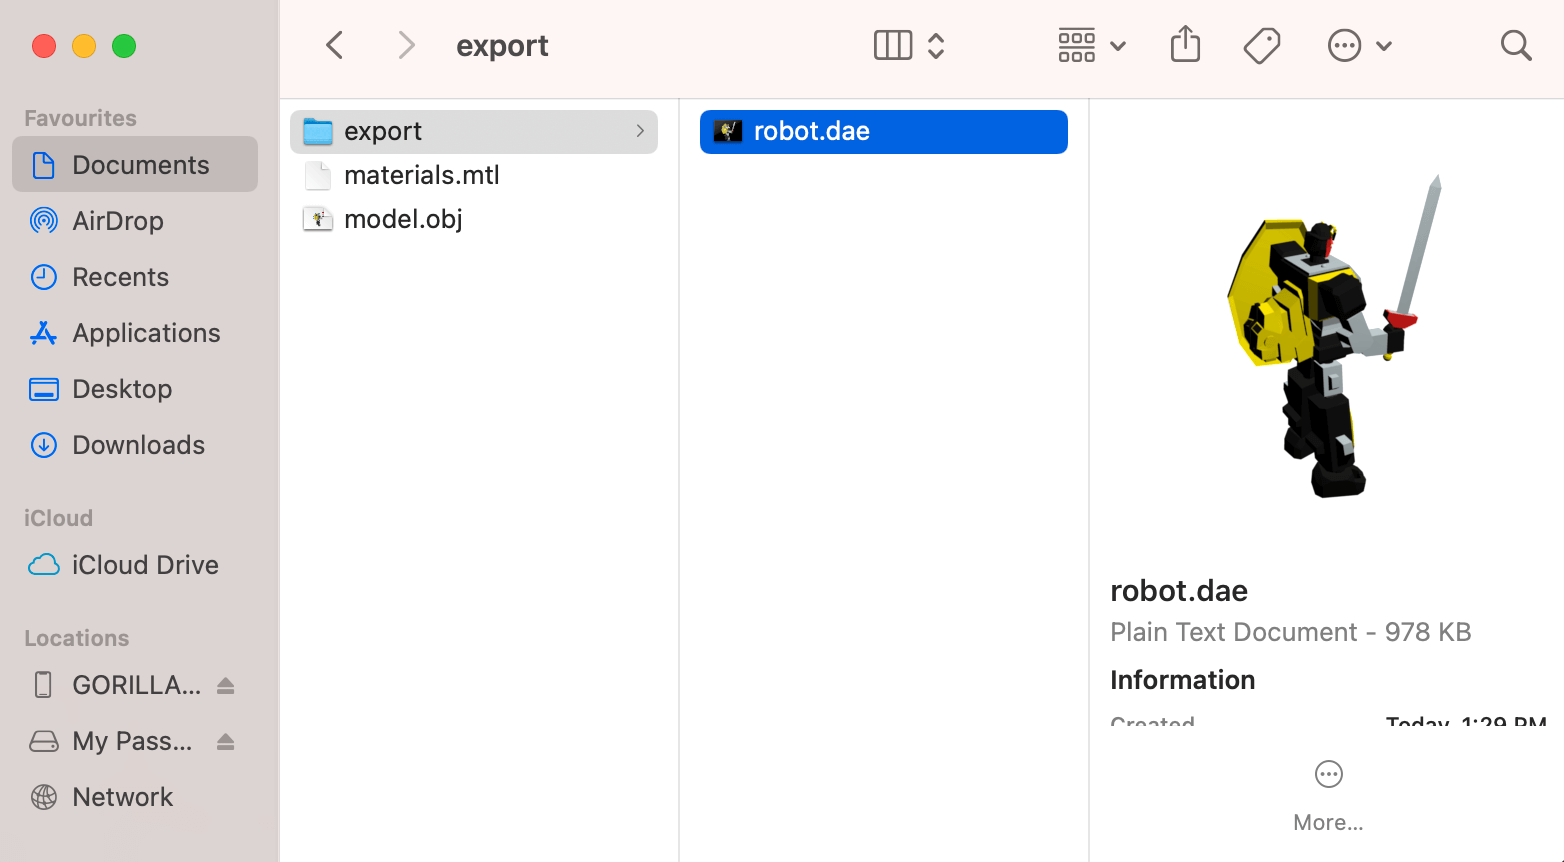
Now you're ready to convert the model to DAE format. Select File > Export > Collada (Default) (.dae) to export the model and save the file as robot.dae.
This is how you use Blender to convert a 3D model to SceneKit supported format. To preview the .dae file, simply open Finder and let it render the model for you.
Creating an ARKit App Using the Single View Application Template
Now that you have prepared the 3D model, let's begin to create our ARKit app. Open Xcode to create a new project. This time, make sure you choose to use the App template. I want to show you how to create the app from scratch.
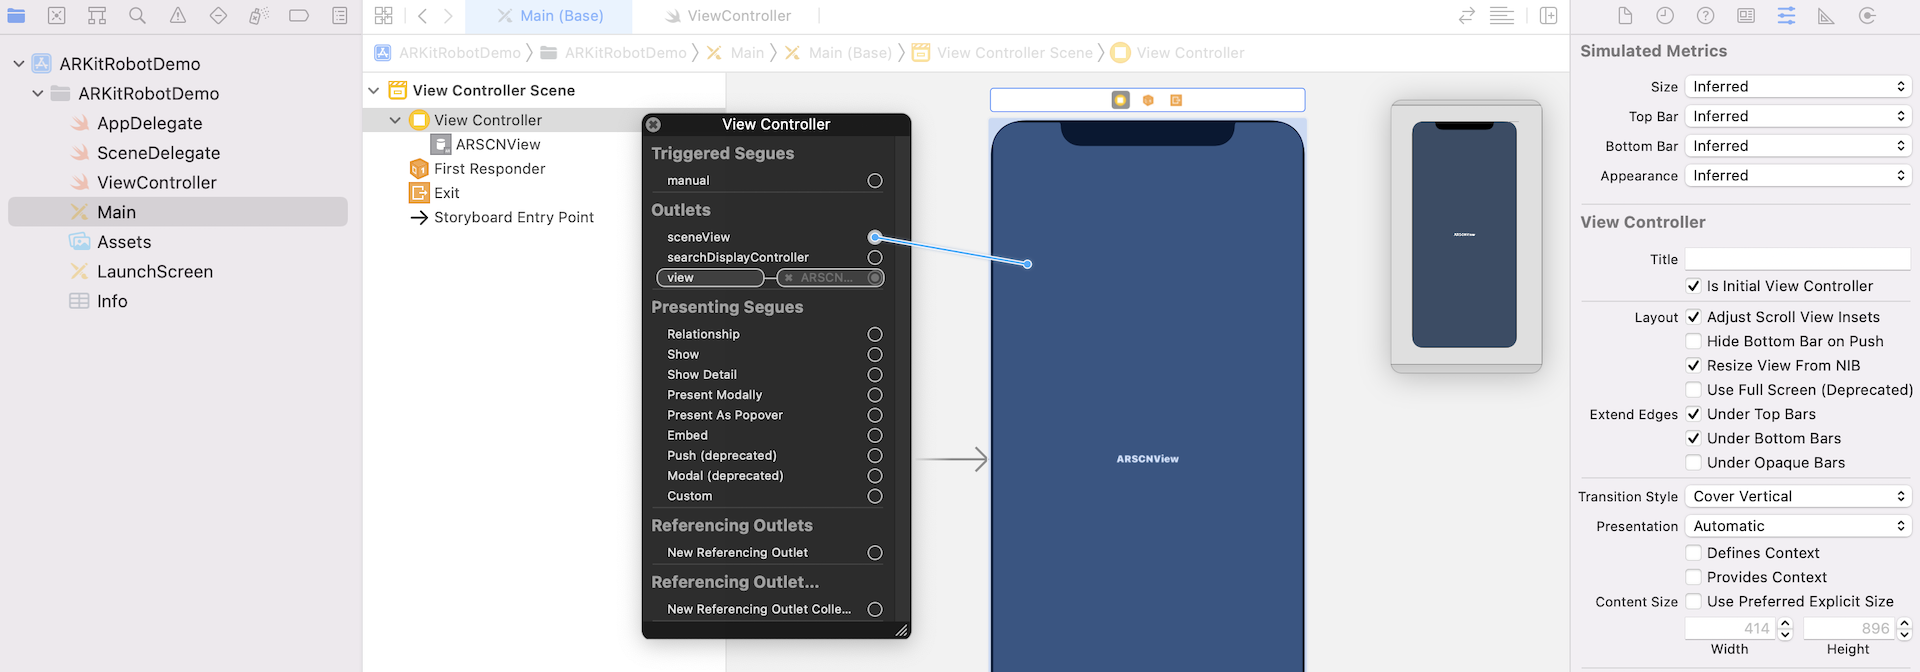
I name the project ARKitRobotDemo but you are free to choose whatever name you prefer. Please make sure you choose Storyboard for the User Interface option. Now go to Main storyboard and delete the View object from the view controller. In the Object library, look for the ARKit SceneKit View object and drag it to the view controller.
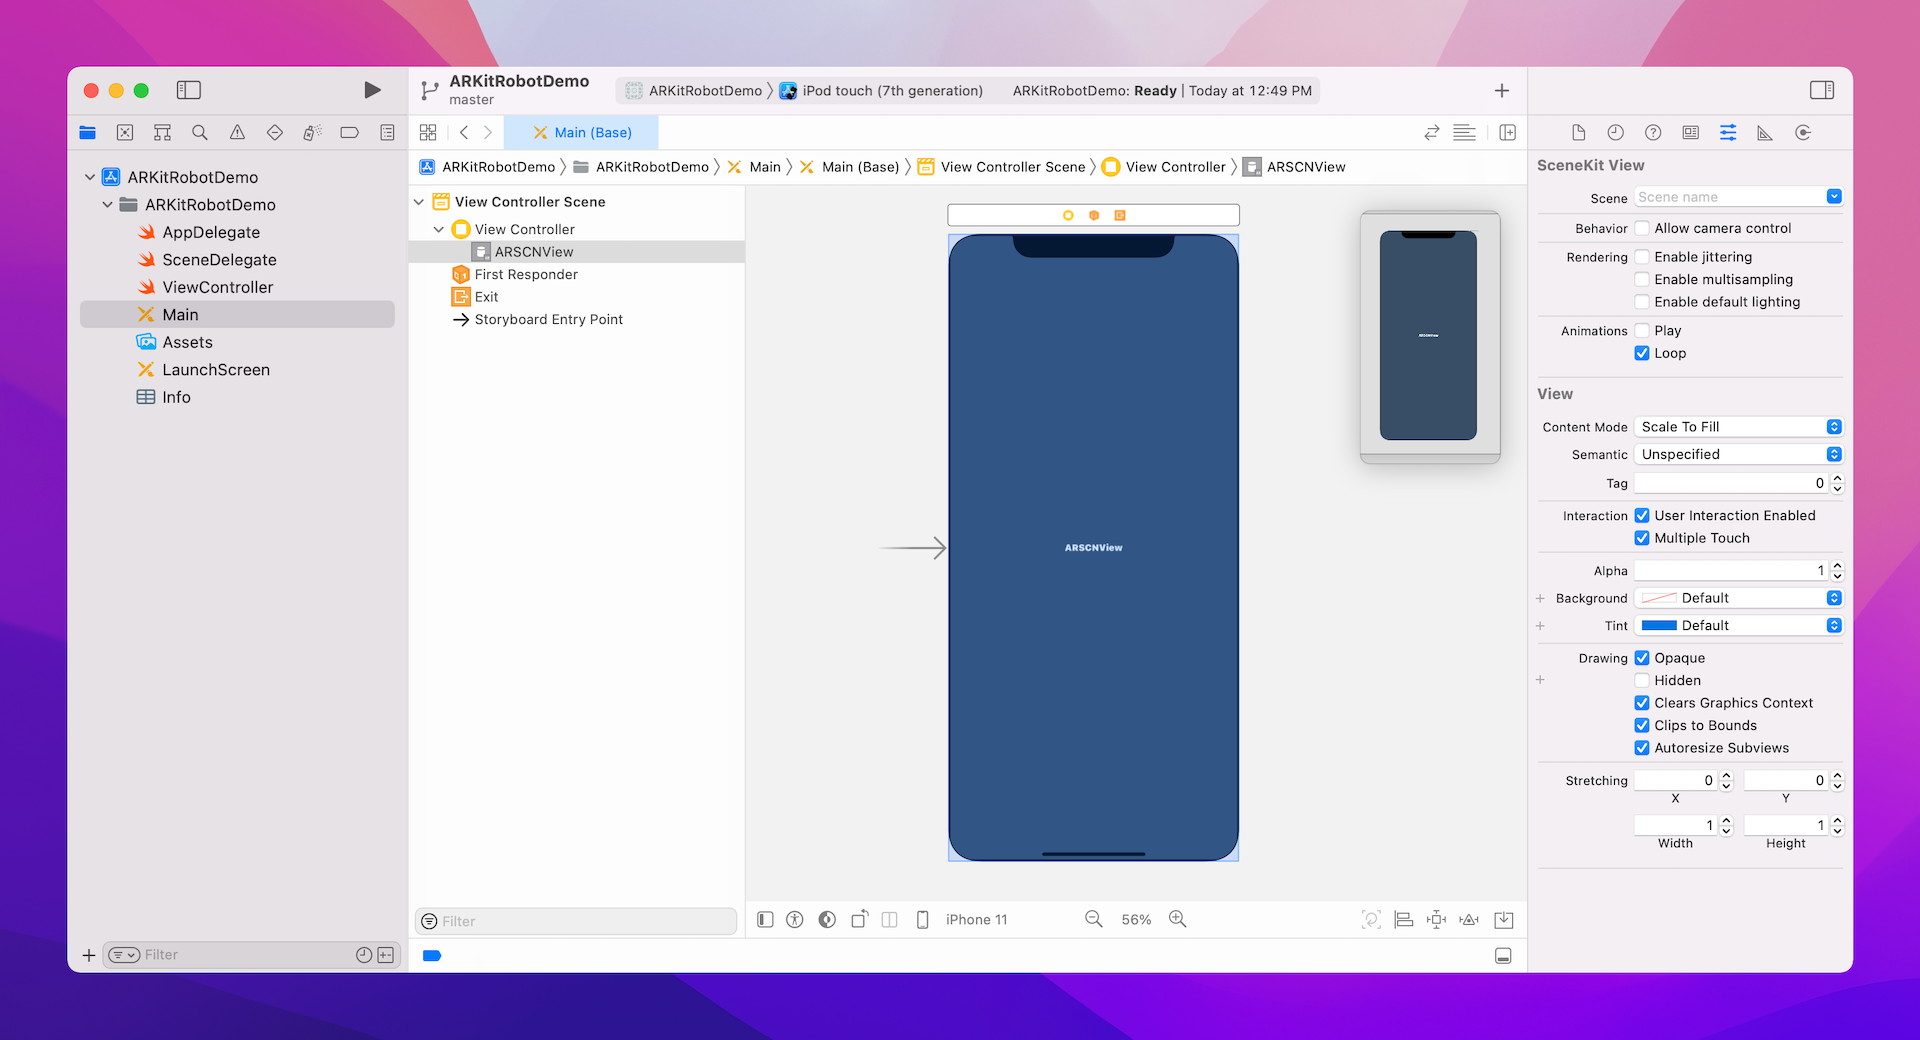
Let's go back to the code. Open ViewController.swift and import both SceneKit and ARKit. These are the two frameworks we need:
import SceneKit
import ARKit
Then create an outlet variable for connecting with the view we just added:
@IBOutlet var sceneView: ARSCNView!
Open the storyboard again and establish a connection between the sceneView variable and the ARKit SceneKit View object.
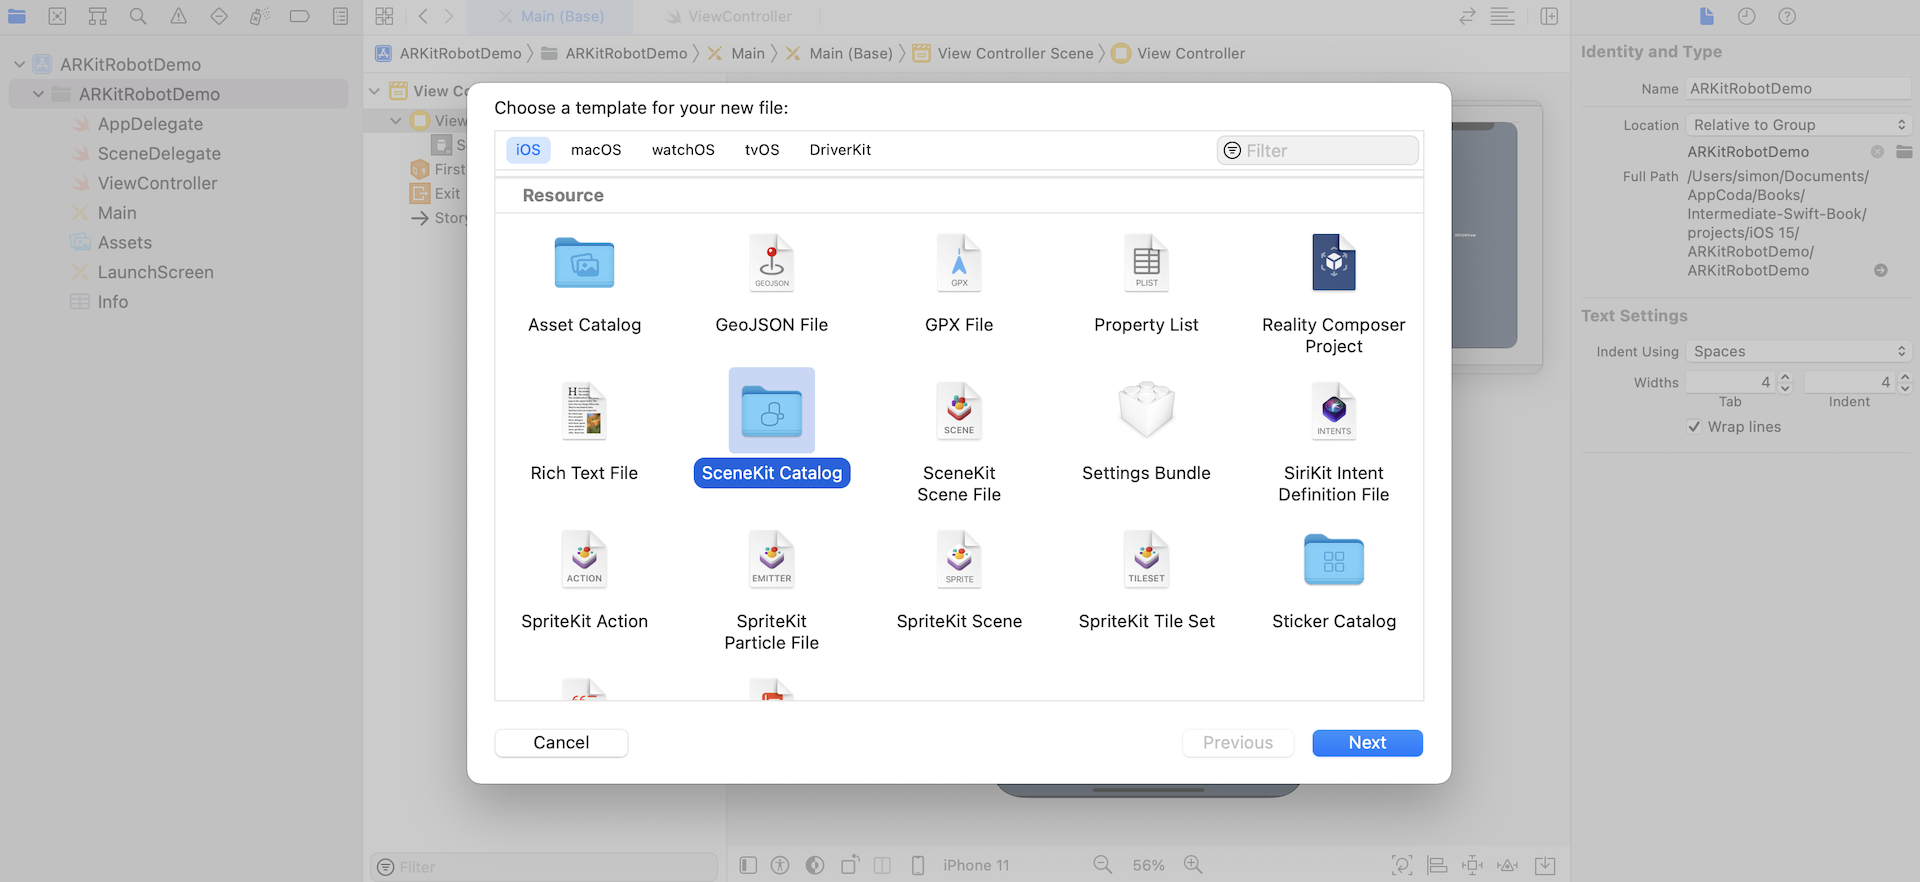
Next, we are going to import the .dae model created earlier into the Xcode project. All the scene assets are stored in a SceneKit asset catalog. To create the asset catalog, right-click ARKitRobotDemo in the project navigator. Choose New file…, scroll down to the Resource section and choose SceneKit Catalog. When prompted, name the file art.scnassets and save it.
Now go back to Finder and locate the robot.dae file. Drag it to art.scnassets to add the file.
Do you still remember the file extension of the SceneKit file used in the demo ARKit project? It is in .scn format. You may wonder if we have to convert the .dae file to .scn format.
The answer is no.
You can preview and edit the DAE file without converting it to .scn file because Xcode automatically converts it to SceneKit's compressed scene format behind the scene. The file extension still remains the same but the file's content has actually been converted.
Now it's time to write some code to prepare the AR environment and render the scene file. Open the ViewController.swift file and update the viewDidLoad() method like this:
override func viewDidLoad() {
    super.viewDidLoad()

    // Show statistics such as fps and timing information
    sceneView.showsStatistics = true

    // Create a new scene
    let scene = SCNScene(named: "art.scnassets/robot.dae")!

    // Set the scene to the view
    sceneView.scene = scene
}
We instantiate a SCNScene object by loading the robot.dae file and then assign the scene to the ARKit's scene view. In order to display statistics such as fps, we also set the showsStatistics property of the scene view to true.
Next, insert the following methods in the ViewController class:
override func viewWillAppear(_ animated: Bool) {
    super.viewWillAppear(animated)

    // Create a session configuration
    let configuration = ARWorldTrackingConfiguration()

    // Run the view's session
    sceneView.session.run(configuration)
}

override func viewWillDisappear(_ animated: Bool) {
    super.viewWillDisappear(animated)

    // Pause the view's session
    sceneView.session.pause()
}
The code above is not new to you. It is the same as the one we discussed in the previous chapter. We instantiate an ARWorldTrackingConfiguration to track the real world and create an immersive AR experience. When the view is about to appear, we start the AR session. We pause the session when the view is going to disappear.
Now open the Info.plist file. Since the app needs to access the device's camera, we have to insert a new key in the file. Right-click the blank area and choose Add row to insert a new key named Privacy - Camera Usage Description. Set the value to This application uses the camera for Augmented Reality.
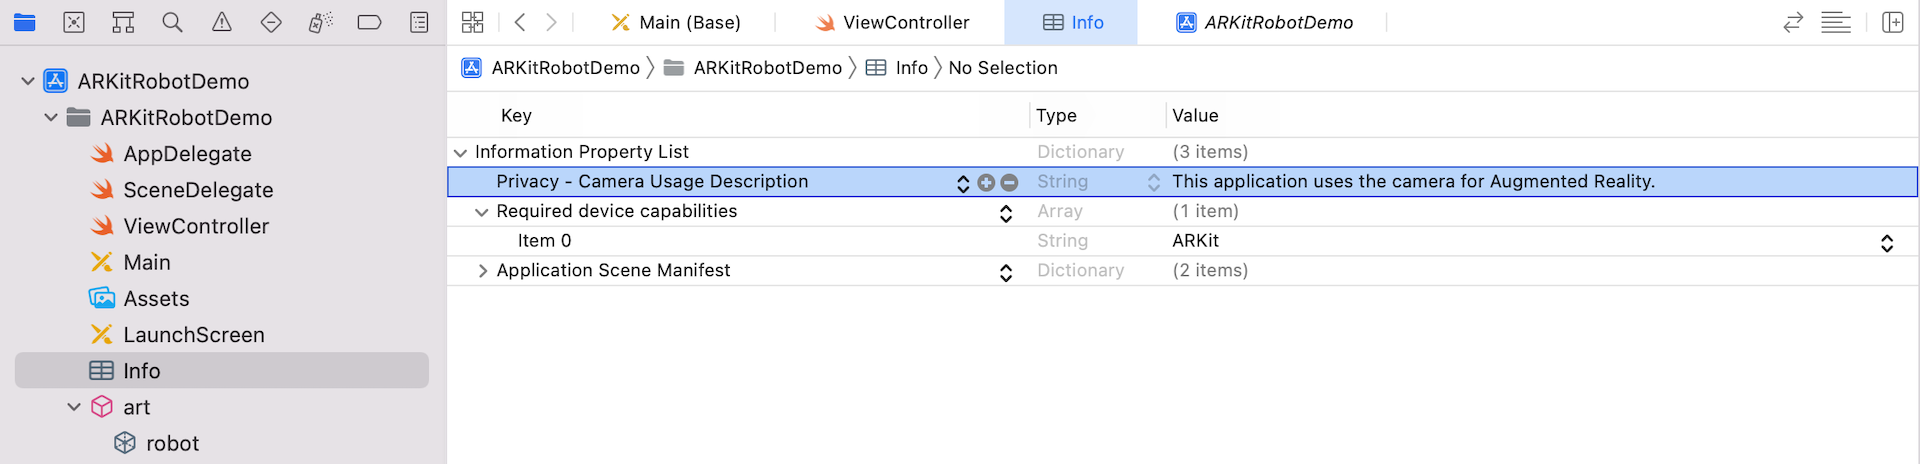
Lastly, insert an additional item for the Required device capabilities key. Set the value of the new item to arkit. This tells iOS that this app can only be run on an ARKit-supported device.
Great! It is now ready to test your ARKit app. Deploy and run it on a real iPhone or iPad. You should see the robot augmented in the real world.

For reference, you can download the complete Xcode project at http://www.appcoda.com/resources/swift55/ARKitRobotDemo.zip.
Working with Plane Detection
Now that you should understand how to create an ARKit app without using the template, let's move onto another topic and create something even better. ARKit supports plane detection allowing you to detect planes and visualize them in your ARKit app. Not only can you visualize the plane, it empowers you to place virtual objects on the detected plane.
Not only can ARKit detects horizontal plane, it also empowers developers to detect vertical planes like walls and doors. For this demo, we will only use the horizontal plane detection.
Apple's engineers have made plane detection easily accessible. All you need to do is set the planeDetection properties of ARWorldTrackingConfiguration to .horizontal. Insert the following line in the viewWillAppear method and put it after the instantiation of the ARWorldTrackingConfiguration object:
configuration.planeDetection = .horizontal
With this line of code, your ARKit app is ready to detect horizontal planes. Whenever a plane is detected, the following method of the ARSCNViewDelegate protocol is called:
optional func renderer(_ renderer: SCNSceneRenderer, didAdd node: SCNNode, for anchor: ARAnchor)
We will adopt the protocol by an extension like this:
extension ViewController: ARSCNViewDelegate {

    func renderer(_ renderer: SCNSceneRenderer, didAdd node: SCNNode, for anchor: ARAnchor) {
        print("Surface detected!")

    }

}
Meanwhile, to keep things simple, we simply print a message to the console when a plane is detected.
In the viewDidLoad method, insert the following two lines of code:
sceneView.delegate = self
sceneView.debugOptions = [ ARSCNDebugOptions.showFeaturePoints ]
The first line of code is very straightforward that we set the delegate to itself. The second line is optional. By enabling the debugging option to show feature points, however, ARKit will render the feature points as yellow dots. You will understand what I mean after running the app.
Now deploy and run the app on your iPhone. After the app is initialized, point the camera to any horizontal surfaces (e.g. floor). If the plane is detected, you will see the message "Surface detected" in the console.
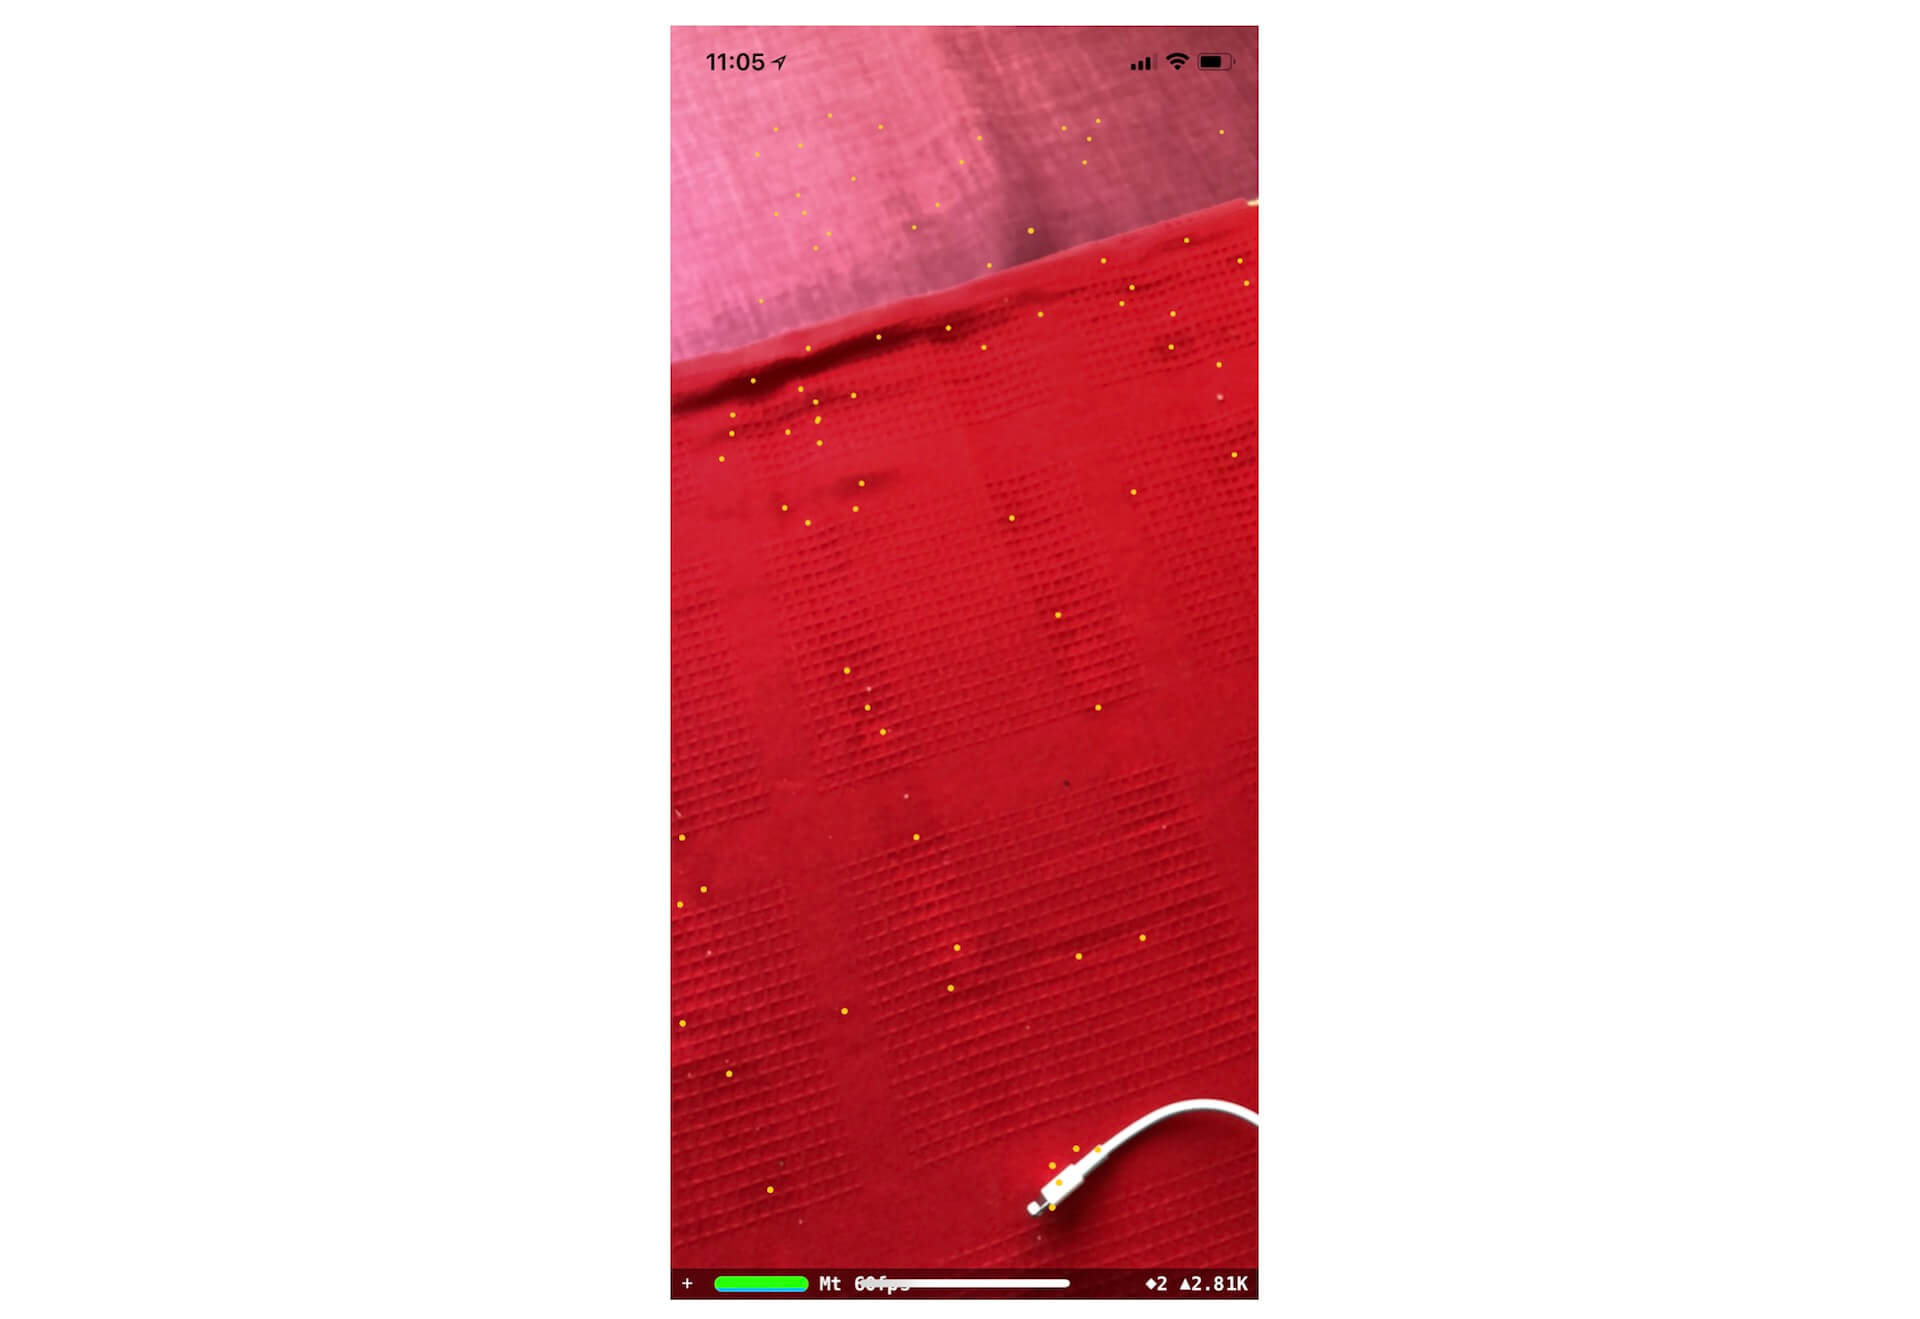
By the way, as you move the camera around, you should notice some yellow dots, which are the feature points. These points represent the notable features detected in the camera image.
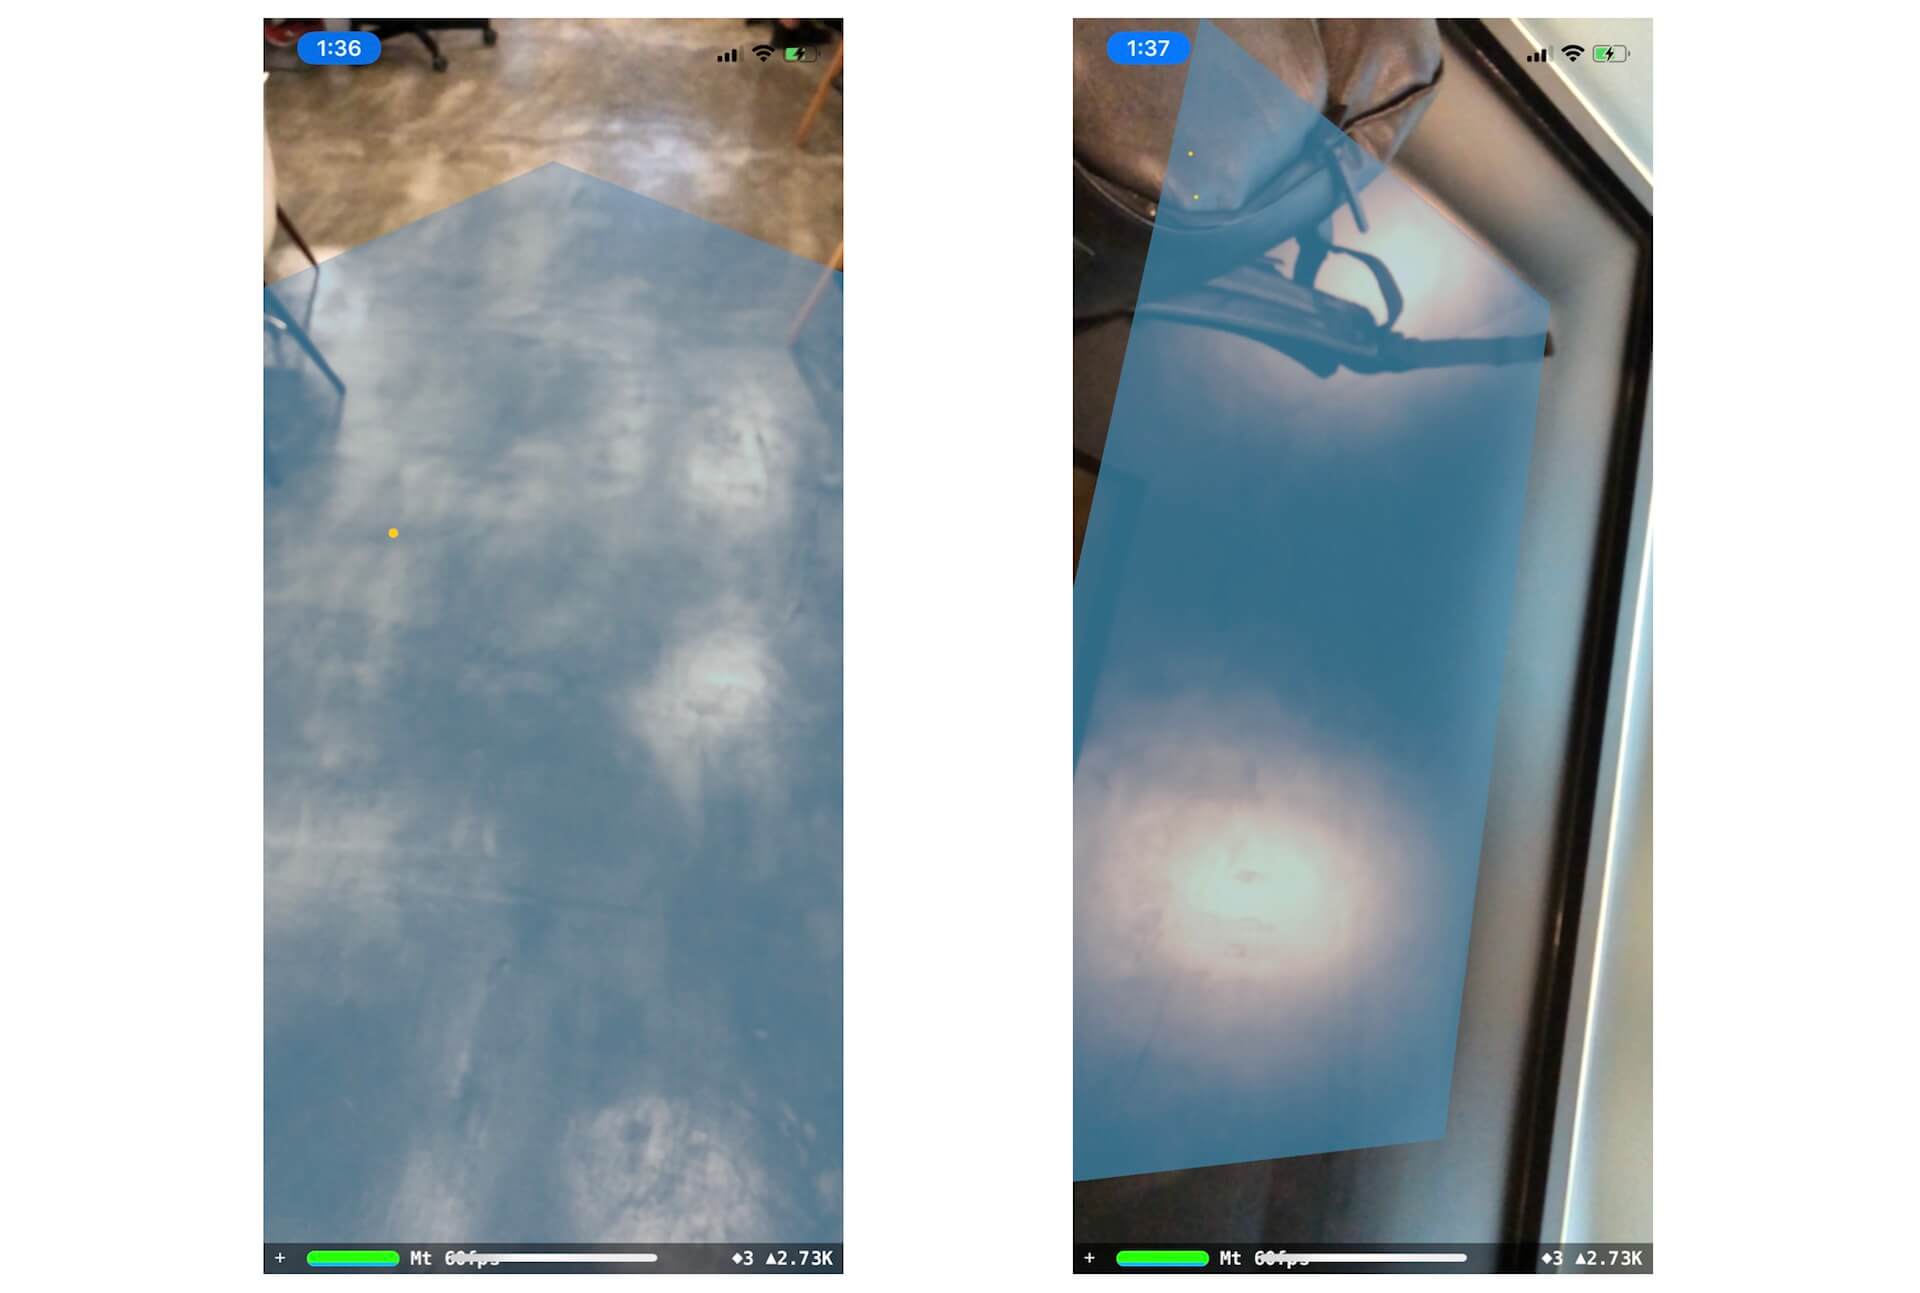
Visualizing the Detected Plane
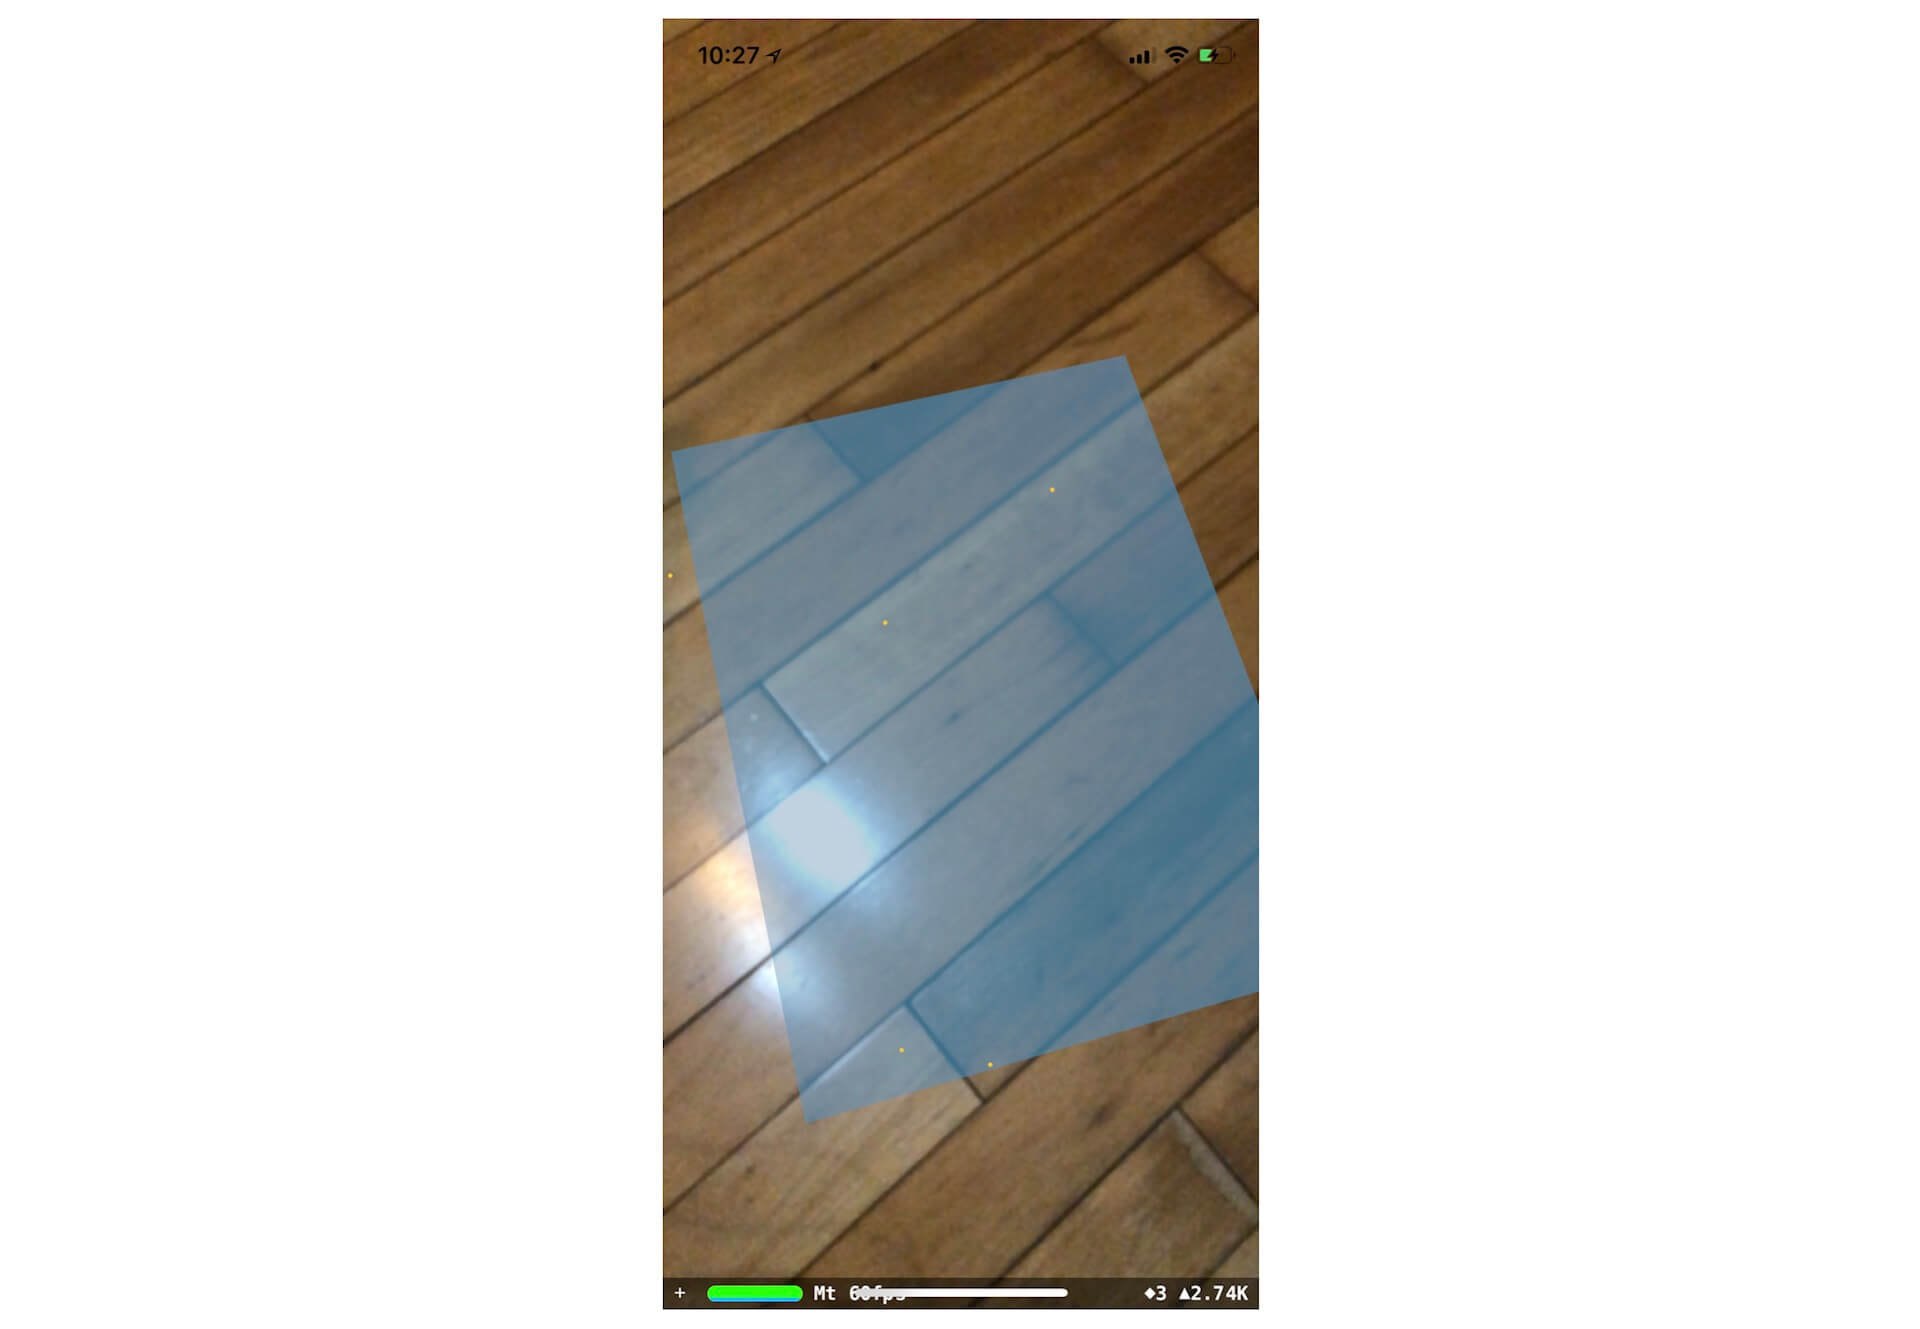
Meanwhile, the app doesn't highlight the detected plane on the screen. We just display a console message when a surface is detected. Wouldn't it be great if we can visualize the detected plane on the screen like the one shown in figure 42.17?
As mentioned earlier, the following method is called every time when a plane is detected:
optional func renderer(_ renderer: SCNSceneRenderer, didAdd node: SCNNode, for anchor: ARAnchor)
I didn't discuss the method in details. But it actually passes us two pieces of information when the method is invoked:
- node - this is the newly added SceneKit node, created by ARKit. By utilizing this node, we can provide visual content to highlight the detected plane.
- anchor - the AR anchor corresponding to the node. Here it refers to the detected plane. This anchor will also provide us extra information about the plane such as the plane size and position.
Now update the method like this to draw a plane on the detected flat surface:
func renderer(_ renderer: SCNSceneRenderer, didAdd node: SCNNode, for anchor: ARAnchor) {

    if let planeAnchor = anchor as? ARPlaneAnchor {

        // Create a virtual plane to visualize the detected plane
        let plane = SCNPlane(width: CGFloat(planeAnchor.extent.x), height: CGFloat(planeAnchor.extent.z))

        // Set the color of the virtual plane
        plane.materials.first?.diffuse.contents = UIColor(red: 90/255, green: 200/255, blue: 250/255, alpha: 0.50)

        // Create the SceneKit plane node
        let planeNode = SCNNode(geometry: plane)
        planeNode.position = SCNVector3(planeAnchor.center.x, 0.0, planeAnchor.center.z)

        // Since the plane in SceneKit is vertical, we have to rotate it by 90 degrees
        // The value should be in the form of radian.
        planeNode.eulerAngles.x = -Float.pi / 2.0

        node.addChildNode(planeNode)
    }
}
Whenever ARKit detects a plane, it automatically adds an ARPlaneAnchor object. Therefore, we first check if the parameter anchor has the type ARPlaneAnchor.
To visualize the detected plane, we draw a plane over it. This is why we create a SCNPlane object with the size of the detected plane. The AR plane anchor provides information about the estimated position and shape of the surface. You can get the width and length of the detected plane from the extent property.
For the next line of code, we simply set the color of the plane.
In order to add this plane, we create a SCNNode object and set its position to the plane's position. By default, all planes in SceneKit is vertical. To change its orientation, we update the eulerAngles property of the node to rotate the plane by 90 degrees.
Lastly, we add this plane as a child node.
Now if you run the app again, it will be able to visualize the detected plane.
Updating the Planes
As you walk around your room to play around with plane detection, you may end up with results similar to that shown in figure 42.18.
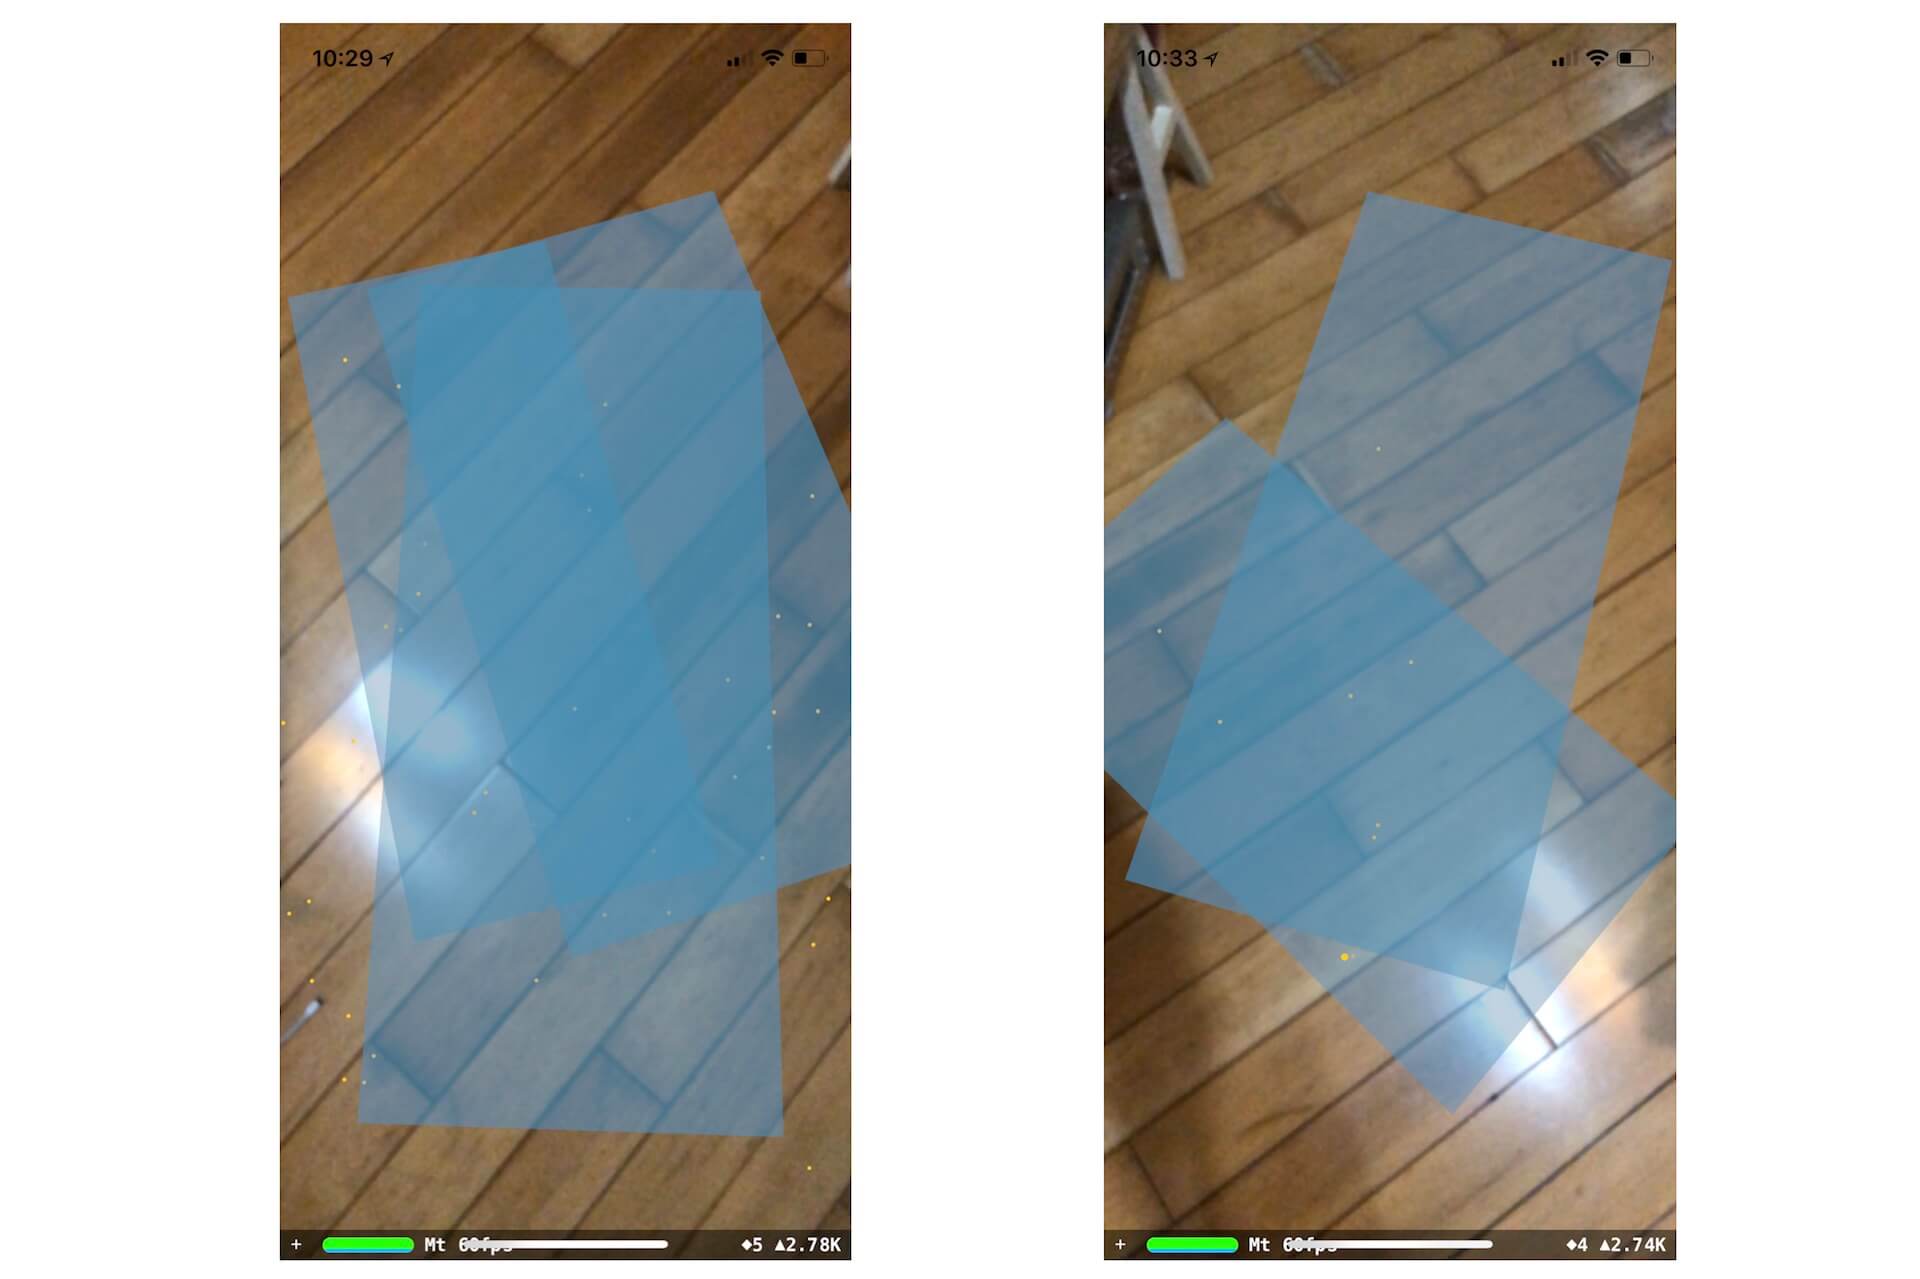
The app now renders a virtual plane whenever a flat surface is detected. This is why you may find one virtual plane overlaps with another. In fact, ARKit keeps updating the detected plane as you move the device's camera around. No matter how the updated plane changes (whether it's bigger or smaller), it calls the following delegate method to inform you about the update:
optional func renderer(_ renderer: SCNSceneRenderer, didUpdate node: SCNNode, for anchor: ARAnchor)
So, to render the updated plane on the screen, we must implement the method and update the virtual plane accordingly. In order to perform the update, we will need to keep track the list of virtual planes created. Thus, let's organize our code a bit for this purpose.
Now create a new Swift file named PlaneNode.swift. Update the file content with the following code:
import Foundation
import SceneKit
import ARKit

class PlaneNode: SCNNode {
    private var anchor: ARPlaneAnchor!
    private var plane: SCNPlane!

    init(anchor: ARPlaneAnchor) {
        super.init()

        self.anchor = anchor

        // Create a virtual plane to visualize the detected plane
        self.plane = SCNPlane(width: CGFloat(anchor.extent.x), height: CGFloat(anchor.extent.z))

        // Set the color of the virtual plane
        self.plane.materials.first?.diffuse.contents = UIColor(red: 90/255, green: 200/255, blue: 250/255, alpha: 0.50)

        // Create the SceneKit plane node
        self.geometry = plane
        self.position = SCNVector3(anchor.center.x, 0.0, anchor.center.z)

        // Since the plane in SceneKit is vertical, we have to rotate it by 90 degrees
        // The value should be in the form of radian.
        self.eulerAngles.x = -Float.pi / 2.0
    }

    required init?(coder aDecoder: NSCoder) {
        super.init(coder: aDecoder)
    }

}
PlaneNode is a subclass of SCNNode, which is used to store two properties including the anchor of the detected plane and the virtual plane drawn. If you look closely at the init(anchor:) method, the code is exactly the same as we have implemented. With the given plane anchor, we create a SCNPlane object for rendering the virtual plane.
Next, we will edit the ViewController class to make use of this newly created class. As we need to keep track of the list of virtual planes, declare the following dictionary variable in ViewController:
private var planes: [ UUID: PlaneNode ] = [:]
We use a dictionary to store the list of planes. ARAnchor has a property named identifier that stores a unique identifier of the anchor. The key of the planes dictionary is the identifier of the detected plane anchor.
Now update the renderer(_:didAdd:for:) method like this:
func renderer(_ renderer: SCNSceneRenderer, didAdd node: SCNNode, for anchor: ARAnchor) {

    if let planeAnchor = anchor as? ARPlaneAnchor {

        let planeNode = PlaneNode(anchor: planeAnchor)

        planes[anchor.identifier] = planeNode
        node.addChildNode(planeNode)
    }
}
As most of the code is relocated to the PlaneNode class, we can simply create a PlaneNode object using the detected plane anchor. Similarly, we add the plane node as a child node. Additionally, we store this virtual plane in the planes variable.
If you test the app again, everything works like before. It will be able to show you a virtual plane when a flat surface is detected, but the virtual plane is still not expandable.
To update the virtual plane, let's create another method in the PlaneNode class:
func update(anchor: ARPlaneAnchor) {
    self.anchor = anchor

    // Update the plane's size
    plane.width = CGFloat(anchor.extent.x)
    plane.height = CGFloat(anchor.extent.z)

    // Update the plane's position
    self.position = SCNVector3(anchor.center.x, 0.0, anchor.center.z)
}
The method is simple. It takes in the new anchor and updates the virtual plane accordingly.
Now we are ready to implement the renderer(_:didUpdate:for:) method. Insert the following code in the ViewController extension:
func renderer(_ renderer: SCNSceneRenderer, didUpdate node: SCNNode, for anchor: ARAnchor) {
    guard let planeAnchor = anchor as?  ARPlaneAnchor, let plane = planes[planeAnchor.identifier] else {
        return
    }

    plane.update(anchor: planeAnchor)
}
We first verify if the updated anchor is found in our list. If yes, we call the update(anchor:) method to update the size & position of the virtual plane.
That's it! Deploy the app onto your iPhone again. This time, the virtual plane keeps updating itself as you move the camera around a flat horizontal surface.
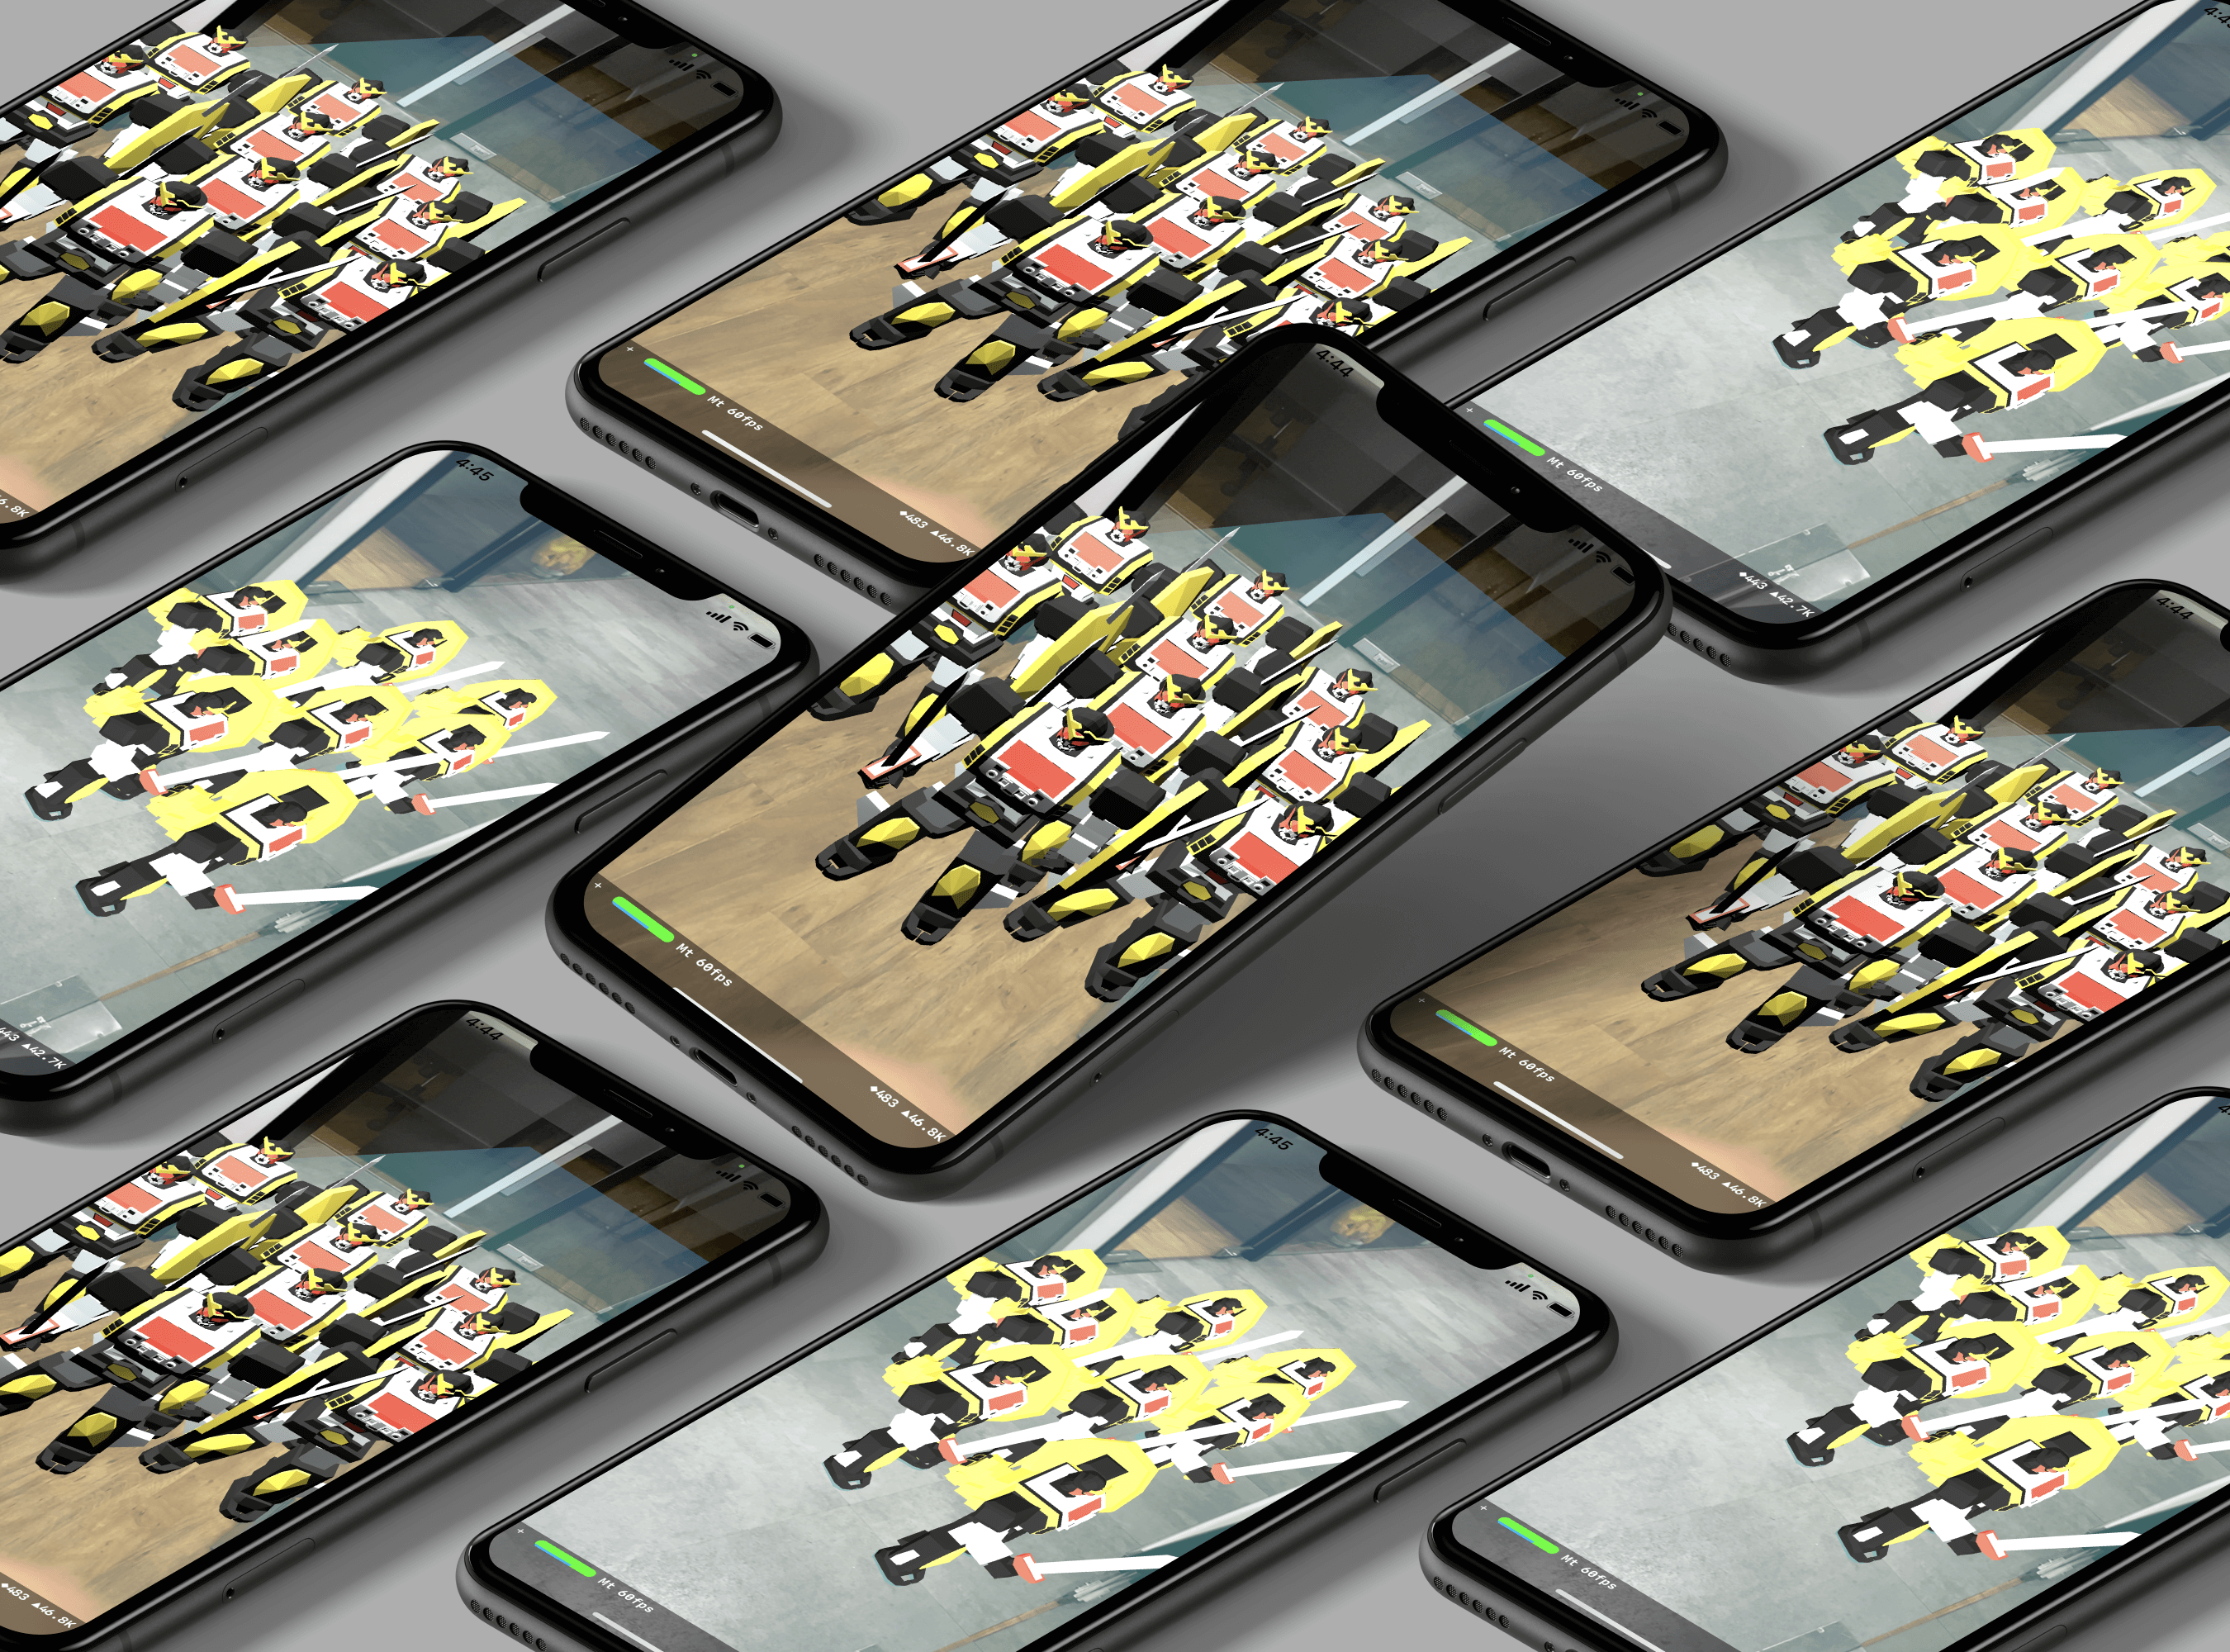
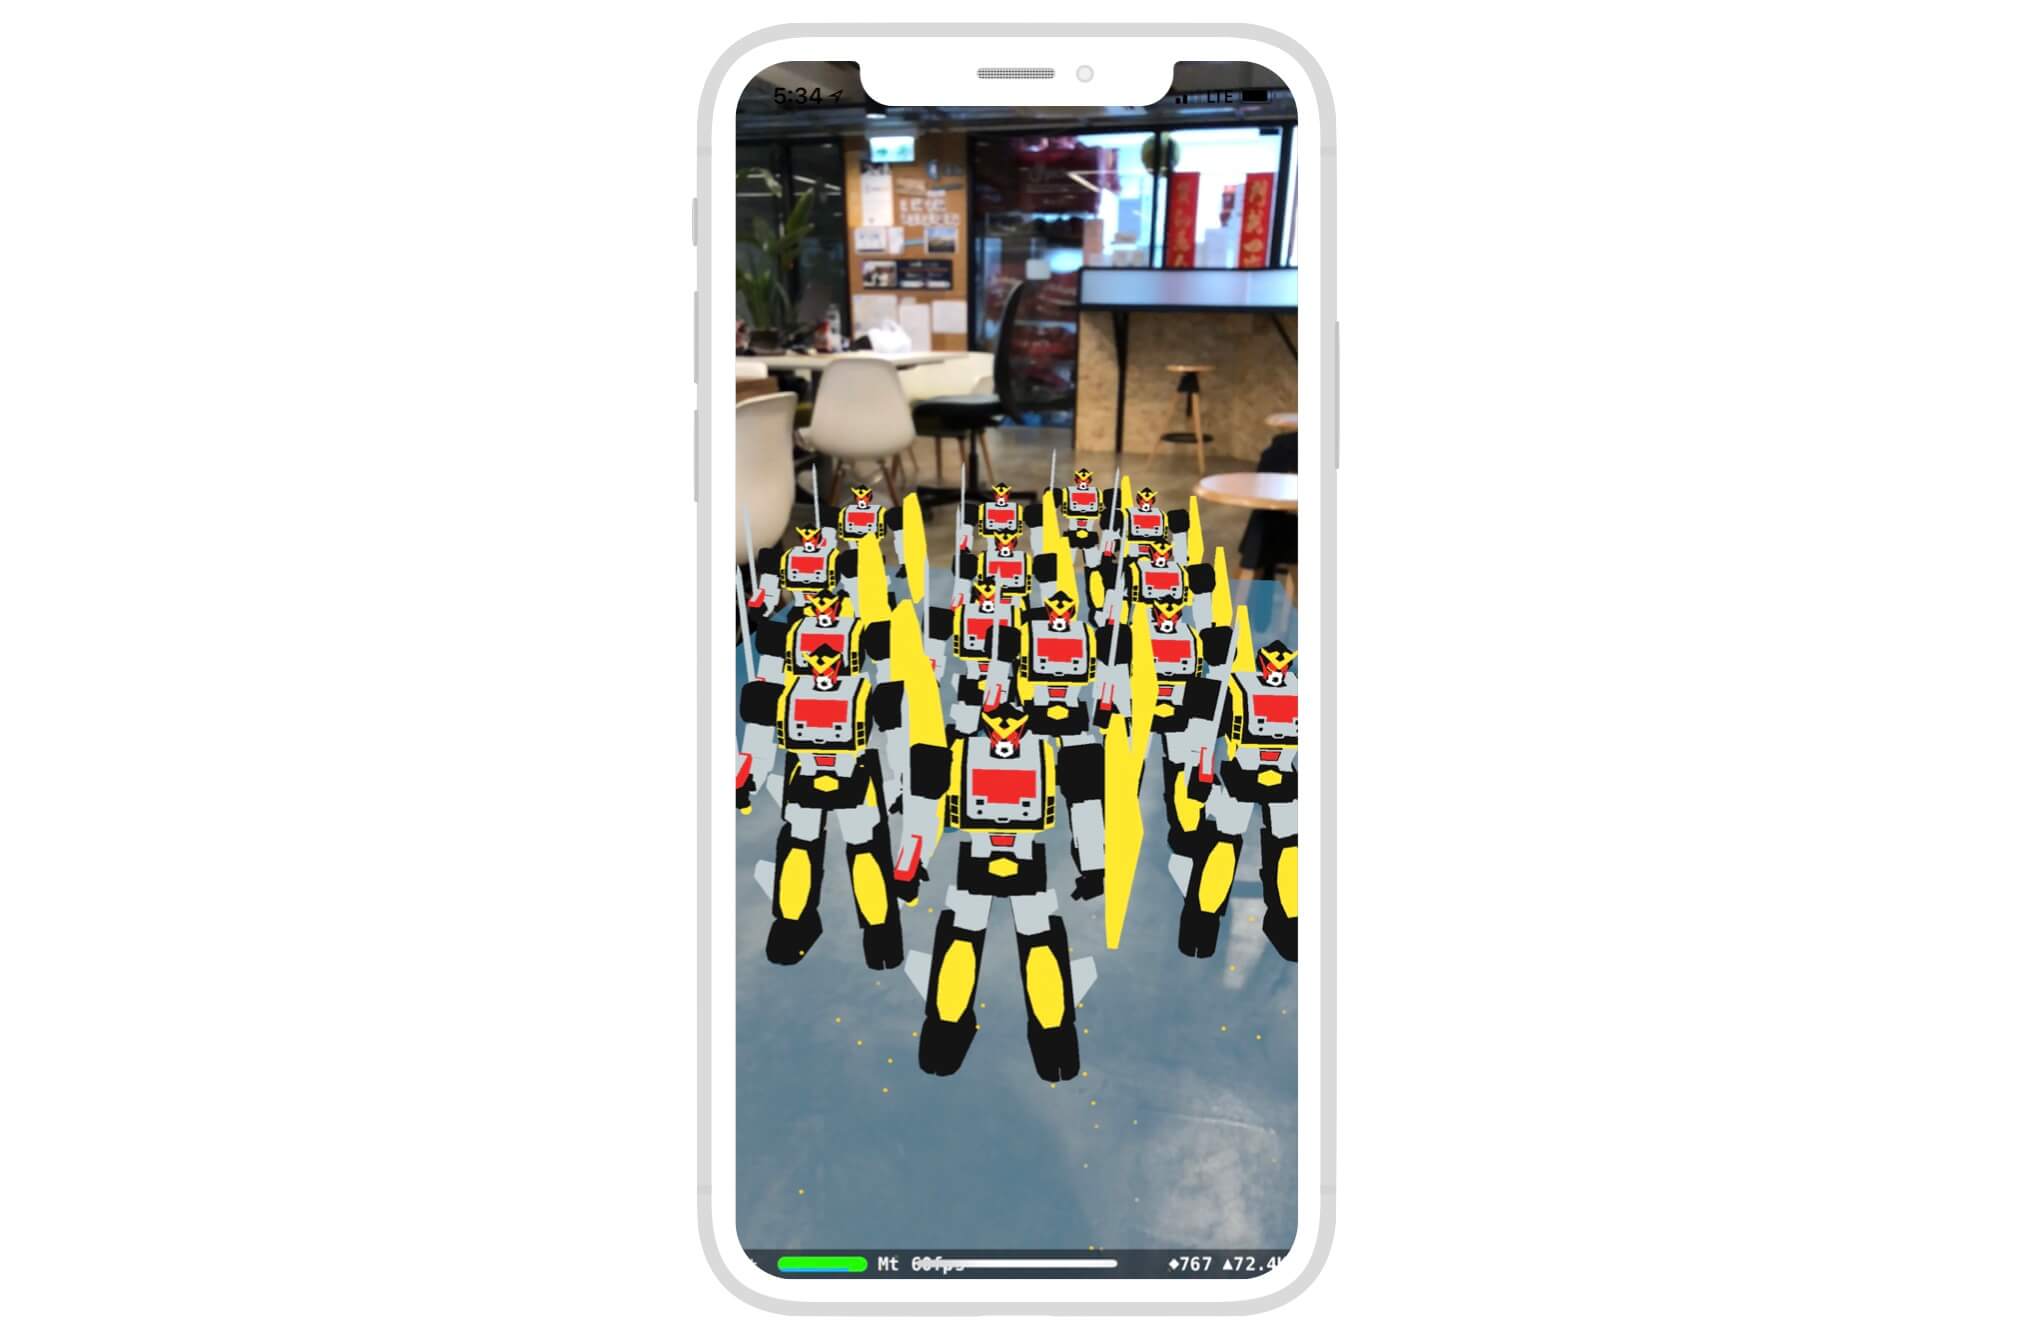
Adding 3D Objects on a Plane
Now that you have learned how to place a 3D object in the real world and detect a flat surface, let's combine these two things together and create something awesome. We will enhance the ARKit app to let users place multiple robots on a flat surface.
First, open ViewController.swift and change the following line of code in the viewDidLoad() method.
From:
let scene = SCNScene(named: "art.scnassets/robot.dae")!
To:
let scene = SCNScene()
We no longer load the robot scene right after the app launch. Instead, we want to let users tap on the detected plane to place the robot. So, an empty scene is more suitable in this case.
Next, insert the following line of code in the same method:
let tapGestureRecognizer = UITapGestureRecognizer(target: self, action: #selector(addRobot(recognizer:)))
sceneView.addGestureRecognizer(tapGestureRecognizer)
We configure a tap gesture recognizer to detect the user's touches. When a tap is detected, we will call the addRobot(recognizer:) method to place the virtual robot. For this method, we implement like this:
@objc func addRobot(recognizer: UITapGestureRecognizer) {
    let tapLocation = recognizer.location(in: sceneView)

    guard let query = sceneView.raycastQuery(from: tapLocation, allowing: .existingPlaneInfinite, alignment: .horizontal) else {
        return
    }

    let hitResults = sceneView.session.raycast(query)

    guard let hitResult = hitResults.first else {
        return
    }

    guard let scene = SCNScene(named: "art.scnassets/robot.dae") else {
        return
    }

    let node = SCNNode()
    for childNode in scene.rootNode.childNodes {
        node.addChildNode(childNode)
    }

    node.position = SCNVector3(hitResult.worldTransform.columns.3.x, hitResult.worldTransform.columns.3.y, hitResult.worldTransform.columns.3.z)
    node.scale = SCNVector3(0.1, 0.1, 0.1)

    sceneView.scene.rootNode.addChildNode(node)

}
In the code above, we first get the touch's location and then check if the touch hits the detected plane. If the user taps any area outside the plane, we just ignore it. When the touch is confirmed, we load the scene file containing the robot model, loop through all the nodes and add them to the main node.
Hit testing searches for real-world objects or surfaces detected through the AR session's processing of the camera image. A 2D point in the image coordinates can refer to any point along a 3D line that starts at the device camera and extends in a direction determined by the device orientation and camera projection. This method searches along that line, returning all objects that intersect it in order of distance from the camera.
- Apple's documentation
That's the general idea of the implementation. Let me further explain how you detect if the user's touch hits the horizontal plane. Before iOS 14, we usually rely on a function called hitTest. This function allows developers to map the coordinate of the touch on the screen to the 3D coordinate of the surface/object in the real world. In iOS 14 or later, the hitTest function is deprecated and it is recommended to use another API called raycastQuery. In the code above, we created a raycastQuery using the touch location of the screen as the starting point. This query extends a virtual "ray" outwards from the screen until it collides with an existing plane (i.e. .existingPlaneInfinite). When you called sceneView.session.raycast(query), it returns with an array of ray-cast results. If the user's touch does hit the virtual plane, the result will be found in the array. This is how we find out where to place the robot.
Ray casting provides a 3D location in physical space that corresponds to a given 2D location on the screen. When you call this function, it succeeds in returning a result when a mathematical ray that ARKit casts outward from the user intersects with any real-world surfaces that ARKit detects in the physical environment.
- Apple's documentation
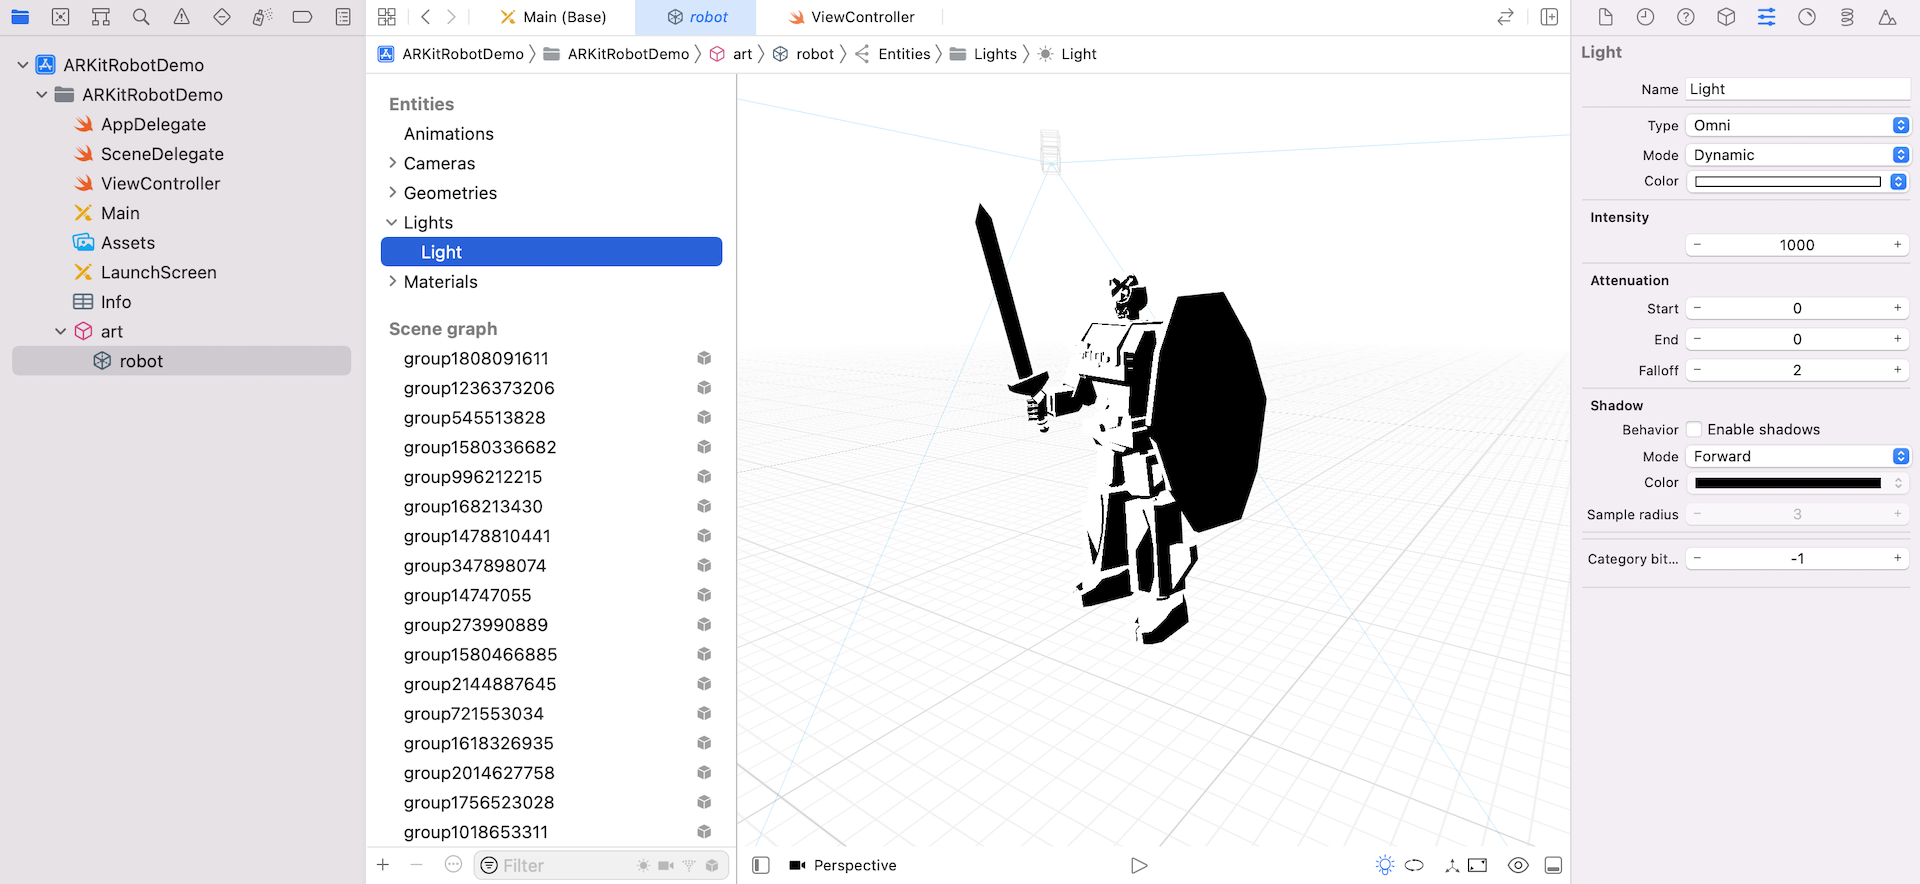
Why looping through multiple nodes here? Take a look at figure 41.13 or open robot.dae again. You should see multiple nodes in the scene graph. For some 3D models like the robot we are working on, they may have more than one node. In this case, we need to render all the nodes in order to display the complete model on the screen. Furthermore, by adding these child nodes to the main node, it allows us to scale or position the model easily. The second last line of the code is to resize the robot to 10% of the original size.
Lastly, we put the node to the root node of the scene view for rendering.
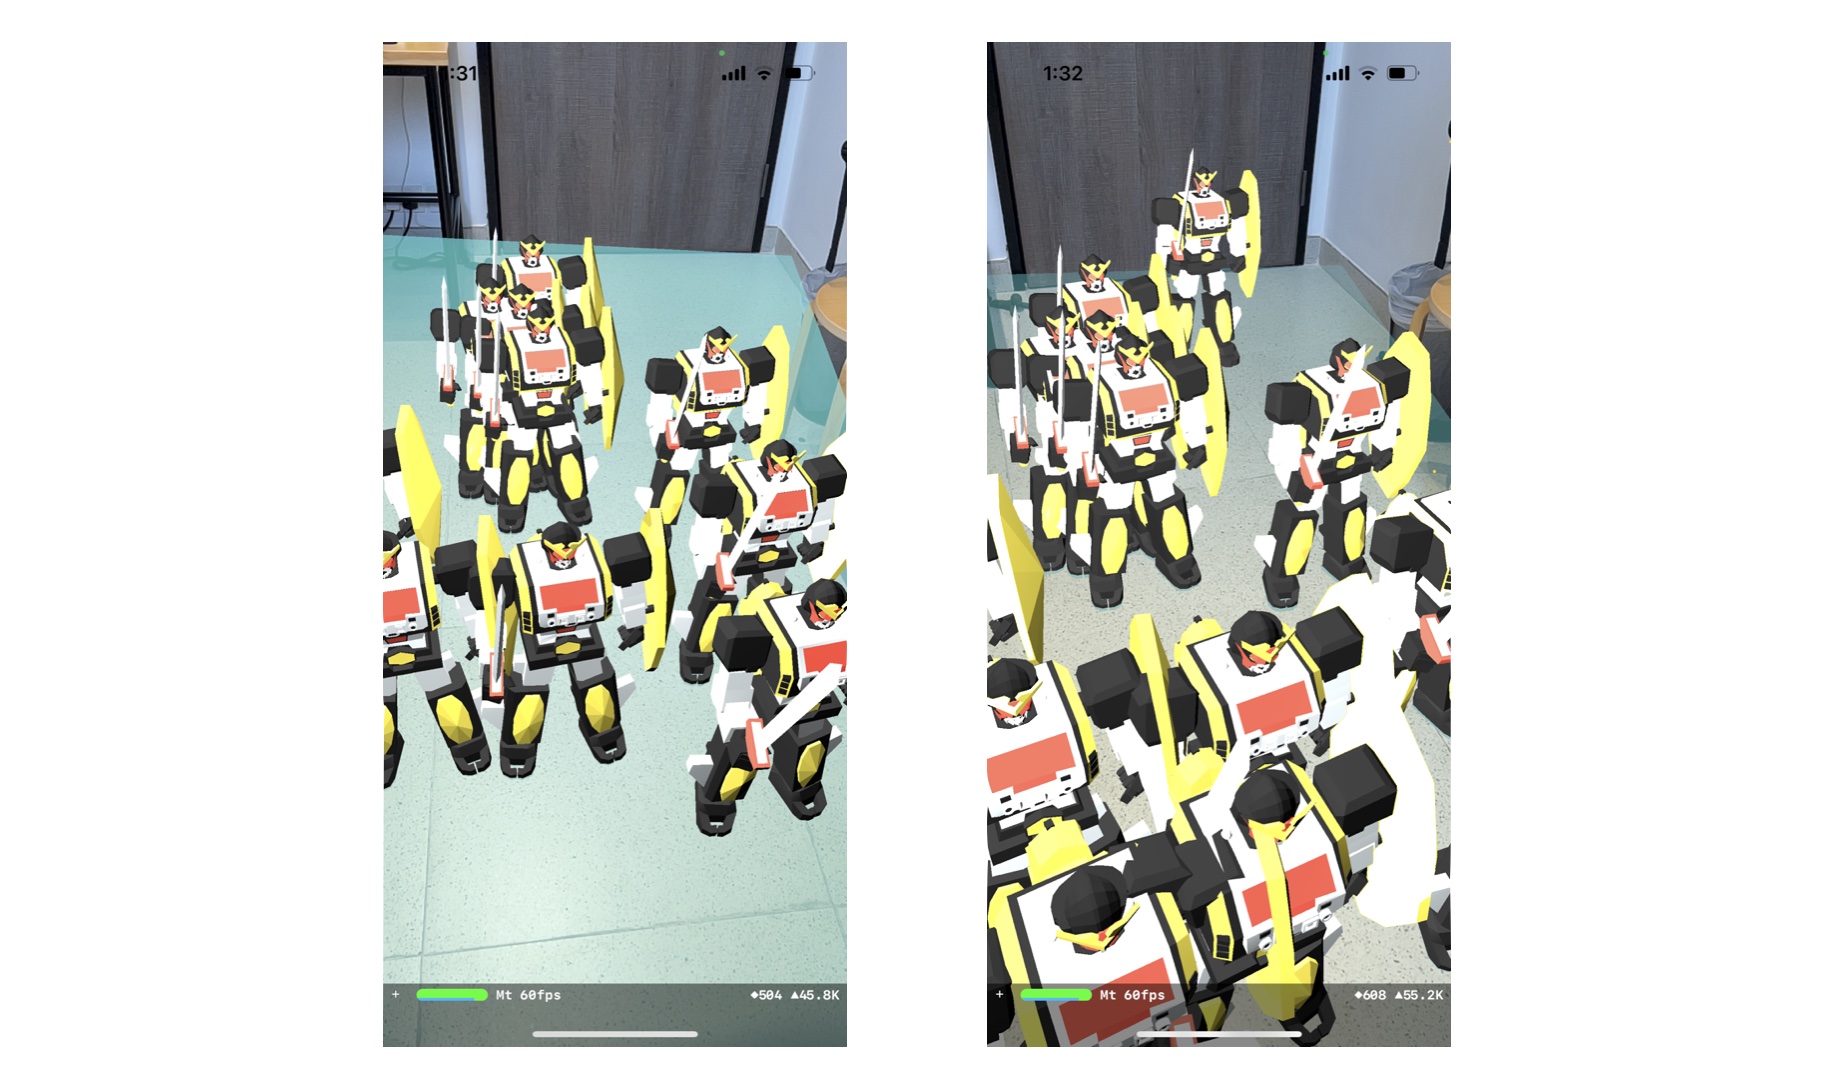
Run the app, move around to detect a plane and then tap on the plane to place a robot.
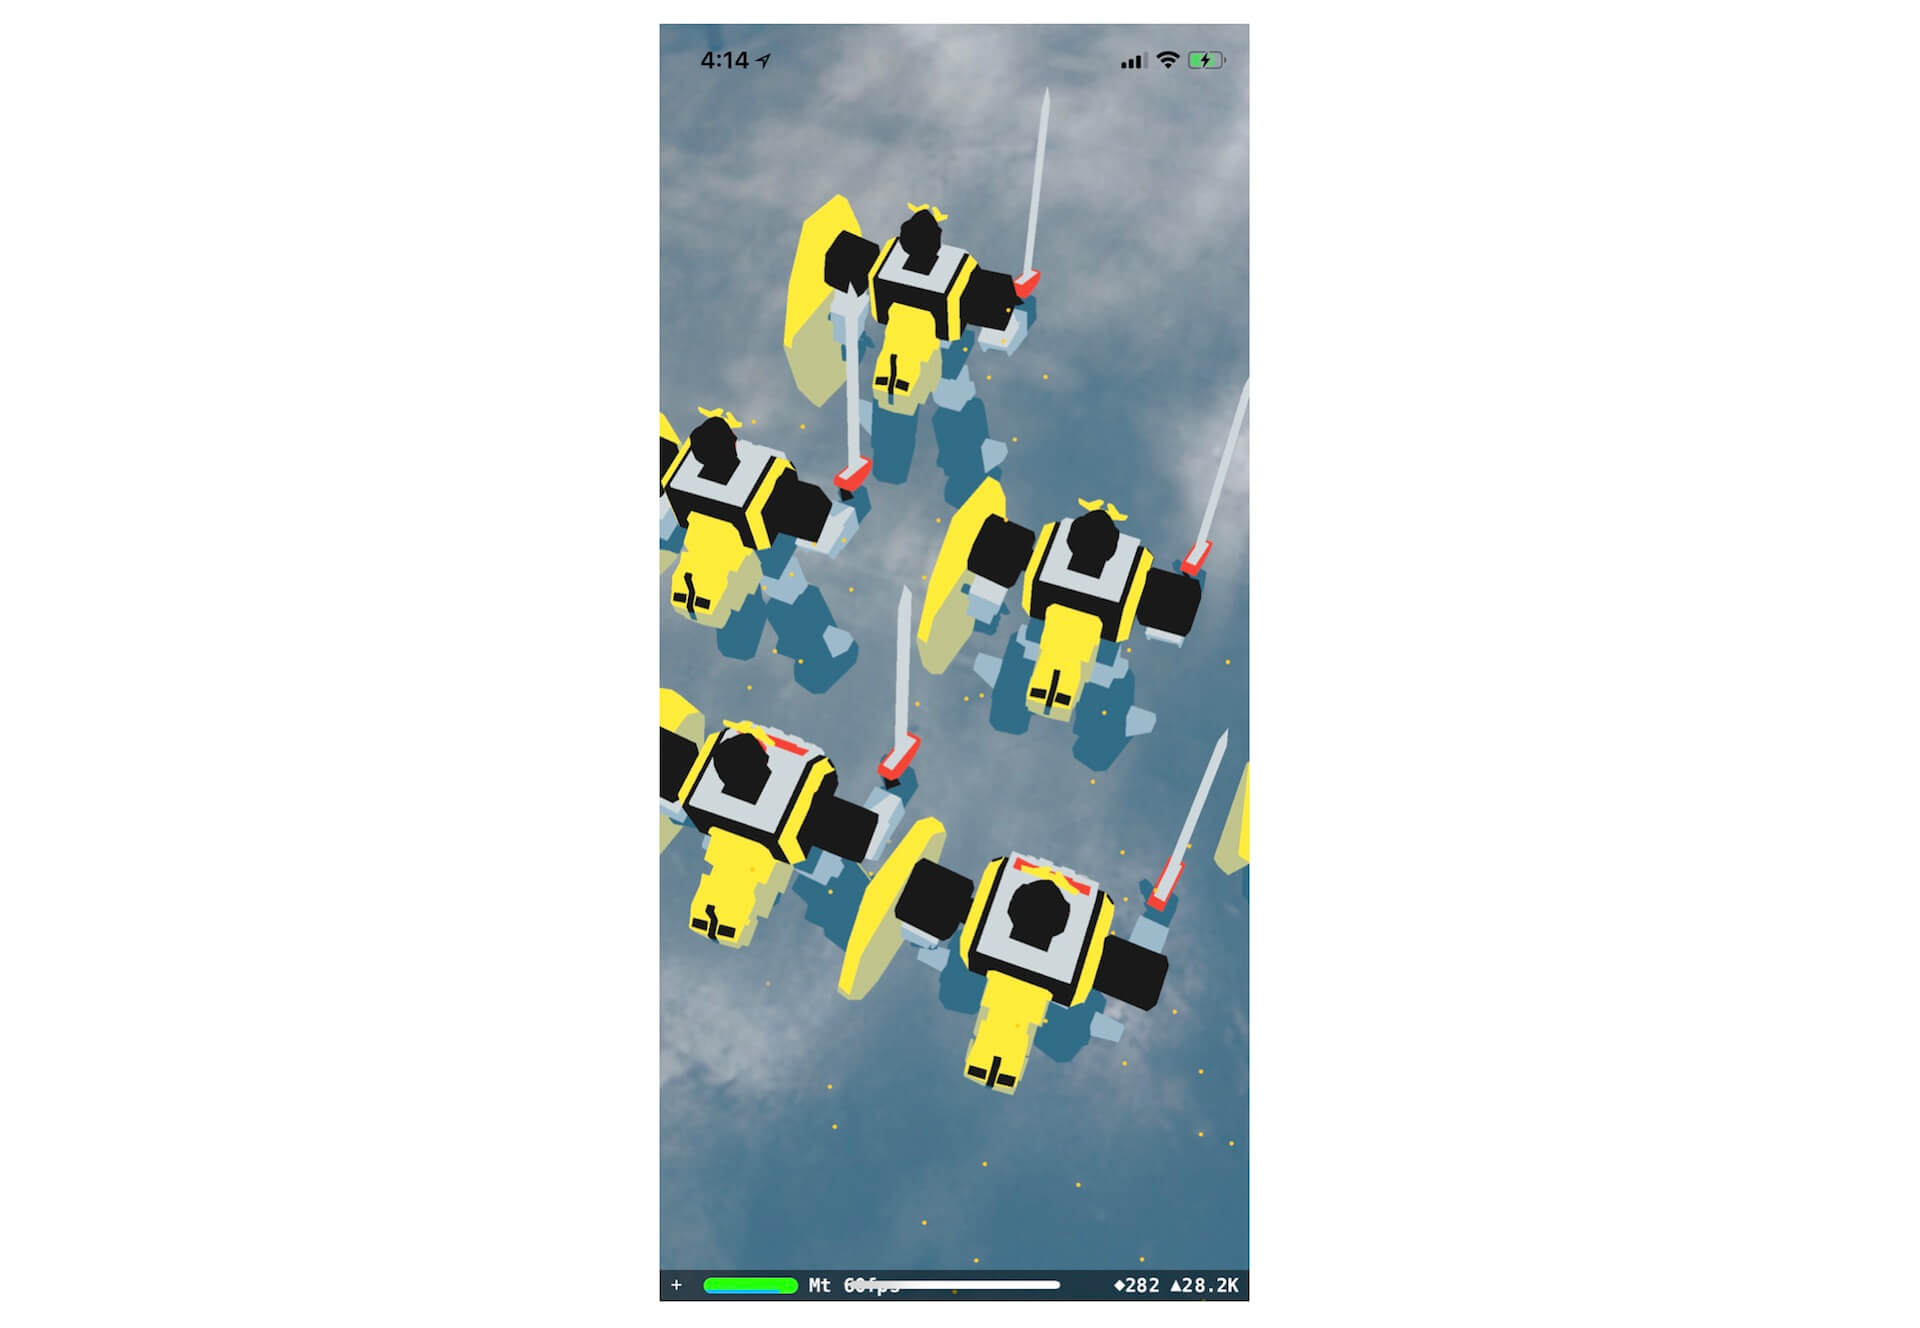
There is something weird you may notice. The robots immerse into the surface rather than stand upright on the floor. Open the robot.dae file and examine the model again. The lower part of the model is below the x-axis. This explains why part of the robot body is rendered below the detected plane. It also explains why its back faces you when the robot appears on the screen.
To improve the rendering, update the position of the node in addRobot(recognizer:) method like this:
node.position = SCNVector3(hitResult.worldTransform.columns.3.x, hitResult.worldTransform.columns.3.y + 0.35, hitResult.worldTransform.columns.3.z)
Also, insert a line of code to rotate the model by 180 degrees (around y-axis):
node.rotation = SCNVector4(0, 1, 0, Float.pi)
Test the app again and you will see a much better result.
Exercise
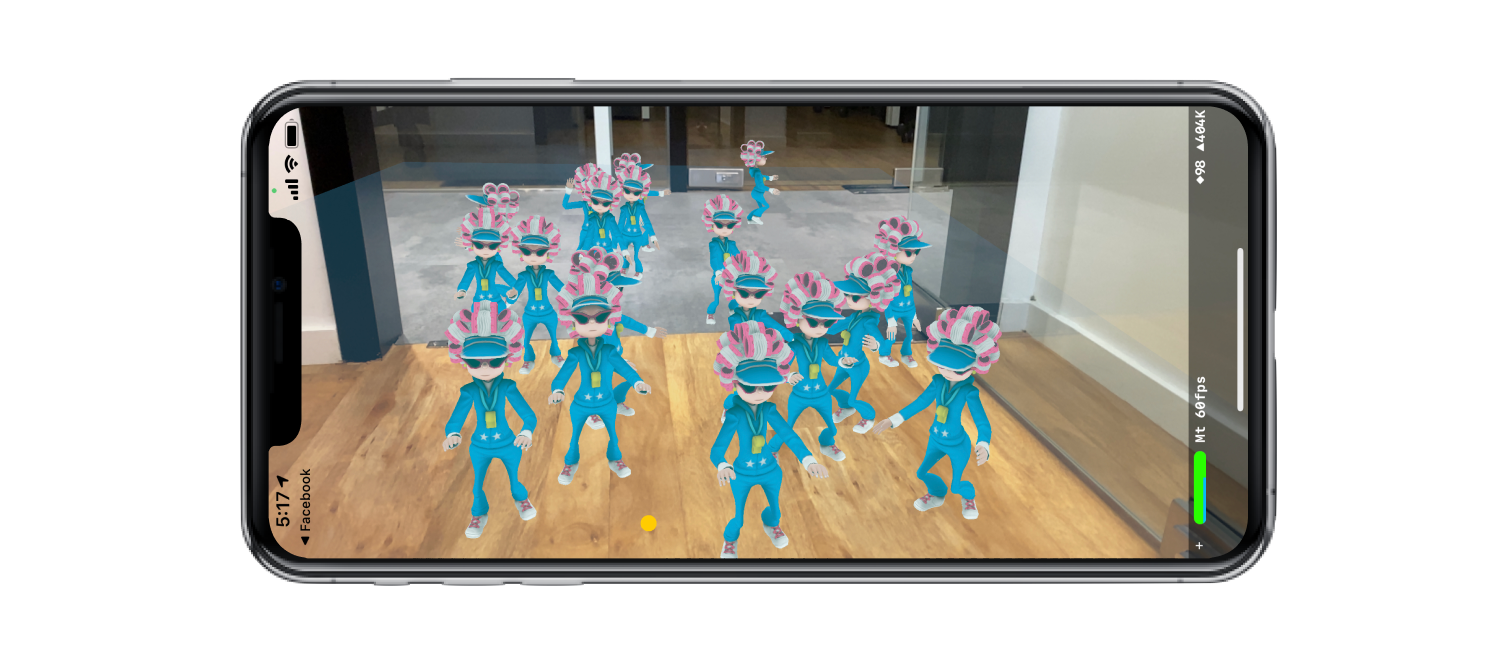
The 3D model doesn't need to be static. You can import animated 3D models into Xcode project and render them using ARKit. Mixamo from Adobe is an online character animation service that provides many animated characters for free download. You can even upload your own 3D character and use Mixamo to create character animations.
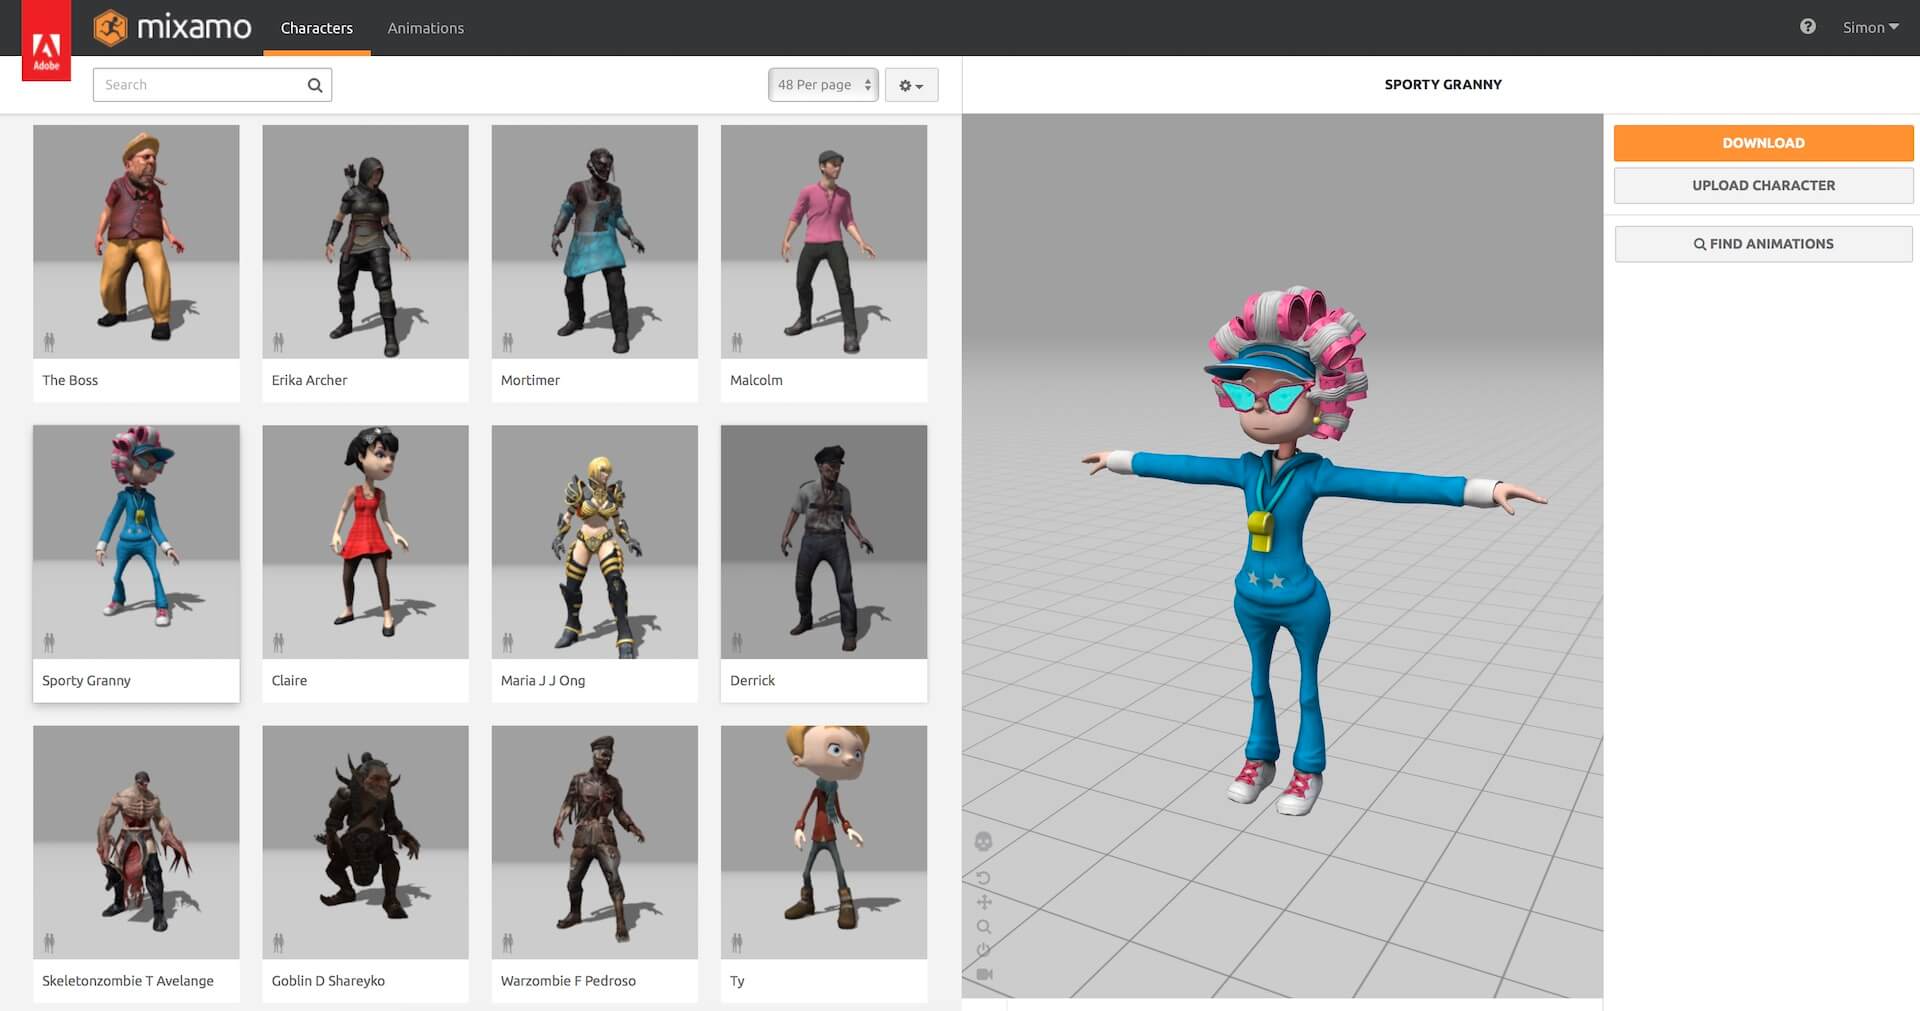
Your task of this exercise is to go to mixamo.com and create an animated character. Start by selecting the character you like and then click Find animations. Choose one of the animations (e.g. Samba Dancing) to create a 3D animated character. Once you are satisfied with your character, hit Download and choose Collada (.dae) as the format to download the animated character.
You can then import the .dae file, together with the textures folder, into the Xcode project. Finally, modify the code to render the animated character in augmented reality.
Summary
This is a huge chapter. You should now know how to find free 3D models, convert them into SceneKit supported format and add 3D objects in the real world using ARKit. Plane detection has been one of the greatest features of ARKit. The tracking is fast and robust, although the detection is less satisfactory for shinning surfaces. The whole idea of augmented reality is to seamlessly blend virtual objects into the real world. Plane detection simply allows you to detect flat surfaces like tables, floors and place objects on them. This opens up tons of opportunities and lets you to build realistic AR apps.
For reference, you can download the complete Xcode project and the sample solution to the exercise using the links below:
Complete Xcode project http://www.appcoda.com/resources/swift55/ARKitRobotDemoPlaneDetection.zip
Sample solution to the exercise
http://www.appcoda.com/resources/swift55/ARKitRobotDemoExercise.zip