- Made by AppCoda
- Contact us / Support
- Tweet this book
- Preface
- 1. Building Adaptive User Interfaces
- 2. Creating Table View Sections and Index list with Diffable Data Source
- 3. Animating Table View Cells
- 4. Working with JSON and Codable
- 5. How to Integrate the Twitter and Facebook SDK for Social Sharing
- 6. Working with Email and Attachments
- 7. Sending SMS and MMS Using MessageUI Framework
- 8. How to Get Direction and Draw Route on Maps
- 9. Search Nearby Points of Interest Using Local Search
- 10. Audio Recording and Playback
- 11. Scan QR Code Using AVFoundation Framework
- 12. Working with URL Schemes
- 13. Building a Full Screen Camera with Gesture-based Controls
- 14. Video Capturing and Playback Using AVKit
- 15. Displaying Banner Ads using Google AdMob
- 16. Working with Custom Fonts
- 17. Working with AirDrop, UIActivityViewController and Uniform Type Identifiers
- 18. Building Grid Layouts Using Collection Views and Diffable Data Source
- 19. Interacting with Collection Views
- 20. Adaptive Collection Views Using UITraitCollection and Compositional Layout
- 21. Building a Weather Widget Using WidgetKit
- 22. Building Slide Out Sidebar Menus Using Objective-C Libraries
- 23. View Controller Transitions and Animations
- 24. Building a Slide Down Menu
- 25. Self Sizing Cells and Dynamic Type
- 26. XML Parsing, RSS and Expandable Table View Cells
- 27. Applying a Blurred Background Using UIVisualEffect
- 28. Using Touch ID and Face ID For Authentication
- 29. Building a Carousel-Like User Interface
- 30. Working with Parse
- 31. Parsing CSV and Preloading a SQLite Database Using Core Data
- 32. Connecting Multiple Annotations with Polylines and Routes
- 33. Using CocoaPods in Swift Projects
- 34. Building a Simple Sticker App
- 35. Building iMessage Apps Using Messages Framework
- 36. Building Custom UI Components Using IBDesignable and IBInspectable
- 37. Using Firebase for User Authentication
- 38. Google and Facebook Authentication Using Firebase
- 39. Using Firebase Database and Storage to Build an Instagram-like App
- 40. Building a Real-time Image Recognition App Using Core ML
- 41. Building AR Apps with ARKit and SpriteKit
- 42. Working with 3D Objects in Augmented Reality Using ARKit and SceneKit
- 43. Use Create ML to Train Your Own Machine Learning Model for Image Recognition
- 44. Building a Sentiment Classifier Using Create ML to Classify User Reviews
- 45. Working with Image Tracking Using ARKit
- Published with GitBook
Chapter 16
Working with Custom Fonts and Dynamic Type
When you add a label to a view, Xcode allows you to change the font type using the Attribute inspector. From there, you can pick a system font or custom font from the pre-defined font family.
What if you can't find any font from the default font family that fits into your app? Typography is an important aspect of app design. Proper use of a typeface makes your app superior, so you may want to use some custom fonts that are created by third parties but not bundled in Mac OS. Just perform a simple search on Google and you'll find tons of free fonts for app development. However, this still leaves you with the problem of bundling the font in your Xcode project. You may think that we can just add the font file into the project, but it's a little more difficult than that. In this chapter, I'll focus on how to bundle new fonts and go through the procedures with you.
As always, I'll give you a demo and build the demo app together. The demo app is very simple; it just displays a set of labels using different custom fonts.
You can start by building the demo from scratch or downloading the template from http://www.appcoda.com/resources/swift55/CustomFontStarter.zip.
Download Custom Fonts
We'll use a few fonts that are available for free. However, we're not allowed to bundle and distribute them via our project template. Before proceeding, download the following fonts via the below links:
- https://www.fontsquirrel.com/fonts/mohave
- https://www.wfonts.com/font/hallo-sans
- http://fontfabric.com/canter-free-font/
Alternatively, you can use any fonts that you own for the project. Or you are free to use some of the beautifully designed fonts from:
- 100 Greatest Free Fonts Collection for 2022 https://speckyboy.com/best-free-fonts/
- The 100 best free fonts http://www.creativebloq.com/graphic-design-tips/best-free-fonts-for-designers-1233380
- A Curated Collection of the 40 Best Google Fonts https://www.typewolf.com/google-fonts
- 100 Greatest Free Fonts for 2022 https://graphicdesignjunction.com/2022/01/100-greatest-free-fonts-for-2022/
- FontPair https://fontpair.co
- 82 best free fonts for designers http://www.creativebloq.com/graphic-design-tips/best-free-fonts-for-designers-1233380
Adding Font Files to the Project
Just like any other resource file (e.g. image), you have to first add the font files to your Xcode project. I like to keep all the resource files in a font folder. In the project navigator, right-click the CustomFont folder and select New Group to create a folder. Change the name to font. Then drag the font files that you have downloaded into the folder.
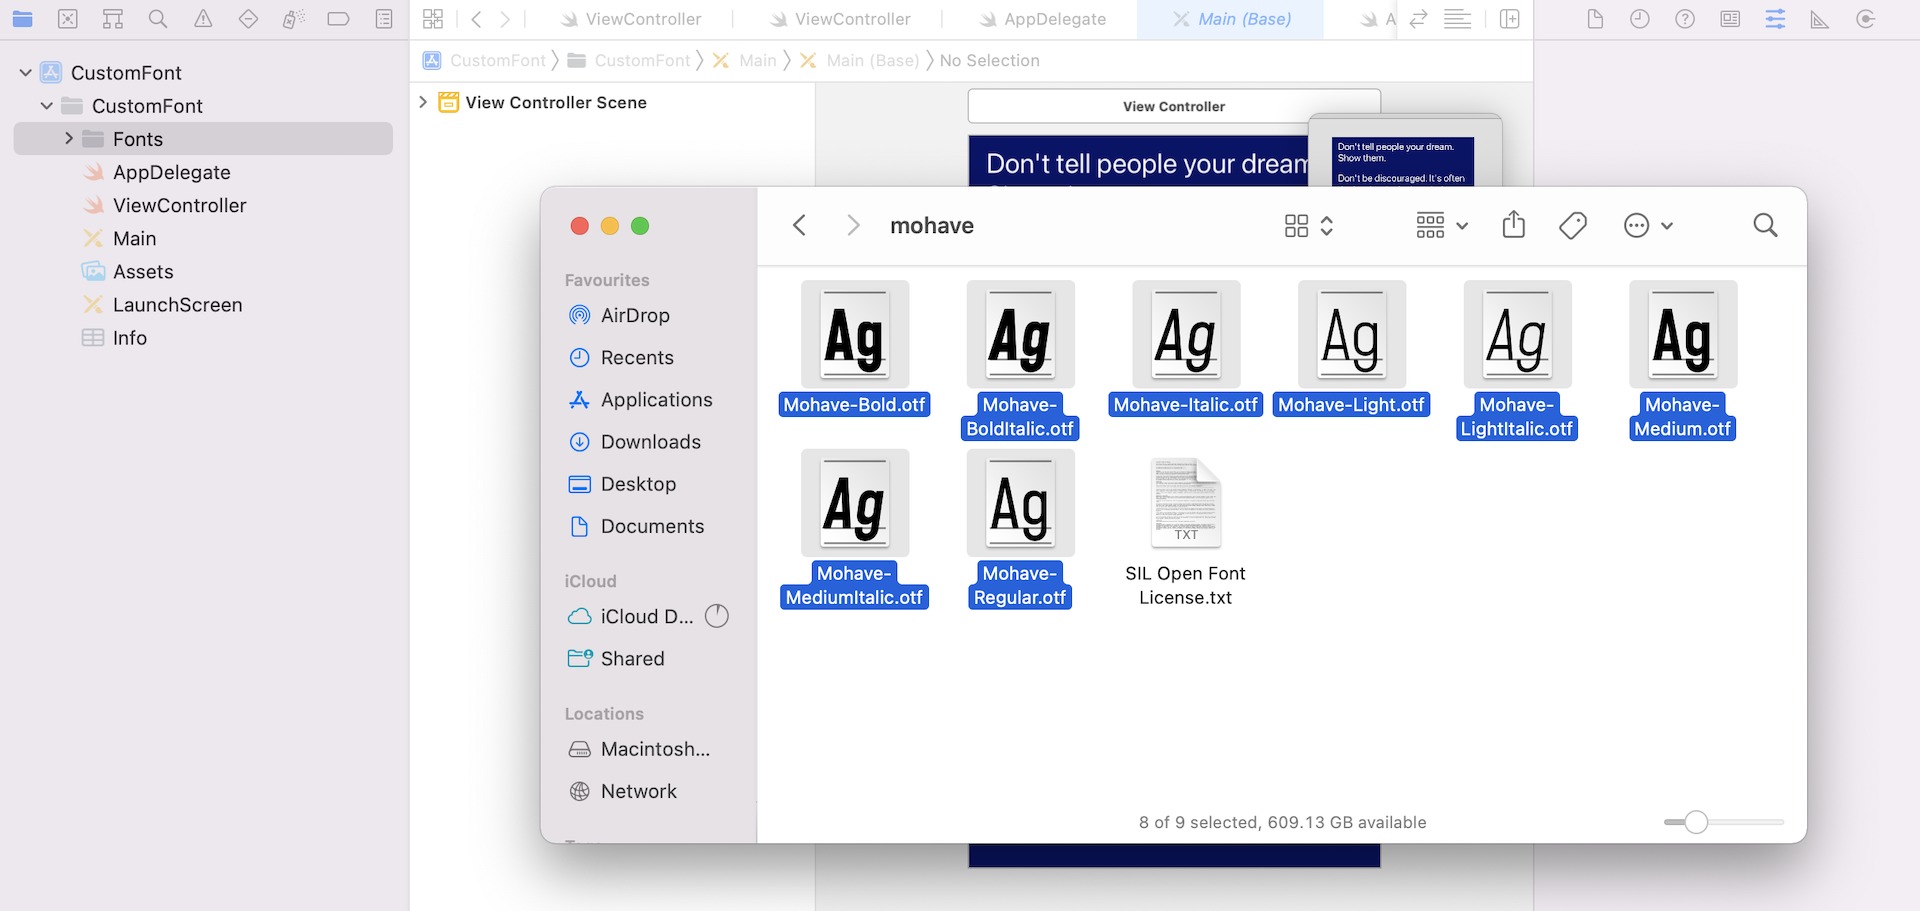
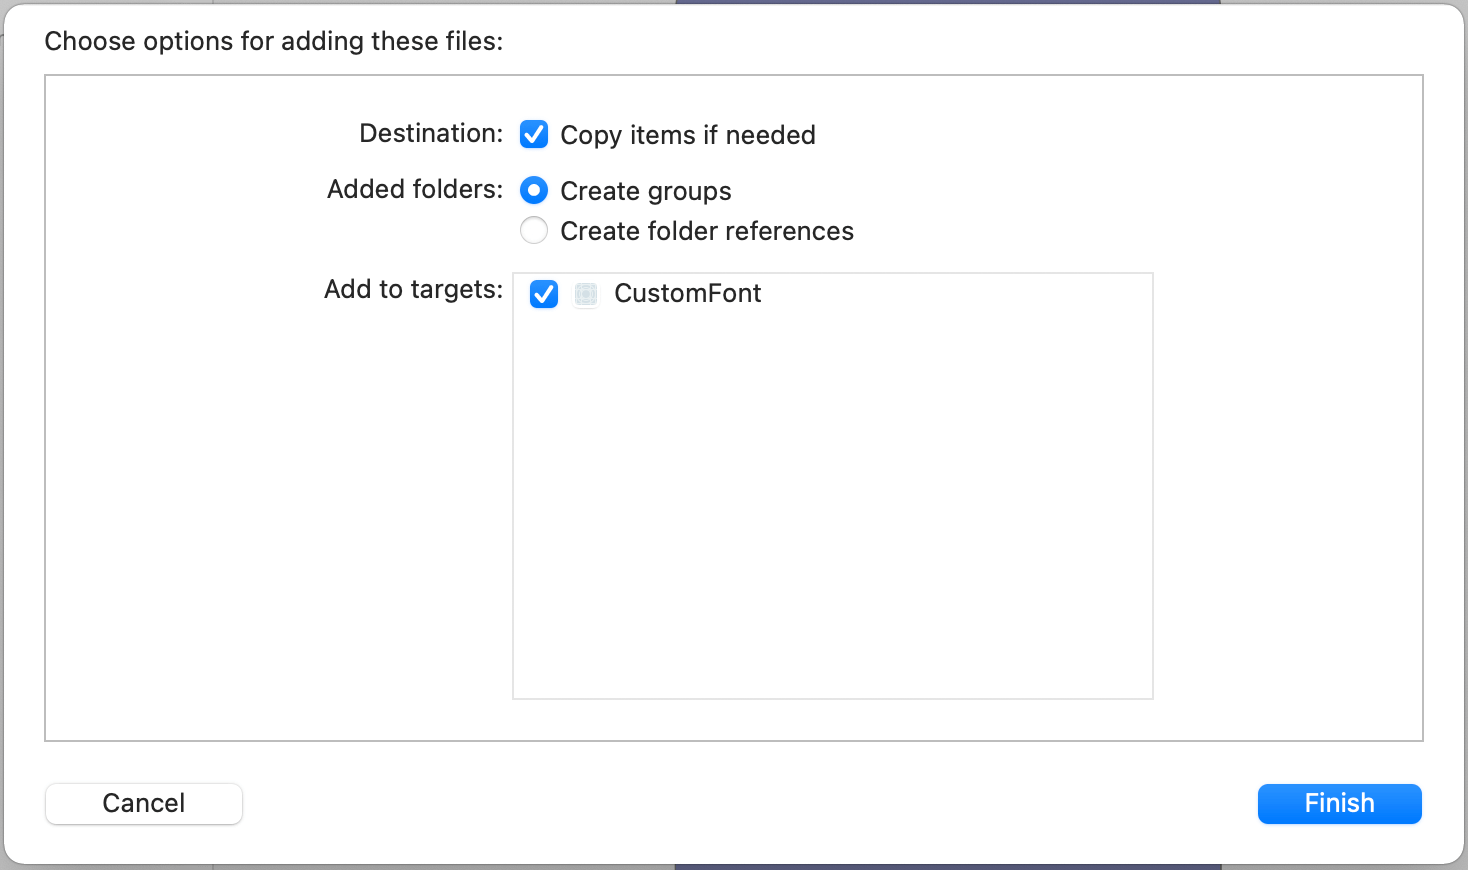
When Xcode prompts you for confirmation, make sure to check the box of your targets (i.e. CustomFont) and enable the Copy items if needed option. This instructs Xcode to copy the font files to your app's folder. If you have this option unchecked, your Xcode project will only add a reference to the font files.
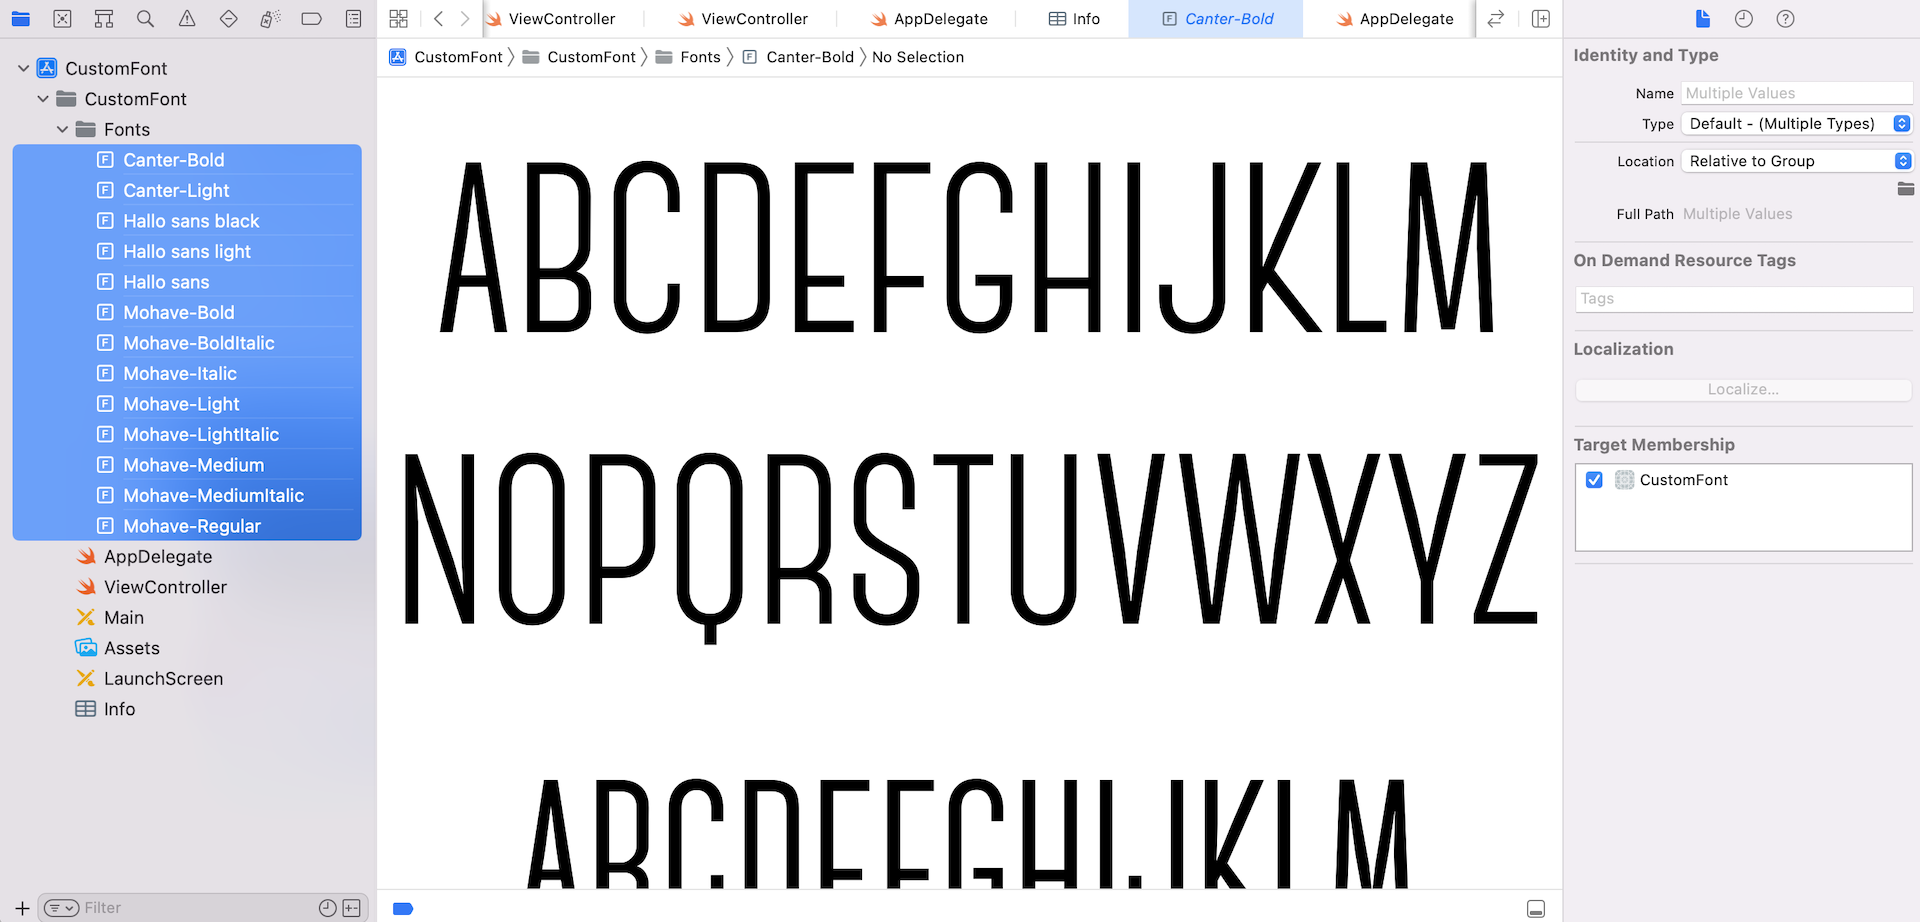
The font files are usually in .ttf or .otf format. Once you add all the files, you should find them in the project navigator under the font folder.
Register the Fonts in the Project Info Settings
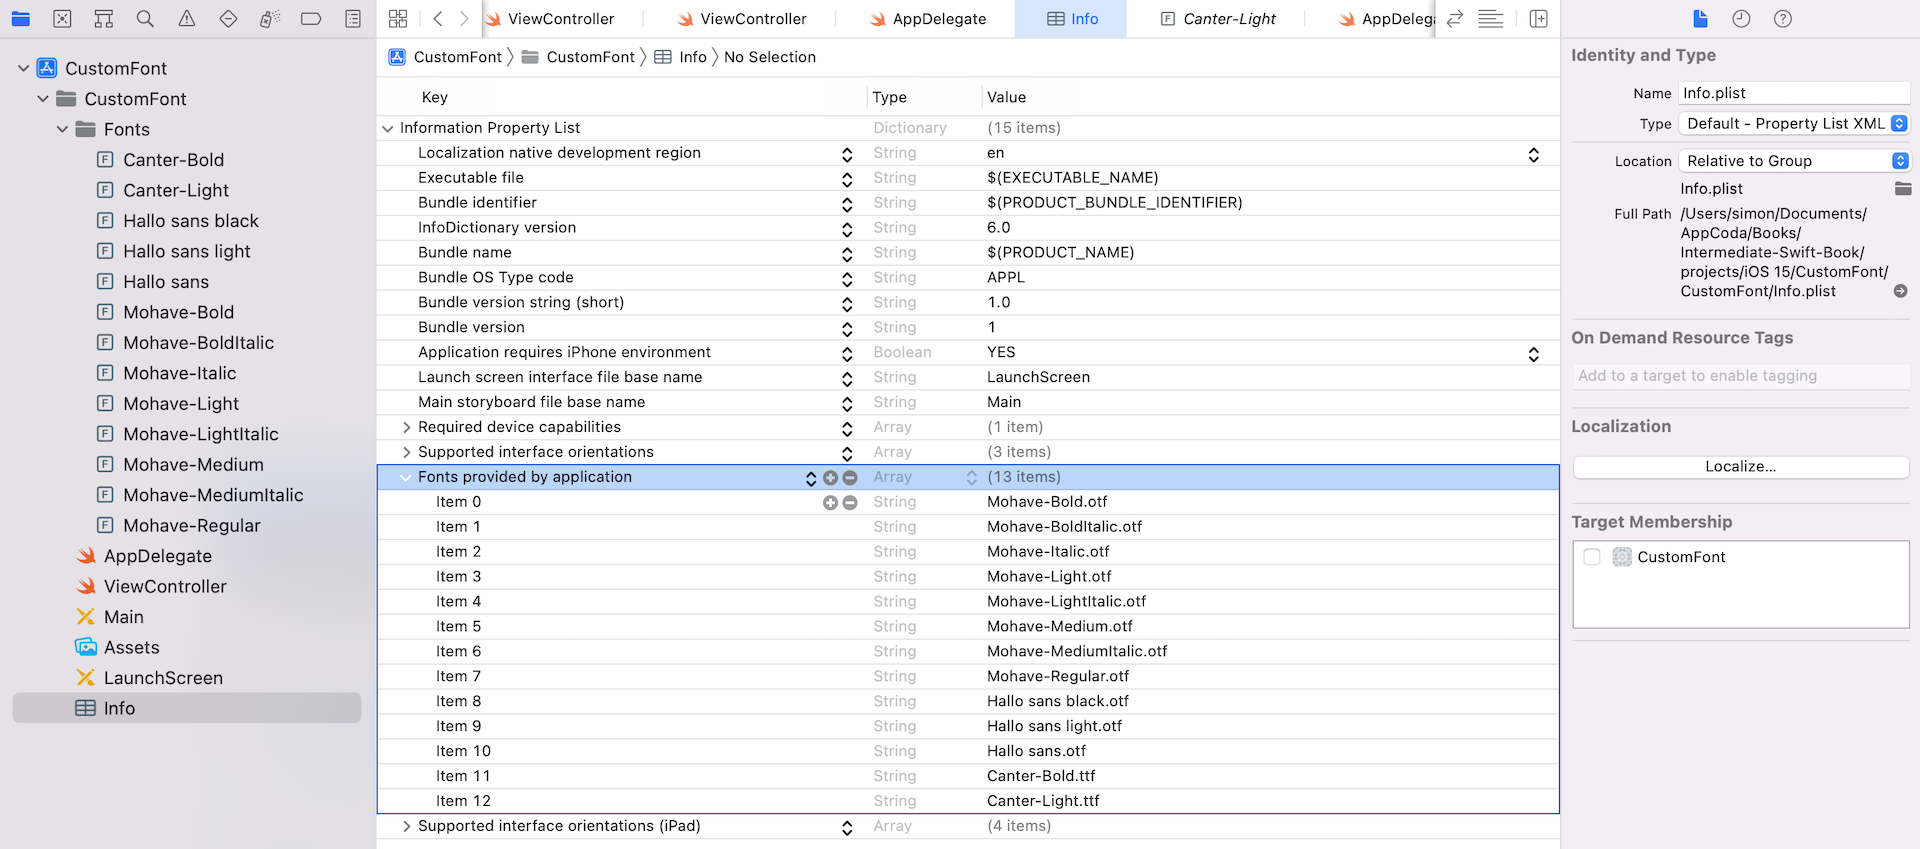
Before using the font faces, you have to register them in the project settings. Select the CustomFont project in the project navigator and then select CustomFont under Targets. Under the Info tab, add a new property named Fonts provided by application. This is an array key that allows you to register the custom font files.
Right-click one of the keys and select Add Row from the context menu. Scroll and select Fonts provided by application from the drop down menu. Click the disclosure icon (i.e. triangle) to expand the key. You should see Item 0. Double click the value field and enter Hallo sans black.otf. Then click the + button next to Item 0 to add another font file. Repeat the same step until all the font files are registered - you'll end up with a screenshot like the one shown below. Make sure you key in the file names correctly. Otherwise, you won't be able to use the fonts.
Using Custom Fonts in Interface Builder
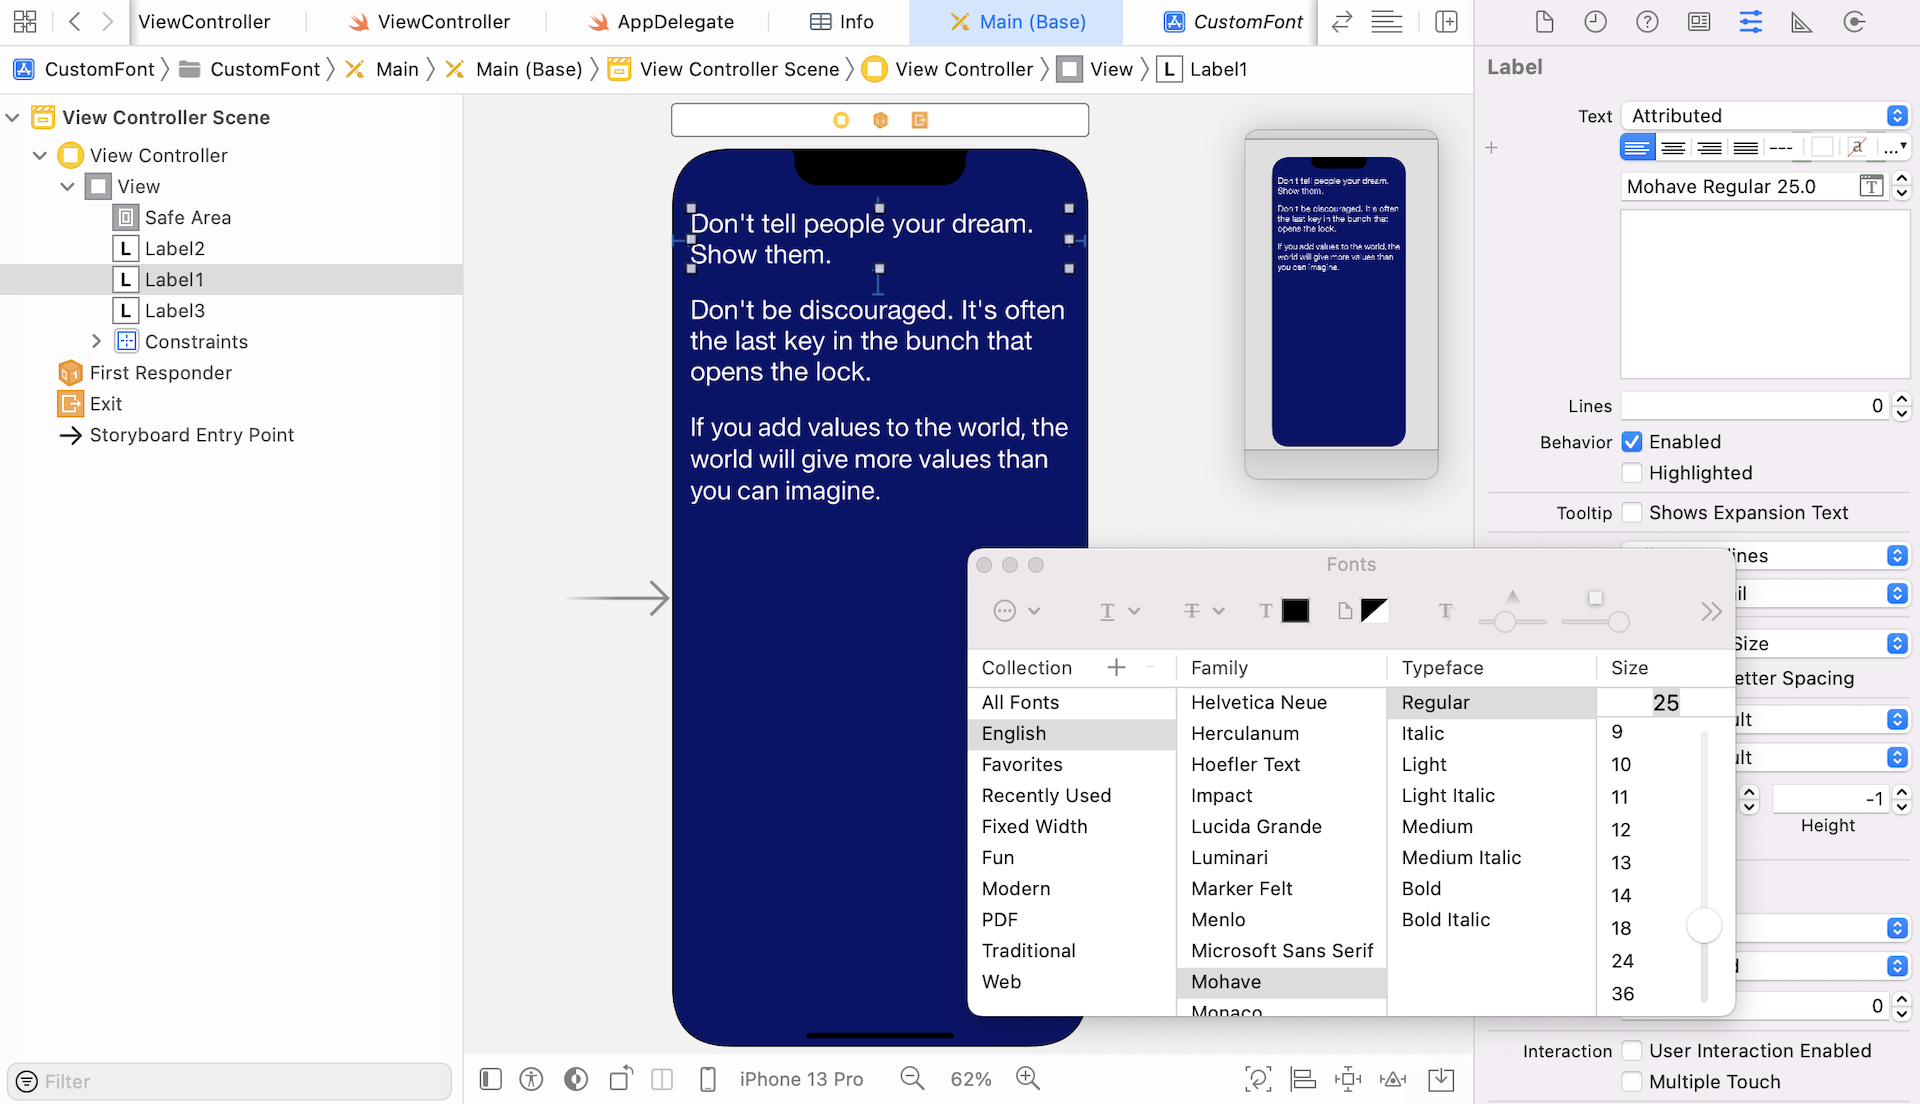
Once you embed the fonts files in your project, Xcode allows you to preview the fonts in Interface Builder. Any custom fonts added to your project will be made available in Interface Builder. You can change the font of an object (e.g. label) in the Attributes inspector and Interface Builder will render the result in real-time.
Using Custom Fonts in Code
Alternatively, you can use the custom font through code. Simply instantiate a UIFont object with your desired custom font and assign it to a UI object such as UILabel. Here is an example:
label1.font = UIFont(name: "Mohave-Italic", size: 25.0)
label2.font = UIFont(name: "Hallo sans", size: 30.0)
label3.font = UIFont(name: "Canter Light", size: 35.0)
If you insert the above code in the viewDidLoad method of the ViewController class and run the app, all the labels should change to the specified custom fonts accordingly.
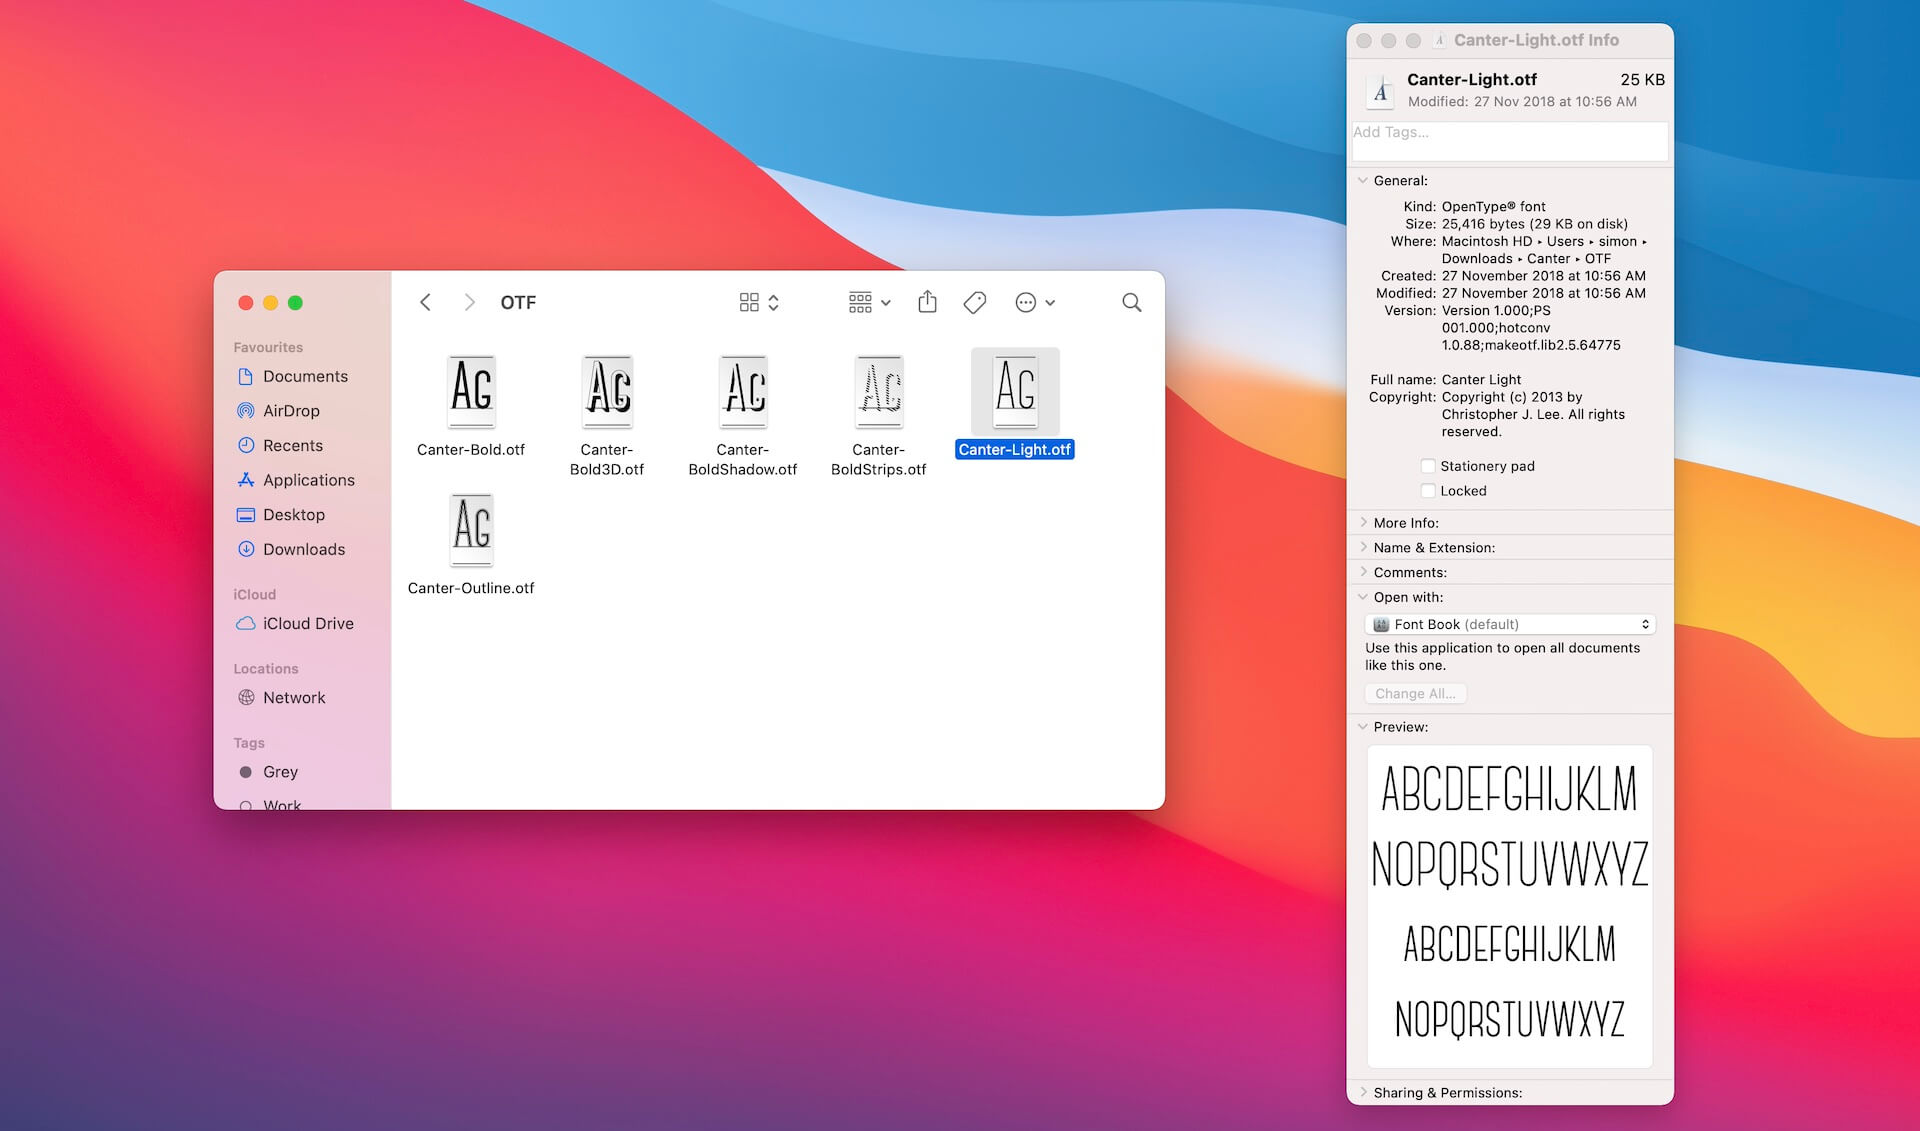
For starters, you may have a question in your mind: how can you find out the font name? It seems that the font names differ from the file names.
That's a very good observation. When initializing a UIFont object, you should specify the font name instead of the filename of the font. To find the name of the font, you can right-click a font file in Finder and select Get Info from the context menu. The value displayed in the Full Name field is the font name used in UIFont. In the sample screenshot, the font name is Canter Light.
Working with Dynamic Type
Dynamic Type is not something new. It has been around since the release of iOS 7. With Dynamic Type, users are able to choose their own font size, as long as the app supports Dynamic Type.
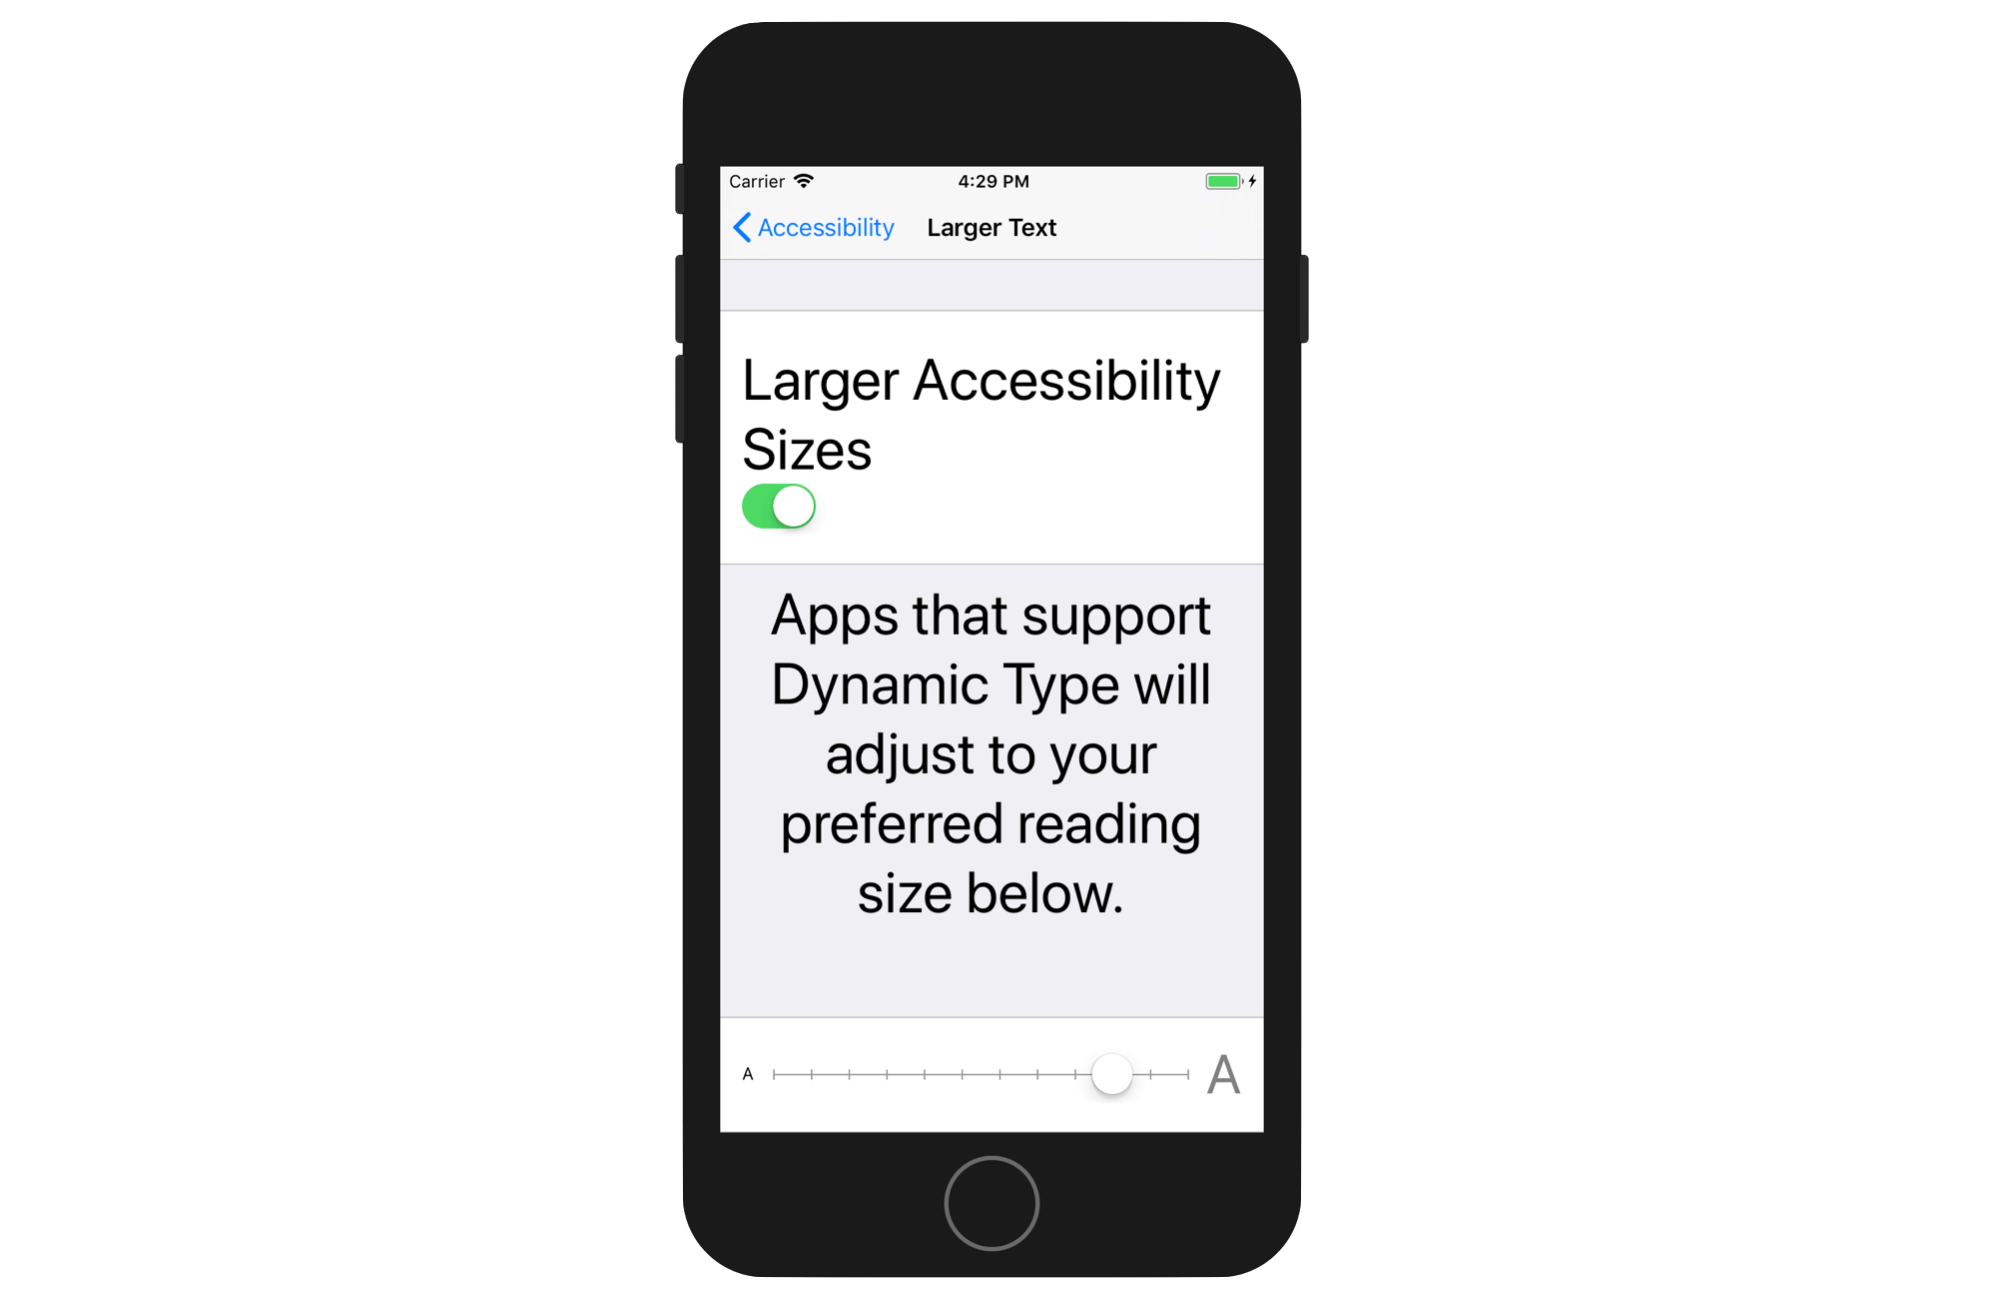
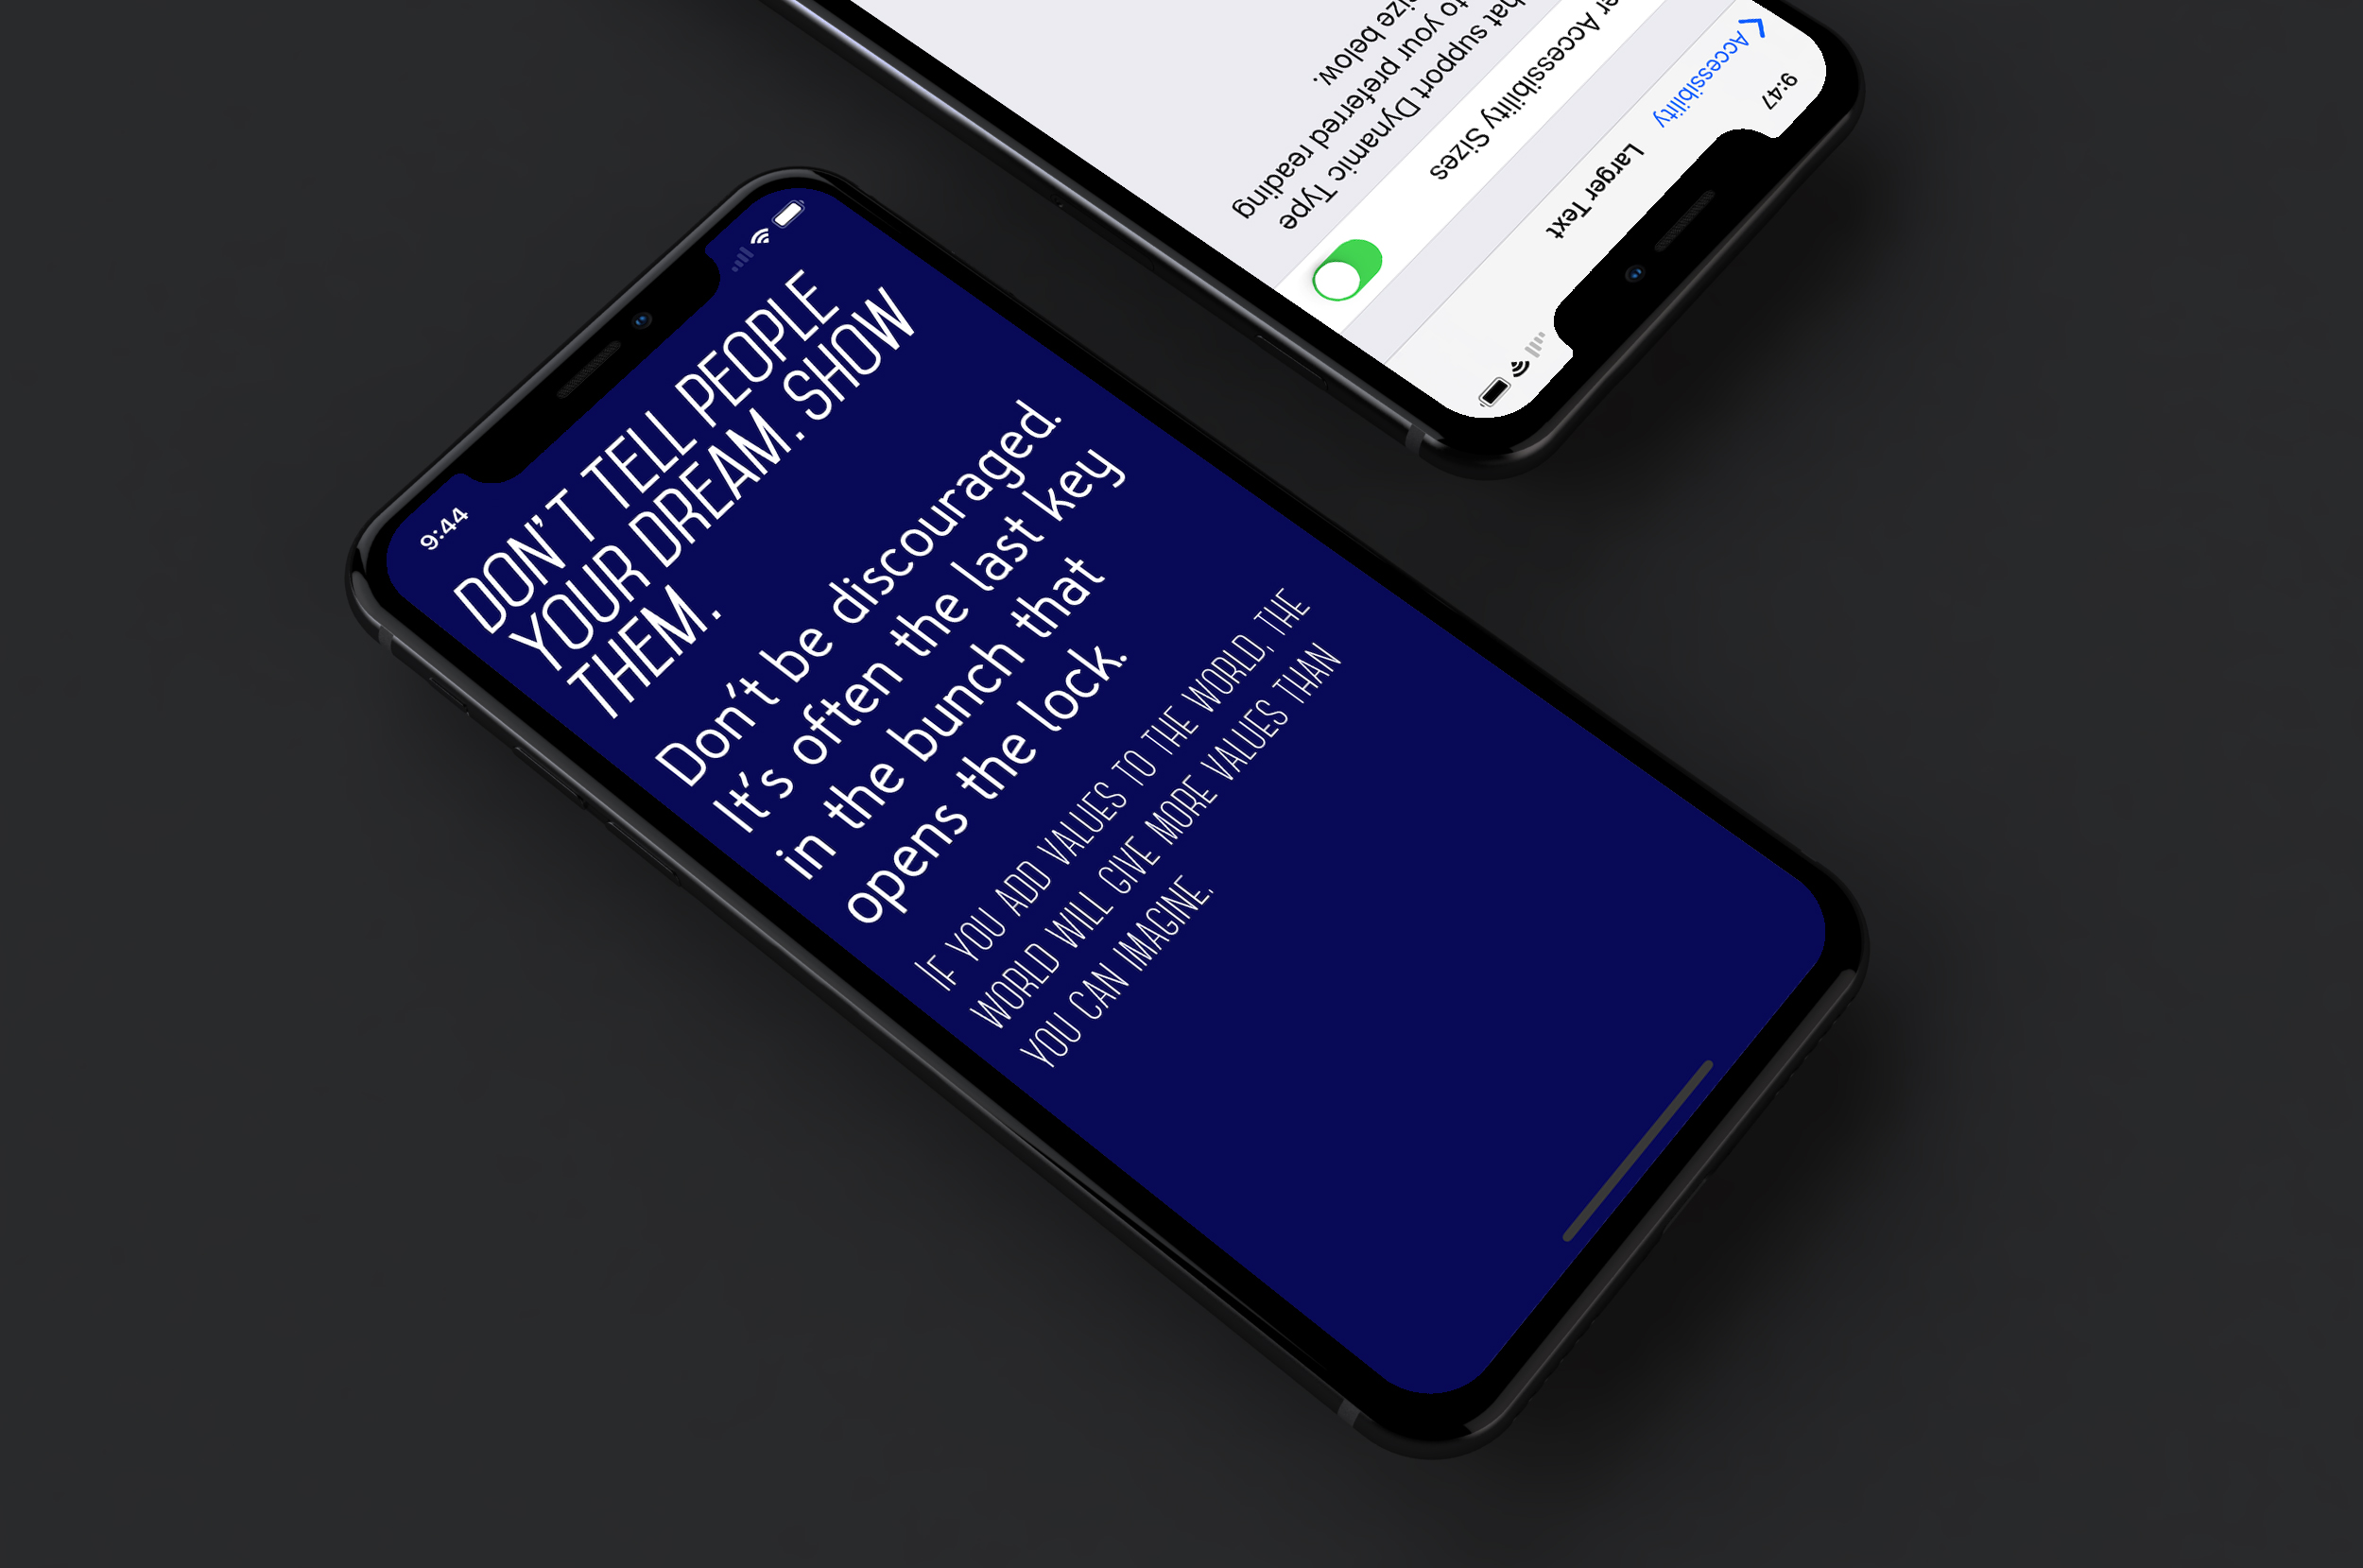
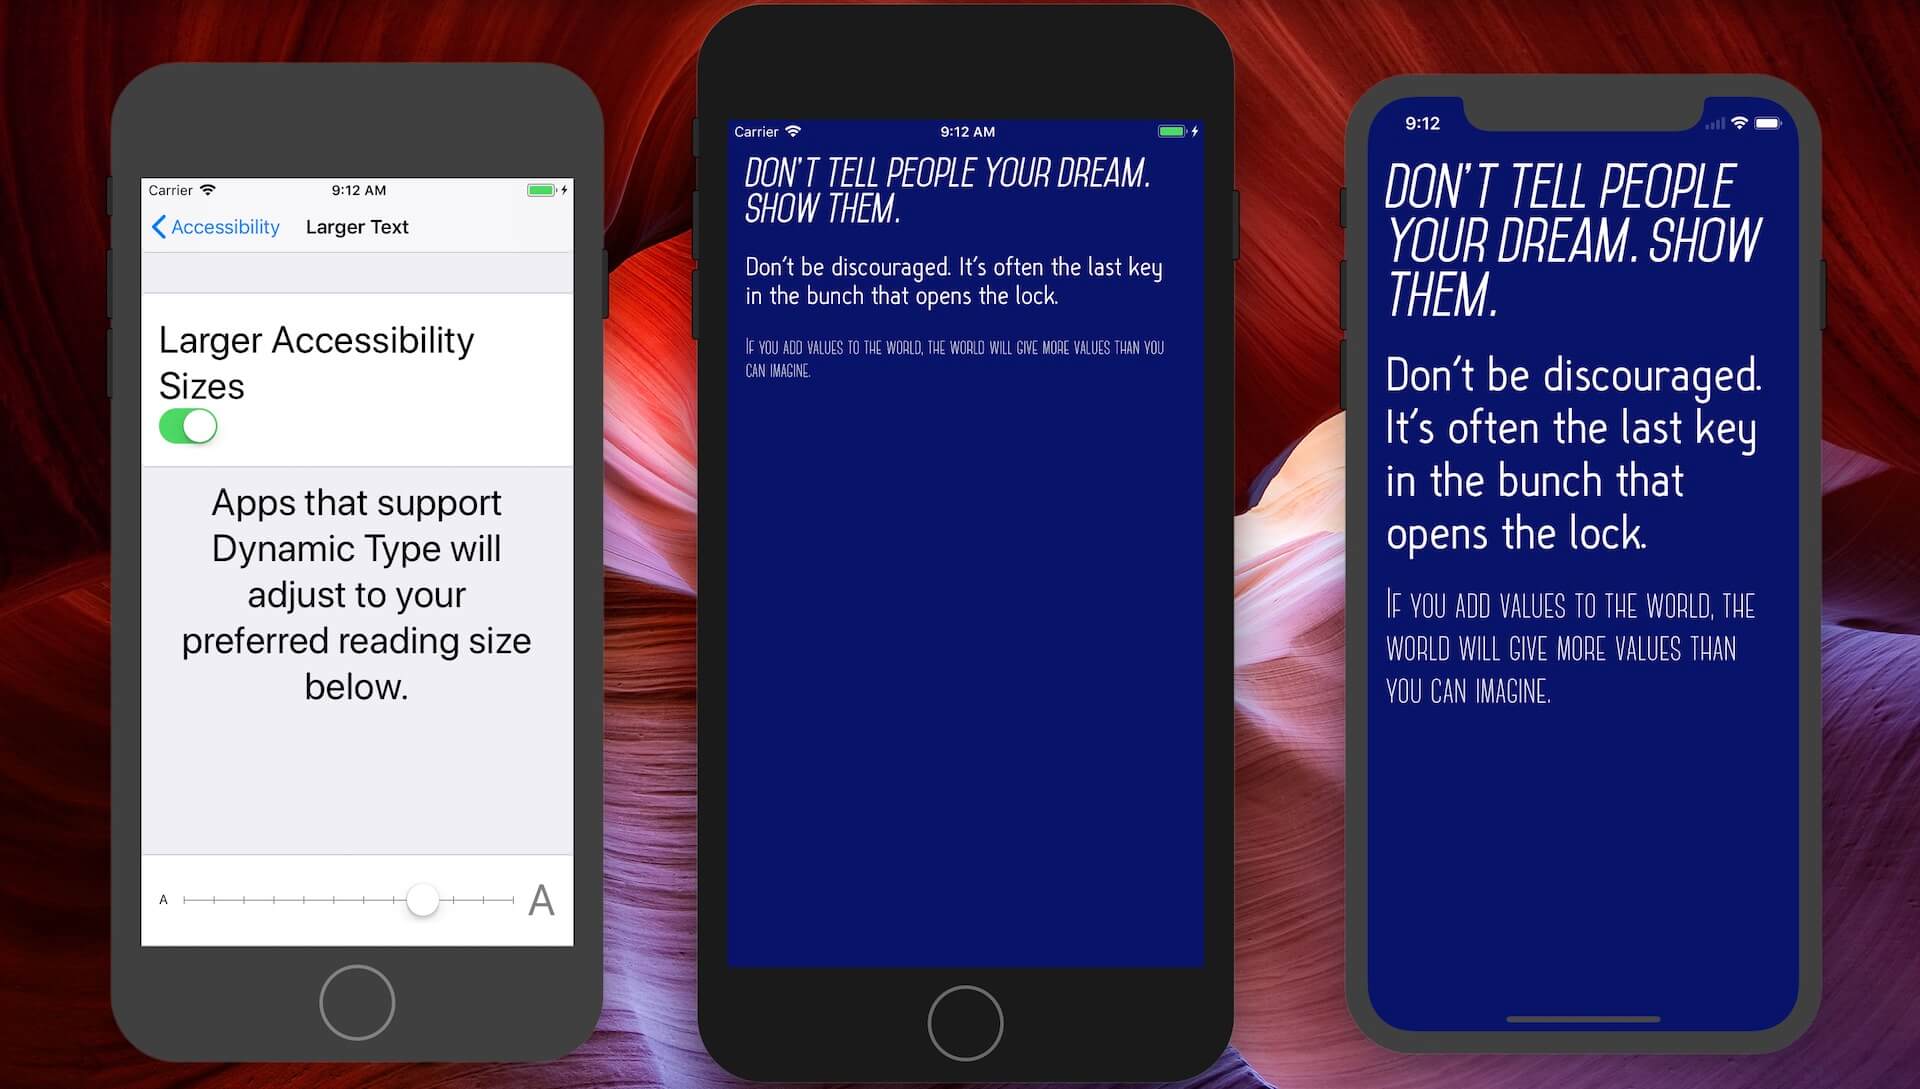
So far, all the labels we worked with are of a fixed font size. Even if you go to Settings > General > Accessibility and enable Larger Text, you will not be able to enlarge the font size of the demo app.
Enabling Dynamic Type
To make your app work with Dynamic Type, you have to set the font of the labels to a text style (instead of a specific font). Similar to what we have done before, you can change the font style through Interface Builder or using code. If you go to Main storyboard, select one of the labels. You can change its font in the Attributes inspector. Instead of using a custom font, choose a text style (say, Title 1).
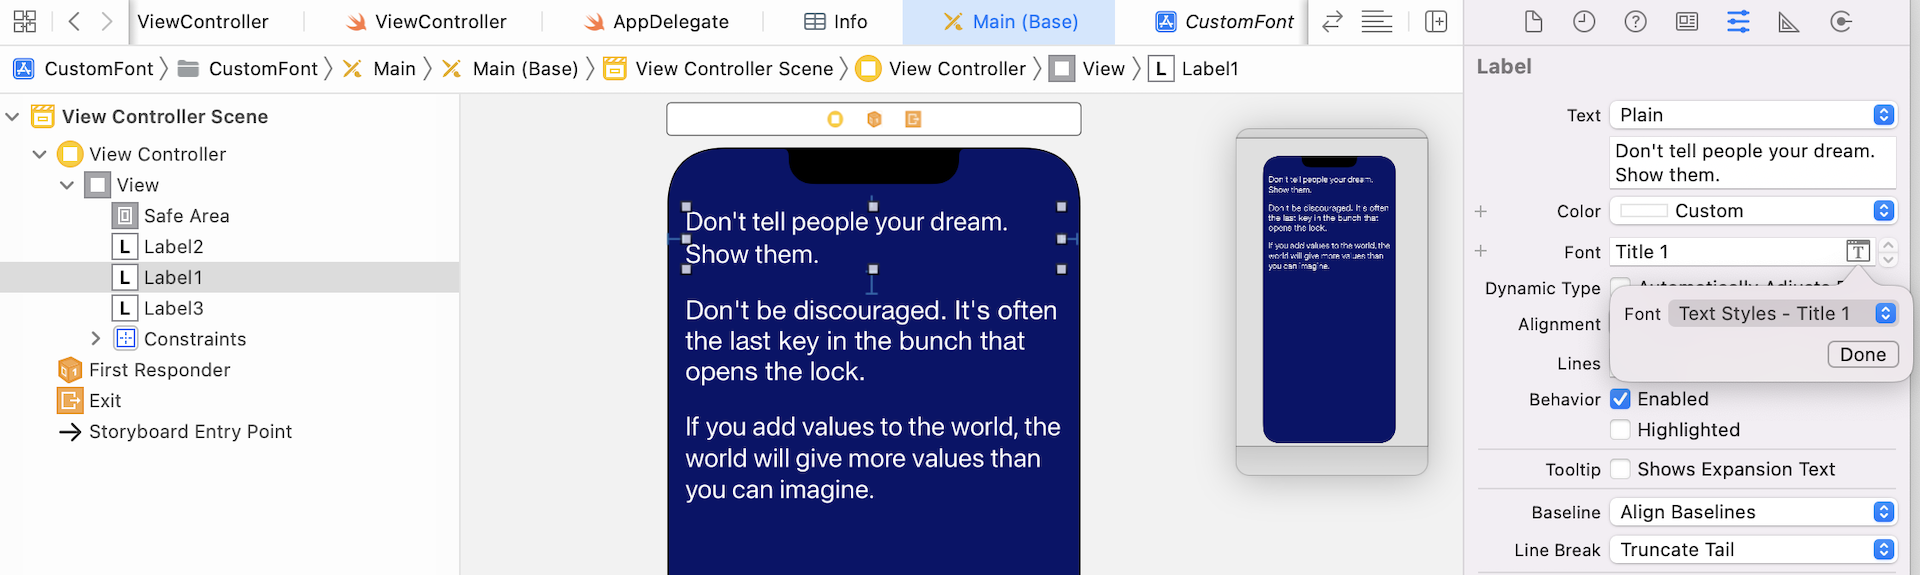
If you prefer to set the font programmatically, replace the code in the viewDidLoad() method of ViewController.swift with the following:
override func viewDidLoad() {
    super.viewDidLoad()

    label1.font = UIFont.preferredFont(forTextStyle: .title1)
    label2.font = UIFont.preferredFont(forTextStyle: .headline)
    label3.font = UIFont.preferredFont(forTextStyle: .subheadline)

}
The preferredFont method of UIFont accepts one of the following text style:
.largeTitle.title1,.title2,.title3.caption1,.caption2.headline.subheadline.body.callout.footnote
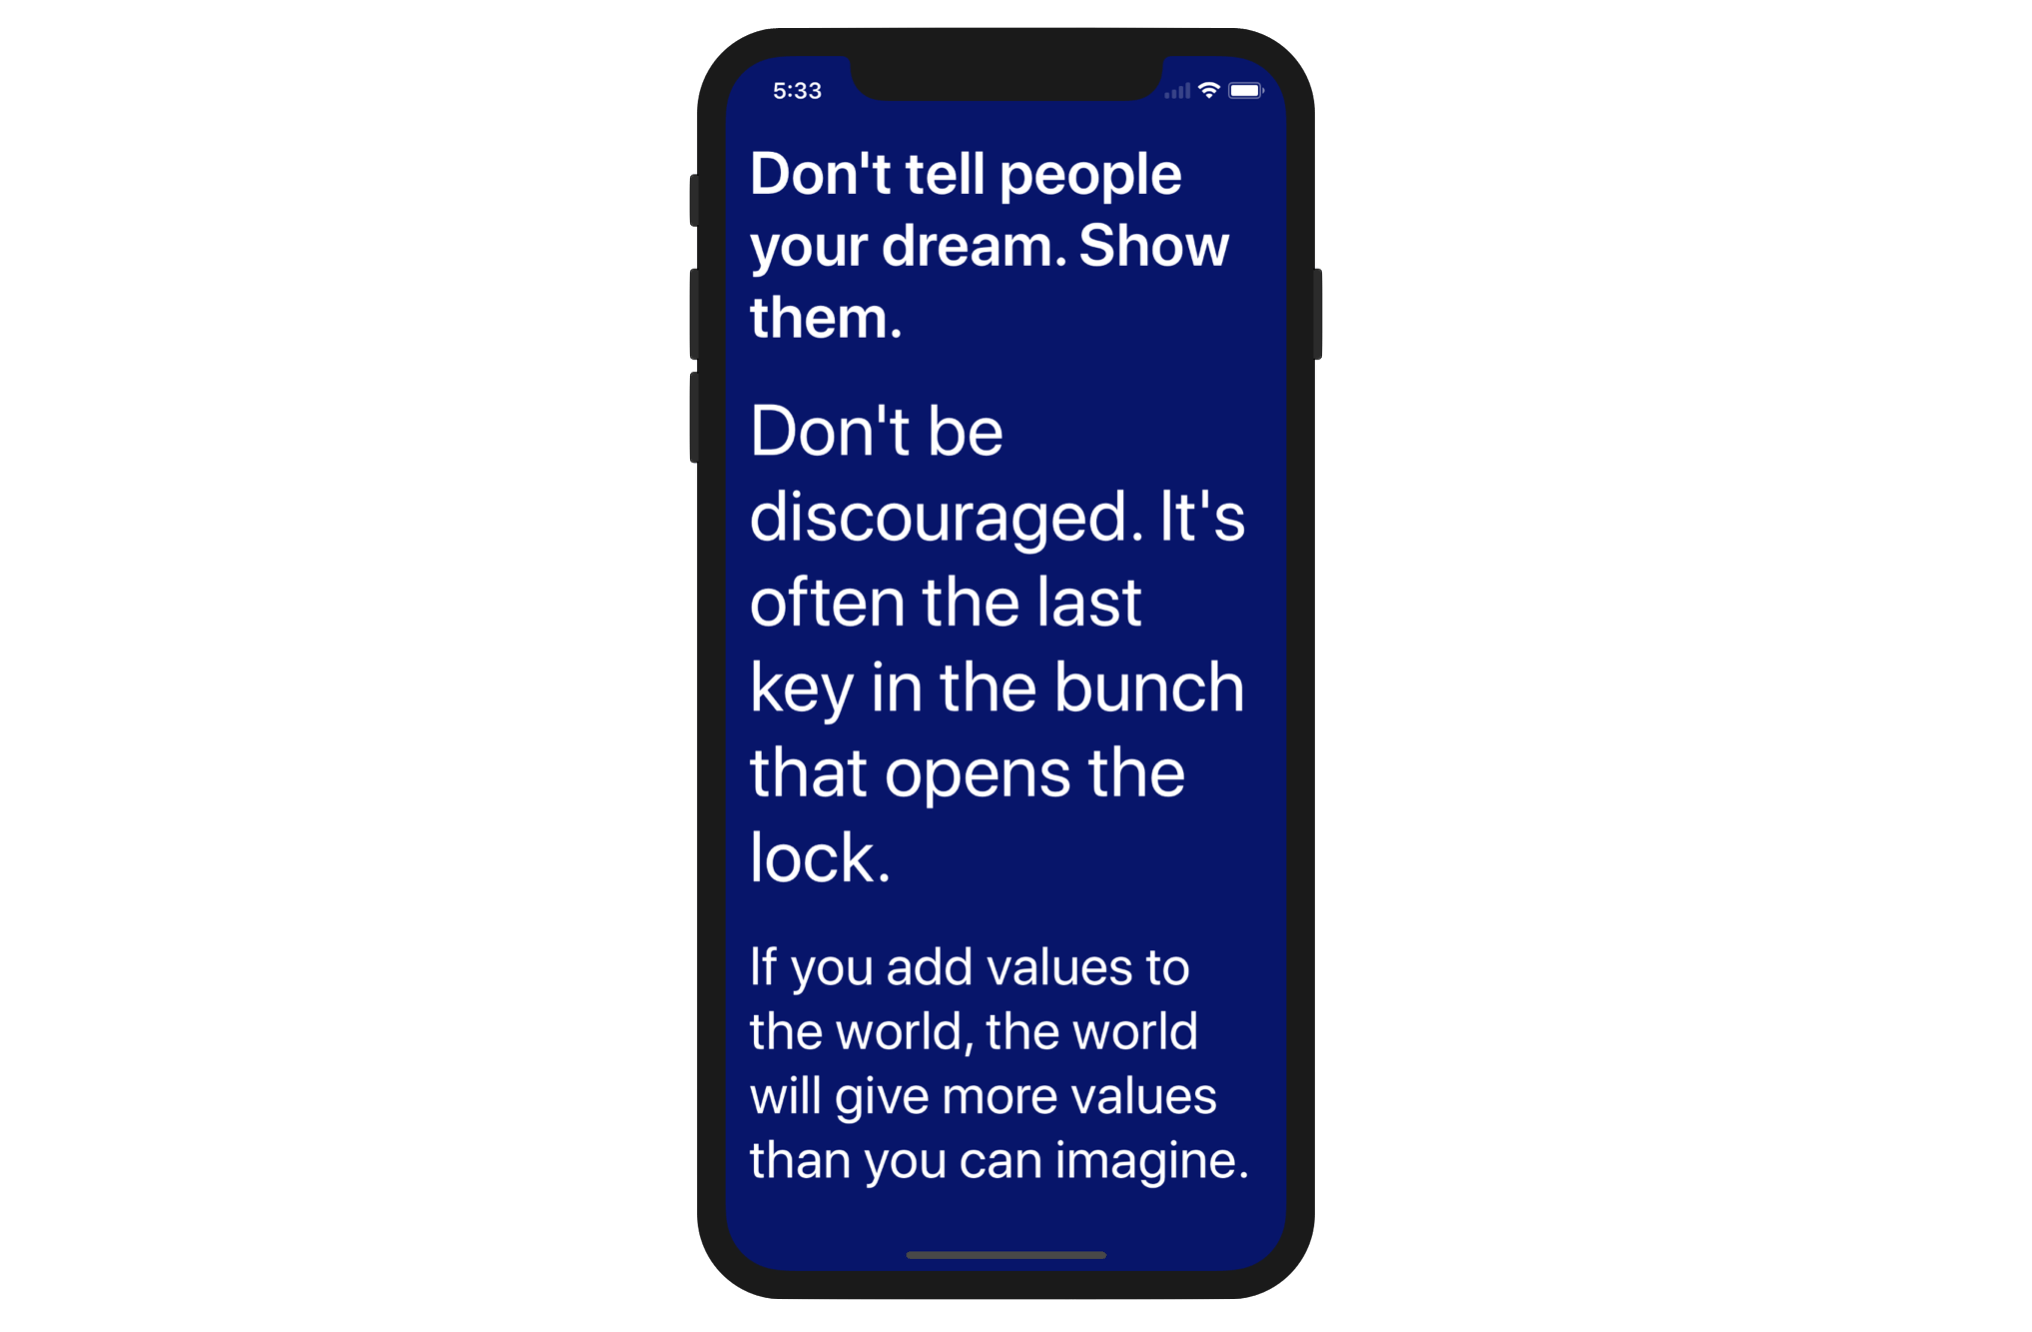
Now open the simulator and go to Setting to enable larger text (see figure 16.7). Once configured, run the app to have a look. You will see the labels are enlarged.
Adjust the Font Automatically
If you go back to Settings to adjust the preferred font size and reopen the demo app, the size of the font is unchanged. Right now, the size of the font keeps intact once the app is launched.
How can you enable the app to adjust the font size whenever the user changes the preferred font size in Settings?
If you use Interface Builder, select the label and go to the Attributes inspector. Tick the checkbox of the Automatically Adjusts Font option. The label will now adjust its font size automatically.

Alternatively, you can set the adjustsFontForContentSizeCategory property of the label object to true so as to make sure the label responds to the text size changes.
label1.adjustsFontForContentSizeCategory = true
label2.adjustsFontForContentSizeCategory = true
label3.adjustsFontForContentSizeCategory = true
Using Custom Fonts for Text Styles
The default font of any text styles is set to San Francisco, which is the system font of iOS. What if you need to use a custom font? How can you use your own font and take advantage of Dynamic Type at the same time?
In iOS 11 (or up), developers can scale any custom font to work with Dynamic Type by using a new class called UIFontMetrics. Before I explain what UIFontMetrics is and how you use it, let's think about what you need to define when using a custom font (say, Mohave) for Dynamic Type.
Apparently, you have to specify the font size for each of the text styles. Say, the .body text style should have the font size of 15 points, the .headline text style is 18 points, etc.
Remember this is just for the default content size. You will have to provide the font size of these text styles for each of the content size categories. Do you know how many content size categories iOS provides?
Go back to figure 16.7 and do the counting.
If you count it correctly, there are a total of 12 content size categories. Combining with 11 text styles, you will need to set a total of 132 different font sizes (12 content size categories x 11 text styles) in order to support Dynamic Type. That's tedious!
This is where UIFontMetrics comes into play to save you time from defining all these font metrics. Instead of specifying the font metrics by yourself, this new class lets you retrieve the font metrics of a specific text style. You can then reuse those metrics to scale the custom font. Here is a sample usage of scaling a custom font for the text style .title1:
if let customFont = UIFont(name: "Mohave-Italic", size: 28.0) {
    let fontMetrics = UIFontMetrics(forTextStyle: .title1)
    label.font = fontMetrics.scaledFont(for: customFont)
}
You can now modify the viewDidLoad() method to the following code snippet:
override func viewDidLoad() {
    super.viewDidLoad()

    if let customFont1 = UIFont(name: "Mohave-Italic", size: 28.0) {
        let fontMetrics = UIFontMetrics(forTextStyle: .title1)
        label1.font = fontMetrics.scaledFont(for: customFont1)
    }

    if let customFont2 = UIFont(name: "Hallo sans", size: 20.0) {
        let fontMetrics = UIFontMetrics(forTextStyle: .headline)
        label2.font = fontMetrics.scaledFont(for: customFont2)
    }

    if let customFont3 = UIFont(name: "Canter-Light", size: 17.0) {
        let fontMetrics = UIFontMetrics(forTextStyle: .subheadline)
        label3.font = fontMetrics.scaledFont(for: customFont3)
    }

    label1.adjustsFontForContentSizeCategory = true
    label2.adjustsFontForContentSizeCategory = true
    label3.adjustsFontForContentSizeCategory = true

}
This is how you use custom fonts and make it work with Dynamic Type. Run the app to have a quick test. Also, remember to adjust the preferred font size in Settings to see the text size changes.
In the code above, we initialized the custom font object with a default font size. It is up to you to decide the font size at the default content size. However, you can always refer to Apple's default typeface for reference.
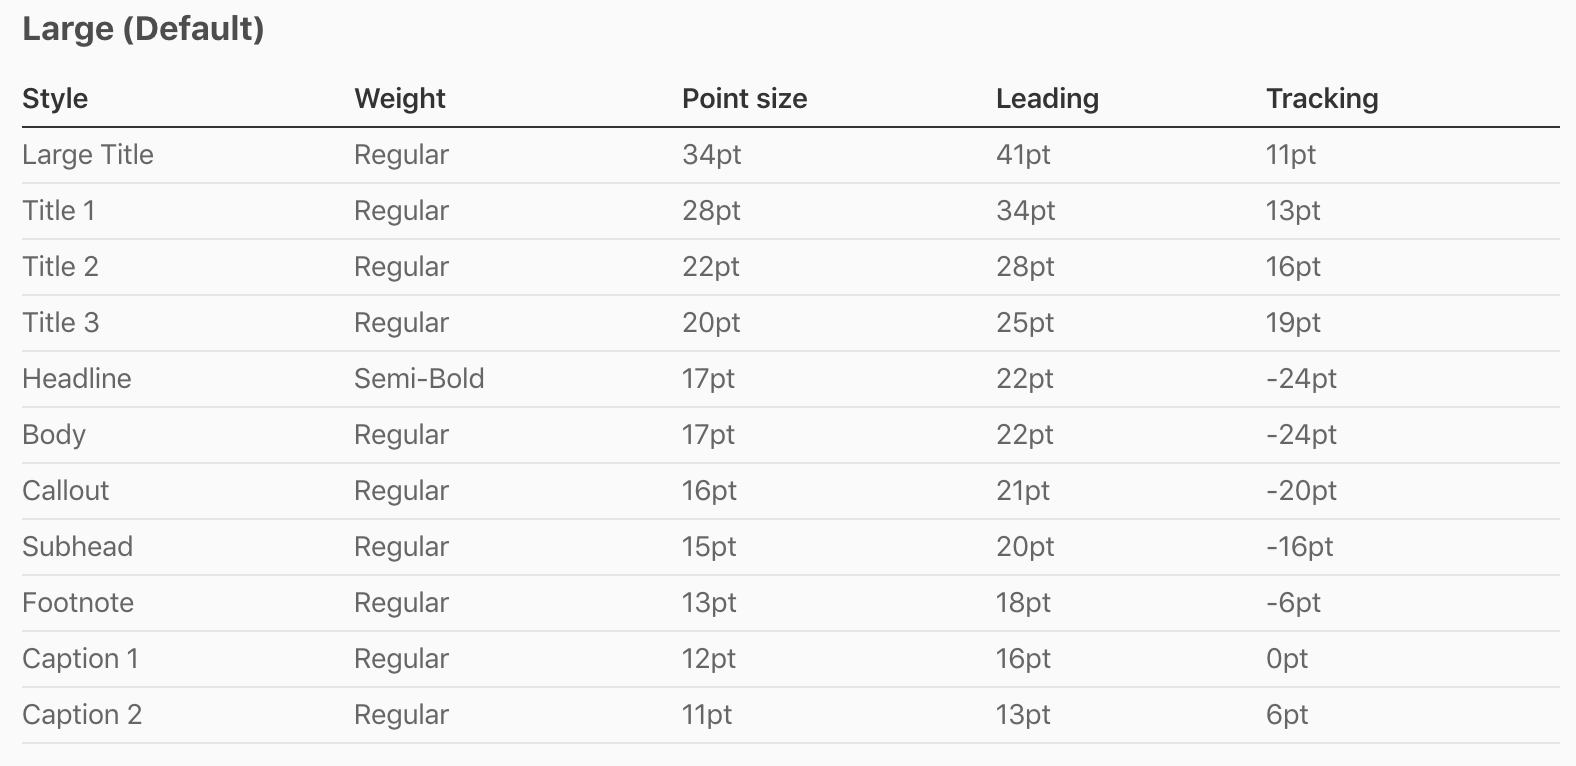
For the San Francisco typeface, Apple published its font metric used for different content size categories in the iOS Human Interface Guidelines. Figure 16.12 shows the font size of all the text styles at the Large content size.
Summary
Apple has put a lot of efforts to encourage developers to use Dynamic Types. With the introduction of UIFontMetrics, you can now easily scale custom fonts and make them work with Dynamic Type. When developing your apps, remember that it will reach a lot of users. Some users may prefer a small text size, some may prefer a large text size for comfortable reading. If your apps haven't utilized Dynamic Type, it is time to add it to your To-Do list.
For reference, you can download the complete project from http://www.appcoda.com/resources/swift55/CustomFont.zip.