- Made by AppCoda
- Contact us / Support
- Tweet this book
- Preface
- 1. Building Adaptive User Interfaces
- 2. Creating Table View Sections and Index list with Diffable Data Source
- 3. Animating Table View Cells
- 4. Working with JSON and Codable
- 5. How to Integrate the Twitter and Facebook SDK for Social Sharing
- 6. Working with Email and Attachments
- 7. Sending SMS and MMS Using MessageUI Framework
- 8. How to Get Direction and Draw Route on Maps
- 9. Search Nearby Points of Interest Using Local Search
- 10. Audio Recording and Playback
- 11. Scan QR Code Using AVFoundation Framework
- 12. Working with URL Schemes
- 13. Building a Full Screen Camera with Gesture-based Controls
- 14. Video Capturing and Playback Using AVKit
- 15. Displaying Banner Ads using Google AdMob
- 16. Working with Custom Fonts
- 17. Working with AirDrop, UIActivityViewController and Uniform Type Identifiers
- 18. Building Grid Layouts Using Collection Views and Diffable Data Source
- 19. Interacting with Collection Views
- 20. Adaptive Collection Views Using UITraitCollection and Compositional Layout
- 21. Building a Weather Widget Using WidgetKit
- 22. Building Slide Out Sidebar Menus Using Objective-C Libraries
- 23. View Controller Transitions and Animations
- 24. Building a Slide Down Menu
- 25. Self Sizing Cells and Dynamic Type
- 26. XML Parsing, RSS and Expandable Table View Cells
- 27. Applying a Blurred Background Using UIVisualEffect
- 28. Using Touch ID and Face ID For Authentication
- 29. Building a Carousel-Like User Interface
- 30. Working with Parse
- 31. Parsing CSV and Preloading a SQLite Database Using Core Data
- 32. Connecting Multiple Annotations with Polylines and Routes
- 33. Using CocoaPods in Swift Projects
- 34. Building a Simple Sticker App
- 35. Building iMessage Apps Using Messages Framework
- 36. Building Custom UI Components Using IBDesignable and IBInspectable
- 37. Using Firebase for User Authentication
- 38. Google and Facebook Authentication Using Firebase
- 39. Using Firebase Database and Storage to Build an Instagram-like App
- 40. Building a Real-time Image Recognition App Using Core ML
- 41. Building AR Apps with ARKit and SpriteKit
- 42. Working with 3D Objects in Augmented Reality Using ARKit and SceneKit
- 43. Use Create ML to Train Your Own Machine Learning Model for Image Recognition
- 44. Building a Sentiment Classifier Using Create ML to Classify User Reviews
- 45. Working with Image Tracking Using ARKit
- Published with GitBook
Chapter 38
Google and Facebook Authentication Using Firebase
Previously, I walked you through how to use Firebase for user authentication with email/password. It is very common nowadays for developers to utilize some federated identity provider credentials such as Google Sign-in and Facebook Login, and let users sign up the app with their own Google/Facebook accounts.
In this chapter, we will see how we can use Firebase Authentication to integrate with Facebook and Google Sign in.
Before diving into the implementation, you probably have a question. Why do we need Firebase Authentication? Why not directly use the Facebook SDK and Google SDK to implement user authentication?
Even if you are going to use Firebase Authentication, it doesn't mean you do not need the Facebook/Google SDK. You still need to install the SDK in your Xcode project. However, with Firebase Authentication, most of the time you interact with the Firebase SDK that you are familiar with. Let me give you an example. This is the code snippet for retrieving the user's display name after login:
if let currentUser = Auth.auth().currentUser {
    nameLabel.text = currentUser.displayName
}
You should be very familiar with the code above if you have read the previous chapter. Now let me ask you. How can you retrieve the user's name for Facebook Login? Probably you will have to go through the Facebook SDK documentation to look up the corresponding API.
Let me tell you if you use Firebase Authentication and perform some integrations with Facebook Login (or Google Sign-in), you can use the same Firebase API (as shown above) to retrieve the user's name from his/her Facebook profile. Does this sound good to you?
This is one of the advantages of using Firebase Authentication to pair with other secure authentication services. And, you can manage all users (whether they use email, Facebook or Google to login) in the same Firebase console.
Prerequisite: You better read Chapter 37 before going through this chapter.Now let's begin to talk about the implementation. The implementation can be divided into three parts. Say, for Facebook Login, here is what we need to do: * **Configure your Facebook app** - to use Facebook login, you need to create a new app on its developer website, and go through some configurations such as App ID and App Secret. * **Set up Facebook Login in Firebase** - as you are going to use Firebase for Facebook Login, you will need to set up your app in Firebase console. * **Integrate Firebase & Facebook SDK into your Xcode project** - after all the configurations, the last step is to write code to implement Facebook Login through both Facebook and Firebase SDK. That looks complicated. I will say the coding part is fairly straightforward, however, it will take you some time to do the configurations and project setup. Okay, let's get started. ### The Demo Project We will use the final project of the demo app that we built in the previous chapter. If you do not have the final project, you can download the starter project from [http://www.appcoda.com/resources/swift55/FirebaseLoginDemo.zip](http://www.appcoda.com/resources/swift55/FirebaseLoginDemo.zip). But please make sure you replace the `GoogleService-Info.plist` file with your own. Please refer to the previous chapter for the detailed procedures. Previously, we implemented the login function of the demo that allows users to sign up and sign in through email/password.
Note: Once you download the starter project, open FirebaseDemo.xcworkspace and change the bundle identifier from com.appcoda.xxx to your own bundle identifier. This is important because this identifier must be unique.
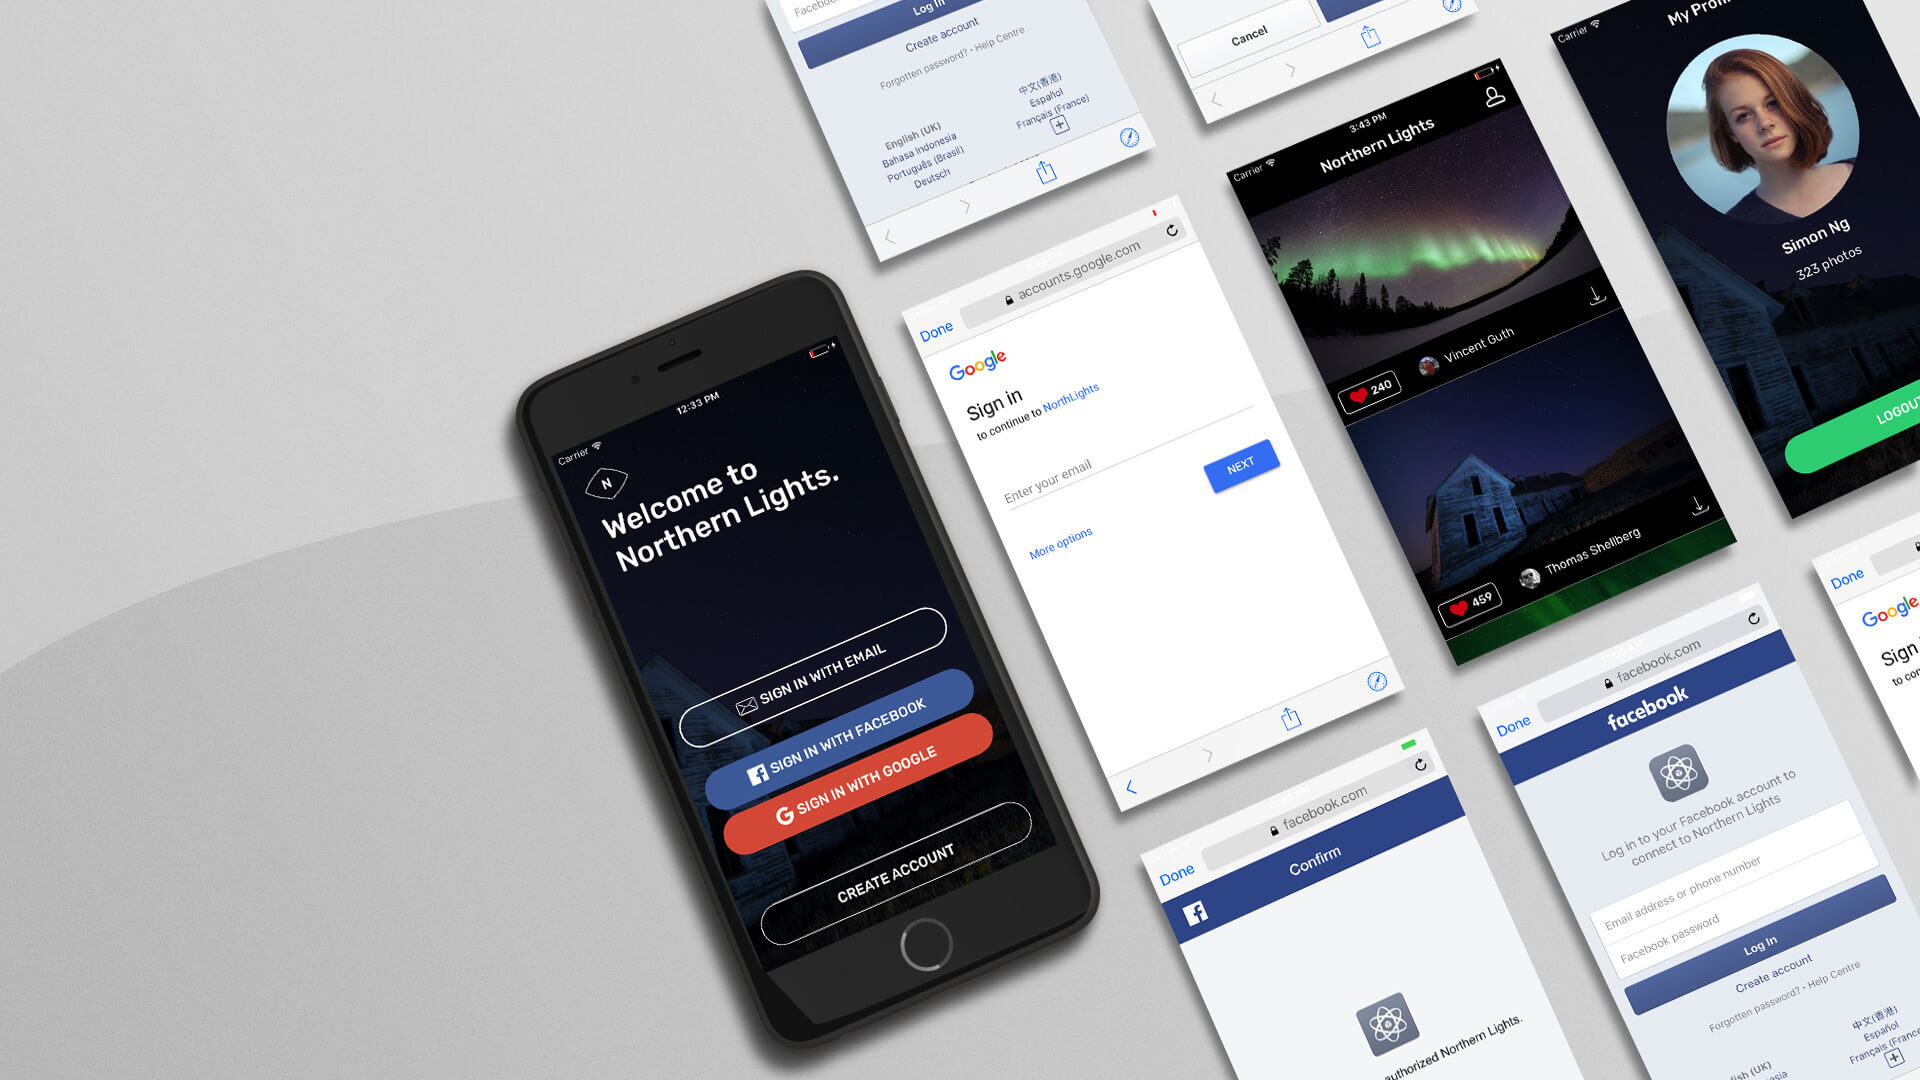
The Facebook and Google Login buttons were left unimplemented. In this chapter, we will make both buttons functional, and provide alternate ways for users to sign in using their own Facebook/Google account.

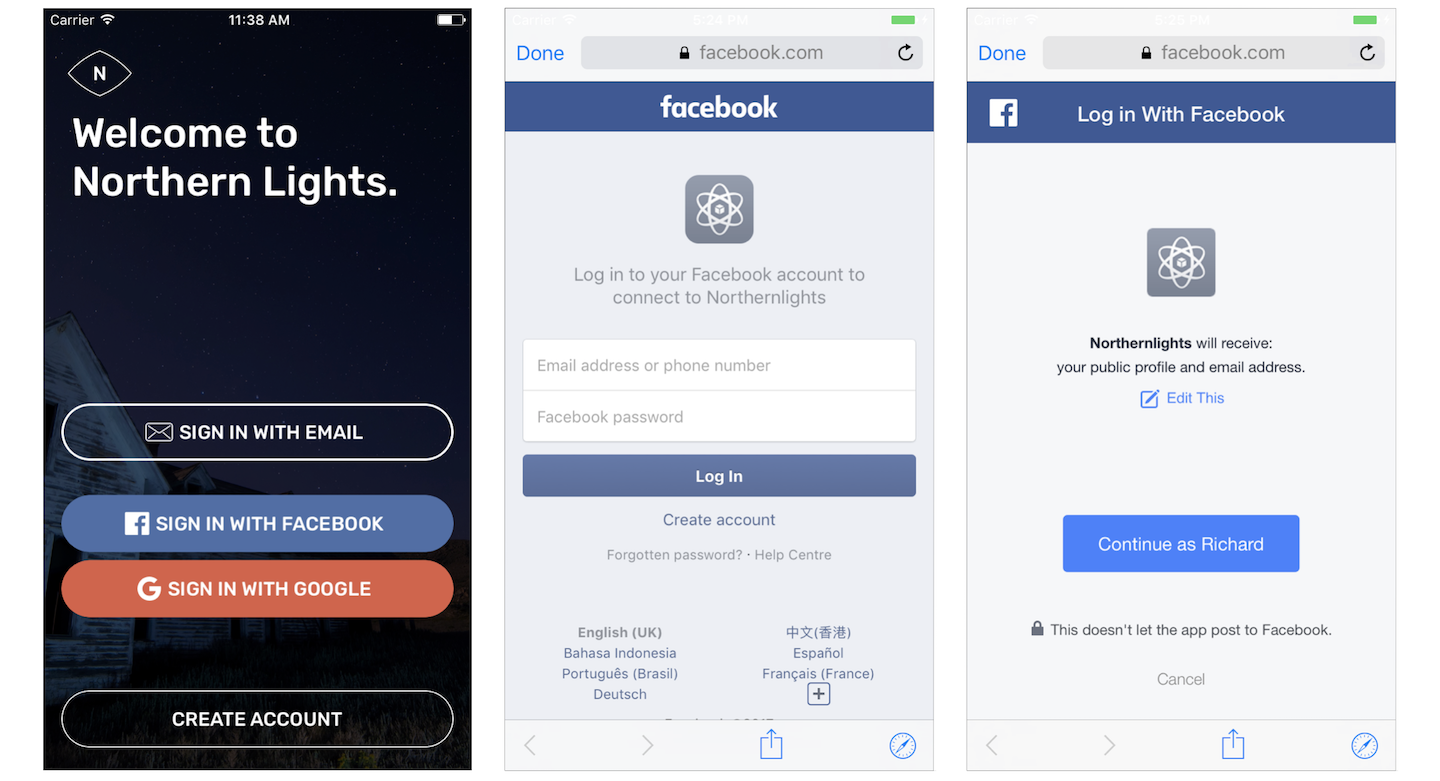
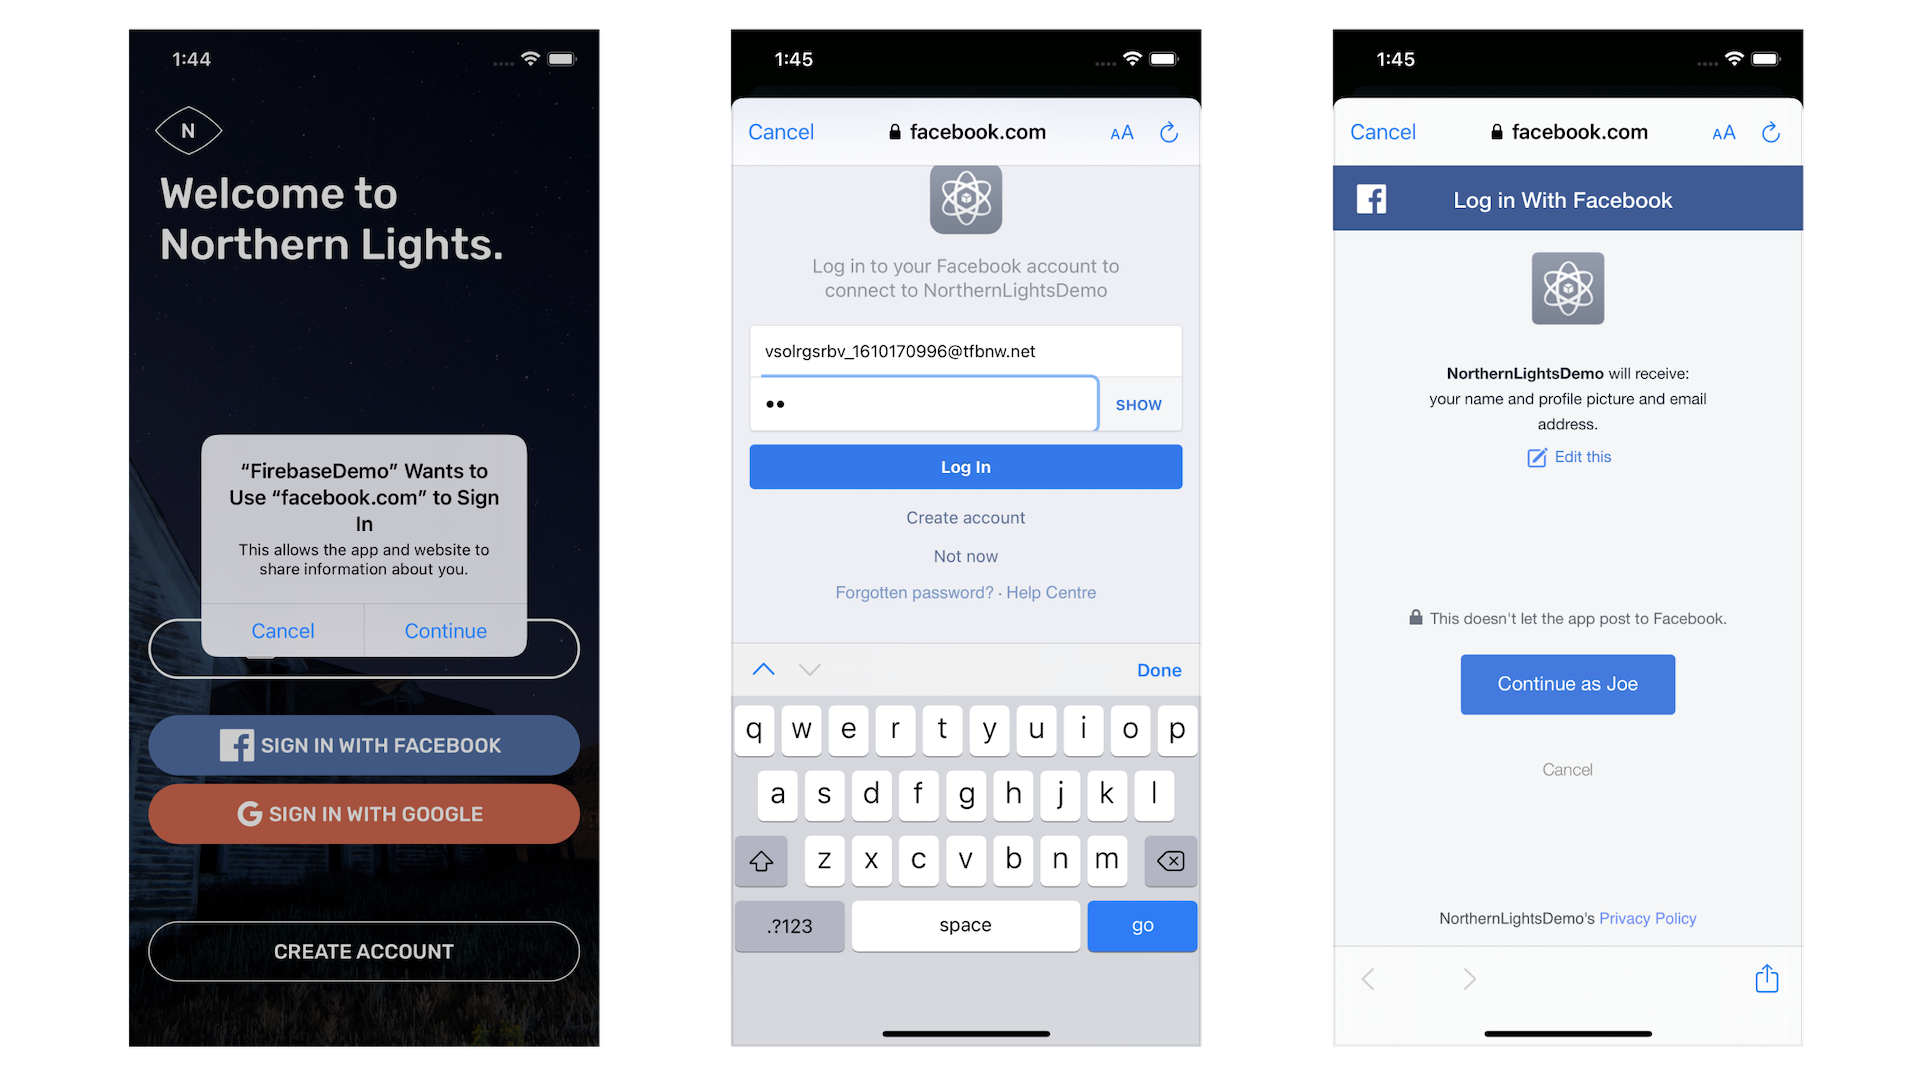
The login process can be very similar to that of email address, and at the same time, quite different from the old-fashioned login approach. Say, when the user taps the Sign in with Facebook button for the first time, the app brings up a login screen for users. The login screen is provided by Facebook, and the user is required to sign in with his/her Facebook account. In addition to that, the user has to grant our app privileges to retrieve his/her email address and public profile (e.g. display name). Facebook usually caches the user's login, so the user does not need to sign in for subsequent login.
Facebook Login
Let's first check out how to implement Facebook Login. In the core section that follows, I will walk you through how to integrate Google Sign In with the demo app.
Setting a New Facebook App
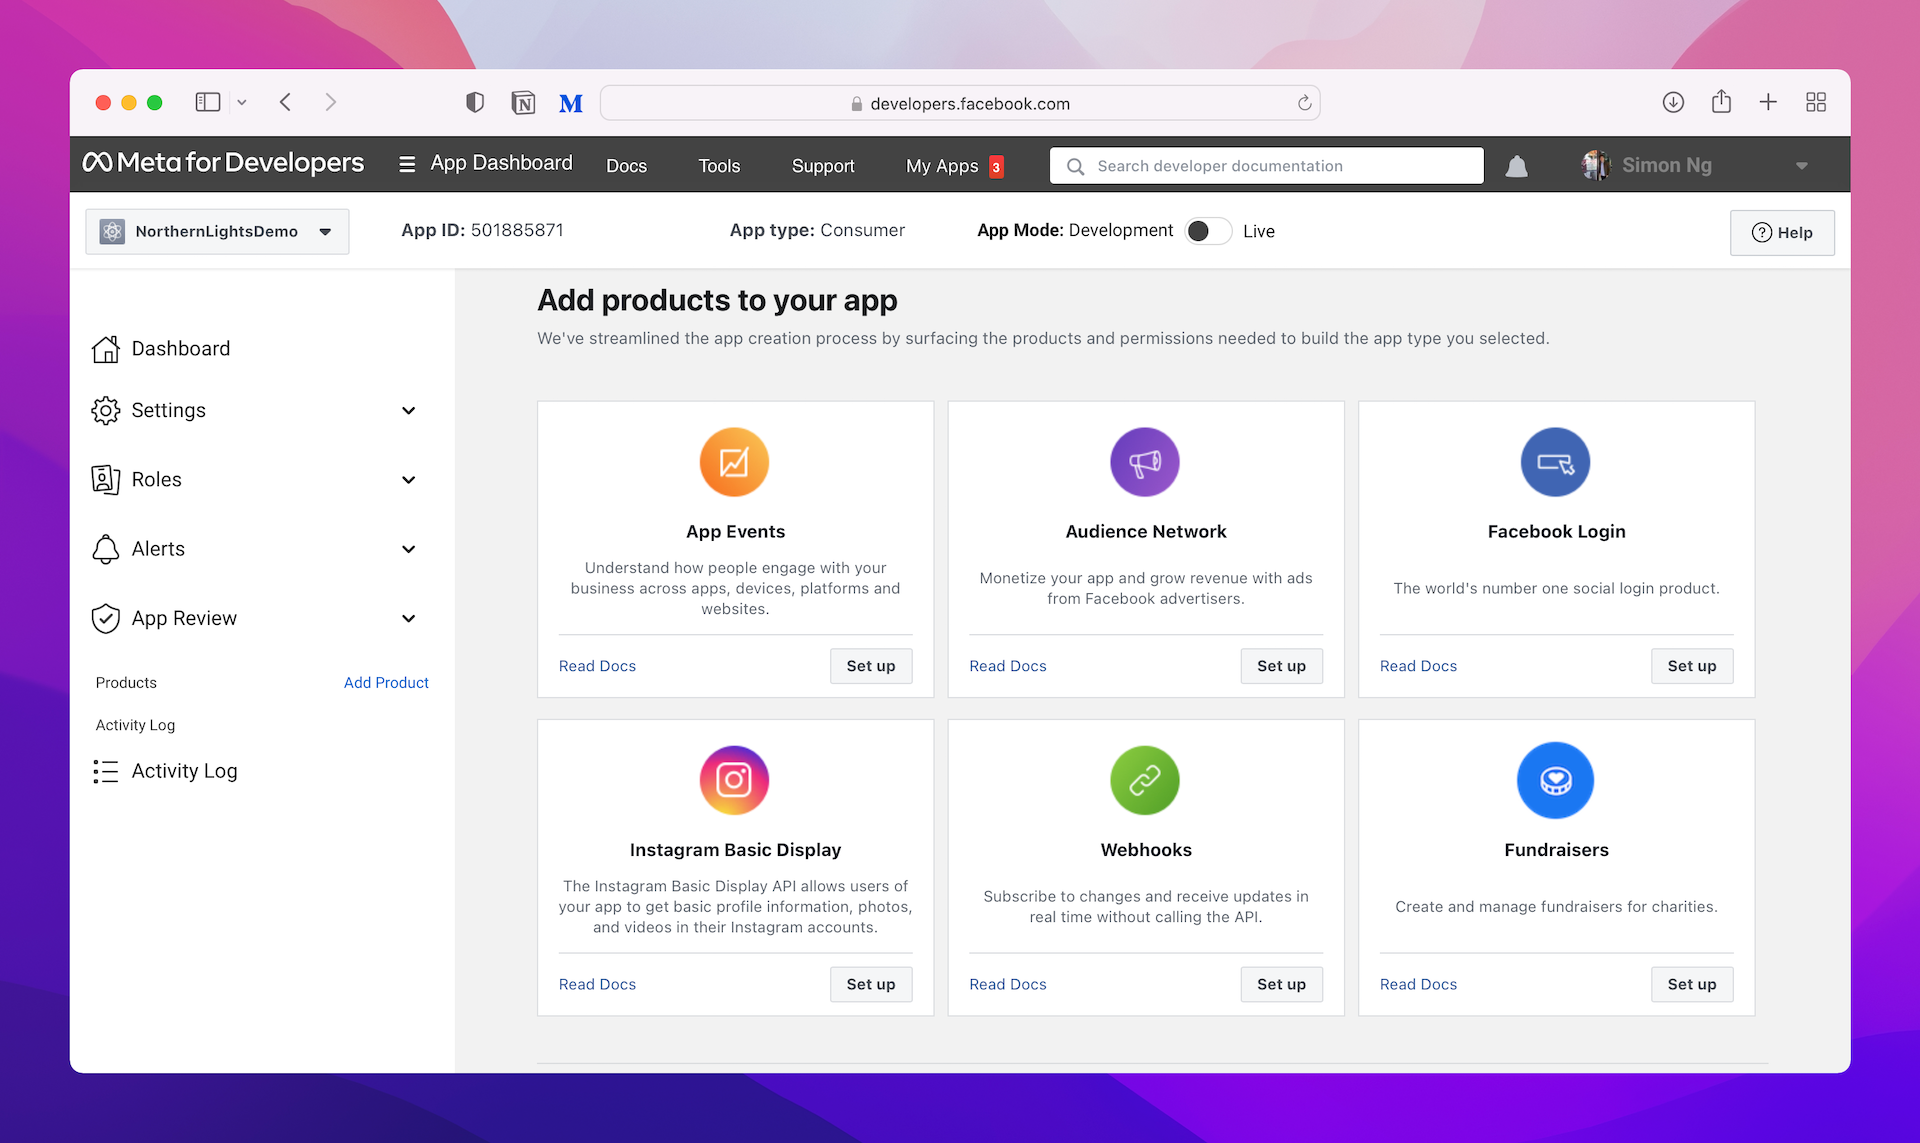
As mentioned before, you will have to go through several configuration procedures. First, we will set up a new Facebook app. Go to Facebook for Developers site (https://developers.facebook.com/), log in with your Facebook account. Click My Apps in the top menu. Then click the Create App button and choose Consumer. I set the name to NorthernLightsDemo.
You will then be brought to a dashboard that you can configure Facebook Login.
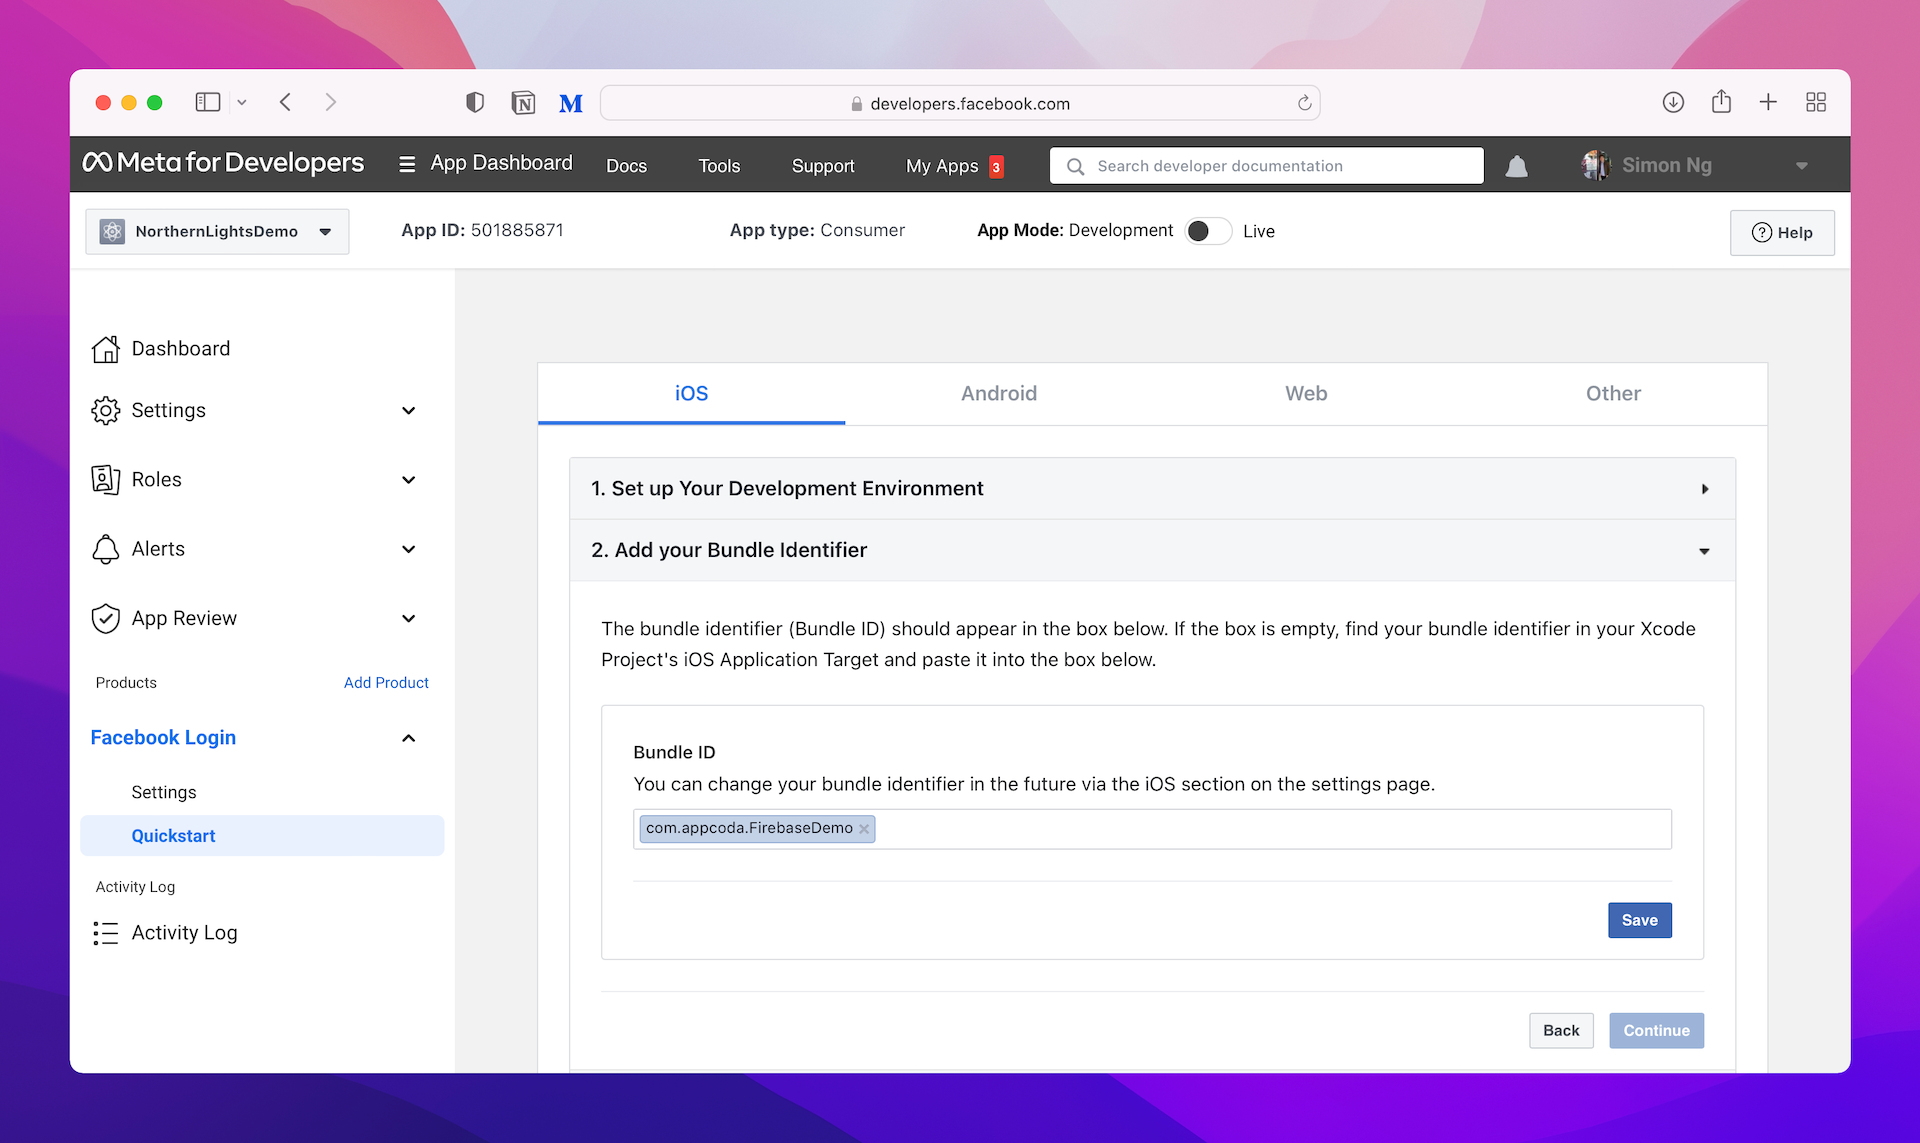
Now click Setup of the Facebook Login option. Choose iOS and Facebook will guide you through the integration process. We will use Swift Package Manager to install the SDK. Therefore, choose SDK: Swift Package Manager in step 1. Click Next to proceed to the next step. In step 2 of the configuration, you're required to provide the bundle ID of your project. Set it to the bundle ID you configured earlier and hit Save to save the change.
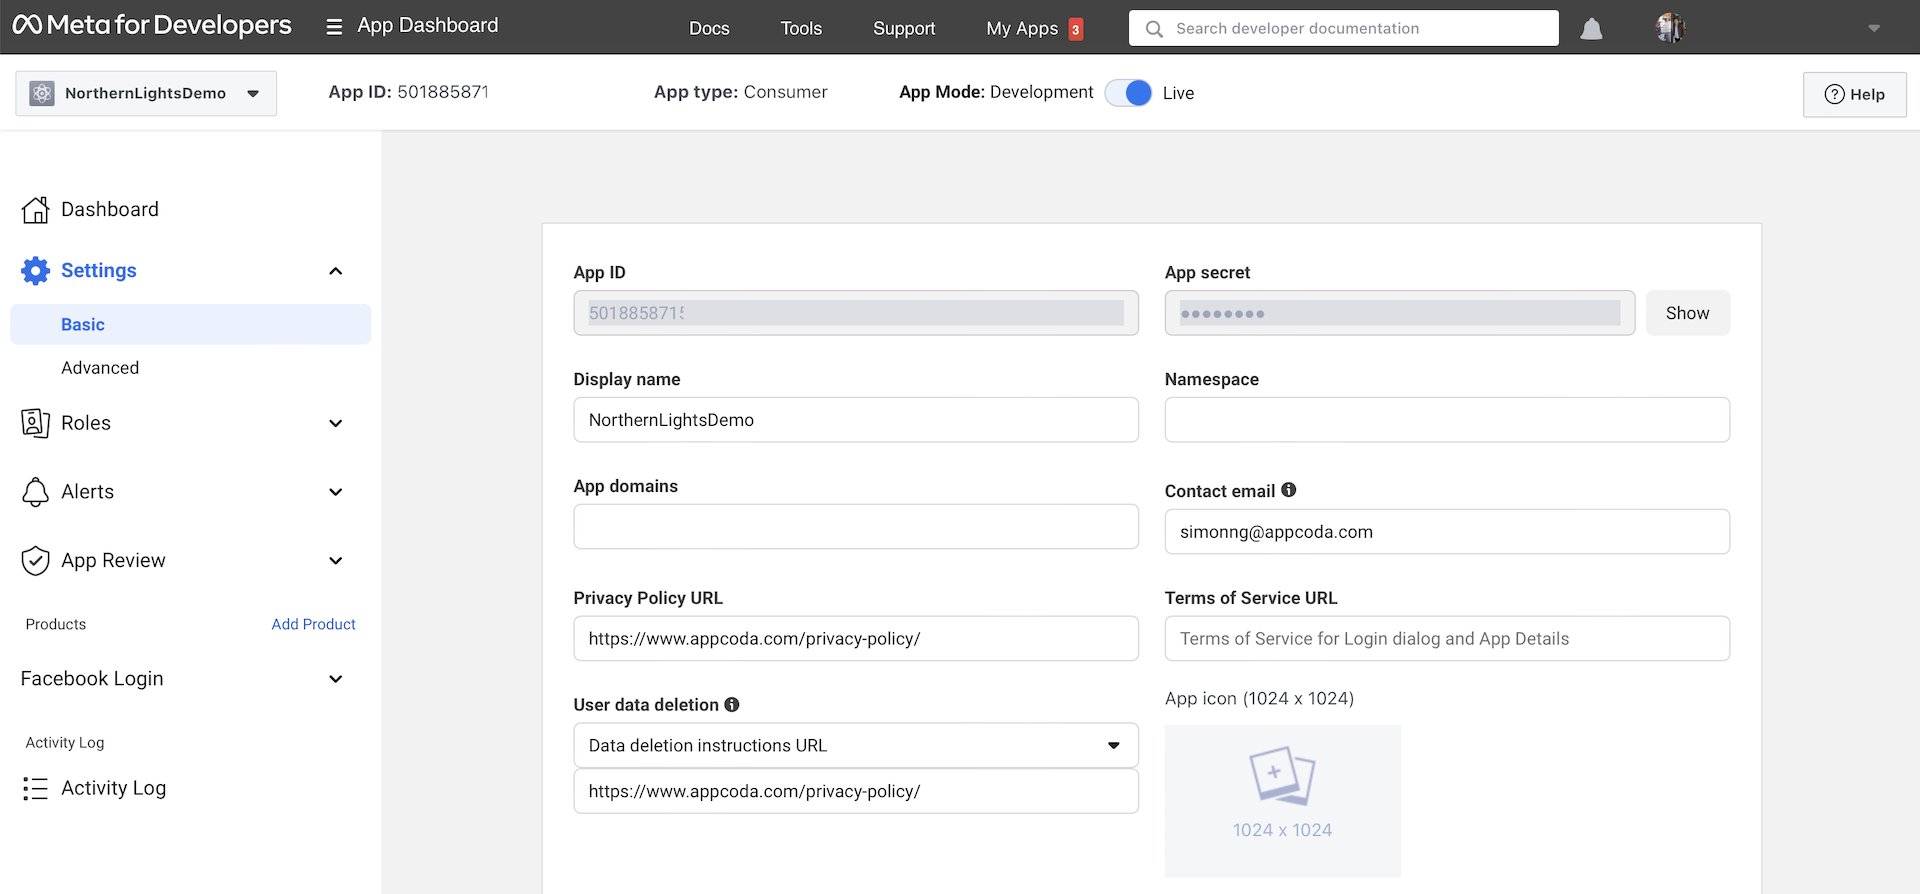
That's it. You can skip the rest of the procedures. If you want to verify the bundle ID setting, click Settings > Basic in the side menu. You should see a section about iOS that shows the bundle ID.
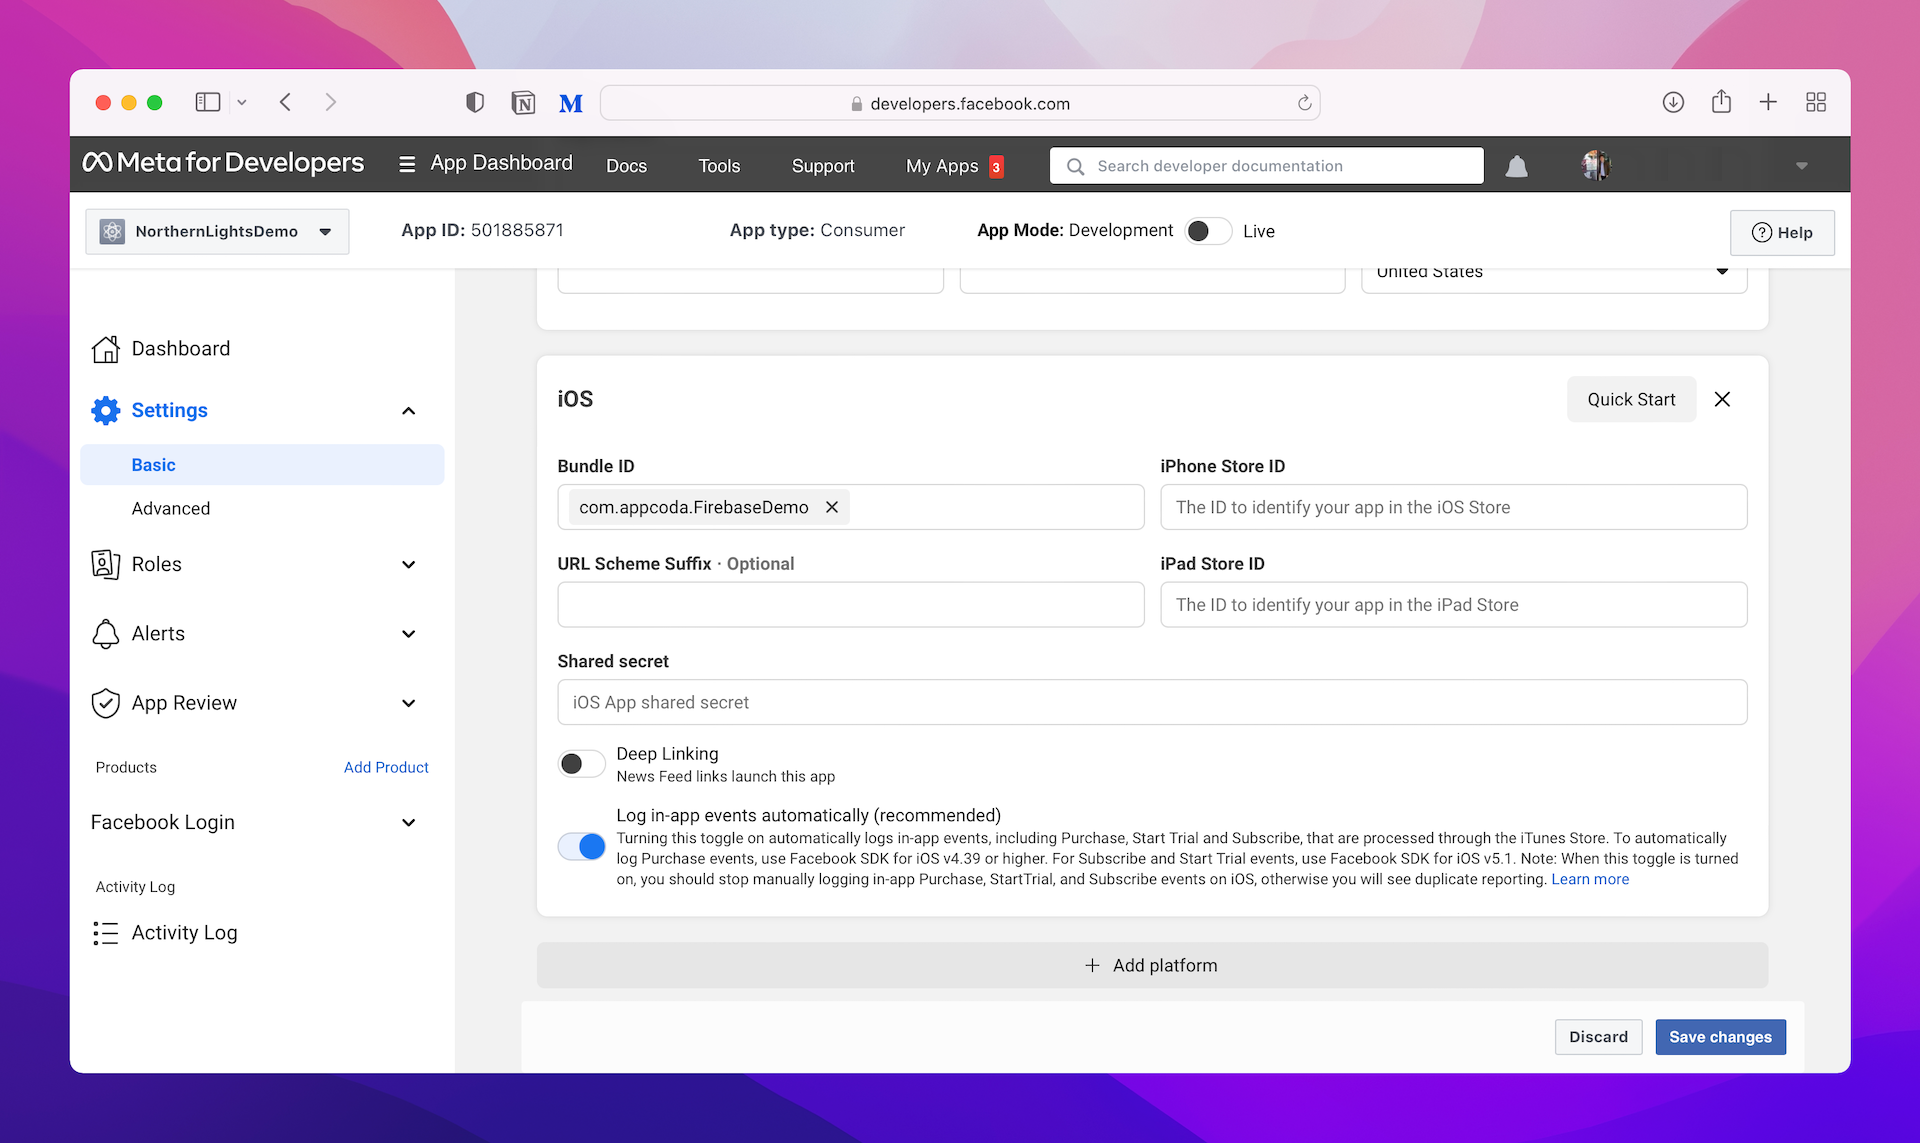
At the beginning of the Settings screen, you should find your App ID and App Secret. By default, App Secret is masked. You can click the Show button to reveal it. We need these two pieces of information for Firebase configuration.
Configuring Facebook Login in Firebase
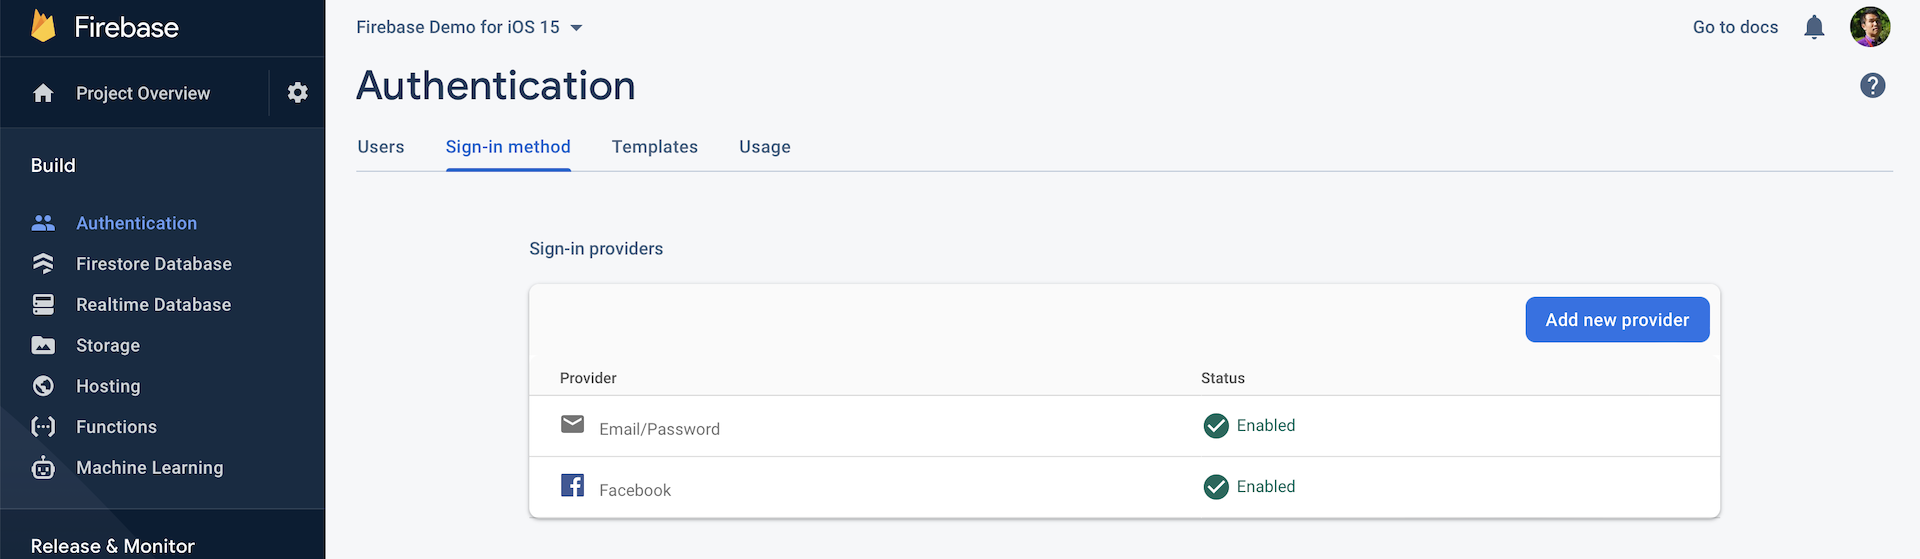
Now head back to the Firebase console (https://console.firebase.google.com) and select the app you created in the previous chapter (e.g. Northern Lights). In the side menu, choose Authentication and then select Sign-in Method.
Note: If you haven't created an app in Firebase, please refer to the previous chapter for procedures.Click the Add new provider button and choose Facebook. Flip the switch to Enable. You have to fill in two options here: App ID and App Secret. These are the values you revealed in the settings of your Facebook app. Fill them in accordingly and hit
Save to save the changes.
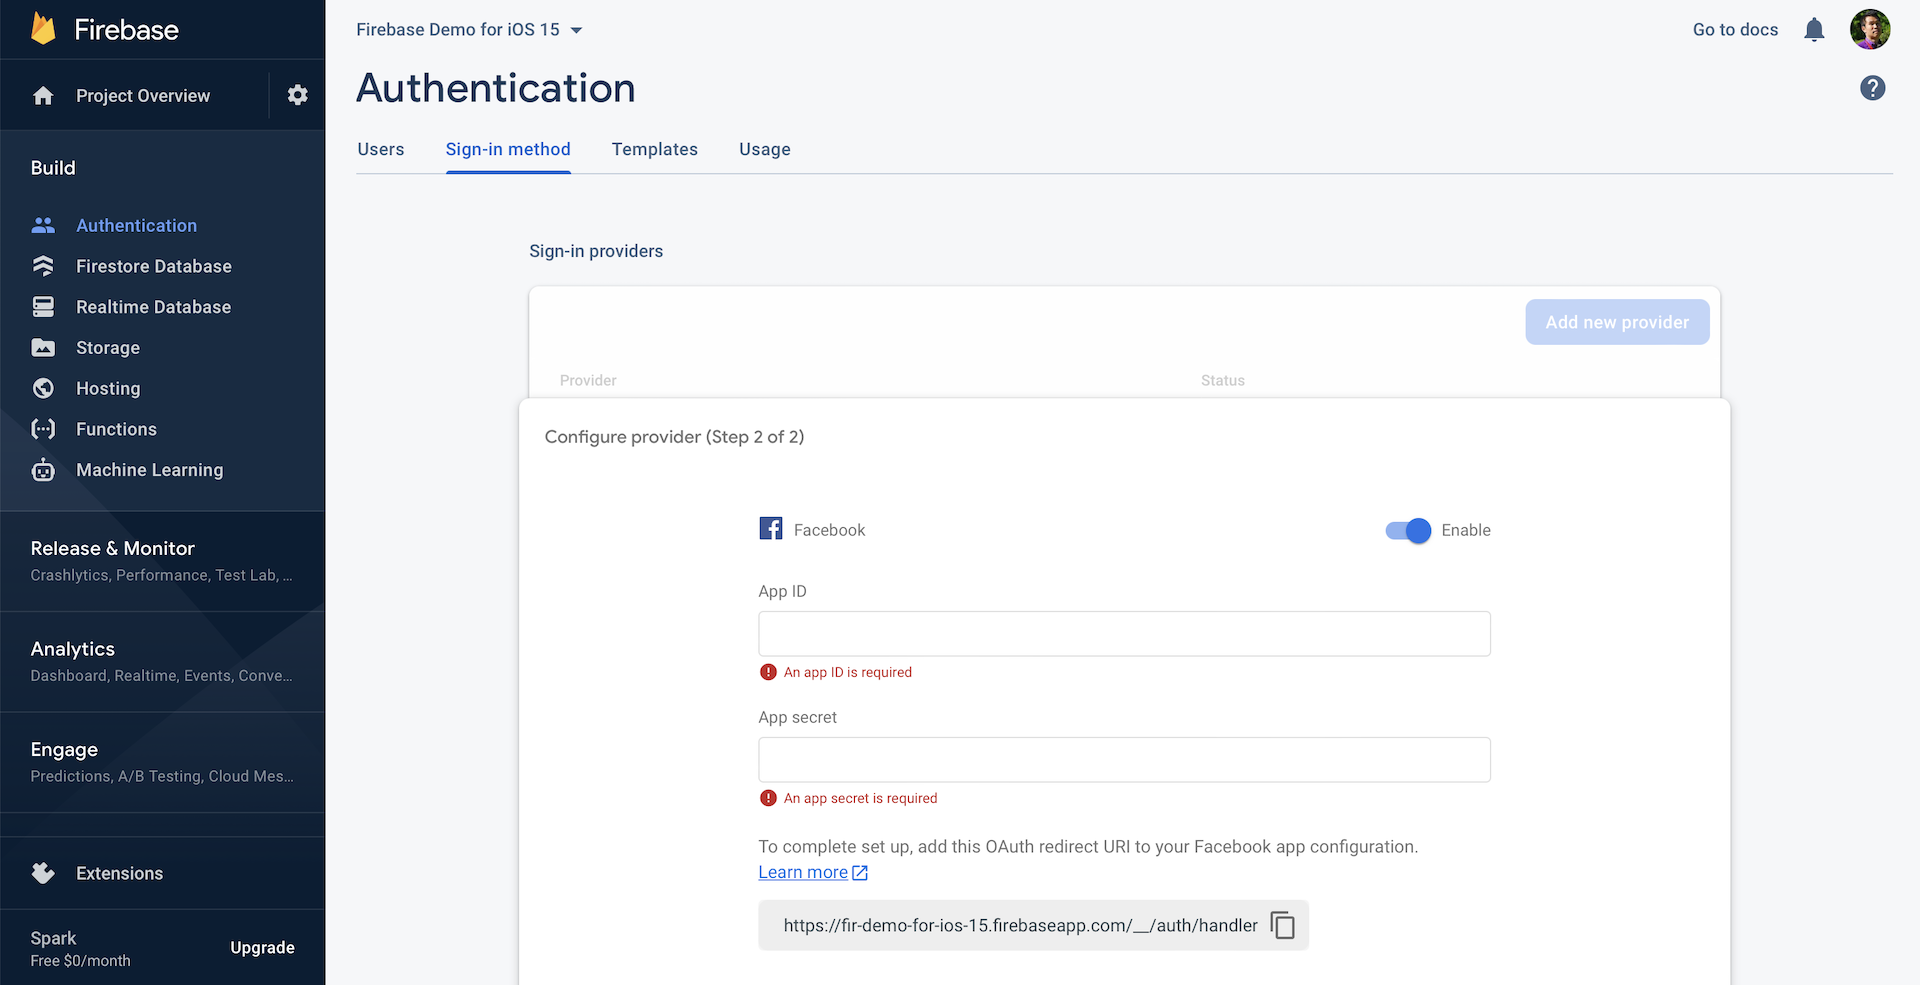
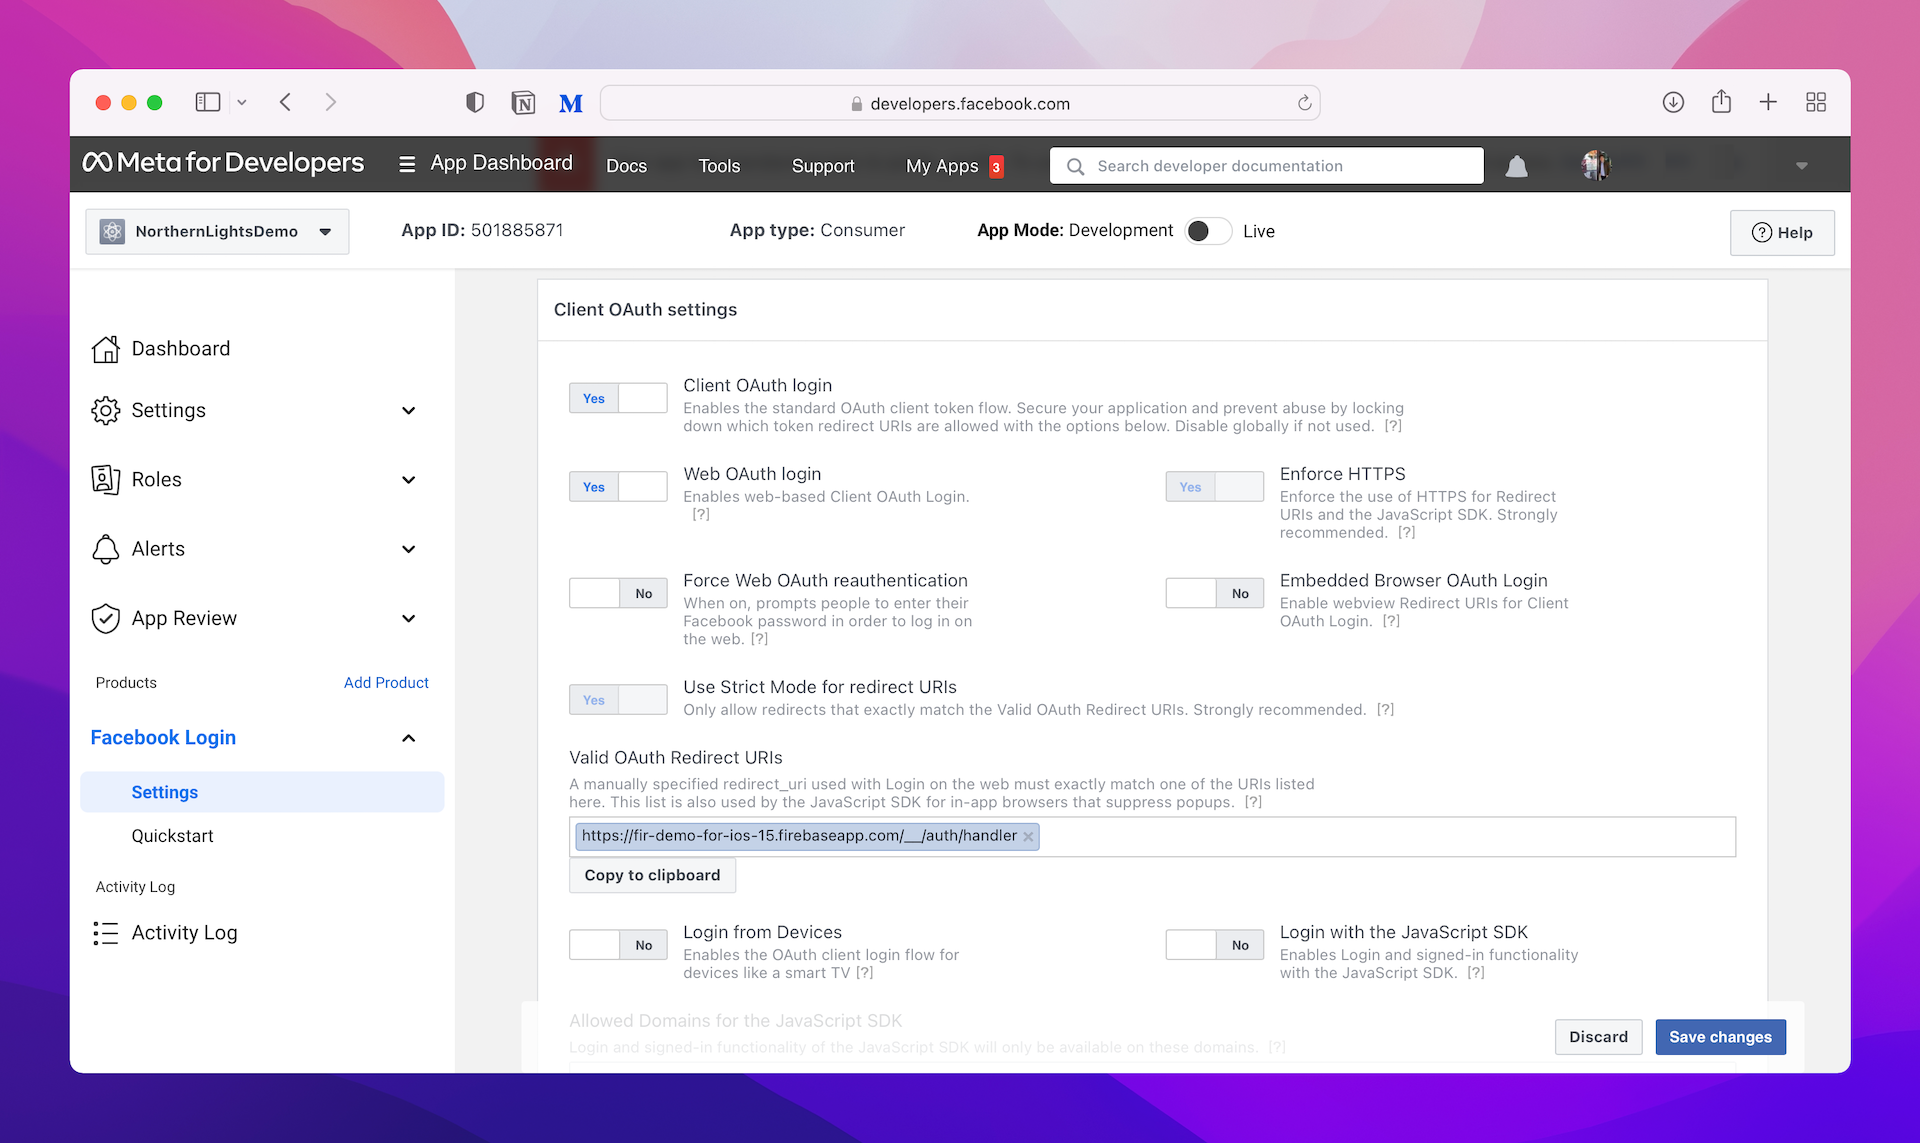
You may notice the OAuth redirect URI. Google APIs use the OAuth 2.0 protocol for authentication and authorization. After a user logs in with his/her Facebook account and grants the access permissions, Facebook will inform Firebase through a callback URL. Here, the OAuth redirect URI is the URL.
You have to copy this URI and add it to your Facebook app configuration. Now go back to your Faecebook app. Under Facebook Login in the side menu, choose Settings. Make sure you paste the URI that you copied earlier in the Valid OAuth redirect URIs field. Hit Save Changes to save the settings.
Great! You have completed the configuration of both your Facebook app and Firebase.
Setting Up the Project with Firebase and Facebook SDK
In the previous chapter, we used Swift Package Manager to install the Firebase SDK. Similarly, you can use the same approach to add the Facebook SDK to the project. Assuming you've opened the Xcode project, go up to Xcode menu and click File > Add Packages.... Type the following repository URL in the search bar:
https://github.com/facebook/facebook-ios-sdk
Make sure you choose the Up to Next Major Version option and set to the latest version (i.e. 12.3.2), and then click Add Package. It'll take some time for Xcode to retrieve the packages.

When it's prompted, select both FacebookCore and FacebookLogin packages. If everything goes smoothly, Swift Package Manager should download the specified SDKs and bundle them in the Xcode project.
Configuring the Xcode Project
There is one more configuration before we dive into the Swift code. Open FirebaseDemo.xcworkspace. In project navigator, right click the Info.plist file and choose Open as > Source code. This will open the file, which is actually an XML file, in text format.
Insert the following XML snippet before the </dict> tag:
<key>CFBundleURLTypes</key>
<array>
  <dict>
  <key>CFBundleURLSchemes</key>
  <array>
    <string>501885871552163</string>
  </array>
  </dict>
</array>
<key>FacebookAppID</key>
<string>fb501885871552163</string>
<key>FacebookClientToken</key>
<string>7c5dab98fd63fd5187997d25823cf615</string>
<key>FacebookDisplayName</key>
<string>Norther Light Demo (iOS 15)</string>
<key>LSApplicationQueriesSchemes</key>
<array>
  <string>fbapi</string>
  <string>fb-messenger-share-api</string>
</array>
The snippet above is my own configuration. Yours should be different from mine, so please make the following changes:
- Change the value of FacebookAppID to your own ID. It should be prefixed with "fb".
- Change the App ID (
501885871552163) to your own ID. You can reveal this ID in the dashboard of your Facebook app. - Change
7c5dab98fd63fd5187997d25823cf615to your own client token. You can find the value under Settings > Advanced > Client Token in your App Dashboard. - Change the display name of the app (i.e. Northern Lights) to your own name.
The Facebook APIs will read the configuration in Info.plist for connecting your Facebook app and managing the Facebook Login. You have to ensure the App ID matches the one you created in the earlier section.
The LSApplicationQueriesSchemes key specifies the URL schemes your app can use with the canOpenURL: method of the UIApplication class. If the user has the official Facebook app installed, it may switch to the app for login purpose. In such case, it is required to declare the required URL schemes in this key, so that Facebook can properly perform the app switch.
Diving into the Swift Code
Finally, after all the cumbersome configurations, it is time to discuss the Swift code. Now open AppDelegate.swift and insert the following import statement:
import FacebookCore
In the application(_:didFinishLaunchingWithOptions:) method, insert a line of code to configure Facebook Login:
ApplicationDelegate.shared.application(application, didFinishLaunchingWithOptions: launchOptions)
In the same class, add the following method:
func application(_ app: UIApplication, open url: URL, options: [UIApplication.OpenURLOptionsKey : Any] = [:]) -> Bool {

    ApplicationDelegate.shared.application(
                app,
                open: url,
                sourceApplication: options[UIApplication.OpenURLOptionsKey.sourceApplication] as? String,
                annotation: options[UIApplication.OpenURLOptionsKey.annotation]
            )
}
What is the code above for? ApplicationDelegate is designed for post processing results from Facebook Login (e.g. switching over to the native Facebook app) or Facebook Dialogs (similar to the web interface of Facebook). It is required to call the application method in order to properly use the Facebook SDK in the application(_:didFinishLaunchingWithOptions:) method.
As mentioned before, the Facebook Login process can happen like this:
- The user taps the Sign in with Facebook button.
- Assuming that the user has the native Facebook app installed, the app will switch to the Facebook app to ask for the user's permission.
- After the user's approval, the Facebook app will switch back to our app, passing us the user's credential, and continue the login process.
When the Facebook app switches back to our app, the application(_:open:options:) method will be invoked. So we have to implement the method to handle the Facebook Login. To properly handle the login, it is required by Facebook to call the application method of ApplicationDelegate:
ApplicationDelegate.shared.application(app, open: url, options: options)
In case that your app uses SceneDelegate.swift, you also need to update the method like this:
func scene(_ scene: UIScene, openURLContexts URLContexts: Set<UIOpenURLContext>) {
    guard let url = URLContexts.first?.url else {
        return
    }

    ApplicationDelegate.shared.application(
        UIApplication.shared,
        open: url,
        sourceApplication: nil,
        annotation: [UIApplication.OpenURLOptionsKey.annotation]
    )
}
Now open to WelcomeViewController.swift. This is the view controller of the Welcome screen that shows the Facebook Login button. In the WelcomeViewController class, first add a couple of import statements to import the required SDK:
import FacebookLogin
import Firebase
Then insert an action method for handling Facebook Login:
@IBAction func facebookLogin(sender: UIButton) {
    let fbLoginManager = LoginManager()
    fbLoginManager.logIn(permissions: ["public_profile", "email"], from: self) { (result, error) in
        if let error = error {
            print("Failed to login: \(error.localizedDescription)")
            return
        }

        guard let accessToken = AccessToken.current else {
            print("Failed to get access token")
            return
        }

        let credential = FacebookAuthProvider.credential(withAccessToken: accessToken.tokenString)

        // Perform login by calling Firebase APIs
        Auth.auth().signIn(with: credential, completion: { (result, error) in
            if let error = error {
                print("Login error: \(error.localizedDescription)")
                let alertController = UIAlertController(title: "Login Error", message: error.localizedDescription, preferredStyle: .alert)
                let okayAction = UIAlertAction(title: "OK", style: .cancel, handler: nil)
                alertController.addAction(okayAction)
                self.present(alertController, animated: true, completion: nil)

                return
            }

            // Present the main view
            if let viewController = self.storyboard?.instantiateViewController(withIdentifier: "MainView") {
                UIApplication.shared.keyWindow?.rootViewController = viewController
                self.dismiss(animated: true, completion: nil)
            }

        })

    }
}
If you've read the previous chapter, it is pretty similar to the code we use when implementing email/password authentication, except the code related to LoginManager. The LoginManager class provides methods for logging a user in and out. For login, you can call the logIn method and specify the read permission you want to ask for. Since we need the email address and the display name of the user, we will ask the user for the read permission of public_profile and email.
After the user signs in with Facebook, whether he/she grants our app permission or not, the complete handler will be called. Here we first check if there is any error. If not, we proceed to retrieve the access token for the user and convert it to a Firebase credential by calling:
FacebookAuthProvider.credential(withAccessToken: accessToken.tokenString)
You should be very familiar with the rest of the code. We call the signIn method of Auth with the Facebook credential. If there is any error, we present an error dialog. Otherwise, we display the home screen and dismiss the current view controller.
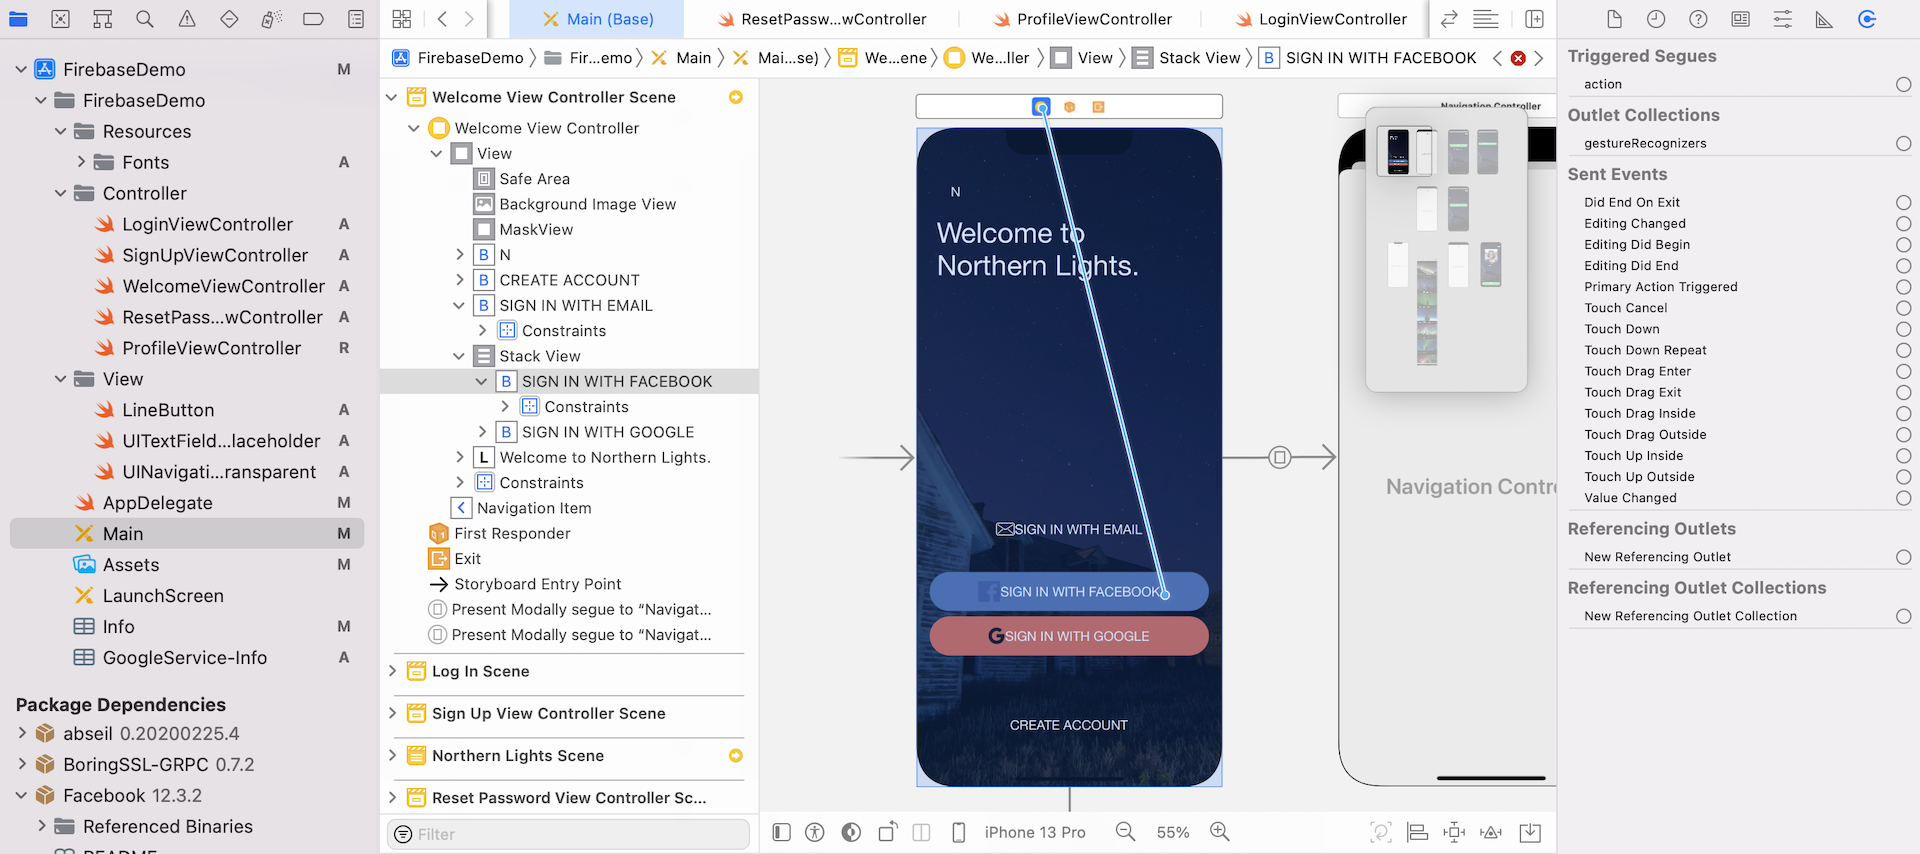
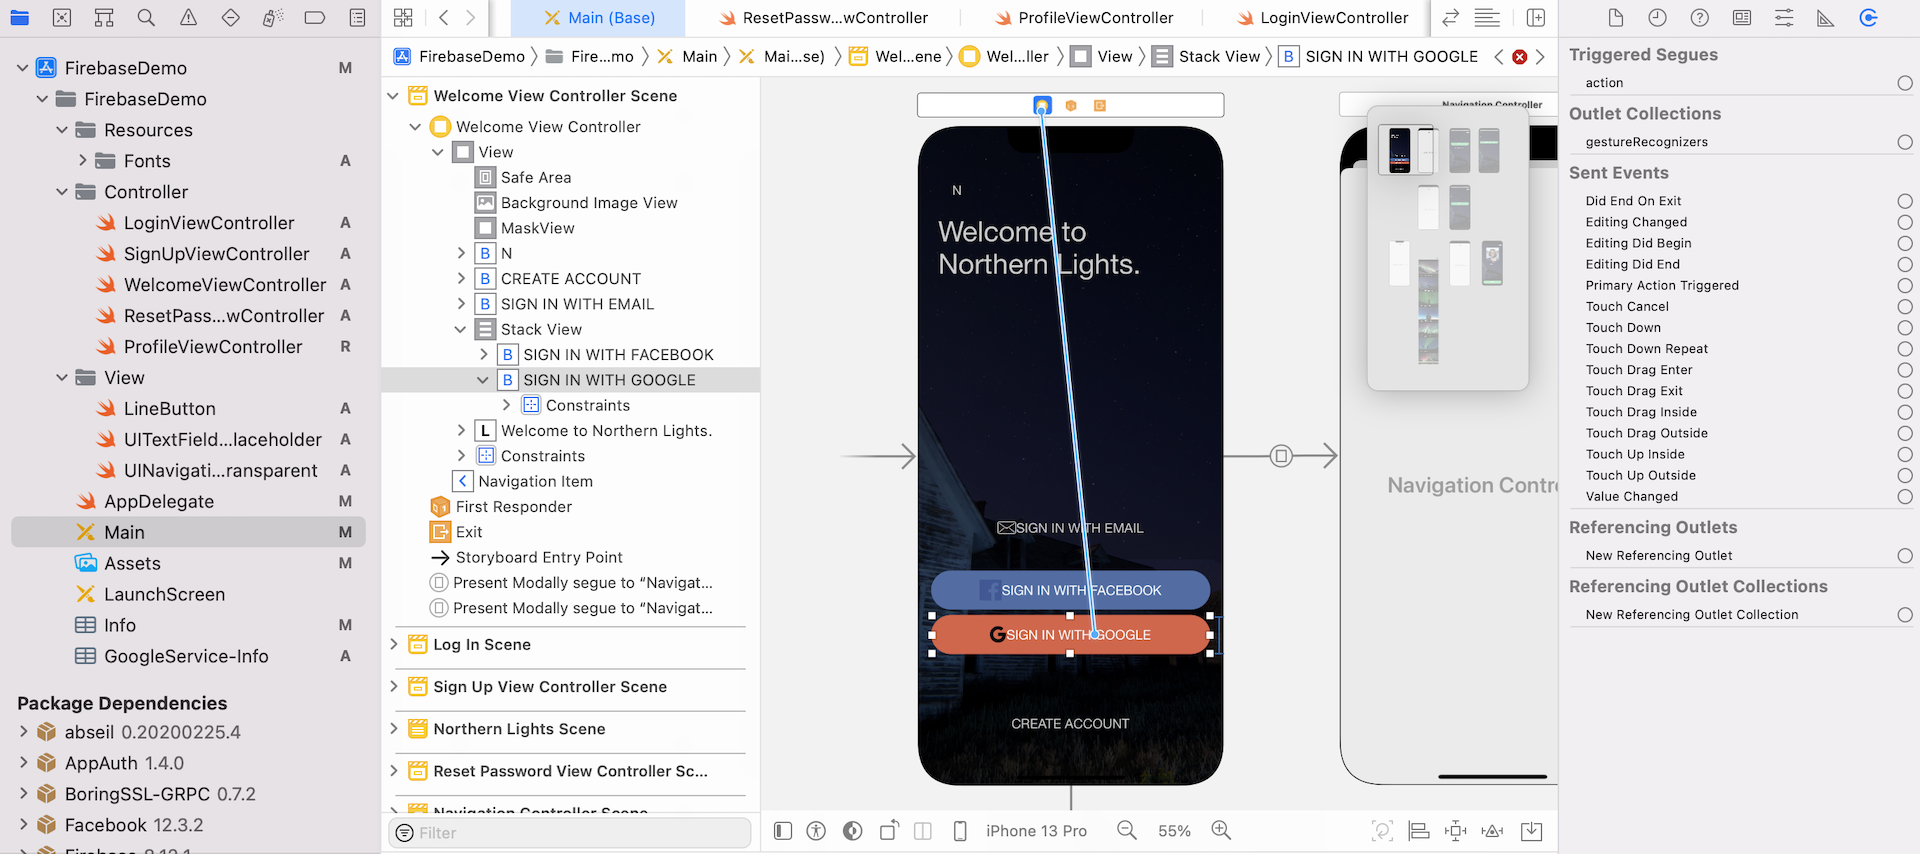
Now switch to the Main storyboard and choose the Welcome View Controller Scene. Control drag from the Sign In With Facebook button to the view controller icon of the dock. Release the buttons and select facebookLoginWithSender: in the popover menu to connect the action method.
Setting Up Test Accounts
It's time to test the app. If you tap the Sign In with Facebook button, you should see the login screen of Facebook. However, your Facebook app that you configured earlier is still in development mode. If you log into the app with your own Facebook account, you will see an error:
App Not Setup: This app is still in development mode, and you don't have access to it. Switch to a registered test user or ask an app admin for permissions.
Now you have two options to test the app:
- Switch your Facebook app to production mode - you can change your Facebook app from development mode to production in the developer dashboard.
- Create a test user (or multiple test accounts) for testing purpose - Facebook allows developers to create a test account to perform testing when the Facebook app is in development mode.
During the development stage of an app, and especially when authentication is involved in it, it's generally a bad habit to use your normal account to perform all the required testings. Therefore, we will first opt for option 2.
Now go back to the Facebook Developer dashboard (https://developers.facebook.com/apps) and select NorthernLightsDemo. In the side bar menu, choose Roles > Test Users.
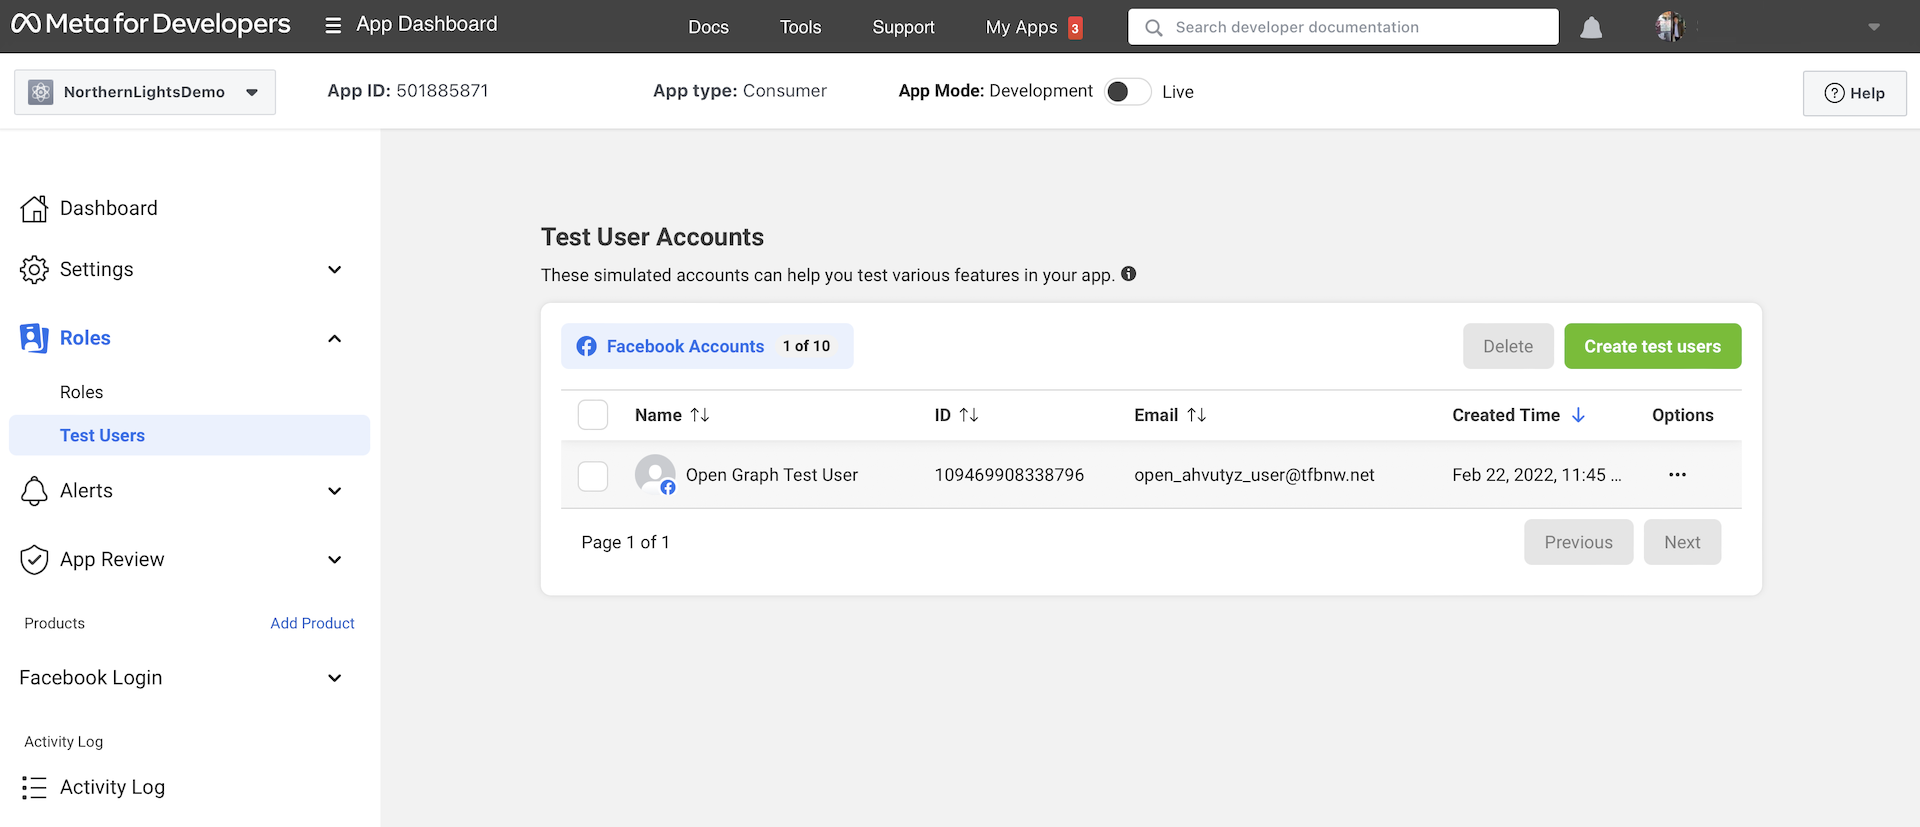
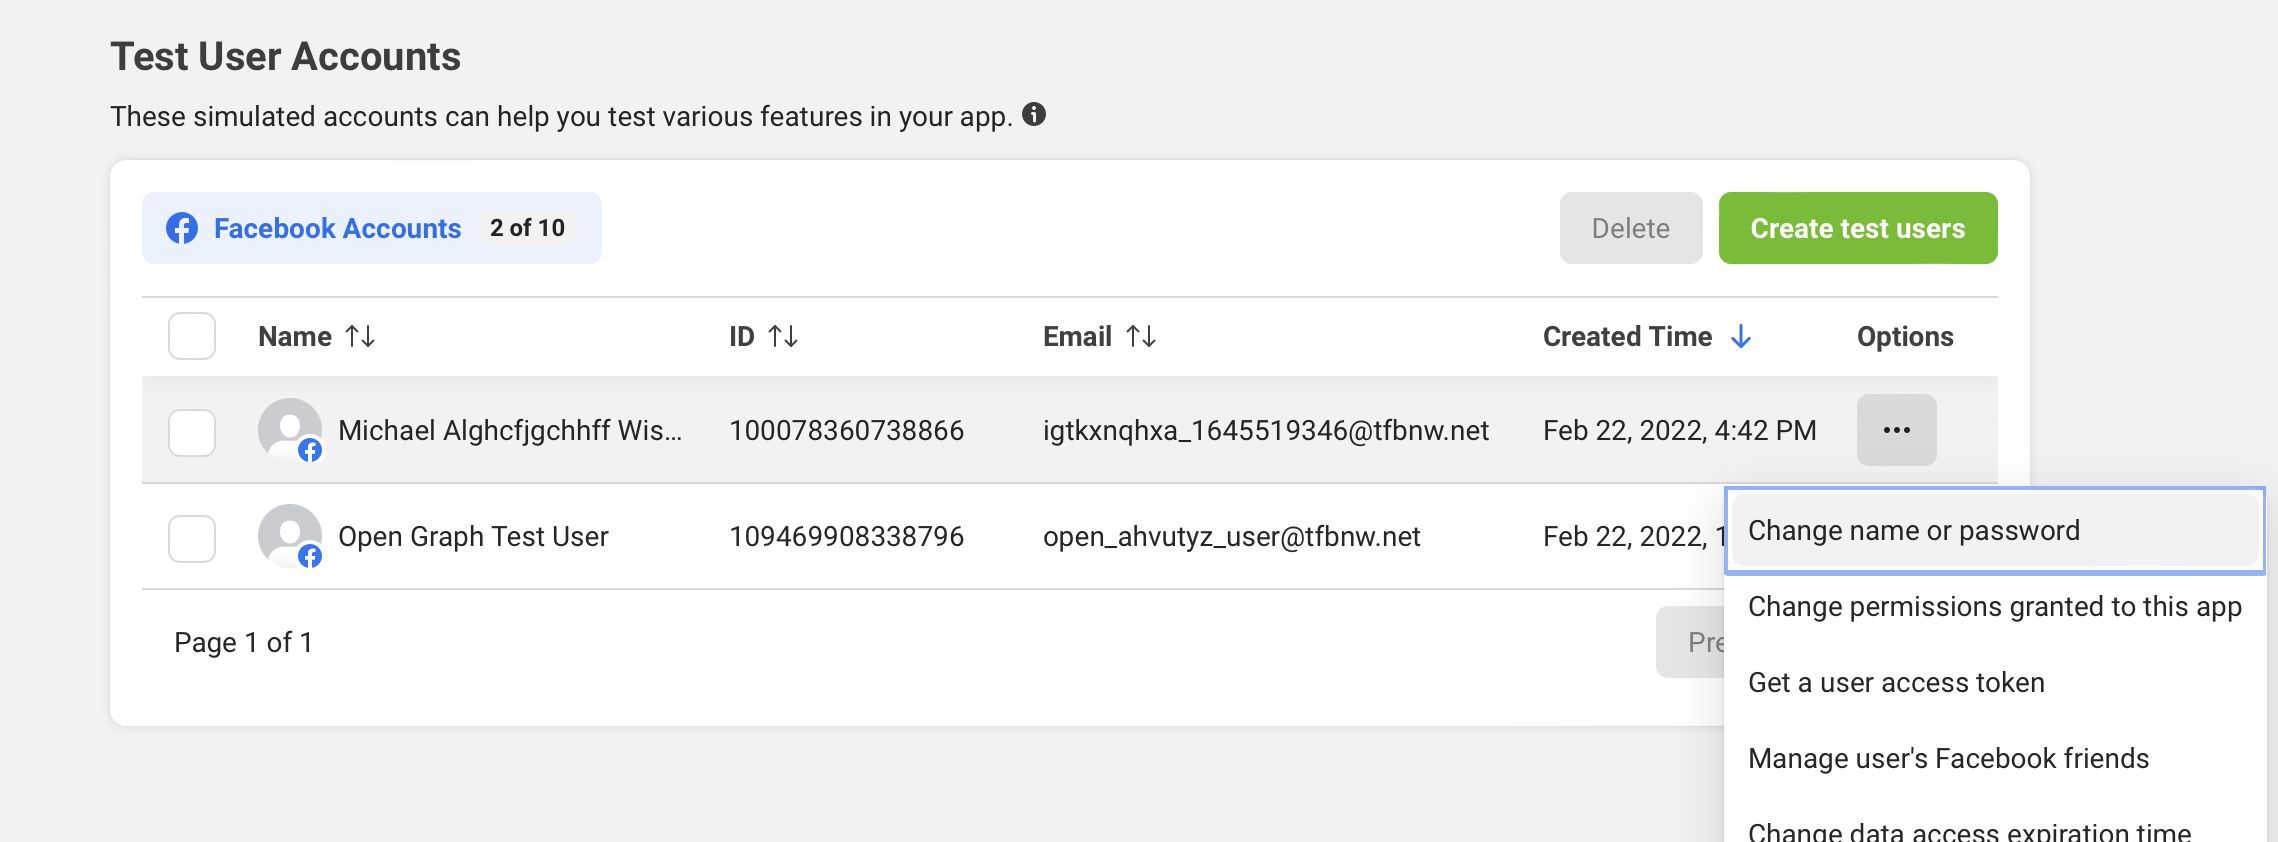
Here you can click the Create test users button to add a new test user. In the popover menu, set the number of test users to 1 and then hit the Create Test Users button. Facebook will then generate a test user with random name and email address. Click the ... button next to the new test user and select Change the name or password for this test user to modify its password.
Testing Facebook Login
Great! You are now ready to test the app. Run the app and select Sign In with Facebook when it launches. Log in with the test account you just created. If everything goes smoothly, you should be able to access the home screen.
Facebook will cache your login status. So next time, you no longer need to sign the app with your test account (or Facebook account) again.
If you want to switch to another Facebook user to test, you have to open facebook.com using mobile Safari, and then log out the user. Next time when you log in the app again, it will prompt you to sign in with a legitimate Facebook account.
Logout and User Profile
How about logout and user profile? Do we need to make any code changes for these two features? If you tap the profile icon to bring up the profile screen, you should find that the display name is the same as the test user's name.
That's cool. So far we haven't made any code change for user profile, and the app is already able to retrieve the display name from the user's Facebook profile.
If you look into the ProfileViewController.swift file, the following code is responsible for retrieving the display name:
if let currentUser = Auth.auth().currentUser {
    nameLabel.text = currentUser.displayName
}
Firebase is smart enough to determine the appropriate display name in reference to the login method (whether it is from Facebook or uses email/password).
For logout, we can use the same API to log a user out.
Auth.auth().signOut()
That is the power of Firebase. You can utilize the same API calls, and Firebase will handle the handle the heavy lifting for you.
Switching to Production
When you finish testing and your app is ready for production, you can go up to the Facebook Developer dashboard. Flip the switch to ON to make the app available to the public. But before you are allowed to switch the app to the production mode, you are required to provide the privacy policy URL and the URL for User Data Deletion.
The General Data Protection Regulation (GDPR) requires developers to provide a way for people to request that their data be deleted. To be compliant with these requirements, you must provide either a data deletion request callback or instructions to inform people how to delete their data from your app or website.
Once changed, you can now log into the app using your production Facebook account.
Google Sign In
Now that we have implemented the Facebook Login function, let's move onto Google Sign In. The implementation procedures are very similar to that of Facebook Login. But instead of using the Facebook SDK, we have to refer to the Google Sign In documentation and install the Google Sign In SDK. Since Firebase is now a product of Google, it will take you fewer steps to configure Google Sign In. Most of the implementation is related to the integration with Google Sign In SDK.
Okay, let's get started.
Enable Google Sign-In in Firebase Console
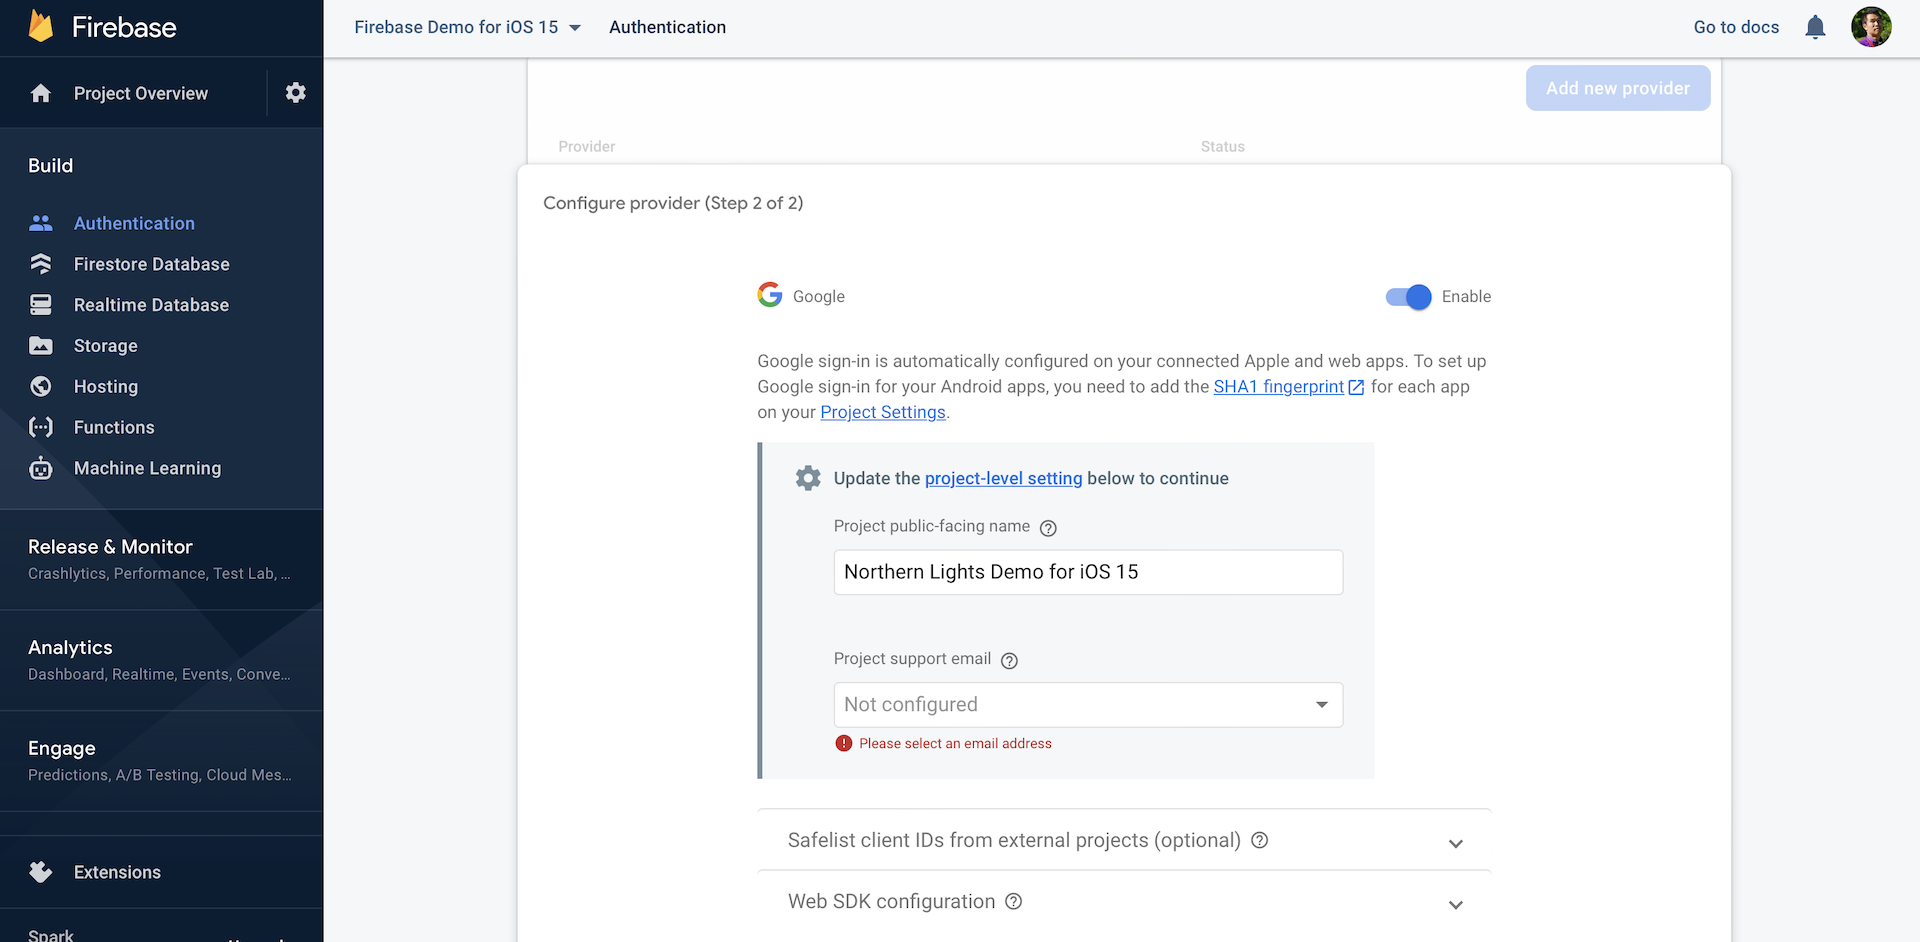
As compared to Facebook Login, the configuration is much less cumbersome. All you need to do is go up to your Firebase console of your app. Under Authentication, select Sign-In Method and then click Add new provider to enable Google Sign In. Fill in the name of your project and the support email, and then click Save to proceed.
Installing the Google Sign In SDK
That's it for the Firebase configuration. The next step is to install the Google Sign In SDK in your Xcode project. Again, the simplest way to do that is through Swift Package Manager.
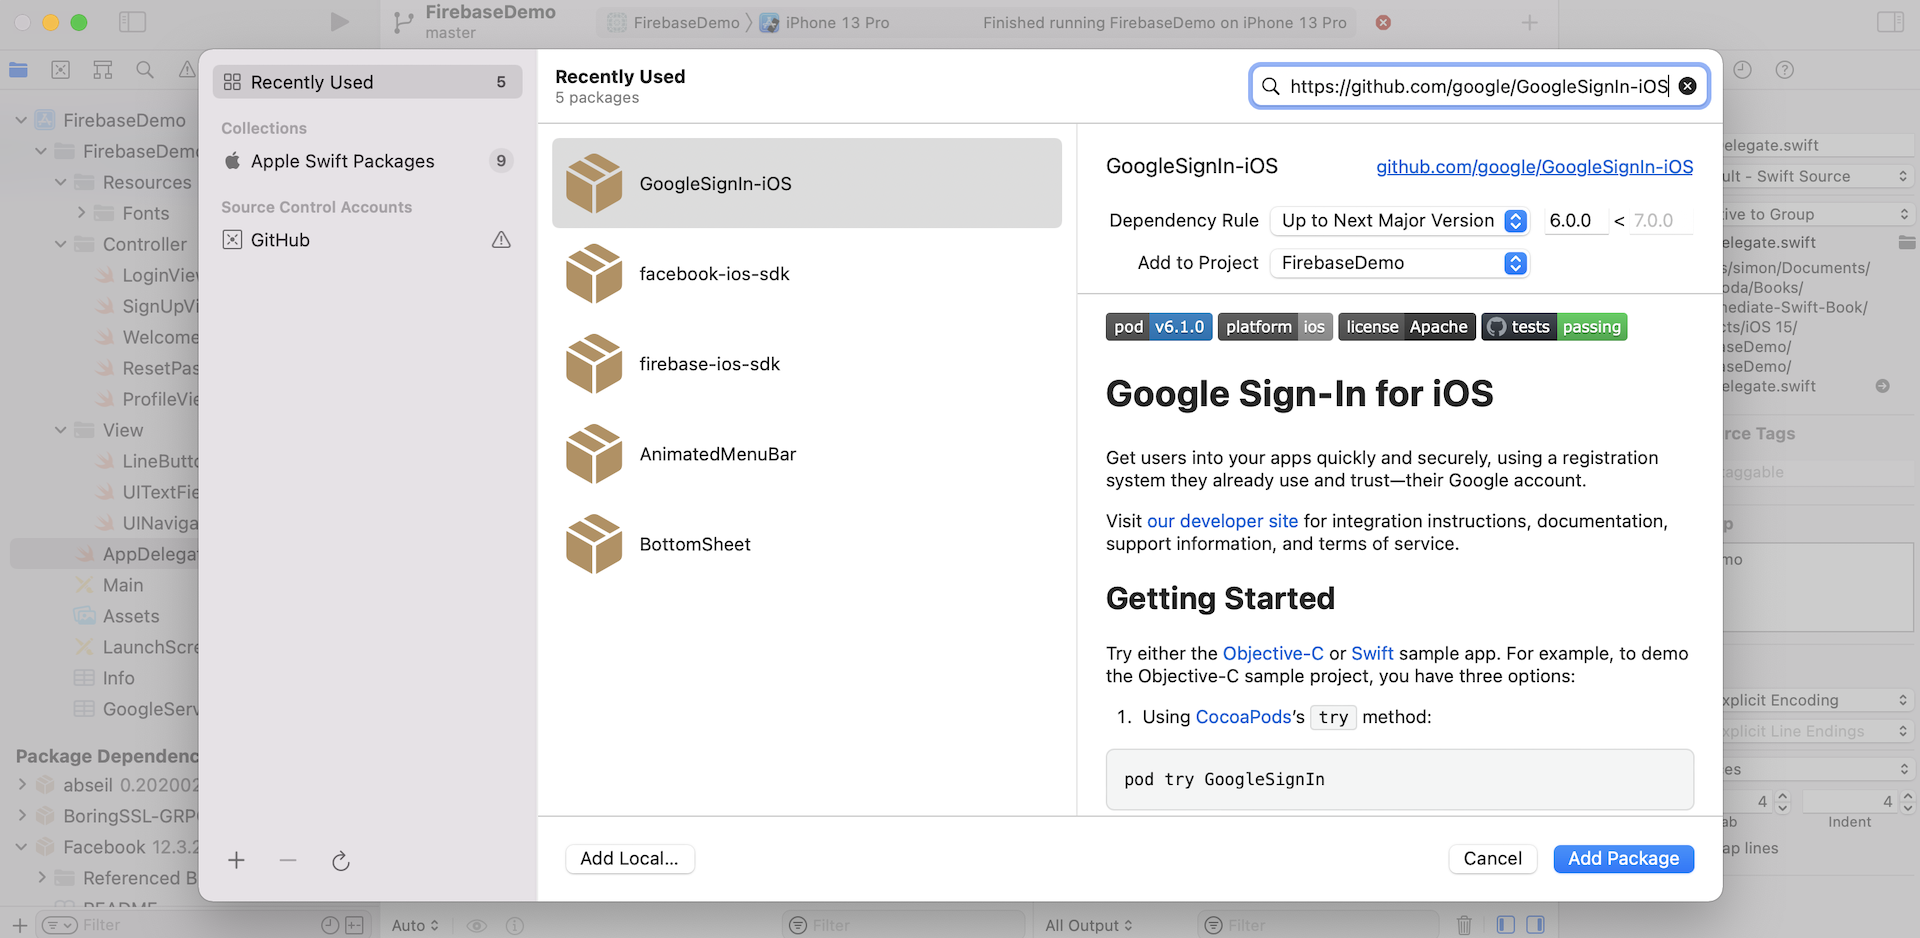
Go up to the Xcode menu and choose File > Add Packages.... Key in the following repository URL:
https://github.com/google/GoogleSignIn-iOS
Click Add Package to continue. Xcode should retrieve the GoogleSignIn package. Click Add Package again to add the package to the project.
Adding Custom URL Schemes
Similar to Facebook Login, Google also performs inter-app communication through custom URL schemes. Therefore, you will need to add a custom URL scheme to the Xcode project. First, select the GoogleService-Info.plist file to look for the value of REVERSED_CLIENT_ID. This is the URL scheme for your own app. Please copy the value first.
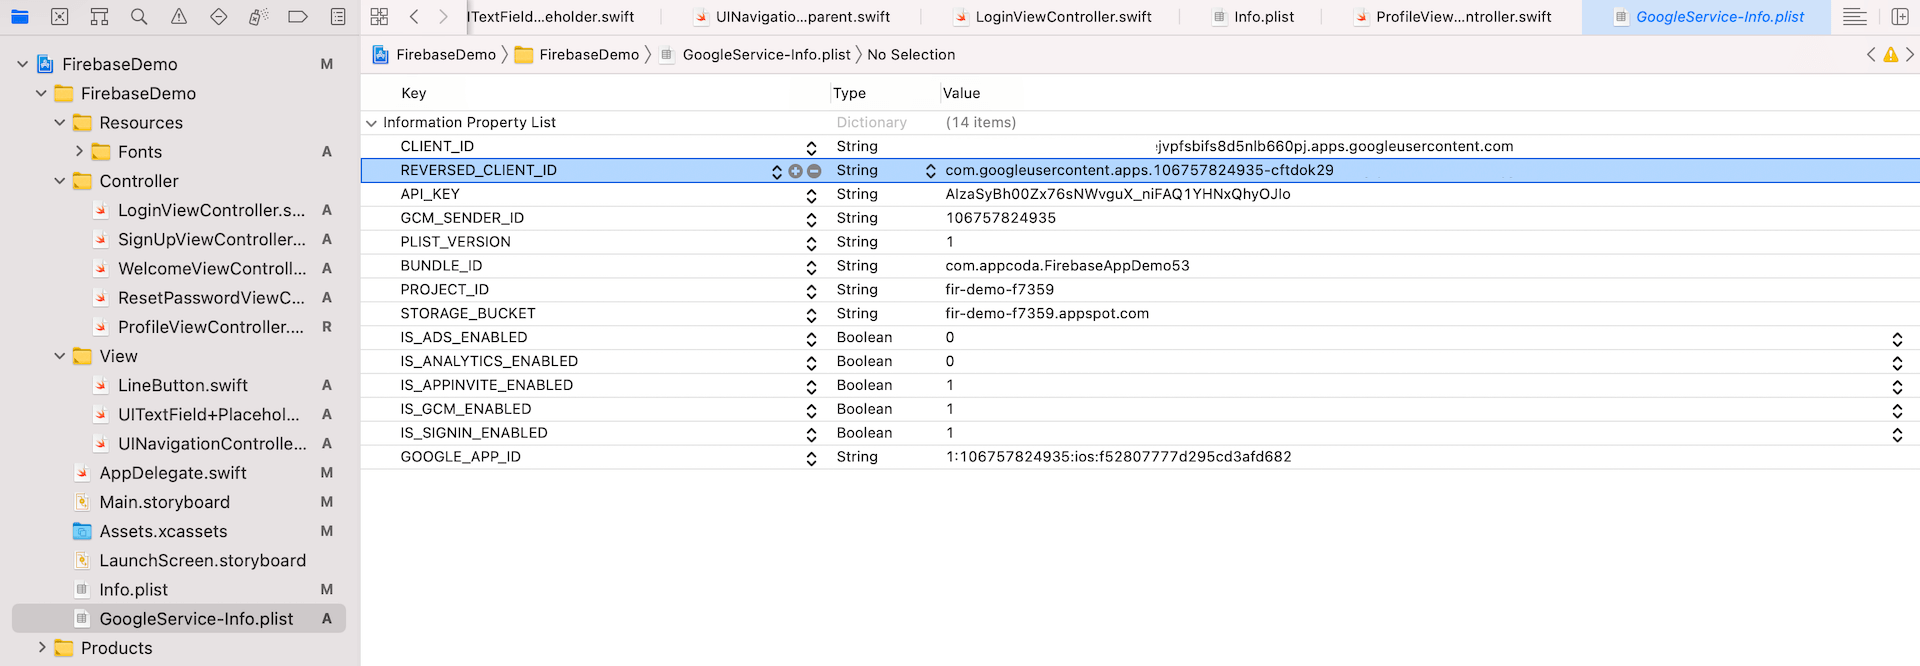
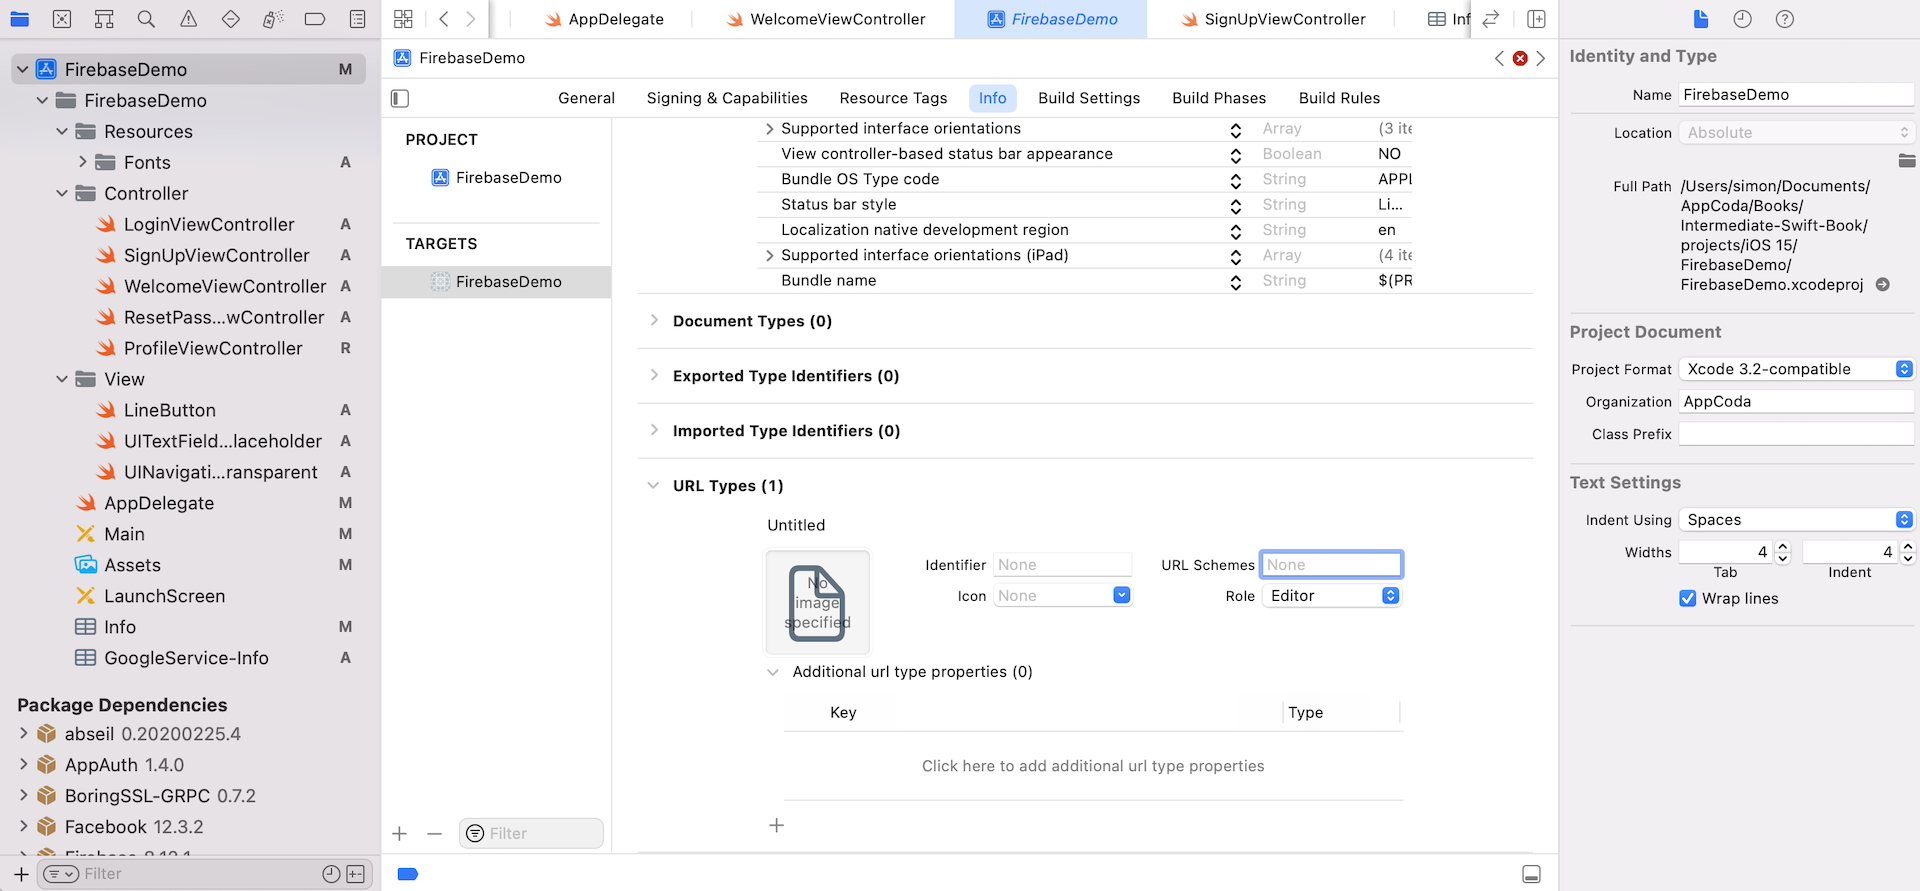
Now select the FirebaseDemo project in the project navigator and then choose FirebaseDemo under Targets. Select the Info tab and expand the URL Types section. Here, you click the + icon to add a new custom URL scheme. Paste the value that you copied earlier into the URL Schemes field.
Implementing the Google Sign In APIs
It is time to write some code to implement the Google Sign In function. Now open AppDelegate.swift and add an import statement at the very beginning of the file:
import GoogleSignIn
In order to use the Google Sign In APIs, you have to first import the GoogleSignIn package. Now your app has to handle two types of URL. One is from Facebook, and the other is from Google. So you have to modify the application(_:open:options:) method like this:
func application(_ app: UIApplication, open url: URL, options: [UIApplication.OpenURLOptionsKey : Any] = [:]) -> Bool {

    var handled: Bool = false

    if url.absoluteString.contains("fb") {
        handled = ApplicationDelegate.shared.application(
                    app,
                    open: url,
                    sourceApplication: options[UIApplication.OpenURLOptionsKey.sourceApplication] as? String,
                    annotation: options[UIApplication.OpenURLOptionsKey.annotation]
        )
    } else {
        handled = GIDSignIn.sharedInstance.handle(url)
    }

    return handled
}
For Google Sign In, it is required for the method to call the handleURL method of the GIDSignIn instance, which will properly handle the URL that your application receives at the end of the authentication process.
Let's move onto the implementation of the Google Sign In button. Select WelcomeViewController.swift and add the import statement:
import GoogleSignIn
To implement Google Sign In, create the following method:
@IBAction func googleLogin(sender: UIButton) {

    guard let clientID = FirebaseApp.app()?.options.clientID else {
        return
    }

    let configuration = GIDConfiguration(clientID: clientID)

    guard let windowScene = UIApplication.shared.connectedScenes.first as? UIWindowScene else { return }
    guard let rootViewController = windowScene.windows.first?.rootViewController else { return }

    GIDSignIn.sharedInstance.signIn(with: configuration, presenting: rootViewController) { [unowned self] user, error in

        if let error = error {
            print("Login error: \(error.localizedDescription)")
            let alertController = UIAlertController(title: "Login Error", message: error.localizedDescription, preferredStyle: .alert)
            let okayAction = UIAlertAction(title: "OK", style: .cancel, handler: nil)
            alertController.addAction(okayAction)
            self.present(alertController, animated: true, completion: nil)

            return

        } else {
            // Present the main view
            if let viewController = self.storyboard?.instantiateViewController(withIdentifier: "MainView") {
                UIApplication.shared.keyWindow?.rootViewController = viewController
                self.dismiss(animated: true, completion: nil)
            }
        }

    }
}
This method will be called with the user taps the Google Sign In button. When the googleLogin method is called, we first retrieve the client ID from the configuration. Then we create a GIDConfiguration object using the client ID. To bring up the Google Sign In dialog, we call the signInWithConfiguration method using the configuration object we created before.
In the completion handler, we check if the login is successful or not. If everything is perfect, we present the main view to the user.
Lastly, go to the Main storyboard and connect the Sign In with Google button with the googleLogin action method. Control-drag from the button to the view controller icon in the dock. Release both buttons and then choose googleLoginWithSender: to connect the method.
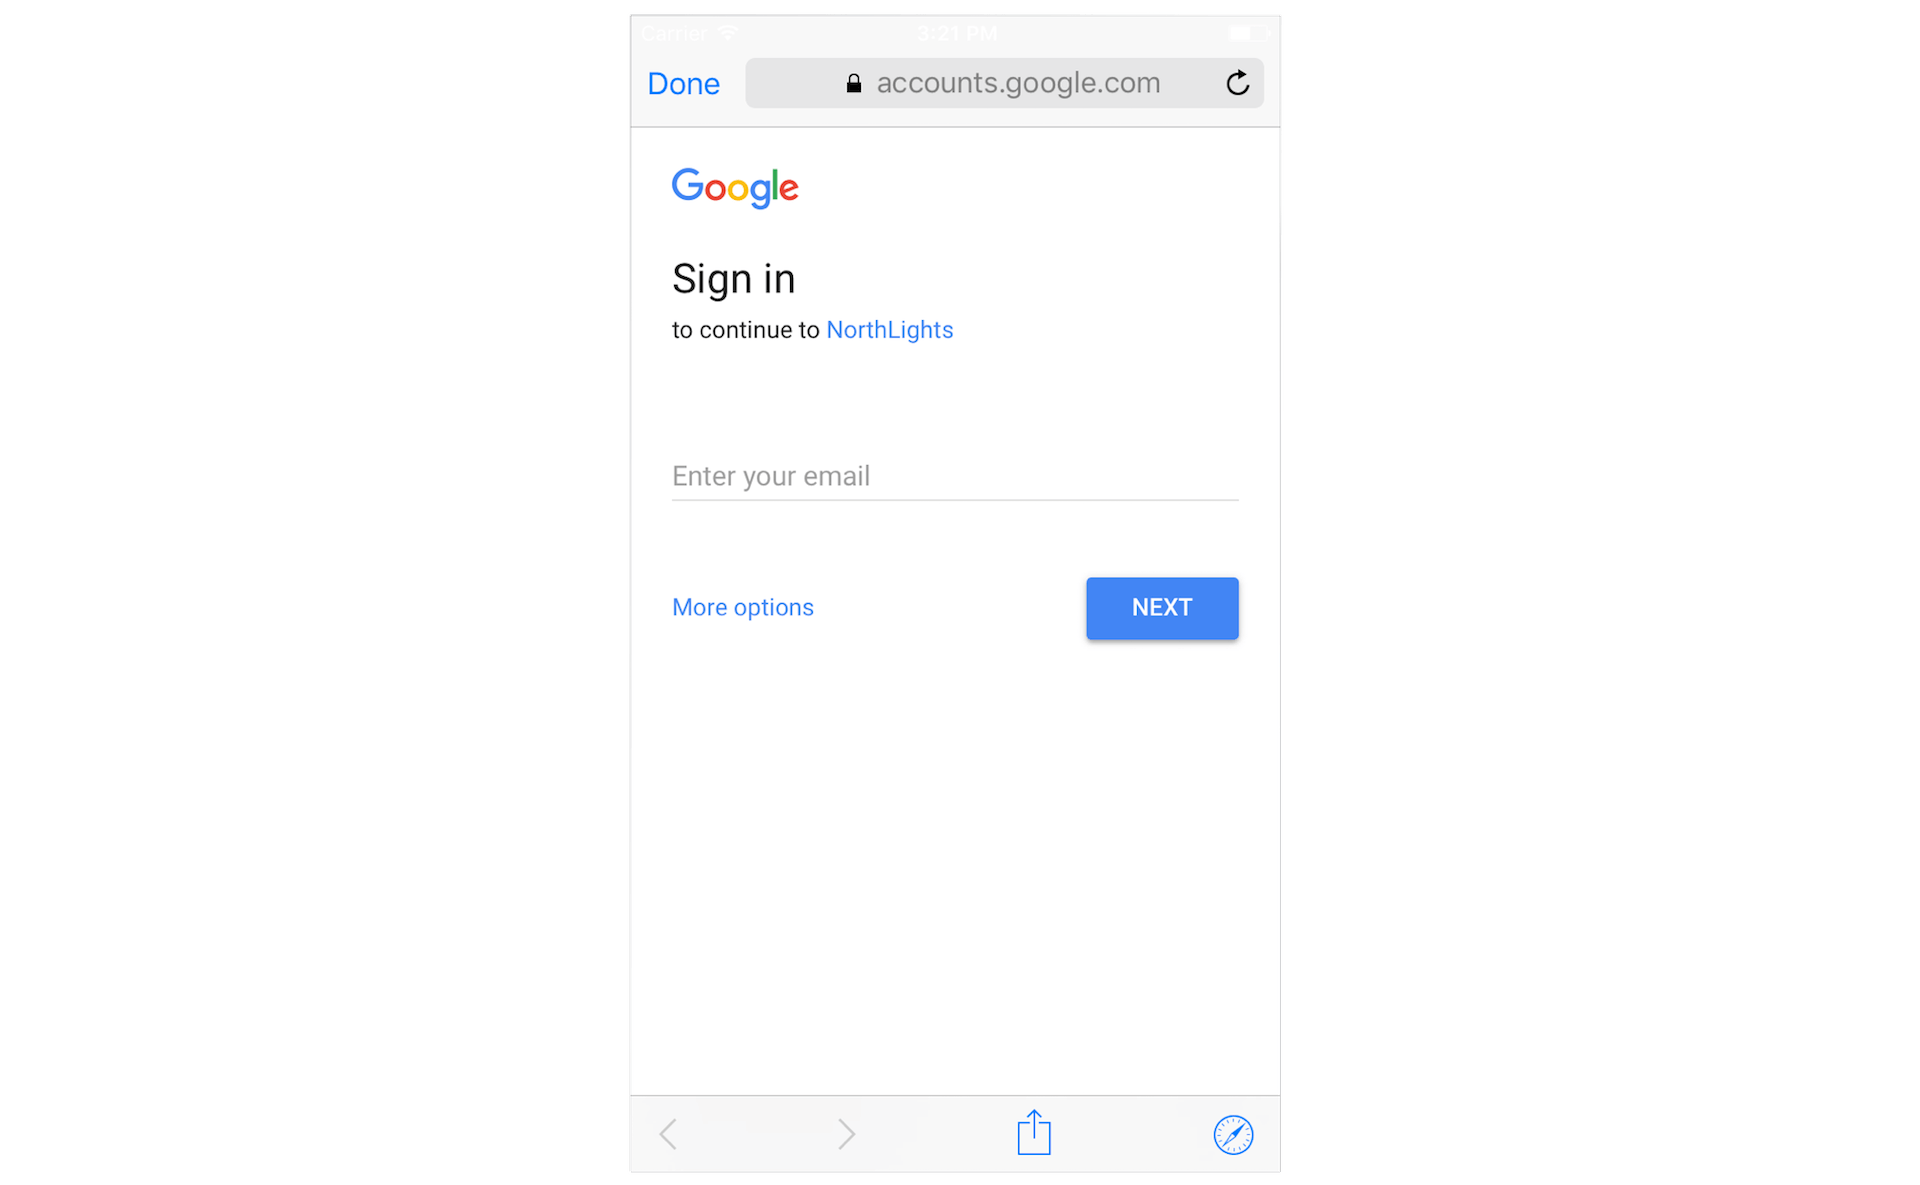
Great! It is time to test the Google Sign In function. Run the app on any simulator or your iPhone. Tap the Sign In with Google button to initiate the login process. You will see a modal dialog that asks you for a Google account. If everything works smoothly, you should be able to sign in the app with your Google account.
Logout and User Profile
Similarly to Facebook Login, you do not need to modify any code for the ProfileViewController.swift file. The logout and user profile features work without any changes. If you tap the Logout button of the user profile screen, you should be able to log out successfully.
Summary
After going through the demo project, I hope you already understand how to integrate Facebook and Google Sign In using Firebase. These are just two of the many sign-in methods that Firebase supports. Later, if your app needs to support Twitter Sign In (or GitHub), you can also use Firebase to implement the sign-in method using a similar procedure.
For reference, you can download the demo project from http://www.appcoda.com/resources/swift55/FirebaseSocialLoginDemo.zip.