- Made by AppCoda
- Contact us / Support
- Tweet this book
- Preface
- 1. Building Adaptive User Interfaces
- 2. Creating Table View Sections and Index list with Diffable Data Source
- 3. Animating Table View Cells
- 4. Working with JSON and Codable
- 5. How to Integrate the Twitter and Facebook SDK for Social Sharing
- 6. Working with Email and Attachments
- 7. Sending SMS and MMS Using MessageUI Framework
- 8. How to Get Direction and Draw Route on Maps
- 9. Search Nearby Points of Interest Using Local Search
- 10. Audio Recording and Playback
- 11. Scan QR Code Using AVFoundation Framework
- 12. Working with URL Schemes
- 13. Building a Full Screen Camera with Gesture-based Controls
- 14. Video Capturing and Playback Using AVKit
- 15. Displaying Banner Ads using Google AdMob
- 16. Working with Custom Fonts
- 17. Working with AirDrop, UIActivityViewController and Uniform Type Identifiers
- 18. Building Grid Layouts Using Collection Views and Diffable Data Source
- 19. Interacting with Collection Views
- 20. Adaptive Collection Views Using UITraitCollection and Compositional Layout
- 21. Building a Weather Widget Using WidgetKit
- 22. Building Slide Out Sidebar Menus Using Objective-C Libraries
- 23. View Controller Transitions and Animations
- 24. Building a Slide Down Menu
- 25. Self Sizing Cells and Dynamic Type
- 26. XML Parsing, RSS and Expandable Table View Cells
- 27. Applying a Blurred Background Using UIVisualEffect
- 28. Using Touch ID and Face ID For Authentication
- 29. Building a Carousel-Like User Interface
- 30. Working with Parse
- 31. Parsing CSV and Preloading a SQLite Database Using Core Data
- 32. Connecting Multiple Annotations with Polylines and Routes
- 33. Using CocoaPods in Swift Projects
- 34. Building a Simple Sticker App
- 35. Building iMessage Apps Using Messages Framework
- 36. Building Custom UI Components Using IBDesignable and IBInspectable
- 37. Using Firebase for User Authentication
- 38. Google and Facebook Authentication Using Firebase
- 39. Using Firebase Database and Storage to Build an Instagram-like App
- 40. Building a Real-time Image Recognition App Using Core ML
- 41. Building AR Apps with ARKit and SpriteKit
- 42. Working with 3D Objects in Augmented Reality Using ARKit and SceneKit
- 43. Use Create ML to Train Your Own Machine Learning Model for Image Recognition
- 44. Building a Sentiment Classifier Using Create ML to Classify User Reviews
- 45. Working with Image Tracking Using ARKit
- Published with GitBook
Chapter 35
Building iMessage Apps Using Messages Framework
As mentioned in the previous chapter, not only can you create a sticker pack, the Messages framework allows developers to build another kind of messaging extensions, known as iMessage apps, that let users interact with your app without leaving the Messages app.
Let me give an example, so you will better understand what an iMessage app can do for you.
You probably have used the Airbnb app before.Let's say, you're now planning the next vacation with your friends. You come across a really nice lodging place to stay, and you want to ask your friends for opinions. So what would you do to share the place?

For now, you may capture a screenshot and then send it over to your friends through Messages, Whatsapp or any messaging clients. Alternatively, you may use the built-in sharing option of the Airbnb app to share a link to your friends, so he/she can view the lodging place on airbnb.com.
Both ways are not perfect, however.
The screenshot may only show partial information of the lodging place. If you send the link to your friends over Messages, it should display the complete information of the place. But opening a link in iOS usually means switching to the mobile Safari browser. The user will need to view the details in Safari, and then switch back to the Messages app to reply the message. This isn't a big deal. That said, as developers, we always look for ways to improve the user experience of an app.
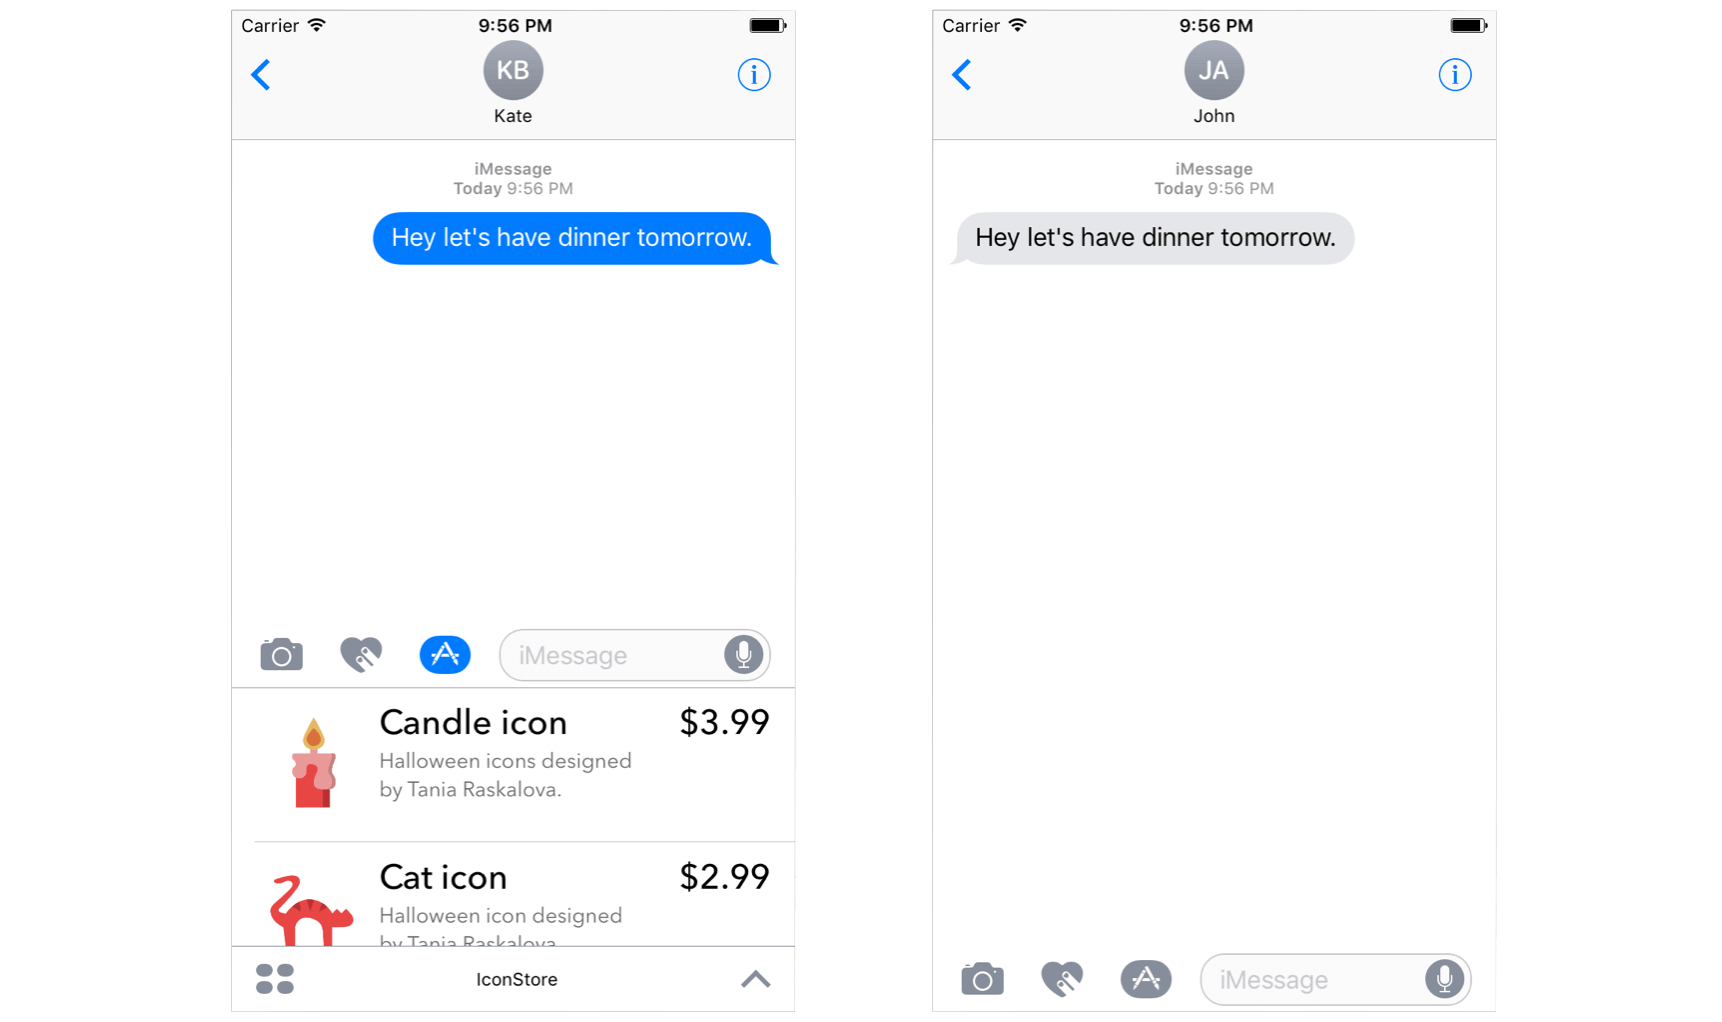
Starting from iOS 10, the Airbnb app comes with a message extension or what we called the iMessage app. The updated app lets you share any of the recently viewed hotels/lodging options right in the Messages app. Figure 35.2 displays the workflow.
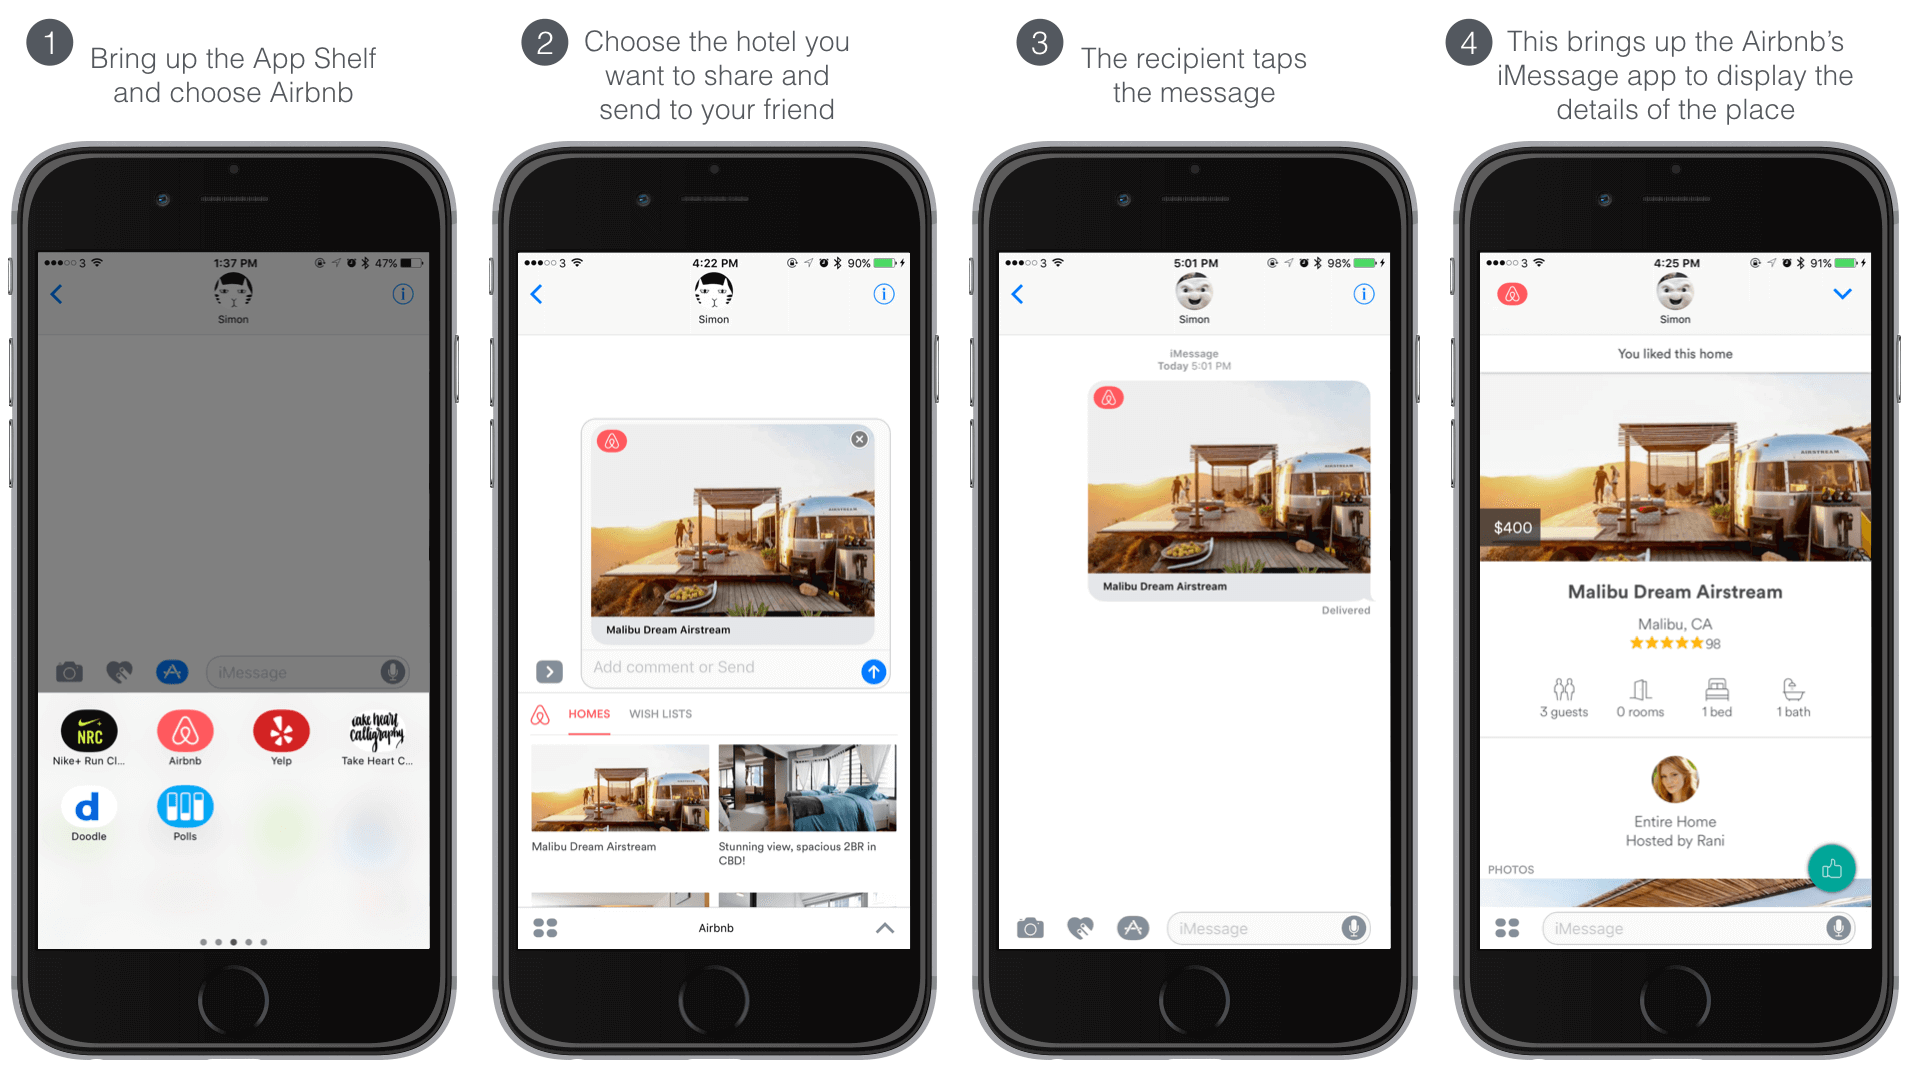
What's interesting is on the receiving side. Assuming the recipient's device has Airbnb installed, he/she can reveal the details of the lodging place right in the Messages app. Furthermore, if the recipient loves the place, he/she can tap the Like button and reply back.
Cool, right? Everything is now done right in Messages, without even launching the Airbnb app or switching to the mobile browser.
You may wonder what happens if the recipient doesn't have the Airbnb app installed?
Messages will bring up the App Store and suggest the user to download the Airbnb app. As you may realize, this is a new way to promote your app. When the recipient receives the message, it is likely he/she will install the app so as to view the message. Your app user just helps you promote your app by sending messages.
Now that you should have a better idea of iMessage apps and why it is important to build for your existing app, let's dive into the implementation.
The Demo App
We will make use of the Icon Store app that we built in chapter 18/19 as a demo. If you haven't read those chapters, it is time to take a look. Even though it is not mandatory, the better you understand the chapter, the better you will understand what I'm going to discuss.
If you're ready to get started, download the Icon Store app from http://www.appcoda.com/resources/swift55/CollectionViewSelection.zip. Unzip it and compile the demo to see if it works.
Meanwhile, if you want to share a favorite icon to another user, you probably do a screen capture and send the screenshot over Messages. What we are going to do is build an iMessage app such that users can access the icons right the Messages app. Users can pick an icon and send it to another user. On the receiving end, the recipient can reveal the icon details simply by tapping the message.
Creating the Message Extension
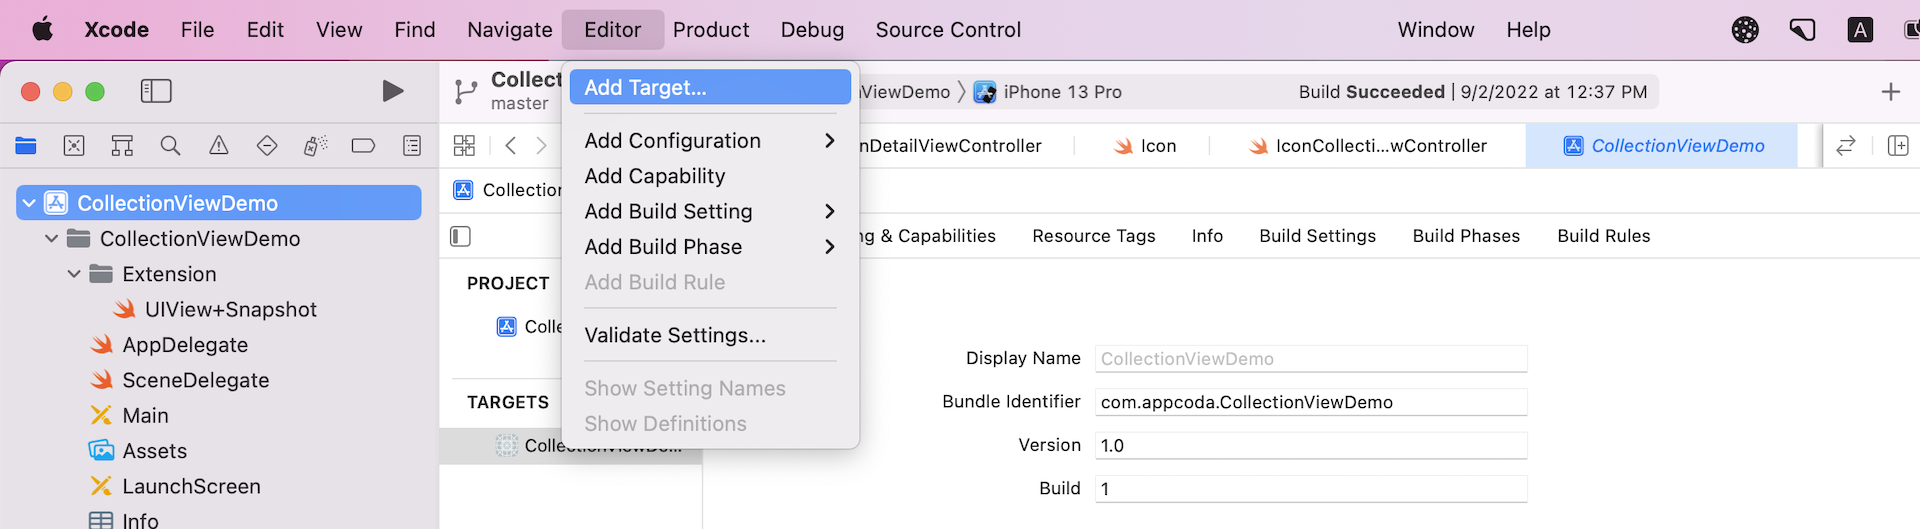
Okay, let's get started. To create a message extension, you have to add a new target for the existing project. First, select CollectionViewDemo project file in the project navigator, and then go up to the Xcode menu. Select Editor > Add Target….
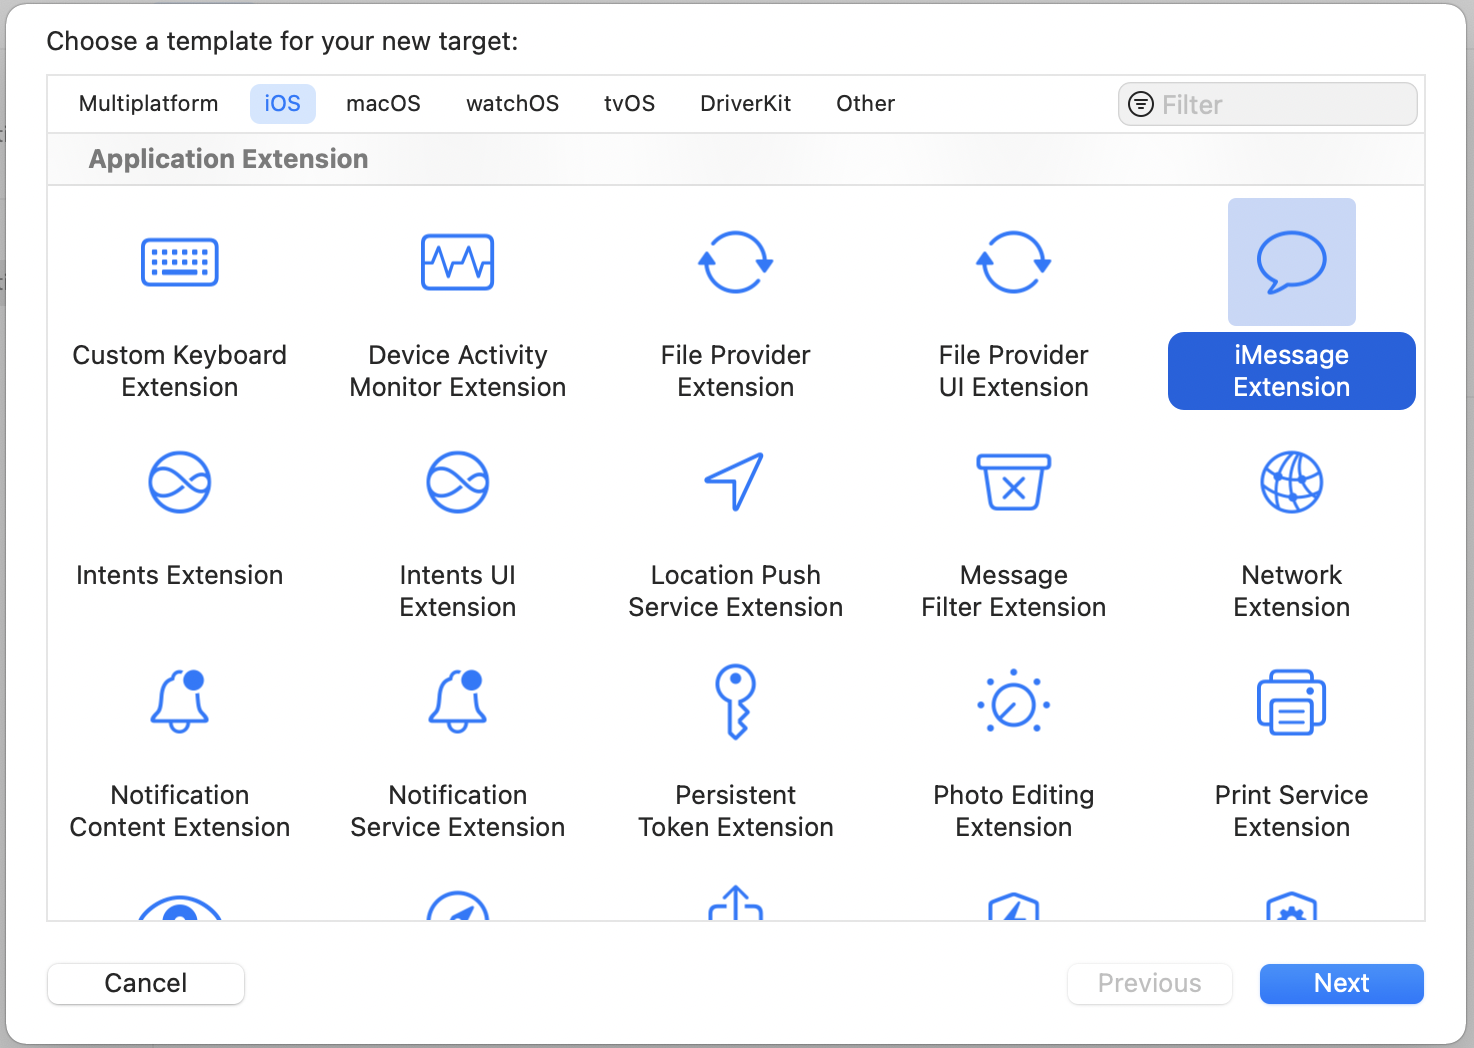
Next, choose iMessage Extension and confirm. Name the product IconStore and hit Finish to proceed.
You will be prompted to activate the MessagesExtension scheme. Simply hit Activate to use the scheme for later testing and debugging.
Once Xcode created the message extension files, you will see a new folder in the project navigator:
- IconStore - contains the asset catalog for the message extension, plus the
.swiftfiles and storyboard for the message extension. This is where you place the app icon of the iMessage app.
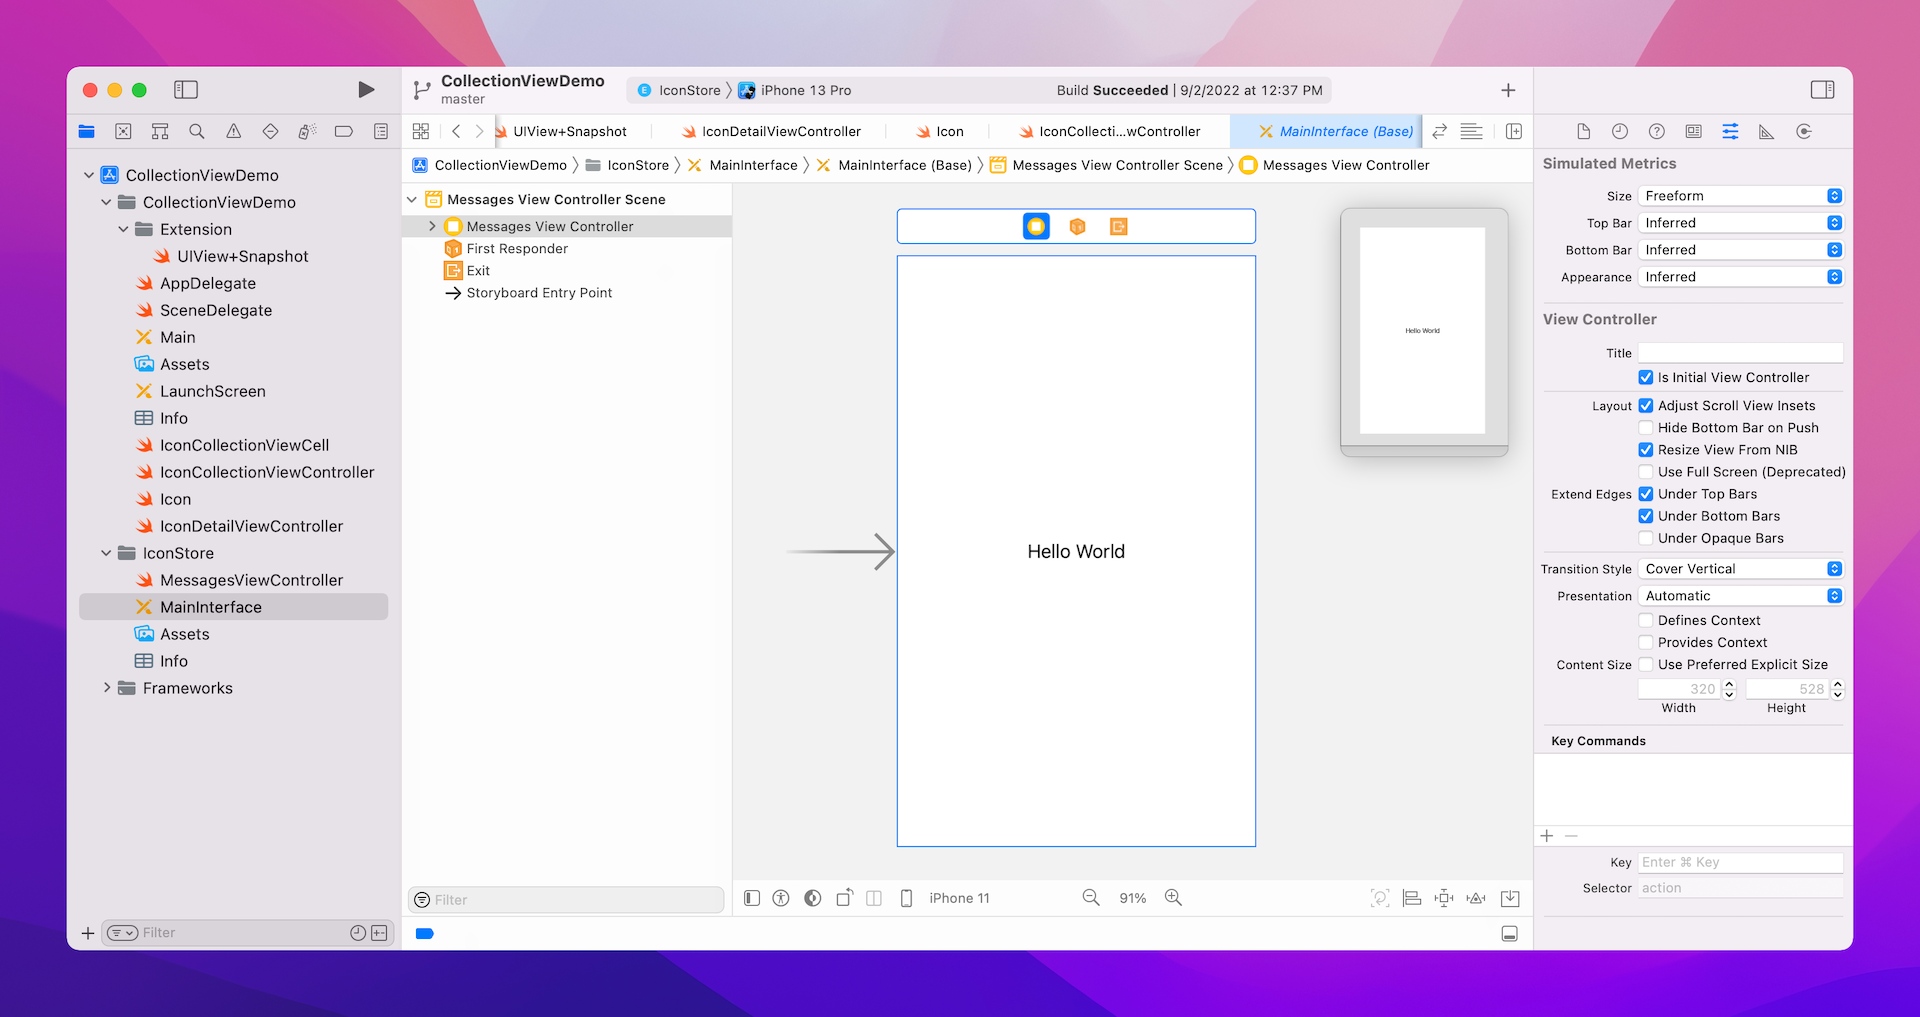
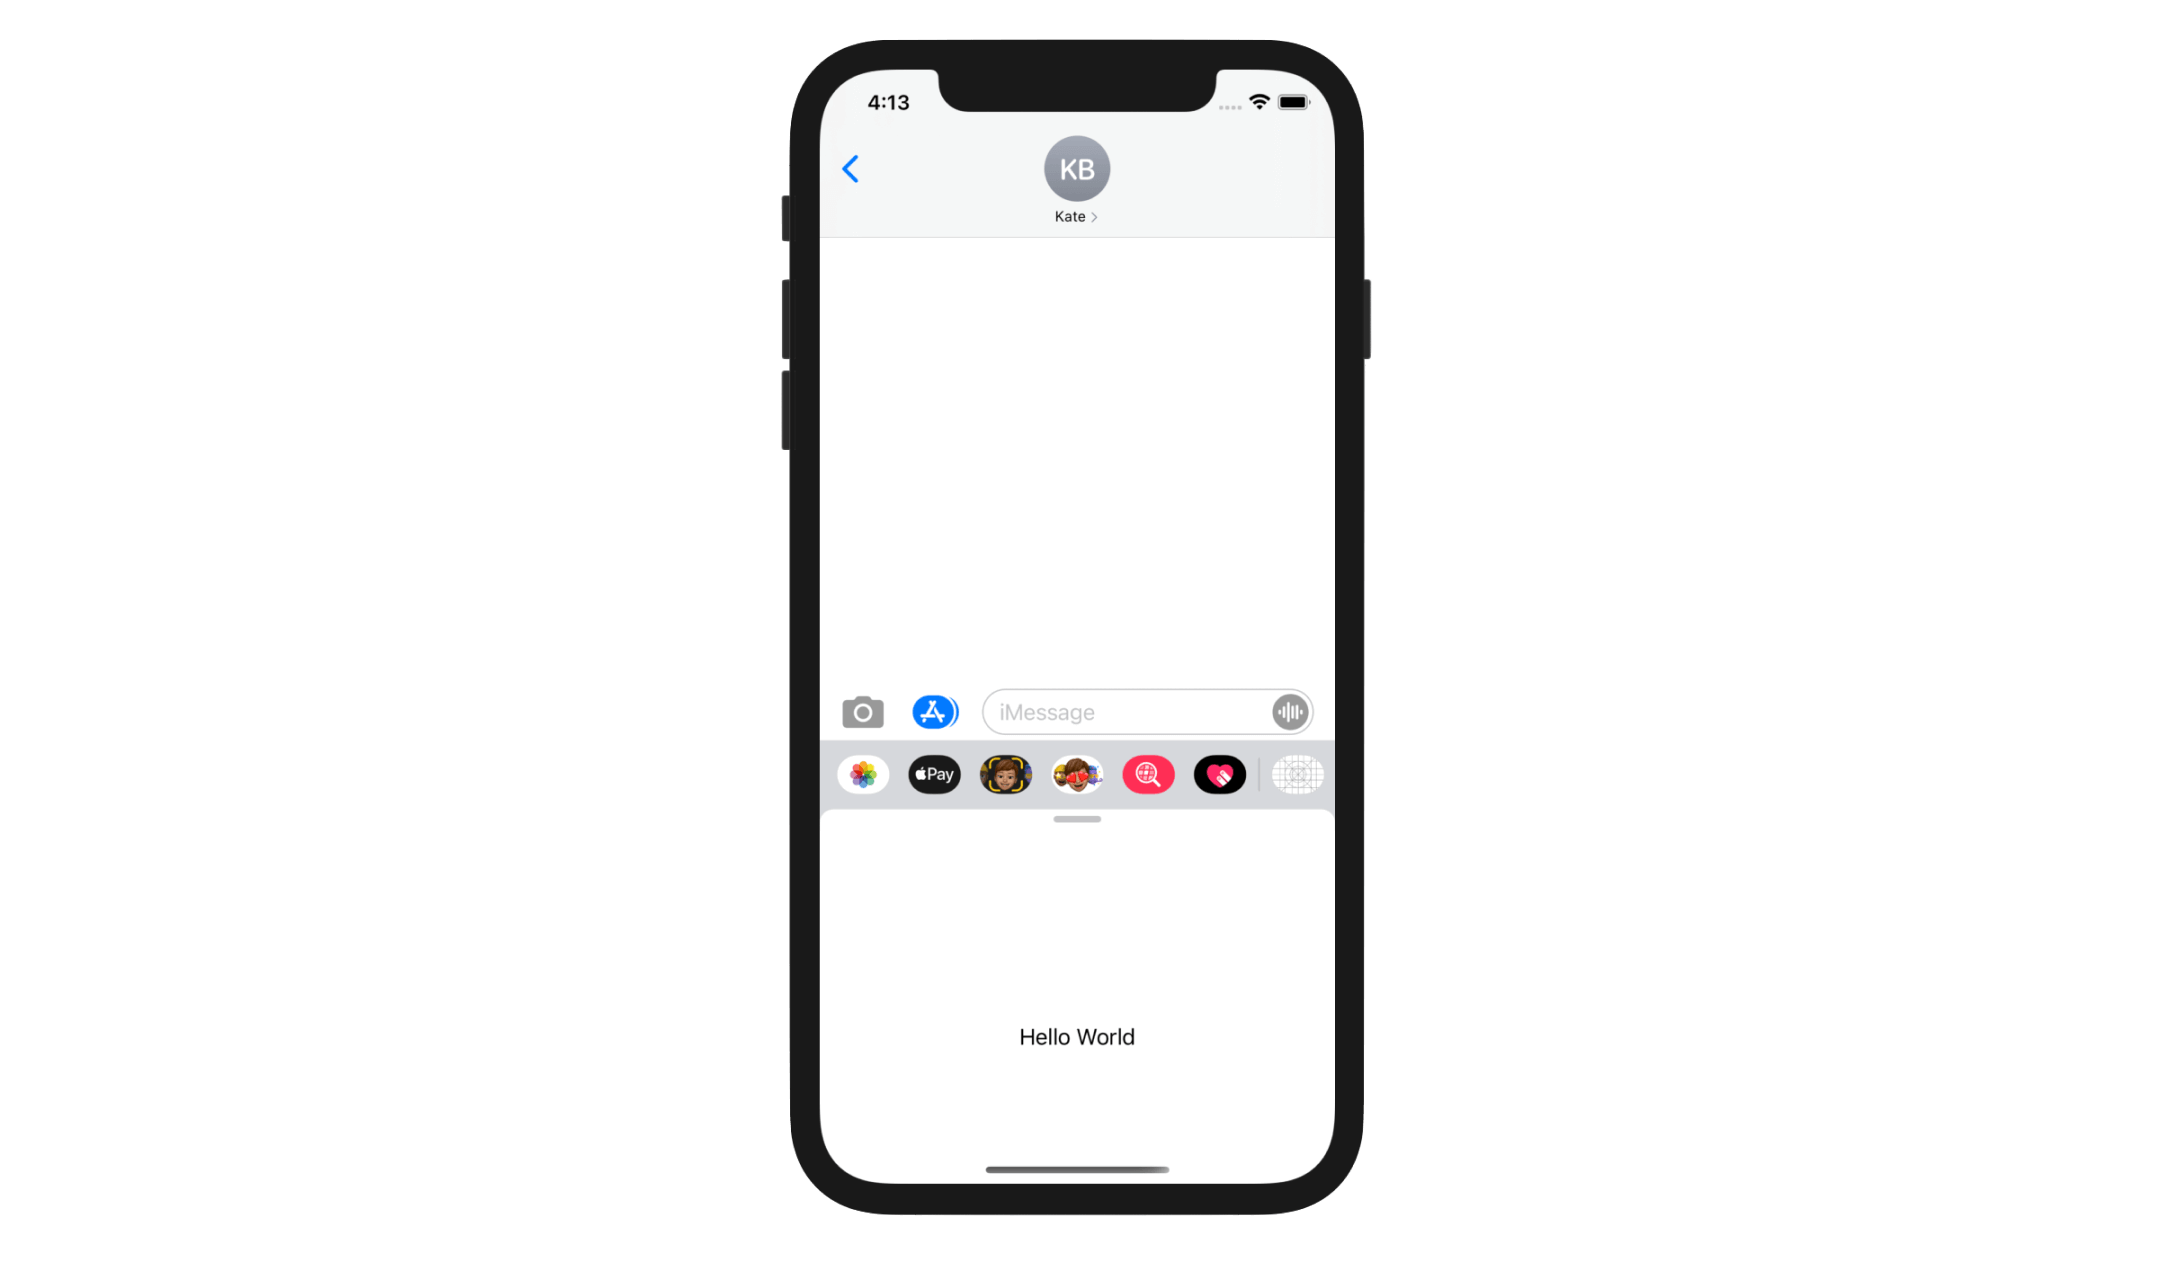
Now, if you select the IconStore scheme and hit the Run button, Messages will bring up the IconStore app and displays the Hello World label. In case if the IconStore extension is brought up, you can click the app ico in the app drawer to activate it.
As you may have already realized, developing a message extension (or iMessage app) is very similar to developing an iOS app. It has its own storyboard, asset catalog, and .swift files. Therefore, to build the iMessage app, we will design a new UI using the new storyboard and provide the implementation of MessagesExtension.
Sharing Code Using an Embedded Framework
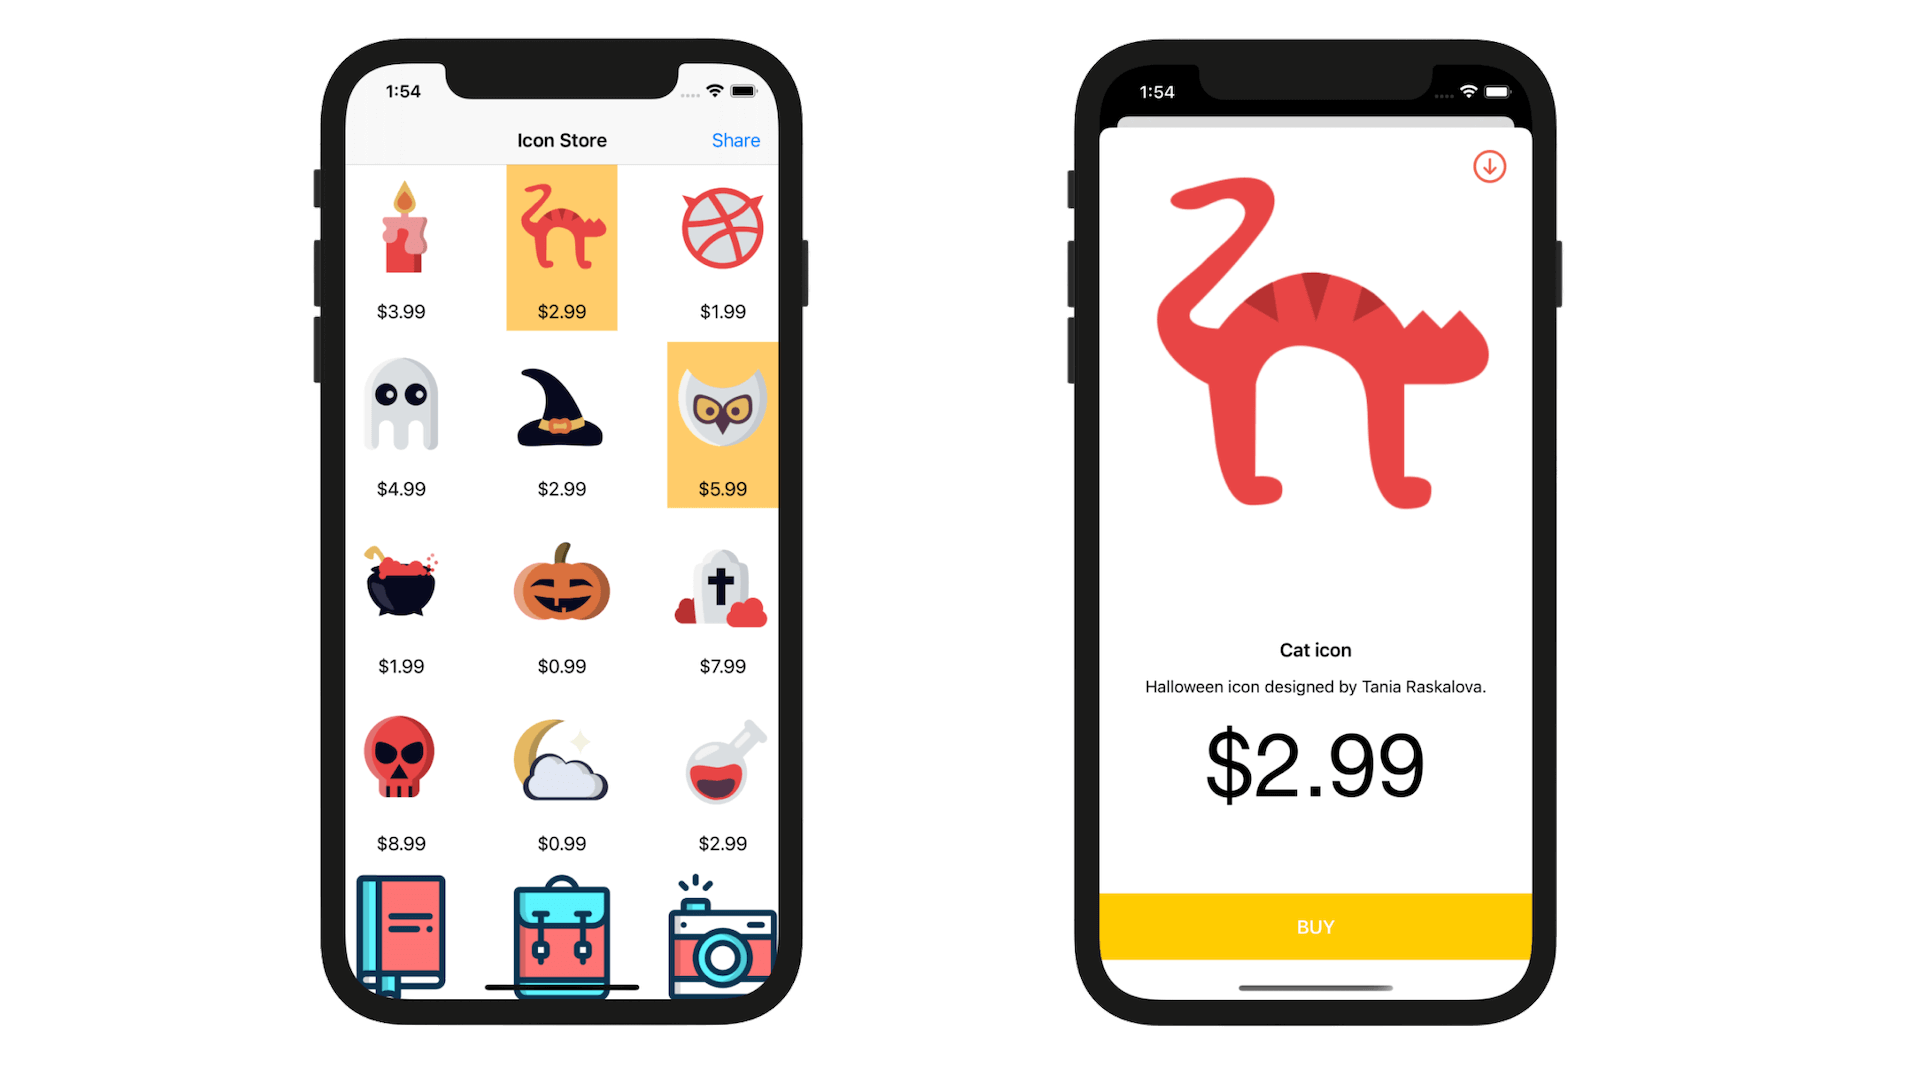
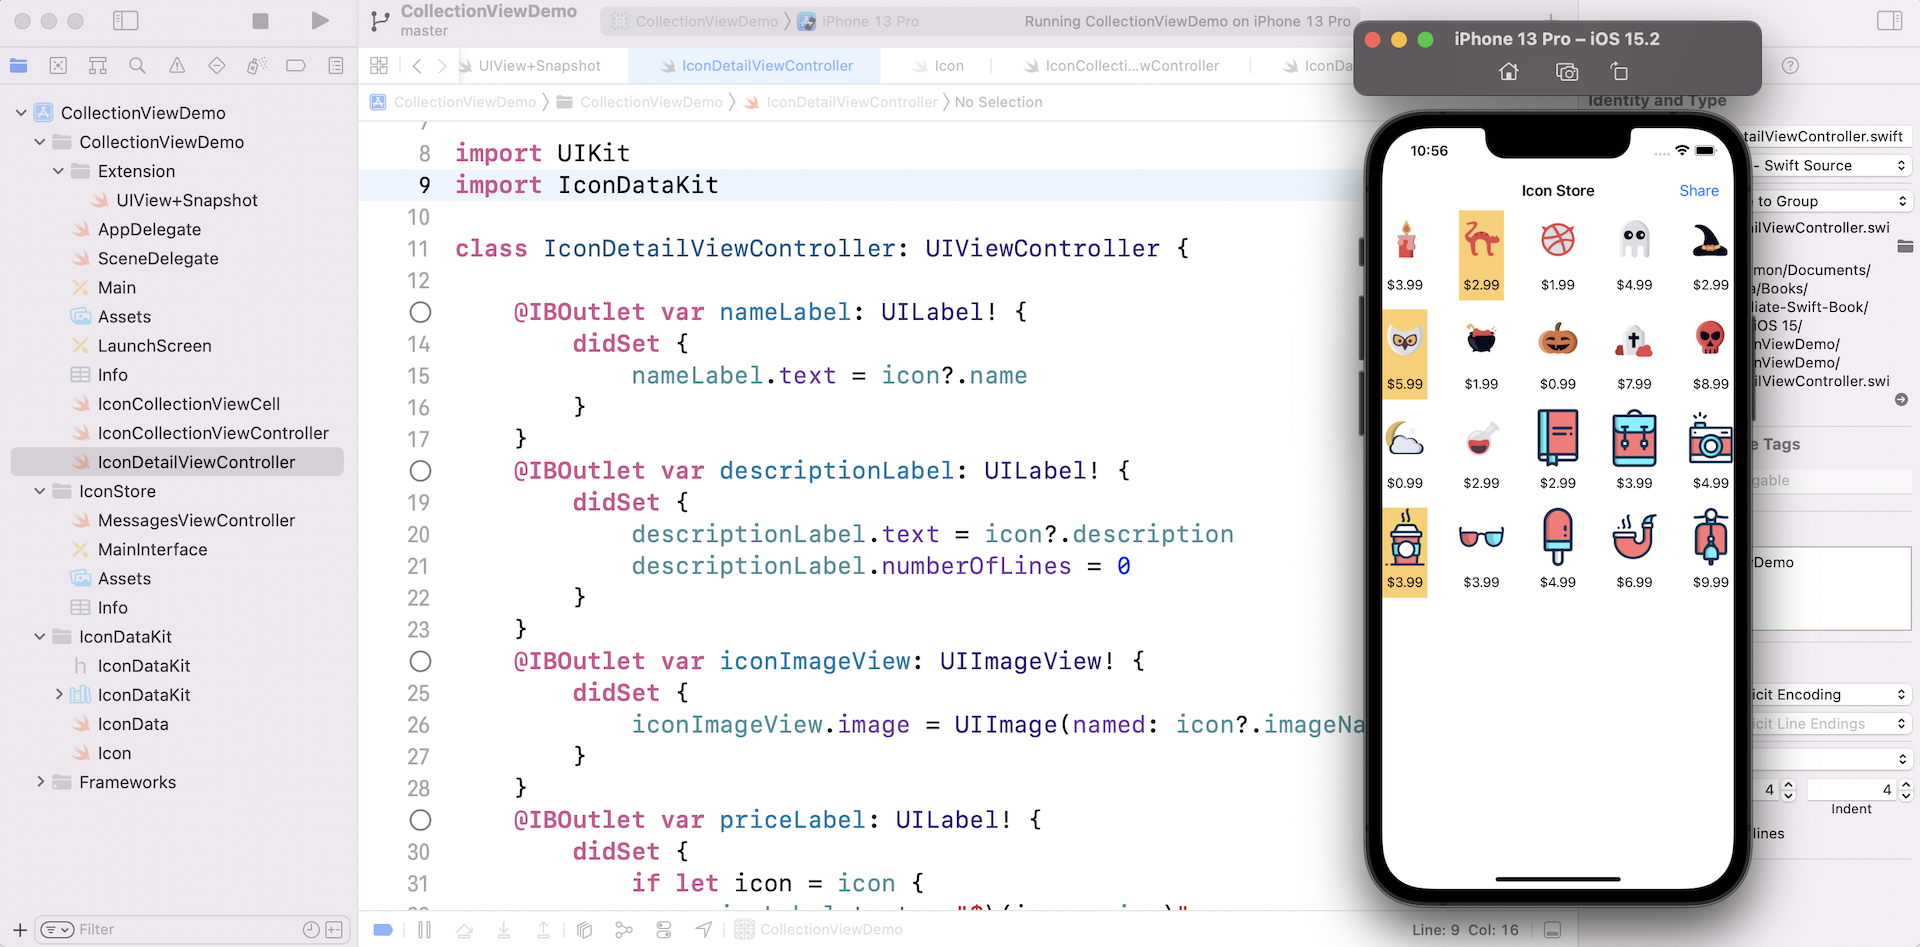
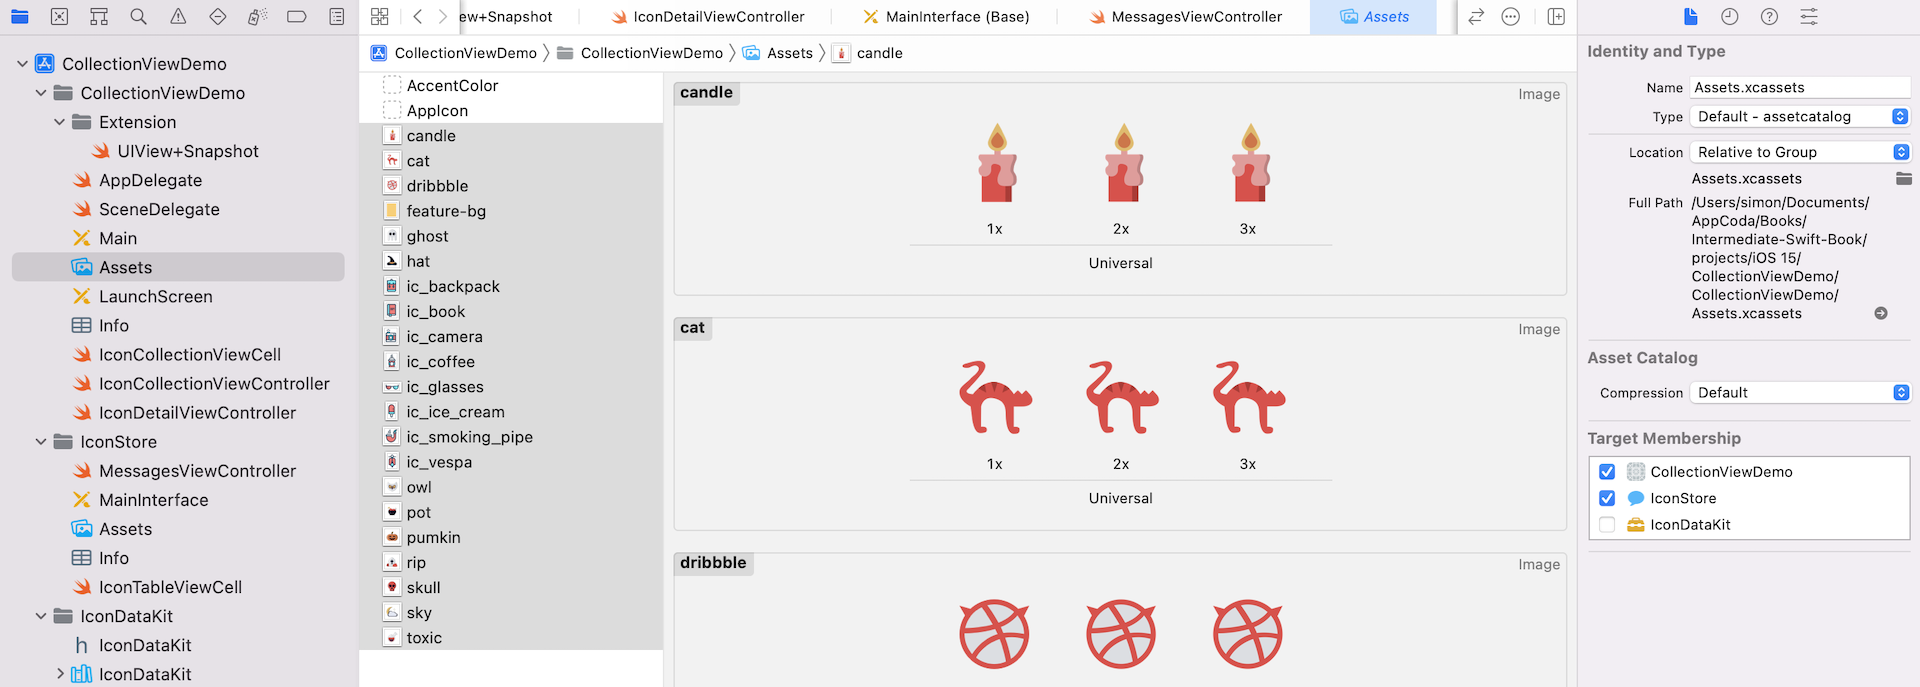
Before we implement the messages extension, let's first check out the existing code. Open the IconCollectionViewController.swift file. You should see a variable named iconSet, which is an array of Icon objects. It stores all icon items for display in the app.
private var iconSet: [Icon] = [ Icon(name: "Candle icon", imageName: "candle", description: "Halloween icons designed by Tania Raskalova.", price: 3.99, isFeatured: false),
                                Icon(name: "Cat icon", imageName: "cat", description: "Halloween icon designed by Tania Raskalova.", price: 2.99, isFeatured: true),
                                Icon(name: "dribbble", imageName: "dribbble",


...

                            ]
In the app extension, we also need the icon data to display the icons in the Messages browser. Obviously, you can copy and paste the data set (i.e. iconSet) into a new file of the app extension. But this is not a good practice. We should avoid duplicating code.
Instead, as the code is shared between the iOS app and the iMessage app, we will create a framework that embeds the shared code. Here is what we are going to do:
- Create an embedded framework called
IconDataKit. This framework can be used by the CollectionViewDemo app and the IconStore iMessage app. - In the framework, we will create a file named
IconData.swift. We will define theiconSetarray in the file, and initialize it with the icon items. - Since the
Iconclass is also used by both apps, we will also move theIcon.swiftfile to the framework. - Remove the original
iconSetvariable fromIconCollectionViewControllerand use the newiconSetprovided by the framework
Create the IconDataKit framework
To create a framework, select CollectionViewDemo in the project navigator. Then go up to the Xcode menu, select Editor > Add Target…. Under iOS, choose Framework and hit Next to proceed.

In the next screen, name the product IconDataKit and confirm. Xcode will create a new folder called IconDataKit.
Before writing code for the framework, select CollectionViewDemo in the project navigator and choose the IconDataKit target. Under the Deployment Info section, enable Allow app extension API only. We have to turn on this option as the framework is going to be used by an app extension. Optionally, you can set the target iOS version (e.g. 13.0 or up).
Note: When creating a framework to share code between the containing app (i.e. iOS app) and the message extension, you have to make sure that the embedded framework does not contain APIs unavailable to app extensions. Otherwise, when you submit your app to the App Store, their review team will reject your app extension.
Defining the iconSet array
Now, right-click the IconDataKit folder in the project navigator and select New File…. Choose the Swift file template to create a simple .swift file, and name it IconData.
Open the IconData.swift file once it is created, and update its content like this:
import Foundation

public struct IconData {
    public static var iconSet: [Icon] = [ Icon(name: "Candle icon", imageName: "candle", description: "Halloween icons designed by Tania Raskalova.", price: 3.99, isFeatured: false),
                                          Icon(name: "Cat icon", imageName: "cat", description: "Halloween icon designed by Tania Raskalova.", price: 2.99, isFeatured: true),
                                          Icon(name: "dribbble", imageName: "dribbble", description: "Halloween icon designed by Tania Raskalova.", price: 1.99, isFeatured: false),
                                          Icon(name: "Ghost icon", imageName: "ghost", description: "Halloween icon designed by Tania Raskalova.", price: 4.99, isFeatured: false),
                                          Icon(name: "Hat icon", imageName: "hat", description: "Halloween icon designed by Tania Raskalova.", price: 2.99, isFeatured: false),
                                          Icon(name: "Owl icon", imageName: "owl", description: "Halloween icon designed by Tania Raskalova.", price: 5.99, isFeatured: true),
                                          Icon(name: "Pot icon", imageName: "pot", description: "Halloween icon designed by Tania Raskalova.", price: 1.99, isFeatured: false),
                                          Icon(name: "Pumkin icon", imageName: "pumkin", description: "Halloween icon designed by Tania Raskalova.", price: 0.99, isFeatured: false),
                                          Icon(name: "RIP icon", imageName: "rip", description: "Halloween icon designed by Tania Raskalova.", price: 7.99, isFeatured: false),
                                          Icon(name: "Skull icon", imageName: "skull", description: "Halloween icon designed by Tania Raskalova.", price: 8.99, isFeatured: false),
                                          Icon(name: "Sky icon", imageName: "sky", description: "Halloween icon designed by Tania Raskalova.", price: 0.99, isFeatured: false),
                                          Icon(name: "Toxic icon", imageName: "toxic", description: "Halloween icon designed by Tania Raskalova.", price: 2.99, isFeatured: false),
                                          Icon(name: "Book icon", imageName: "ic_book", description: "Colorful icon designed by Marin Begović.", price: 2.99, isFeatured: false),
                                          Icon(name: "Backpack icon", imageName: "ic_backpack", description: "Colorful icon designed by Marin Begović.", price: 3.99, isFeatured: false),
                                          Icon(name: "Camera icon", imageName: "ic_camera", description: "Colorful camera icon designed by Marin Begović.", price: 4.99, isFeatured: false),
                                          Icon(name: "Coffee icon", imageName: "ic_coffee", description: "Colorful icon designed by Marin Begović.", price: 3.99, isFeatured: true),
                                          Icon(name: "Glasses icon", imageName: "ic_glasses", description: "Colorful icon designed by Marin Begović.", price: 3.99, isFeatured: false),
                                          Icon(name: "Icecream icon", imageName: "ic_ice_cream", description: "Colorful icon designed by Marin Begović.", price: 4.99, isFeatured: false),
                                          Icon(name: "Smoking pipe icon", imageName: "ic_smoking_pipe", description: "Colorful icon designed by Marin Begović.", price: 6.99, isFeatured: false),
                                          Icon(name: "Vespa icon", imageName: "ic_vespa", description: "Colorful icon designed by Marin Begović.", price: 9.99, isFeatured: false)]

}
Both the IconData structure and the iconSet variable are defined with the access level public, so that other modules can access them. If you want to learn more about access levels in Swift, you can check out the official documentation (https://docs.swift.org/swift-book/LanguageGuide/AccessControl.html).
Moving the Icon Class from CollectionViewDemo to the Framework
Next, we will migrate the Icon class (i.e. Icon.swift) from CollectionViewDemo to the IconDataKit framework. To do that, you just need to drag the Icon.swift file under CollectionViewDemo to IconDataKit. But make sure you change the target membership from CollectionViewDemo to IconDataKit. Otherwise, you will experience an error when building the framework.
Similar to what we did earlier, we need to modify the code a bit to change the access level to public like this:
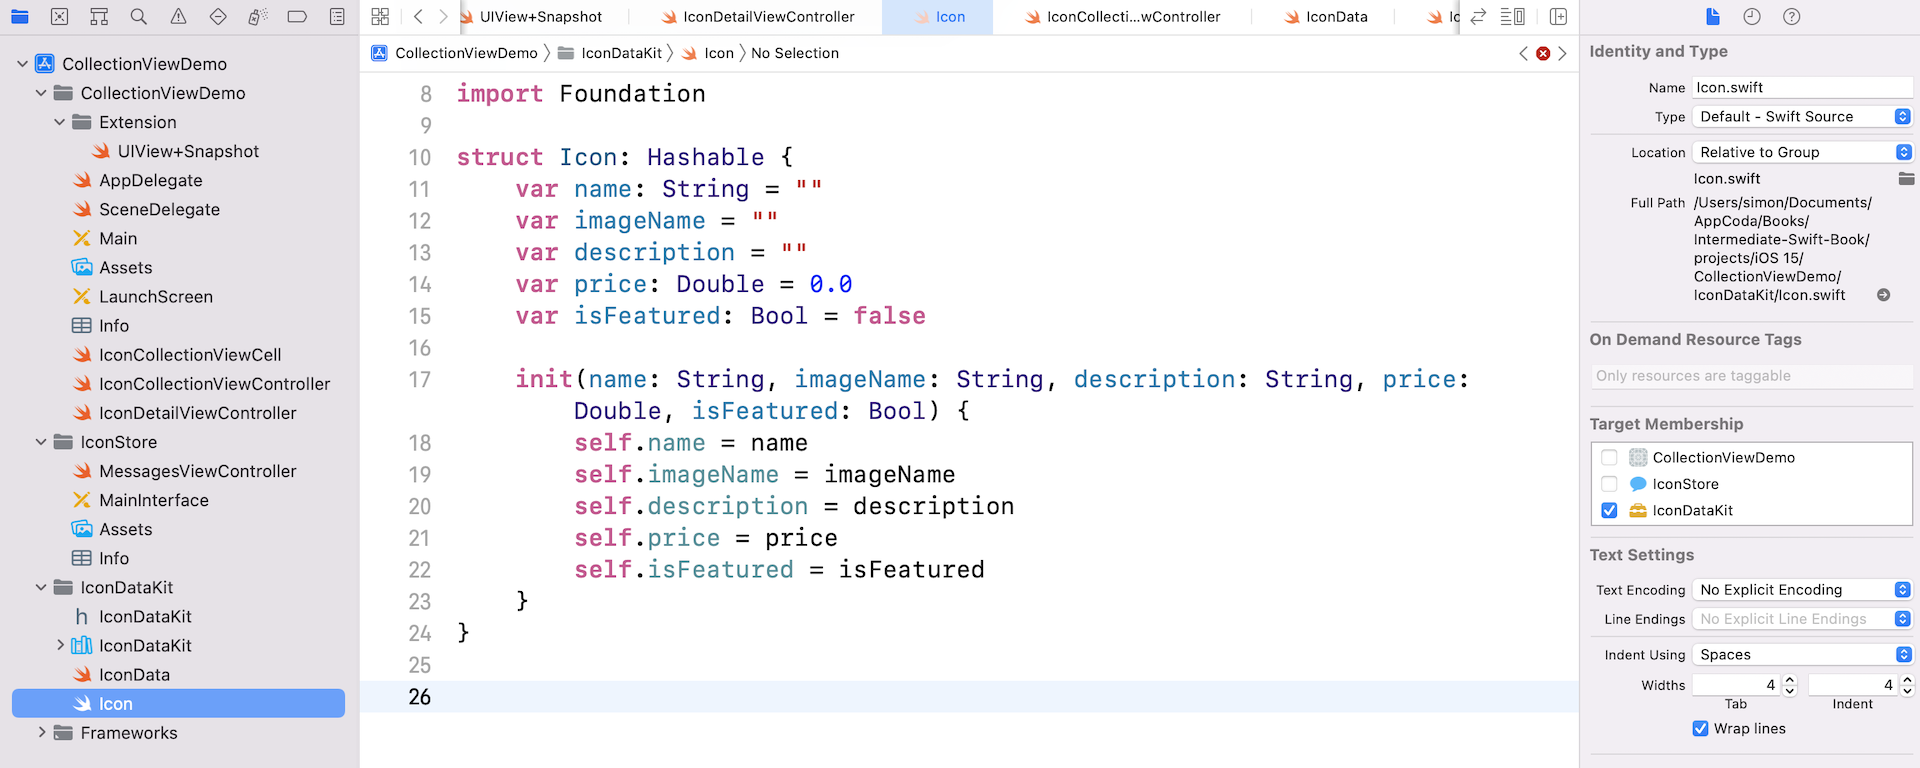
public struct Icon: Hashable {
    public var name: String = ""
    public var imageName = ""
    public var description = ""
    public var price: Double = 0.0
    public var isFeatured: Bool = false

    init(name: String, imageName: String, description: String, price: Double, isFeatured: Bool) {
        self.name = name
        self.imageName = imageName
        self.description = description
        self.price = price
        self.isFeatured = isFeatured
    }
}
Replacing the Value of the iconSet Variable
Now that the icon data is migrated to the IconDataKit framework, it is time to replace the original iconSet variable in the IconCollectionViewController class with the one in IconData.
Open IconCollectionViewController.swift and add the following import statement:
import IconDataKit
Replace the iconSet variable like this:
private var iconSet: [Icon] = IconData.iconSet
Now we refer to the set of icon data defined in IconDataKit. Lastly, open IconDetailViewController.swift, which also refers to the Icon class. Insert the following statement at the very beginning to import the IconDataKit framework:
import IconDataKit
That's it. We have now migrated the common data to a framework. If you run the app (i.e. CollectionViewDemo) on an iOS device or simulator, you should see the same UI as shown in figure 35.11. The app should look the same as it is. However, the underlying implementation of the icon data is totally different. And, the framework is ready to be used by both CollectionViewDemo and IconStore.
Designing the UI of the iMessage App
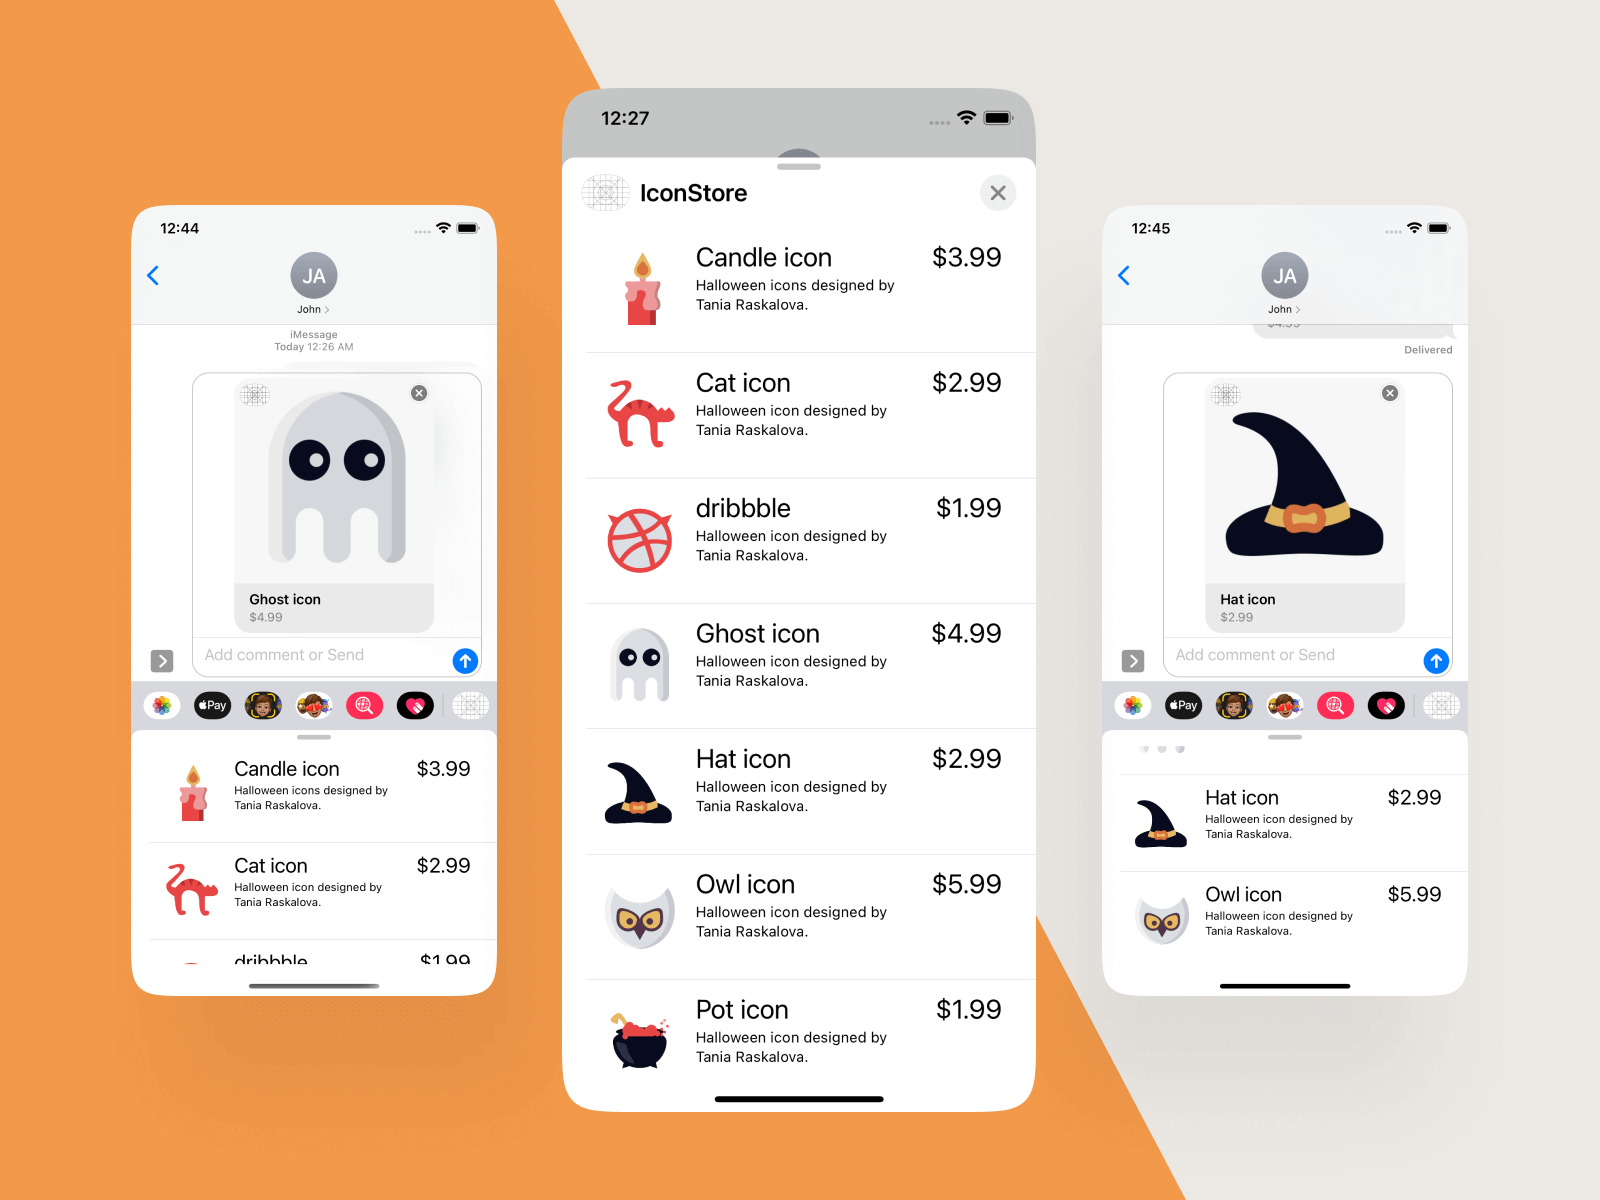
Okay, it's time to move onto the implementation of the iMessage app. We will begin with the user interface. If you forget the look & feel of the iMessage app we are going to build, refer to figure 35.4. The iMessage app displays a list of icons with description and price in a table view. When the user taps any of the icons, it will bring up a modal view controller to display the icon details.
Now open the MainInterface storyboard under IconStore. Let's see how to design the iMessage app UI.
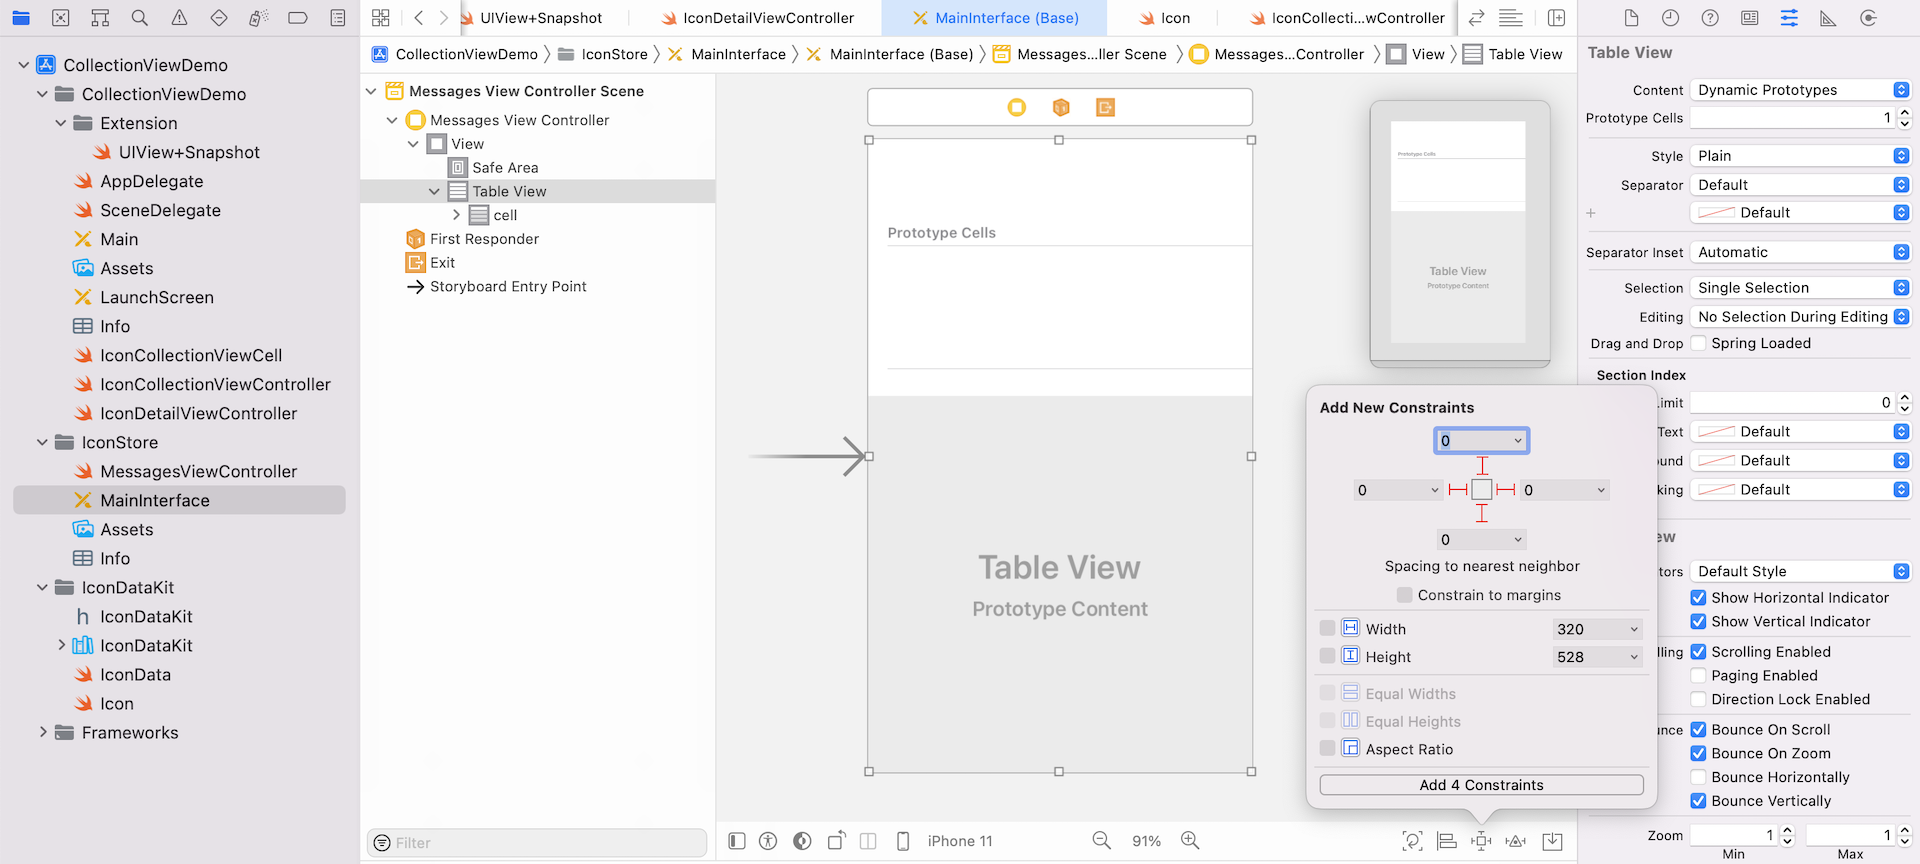
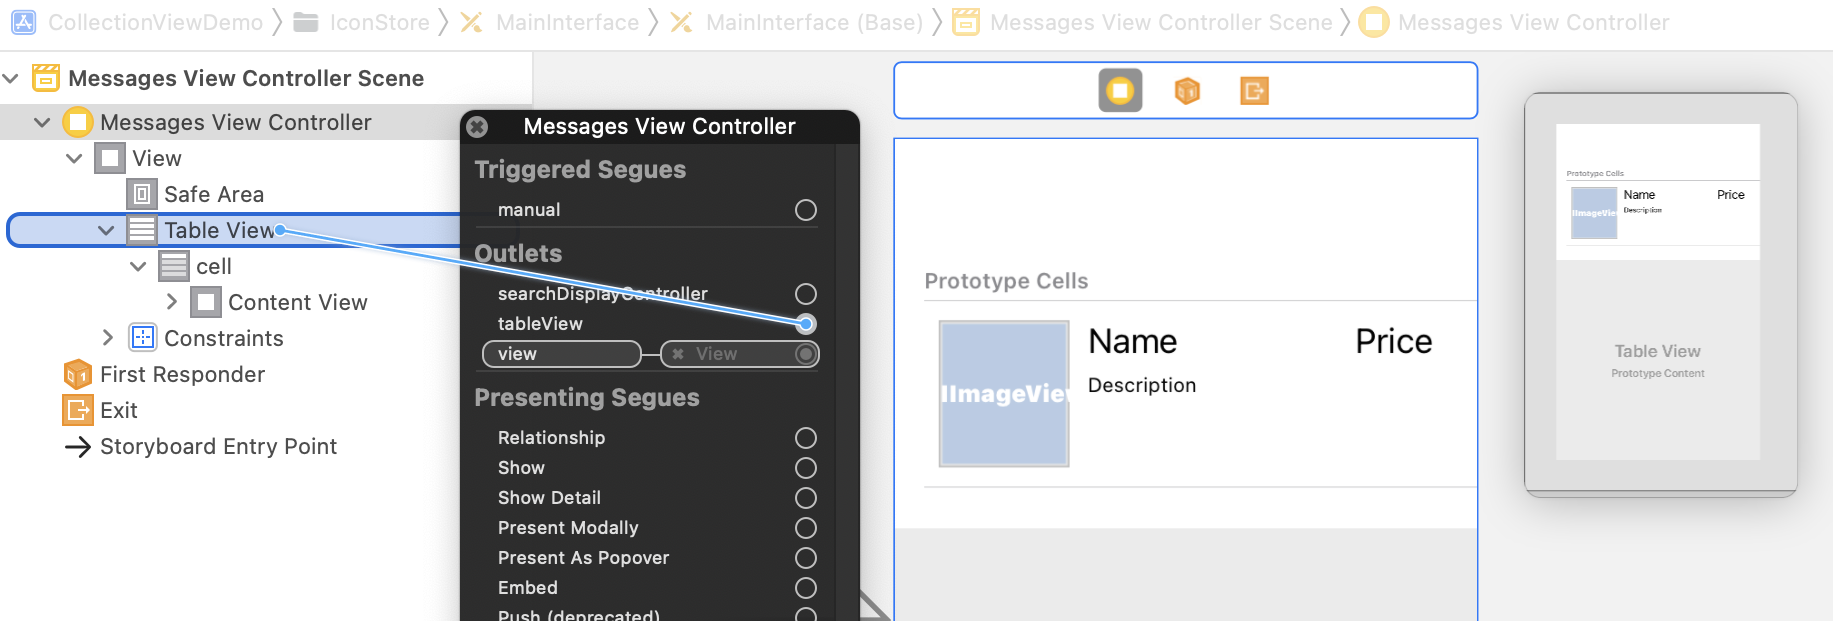
For any iMessage app, MSMessagesAppViewController is the principal view controller. This is the view controller it is presented to users when the iMessage app is launched. The storyboard already comes with a default view controller, which is a child class of MSMessagesAppViewController. We're going to design this controller and turn it into a table view for displaying a list of icons.
First, delete the default "Hello World" label. Then drag a table view object from the Object library to the view controller. Resize it to fit the whole view. In the Attributes inspector, change the Prototype Cells option from 0 to 1 to add a prototype cell. Next, change the height of the cell to 103 points. Make sure you select the table view cell and go to the Attributes inspector. Set the cell's identifier to cell.
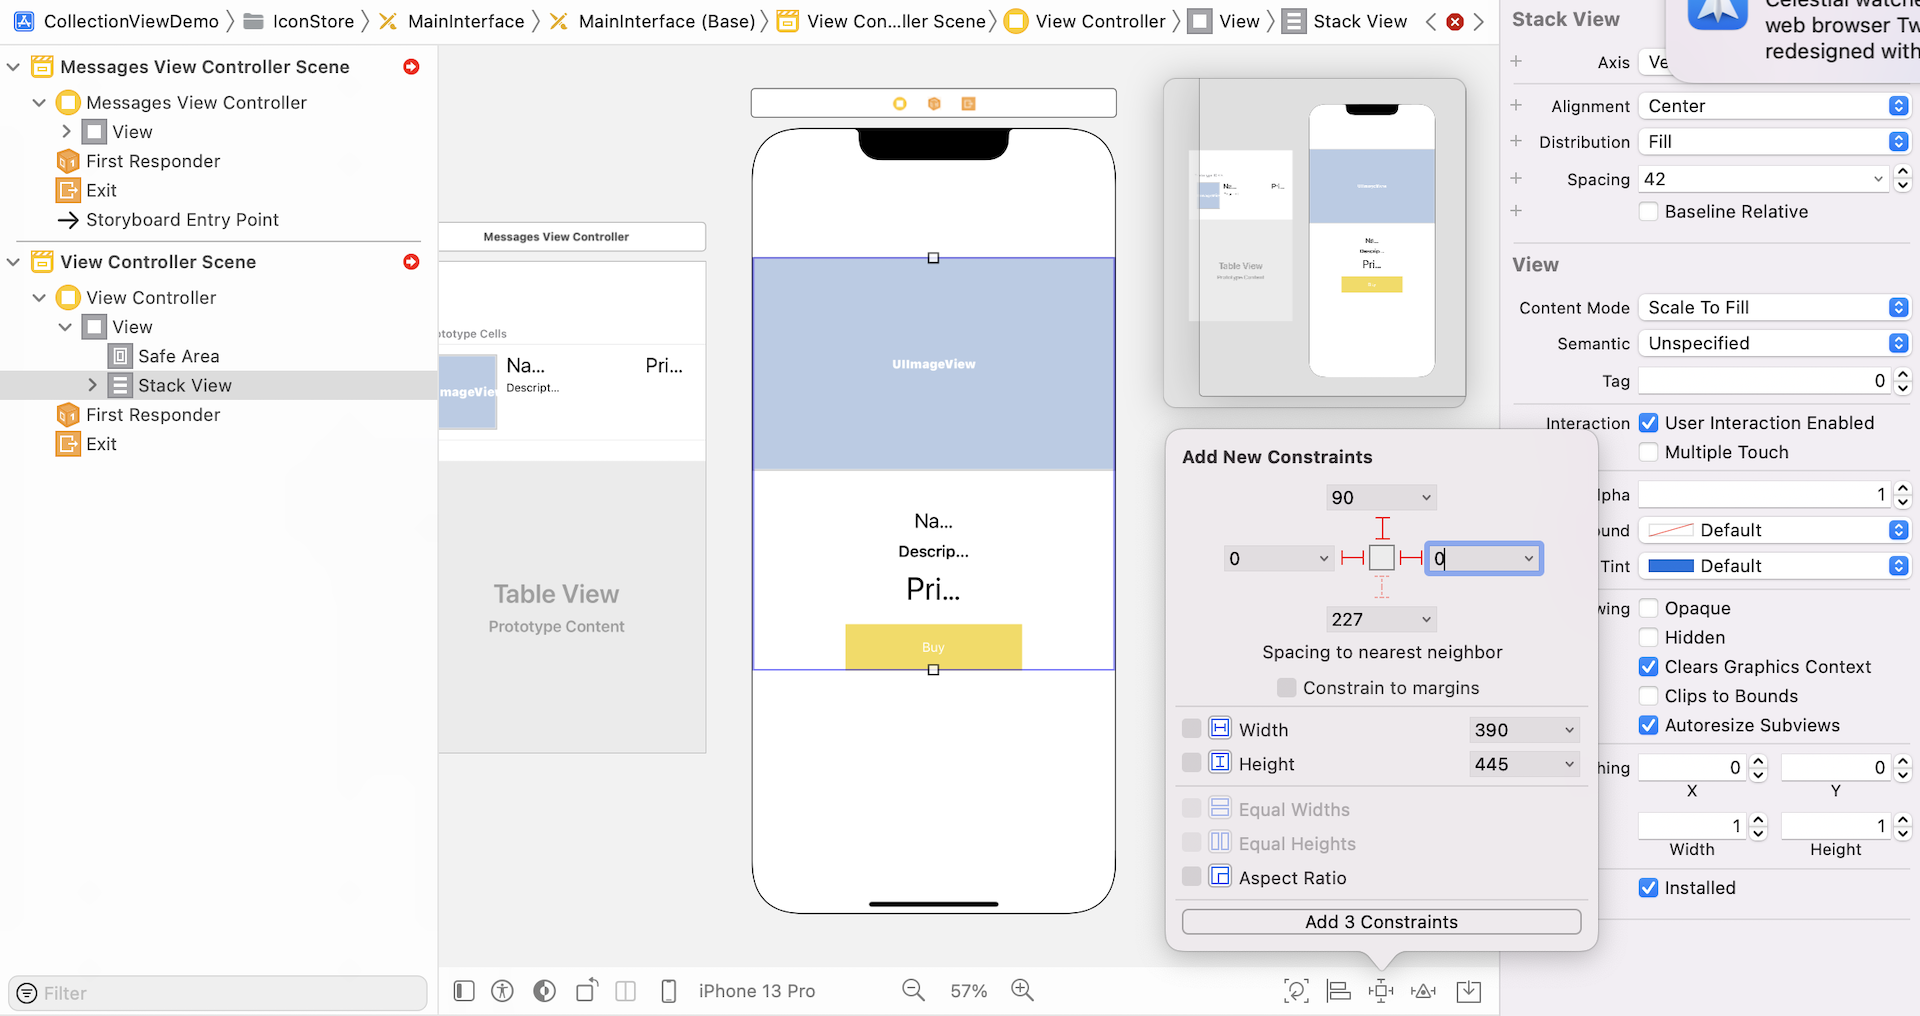
To ensure the table view fits all screen sizes, select the table view and click the Add New Constraints button. Set the spacing values to zero and add the constraints.
So far, your UI should look like figure 35.12. Now we are going to design the prototype cell.
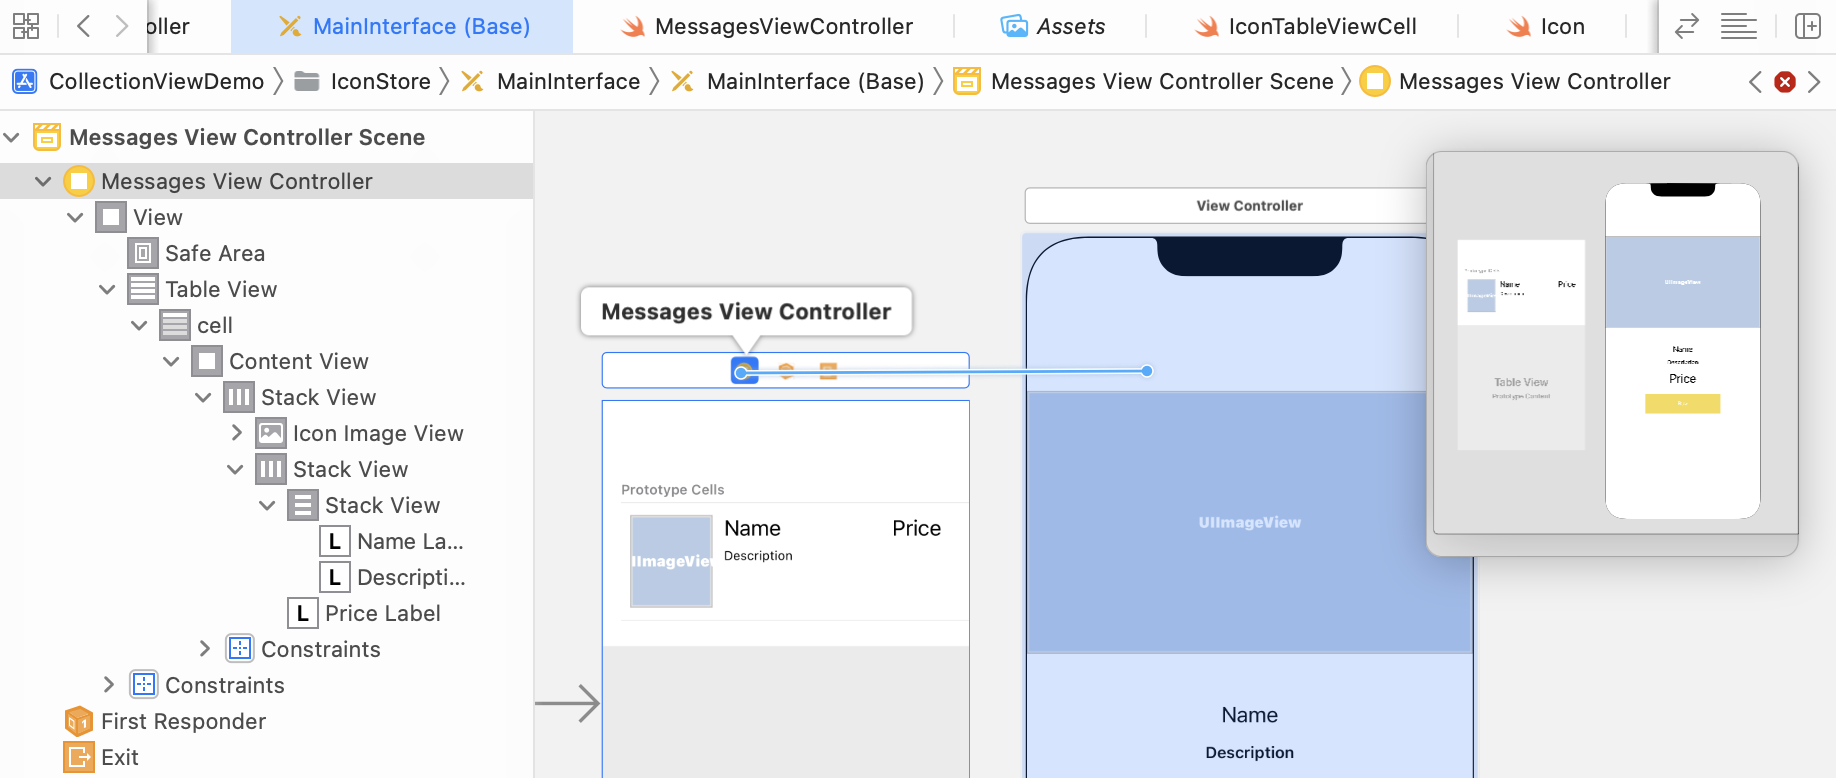
First, drag an image view to the cell. Change its size to 72 points by 86 points. In the Attributes inspector, set the content mode to Aspect Fit.
Next, add a label to the cell and change the title to Name. Set the font to Title 2. Drag another label to the cell and set the title to Description. Set the font to Caption 1.
Now drag another label to the cell and set the title to Price. Again, set the font to Title 2. Also, set the Alignment option to right-aligned.
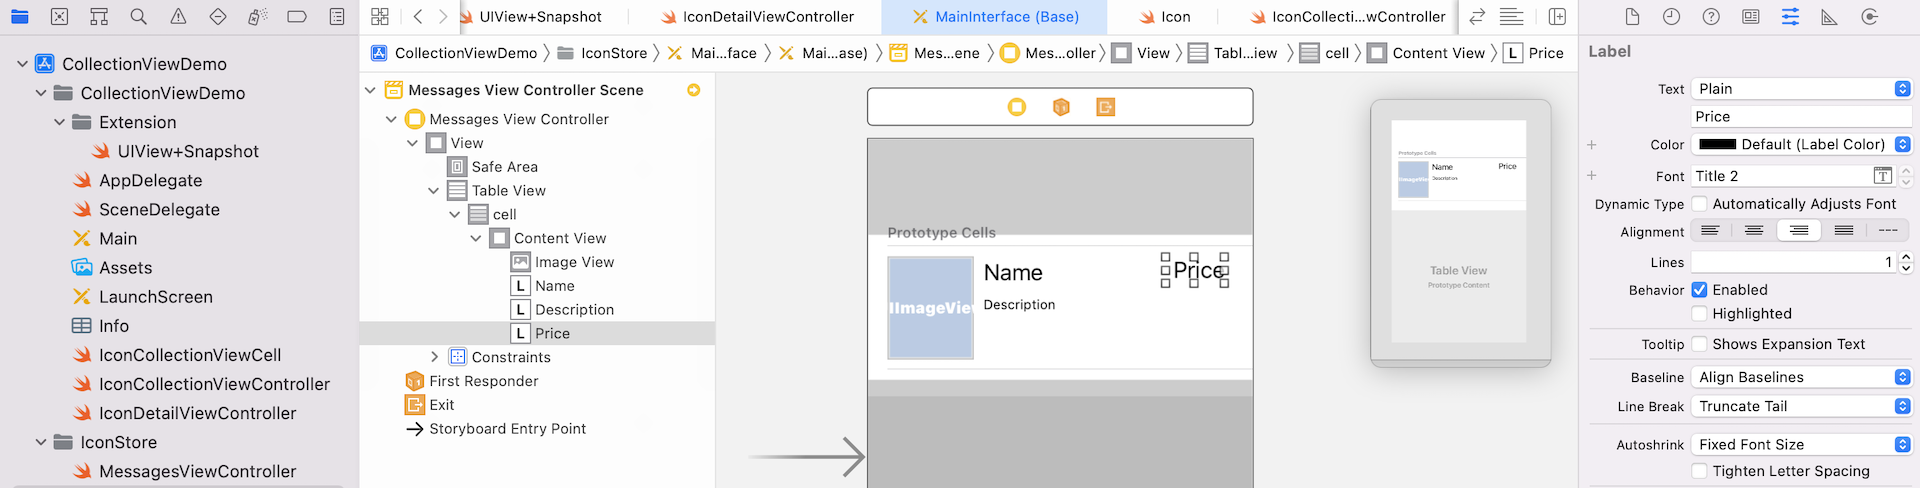
Once finished, your cell UI should be similar to that shown in figure 35.13.
In order to ensure the UI elements fit all types of screens, we will use stack views and add some layout constraints for the labels and image view.
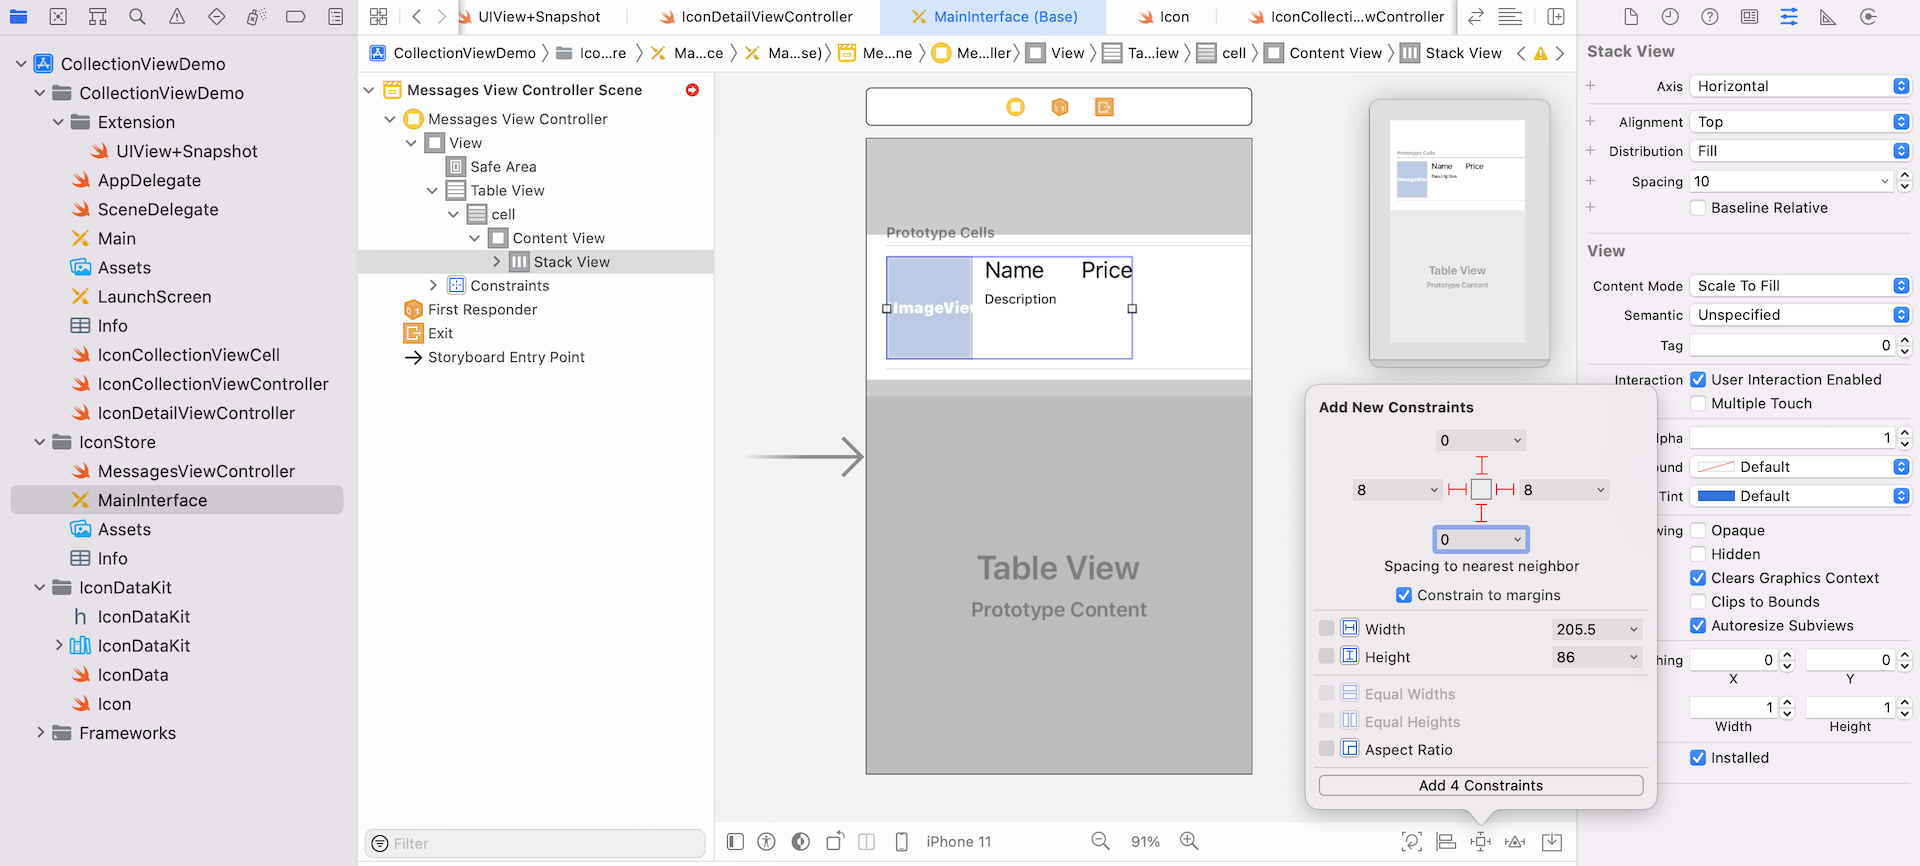
First, hold the command key, and select both Name and Description labels. Click the Embed in button to embed them in a stack view. Then select both the stack view and the Price label. Again, click the Embed in button to embed both items in a stack view. In the Attributes inspector, set the spacing option to 20 points.
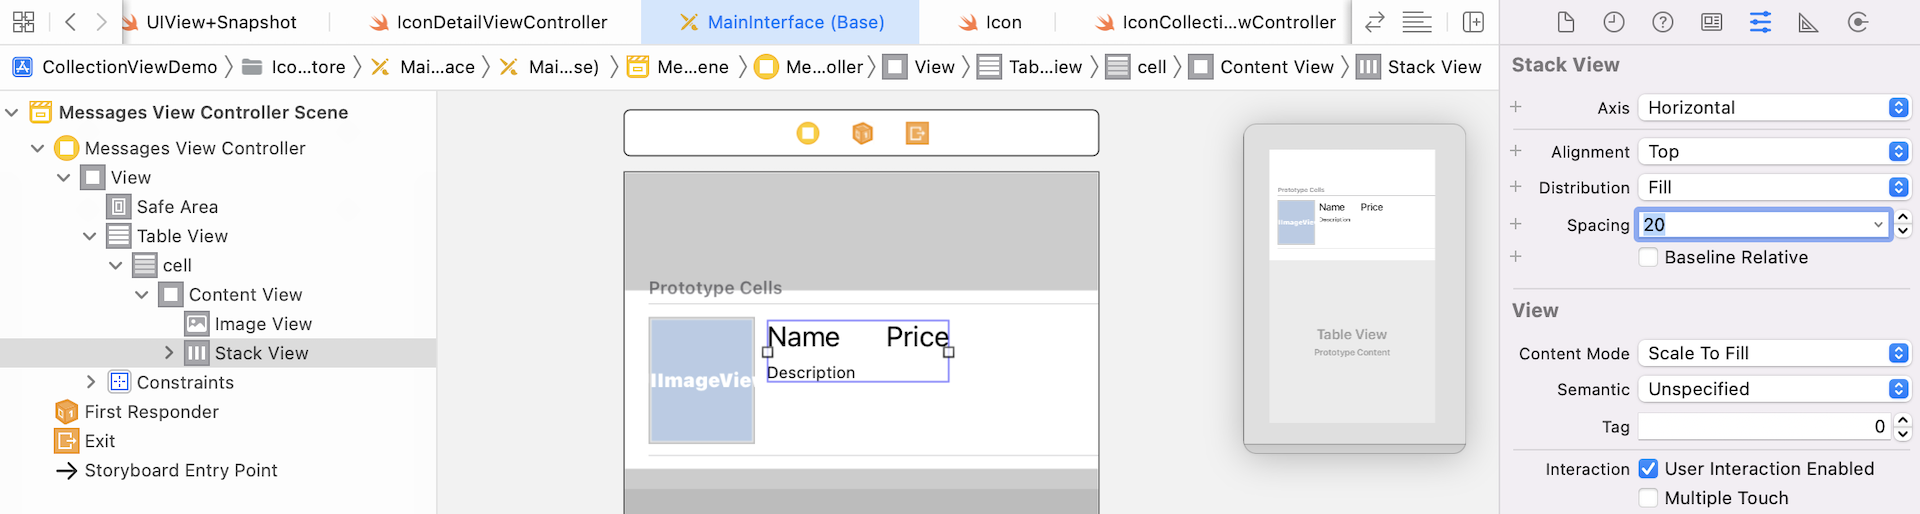
Next, select the stack view we just created and the image view. Click the Embed in button to embed both UI elements in a stack view. In the Attributes inspector, set the spacing to 10 points.
Once again, select the stack view, that embeds all the labels and image view. Click the Add New Constraints button and add 4 spacing constraints for the stack view. Refer to figure 35.15 for the spacing values.
If you experience any layout issues, just hit the Update Frames in the layout bar to fix the issues.
Lastly, we want to fix the size of the image view. Select the image view, and then click the Add New Constraints button. Check both width and height checkboxes, and add the constraints.
Now that you've completed the design of the Messages View Controller, let's move onto the coding part.
Implementing MessagesViewController
The Messages View Controller in the storyboard is associated with the MessagesViewController.swift. In order to display the icons in the table, we have to implement two things:
- Create a new class for the custom table view cell
- Update the
MessagesViewControllerclass to implement bothUITableViewDataSourceandUITableViewDelegateprotocols
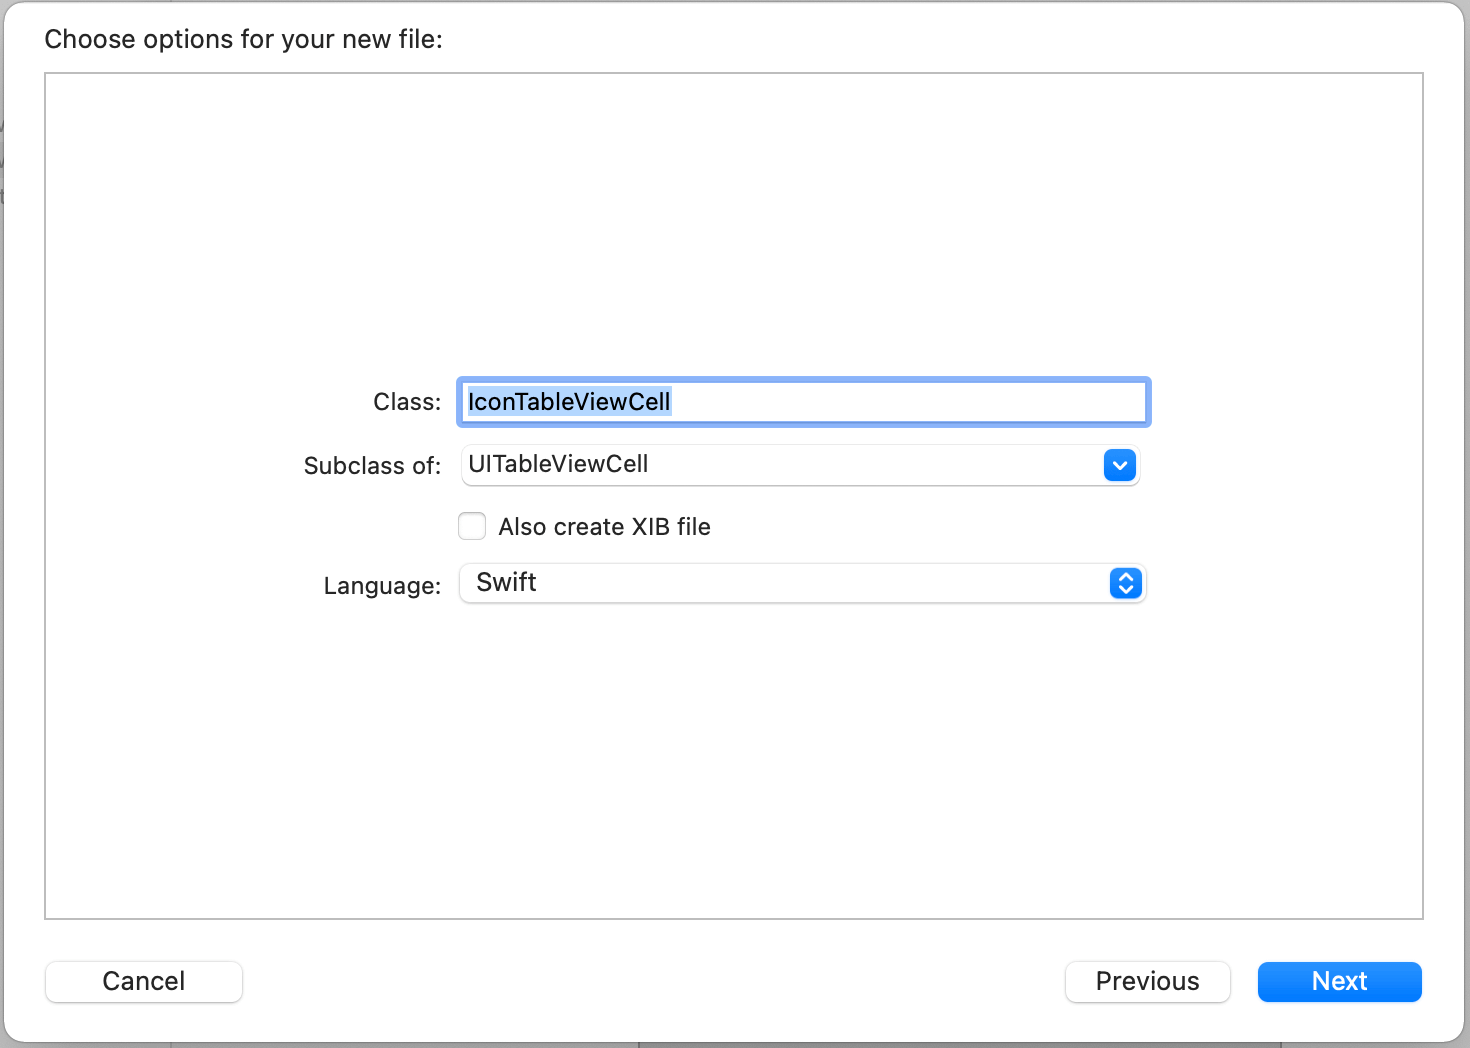
Note: I assume that you understand how to work with UITableView and populate data in it. If not, please refer to the beginner book for details.So first, right click the IconStore folder in the project navigator. Choose
New File… and select Cocoa Touch Class. Name the class IconTableViewCell.
Once the file is created, add the following outlet variables in the IconTableViewCell class:
@IBOutlet var iconImageView: UIImageView!
@IBOutlet var nameLabel: UILabel!
@IBOutlet var descriptionLabel: UILabel! {
    didSet {
        descriptionLabel.numberOfLines = 0
    }
}
@IBOutlet var priceLabel: UILabel!
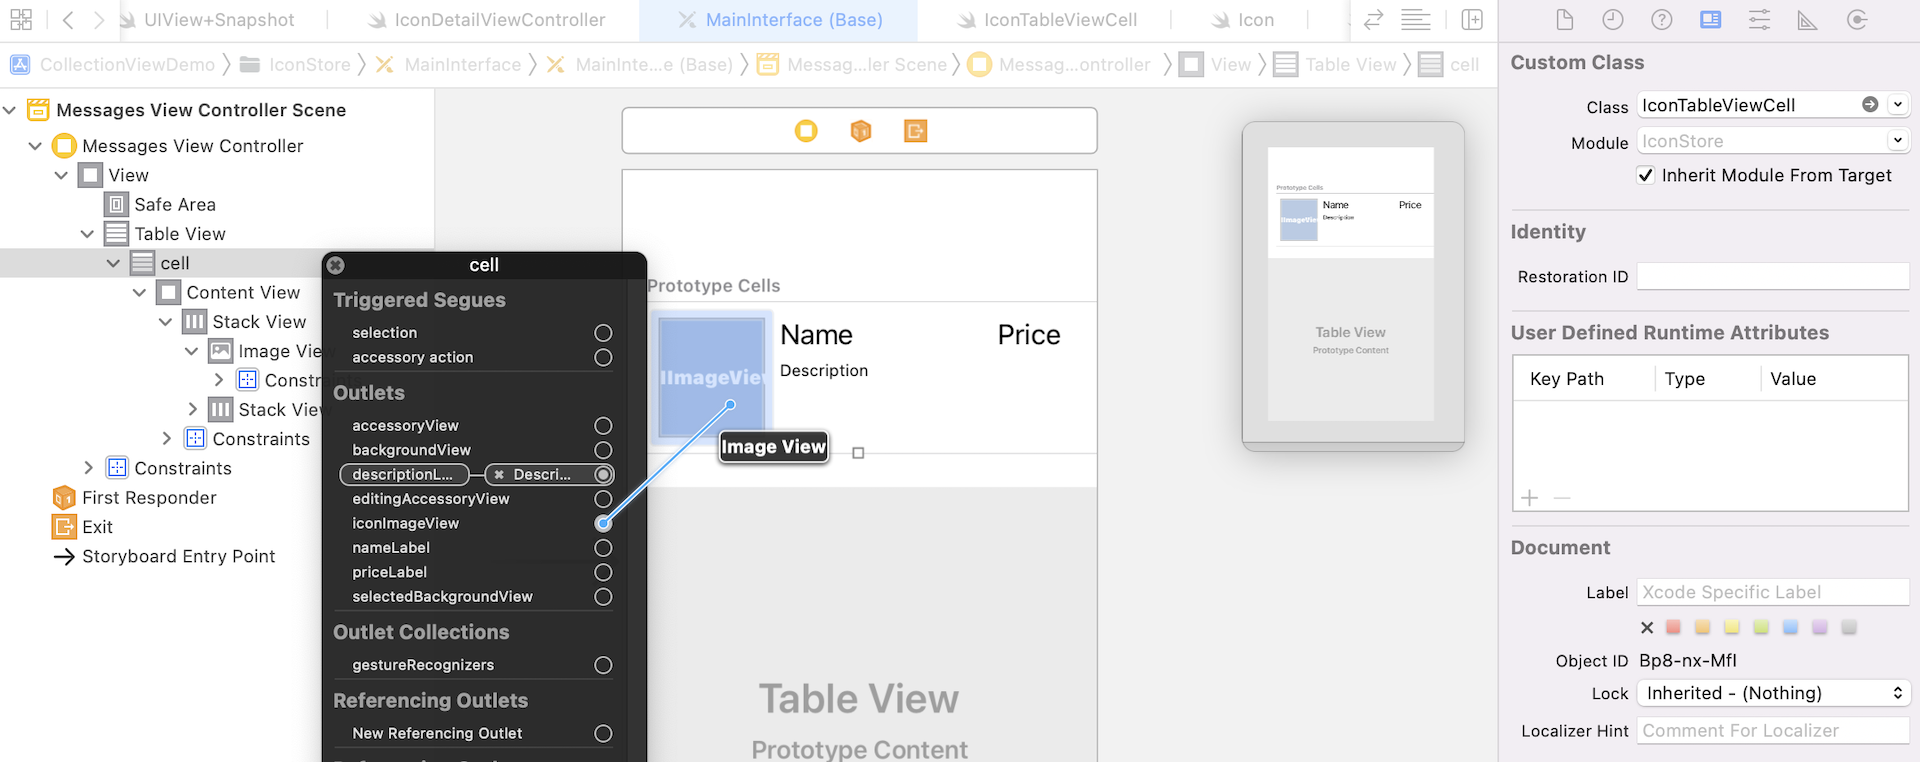
Now go back to MainInterface storyboard and select the prototype cell. In the Identity inspector, set the custom class to IconTableViewCell. Then connect the labels/image view with the corresponding outlet variable.
The next step is to populate the data to the table view we just designed. Switch over to the MessagesViewController.swift file, add an import statement to import the IconDataKit framework. We need to do this because we are going to load the icon data from the framework.
import IconDataKit
Next, define an outlet variable for the table view in the class:
@IBOutlet var tableView: UITableView!
You need to switch back to MainInterface to connect the table view with the tableView outlet.
Similar to IconCollectionViewController, we need to define a variable to hold the icon set ( or the icon data). In MessagesViewController, define a new variable named iconSet to store the icon data from IconData:
private var iconSet = IconData.iconSet
To populate the icon data in the table view, we will use the diffable data source approach. Create an extension and implement two methods like this:
extension MessagesViewController {

    func configureDataSource() -> UITableViewDiffableDataSource<Section, Icon> {

        let dataSource = UITableViewDiffableDataSource<Section, Icon>(tableView: tableView) { (tableView, indexPath, icon) -> UITableViewCell? in

            let cell = tableView.dequeueReusableCell(withIdentifier: "cell", for: indexPath) as! IconTableViewCell

            cell.nameLabel.text = icon.name
            cell.descriptionLabel.text = icon.description
            cell.priceLabel.text = "$\(icon.price)"
            cell.iconImageView.image = UIImage(named: icon.imageName)

            return cell
        }

        return dataSource
    }

    func updateSnapshot(animatingChange: Bool = false) {

        // Create a snapshot and populate the data
        var snapshot = NSDiffableDataSourceSnapshot<Section, Icon>()
        snapshot.appendSections([.all])
        snapshot.appendItems(iconSet, toSection: .all)

        dataSource.apply(snapshot, animatingDifferences: false)
    }
}
I assume you understand how to use the diffable data source to work with UITableView, so I will not go into the details of the methods. In brief, the configureData() method is written for preparing the diffable data source with the cell configuration. The updateSnapshot method is designed to create the snapshot for presenting the data to the table view.
Next, declare the Section enum and the dataSource variable in the same class:
enum Section {
    case all
}

lazy var dataSource = configureDataSource()
Lastly, update the viewDidLoad() method to set the data source of the table view:
override func viewDidLoad() {
    super.viewDidLoad()

    tableView.dataSource = dataSource

    updateSnapshot()
}
Now it is ready to test the iMessage app and see if it works. Make sure you select the MessagesExtension scheme (i.e. IconStore) and choose whatever iOS simulator as you like. Hit the Run button and load the message extension in the Messages app.
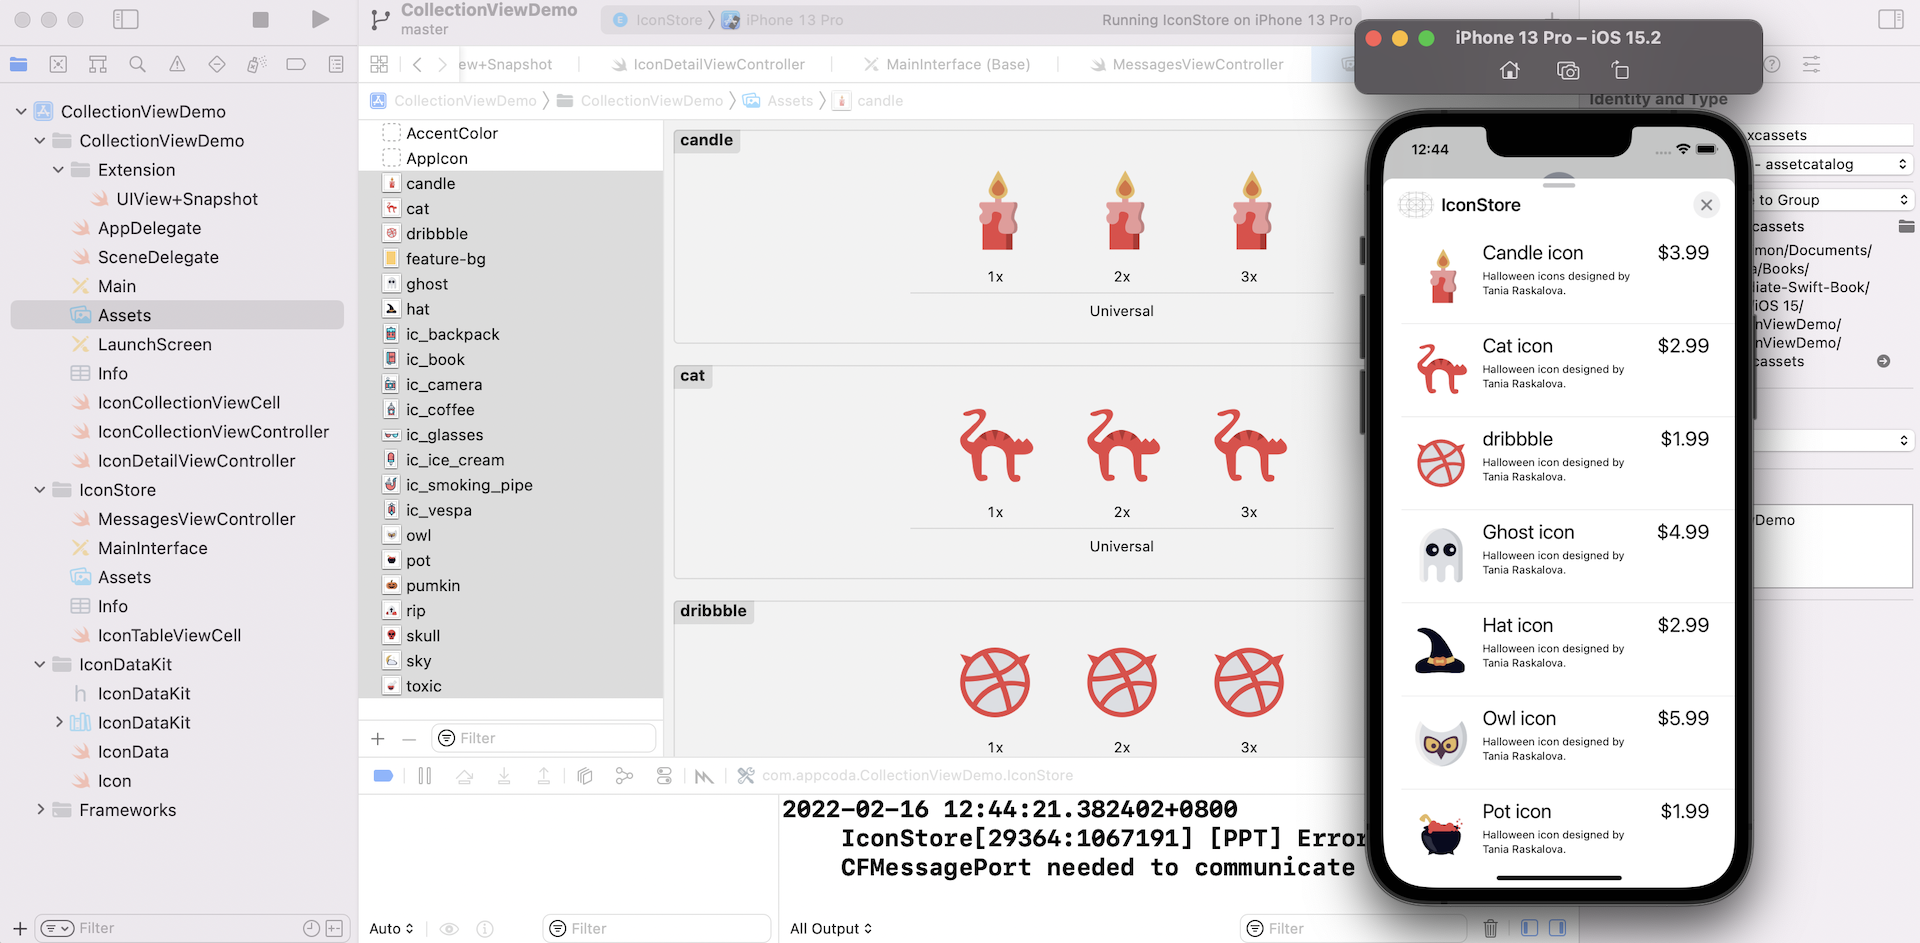
If everything works as expected, your iMessage app should display a list of icons in Messages. But you will notice that all icon images are missing.
Currently, the icon images are put in the asset catalog of the CollectionViewDemo app. If you select the asset catalog, you should find that its target membership is set to CollectionViewDemo. To allow the message extension to access the asset, check IconStore under target membership.
Run the iMessage app again. It should be able to load the icon images. You can click the expand button at the lower right corner to expand the view to reveal more icons.
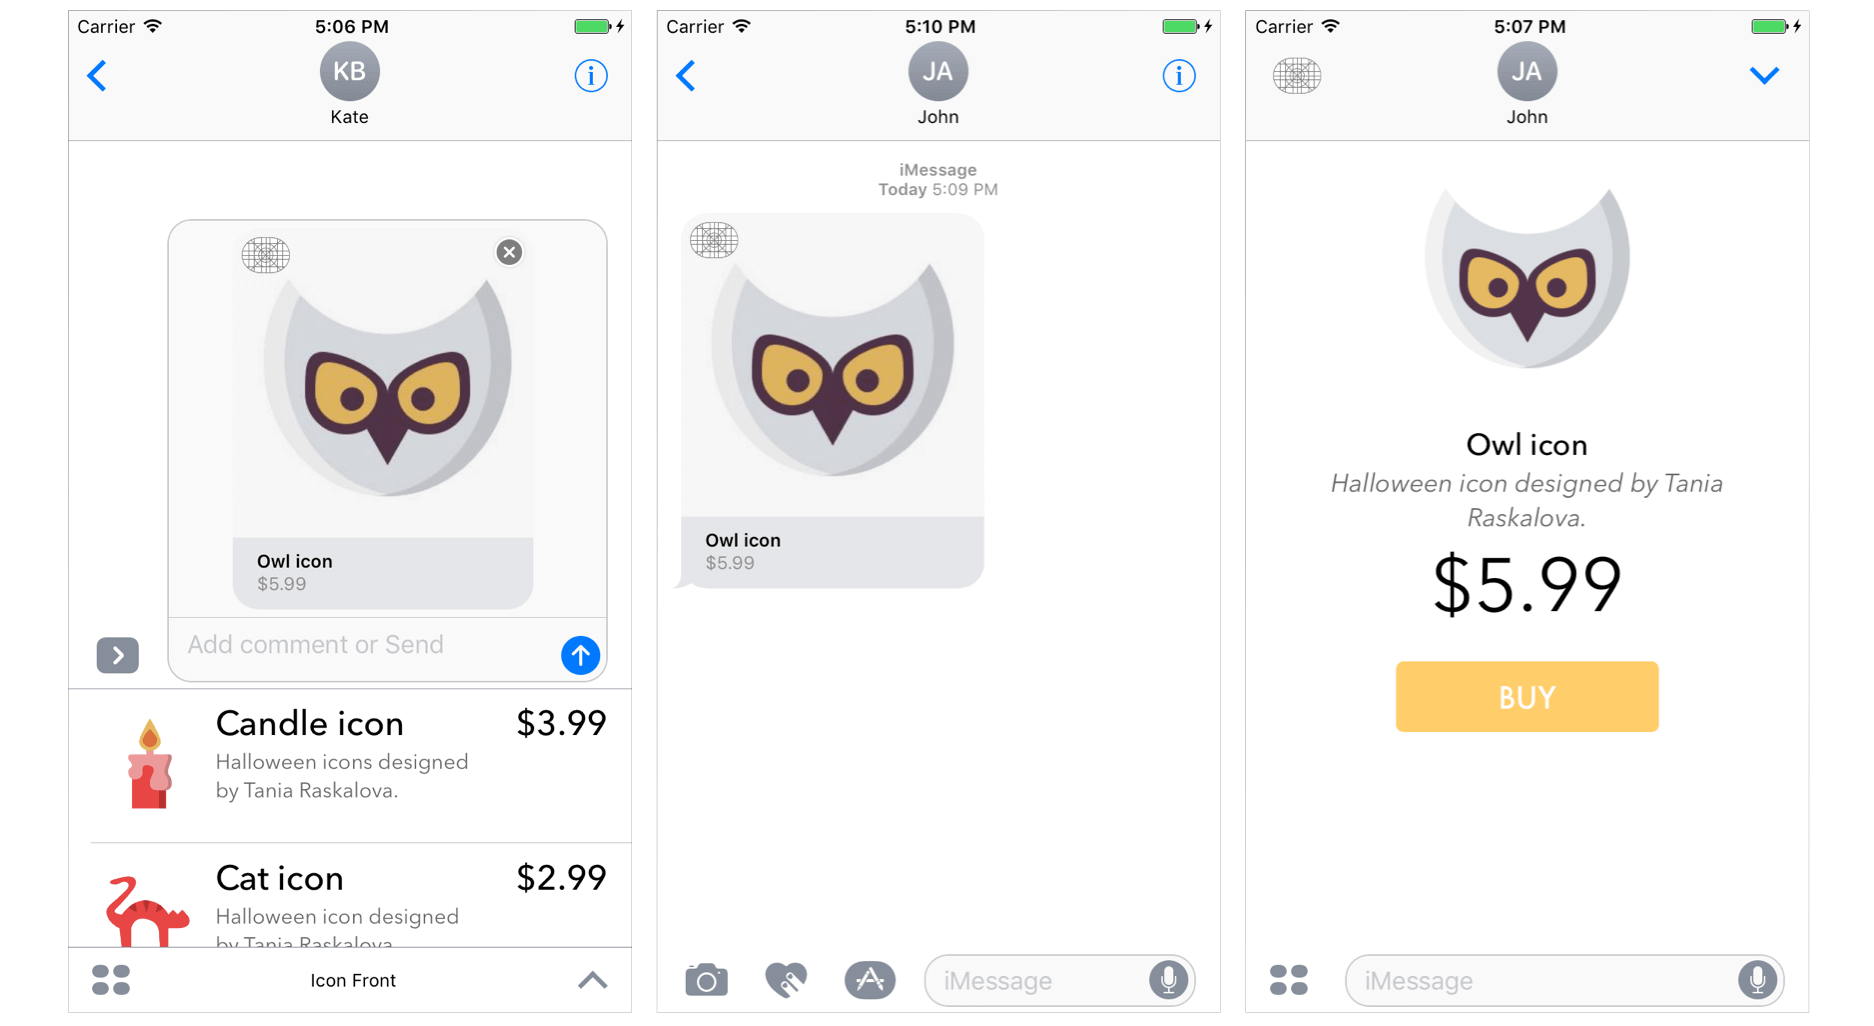
Adding a Message to the Conversation
Did you tap an icon and expect it to show up in the message field? Meanwhile, it won't. Unlike the sticker app we built in the previous chapter, you have to handle the item selection on your own for a custom iMessage app.
If you understand the UITableViewDelegate protocol, you should be very familiar with the implementation of table view selection. It comes down to this method of the protocol:
optional func tableView(_ tableView: UITableView, didSelectRowAt indexPath: IndexPath)
In the MessagesViewController class, insert a line of code to declare the selectedIcon variable:
private var selectedIcon: Icon?
This variable is used to hold the selected icon for later use. For the tableView(_:didSelectRowAt:) method, we will implement it using an extension:
extension MessagesViewController: UITableViewDelegate {

    func tableView(_ tableView: UITableView, didSelectRowAt indexPath: IndexPath) {

        requestPresentationStyle(.compact)
        tableView.deselectRow(at: indexPath, animated: true)

        let icon = iconSet[indexPath.row]

        if let conversation = activeConversation {
            let messageLayout = MSMessageTemplateLayout()
            messageLayout.caption = icon.name
            messageLayout.subcaption = "$\(icon.price)"
            messageLayout.image = UIImage(named: icon.imageName)

            let message = MSMessage()
            message.layout = messageLayout

            if var components = URLComponents(string: "http://www.appcoda.com") {
                components.queryItems = icon.queryItems
                message.url = components.url
            }

            conversation.insert(message, completionHandler: { (error) in
                if let error = error {
                    print(error)
                }
            })
        }
    }
}
Let me walk you through the code line by line.
As you know, iMessage apps can be in two states: compact and expanded. The message field only appears when the app is in compact mode. Therefore, the first line of code (requestPresentationStyle(.compact)) ensures the iMessage app returns to compact mode.
The second line is pretty trivial. We simply call the deselectRow method of the table view to deselect the row.
The next two lines are to retrieve the current selected icon.
The rest of the code is the core of the method. MSMessagesAppViewController has a property called actionConversation, which holds the conversation that the user is currently viewing in the Messages app. To add a message to the existing conversion, you will need to implement a couple of things:
Create an
MSMessageobject - it is the object that will be inserted in the conversation. To create anMSMessageobject, you are required to set both itsurlandlayoutproperties. TheURLproperty is the model of the message. In other words, it contains the message's data in form of URL. Here is an example:http://www.appcoda.com/?name=Cat%20icon&imageName=cat&description=Halloween%20icon%20designed%20by%20Tania%20Raskalova.&price=2.99The information of the cat icon is encoded into a URL string. Each property of an icon is converted into a URL parameter. At the receiving end, it can pick up the URL and easily get back the message content by parsing the URL parameters.
Not only is the URL designed for data passing, it is intended to link to a particular web page to display the custom message content for devices who do not support the messaging extension. Say, you view a message sent from an iMessage app using the built-in Messages app on macOS. You will be redirected to the URL and use Safari to view the message content.
The
layoutproperty defines the look & feel of the message. The Messages framework comes with an API calledMSMessageTemplateLayoutthat lets developers easily create a message bubble. The message template includes the Message extension's icon, an image (video/audio file) and a number of text elements such as title and subtitle. Figure 35.21 shows the message template layout.
Figure 35.21. Message Template Layout Once the
MSMessageobject is created, you can add it to the active conversation, which is an instance ofMSConversation. To do that, you can call itsinsert(_:completionHandler:)method like this:conversation.insert(message, completionHandler: { (error) in if let error = error { print(error) } })
Now let's take a look at the code snippet again. To insert a message into the active conversation, we first create the MSMessageTemplateLayout object. We set the caption to the icon's name, subcaption to the icon's price, and the image to the icon's image.
And then we create the MSMessage object and set its layout property to the layout object just created.
As discussed earlier, we have to set the url property of the MSMessage object to the URL version of the message content.
The question is:
How can we encode and transform the content of the icon object into a URL string like this?
http://www.appcoda.com/?name=Cat%20icon&imageName=cat&description=Halloween%20icon%20designed%20by%20Tania%20Raskalova.&price=2.99
The iOS SDK has a URLComponents structure. You use it to easily access, set, or modify a URL's component parts. In general, you create a URLComponents structure with a base URL, and set its queryItems property, which is actually an array of URLQueryItem. So, you can create the URL string like this:
if var components = URLComponents(string: "http://www.appcoda.com") {
    let name = URLQueryItem(name: "name", value: icon.name)
    let imageName = URLQueryItem(name: "imageName", value: icon.imageName)
    let description = URLQueryItem(name: "description", value: icon.description)
    let price = URLQueryItem(name: "price", value: "\(icon.price)")
    components.queryItems = [name, imageName, description, price]
    message.url = components.url
}
But in the code snippet, we simplify the code to this:
if var components = URLComponents(string: "http://www.appcoda.com") {
    components.queryItems = icon.queryItems
    message.url = components.url
}
I want to centralize the encoding and decoding of the message content in the Icon class. Therefore I added a couple of extensions in the class. Insert the following code in Icon.swift:
public extension Icon {

    enum QueryItemKey: String {
        case name = "name"
        case imageName = "imageName"
        case description = "description"
        case price = "price"
    }

    var queryItems: [URLQueryItem] {
        var items = [URLQueryItem]()

        items.append(URLQueryItem(name: QueryItemKey.name.rawValue, value: name))
        items.append(URLQueryItem(name: QueryItemKey.imageName.rawValue, value: imageName))
        items.append(URLQueryItem(name: QueryItemKey.description.rawValue, value: description))
        items.append(URLQueryItem(name: QueryItemKey.price.rawValue, value: String(price)))

        return items
    }

    init(queryItems: [URLQueryItem]) {
        for queryItem in queryItems {
            guard let value = queryItem.value else { continue }

            if queryItem.name == QueryItemKey.name.rawValue {
                self.name = value
            }

            if queryItem.name == QueryItemKey.imageName.rawValue {
                self.imageName = value
            }

            if queryItem.name == QueryItemKey.description.rawValue {
                self.description = value
            }

            if queryItem.name == QueryItemKey.price.rawValue {
                self.price = Double(value) ?? 0.0
            }
        }
    }
}

public extension Icon {
    init?(message: MSMessage?) {
        guard let messageURL = message?.url else { return nil }

        guard let urlComponents = URLComponents(url: messageURL, resolvingAgainstBaseURL: false),
            let queryItems = urlComponents.queryItems else {
                return nil
        }

        self.init(queryItems: queryItems)
    }
}
Also, insert an additional import statement at the very beginning:
import Messages
In the first extension, we use enum to represent the available URL parameters of the message content. The queryItems property is computed on the fly to initialize the URLQueryItem pairs.
The extension also provides an init method that accepts an array of URLQueryItem, and set its values back to the properties of an Icon object.
The second extension is designed for the receiving side, which will be used later. It takes in an MSMessage object and converts the content to an Icon object.
By using extensions, we add more functionalities to the Icon class and centralize all the conversion logic in a common place. It will definitely make the code cleaner and easier to maintain. And this is why we can simply use a single line of code to compute the query items:
components.queryItems = icon.queryItems
Finally, don't forget to insert this line of code in the viewDidLoad method of MessagesViewController:
tableView.delegate = self
That's it. Let's rebuild and test the iMessage app. If Xcode shows you any errors, you will probably need to compile the IconDataKit framework again. You will just need to select the IconDataKit scheme and hit the Play button to rebuild it. Then you choose the MessagesExtension scheme to launch the app in simulator. Now if you pick an icon, it will be displayed in the message field, and send it over to another user.

Displaying the Icon Details
Tapping the message now brings up the iMessage app in expanded mode. This is not we expect. Instead, we want to display the details of the chosen icon. To make this happen, there are a few modifications/enhancements we have to make:
- Design the detail screen in the
MainInterfacestoryboard. - Create a new class named
IconDetailViewControllerfor the detail screen. - Modify the
MessagesViewControllerclass such that it brings upIconDetailViewControllerwhenever a message is selected.
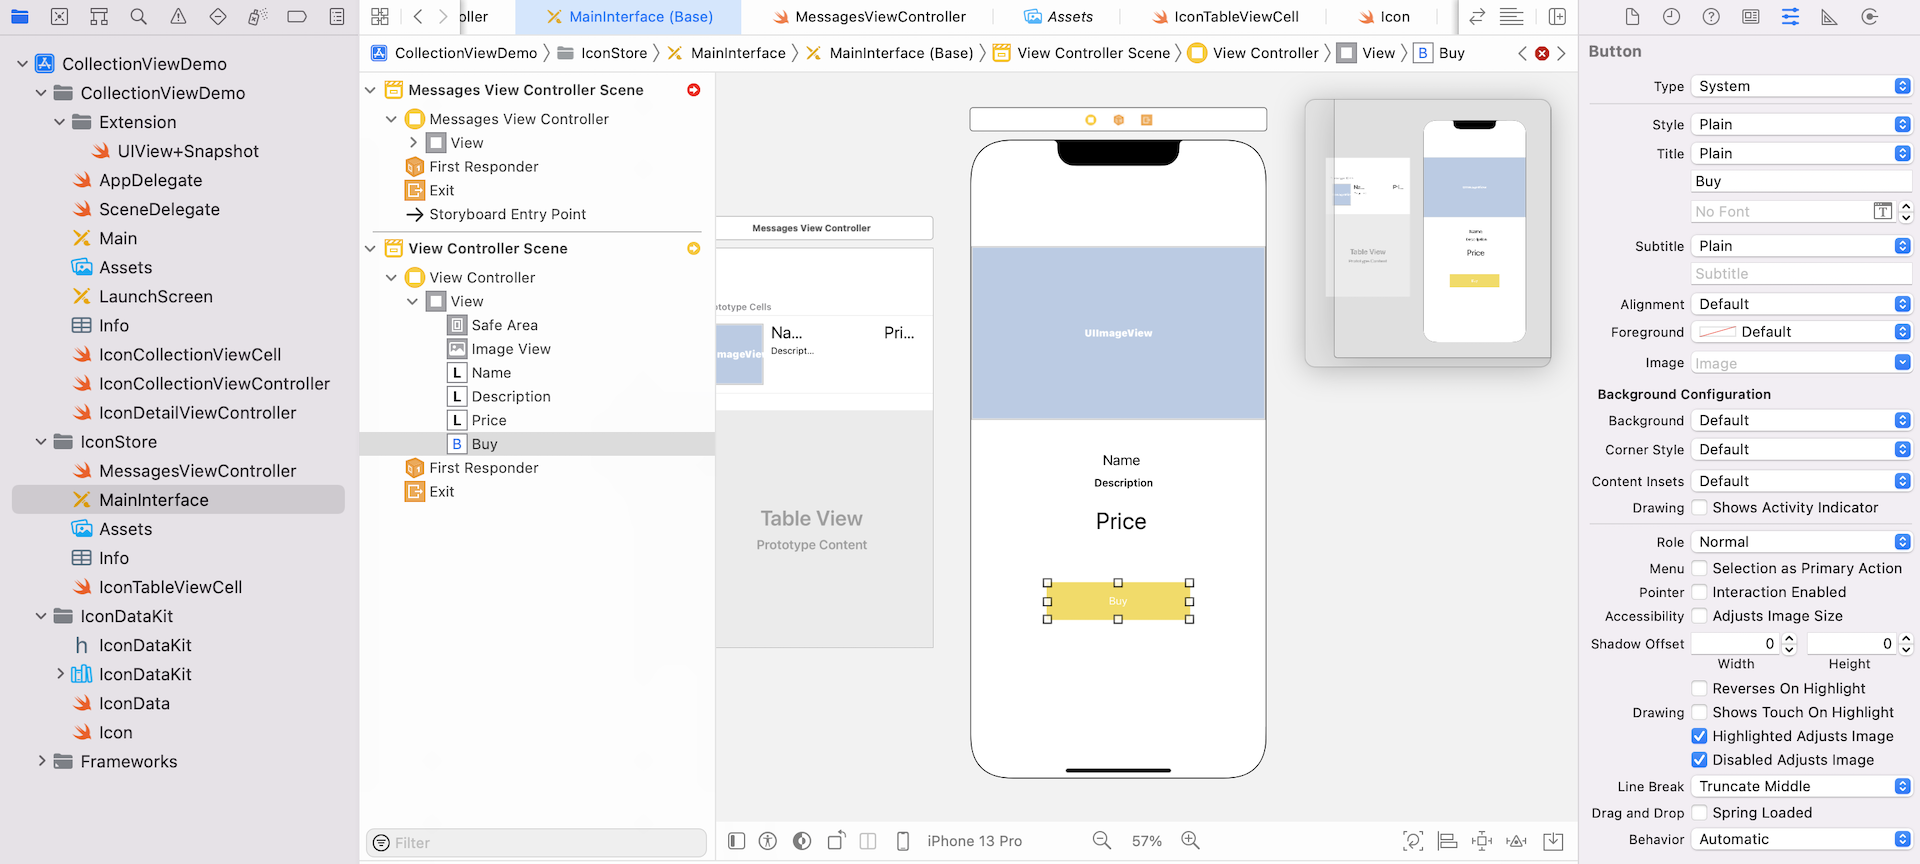
Designing the Detail View Controller
Let's begin with the first change and design the detail view controller. Open the MainInterface storyboard. In Object library, drag a view controller into the storyboard, and add the following UI elements:
- Drag an image view to the view controller. In the Size inspector, set
Xto0,Yto140,Widthto390, andHeightto230. In the Attributes inspector, set the content mode toAspect Fit. - Add a Name label to the view controller. Choose the font to whatever style you like. I use the font style Title 2. Next, add another label named Description and put it below the Name label. Change its font type to headline. Then add another label named Price. Make it a bit large than the other two labels by using the Large Title font style. For all the labels, change the alignment option to center under the Attributes inspector.
- Lastly, add a button to the view controller and name it
BUY. In Attributes inspector, set the background color to yellow and text color to white. Change the width to190and height to50. To make the button round corner, add a runtime attributelayer.cornerRadiusin the Identity inspector, and set its value to10.
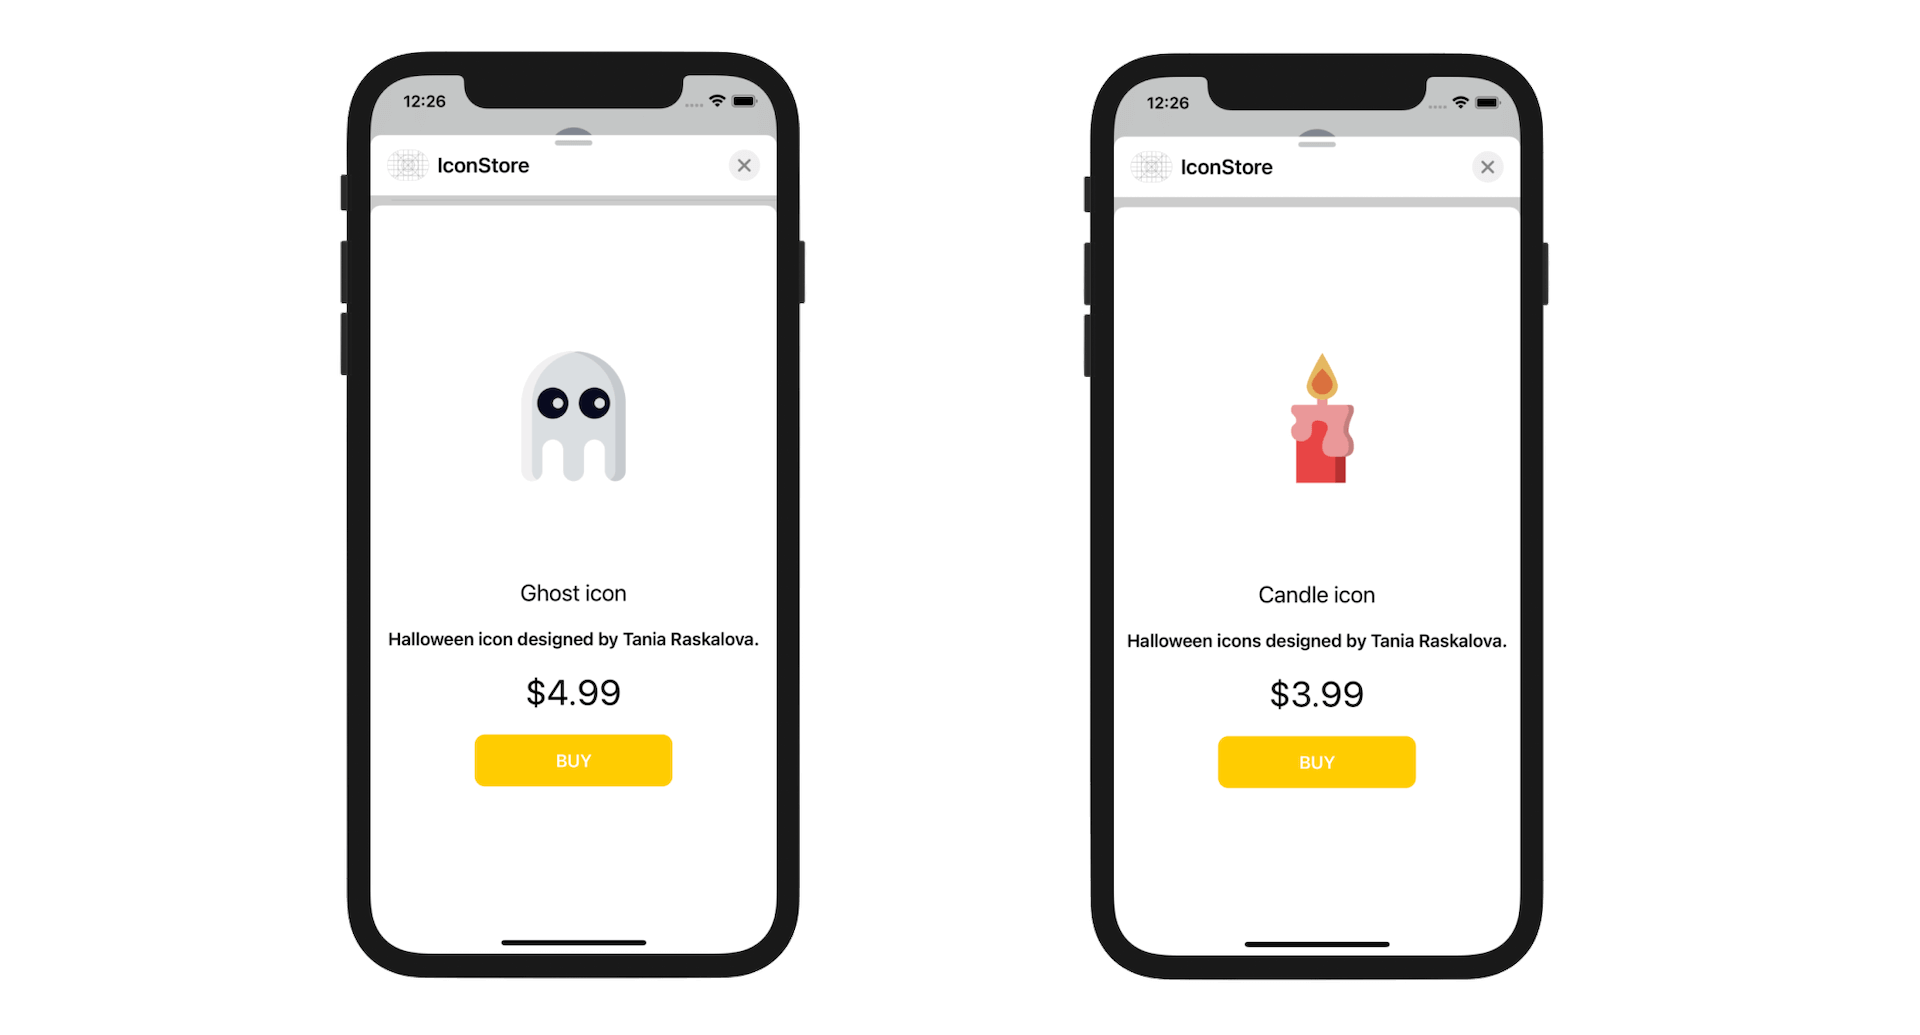
Your detail view controller should be very similar to that shown in figure 35.23.
As always, we need to add some layout constraints so that the view can fit all devices.
First, select the Name, Description and Price labels. Click the Embed button in the layout bar to embed them in a stack view.
Next, select the Buy button. Click the Add New Constraints button to add a couple of size constraints. Check both Width and Height option to add two constraints.
Then select the stack view just created and the Buy button. Again, click the Embed button to embed them in another stack view. Select the new stack view. In the Attributes inspector, set the spacing option to 20 points to add some spaces between the labels and the Buy button. Also, change the alignment option to Center.
Once again, select the new stack view and the image view. Click the Embed button to embed both views in a new stack view.
Now make sure you select the new stack view, and click the Add New Constraints button to add the spacing constraints for the top, left and right sides. You can refer to figure 35.24 for details.
Finally, select the image view and add a height constraint to resolve the ambiguity. Click the Add New Constraints button and check the height checkbox to add the height constraint.
That's it for the design.
The detail view controller will appear when a user taps one of the table cells. We will connect both view controllers using a segue. Press and hold the control key, drag from the Messages View Controller to the detail view controller. In the popover menu, choose Present Modally as the segue type.
We will need to refer to this segue in our code. So, select the segue and go to the Attributes inspector to give it an identifier. Name the identifier IconDetail.
Creating a New Class for the Detail View Controller
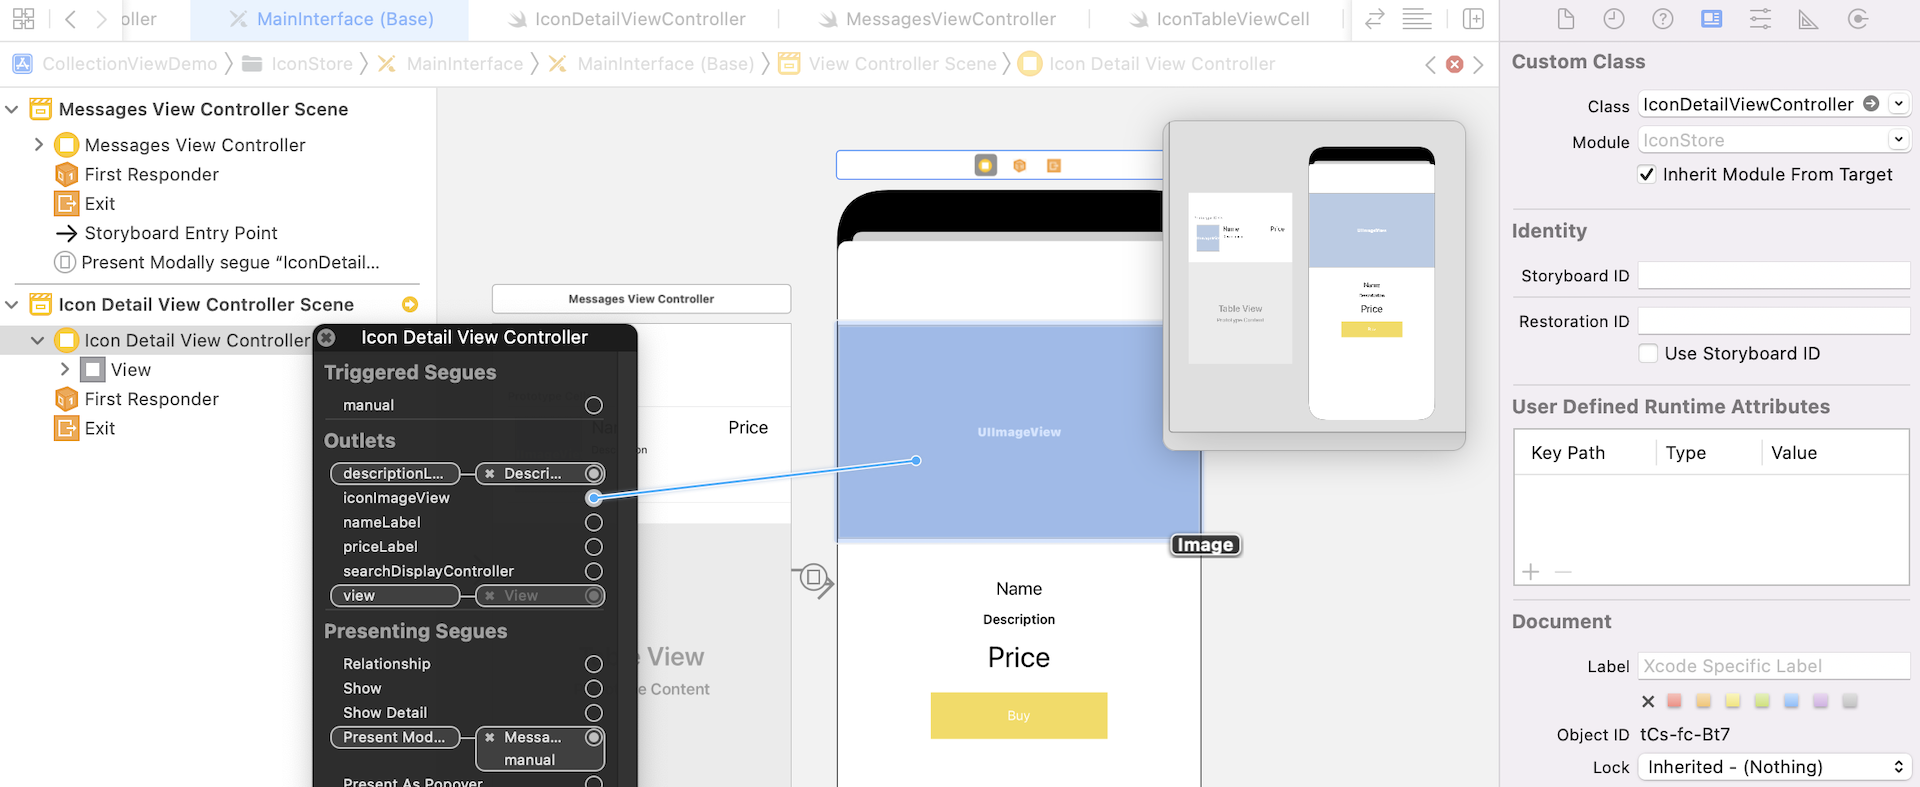
Similar to the custom cell, we will create a custom class for the detail view controller. Right click the IconStore folder and select New File…. Choose the Cocoa Touch Class template and name the class IconDetailViewController. Make sure it is extended from UIViewController.
In the IconDetailViewController.swift file created, insert the following line of code to import the IconDataKit framework:
import IconDataKit
In order to update the content of the UI elements in the detail view controller, declare the following outlets in the class and add an icon variable:
@IBOutlet var nameLabel: UILabel! {
    didSet {
        nameLabel.text = icon?.name
    }
}
@IBOutlet var descriptionLabel: UILabel! {
    didSet {
        descriptionLabel.text = icon?.description
    }
}
@IBOutlet var iconImageView: UIImageView! {
    didSet {
        iconImageView.image = UIImage(named: icon?.imageName ?? "")
    }
}
@IBOutlet var priceLabel: UILabel! {
    didSet {
        if let icon = icon {
            priceLabel.text = "$\(icon.price)"
        }
    }
}

var icon: Icon?
The icon variable will store the selected icon (as passed from the Messages View Controller) to display in the detail view. You can initialize the value of the labels and image in the viewDidLoad() method. But I prefer to use didSet for outlet initialization. It is more readable and keeps the code more organized.
As usual, head back to MainInterface and set the custom class of the detail view controller to IconDetailViewController. And then right click Icon Detail View Controller in document outline and connect the outlets with the appropriate label/image view.
Managing Message Selections and Extension States
How can we trigger the detail view controller when a user taps a message in the Messages app?
You will first have to understand how the MSMessagesAppViewController class works.
The MSMessagesAppViewController class has some built-in methods to track messages such as when the message is selected by a user, and when a user deletes a message from the input field. It also comes with methods that are invoked when the message extension transits from one state (e.g. inactive) to another (e.g. active).
If a user selects one of messages in the conversation, while the extension is active, the didSelect method will be called. Both the message parameter and the conversation object’s selectedMessage property contain the message selected by the user.
func didSelect(_ message: MSMessage, conversation: MSConversation)
It is quite obvious that we need to override this method with our own implementation so as to bring up the icon detail view controller. Let's first create a helper method like this in the MessagesViewController.swift file:
func presentIconDetails(message: MSMessage) {
    selectedIcon = Icon(message: message)
    performSegue(withIdentifier: "IconDetail", sender: self)
}
The method does a couple of things:
- Create an icon object from the selected message.
- Call the
performSeguemethod with the specific identifier to present the detail view.
In order to pass the selected icon from the Messages View Controller to the Icon Detail View Controller, add the prepare(for:sender:) method like this:
override func prepare(for segue: UIStoryboardSegue, sender: Any?) {
    if let identifier = segue.identifier, identifier == "IconDetail" {
        let destinationController = segue.destination as! IconDetailViewController
        destinationController.icon = selectedIcon
    }
}
Now create the didSelect method like this:
override func didSelect(_ message: MSMessage, conversation: MSConversation) {
    guard let selectedMessage = conversation.selectedMessage else {
            return
    }

    presentIconDetails(message: selectedMessage)
}
When a message is selected, we call the presentIconDetails method to bring up the detail view and display the selected icon. You may test the message extension right now. Pick an icon and send it over to a recipient. But it is very likely you'll experience a couple of issues:
- On the sender side, you can reveal the details of the icon when you select the message in the conversation. However, when you close the detail view, it still appears in the message browser.
- On the receiving side, you can't reveal the icon details when you select a message.
For the first issue, we didn't dismiss the icon detail view controller. This is why you still see the icon detail view when the iMessage app returns to its compact mode.
The second issue is more complicated. Probably you expect the didSelect method is called when the message is selected by the recipient. The fact is that the method is only called while the message extension is in active mode. This is why you can't bring up the detail view controller on the receiving side.
The MSMessagesAppViewController class has several methods to manage the extension's state such as:
willBecomeActive(with:)- invoked before the extension becomes active.didBecomeActive(with:)- invoked after the extension becomes active.willResignActive(with:)- Invoked before the message resigns its active status.didResignActive(with: MSConversation)- Invoked after the message resigns its active status.
And it has a number of methods that manage the presentation styles:
willTransition(to:)- invoked before the extension transitions to a new presentation style. Say, the extension changes from compact mode to expanded mode.didTransition(to:)- invoked after the extension transitions to a new presentation style.
To resolve the first issue, we will implement the willTransition(to:) method and dismiss the modal view controller when the message extension returns to compact mode.
override func willTransition(to presentationStyle: MSMessagesAppPresentationStyle) {
    // Called before the extension transitions to a new presentation style.

    // Use this method to prepare for the change in presentation style.
    if presentationStyle == .compact {
        dismiss(animated: false, completion: nil)
        return
    }

}
For the second issue, the willBecomeAction method is the one we are interested in. When the message extension is activated by the user, the method will be first called. So we implement the method like this to present the icon detail view controller with the selected message:
override func willBecomeActive(with conversation: MSConversation) {
    // Called when the extension is about to move from the inactive to active state.
    // This will happen when the extension is about to present UI.

    // Use this method to configure the extension and restore previously stored state.
    guard presentationStyle == .expanded else {
        dismiss(animated: false, completion: nil)
        return
    }

    if let selectedMessage = conversation.selectedMessage {
        presentIconDetails(message: selectedMessage)
    }
}
Now it is ready to test the iMessage app again. You should be able to reveal the icon details when tapping a message in the conversation, even for the recipient.
Summary
In this chapter, I have walked you through an introduction of iMessage apps. You now know how to create app extensions for the Messages app using the Message framework.
The launch of the new Message App Store opens up a lot of opportunities for iOS developers. As compared with the App Store, which has over 2 million apps, the Message App Store only has fewer apps when it first launches. It is still a good time to develop an iMessage app to reach more users. And, as mentioned at the beginning of the chapter, you can let your users help promote your app. Consider one sends an icon to a group of users, and some of the users do not have your app installed, it is very likely some recipients will install the app in order to view the message details. So take some time to explore the Message framework and build an iMessage app!
For reference, you can download the complete project from http://www.appcoda.com/resources/swift55/iMessageApp.zip.