- Made by AppCoda
- Contact us / Support
- Tweet this book
- Preface
- 1. Building Adaptive User Interfaces
- 2. Creating Table View Sections and Index list with Diffable Data Source
- 3. Animating Table View Cells
- 4. Working with JSON and Codable
- 5. How to Integrate the Twitter and Facebook SDK for Social Sharing
- 6. Working with Email and Attachments
- 7. Sending SMS and MMS Using MessageUI Framework
- 8. How to Get Direction and Draw Route on Maps
- 9. Search Nearby Points of Interest Using Local Search
- 10. Audio Recording and Playback
- 11. Scan QR Code Using AVFoundation Framework
- 12. Working with URL Schemes
- 13. Building a Full Screen Camera with Gesture-based Controls
- 14. Video Capturing and Playback Using AVKit
- 15. Displaying Banner Ads using Google AdMob
- 16. Working with Custom Fonts
- 17. Working with AirDrop, UIActivityViewController and Uniform Type Identifiers
- 18. Building Grid Layouts Using Collection Views and Diffable Data Source
- 19. Interacting with Collection Views
- 20. Adaptive Collection Views Using UITraitCollection and Compositional Layout
- 21. Building a Weather Widget Using WidgetKit
- 22. Building Slide Out Sidebar Menus Using Objective-C Libraries
- 23. View Controller Transitions and Animations
- 24. Building a Slide Down Menu
- 25. Self Sizing Cells and Dynamic Type
- 26. XML Parsing, RSS and Expandable Table View Cells
- 27. Applying a Blurred Background Using UIVisualEffect
- 28. Using Touch ID and Face ID For Authentication
- 29. Building a Carousel-Like User Interface
- 30. Working with Parse
- 31. Parsing CSV and Preloading a SQLite Database Using Core Data
- 32. Connecting Multiple Annotations with Polylines and Routes
- 33. Using CocoaPods in Swift Projects
- 34. Building a Simple Sticker App
- 35. Building iMessage Apps Using Messages Framework
- 36. Building Custom UI Components Using IBDesignable and IBInspectable
- 37. Using Firebase for User Authentication
- 38. Google and Facebook Authentication Using Firebase
- 39. Using Firebase Database and Storage to Build an Instagram-like App
- 40. Building a Real-time Image Recognition App Using Core ML
- 41. Building AR Apps with ARKit and SpriteKit
- 42. Working with 3D Objects in Augmented Reality Using ARKit and SceneKit
- 43. Use Create ML to Train Your Own Machine Learning Model for Image Recognition
- 44. Building a Sentiment Classifier Using Create ML to Classify User Reviews
- 45. Working with Image Tracking Using ARKit
- Published with GitBook
Chapter 37
Using Firebase for User Authentication
Since Facebook announced the demise of Parse Cloud, a lot of app developers were looking for Parse alternatives. Among all available options, Firebase is one of the most popular choices for app developers to replace their apps' backend.
Note: If you want to stick with Parse, you can refer to chapter 30 in which we show you how to keep using Parse through a third party provider.One reason of its popularity is that Firebase is hosted and run by Google, which means the servers are powerful and reliable, so you do not have to worry about the stability of your app's backend. On top of that, Firebase supports nearly all kinds of platforms including iOS, Android, and web. It is very likely you are going to build apps for iOS as you're reading this book. However, in case you want to expand your apps to other platforms, Firebase is ready to support your projects.
Firebase is also used by some very big tech companies like PicCollage, Shazam, Wattpad, Skyscanner and other big start-ups so you can see how popular Firebase is.
As its name suggests, Firebase starts out as a cloud backend for mobile. In mid-2016, Google took Firebase further to become a unified app platform. Not only can you use it as a real-time database or for user authentication, it now can act as your analytic, messaging and notifications solutions for mobile apps.
In this chapter, I will focus on how to use Firebase for user authentication. Later, we will explore other features of Firebase.
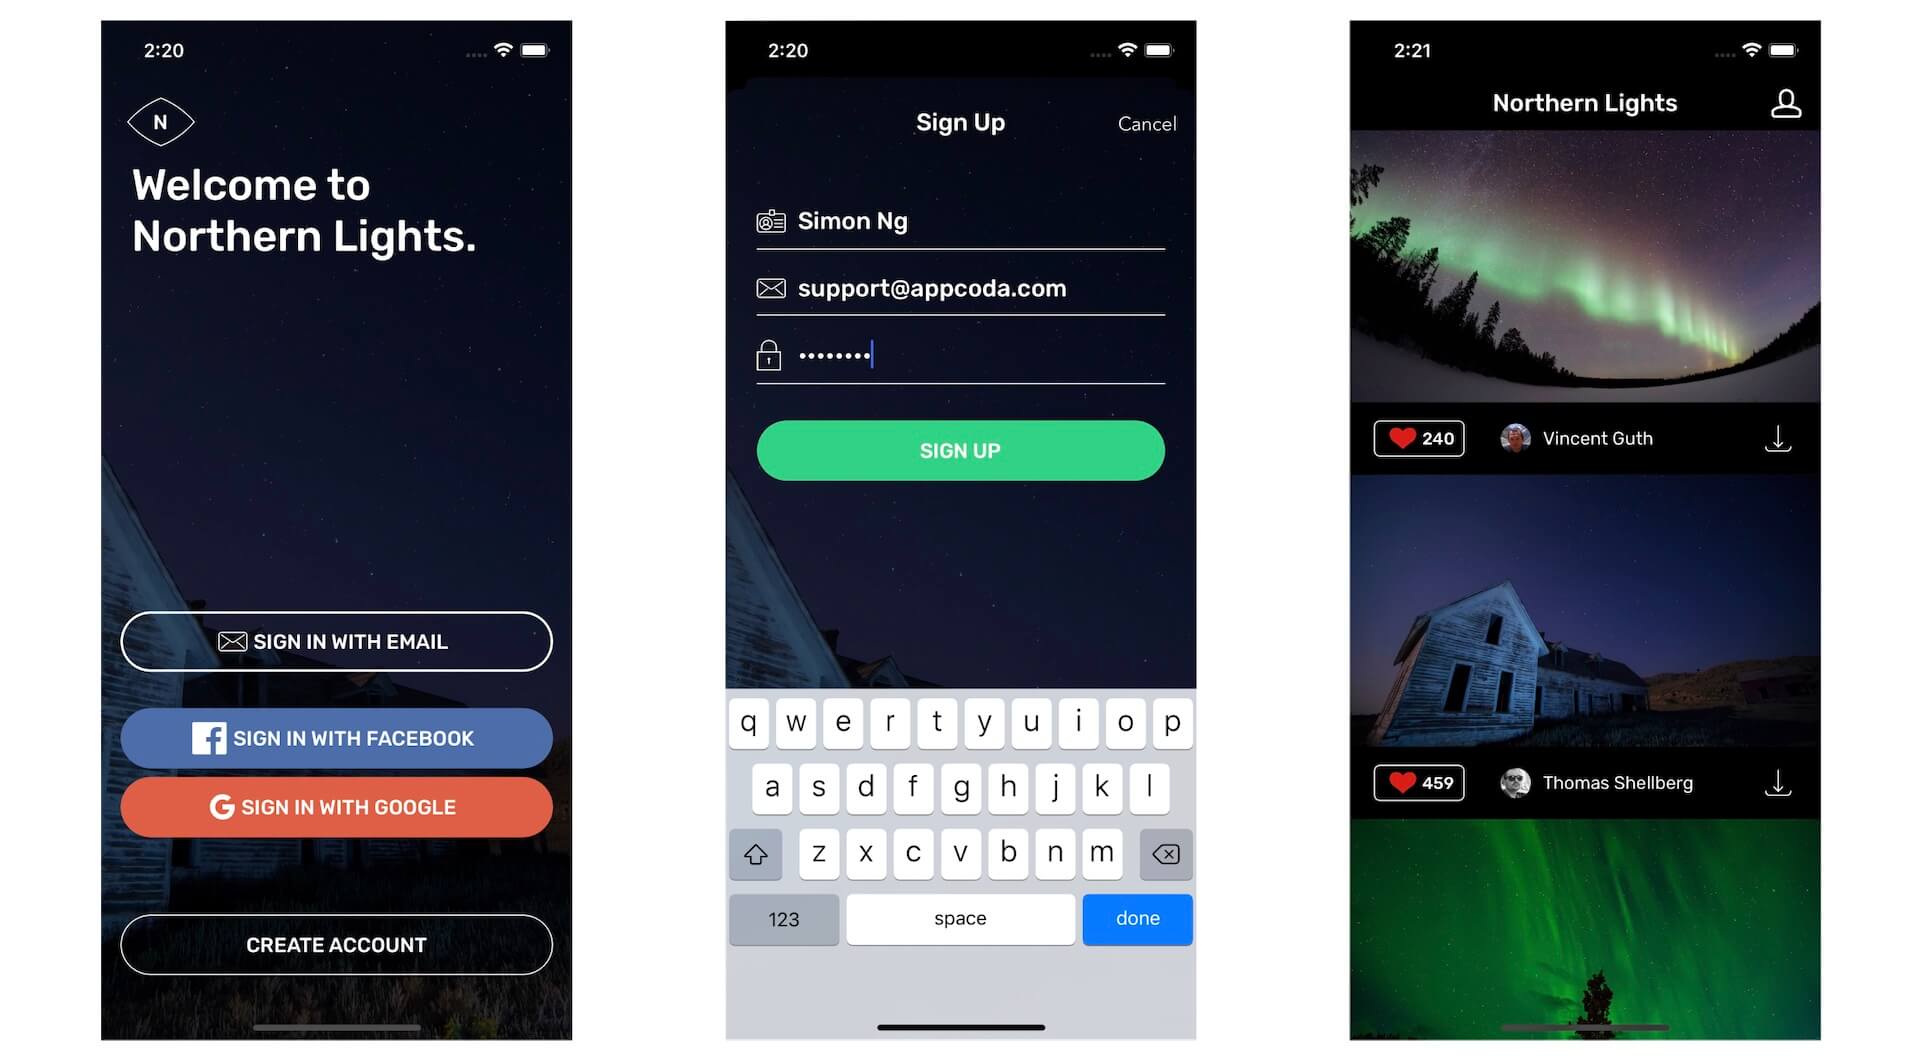
The Demo App
As usual, the demo app is simple. But it doesn't mean it has to be ugly. You can first download the starter project (http://www.appcoda.com/resources/swift55/FirebaseLoginStarter.zip) to take a look.
To demonstrate how we utilize Firebase to implement the following user account-related functions:
- Sign up
- Login
- Logout
- Reset password
- Email verification
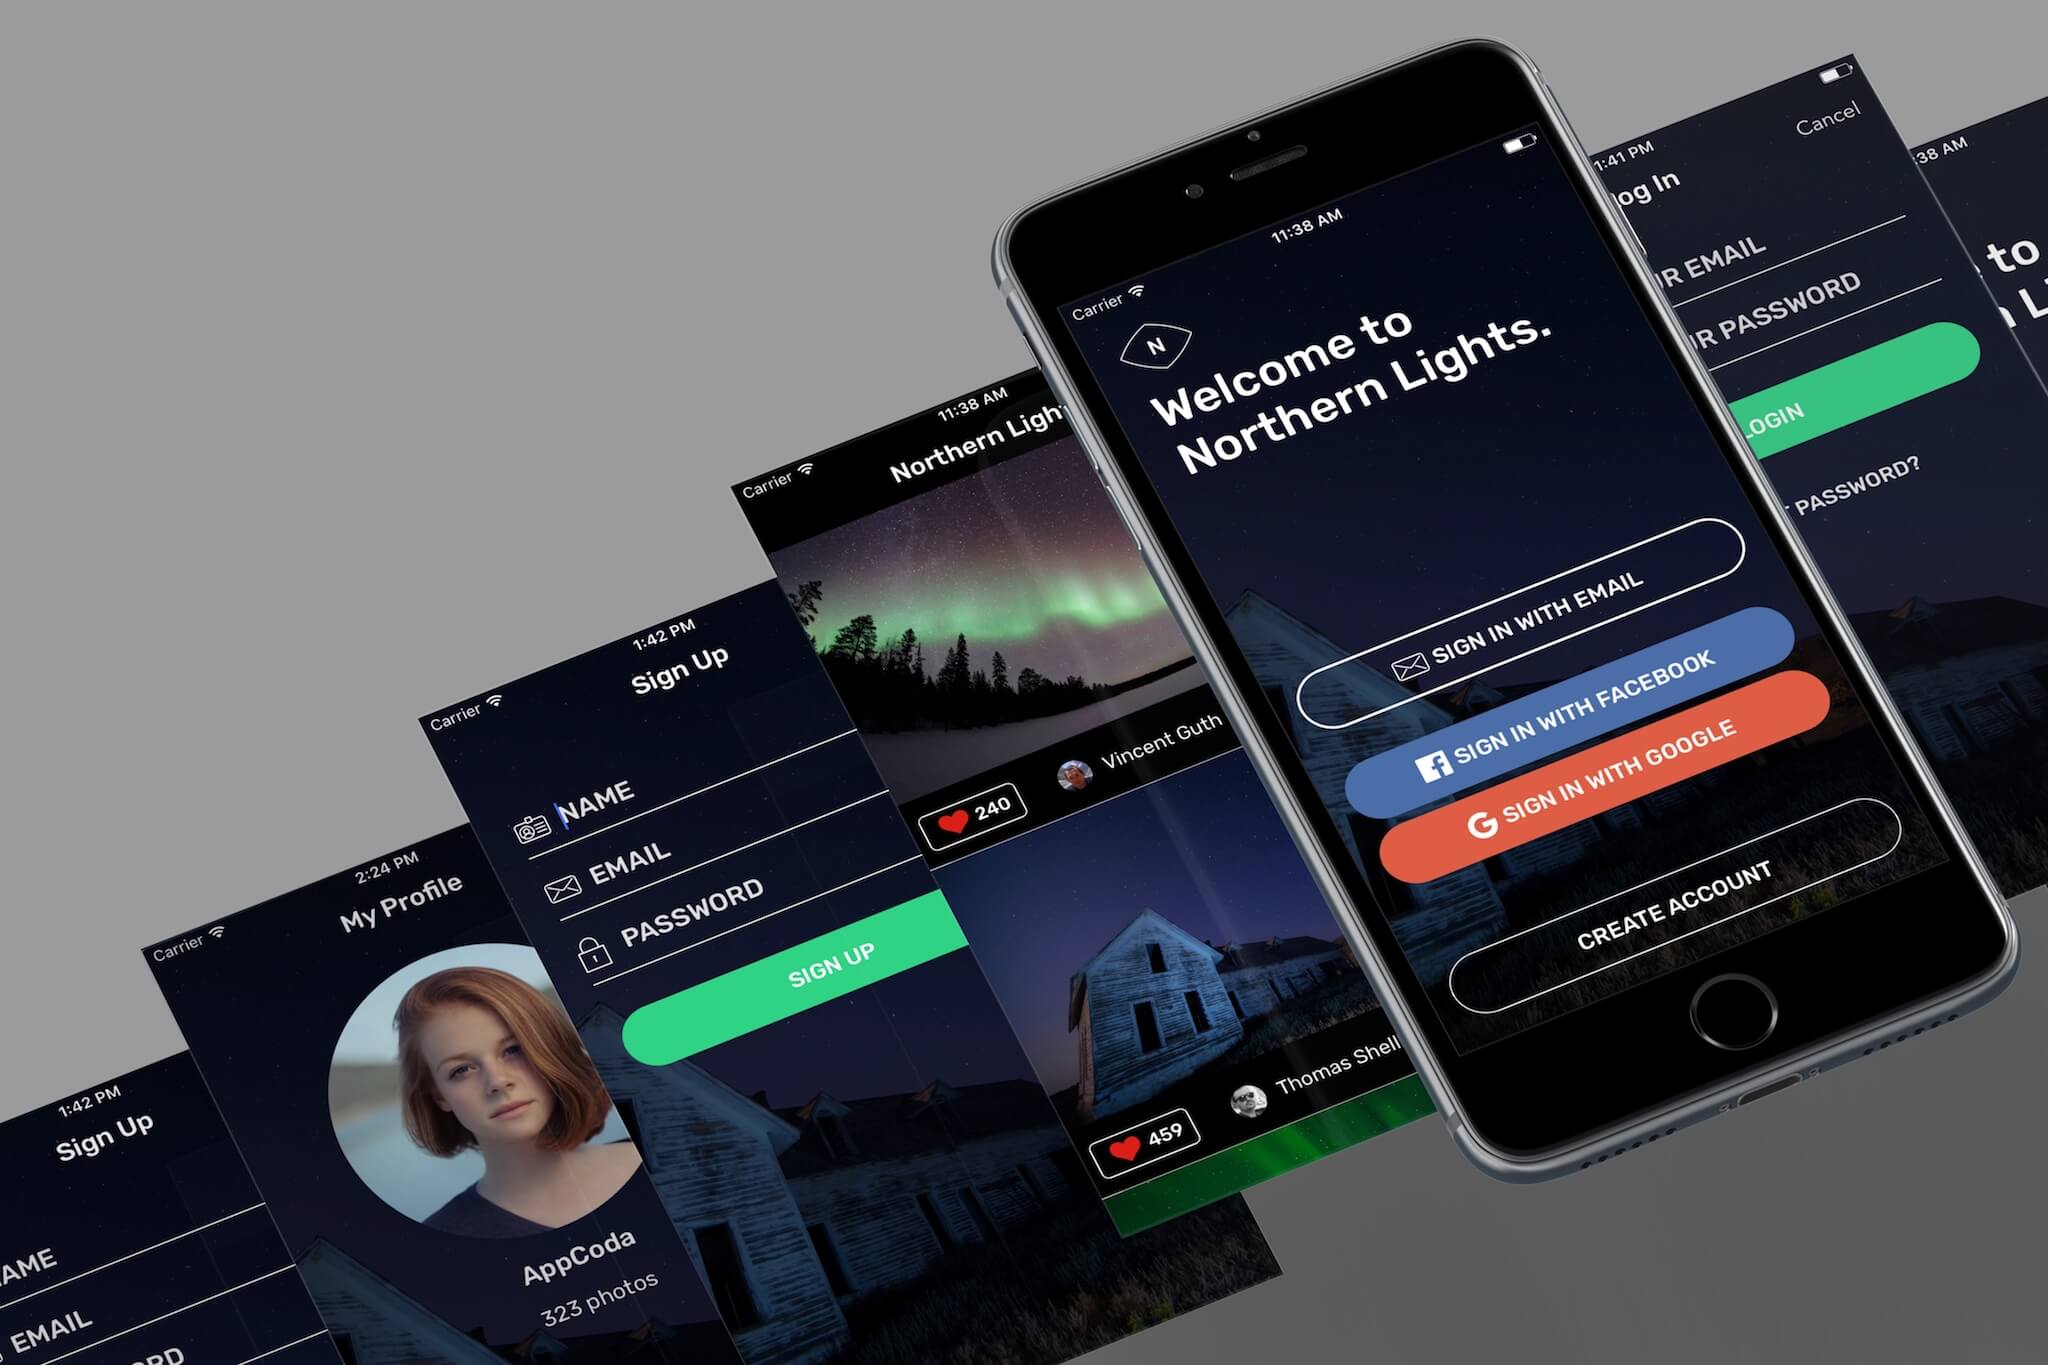
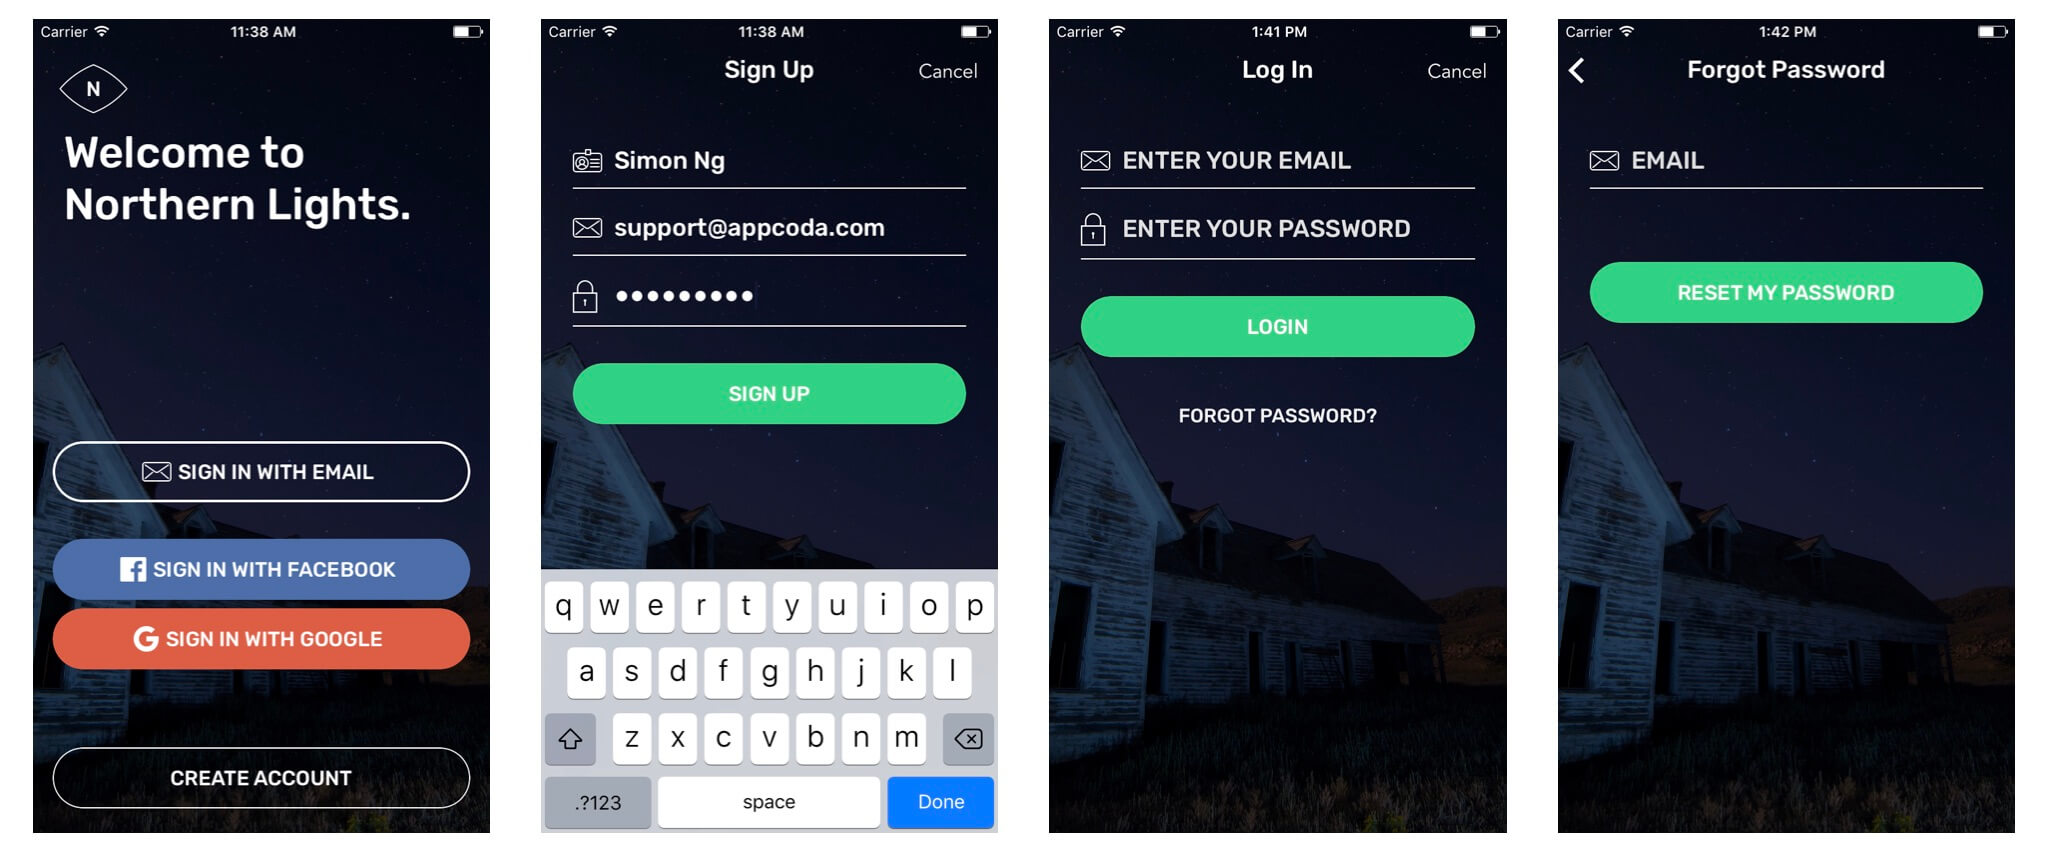
I have designed a few screens for this demo app. You can open the Main.storyboard file to take a look.
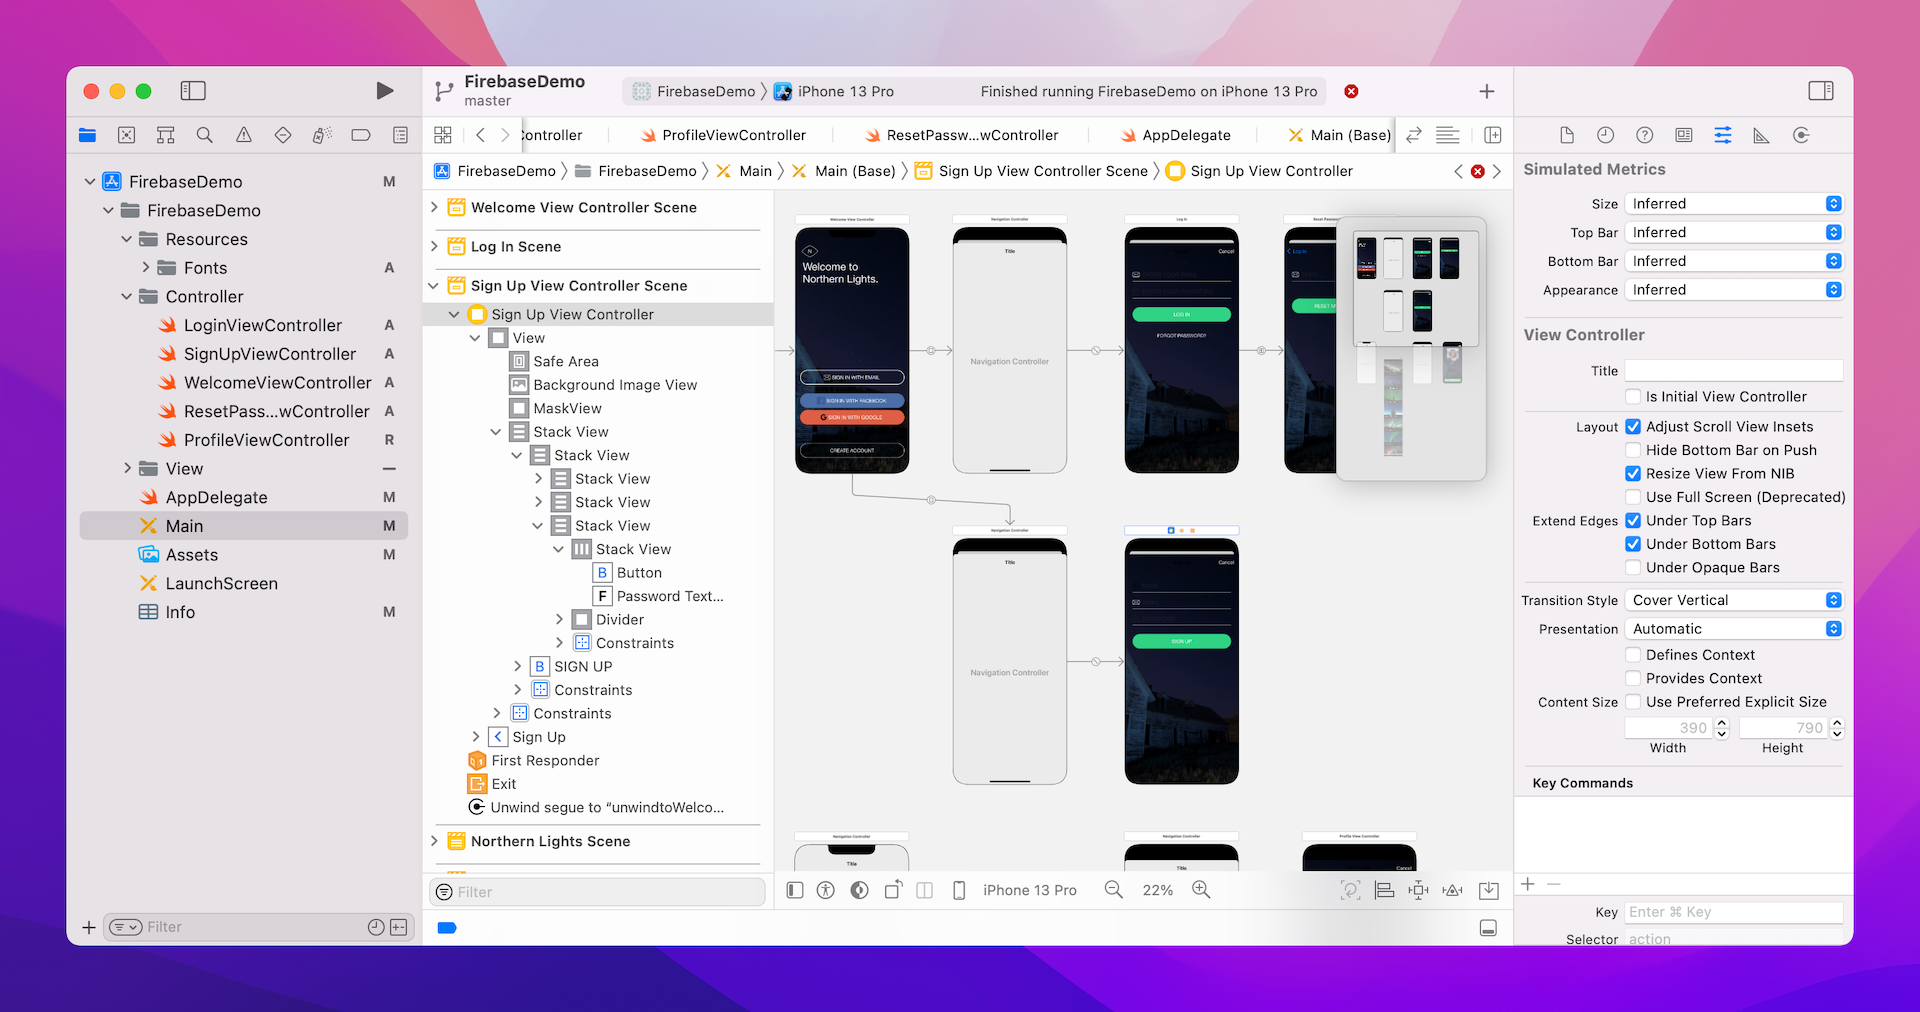
You are free to build the project and have a quick tour. When the app is first launched, it shows the welcome screen (i.e. Welcome View Controller) with login and sign up buttons. I have already linked the app views with segues. Tapping the Create Account button will bring up the Sign Up screen, while tapping the Sign in with Email button will show you the Login screen. If a user forgets the password, we also provide a Forgot Password function for him/her to reset the password.
I have built the home screen (i.e. Northern Lights View Controller) that shows a list of northern lights photos. You can't access this screen right now as we haven't implemented the Login function. But once we build them, the app will display the home screen after a user completes a login or sign up. In the home screen, the user can also bring up the profile screen by tapping the top-right icon.
Now that you should have some ideas about the demo app, let's get started to implement user authentication with Firebase. But before moving on, first change the bundle ID of the starter project. Select FireBaseDemo project in the project navigator, and then select FirebaseDemo target. In the General tab, you can find the bundle identifier field under the Identity section. It is now set to com.appcoda.FirebaseDemo. Change it other value (say,
Adding Firebase to the Xcode Project
Before you are allowed to use Firebase as your app's backend, you will have to go to https://firebase.google.com/ and register your app project.
As mentioned earlier, Firebase is a product of Google. You can sign into Firebase using your Google account. Once logged in, click Go to Console and then select Add Project. It will take you to a screen where you name your project. Name your project whatever you want (e.g. Firebase Demo). Optionally, you can choose to enable Google Analytics, though it's not required for this demo. Hit Create Project to continue.
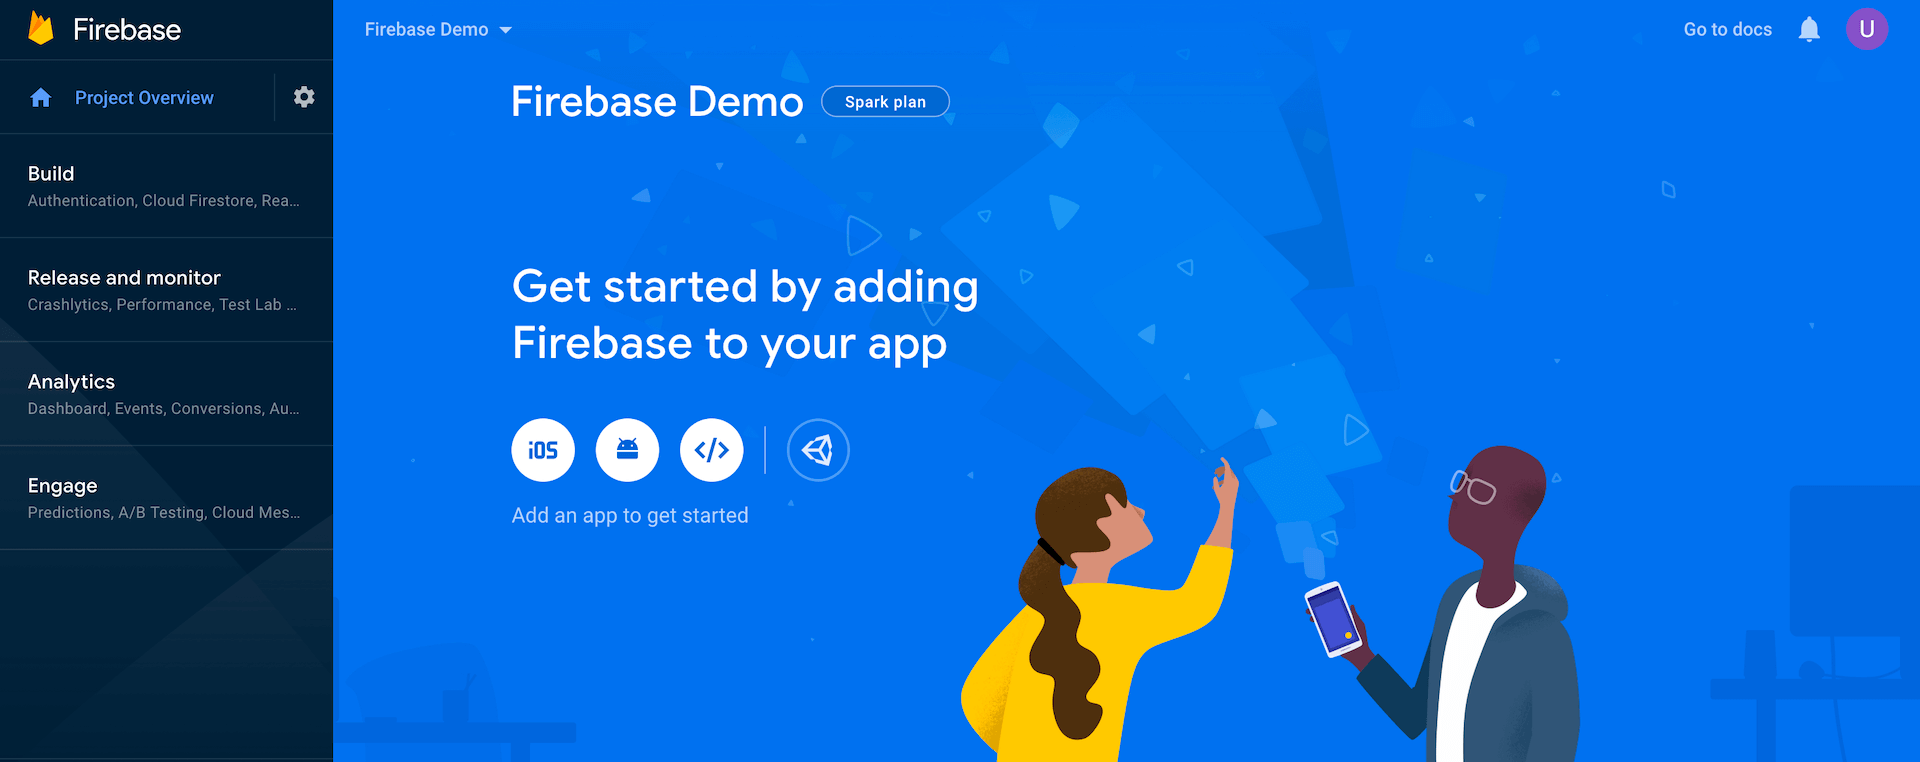
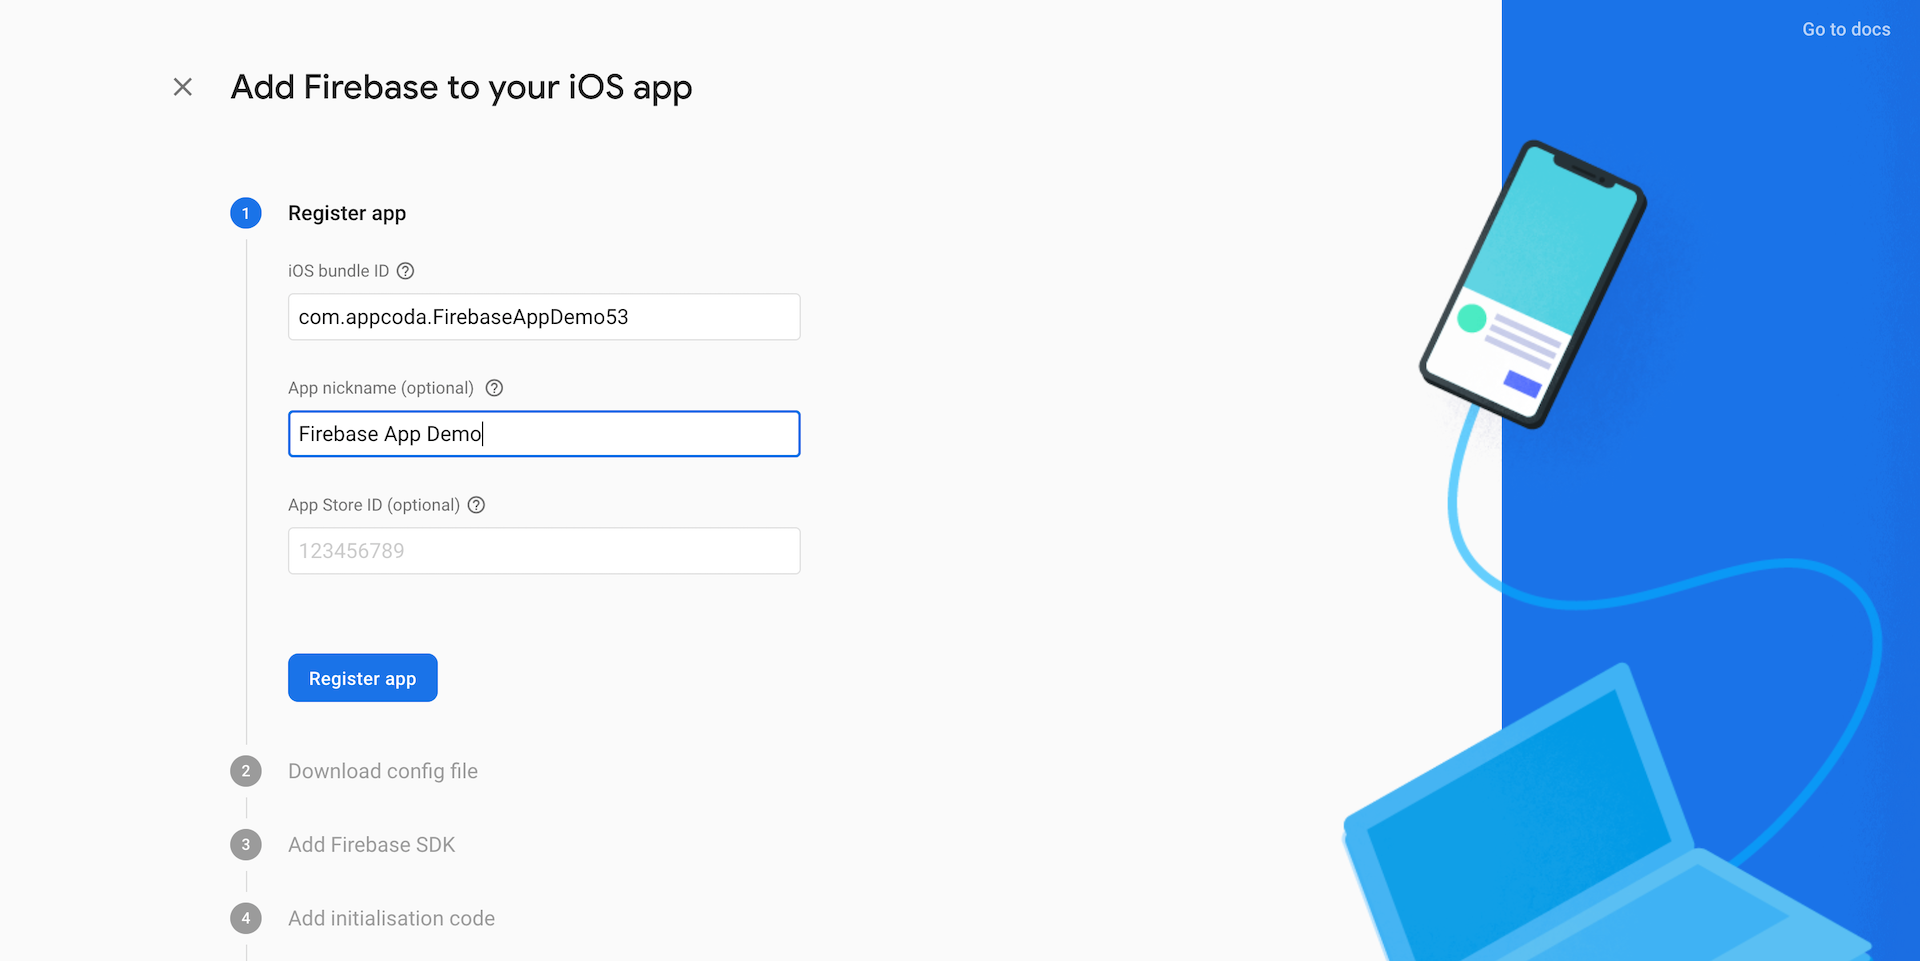
Once Firebase created the new project for you, it will take you to the dashboard of your project. This is where you can access all the features of Firebase such as database, notifications, and AdMob. In the overview, you should see three options for adding an app. Click the iOS icon. You'll then be prompted for filling in the bundle ID and app nickname. Here I use com.appcoda.FirebaseAppDemo55 as the bundle ID, but yours should be different from mine. Make sure this ID matches the one you set in the starter project earlier. For app nickname, you can fill in whatever you prefer. Like the nickname field, the App Store ID field is optional. If your app is already live on the App Store, you can add its ID.
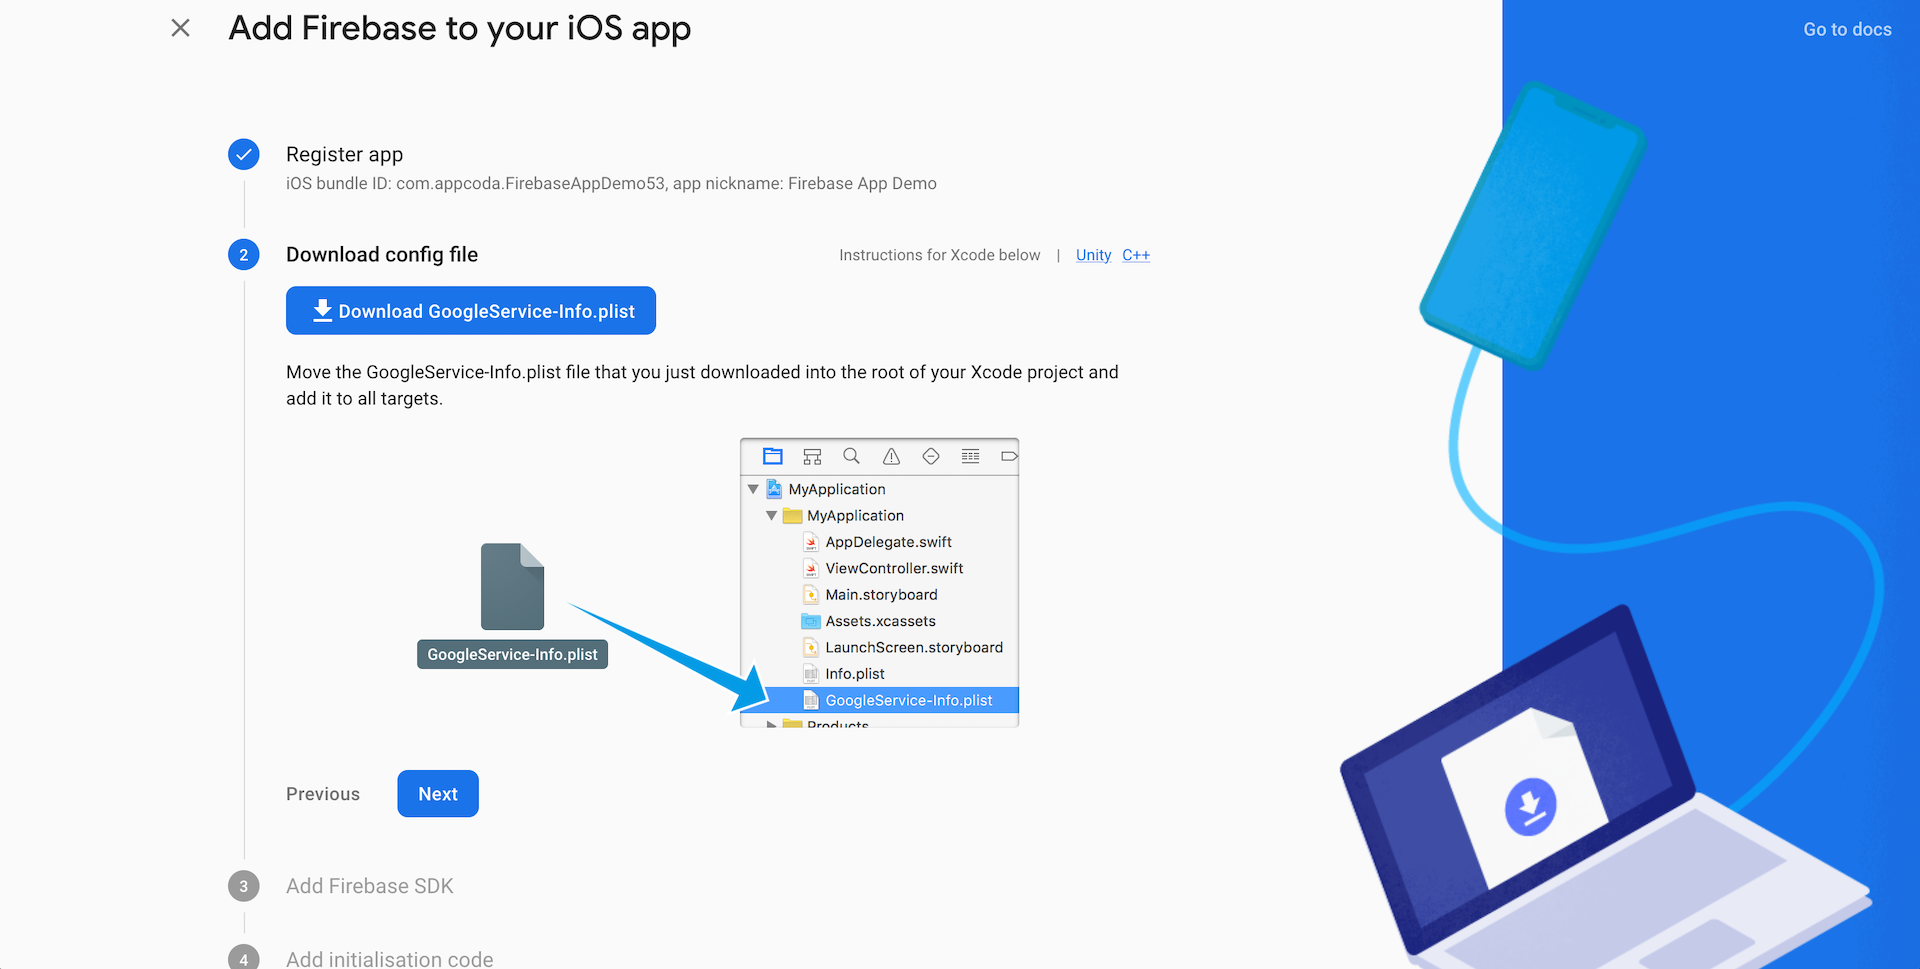
When you finish, click the Register App button to proceed and Firebase will generate a file named GoogleService-Info.plist for you. Hit the Download GoogleService-Info.plist button to download it to your Mac computer.
This plist file is specifically generated for your own project. If you look into the file, you will find different identifiers for accessing the Firebase services such as AdMob and storage.
Now follow the on-screen instruction to add the GoogleService-Info.plist file (which can be found in your download folder by default) to your Xcode project.
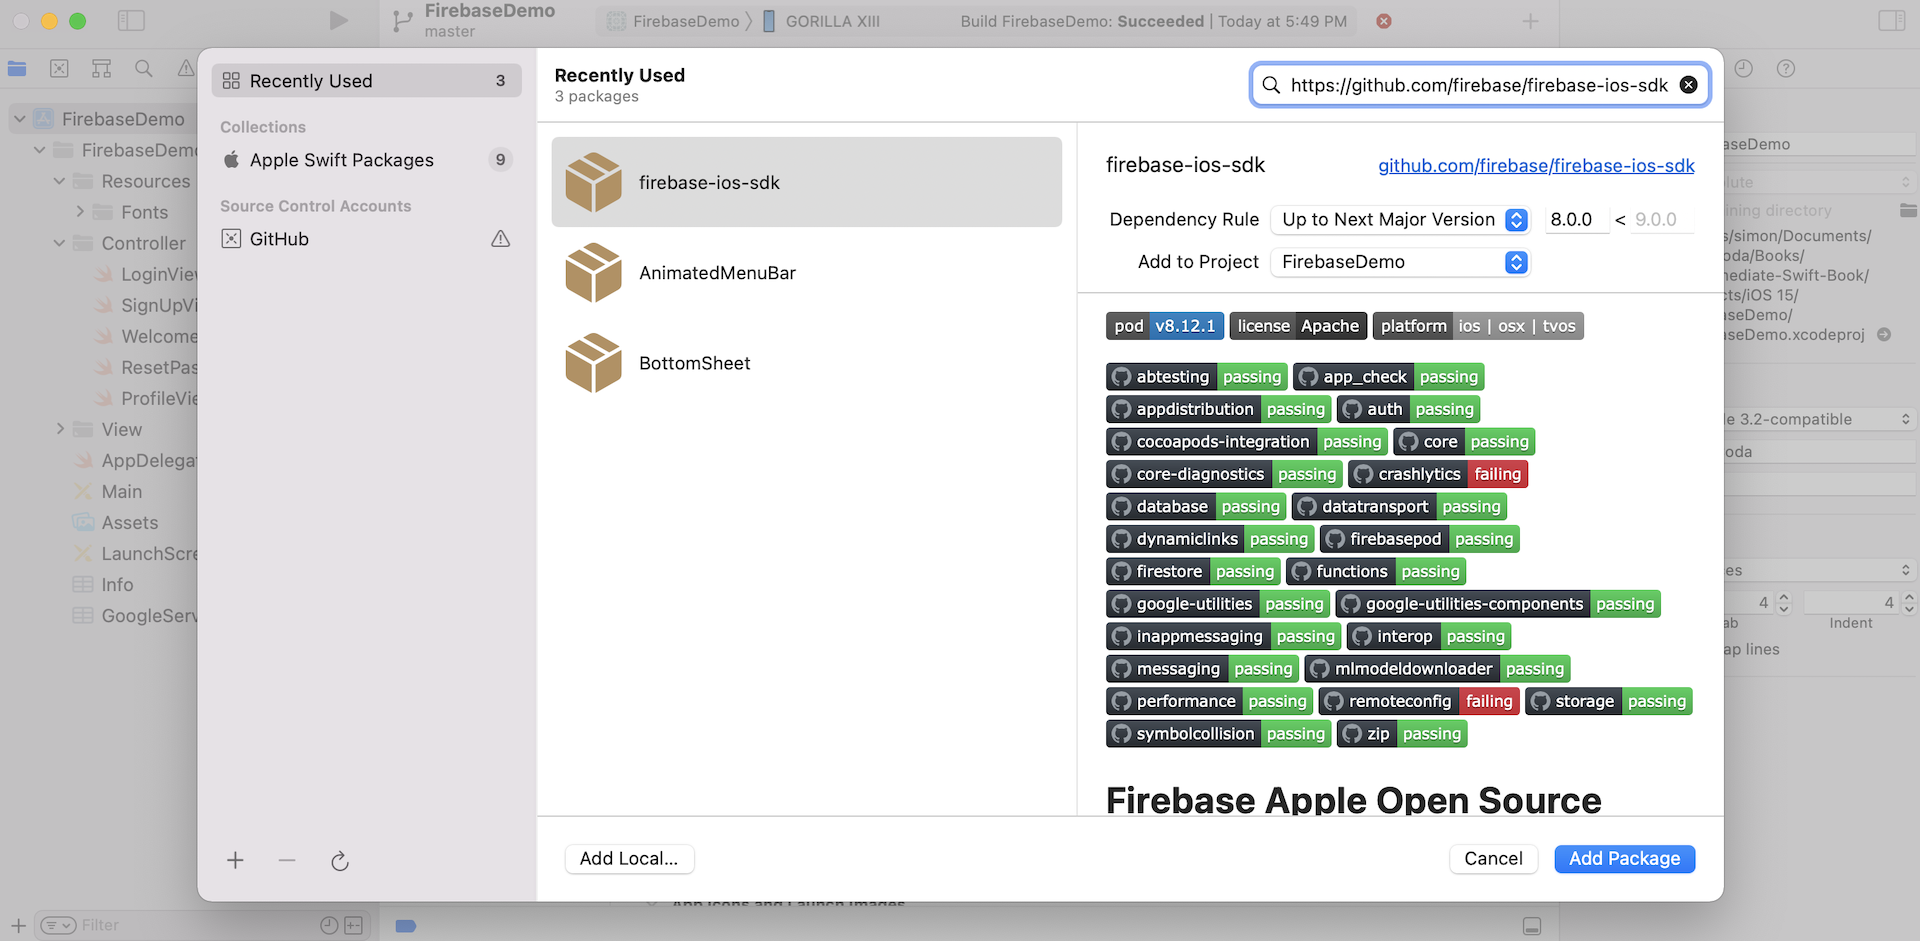
Press Next to proceed to the next step. The best way to install the Firebase library is through Swift Package Manager. In Xcode menu, choose File > Add Packages. In the search bar, enter the Firebase iOS SDK repository URL:
https://github.com/firebase/firebase-ios-sdk
Xcode should show you the firebase-ios-sdk package. Click Add Package to download and retrieve the packages. Choose both FirebaseAuth and FirebaseDatabase packages, and add them to the project.
Implementing Sign Up, Login and Logout Using Firebase
Now that we have configured our project with the Firebase libraries, it is time to write some code. We will first implement the Sign Up and Login features for the demo app.
Initializing Firebase
To use Firebase, the very first thing is to call the configure() of FirebaseApp, the entry point of Firebase SDKs. By making this call, it reads the GoogleService-Info.plist file you added before and configures your app for using the Firebase backend.
We will call this API when the app is first launched. Select AppDelegate.swift in the project navigator. At the beginning of the file, insert the following line of code to import the Firebase API:
import Firebase
Next, update the application(_:didFinishLaunchingWithOptions:) method like this:
func application(_ application: UIApplication, didFinishLaunchingWithOptions launchOptions: [UIApplicationLaunchOptionsKey: Any]?) -> Bool {

    // Set up the style and color of the common UI elements
    customizeUIStyle()

    // Configure Firebase
    FirebaseApp.configure()

    return true
}
Here we insert a line of code to call FirebaseApp.configure() to initialize and configure Firebase. This line of code helps you connect Firebase when your app starts up.
Now run the app. And then switch back to the Firebase dashboard to finish the app configuration. Click Continue to the console to proceed.
Sign Up Implementation
Now we’re ready to do implement the Sign Up feature using Firebase. Firebase supports multiple authentication methods such as email/password, Facebook, and Twitter. In this demo, we will use the email/password approach.
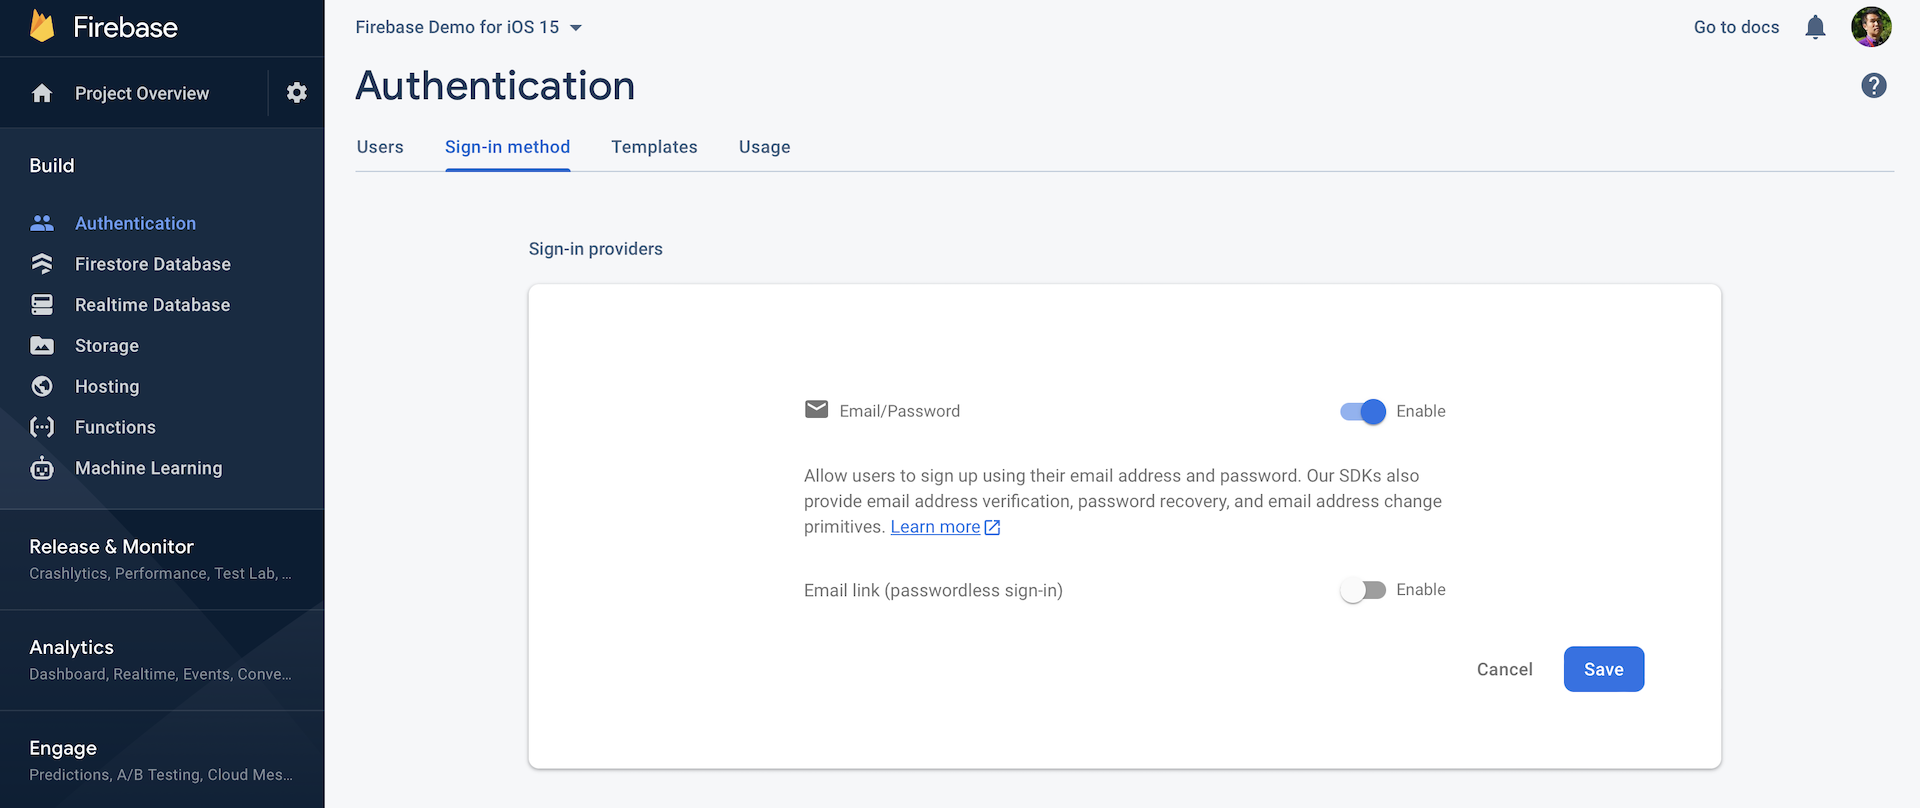
To do that, go back to the Firebase dashboard. In the side menu, select Authentication and then click Get Started. Choose Sign-in Method. By default, all authentication methods are disabled. Now click Email/Password and turn the switch to ON. Save it and you'll see its status changes to Enabled.
Once this is enabled, you’re now ready to implement the sign up and authentication feature.
Go back to Xcode and select SignUpViewController.swift. This is the view controller file for the Sign Up View Controller in storyboard. For the starter project, we haven't implemented any action method for the Sign Up button. This is what we're going to do now.
Similar to AppDelegate.swift, we will need to first add an import statement at the beginning of the file in order to use the Firebase APIs:
import Firebase
Next, we will add an action method called registerAccount in the SignUpViewController class. Insert the following code for the method:
@IBAction func registerAccount(sender: UIButton) {

    // Validate the input
    guard let name = nameTextField.text, name != "",
        let emailAddress = emailTextField.text, emailAddress != "",
        let password = passwordTextField.text, password != "" else {

            let alertController = UIAlertController(title: "Registration Error", message: "Please make sure you provide your name, email address and password to complete the registration.", preferredStyle: .alert)
            let okayAction = UIAlertAction(title: "OK", style: .cancel, handler: nil)
            alertController.addAction(okayAction)
            present(alertController, animated: true, completion: nil)

            return
    }

    // Register the user account on Firebase
    Auth.auth().createUser(withEmail: emailAddress, password: password, completion: { (user, error) in

        if let error = error {
            let alertController = UIAlertController(title: "Registration Error", message: error.localizedDescription, preferredStyle: .alert)
            let okayAction = UIAlertAction(title: "OK", style: .cancel, handler: nil)
            alertController.addAction(okayAction)
            self.present(alertController, animated: true, completion: nil)

            return
        }

        // Save the name of the user
        if let changeRequest = Auth.auth().currentUser?.createProfileChangeRequest() {
            changeRequest.displayName = name
            changeRequest.commitChanges(completion: { (error) in
                if let error = error {
                    print("Failed to change the display name: \(error.localizedDescription)")
                }
            })
        }

        // Dismiss keyboard
        self.view.endEditing(true)

        // Present the main view
        if let viewController = self.storyboard?.instantiateViewController(withIdentifier: "MainView") {
            UIApplication.shared.keyWindow?.rootViewController = viewController
            self.dismiss(animated: true, completion: nil)
        }
    })
}
Let me go through the above code line by line. If you've built the starter project and run the app before, you know the Sign Up screen has three fields: name, email, and password.
When this method is called, we first perform some simple validations. Here we just want to make sure the user fills in all the fields before we send the information to Firebase for account registration.
I prefer to use guard instead of if for input validations. When the conditions are not met (here, some fields are blank), it executes the code in the else block to display an error alert. If the user fills in all the required fields, it continues to execute the code in the method. In this scenario, guard makes our code more readable and clean.
Once we get the user information, we call Auth.auth().createUser with the user's email address and password. Auth is the class for managing user authentication. We first invoke its class method auth() to get the default auth object of our app. To register the user on Firebase, all you need is to call the createUser method with the email address and password. Firebase will then create an account for the user using the email address as the user ID.
The createUser method has a completion handler to tell you whether the registration is successful or not. You provide your own handler (or a closure) to verify the registration status and perform further processing. In our implementation, we first verify if there is any errors by checking the error object. In case the user registration fails, we display an alert message with the error returned. Some of the possible errors are:
- The email address is badly formatted.
- The email address already exists.
If there is no error (i.e. error object is nil), it means the registration is a success. Firebase will automatically sign in the account.
Apparently, the createUser method doesn't save the user's name for you. It only needs the user's email address and password to create the account for authentication. To set the user's name for the account, we can set the displayName property of the User object. When the sign up is successful, Firebase returns you the User object (here, it is the user variable) of the current user. This built-in user object has a couple of properties for storing profile information including display name and photo URL.
In the code above, we set the display name to the user's name. In order to update the user profile, we first call createProfileChangeRequest() to create an object for changing the profile data. Then we set its displayName properties and invoke commitChanges(completion:) to commit and upload the changes to Firebase.
The last part of the method is to dismiss the sign up view controller and replace it with the home screen (i.e. MainView or Northlights View). In the starter project, I have already set the navigation controller of the Northlights view with a storyboard ID named MainView. So in the code above, we instantiate the controller by calling instantiateViewController with the identifier and set it as the root view controller. Then we dismiss the Sign Up view controller. Now when the user completes the sign up, he/she will be able to access the main view.
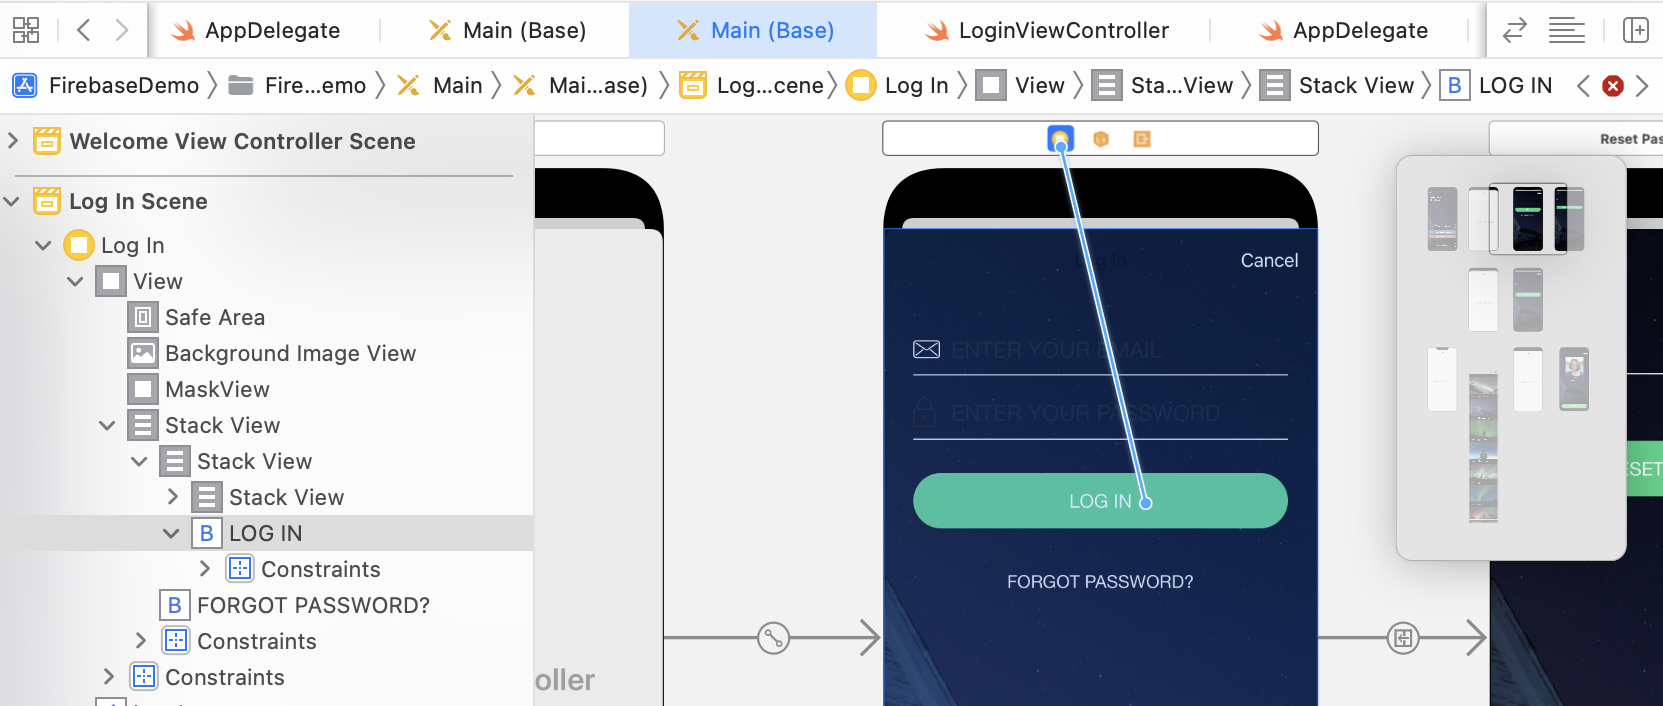
Okay, we still miss one thing. We haven't connected the Sign Up button with the registerAccount action method yet. Go to the Main storyboard and locate the Sign Up View Controller. Control drag from the Sign Up button to Sign Up View Controller in the outline view (or the dock). In the popover menu, choose registerAccountWithSender: to connect the method.
Before moving to the next section, you can build the project and test the Sign Up function. After launching the app, tap Create Account, fill in the account information and tap Sign Up. You should be able to create an account on Firebase and access the home screen.
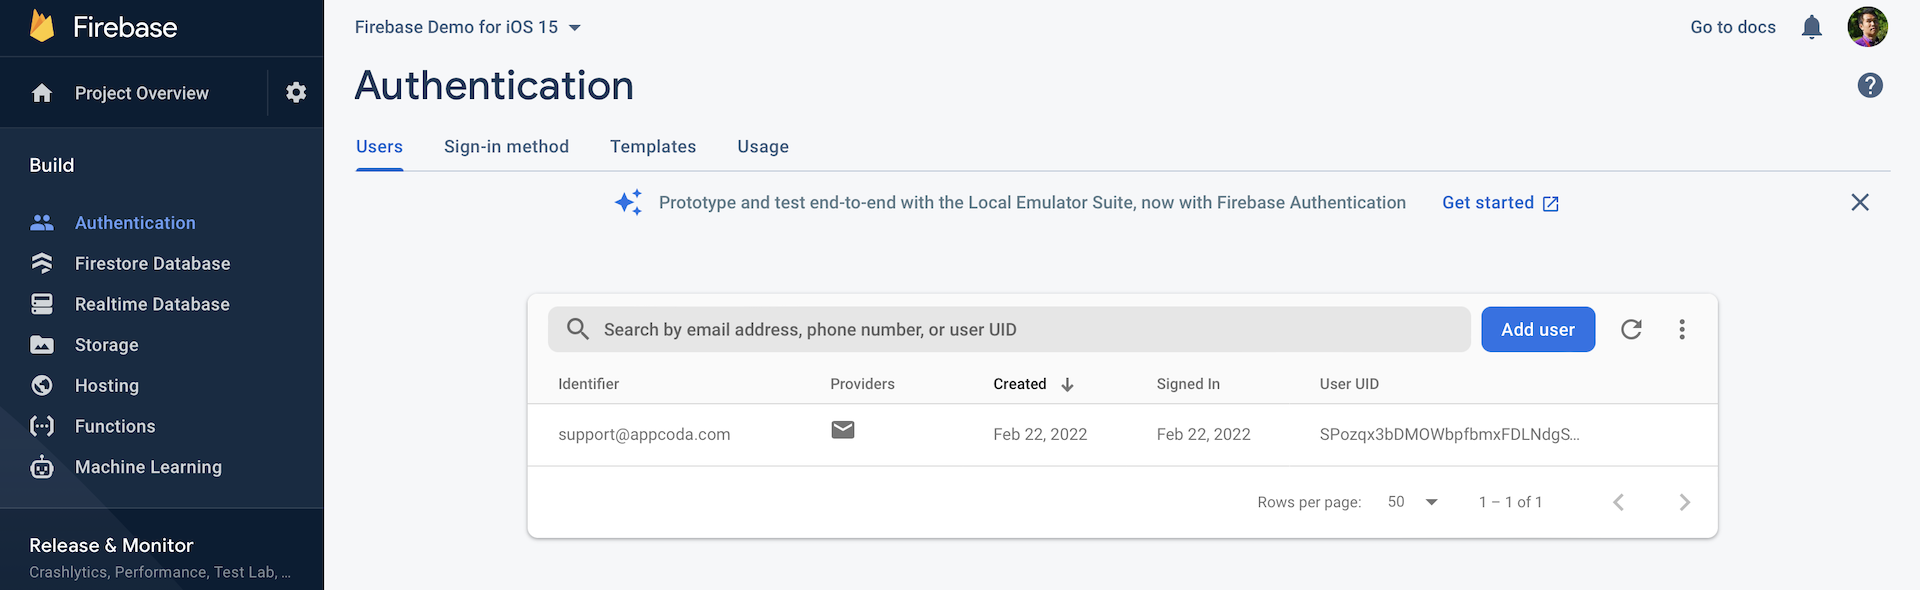
If you go back to the Firebase console, you will find the user ID in the Users tab under the Authentication section.
Login Implementation
Now that we have completed the implementation of the Sign Up feature, I hope you already have some ideas about how Firebase works. Let's continue to build the login function.
The implementation is very similar to Sign Up. With the Firebase SDK, you can implement the Login function with just a simple API call. In the project navigator, select LoginViewController.swift, which is the class that associates with the Login View Controller in the storyboard. If you use the starter project, the outlets are all connected with its corresponding text fields.
Again you need to import Firebase before using the APIs. So add the following line of code at the very beginning of the file:
import Firebase
Next, create a new action method called login in the class like this:
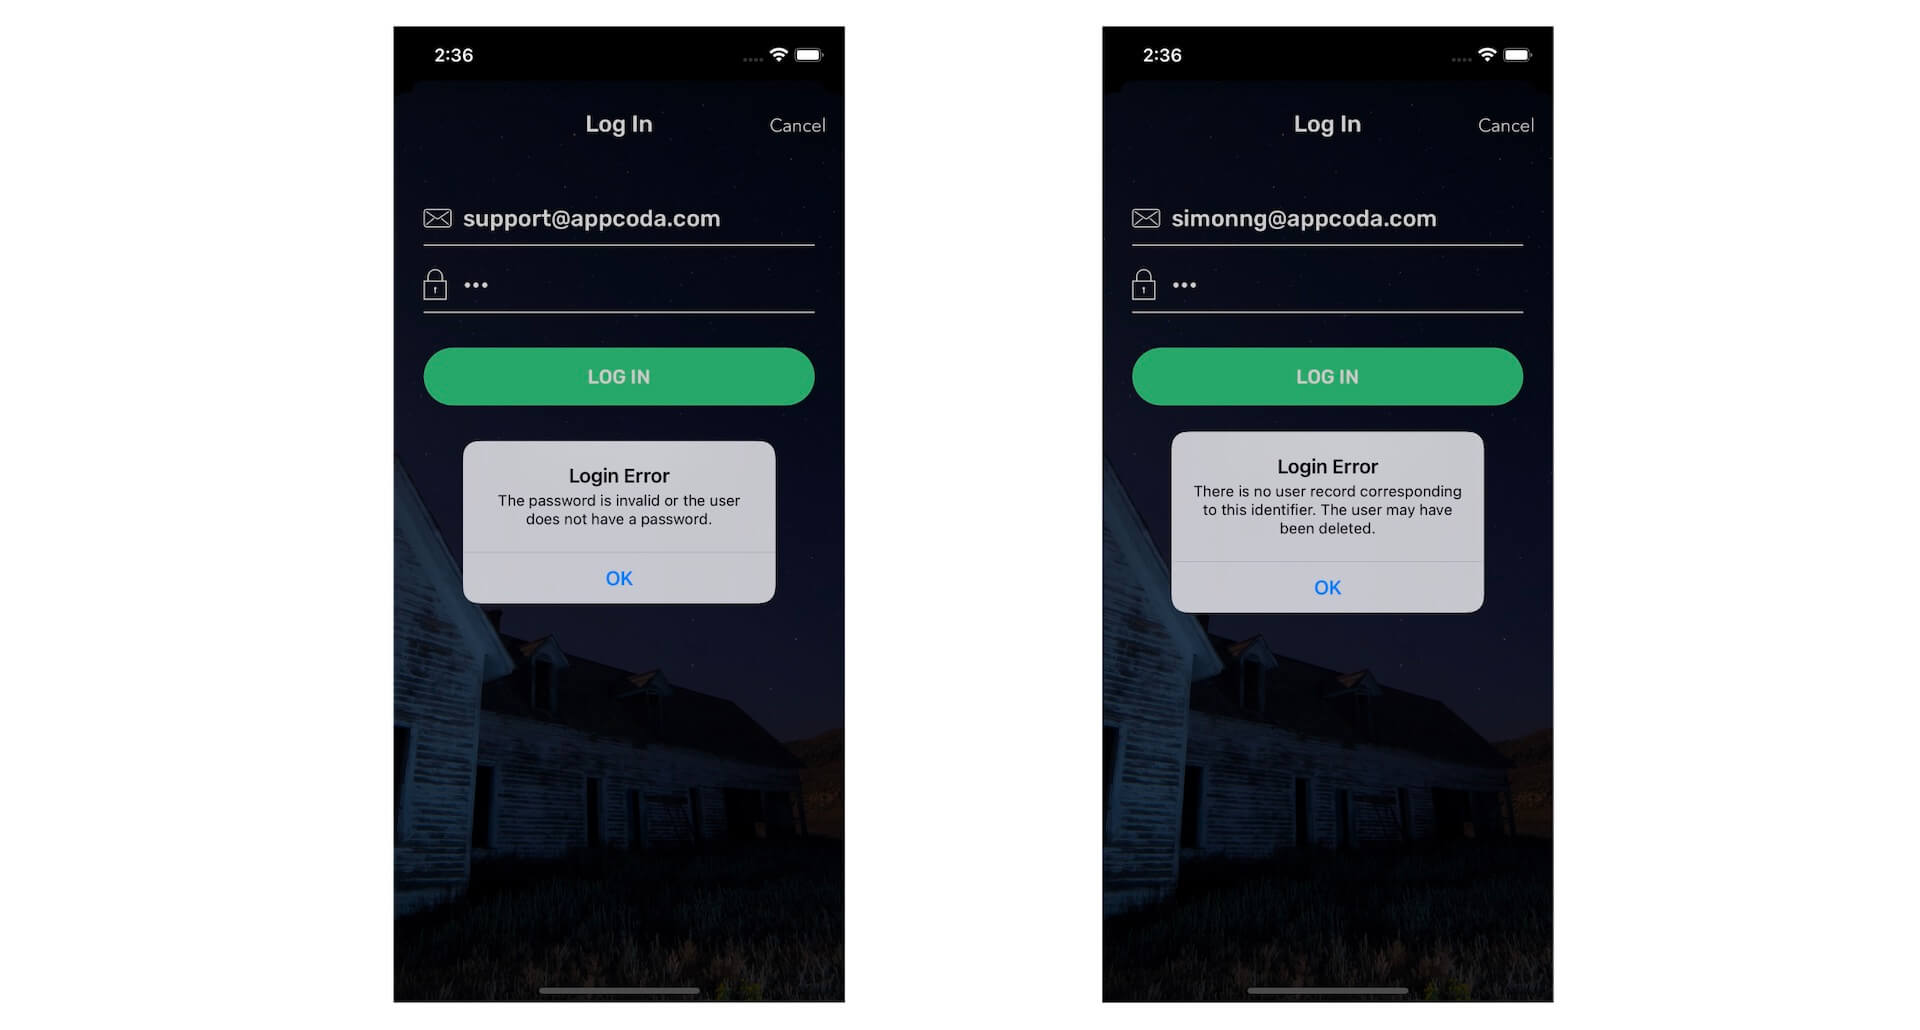
@IBAction func login(sender: UIButton) {

    // Validate the input
    guard let emailAddress = emailTextField.text, emailAddress != "",
        let password = passwordTextField.text, password != "" else {

            let alertController = UIAlertController(title: "Login Error", message: "Both fields must not be blank.", preferredStyle: .alert)
            let okayAction = UIAlertAction(title: "OK", style: .cancel, handler: nil)
            alertController.addAction(okayAction)
            present(alertController, animated: true, completion: nil)

            return
    }

    // Perform login by calling Firebase APIs
    Auth.auth().signIn(withEmail: emailAddress, password: password, completion: { (user, error) in

        if let error = error {
            let alertController = UIAlertController(title: "Login Error", message: error.localizedDescription, preferredStyle: .alert)
            let okayAction = UIAlertAction(title: "OK", style: .cancel, handler: nil)
            alertController.addAction(okayAction)
            self.present(alertController, animated: true, completion: nil)

            return
        }

        // Dismiss keyboard
        self.view.endEditing(true)

        // Present the main view
        if let viewController = self.storyboard?.instantiateViewController(withIdentifier: "MainView") {
            UIApplication.shared.keyWindow?.rootViewController = viewController
            self.dismiss(animated: true, completion: nil)
        }

    })
}
As you can see, the code is quite similar to the registerAccount method we discussed earlier. At the very beginning of the method, we validate the user input to ensure that both fields are not blank.
Assuming the user has filled his/her email address and password, we call the signIn method of the Firebase API to perform the login. The method accepts three parameters including the email address (i.e. the login ID) and password. The third parameter is the completion handler. When the sign in completes, Firebase returns us the result of the operation through the completion handler.
Similar to what we have done before, we check if there is an error. If everything is perfect, we dismiss the on-screen keyboard, and bring the user to the home screen (i.e. MainView).
Lastly, before you test the app, switch to the Main storyboard and locate the Login View Controller. You will have to connect the action method with the Log In button. Control drag from the Log In button to the view controller in the dock or document outline. Select loginWithSender: from the popover menu.
Now you're ready to test the login function. Use the same account that you signed up earlier to test the login. The app should bring you to the home screen if everything is correct. Or it will display you some errors.
Logout Implementation
If you fully understand how to implement sign up and login, it should not be difficult for you to implement the logout function. All you need is refer to the Firebase documentation and see which API is suitable for logout.
Anyway, let's go back to Xcode and continue to implement the feature.
The logout button can be found in the profile view controller. Therefore, select ProfileViewController.swift and add an import statement to use the Firebase APIs:
import Firebase
Next, create a new action method called logout in the class:
@IBAction func logout(sender: UIButton) {
    do {
        try Auth.auth().signOut()

    } catch {
        let alertController = UIAlertController(title: "Logout Error", message: error.localizedDescription, preferredStyle: .alert)
        let okayAction = UIAlertAction(title: "OK", style: .cancel, handler: nil)
        alertController.addAction(okayAction)
        present(alertController, animated: true, completion: nil)

        return
    }

    // Present the welcome view
    if let viewController = self.storyboard?.instantiateViewController(withIdentifier: "WelcomeView") {
        UIApplication.shared.keyWindow?.rootViewController = viewController
        self.dismiss(animated: true, completion: nil)
    }

}
To log out a user, you just need to call the signOut() method of Auth. The method throws an error if the logout is unsuccessful. We simply present an alert prompt to display the error message. And, if the logout performs properly, we dismiss the current view and bring the user back to the welcome screen, which is the original screen when the app is first launched.
Again, remember to go to the storyboard and connect the action method with the Logout button. Locate the Profile View Controller. Control drag from the Logout button to the Profile View Controller in the document outline view (or the dock). Choose logoutWithSender: when prompted to connect the button with the action method.
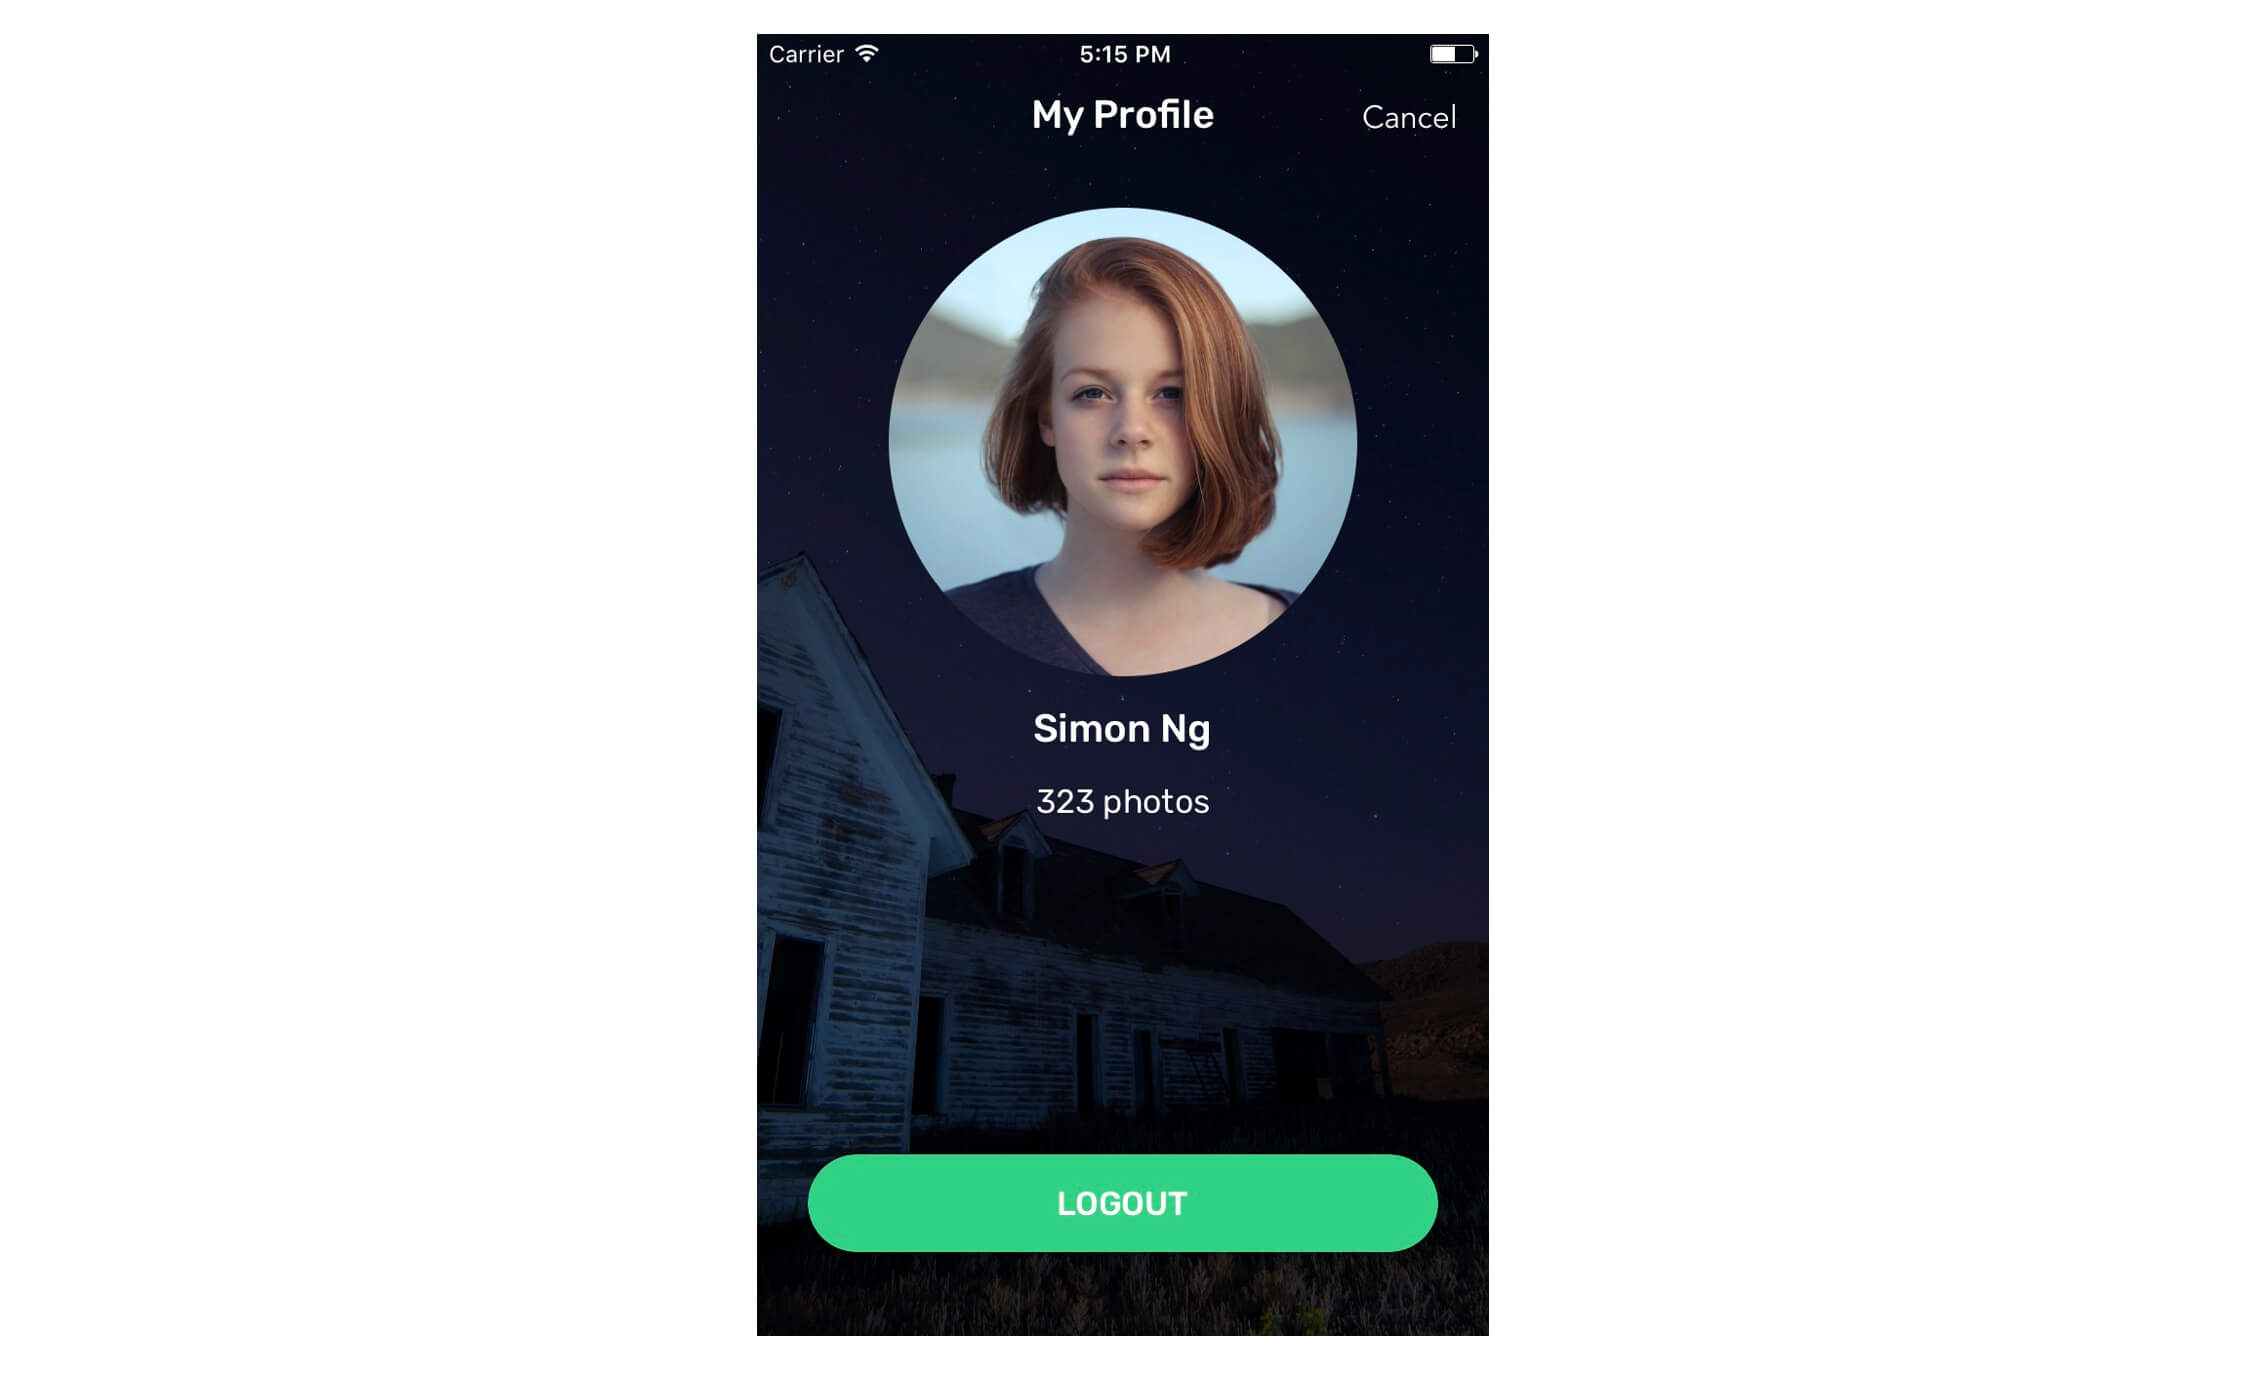
For demo purpose, the profile screen now shows a static profile photo and a sample name. As the user has provided his/her name during sign up, you may wonder whether we can retrieve the name from Firebase and display it in the profile view.
With the Firebase SDK, it turns out that it is pretty straightforward to do that. If you are not forgetful, you should remember we have set the display name of the user. We can retrieve that information and set it to the label.
To do that, update the viewDidLoad() method like this:
override func viewDidLoad() {
    super.viewDidLoad()

    self.title = "My Profile"

    if let currentUser = Auth.auth().currentUser {
        nameLabel.text = currentUser.displayName
    }
}
We can retrieve the current user object by accessing the currentUser property of the authentication object. Then we just assign the display name to the name label.
Resetting the User's Password
What happens if the user forgot his/her login password? We are going to implement the password reset function for users to reset the password. Again it is a simple API call.
In Xcode, open the ResetPasswordViewController.swift file. This is the class for the Reset Password view controller in the storyboard. First, insert the import statement for accessing the Firebase APIs:
import Firebase
Next, we will create an action method named resetPassword. Insert the following code in the class:
@IBAction func resetPassword(sender: UIButton) {

    // Validate the input
    guard let emailAddress = emailTextField.text,
        emailAddress != "" else {

            let alertController = UIAlertController(title: "Input Error", message: "Please provide your email address for password reset.", preferredStyle: .alert)
            let okayAction = UIAlertAction(title: "OK", style: .cancel, handler: nil)
            alertController.addAction(okayAction)
            present(alertController, animated: true, completion: nil)

            return
    }

    // Send password reset email
    Auth.auth().sendPasswordReset(withEmail: emailAddress, completion: { (error) in

        let title = (error == nil) ? "Password Reset Follow-up" : "Password Reset Error"
        let message = (error == nil) ? "We have just sent you a password reset email. Please check your inbox and follow the instructions to reset your password." : error?.localizedDescription

        let alertController = UIAlertController(title: title, message: message, preferredStyle: .alert)
        let okayAction = UIAlertAction(title: "OK", style: .cancel, handler: { (action) in

            if error == nil {

                // Dismiss keyboard
                self.view.endEditing(true)

                // Return to the login screen
                if let navController = self.navigationController {
                    navController.popViewController(animated: true)
                }
            }
        })
        alertController.addAction(okayAction)

        self.present(alertController, animated: true, completion: nil)
    })

}
Similar to what we have implemented for other methods, we first validate the user's input at the very beginning. We just want to make sure the user provides the email address, which is the account ID for password reset.
Once the validation is done, we call the sendPasswordReset method with the user's email address. If the given email address can be found in Firebase, the system will send a password reset email to the specified email address. The user can then follow the instructions to reset the password.
In the code above, we display an alert prompt showing either an error or a success message after the sendPasswordReset method call. If it is a success, we ask the user to check the inbox, and then the app automatically navigates back to the login screen.
Before testing the app, make sure you go back to the storyboard. Locate the Reset Password View Controller. Control drag from the Reset Password button to the Reset Password View Controller in the outline view (or the dock). Choose resetPasswordWithSender: to connect the action method.
Now build the app and test it. Go to the Reset Password screen and fill in your email address. You will receive a password reset email after hitting the Reset Password button. Just follow the instructions and you can reset the password.
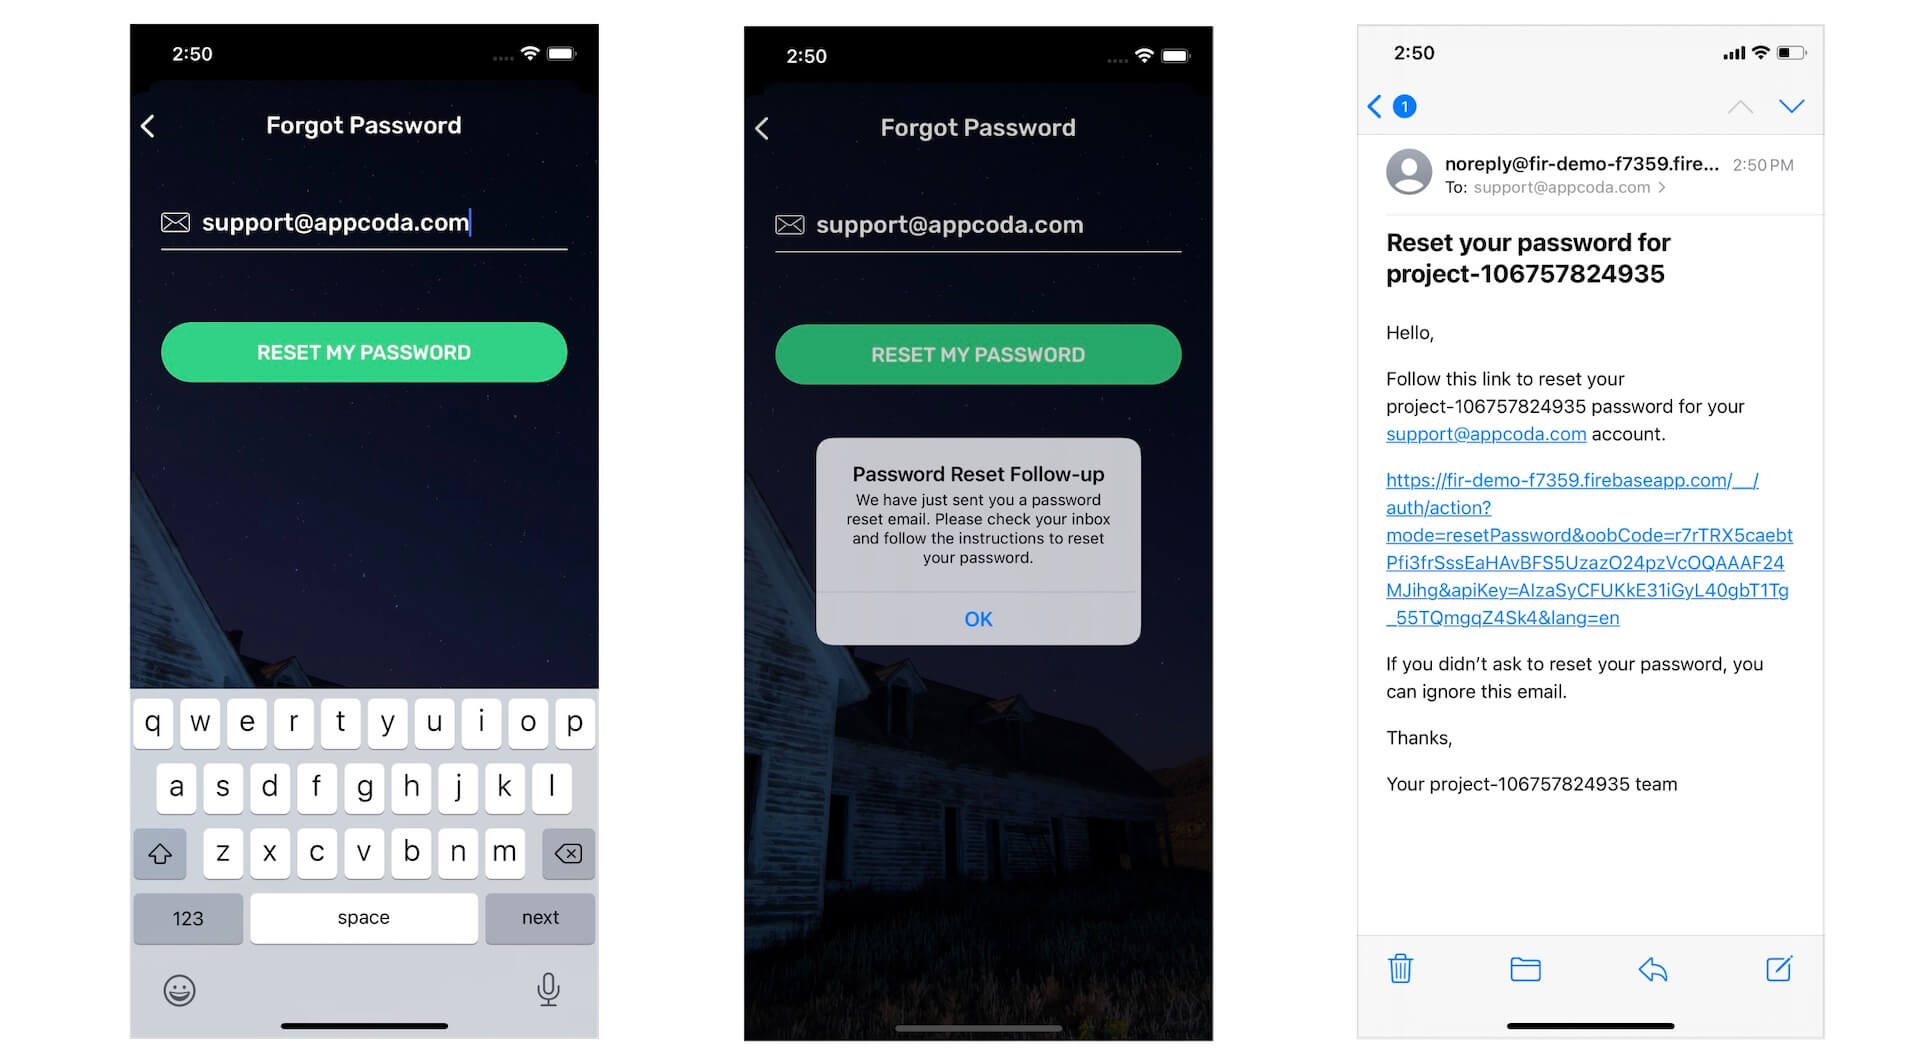
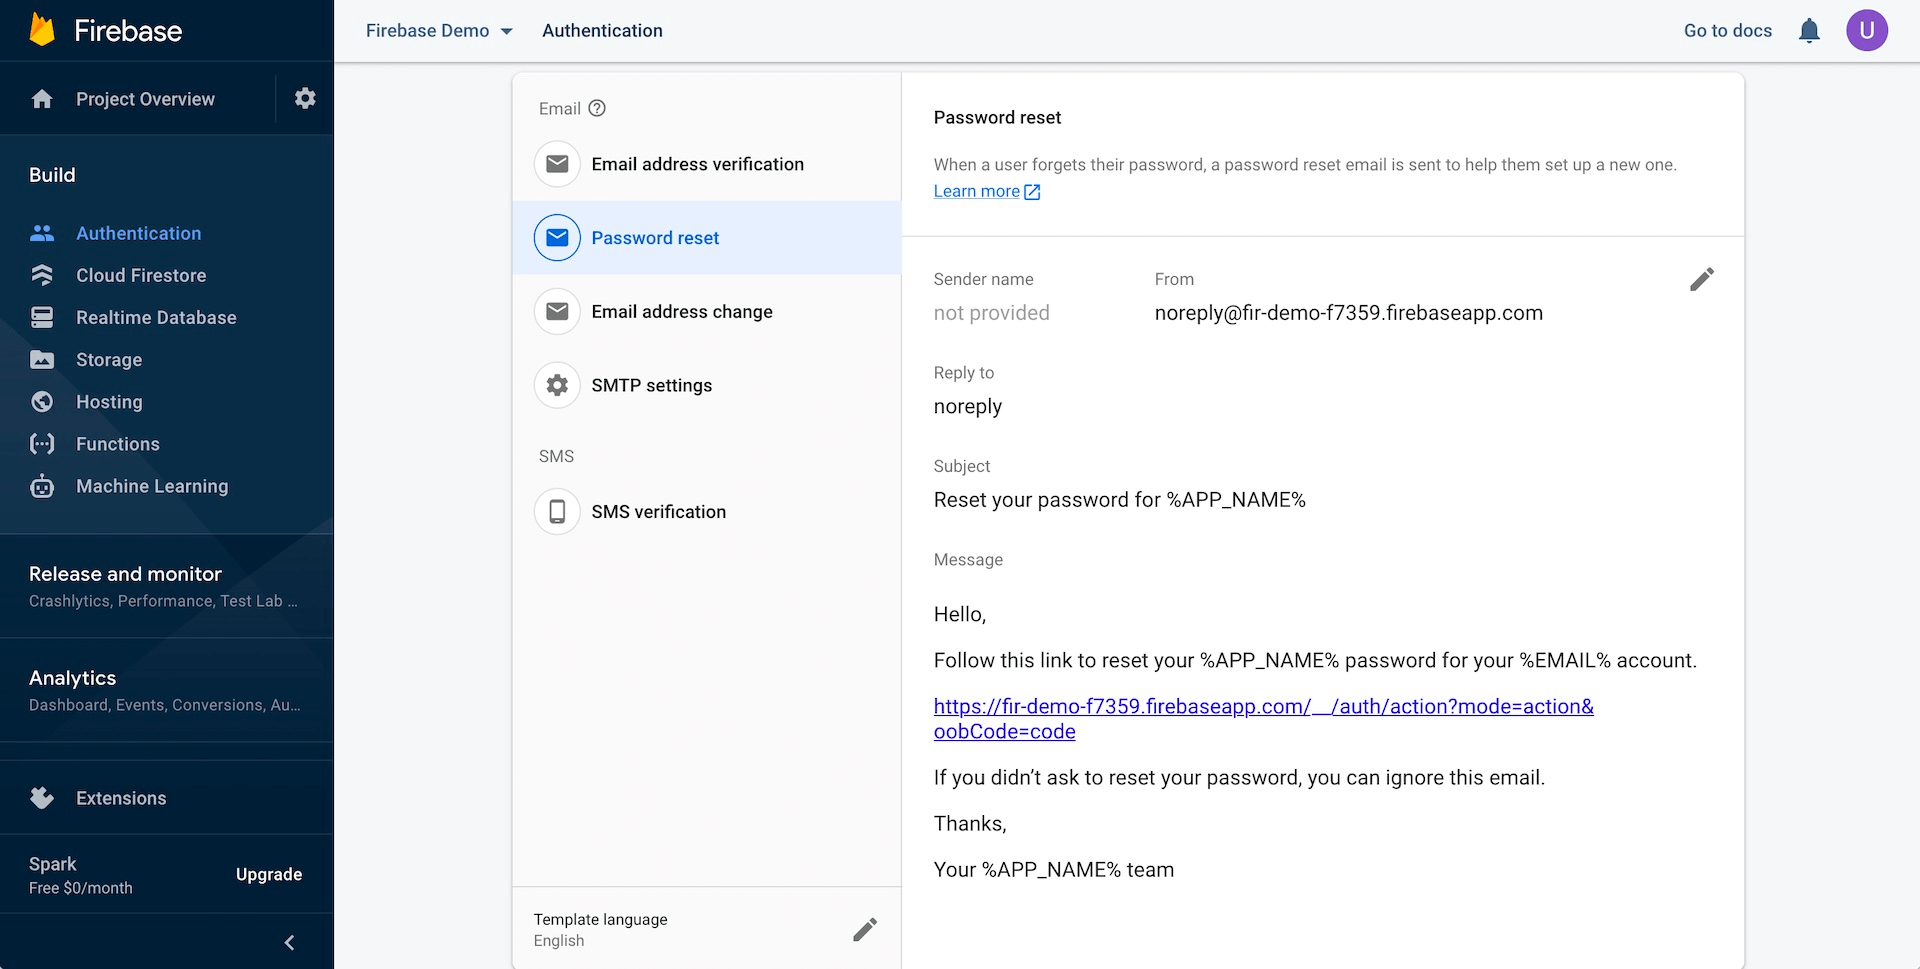
Firebase allows you to customize the content and the from email address of the password reset email. You can go up to the Firebase console, and choose Authentication > Email Templates to customize the email.
Working with Email Verification
As long as the email address provided by users conforms to the format of an email address, the app accepts it for user registration. What happens if the user provides a fake email address? How can you prevent spam accounts?
One of the popular ways to reduce the number of spam accounts is to implement email verification. After the user signs up using an email address, we send an email with a verification link to that email address. The user can only complete the sign up process by clicking the verification link.
Can we implement this type of verification in our app using Firebase? The answer is absolutely "Yes". Let's see how we can modify the app to support the feature.
If you go to the Firebase console and check out the Authentication function. You will find an email template about email address verification under the Email Templates tab. Firebase has the email verification built-in, but you have to write some code to enable the feature.

Every time when you want/need to know more about an API, the best way is to refer to the official documentation. If you haven't checked out the API documentation, take a look at the description of User here:
https://firebase.google.com/docs/reference/ios/firebaseauth/api/reference/Classes/FIRUser
The User class specifies that it has a property named isEmailVerified that indicates whether the email address associated with the user has been verified. And it has a method called sendEmailVerification(completion:) for sending a verification email to the user.
These are the things we need. With the property and the method call, they allow us to implement the email verification feature like this:
- When the user signs up an account, we can call
sendEmailVerification(completion:)to send a confirmation email with a verification link. The user has to click the verification link to complete the sign up. - If the user tries to log into the app without confirming the email address, the app will show an error message telling the user to confirm his/her email address. With the
isEmailVerifiedproperty, we can easily verify the status. - If the user confirms the email address, he/she will be able to log into the app.
Let's first start with the modification of SignUpViewController.swift. As we need to send a verification email after user sign up, we will need to modify the registerAccount action method. Update the method like this:
@IBAction func registerAccount(sender: UIButton) {
// Validate the input
guard let name = nameTextField.text, name != "",
let emailAddress = emailTextField.text, emailAddress != "",
let password = passwordTextField.text, password != "" else {
let alertController = UIAlertController(title: "Registration Error", message: "Please make sure you provide your name, email address and password to complete the registration.", preferredStyle: .alert)
let okayAction = UIAlertAction(title: "OK", style: .cancel, handler: nil)
alertController.addAction(okayAction)
present(alertController, animated: true, completion: nil)
return
}
// Register the user account on Firebase
Auth.auth().createUser(withEmail: emailAddress, password: password, completion: { (user, error) in
if let error = error {
let alertController = UIAlertController(title: "Registration Error", message: error.localizedDescription, preferredStyle: .alert)
let okayAction = UIAlertAction(title: "OK", style: .cancel, handler: nil)
alertController.addAction(okayAction)
self.present(alertController, animated: true, completion: nil)
return
}
// Save the name of the user
if let changeRequest = Auth.auth().currentUser?.createProfileChangeRequest() {
changeRequest.displayName = name
changeRequest.commitChanges(completion: { (error) in
if let error = error {
print("Failed to change the display name: \(error.localizedDescription)")
}
})
}
// Dismiss keyboard
self.view.endEditing(true)
// Send verification email
Auth.auth().currentUser?.sendEmailVerification(completion: { (error) in
print("Failed to send verification email")
})
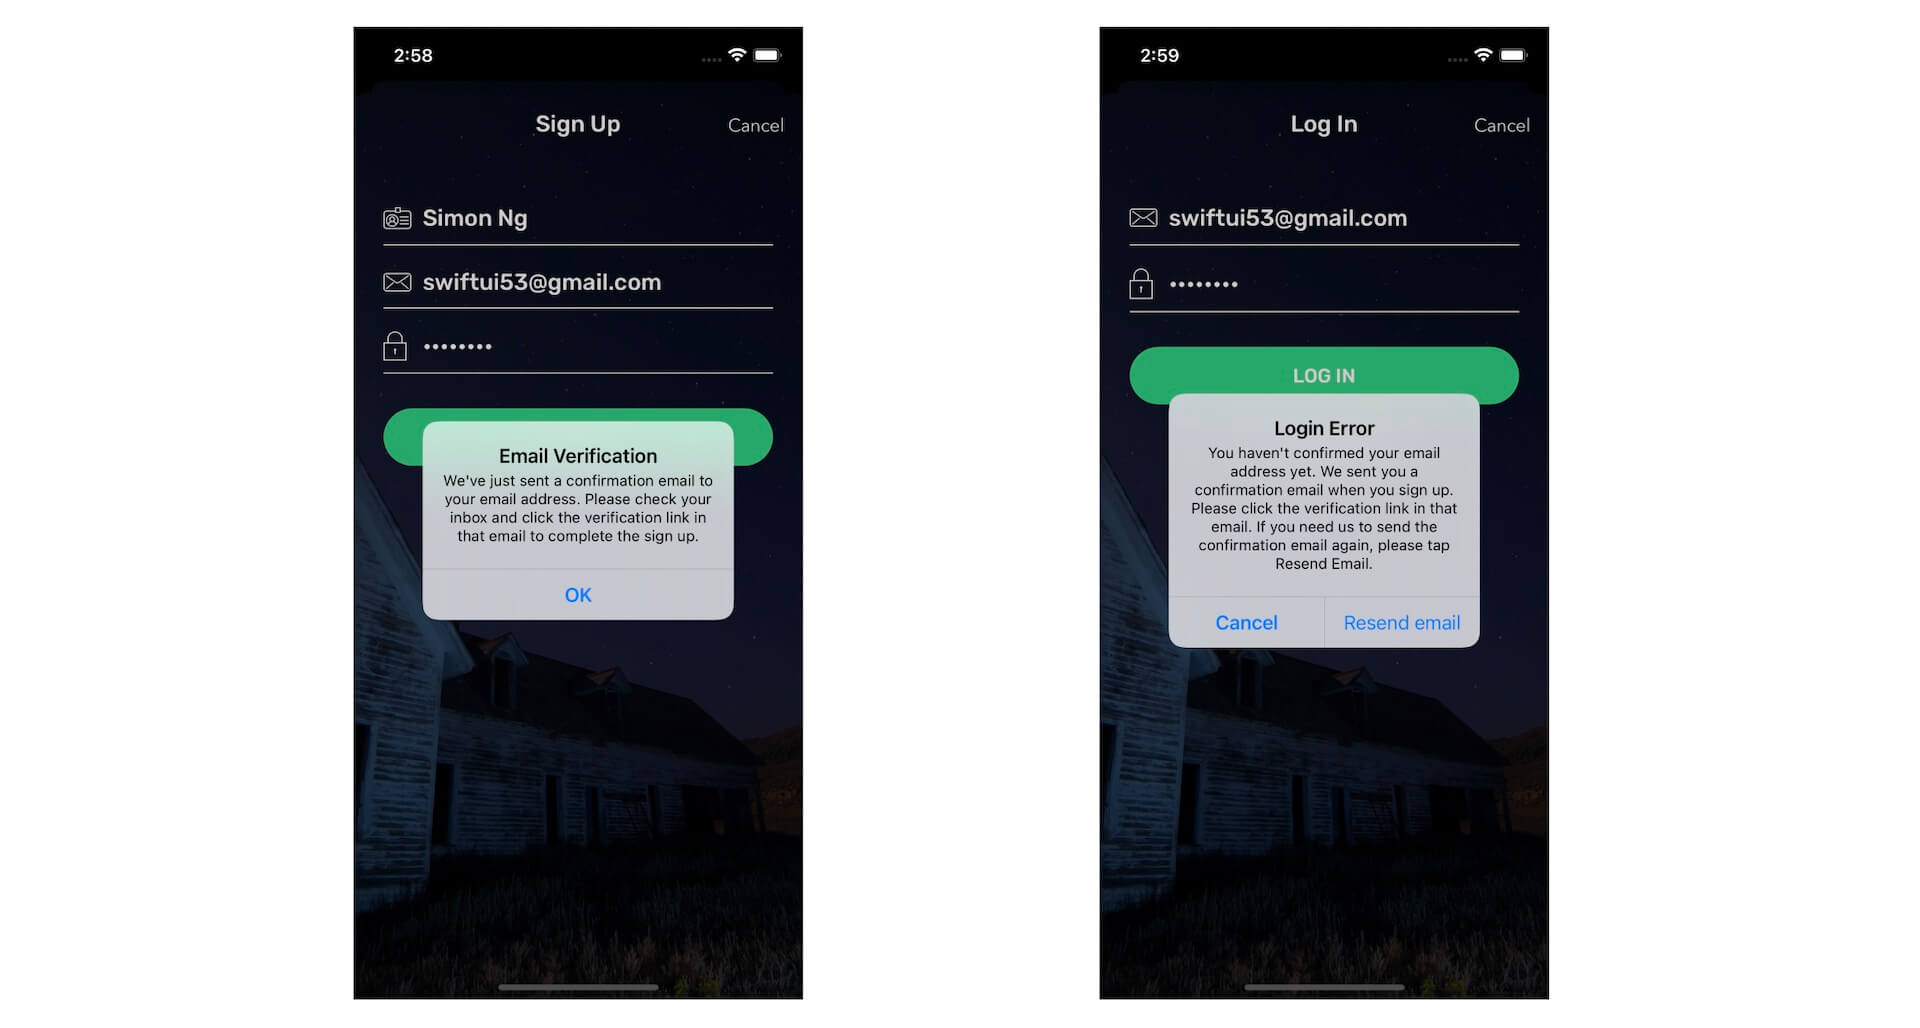
let alertController = UIAlertController(title: "Email Verification", message: "We've just sent a confirmation email to your email address. Please check your inbox and click the verification link in that email to complete the sign up.", preferredStyle: .alert)
let okayAction = UIAlertAction(title: "OK", style: .cancel, handler: { (action) in
// Dismiss the current view controller
self.dismiss(animated: true, completion: nil)
})
alertController.addAction(okayAction)
self.present(alertController, animated: true, completion: nil)
})
}
Everything before the comment // Send verification email is the same as before. Instead of bringing up the home screen (i.e MainView) after creating the user account, we call sendEmailVerification(completion:) to send a verification email, and display an on-screen message informing the user to check the inbox.
At this point, the user can't access the home screen of the app. We force the user to go back to the welcome screen. He/she has to confirm their email address, and then log into the app again.
Next, we will need to modify the LoginViewController.swift file, which controls the logic of user login. Open the file and update the login action method like this:
@IBAction func login(sender: UIButton) {

    // Validate the input
    guard let emailAddress = emailTextField.text, emailAddress != "",
        let password = passwordTextField.text, password != "" else {

            let alertController = UIAlertController(title: "Login Error", message: "Both fields must not be blank.", preferredStyle: .alert)
            let okayAction = UIAlertAction(title: "OK", style: .cancel, handler: nil)
            alertController.addAction(okayAction)
            present(alertController, animated: true, completion: nil)

            return
    }

    // Perform login by calling Firebase APIs
    Auth.auth().signIn(withEmail: emailAddress, password: password, completion: { (result, error) in

        if let error = error {
            let alertController = UIAlertController(title: "Login Error", message: error.localizedDescription, preferredStyle: .alert)
            let okayAction = UIAlertAction(title: "OK", style: .cancel, handler: nil)
            alertController.addAction(okayAction)
            self.present(alertController, animated: true, completion: nil)

            return
        }

        // Email verification
        guard let result = result, result.user.isEmailVerified else {
            let alertController = UIAlertController(title: "Login Error", message: "You haven't confirmed your email address yet. We sent you a confirmation email when you sign up. Please click the verification link in that email. If you need us to send the confirmation email again, please tap Resend Email.", preferredStyle: .alert)

            let okayAction = UIAlertAction(title: "Resend email", style: .default, handler: { (action) in

                Auth.auth().currentUser?.sendEmailVerification(completion: nil)
            })
            let cancelAction = UIAlertAction(title: "Cancel", style: .cancel, handler: nil)
            alertController.addAction(okayAction)
            alertController.addAction(cancelAction)

            self.present(alertController, animated: true, completion: nil)

            return
        }


        // Dismiss keyboard
        self.view.endEditing(true)

        // Present the main view
        if let viewController = self.storyboard?.instantiateViewController(withIdentifier: "MainView") {
            UIApplication.shared.keyWindow?.rootViewController = viewController
            self.dismiss(animated: true, completion: nil)
        }

    })

}
The code is very similar to that we implemented earlier, except that we add several lines of code to check if the email address has been verified or not. If the email is not verified, we will not allow the user to access the home screen or main view.
In the completion handler of the signIn method, we perform email verification by checking the isEmailVerified property of the current user. If its value is false (i.e the email address is not verified), we display an alert and give an option to resend the verification email.
The rest of the code for presenting the main view will only be executed if the user's email address is verified.
After all these changes, it is now ready to test the app again. Try to sign up a new account, and you will receive a confirmation email with a verification link. If you try to log in the app without clicking the verification link, you will end up with an error. But you can log in normally once you verify your email address.
Summary
In this chapter, I walked you through the basics of Firebase. Firebase is now no longer just a database backend. It is a mobile platform that provides a suite of tools (e.g. user authentication) for developers to quickly develop great apps. As you learned in this chapter, you do not need to build your own backend for user authentication or storing user account information. Firebase, along with its SDK, gives everything you need.
Now I believe you understand how to implement sign up, login, logout and password reset using Firebase. If you need to provide user authentication in your apps, you may consider using Firebase as your mobile backend.
For reference, you can download the demo project from http://www.appcoda.com/resources/swift55/FirebaseLoginDemo.zip.