- Made by AppCoda
- Contact us / Support
- Tweet this book
- Preface
- 1. Building Adaptive User Interfaces
- 2. Creating Table View Sections and Index list with Diffable Data Source
- 3. Animating Table View Cells
- 4. Working with JSON and Codable
- 5. How to Integrate the Twitter and Facebook SDK for Social Sharing
- 6. Working with Email and Attachments
- 7. Sending SMS and MMS Using MessageUI Framework
- 8. How to Get Direction and Draw Route on Maps
- 9. Search Nearby Points of Interest Using Local Search
- 10. Audio Recording and Playback
- 11. Scan QR Code Using AVFoundation Framework
- 12. Working with URL Schemes
- 13. Building a Full Screen Camera with Gesture-based Controls
- 14. Video Capturing and Playback Using AVKit
- 15. Displaying Banner Ads using Google AdMob
- 16. Working with Custom Fonts
- 17. Working with AirDrop, UIActivityViewController and Uniform Type Identifiers
- 18. Building Grid Layouts Using Collection Views and Diffable Data Source
- 19. Interacting with Collection Views
- 20. Adaptive Collection Views Using UITraitCollection and Compositional Layout
- 21. Building a Weather Widget Using WidgetKit
- 22. Building Slide Out Sidebar Menus Using Objective-C Libraries
- 23. View Controller Transitions and Animations
- 24. Building a Slide Down Menu
- 25. Self Sizing Cells and Dynamic Type
- 26. XML Parsing, RSS and Expandable Table View Cells
- 27. Applying a Blurred Background Using UIVisualEffect
- 28. Using Touch ID and Face ID For Authentication
- 29. Building a Carousel-Like User Interface
- 30. Working with Parse
- 31. Parsing CSV and Preloading a SQLite Database Using Core Data
- 32. Connecting Multiple Annotations with Polylines and Routes
- 33. Using CocoaPods in Swift Projects
- 34. Building a Simple Sticker App
- 35. Building iMessage Apps Using Messages Framework
- 36. Building Custom UI Components Using IBDesignable and IBInspectable
- 37. Using Firebase for User Authentication
- 38. Google and Facebook Authentication Using Firebase
- 39. Using Firebase Database and Storage to Build an Instagram-like App
- 40. Building a Real-time Image Recognition App Using Core ML
- 41. Building AR Apps with ARKit and SpriteKit
- 42. Working with 3D Objects in Augmented Reality Using ARKit and SceneKit
- 43. Use Create ML to Train Your Own Machine Learning Model for Image Recognition
- 44. Building a Sentiment Classifier Using Create ML to Classify User Reviews
- 45. Working with Image Tracking Using ARKit
- Published with GitBook
Chapter 25
Self Sizing Cells and Dynamic Type
In iOS 8, Apple introduced a new feature for UITableView known as Self Sizing Cells. To me, this was seriously one of the most exciting features for the SDK at the time. Prior to iOS 8, if you wanted to display dynamic content in a table view with variable heights, you would need to calculate the row height manually. In iOS 11, Apple's engineers take this feature even further. The self-sizing feature is enabled automatically. In other words, header views, footer views and cells use self-sizing by default for displaying dynamic content.
While this feature is now enabled without the need of configurations in iOS 14, I want you to understand what happens under the hood. In brief, here is what you need to do when using self sizing cells:
- Define auto layout constraints for your prototype cell
- Specify the
estimatedRowHeightproperty of your table view - Set the
rowHeightproperty of your table view toUITableView.automaticDimension
If we express the last point in code, it looks like this:
tableView.estimatedRowHeight = 95.0
tableView.rowHeight = UITableView.automaticDimension
This is what iOS 14 (actually since iOS 11) has done for you.
With just two lines of code, you instruct the table view to calculate the cell's size to match its content and render it dynamically. This self sizing cell feature should save you tons of code and time. You're going to love it.
In the next section, we'll develop a simple demo app to demonstrate self sizing cell. There is no better way to learn a new feature than to use it. In addition to self sizing cell, I will also talk about Dynamic Type. Dynamic Type was first introduced in iOS 7 - it allows users to customize the text size to fit their own needs. However, only apps that adopt Dynamic Type respond to the text change.
You're encouraged to adopt Dynamic Type so as to give your users the flexibility to change text sizes, and to improve the user experience for vision-challenged users. Therefore, in the later section you will learn how to adopt dynamic type in your apps.
Building a Simple Demo
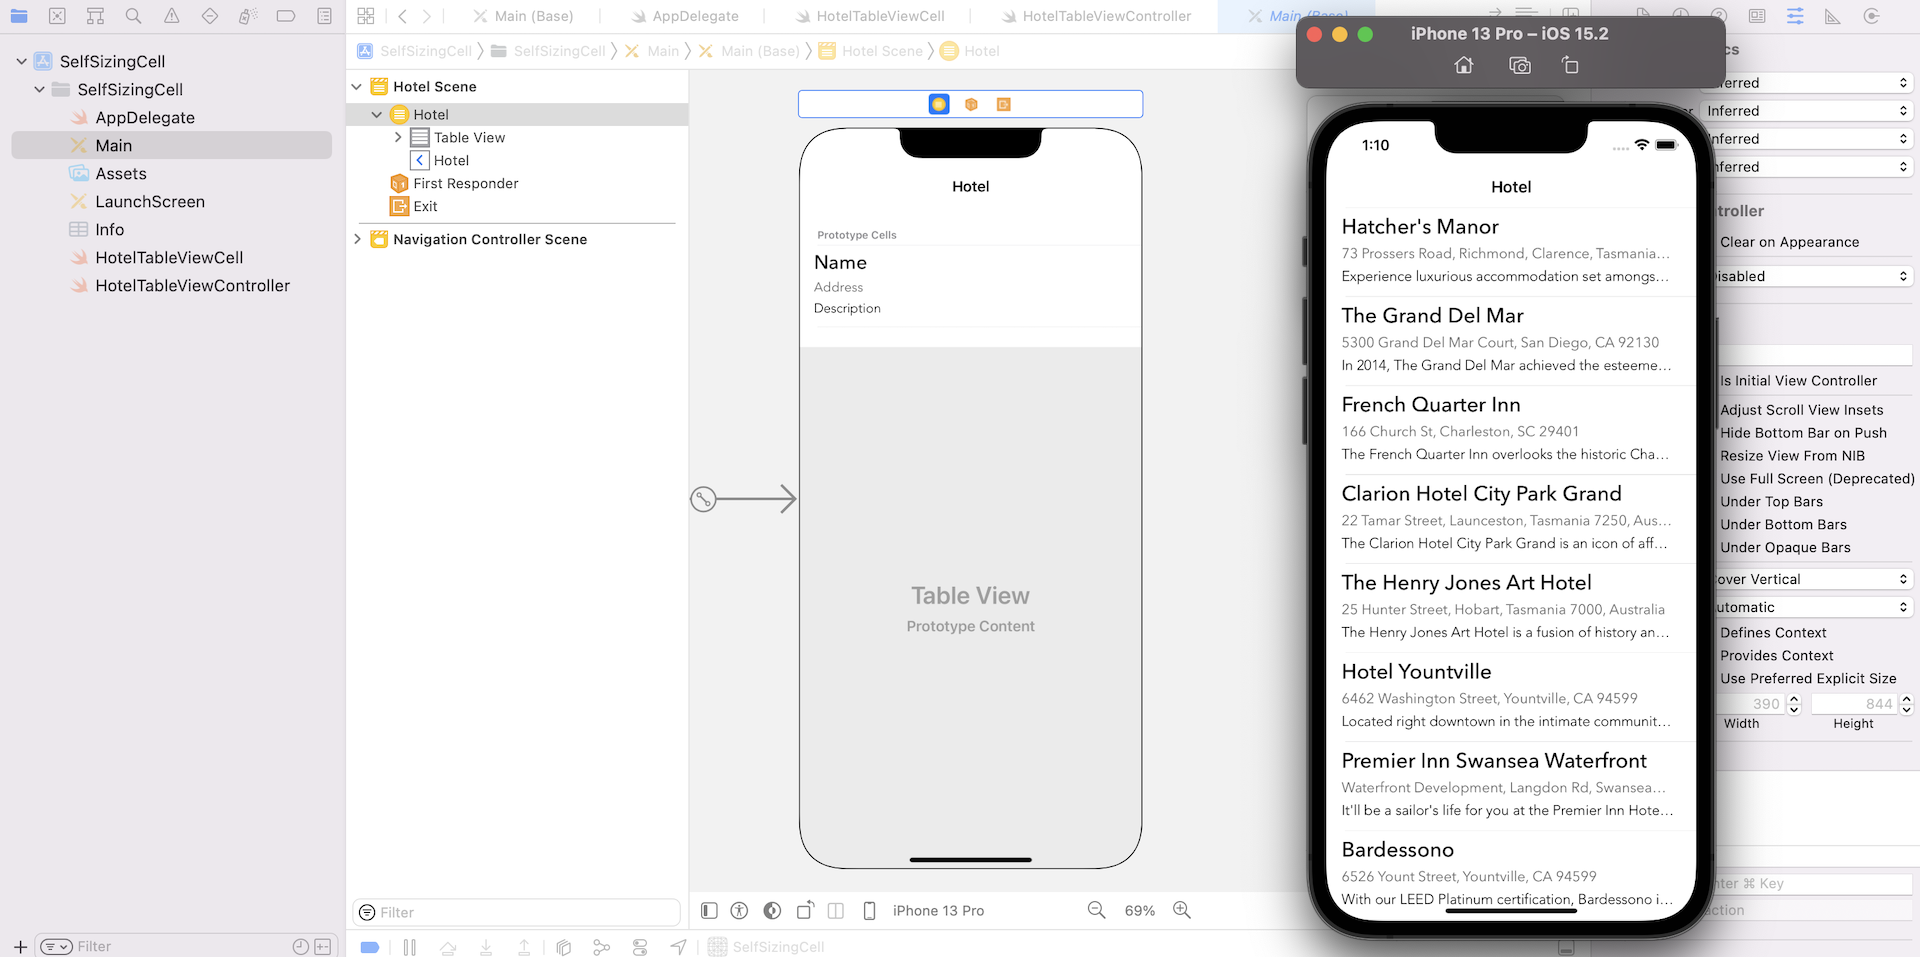
We will start with a project template for a simple table-based app showing a list of hotels. The prototype cell contains three one-line text labels for the name, address and description of a hotel. If you download the project from http://www.appcoda.com/resources/swift55/SelfSizingCellStarter.zip and run it, you will have an app like the one shown below.
As you can see, some of the addresses and descriptions are truncated; you may have faced the same issue when developing table-based apps. To fix the issue, one option is to simply reduce the font size or increase the number of lines of a label. However, this solution is not perfect. As the length of the addresses and descriptions varies, it will probably result in an imperfect UI with redundant white spaces. A better solution is to adapt the cell size with respect to the size of its inner content. Prior to iOS 8, you would need to manually compute the size of each label and adjust the cell size accordingly, which would involve a lot of code and subsequently a lot of time.
In iOS 15, all you need to do is define appropriate layout constraints and the cell size can be adapted automatically. Currently, the project template creates a prototype cell with a fixed height of 95 points. What we are going to do is turn the cells into self sizing cells so that the cell content can be displayed perfectly.
Adding Auto Layout Constraints
Many developers hate auto layout and avoid using it whenever possible. However, without auto layout self sizing cells will not work, because they rely on the constraints to determine the proper row height. In fact, table view calls systemLayoutSizeFittingSize on your cell and that returns the size of the cell based on the layout constraints. If this is the first time you're working with auto layout, I recommend that you quickly review chapter 1 about adaptive UI before continuing.
For the project template I did not define any auto layout constraints for the prototype cell; let's add a few constraints to the cell.
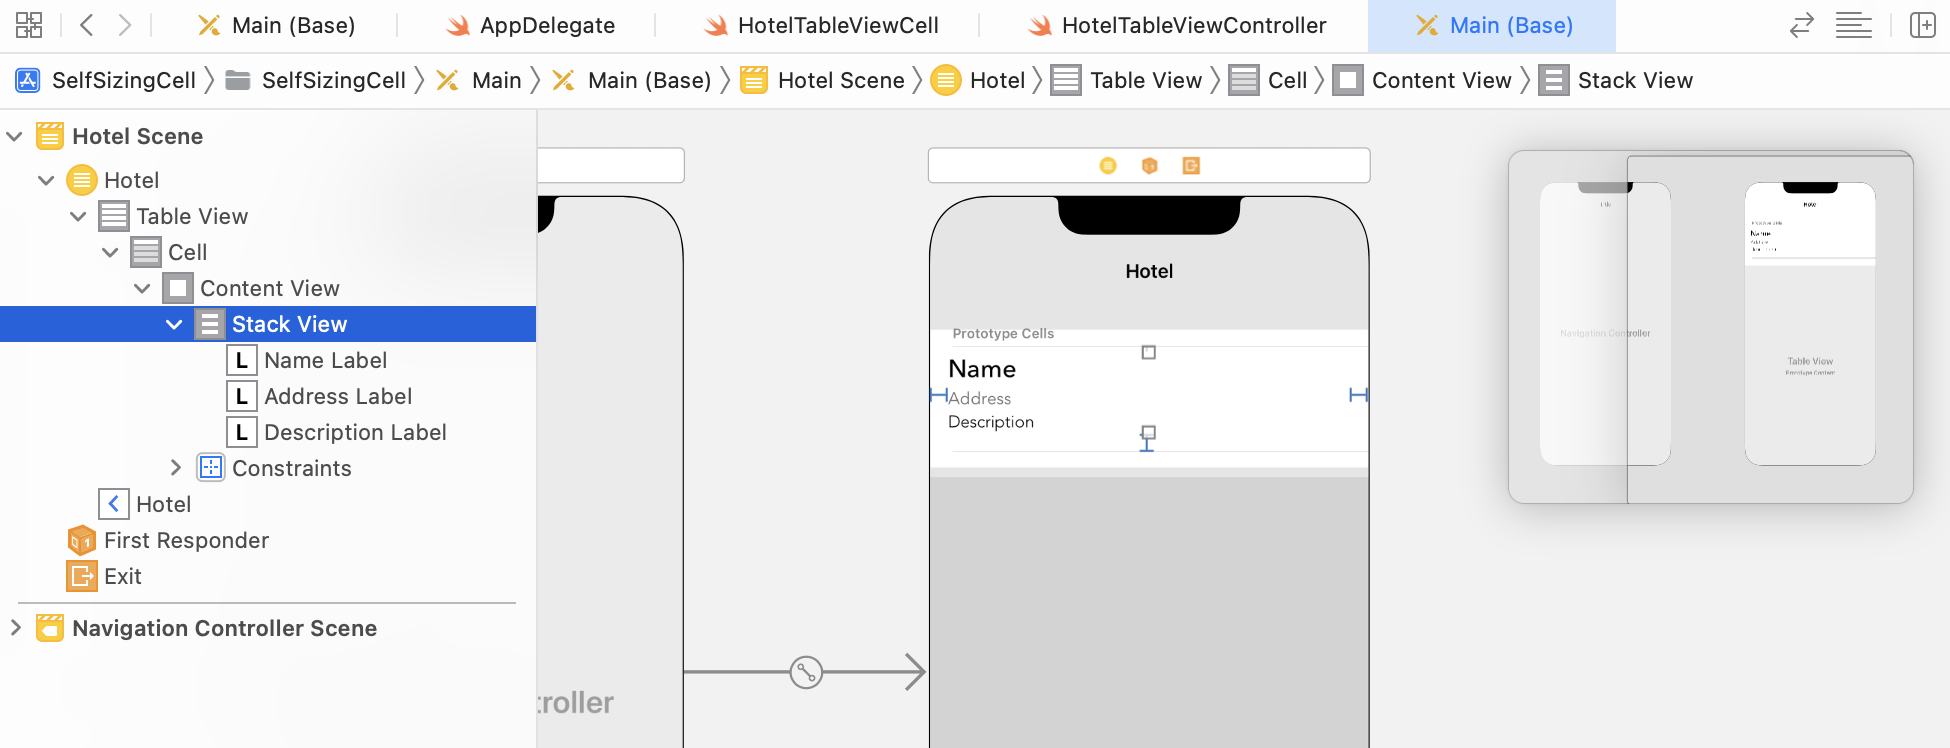
First, press and hold command key to select address, description and name labels. Then click the Embed in button to embed them in a stack view.
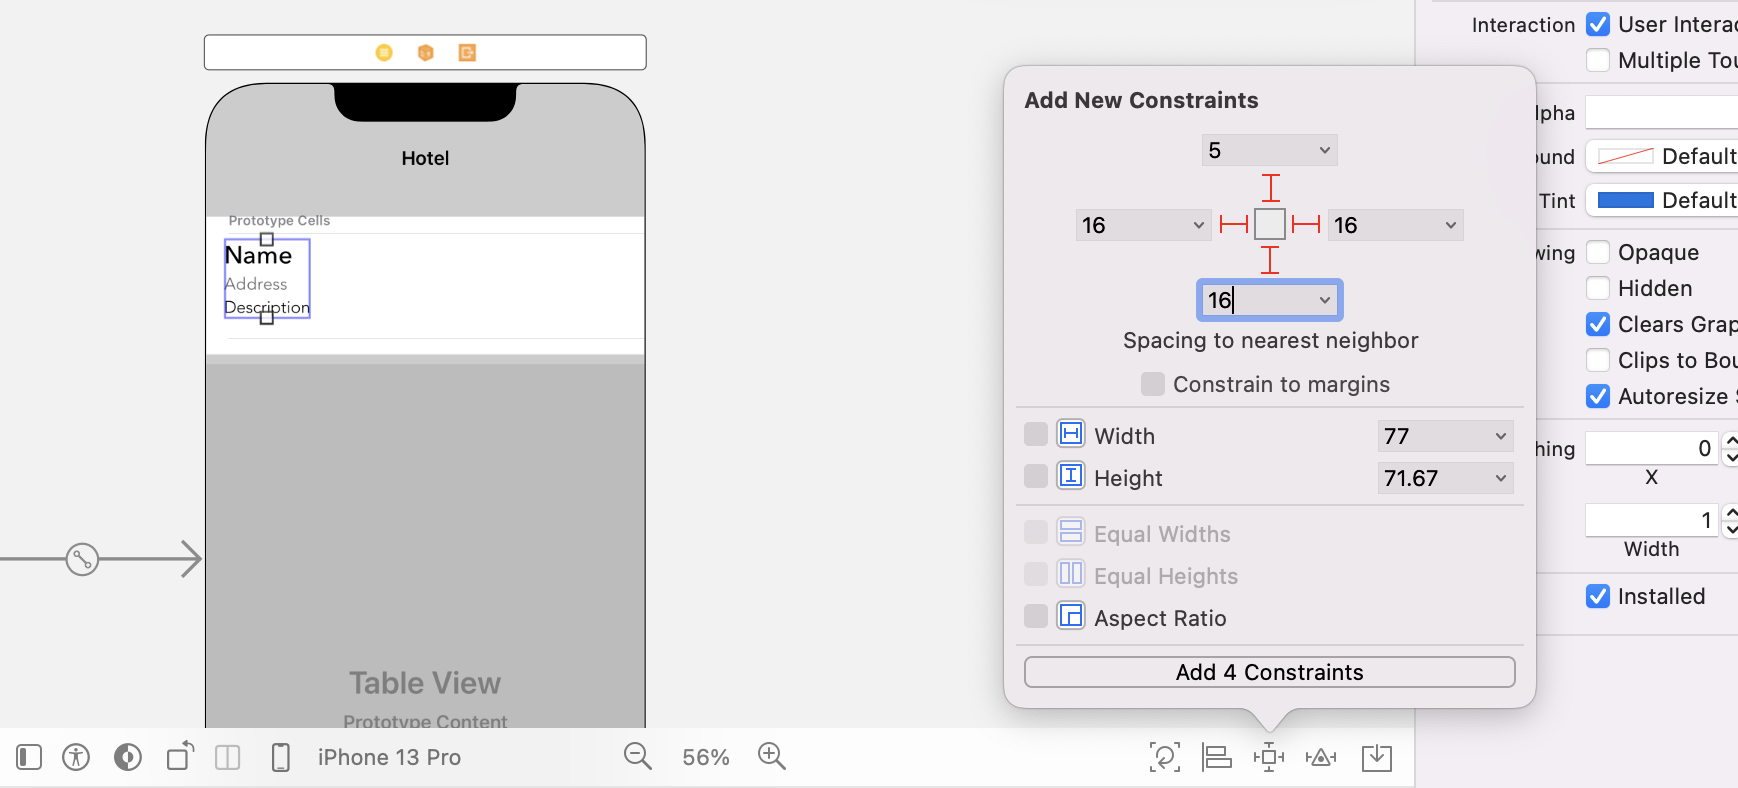
Next, we are going to add spacing constraints for the stack view. Click the Add New Constraints button, and set the space value for each side (refer to the figure below). Click Add 4 Constraints to add the constraints.
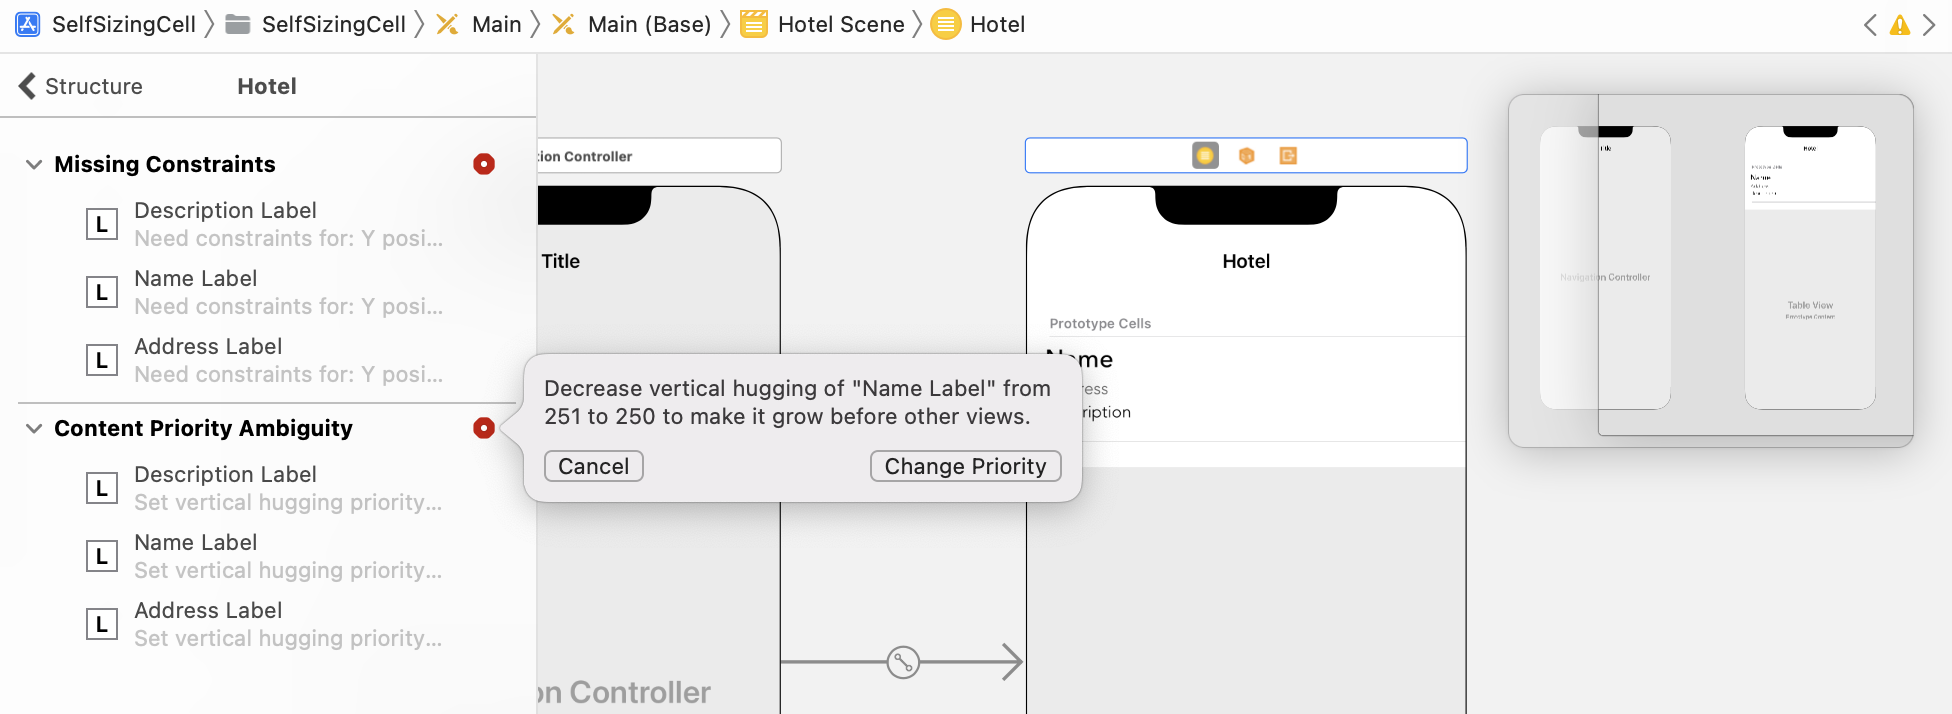
Interface Builder detects some ambiguities of the layout. In the Document Outline view, click the disclosure arrow and you will see a list of the issues. Click the error symbol next to Content Priority Ambiguity to fix the issue.
If you have configured the constraints correctly, your final layout should look similar to this:
Setting Row Height
With the layout constraints configured, you now need to add the following code in the viewDidLoad method of HotelTableViewController:
tableView.estimatedRowHeight = 95.0
tableView.rowHeight = UITableView.automaticDimension
The lines of code set the estimatedRowHeight property to 95 points, which is the current row height, and the rowHeight property to UITableView.automaticDimension, which is the default row height in iOS. In other words, you ask table view to figure out the appropriate cell size based on the provided information.
If you test the app now, the cells are still not resized. This is because all labels are restricted to display one line only. Select the Name label and set the number of lines under the attributes inspector to 0. By doing this, the label should now adjust itself automatically. Repeat the same procedures for both the Address and Description labels.
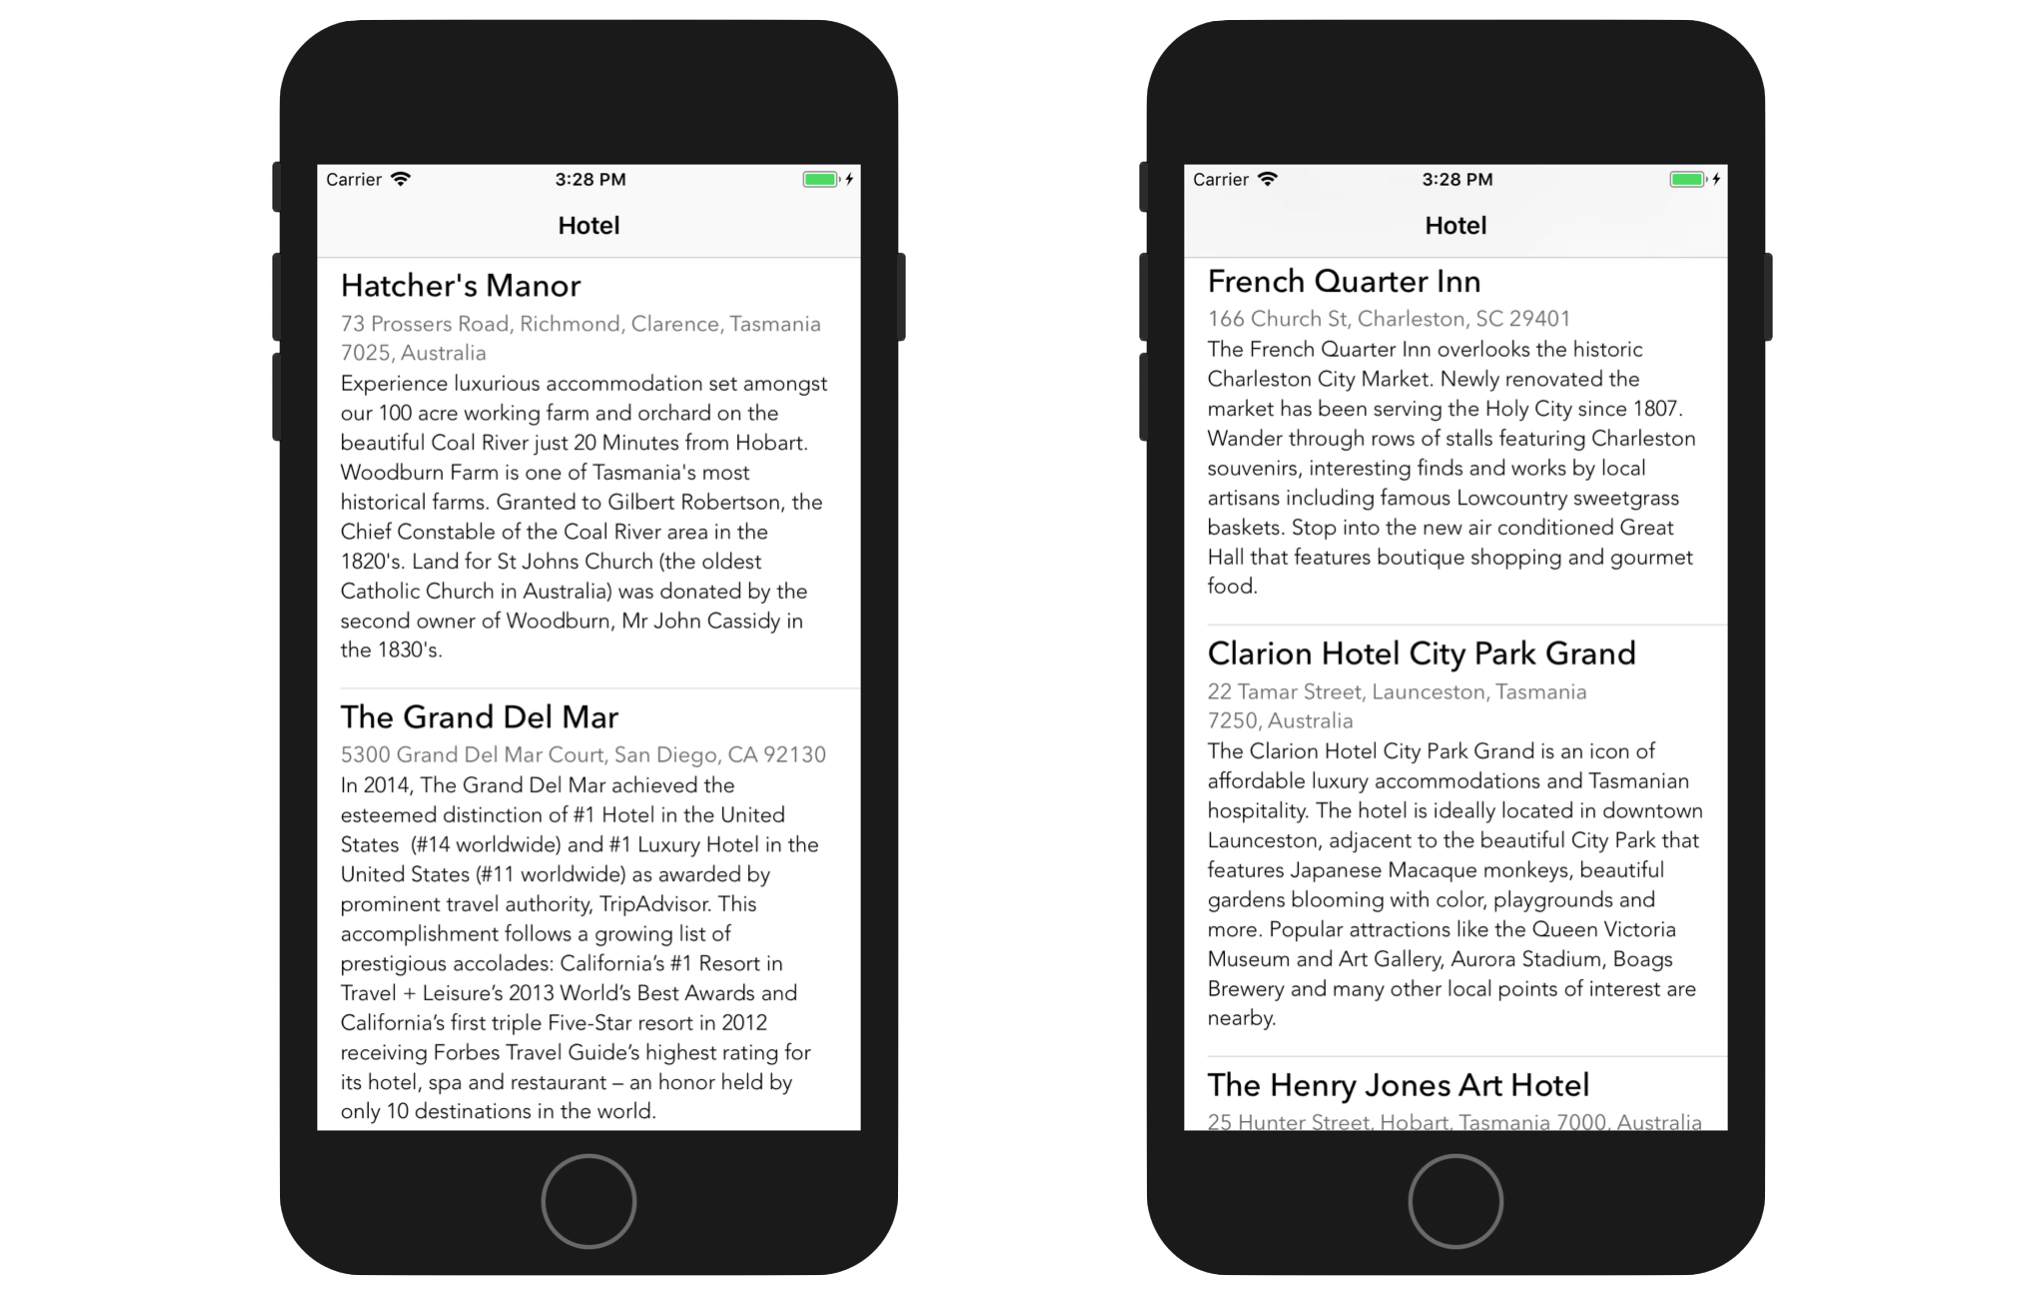
Once you made the changes, you can run the project again. This time the cells should be resized properly with respect to the content.
Dynamic Type Introduction
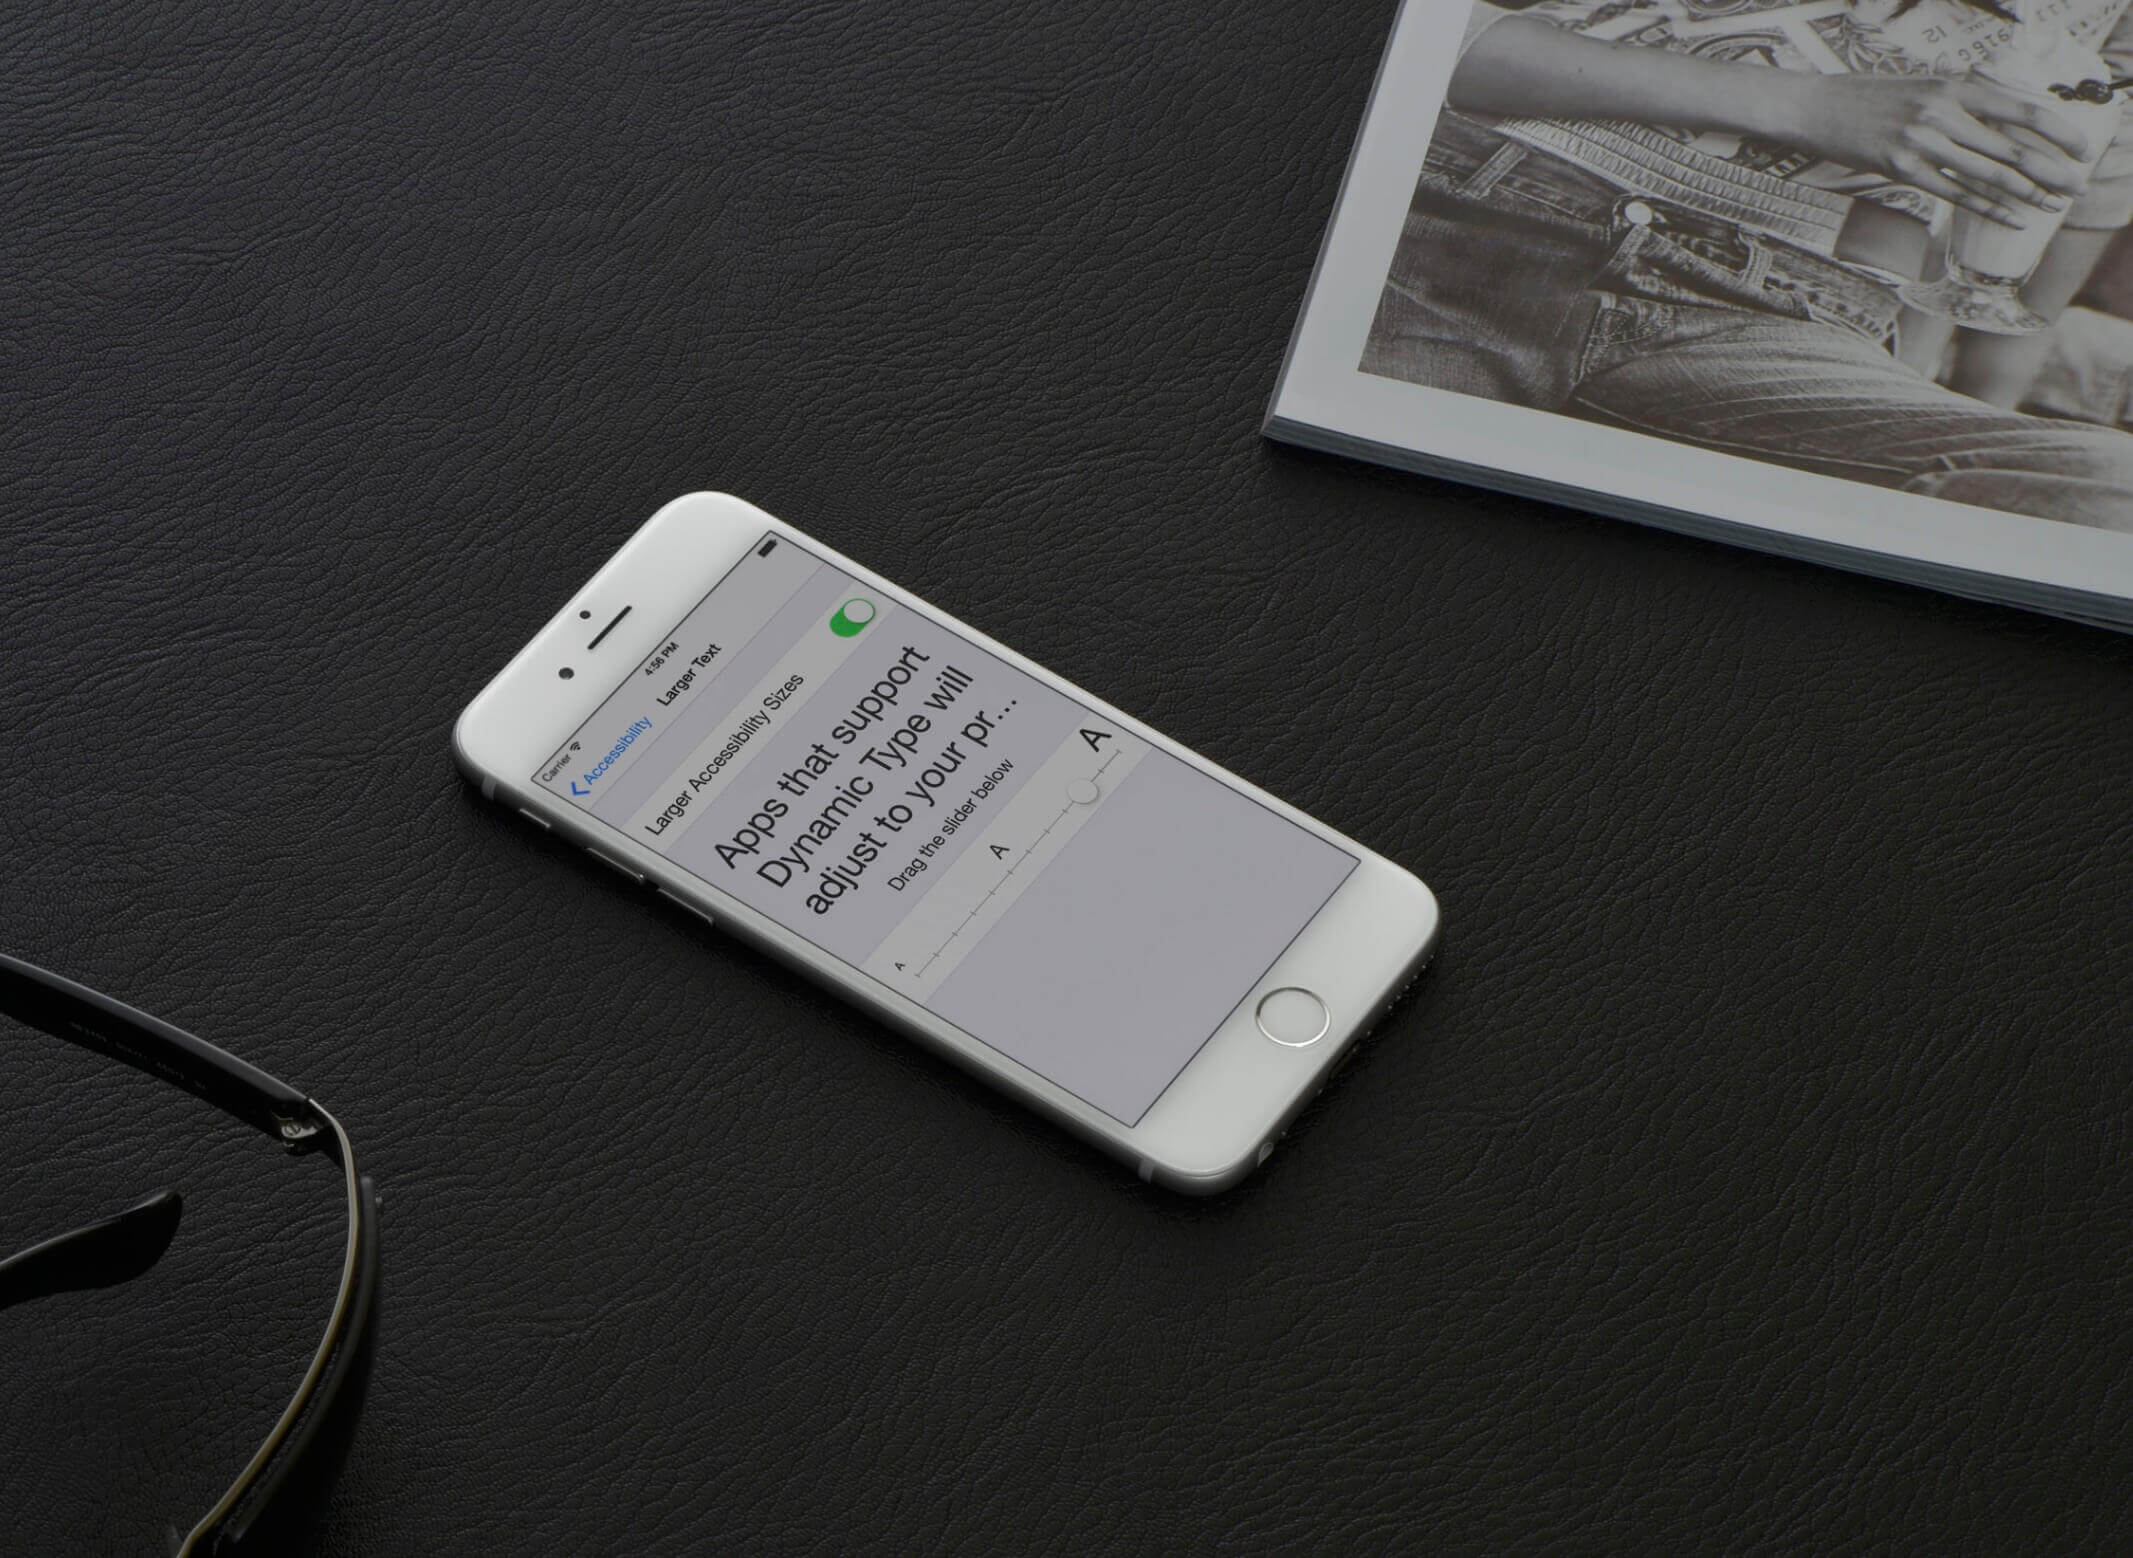
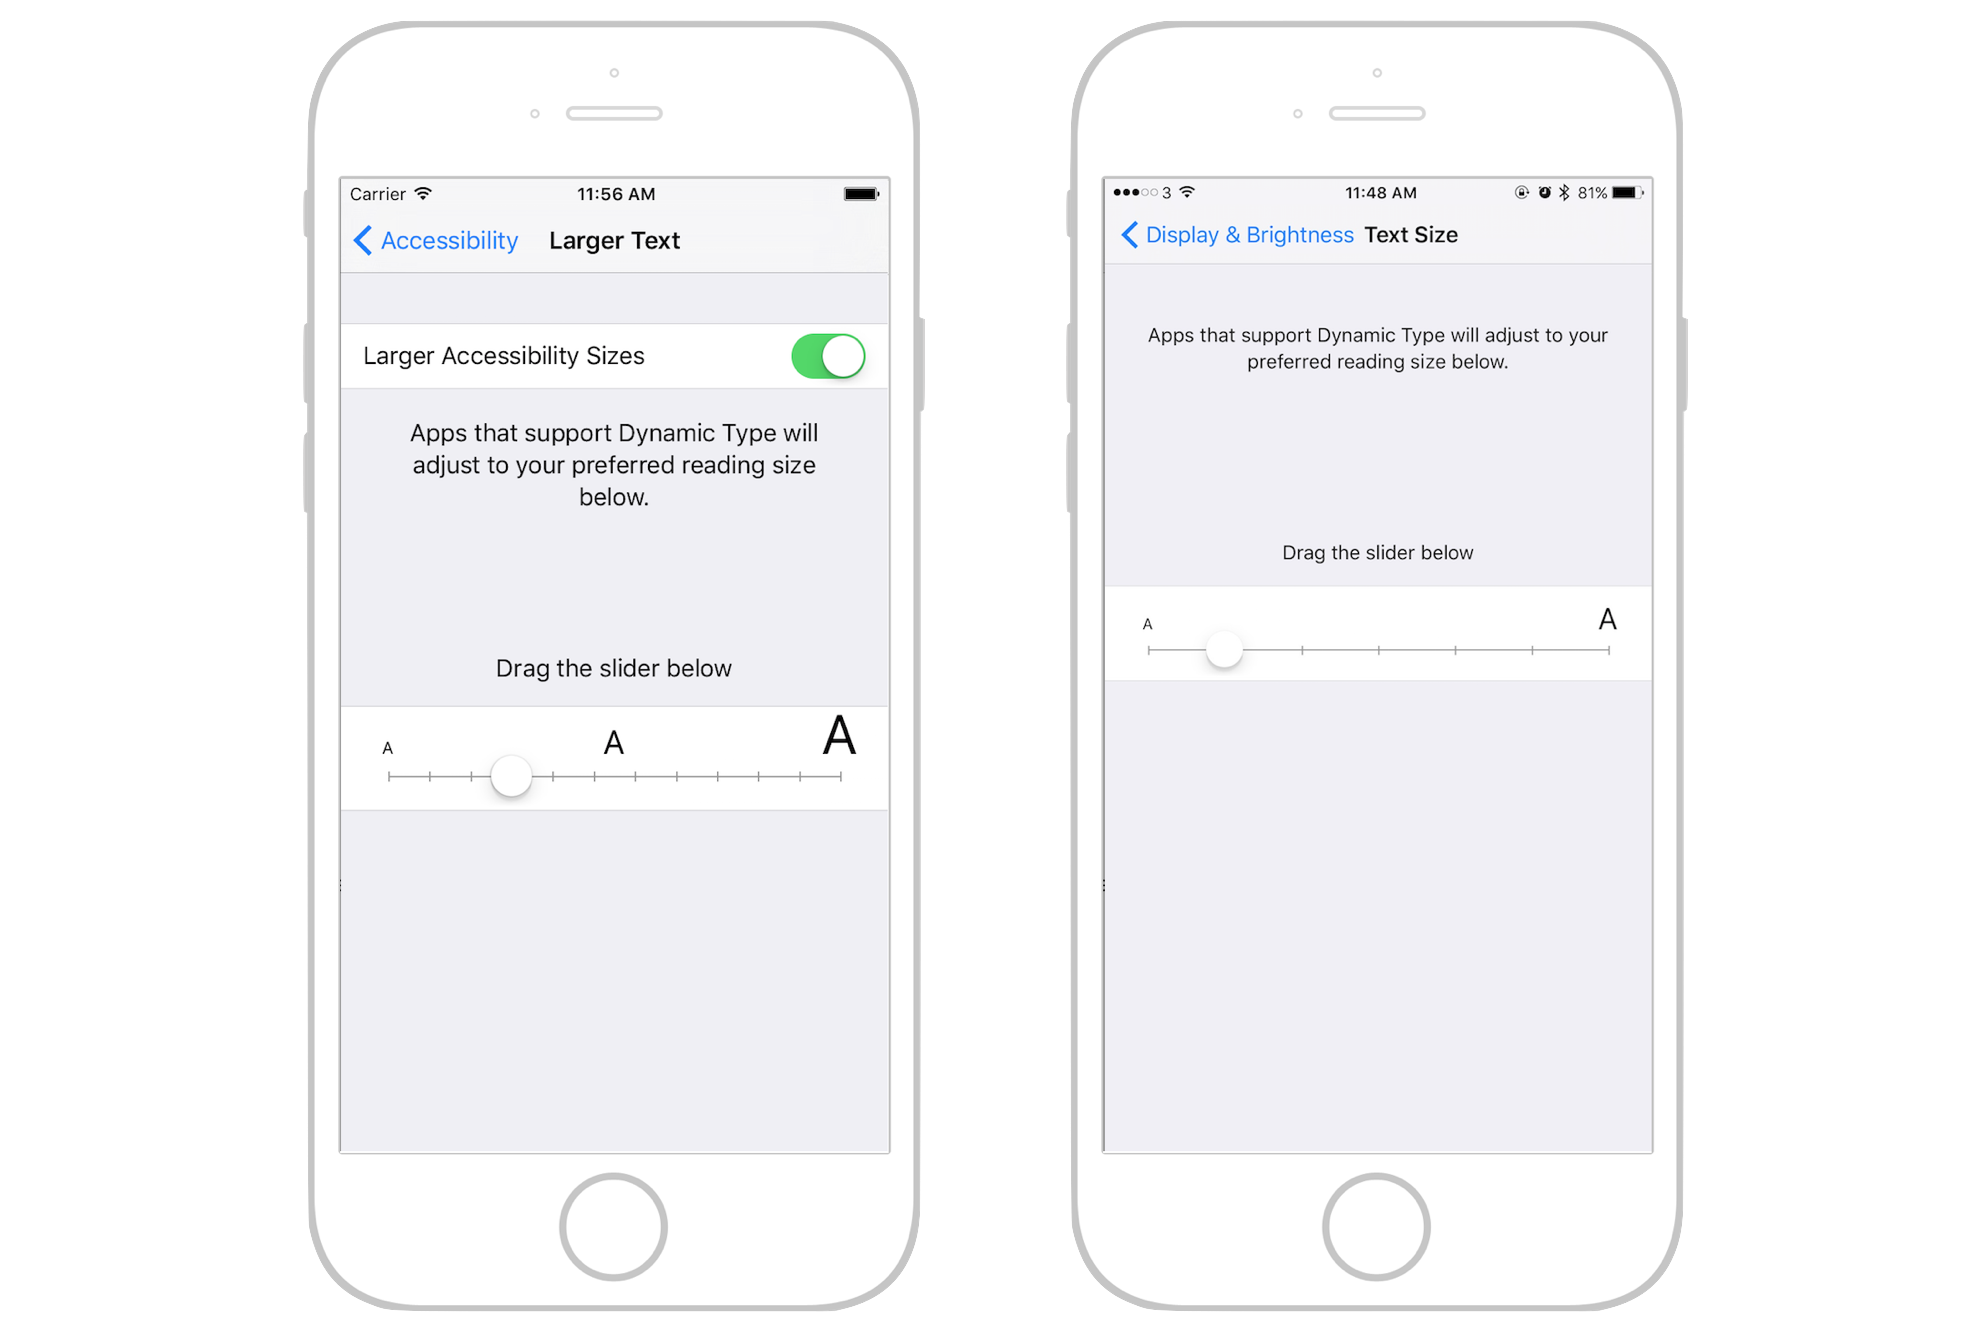
Self sizing cells are particularly useful to support Dynamic Type. You may not have heard of Dynamic Type but you probably see the setting screen (Settings > General > Accessibility > Larger Text or Settings > Display & Brightness > Text Size) shown below.
Dynamic Type was first introduced in iOS 7 - it allows users to customize the text size to fit their own needs. However, only apps that adopt dynamic type respond to the text change. I believe most of the users are not aware of this feature because only a fraction of third-party apps have adopted the feature.
From iOS 8 and onwards, Apple wants to encourage developers to adopt Dynamic Type. All of the system applications have already adopted Dynamic Type and the built-in labels automatically have dynamic fonts. When the user changes the text size, the size of labels are going to change as well.
Furthermore, the introduction of Self Sizing Cells is a way to facilitate the widespread adoption of Dynamic Type. It saves you a lot of code from developing your own solution to adjust the row height. Once the cell is self-sized, adopting Dynamic Type is just a piece of cake.
Let's explore how to apply dynamic type to the demo app.
Adopting Dynamic Type
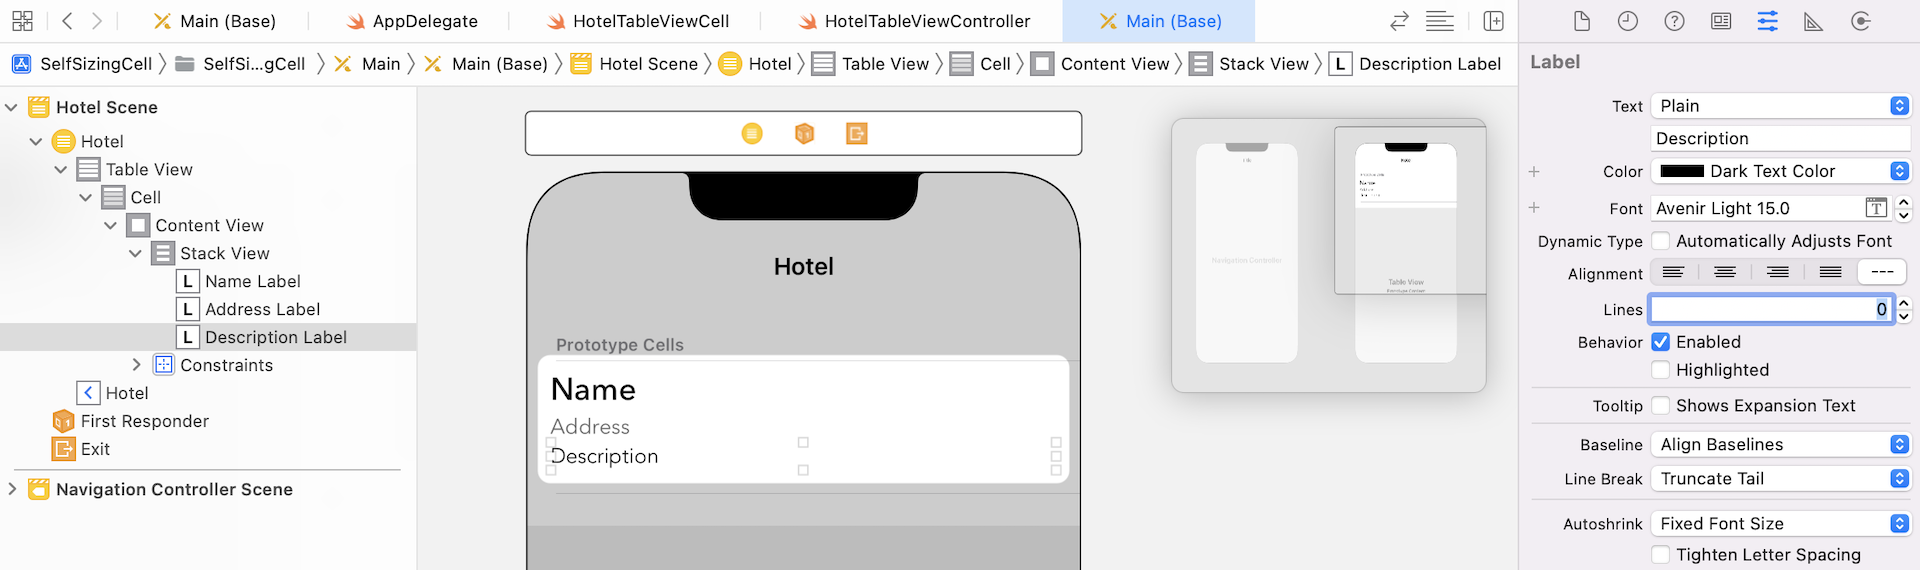
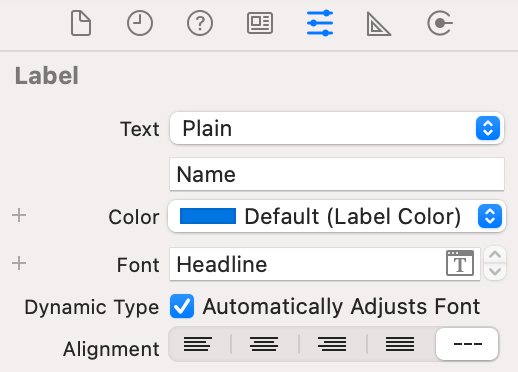
We will change the font of the label in the demo project from a custom font to a preferred font for text style (i.e. headline, body, etc). First, select the Name label and go to the Attributes inspector. Change the font option to Headline.
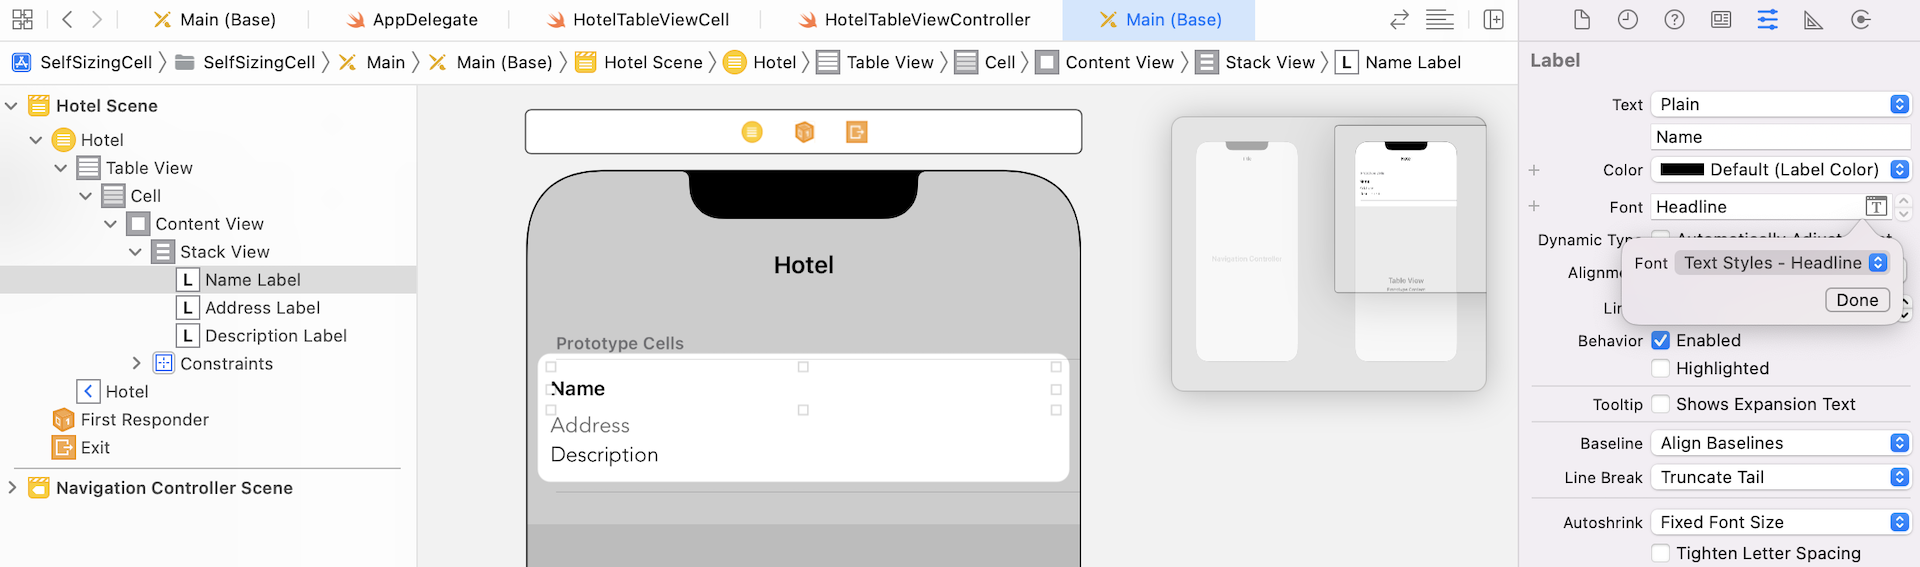
Next, select the Address label and change the font to Subhead. Repeat the same procedure but change the font of the Description label to Body. As the font style is changed, Xcode should detect some auto layout issues. Just click the disclosure indicator on the Interface Builder outline menu to fix the issues.
That's it. Before testing the app, you should first change the text size. In the simulator, go to Settings > General > Accessibility > Larger Text and enable the Larger Accessibility Sizes option. Drag the slider to set to your preferred font size.
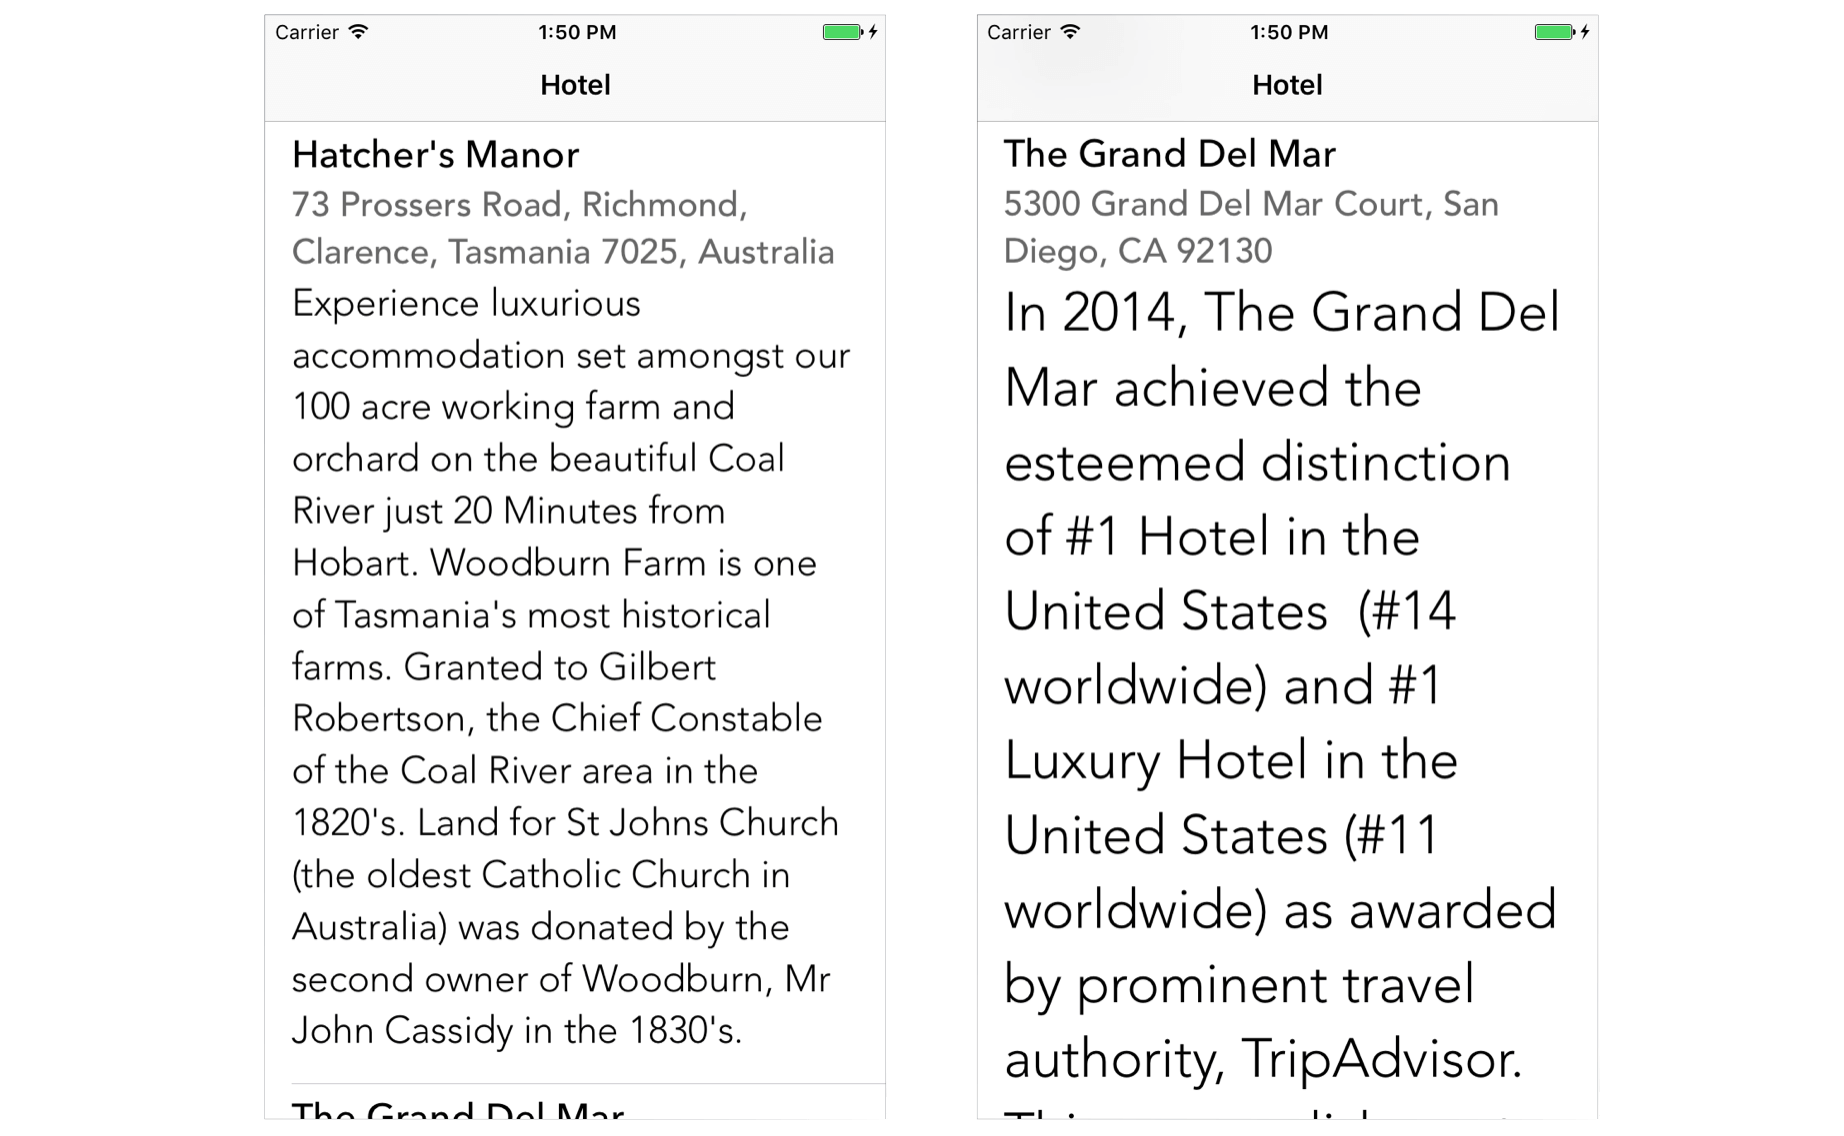
Now run the app and it should adapt to the text size change.
Responding to Text Size Change
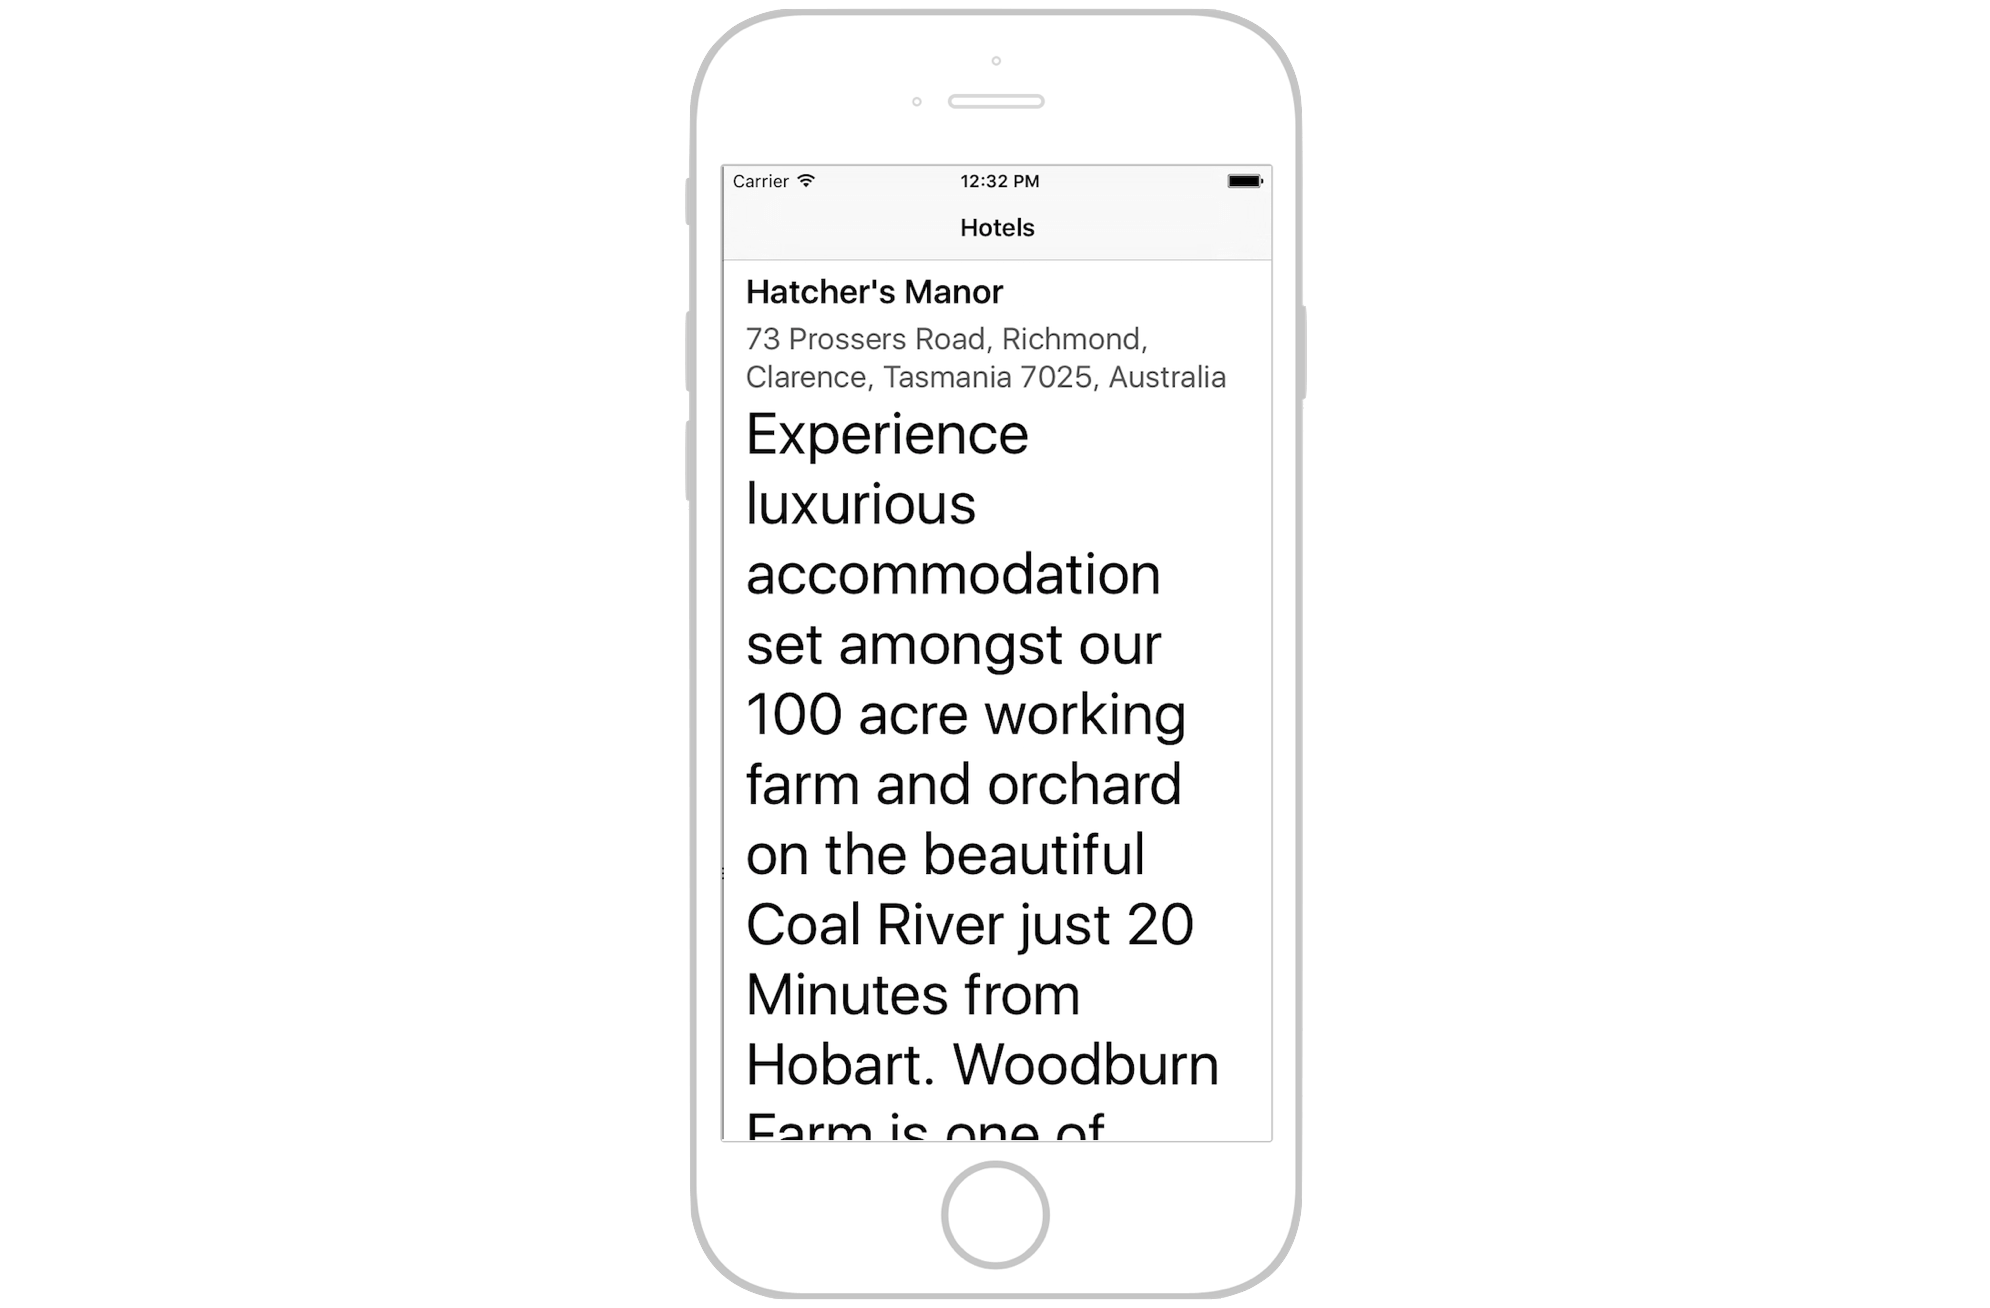
Now that the demo app has adopted dynamic type, but it doesn't respond to text size change yet. While running the demo app, go to Settings and change the text size. When you switch back to the app, the font size will not be adjusted accordingly; you must quit the app and re-launch it to effectuate the change.
Prior to iOS 11, your app has to listen to the UIContentSizeCategoryDidChangeNotification event and perform a table view reload in order to respond to the size change.
NotificationCenter.default.addObserver(self, selector: #selector(onTextSizeChange), name: .UIContentSizeCategoryDidChange, object: nil)
Now in iOS 14, you just need to enable an option in Interface Builder and iOS will handle the rest. Go to Interface Builder and select the name label. In the Attributes inspector, tick the Automatically Adjusts Font option.
Repeat the same procedures for the other two labels. Now you can test the app again. When the app is launched in the simulator, press command+shift+h to go back to the home screen. Then go to Settings > General > Accessibility > Larger Text and enable the Larger Accessibility Sizes option. Drag the slider to set to change the text size.
Once changed, press command+shift+h again to go back to the home screen. Launch the SelfSizingCell app and the size of the labels should change automatically.
Alternatively, if you prefer to change the setting programmatically, all you need to do is set the label's adjustsFontForContentSizeCategory property to true. Here is an example:
@IBOutlet weak var nameLabel:UILabel! {
    didSet {
        nameLabel.adjustsFontForContentSizeCategory = true
    }
}
@IBOutlet weak var addressLabel:UILabel! {
    didSet {
        addressLabel.adjustsFontForContentSizeCategory = true
    }
}
@IBOutlet weak var descriptionLabel:UILabel! {
    didSet {
        descriptionLabel.adjustsFontForContentSizeCategory = true
    }
}
Using Custom Font
Now that you have learned how to adopt Dynamic Type and enable your app to respond to text size changes. However, there is one issue with dynamic type that we haven't covered yet. The font of the text style is defaulted to San Francisco, Apple's default font in iOS. Fortunately, you are allowed to configure your own font for Dynamic Type. You can refer to chapter 16 for the details of the implementation.
Summary
By now, you should understand how to implement self sizing cells. This feature is particularly useful when you need to display dynamic content with variable length. As you can see, the iOS API has has taken care of the heavy lifting. All you need to do is define the required auto layout constraints.
For reference, you can download the final project from http://www.appcoda.com/resources/swift55/SelfSizingCell.zip.