- Made by AppCoda
- Contact us / Support
- Tweet this book
- Preface
- 1. Building Adaptive User Interfaces
- 2. Creating Table View Sections and Index list with Diffable Data Source
- 3. Animating Table View Cells
- 4. Working with JSON and Codable
- 5. How to Integrate the Twitter and Facebook SDK for Social Sharing
- 6. Working with Email and Attachments
- 7. Sending SMS and MMS Using MessageUI Framework
- 8. How to Get Direction and Draw Route on Maps
- 9. Search Nearby Points of Interest Using Local Search
- 10. Audio Recording and Playback
- 11. Scan QR Code Using AVFoundation Framework
- 12. Working with URL Schemes
- 13. Building a Full Screen Camera with Gesture-based Controls
- 14. Video Capturing and Playback Using AVKit
- 15. Displaying Banner Ads using Google AdMob
- 16. Working with Custom Fonts
- 17. Working with AirDrop, UIActivityViewController and Uniform Type Identifiers
- 18. Building Grid Layouts Using Collection Views and Diffable Data Source
- 19. Interacting with Collection Views
- 20. Adaptive Collection Views Using UITraitCollection and Compositional Layout
- 21. Building a Weather Widget Using WidgetKit
- 22. Building Slide Out Sidebar Menus Using Objective-C Libraries
- 23. View Controller Transitions and Animations
- 24. Building a Slide Down Menu
- 25. Self Sizing Cells and Dynamic Type
- 26. XML Parsing, RSS and Expandable Table View Cells
- 27. Applying a Blurred Background Using UIVisualEffect
- 28. Using Touch ID and Face ID For Authentication
- 29. Building a Carousel-Like User Interface
- 30. Working with Parse
- 31. Parsing CSV and Preloading a SQLite Database Using Core Data
- 32. Connecting Multiple Annotations with Polylines and Routes
- 33. Using CocoaPods in Swift Projects
- 34. Building a Simple Sticker App
- 35. Building iMessage Apps Using Messages Framework
- 36. Building Custom UI Components Using IBDesignable and IBInspectable
- 37. Using Firebase for User Authentication
- 38. Google and Facebook Authentication Using Firebase
- 39. Using Firebase Database and Storage to Build an Instagram-like App
- 40. Building a Real-time Image Recognition App Using Core ML
- 41. Building AR Apps with ARKit and SpriteKit
- 42. Working with 3D Objects in Augmented Reality Using ARKit and SceneKit
- 43. Use Create ML to Train Your Own Machine Learning Model for Image Recognition
- 44. Building a Sentiment Classifier Using Create ML to Classify User Reviews
- 45. Working with Image Tracking Using ARKit
- Published with GitBook
Chapter 24
Building a Slide Down Menu
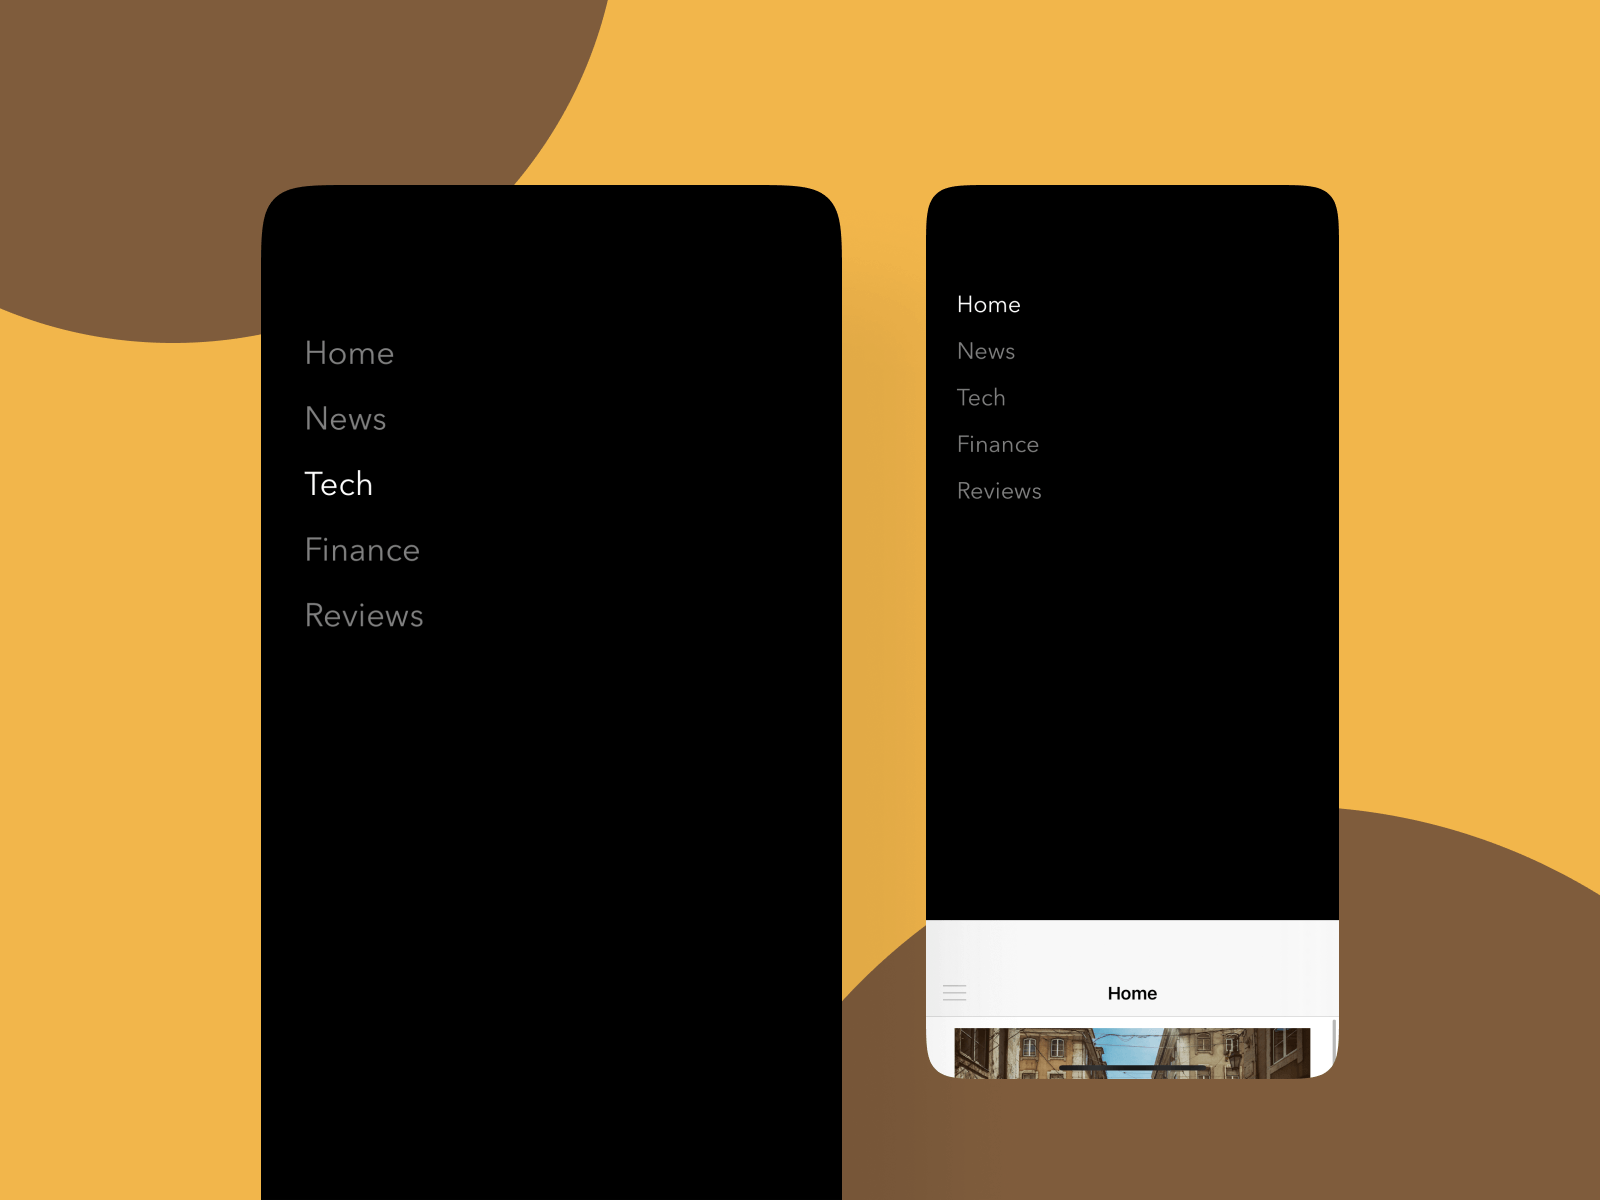
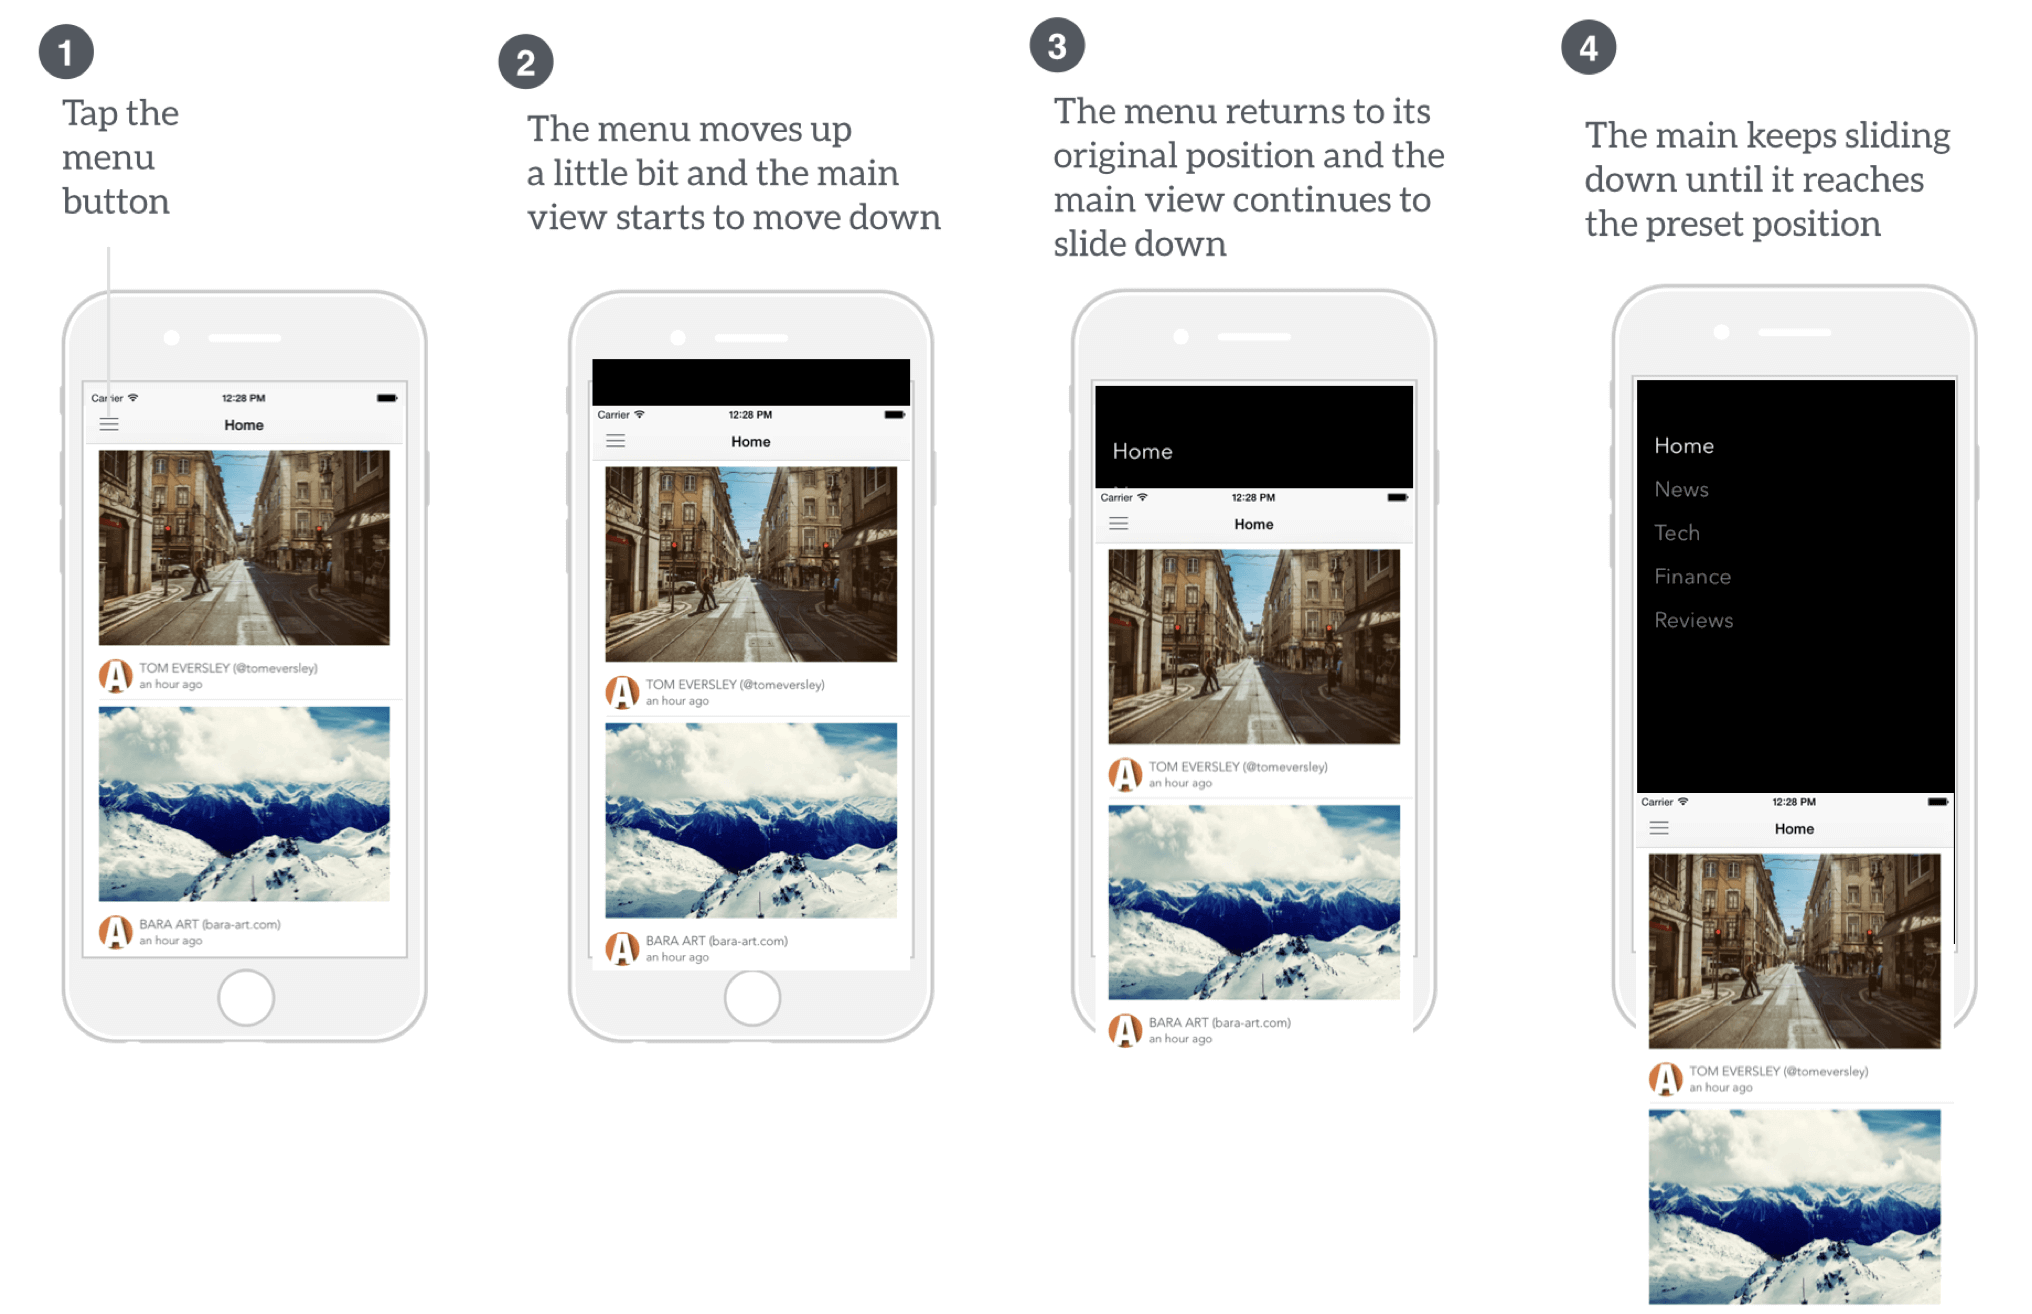
Navigation is an important part of every user interface. There are multiple ways to present a menu for your users to access the app's features. The sidebar menu that we discussed earlier is an example. Slide down menu is another common menu design. When a user taps the menu button, the main screen slides down to reveal the menu. The screen below shows a sample slide down menu used in the older version of the Medium app.
If you have gone through the previous chapter, you should have a basic understanding of custom view controller transition. In this chapter, you will apply what you have learned to build an animated slide down menu.
As usual, I don't want you to start from scratch. You can download the project template from http://www.appcoda.com/resources/swift55/SlideDownMenuStarter.zip. It includes the storyboard and view controller classes. You will find two table view controllers. One is for the main screen (embedded in a navigation controller) and the other is for the navigation menu. If you run the project, the app should present you the main interface with some dummy data.

Before moving on, take a few minutes to browse through the code template to familiarize yourself with the project.
Presenting the Menu Modally
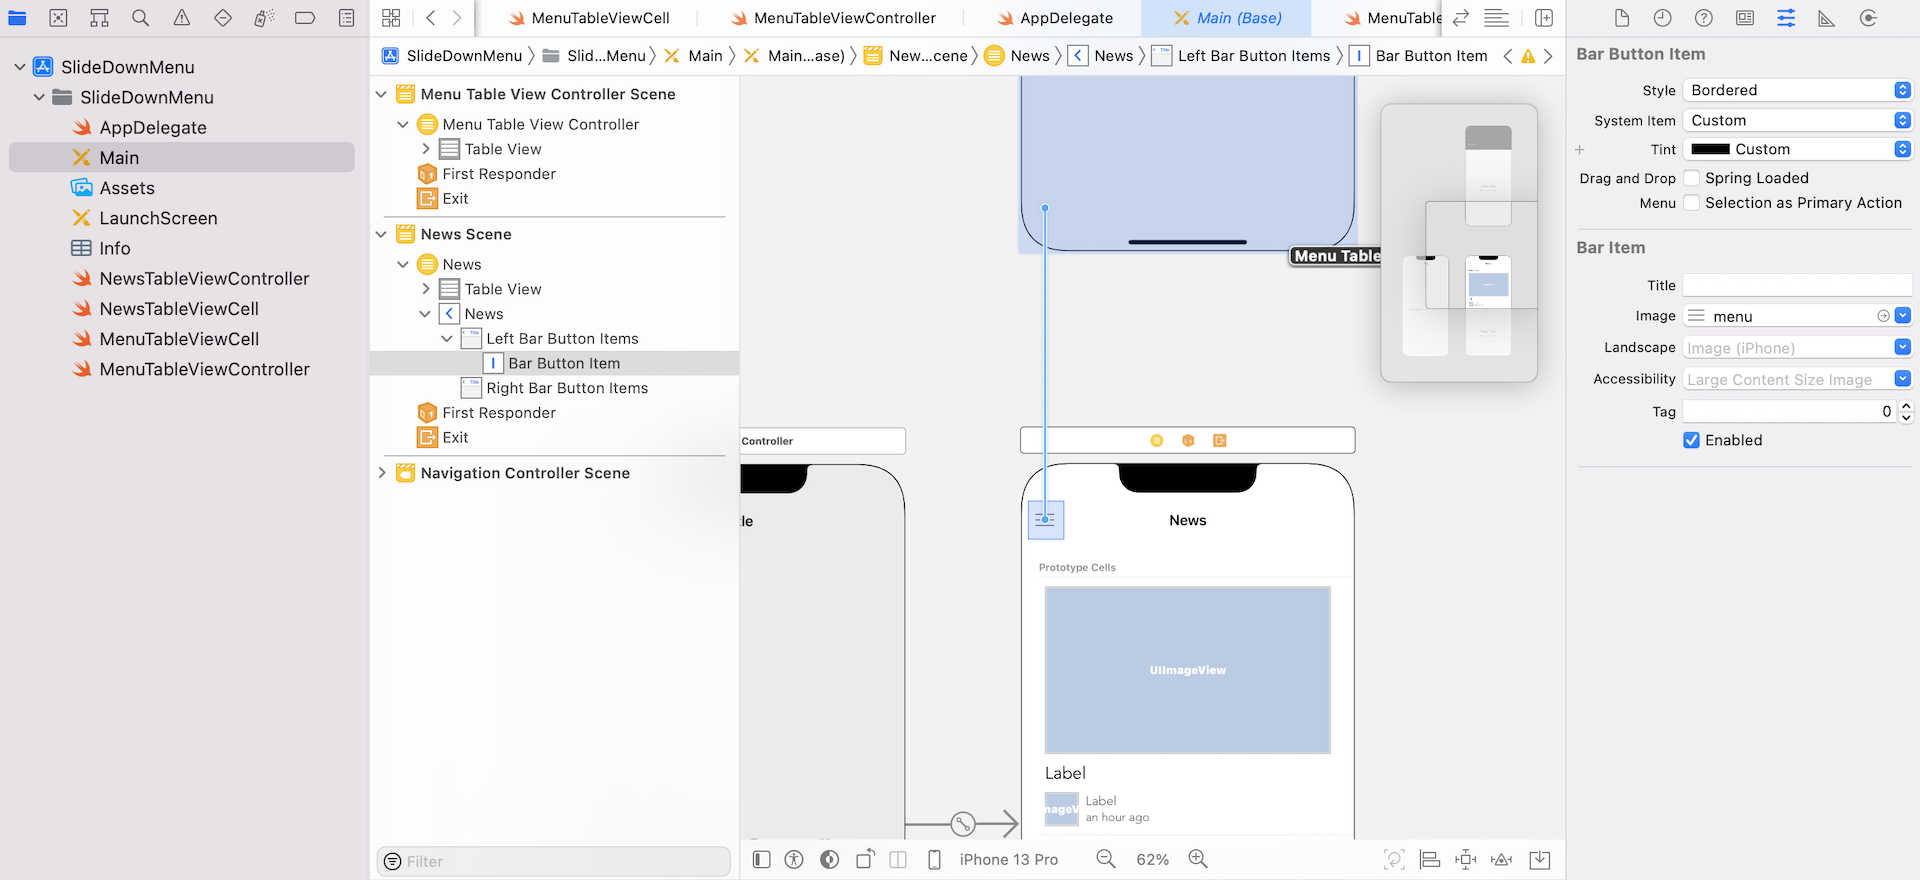
Okay, let's get started. First, open the Mainstoryboard. You should find two table view controllers, which are not connected with any segue yet. In order to bring up the menu when a user taps the menu button, control-drag from the menu button to the menu table view controller. Release the buttons and select present modally under action segue.
If you run the project now, the menu will be presented as a modal view. In order to dismiss the menu, we will add an unwind segue. Open the NewsTableViewController.swift file and insert an unwind action method:
@IBAction func unwindToHome(segue: UIStoryboardSegue) {
    let sourceController = segue.source as! MenuTableViewController
    self.title = sourceController.currentItem
}
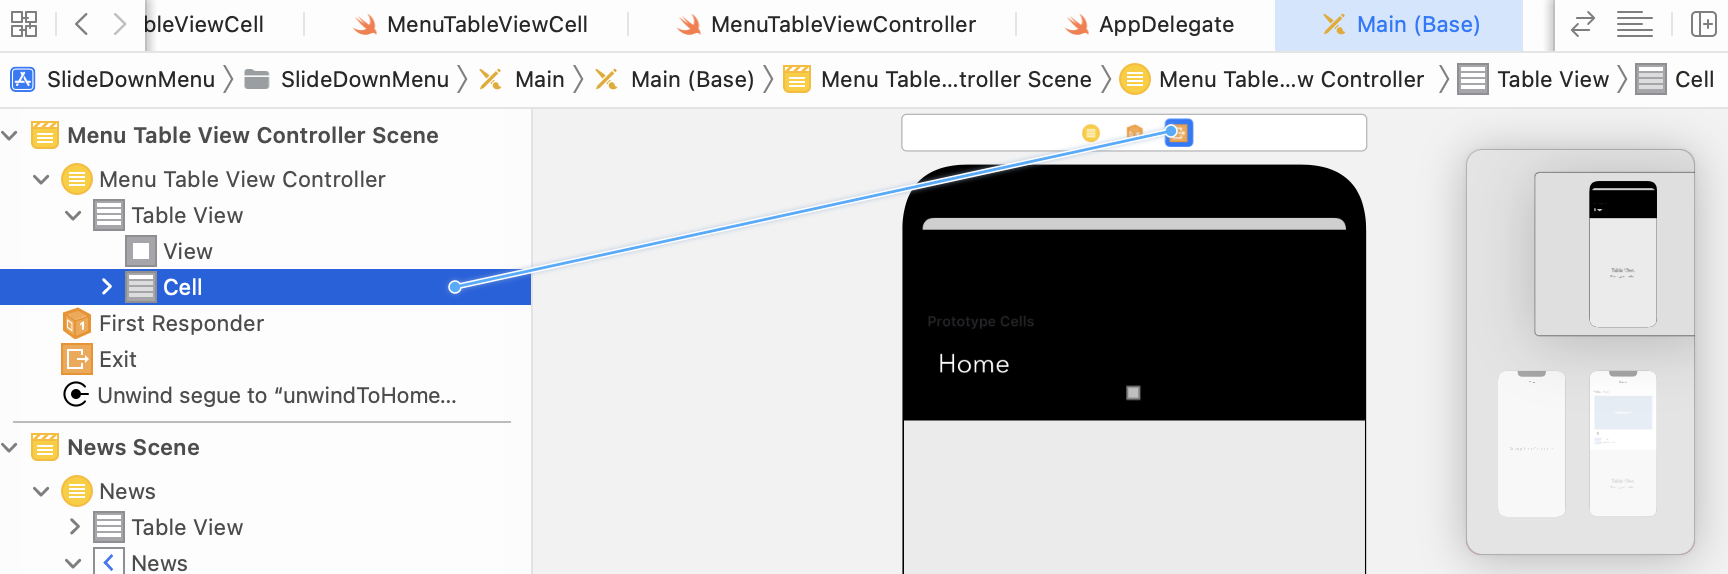
Next, go to the storyboard. Control-drag from the prototype cell of the Menu table view controller to the exit icon. When prompted, select the unwindToHomeWithSegue: option under selection segue.
Now test the app again. When a user taps any menu item, the menu controller will dismiss to reveal the main screen.
Through the unwindToHome action method, the main view controller (i.e. NewsTableViewController) retrieves the menu item selected by the user and changes the title of the navigation bar. To keep things simple, we just change the title of the navigation bar and will not alter the content of the main screen.
However, the app can't change the title yet. The reason is that the currentItem variable of the MenuTableViewController object is not updated properly. To make it work, there are a couple of methods we need to implement.
Insert the following method in the MenuTableViewController class:
override func prepare(for segue: UIStoryboardSegue, sender: Any?) {
    let menuTableViewController = segue.source as! MenuTableViewController
    if let selectedIndexPath = menuTableViewController.tableView.indexPathForSelectedRow {
        currentItem = menuItems[selectedIndexPath.row]
    }
}
Here, we just update the currentItem variable to the selected menu item. Later the NewsTableViewController class can pick the value of currentItem to update the title of the navigation bar.
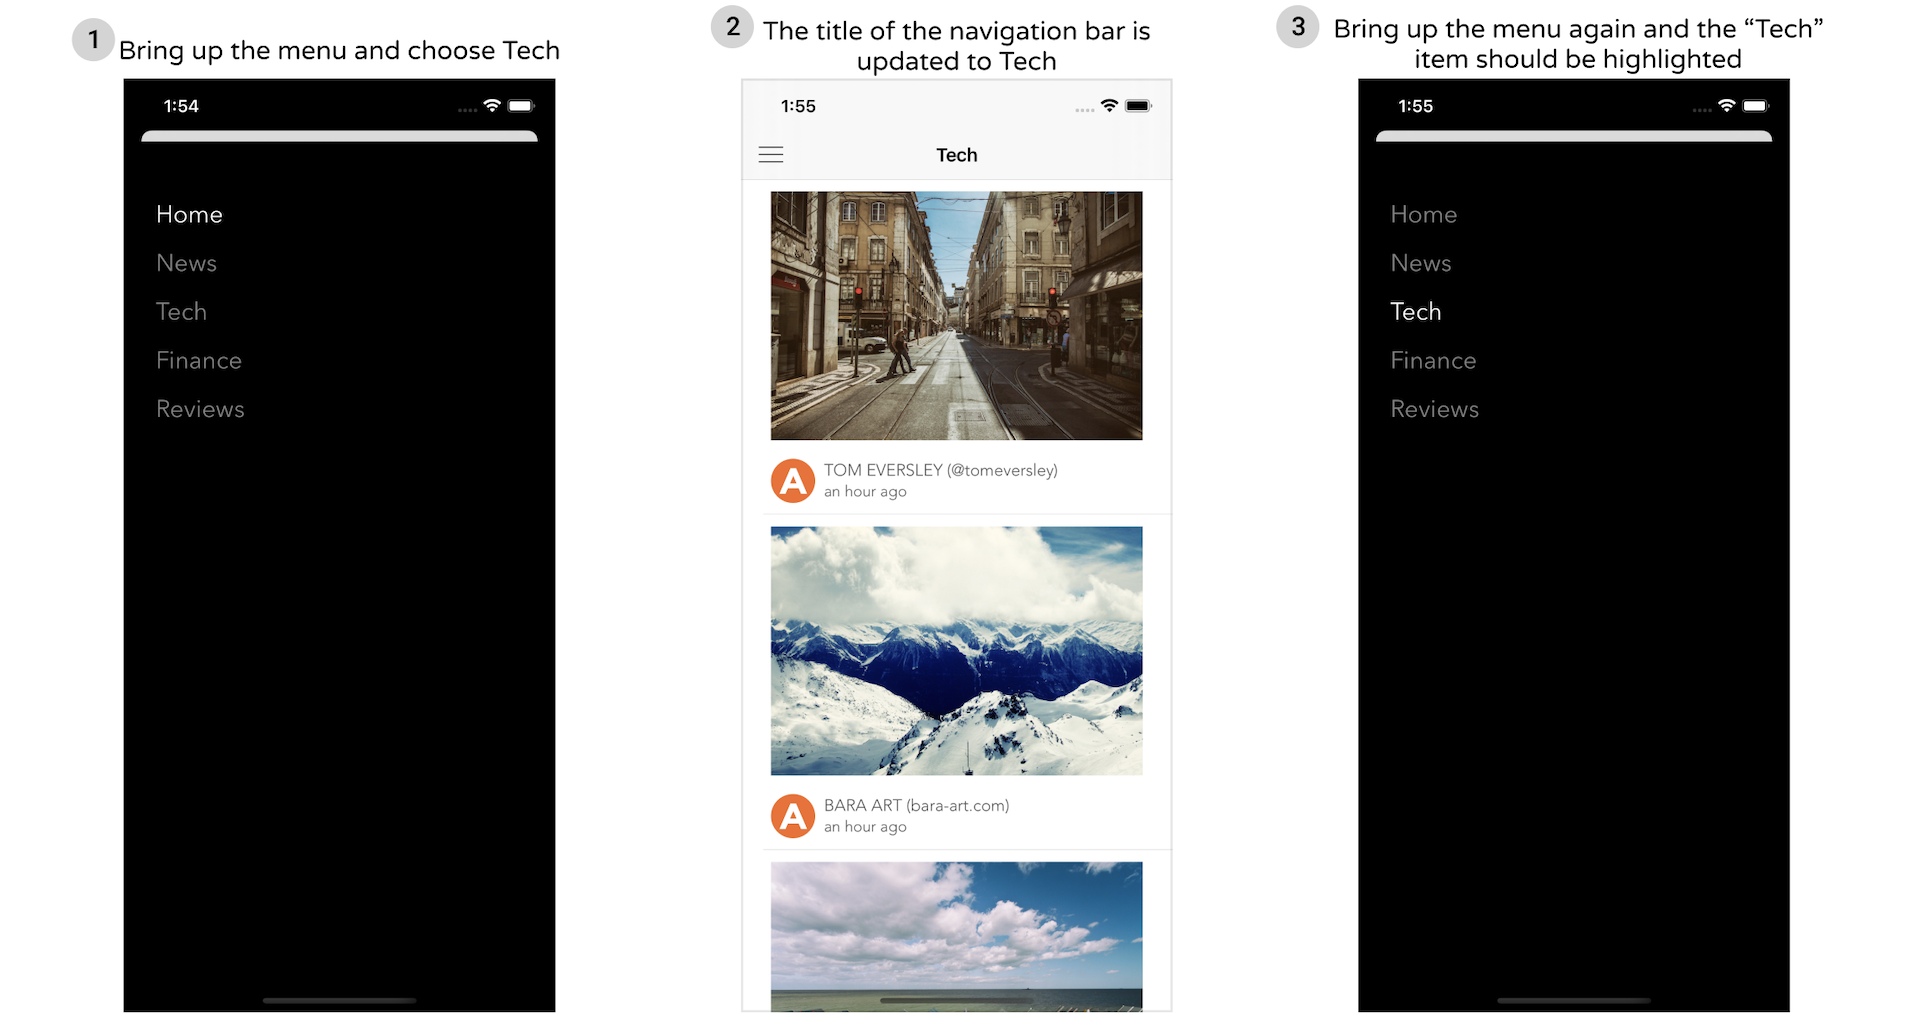
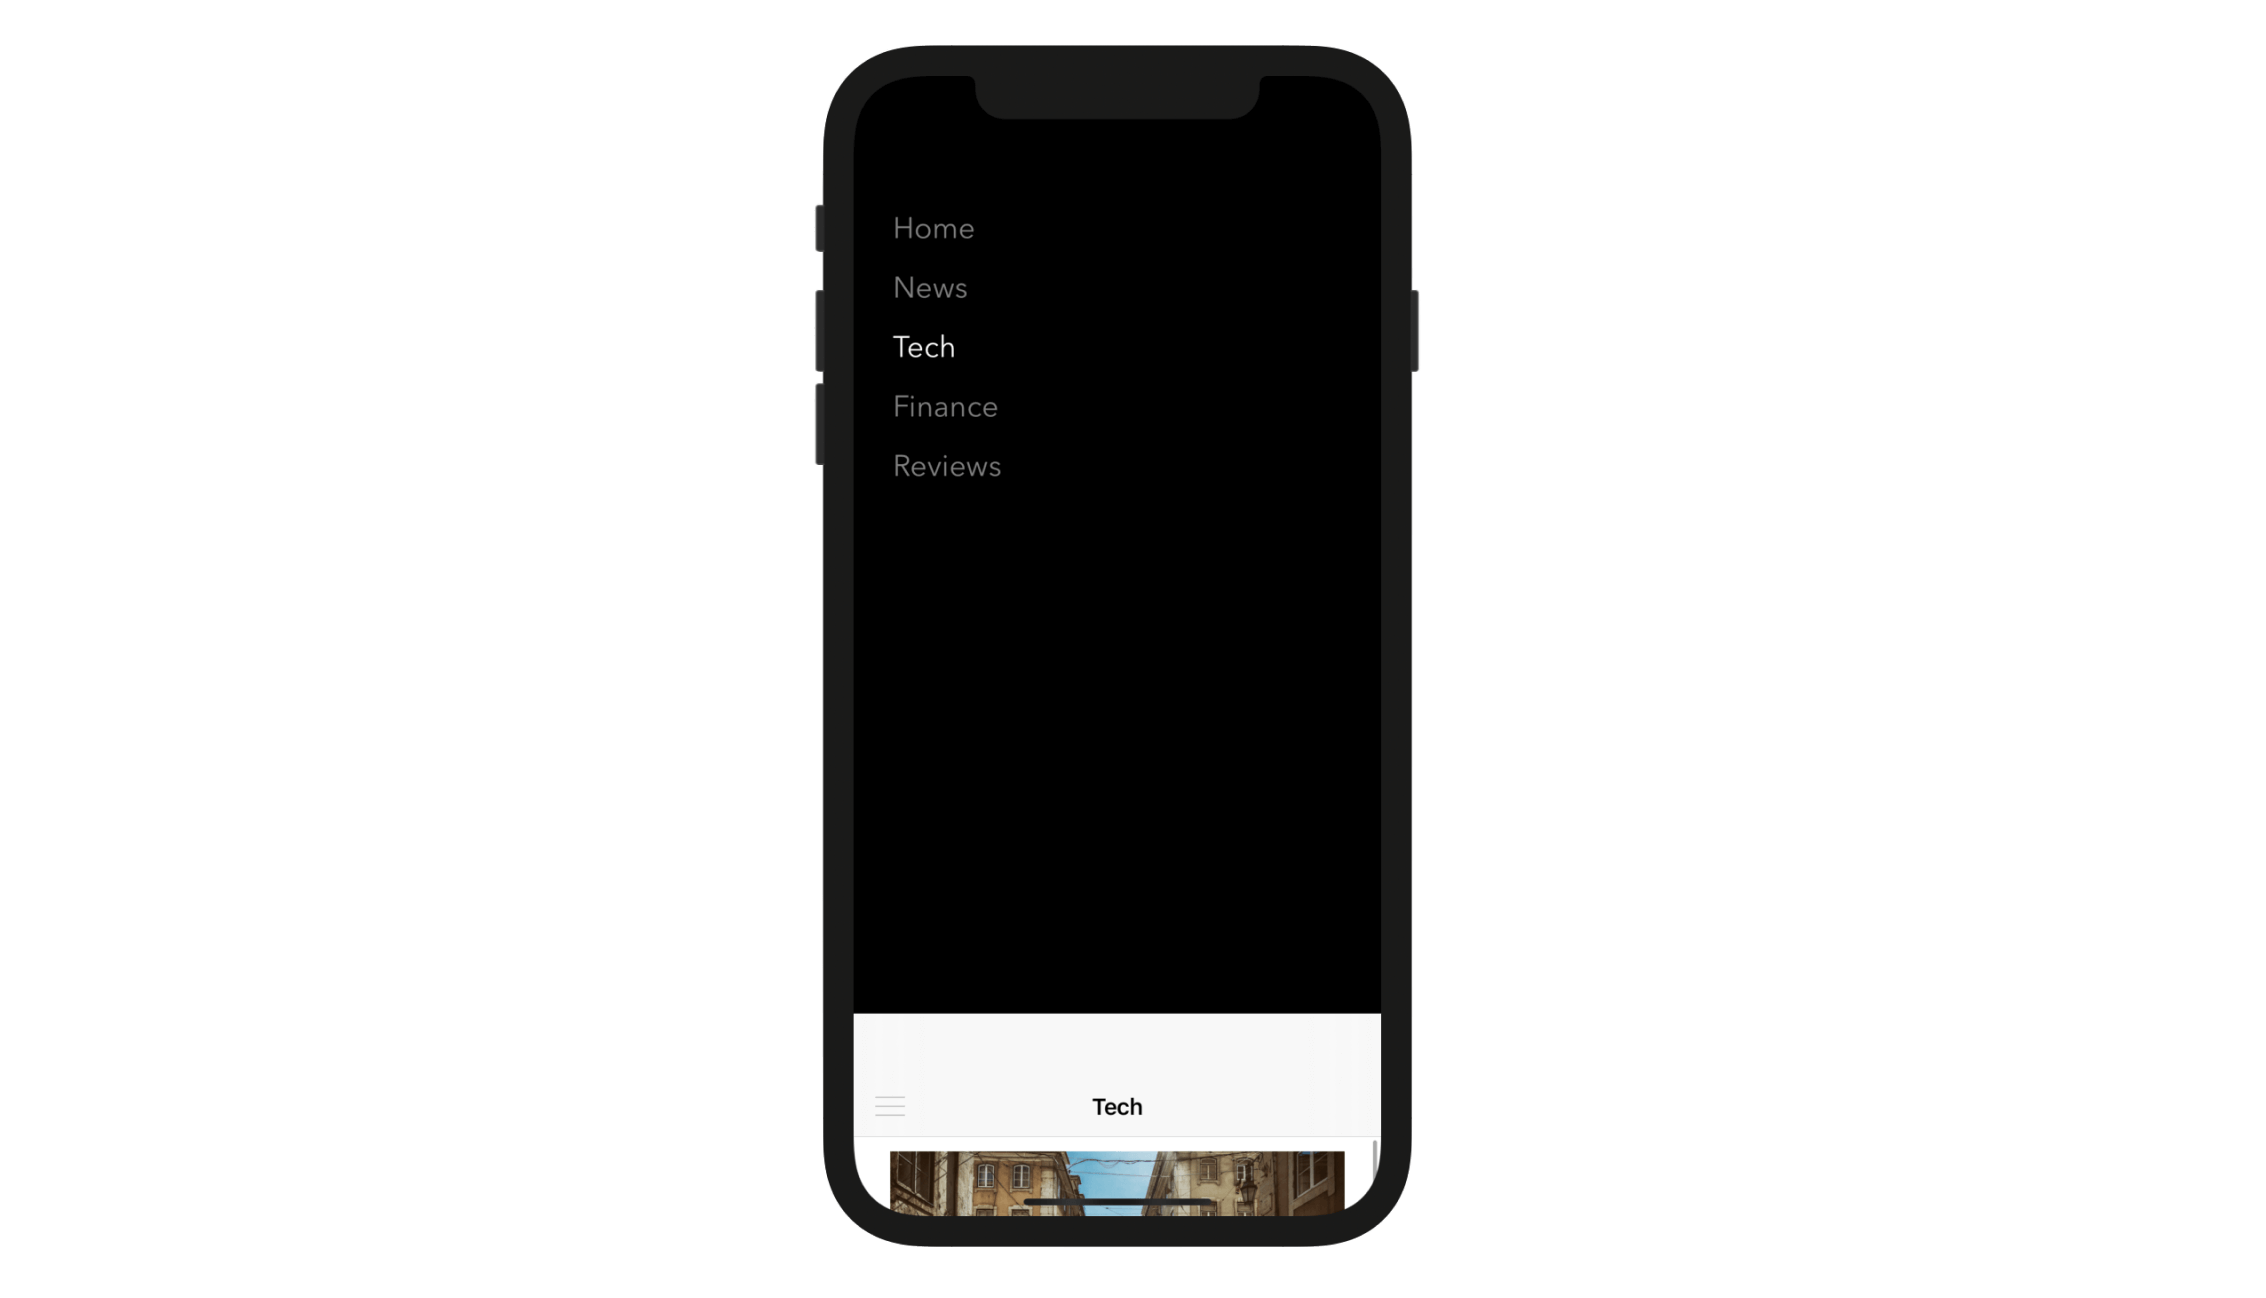
Now, the app should be able to update the title of navigation bar. But there is still one thing left. For example, say you select Tech in the menu, the app then changes the title to Tech. However, if you tap the menu button again, the menu controller still highlights Home in white, instead of Tech.
Let's fix the issue. In the NewsTableViewController.swift file, insert the following method to pass the current title to the menu controller:
override func prepare(for segue: UIStoryboardSegue, sender: Any?) {
    let menuTableViewController = segue.destination as! MenuTableViewController
    menuTableViewController.currentItem = self.title!
}
When the menu button is tapped, the prepare(for:sender:) method will be called before trasitioning to the menu view controller. Here we just update the current item of the controller, so it can highlight the item in white.
Now compile and run the project. Tap the menu item and the app will present you the menu modally. When you select a menu item, the menu will dismiss and the navigation bar title will change accordingly.
Creating the Animated Slide Down Menu
Now that the menu is presented using the standard animation, let's begin to create a custom transition. As I mentioned in the previous chapter, the core of a custom view controller animation is to create an animator object, that conforms to both UIViewControllerAnimatedTransitioning and UIViewControllerTransitioningDelegate protocols. We are going to implement the class. But first, let's take a look at how the slide down menu works.
When a user taps the menu, the main view begins to slide down until it reaches the predefined location, which is 150 points away from the bottom of the screen. The below illustration should give you a better idea of the sliding menu.
Building the Slide Down Menu Animator
To create the slide down animation, we will create a slide down animator called MenuTransitionManager. In the project navigator, right click the SlideDownMenu folder to create a new Swift file. Name the class MenuTransitionManager and update the class like this:
import UIKit

class MenuTransitionManager: NSObject, UIViewControllerAnimatedTransitioning, UIViewControllerTransitioningDelegate {

    let duration = 0.5
    var isPresenting = false

    var snapshot:UIView?

    func transitionDuration(using transitionContext: UIViewControllerContextTransitioning?) -> TimeInterval {
        return duration
    }

    func animateTransition(using transitionContext: UIViewControllerContextTransitioning) {

        // Get reference to our fromView, toView and the container view
        guard let fromView = transitionContext.view(forKey: UITransitionContextViewKey.from) else {
            return
        }

        guard let toView = transitionContext.view(forKey: UITransitionContextViewKey.to) else {
            return
        }

        // Set up the transform we'll use in the animation
        let container = transitionContext.containerView
        let moveDown = CGAffineTransform(translationX: 0, y: container.frame.height - 150)
        let moveUp = CGAffineTransform(translationX: 0, y: -50)

        // Add both views to the container view
        if isPresenting {
            toView.transform = moveUp
            snapshot = fromView.snapshotView(afterScreenUpdates: true)
            container.addSubview(toView)
            container.addSubview(snapshot!)
        }

        // Perform the animation
        UIView.animate(withDuration: duration, delay: 0.0, usingSpringWithDamping: 0.8, initialSpringVelocity: 0.8, options: [], animations: {

            if self.isPresenting {
                self.snapshot?.transform = moveDown
                toView.transform = CGAffineTransform.identity
            } else {
                self.snapshot?.transform = CGAffineTransform.identity
                fromView.transform = moveUp
            }

        }, completion: { finished in

            transitionContext.completeTransition(true)

            if !self.isPresenting {
                self.snapshot?.removeFromSuperview()
            }
        })
    }

    func animationController(forPresented presented: UIViewController, presenting: UIViewController, source: UIViewController) -> UIViewControllerAnimatedTransitioning? {

        isPresenting = true
        return self
    }

    func animationController(forDismissed dismissed: UIViewController) -> UIViewControllerAnimatedTransitioning? {

        isPresenting = false
        return self
    }

}
The class implements both UIViewControllerAnimatedTransitioning and UIViewControllerTransitioningDelegate protocols. I will not go into the details of the methods, as they are explained in the previous chapter. Let's focus on the animation block (i.e. the animateTransition method).
Referring to the illustration displayed earlier, during the transition, the main view is the fromView, while the menu view is the toView.
To create the animations, we configure two transforms. The first transform (i.e. moveDown) is used to move down the main view. The other transform (i.e. moveUp) is configured to move up the menu view a bit so that it will also have a slide-down effect when restoring to its original position. You will understand what I mean when you run the project later.
From iOS 7 and onwards, you can use the UIView-Snapshotting API to quickly and easily create a light-weight snapshot of a view.
snapshot = fromView.snapshotView(afterScreenUpdates: true)
By calling the snapshotView(afterScreenUpdates:) method, you have a snapshot of the main view. With the snapshot, we can add it to the container view to perform the animation. Note that the snapshot is added on top of the menu view.
For the actual animation when presenting the menu, the implementation is really simple. We just apply the moveDown transform to the snapshot of the main view and restore the menu view to its default position.
self.snapshot?.transform = moveDown
toView.transform = CGAffineTransform.identity
When dismissing the menu, the reverse happens. The snapshot of the main view slides up and returns to its default position. Additionally, the snapshot is removed from its super view so that we can bring the actual main view back.
Now open NewsTableViewController.swift and declare a variable for the MenuTransitionManager object:
let menuTransitionManager = MenuTransitionManager()
In the prepare(for:sender:) method, add a couple of lines of code to hook up the animation and change the modal presentation style:
override func prepare(for segue: UIStoryboardSegue, sender: Any?) {
    let menuTableViewController = segue.destination as! MenuTableViewController
    menuTableViewController.currentItem = self.title!
    menuTableViewController.transitioningDelegate = menuTransitionManager
    menuTableViewController.modalPresentationStyle = .fullScreen
}
Starting from iOS 13, Apple is default to present a modal view in a card-like format. In order to make the transition work properly, we have to set the modalPresentationStyle property to .fullScreen.
That's it! You can now compile and run the project. Tap the menu button and you will have a slide down menu.
Detecting Tap Gesture
For now, the only way to dismiss the menu is to select a menu item. From a user's perspective, tapping the snapshot should dismiss the menu too. However, the snapshot of the main view is non-responsive.
The snapshot is actually a UIView object. So we can create a UITapGestureRecognizer object and add it to the snapshot. When instantiating a UITapGestureRecognizer object, we need to pass it the target object that is the recipient of action messages sent by the receiver, and the action method to be called. Obviously, you can hardcode a particular object as the target object to dismiss the view, but to keep our design flexible, we will define a protocol and let the delegate object implement it.
In MenuTransitionManager.swift, define the following protocol:
@objc protocol MenuTransitionManagerDelegate {
    func dismiss()
}
Here we define a MenuTransitionManagerDelegate protocol with a required method called dismiss(). The beauty of a protocol is that you do not need to provide any implementation for the methods. Instead the implementation is left to the delegate that implements the protocol. In other words, the delegate should implement the dismiss method and provide the actual logic for dismissing the view.
Quick note: Here, the protocol must be exposed to the Objective-C runtime, as it will be accessed by UITapGestureRecognizer. This is why we prefix the protocol with the @objc attribute.In the
MenuTransitionManager class, declare a delegate variable for storing the delegate object:
var delegate: MenuTransitionManagerDelegate?
Later, the object which is responsible to handle the tap gesture should be set as the delegate object. Lastly, we need to create a UITapGestureRecognizer object and add it to the snapshot. A good way to do this is define a didSet method within the snapshot variable. Change the snapshot declaration to the following:
var snapshot: UIView? {
    didSet {
        if let delegate = delegate {
            let tapGestureRecognizer = UITapGestureRecognizer(target: delegate, action: #selector(delegate.dismiss))
            snapshot?.addGestureRecognizer(tapGestureRecognizer)
        }
    }
}
Property observer is one of the powerful features in Swift. The observer (willSet/didSet) is called every time a property's value is set. This provides us a convenient way to perform certain actions immediately before or after an assignment. The willSet method is called right before the value is stored, while the didSet method is called immediately after the assignment.
In the above code, we make use of the property observer to create a gesture recognizer and set it to the snapshot. So every time we assign the snapshot variable an object, it will immediately configure with a tap gesture recognizer.
We are almost done. Now go back to NewsTableViewController.swift, which is the class to implement the MenuTransitionManagerDelegate protocol. Create an extension to adopt the MenuTransitionManagerDelegate protocol like this:
extension NewsTableViewController: MenuTransitionManagerDelegate {

    func dismiss() {
        dismiss(animated: true, completion: nil)
    }

}
Here, we simply dismiss the view controller by calling the dismiss(animated:completion:) method.
Lastly, insert a line of code in the prepare(for:sender:) method of the NewsTableViewController class to set itself as the delegate object:
menuTransitionManager.delegate = self
Great! You're now ready to test the app again. Hit the Run button to try it out. You should be able to dismiss the menu by tapping the snapshot of the main view.
By applying custom view controller transitions properly, you can greatly improve the user experience and set your app apart from the crowd. The slide down menu is just an example, so try to create your own animation in your next app.
For reference, you can download the final project from http://www.appcoda.com/resources/swift55/SlideDownMenu.zip.