- Made by AppCoda
- Contact us / Support
- Tweet this book
- Preface
- 1. Building Adaptive User Interfaces
- 2. Creating Table View Sections and Index list with Diffable Data Source
- 3. Animating Table View Cells
- 4. Working with JSON and Codable
- 5. How to Integrate the Twitter and Facebook SDK for Social Sharing
- 6. Working with Email and Attachments
- 7. Sending SMS and MMS Using MessageUI Framework
- 8. How to Get Direction and Draw Route on Maps
- 9. Search Nearby Points of Interest Using Local Search
- 10. Audio Recording and Playback
- 11. Scan QR Code Using AVFoundation Framework
- 12. Working with URL Schemes
- 13. Building a Full Screen Camera with Gesture-based Controls
- 14. Video Capturing and Playback Using AVKit
- 15. Displaying Banner Ads using Google AdMob
- 16. Working with Custom Fonts
- 17. Working with AirDrop, UIActivityViewController and Uniform Type Identifiers
- 18. Building Grid Layouts Using Collection Views and Diffable Data Source
- 19. Interacting with Collection Views
- 20. Adaptive Collection Views Using UITraitCollection and Compositional Layout
- 21. Building a Weather Widget Using WidgetKit
- 22. Building Slide Out Sidebar Menus Using Objective-C Libraries
- 23. View Controller Transitions and Animations
- 24. Building a Slide Down Menu
- 25. Self Sizing Cells and Dynamic Type
- 26. XML Parsing, RSS and Expandable Table View Cells
- 27. Applying a Blurred Background Using UIVisualEffect
- 28. Using Touch ID and Face ID For Authentication
- 29. Building a Carousel-Like User Interface
- 30. Working with Parse
- 31. Parsing CSV and Preloading a SQLite Database Using Core Data
- 32. Connecting Multiple Annotations with Polylines and Routes
- 33. Using CocoaPods in Swift Projects
- 34. Building a Simple Sticker App
- 35. Building iMessage Apps Using Messages Framework
- 36. Building Custom UI Components Using IBDesignable and IBInspectable
- 37. Using Firebase for User Authentication
- 38. Google and Facebook Authentication Using Firebase
- 39. Using Firebase Database and Storage to Build an Instagram-like App
- 40. Building a Real-time Image Recognition App Using Core ML
- 41. Building AR Apps with ARKit and SpriteKit
- 42. Working with 3D Objects in Augmented Reality Using ARKit and SceneKit
- 43. Use Create ML to Train Your Own Machine Learning Model for Image Recognition
- 44. Building a Sentiment Classifier Using Create ML to Classify User Reviews
- 45. Working with Image Tracking Using ARKit
- Published with GitBook
Chapter 21
Building a Weather Widget Using WidgetKit
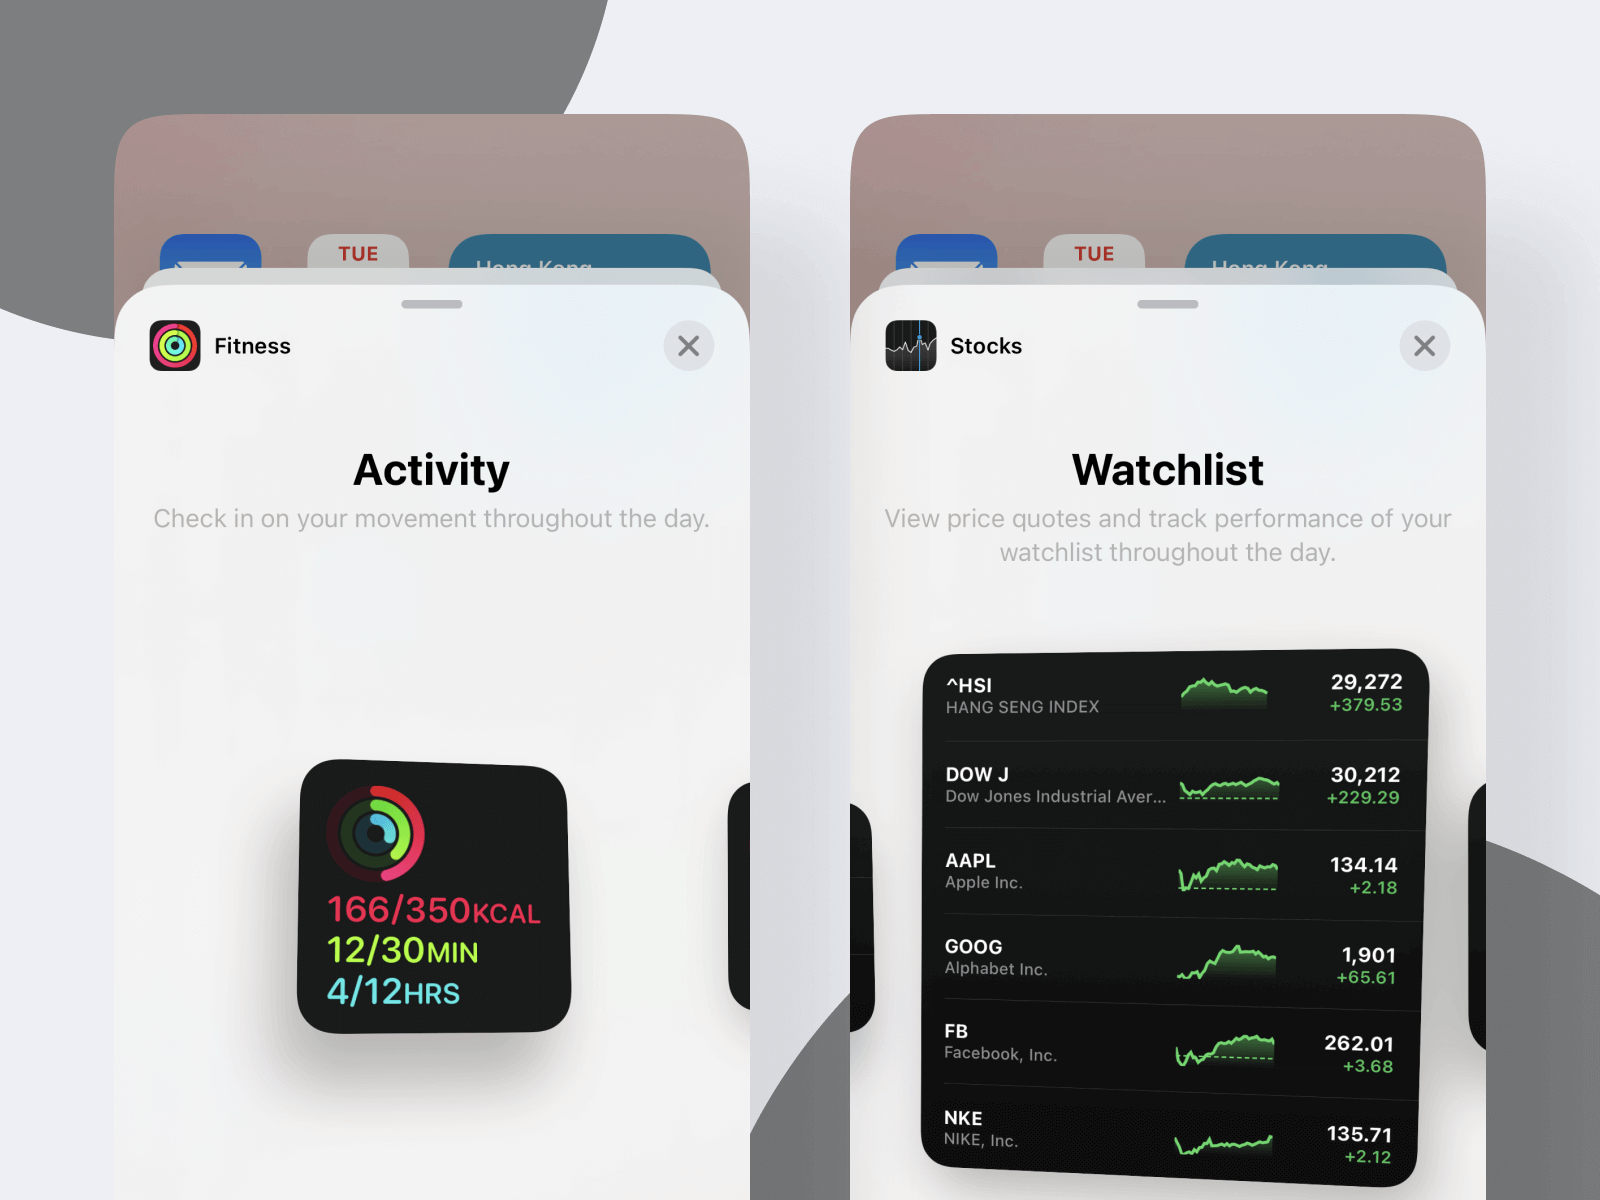
In iOS 8, Apple introduced app extensions, which let you extend functionality beyond your app and make it available to users from other parts of the system (such as from other apps or the Notification Center). For example, you can provide a widget for users to put in Notification Center. This widget can display the latest information from your app (i.e. weather, sports scores, stock quotes, etc.).
With the release of iOS 14, Apple completely revamped this feature and introduced a new framework called WidgetKit. If you've used widgets on the latest version of iOS, you know you can add widgets directly your Home Screen, a great feature allowing users to customize the look of the screen.
In this chapter, I will show you how to develop a weather widget using WidgetKit. You will also learn how to share data between the widget and the app using App Group.
Understanding How App Extensions Work
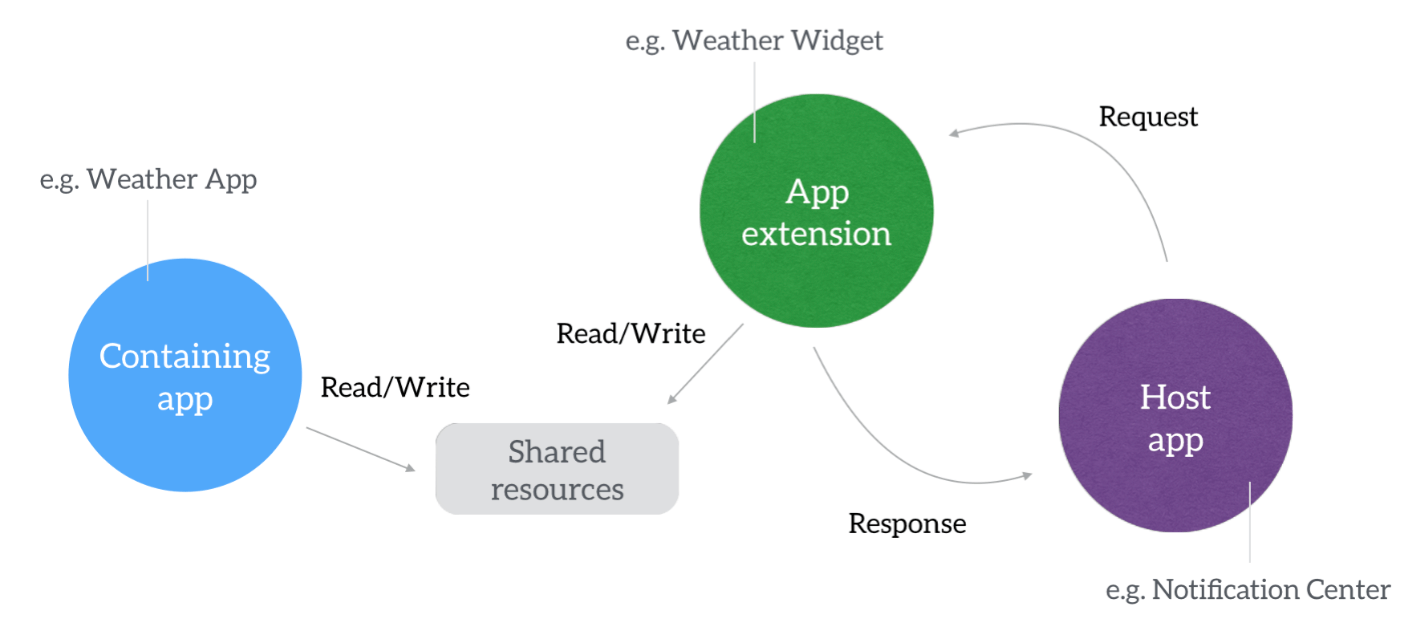
Before getting started with the Widget Extensions, let's first take a look at how extensions work. To start off, app extensions are not standalone apps. An extension is delivered via the App Store as a part of an app bundle. The app that the extension is bundled with is known as the container app, while the app that invokes the extension is the host app. For example, if you're building a weather app that bundles a weather widget, the weather widget will appear in the widget menu for users' selection. Usually, you bundle a single app extension in a container but you're allowed to have more than one extension.
When an extension is running, it doesn't run in the same process as the container app. Every instance of your extension runs as its own process. It is also possible to have one extension run in multiple processes at the same time. For example, let's say you have a sharing extension which is invoked in Safari. An instance of the extension, a new process, is going to be created to serve Safari. Now, if the user goes over to Mail and launches your share extension, a new process of the extension is created again. These two processes don't share address space.
An extension cannot communicate directly with its container app, nor can it enable communication between the host app and container app. However, indirect communication with its container app is possible via either openURL:completionHandler: or a shared data container like the use of UserDefaults to store data which both extension and container apps can read and write to.
The Weather Widget
Widgets are not mini apps. This is a very important concept you have to remember. Widgets should be lightweight and mainly use to provide brief pieces of information. In iOS 14, widgets come in three sizes: small, medium, and large. Your widget can display the same visual information regardless of its size. Alternatively, you can customize the widgets to present more information for widgets with larger size.
We are going to explore how to create a widget by creating a simple weather app. To keep you focused on building an extension instead of creating an app from scratch, I have provided a starter project that you can download at http://www.appcoda.com/resources/swift55/WeatherDemo.zip. The project is a simple weather app, showing the various weather information of a particular location. You will need an internet connection for the data to be fetched. The app is very simple and doesn't include any geoLocation functionality.
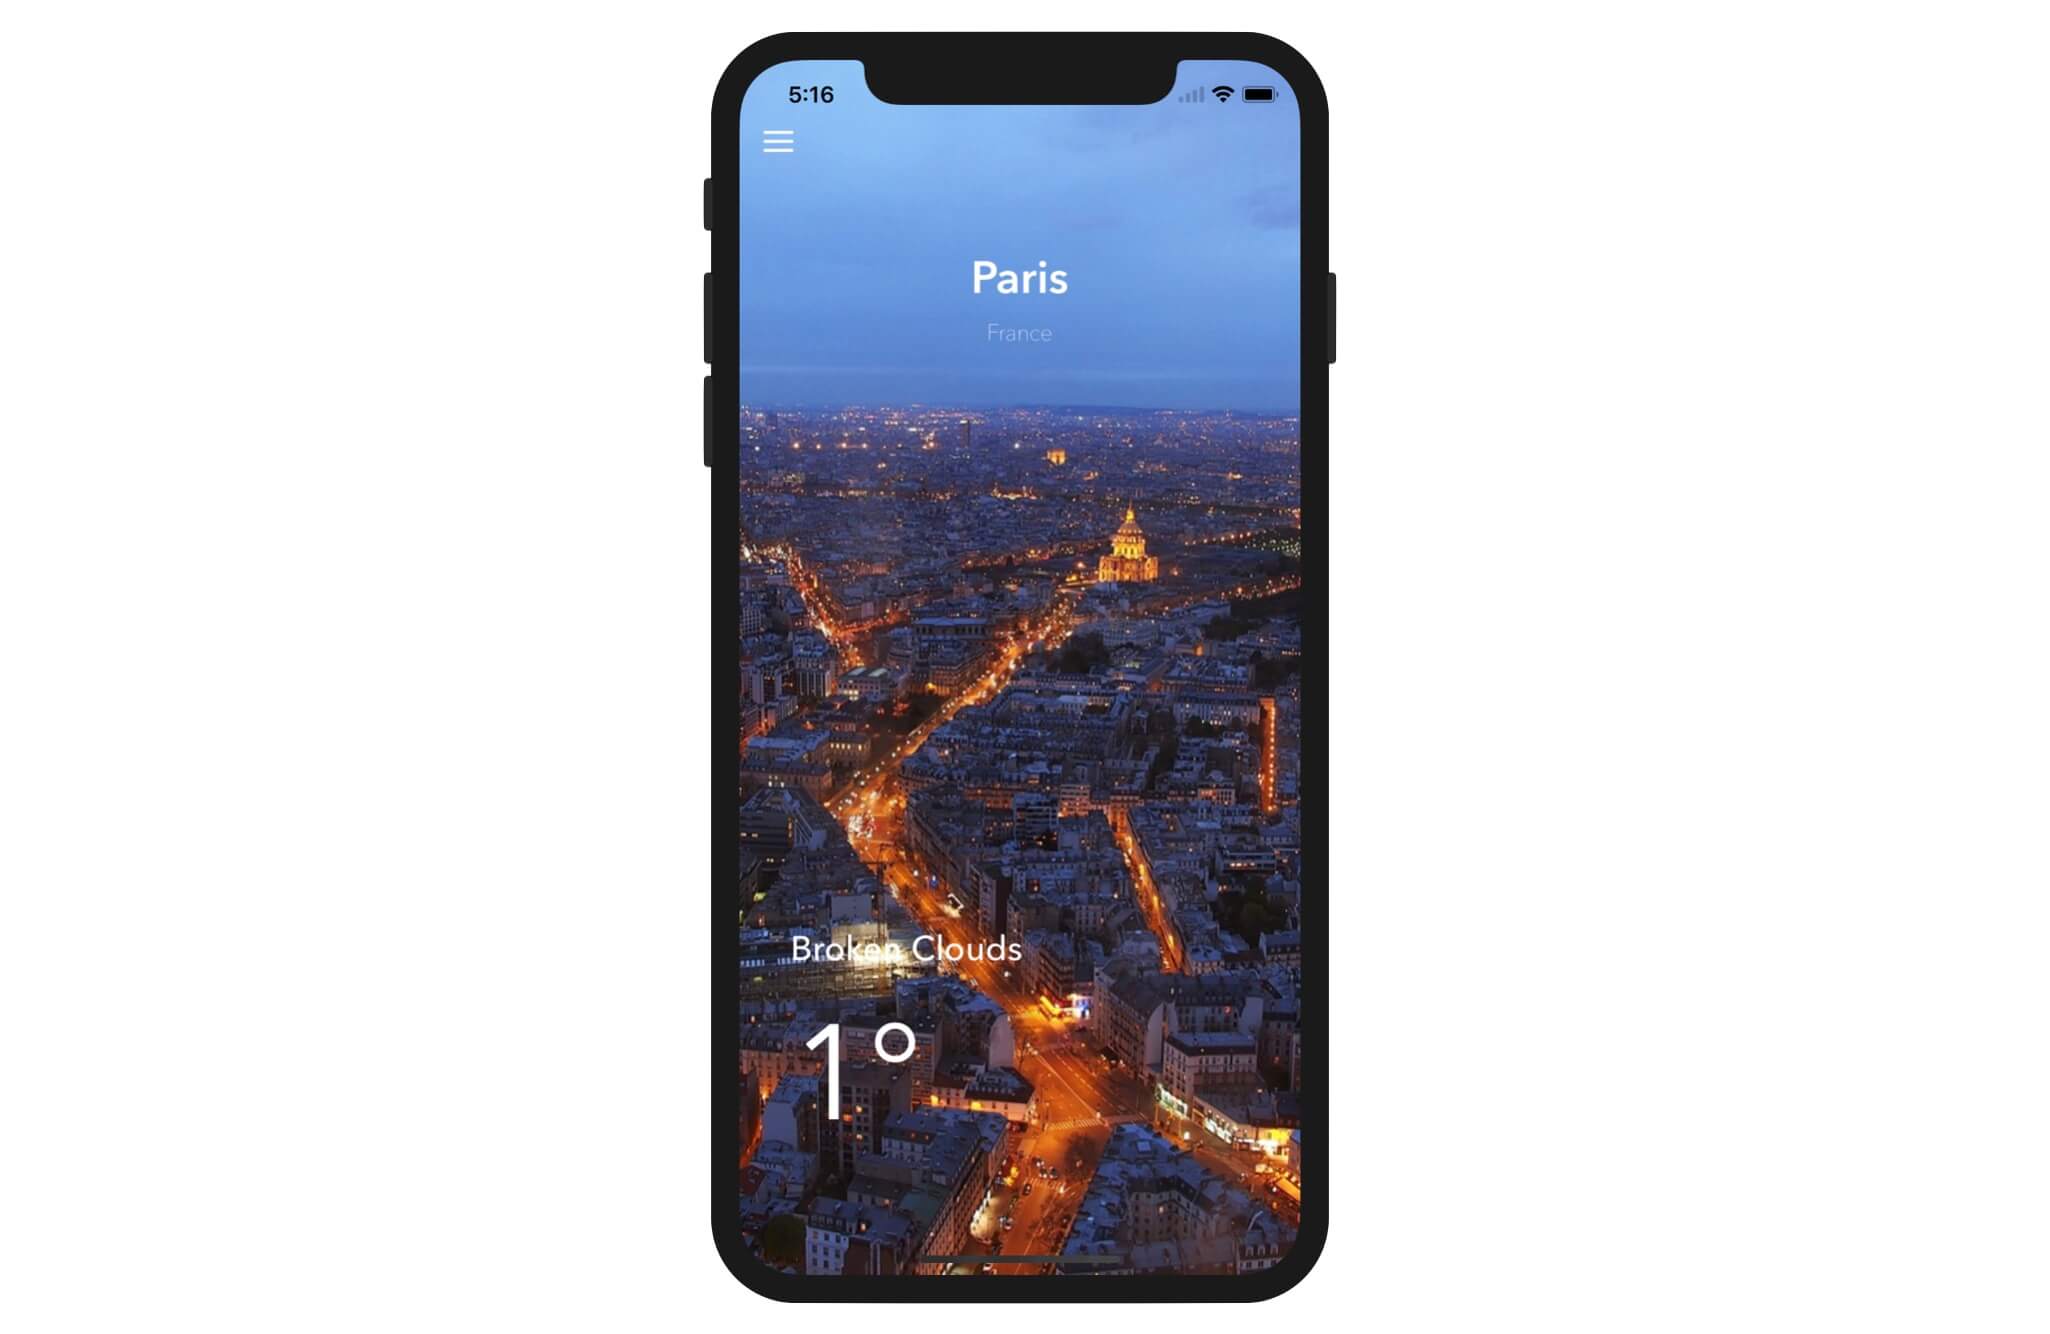
The default location is set to Paris, France. The app, however, provides a setting screen for altering the default location. It relies on a free API provided by openweathermap.org to aggregate weather information. The API returns weather data for a particular location in JSON format. If you have no idea about JSON parsing in iOS, refer to Chapter 4 for details.
When you open the app, you should see a visual that shows the weather information for the default location. You can simply tap the menu button to change the location.
We are going to create a widget extension of the app that will show a brief summary of the weather for the selected city. You'll also learn how to share data between the container app and extension. We'll use this shared data to let a user choose the location they want weather information about.
Code Sharing with Embedded Framework
Extensions are created in their own targets separate from the container app. This means that you can't access common code files as you normally would in your project. While you can duplicate the common code files in the extension, this is not a good habit to get into. To avoid code repetition, make the common code files available to both the container app and the extension.
For example, both the weather app and the weather extension are required to use the WeatherService class to retrieve the latest weather information. You can replicate the files in both targets. But this is not a good practice. When developing an app or an extension, you should always consider code reuse.
To allow for code reuse, you create an embedded framework, which can be used across both targets. You can place the common code that will need to be used by both the container app and extension in the framework.
In the demo app, both the extension and container app make a call to a weather API and retrieve the weather data. Without using a framework we would have to duplicate the code, which would be inefficient and difficult to maintain.
Creating an Embedded Framework
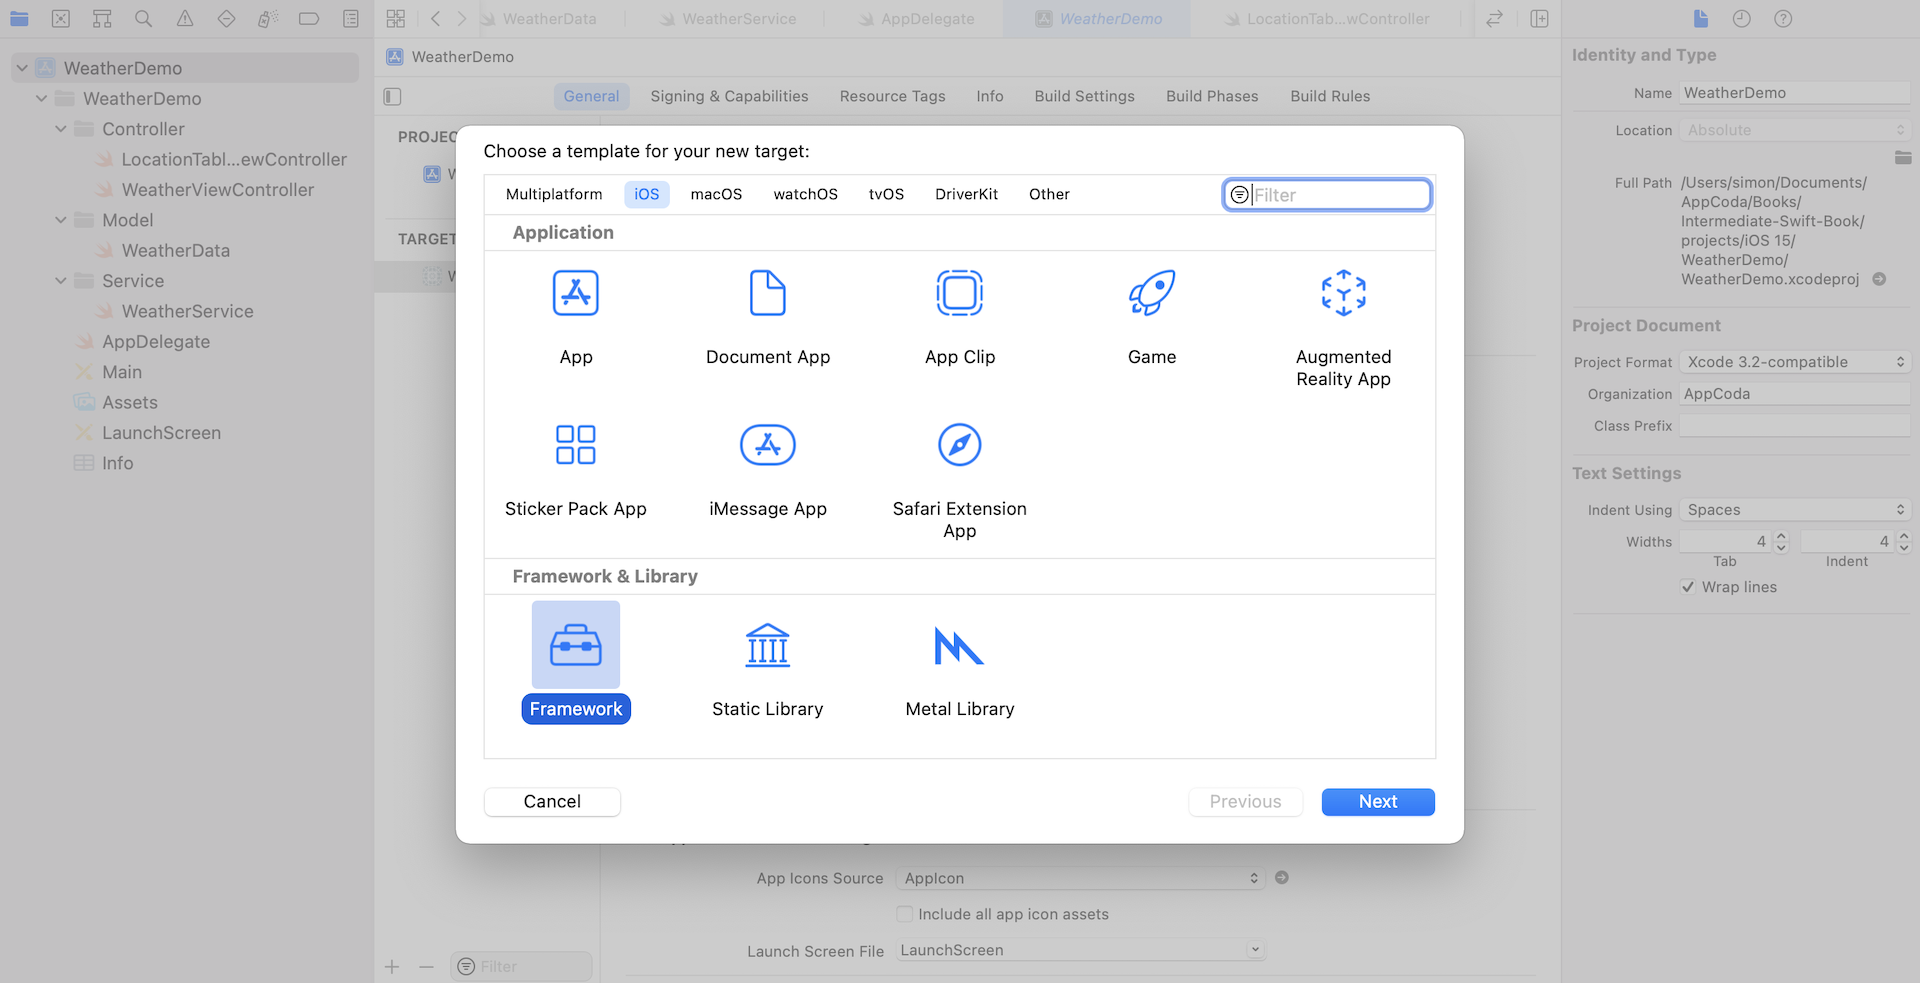
To create a framework, select your project in the Project Navigator and then go up to the Xcode menu to select Editor > Add Target. From the window that appears, select the iOS tab. Scroll down and select Framework under Framework & Library.
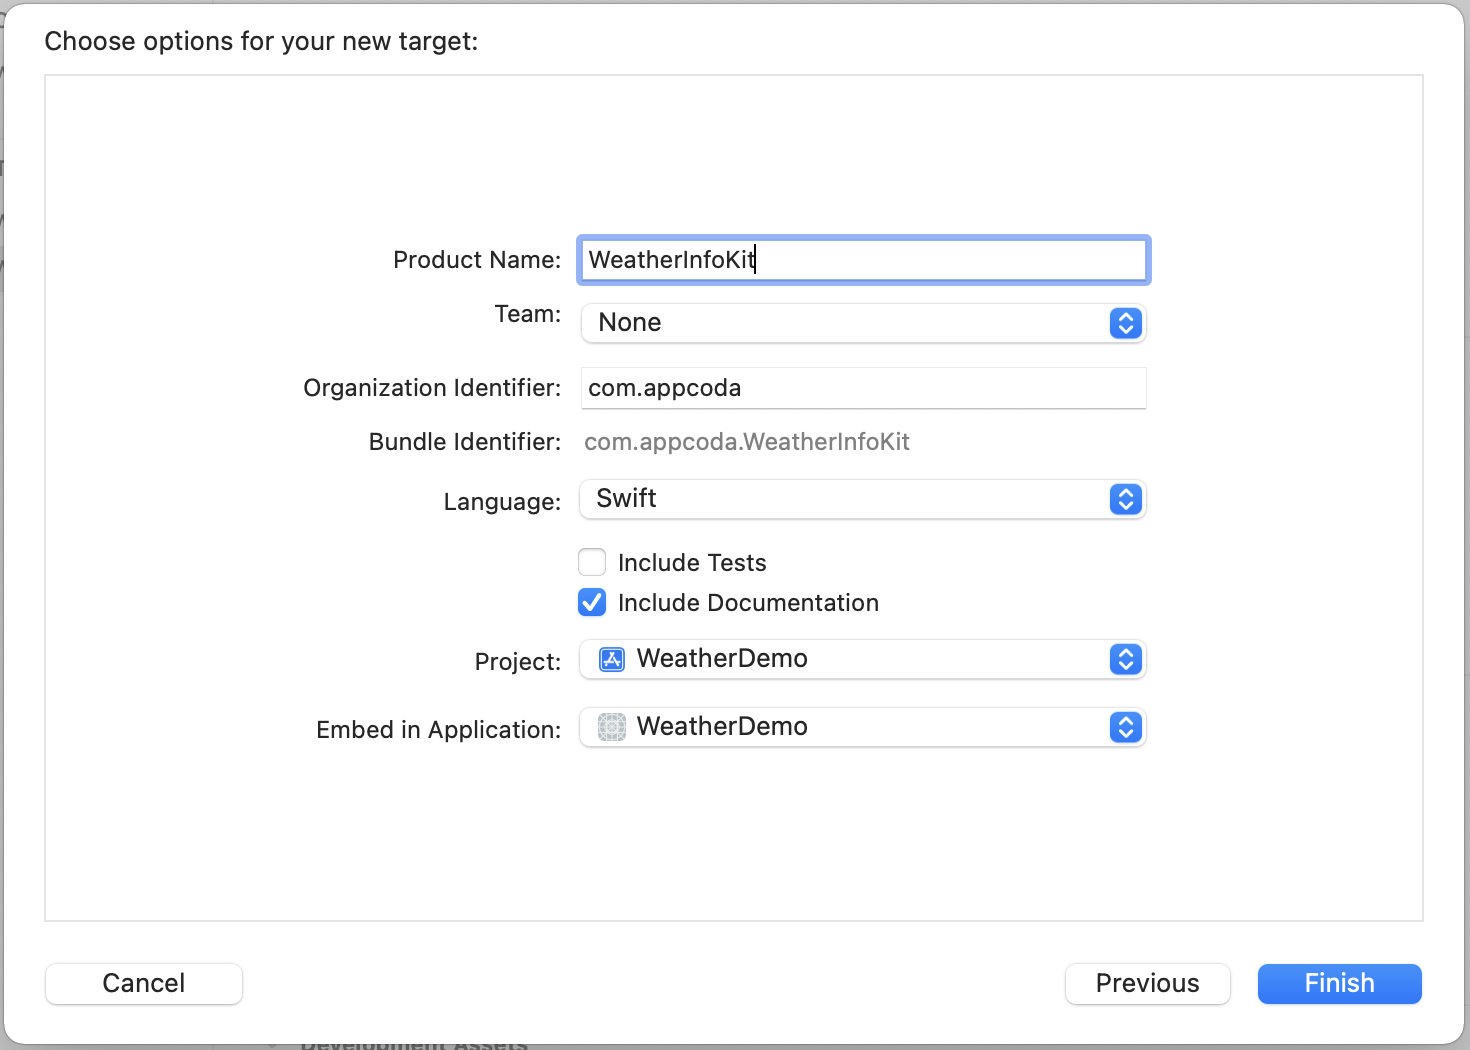
Set its name to WeatherInfoKit and check that the language is Swift. Leave the rest of the options as they are and click Finish.
You will see a new target appear in the list of targets as well as a new group folder in the Project Navigator. When you expand the WeatherInfoKit group, you will see WeatherInfoKit.h. If you are using Objective-C, or if you have any Objective-C files in your framework, you will have to include all public headers of your frameworks here. Because we're now using Swift, we do not need to edit this file.
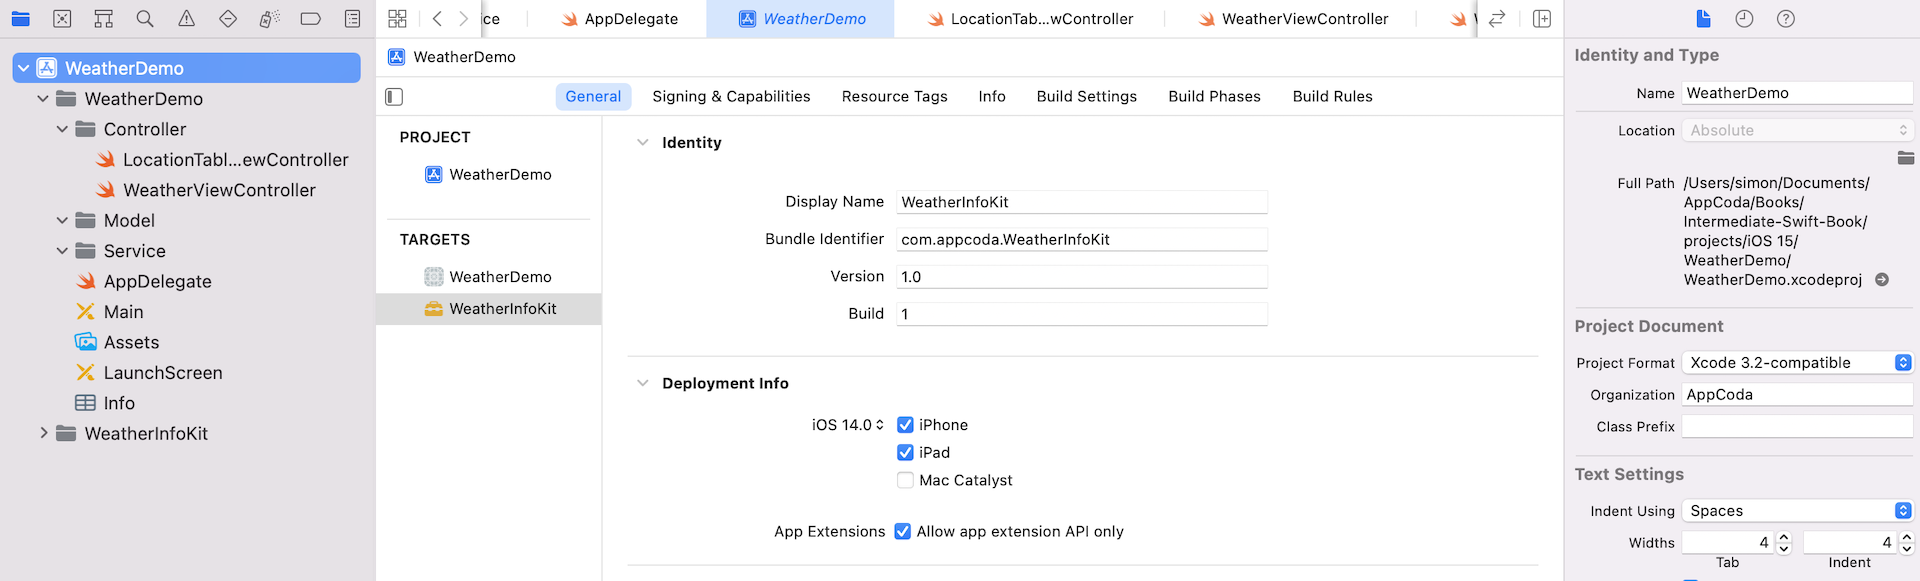
Next, on the General tab of the WeatherInfoKit target, under the Deployment Info section, check Allow app extension API only. Make sure the version of the target in the Deployment Info section is set to 14.0 because this Xcode project is set to support iOS 14.0 (or up). Optionally, you can uncheck the Mac checkbox because this app is designed to run on iPhone and iPad.
You should note that app extensions are somewhat limited in what they can do and therefore not all Cocoa Touch APIs are available for use in extensions. For instance, extensions cannot do the following:
- Access the camera or microphone on an iOS device
- Receive data using AirDrop (however they can send data using AirDrop)
- Perform long-running background tasks
- Use any API marked in header files with the
NS_EXTENSION_UNAVAILABLEmacro, similar unavailability macro, or any API in an unavailable framework (for example EventKit or HealthKit) are unavailable to app extensions. - Access a sharedApplication object or use any of the methods on that object. For example, both the HealthKit framework and EventKit UI framework are unavailable to app extensions.
Because the framework we're creating will be used by an app extension, it's important to check the Allow app extension API only option.
Moving Common Files to the Framework
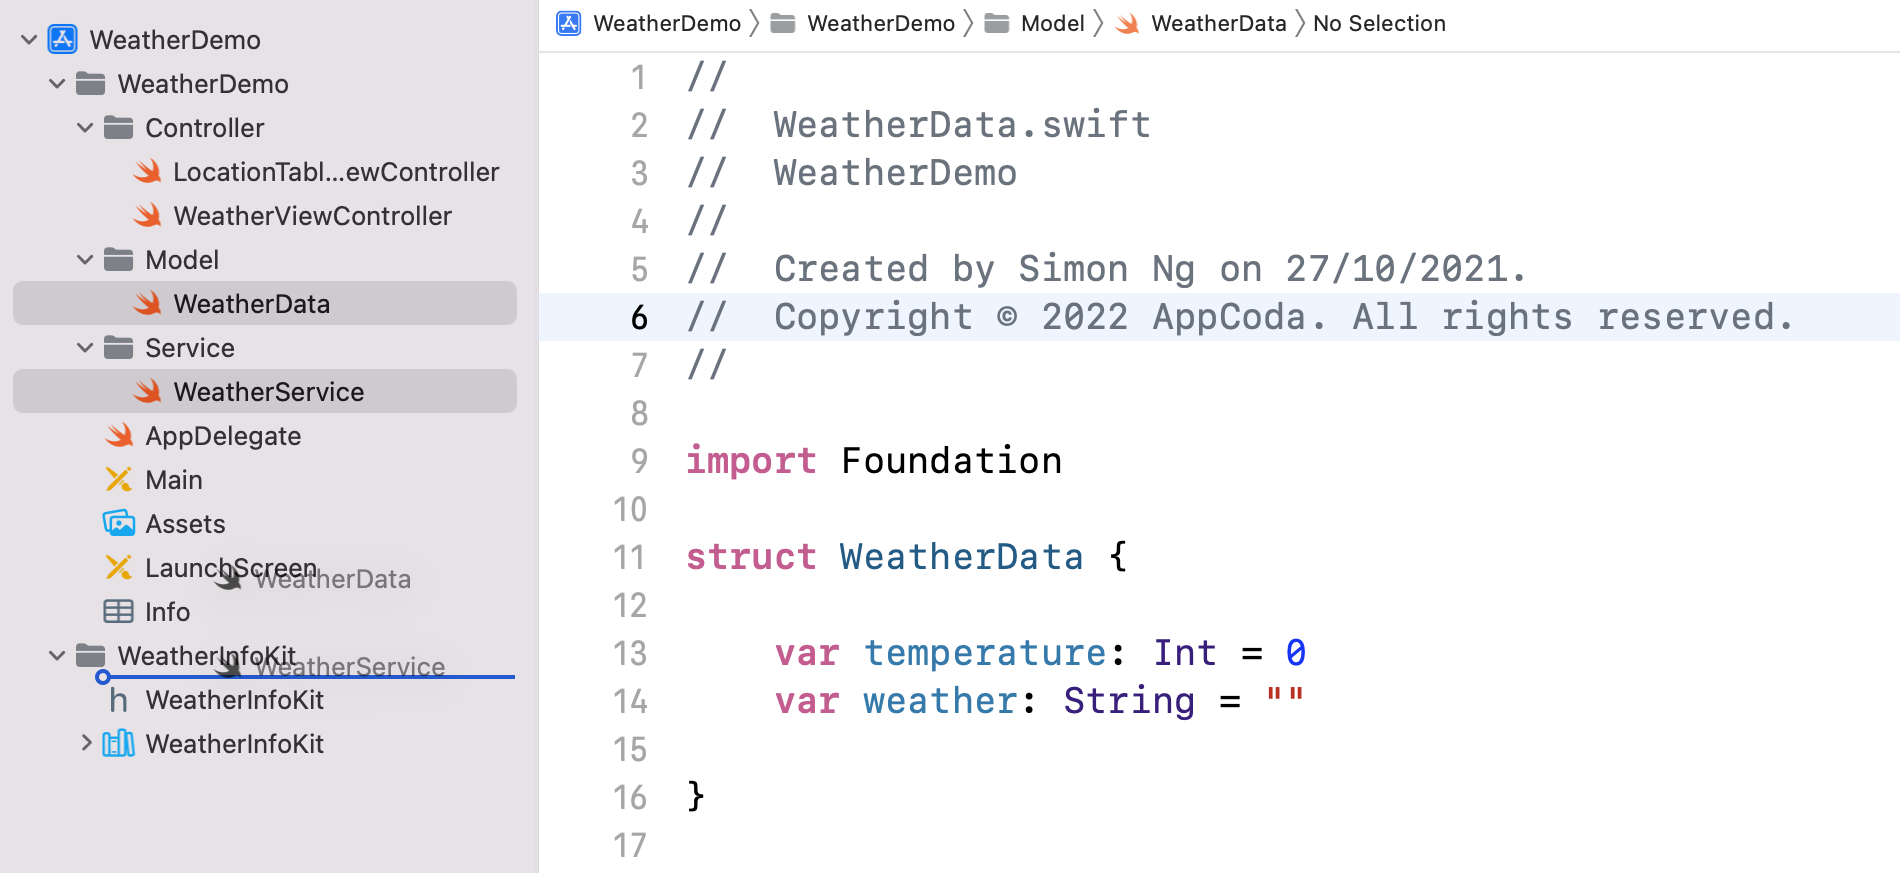
In the starter project, both WeatherService.swift and WeatherData.swift are common code files. The WeatherData structure represents the weather information including temperature (in Celsius) and weather description (e.g. Sky is clear). The WeatherService class is a common service class that is responsible for calling up the weather API and parsing the returned JSON data.
To put these two files (or classes) into the WeatherInfoKit framework, all you need to do is drag these two files into the WeatherInfoKit group under the Project Navigator.
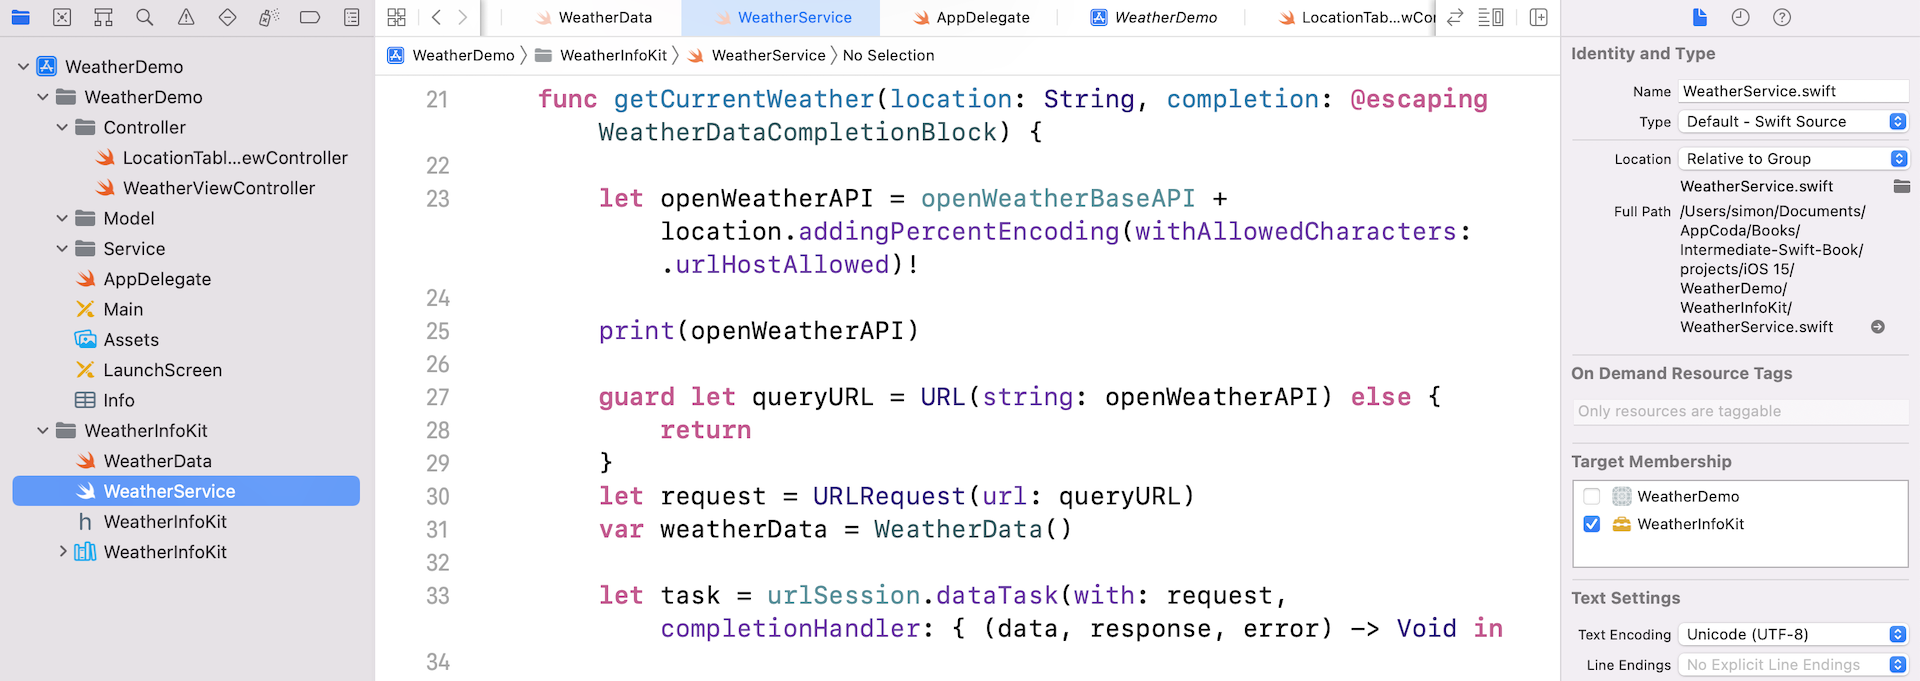
Now both WeatherService.swift and WeatherData.swift should be a part of the WeatherInfoKit target. Xcode has changed the file's target membership for you. But to play safe, let's make sure the setting is correct. Select the WeatherService.swift file from the Project Navigator. Then open the File Inspector and verify the file target in the Target Membership section. The WeatherInfoKit option should be ticked. Repeat the process for the WeatherData.swift file.
Because the WeatherService and WeatherData classes were removed from the WeatherDemo target, you'll end up with an error in WeatherViewController.swift.
Swift provides five access levels for entities in your code: open, public, internal, file-private and private. For details of each access level, you can refer to Apple's official Swift documentation.
By default, all entities (e.g. classes, variables) are defined with the internal access level. That means the entities can only be used within any source file from the same module/target. Now that the WeatherService and WeatherData classes were moved to another target (i.e. WeatherInfoKit), the WeatherViewController of the WeatherDemo target can no longer access both classes as the access level of the classes is set to internal.
To resolve the error, we have to change the access level of these classes to public.
Public access allows entities to be used in source files from another module. When you're developing a framework, typically, your classes should be accessible by source files of any modules. In this case, you use public access to specify the public interface of a framework.
So, open WeatherData.swift. Add the public access modifier to the class declaration and other properties:
public struct WeatherData {

    public var temperature: Int = 0
    public var weather: String = ""

    public init() {}

    public init(temperature: Int, weather: String) {
        self.temperature = temperature
        self.weather = weather
    }
}
Apply the same change to the class, method and typealias declarations of WeatherService.swift:
public class WeatherService {
    public typealias WeatherDataCompletionBlock = (_ data: WeatherData?) -> ()

    let openWeatherBaseAPI = "http://api.openweathermap.org/data/2.5/weather?appid=5dbb5c068718ea452732e5681ceaa0c7&units=metric&q="
    let urlSession = URLSession.shared

    public class func sharedWeatherService() -> WeatherService {
        return _sharedWeatherService
    }

    public func getCurrentWeather(location:String, completion: @escaping WeatherDataCompletionBlock) {
        ...
    }

}
After doing this, however, the errors in WeatherViewController.swift still appear. Include the following import statement at the top of the file to import the framework we just created:
import WeatherInfoKit
Now compile the project again. You should be able to run the WeatherDemo without errors. The app is still the same but the common files are now put into a framework.
Creating the Widget Extension
You're now ready to create the widget. To create a widget, we'll use the Today extension point template provided by Xcode. Select the project in the Project Navigator and add a new target by selecting Editor > Add Target. Select iOS and then choose Widget Extension. Click Next to proceed.
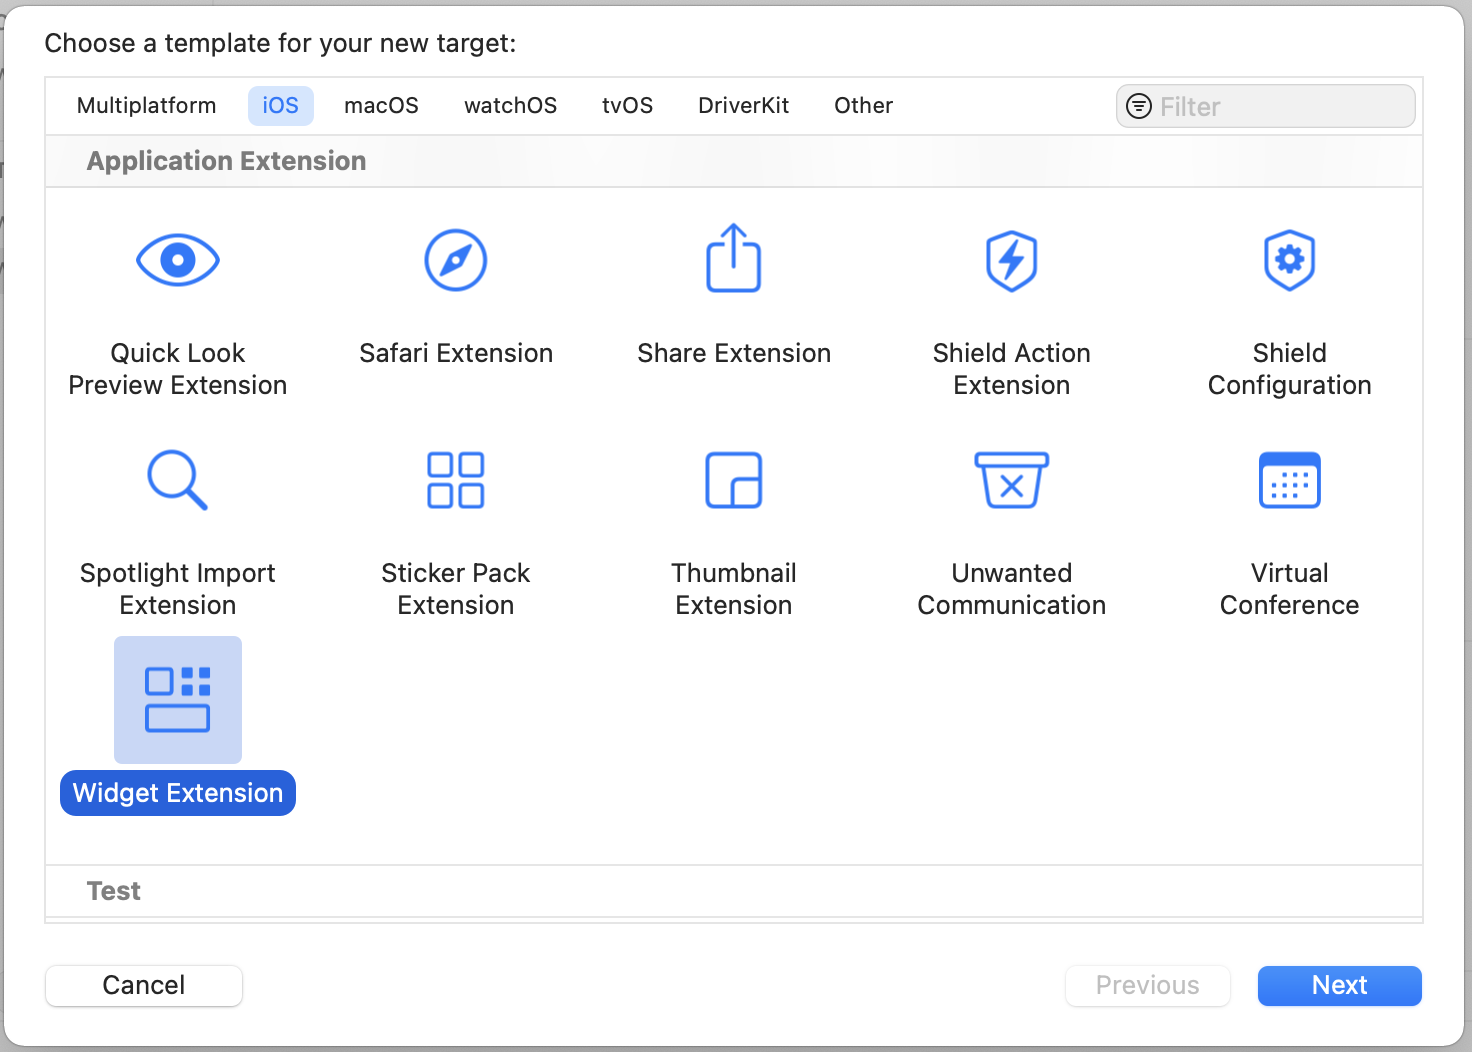
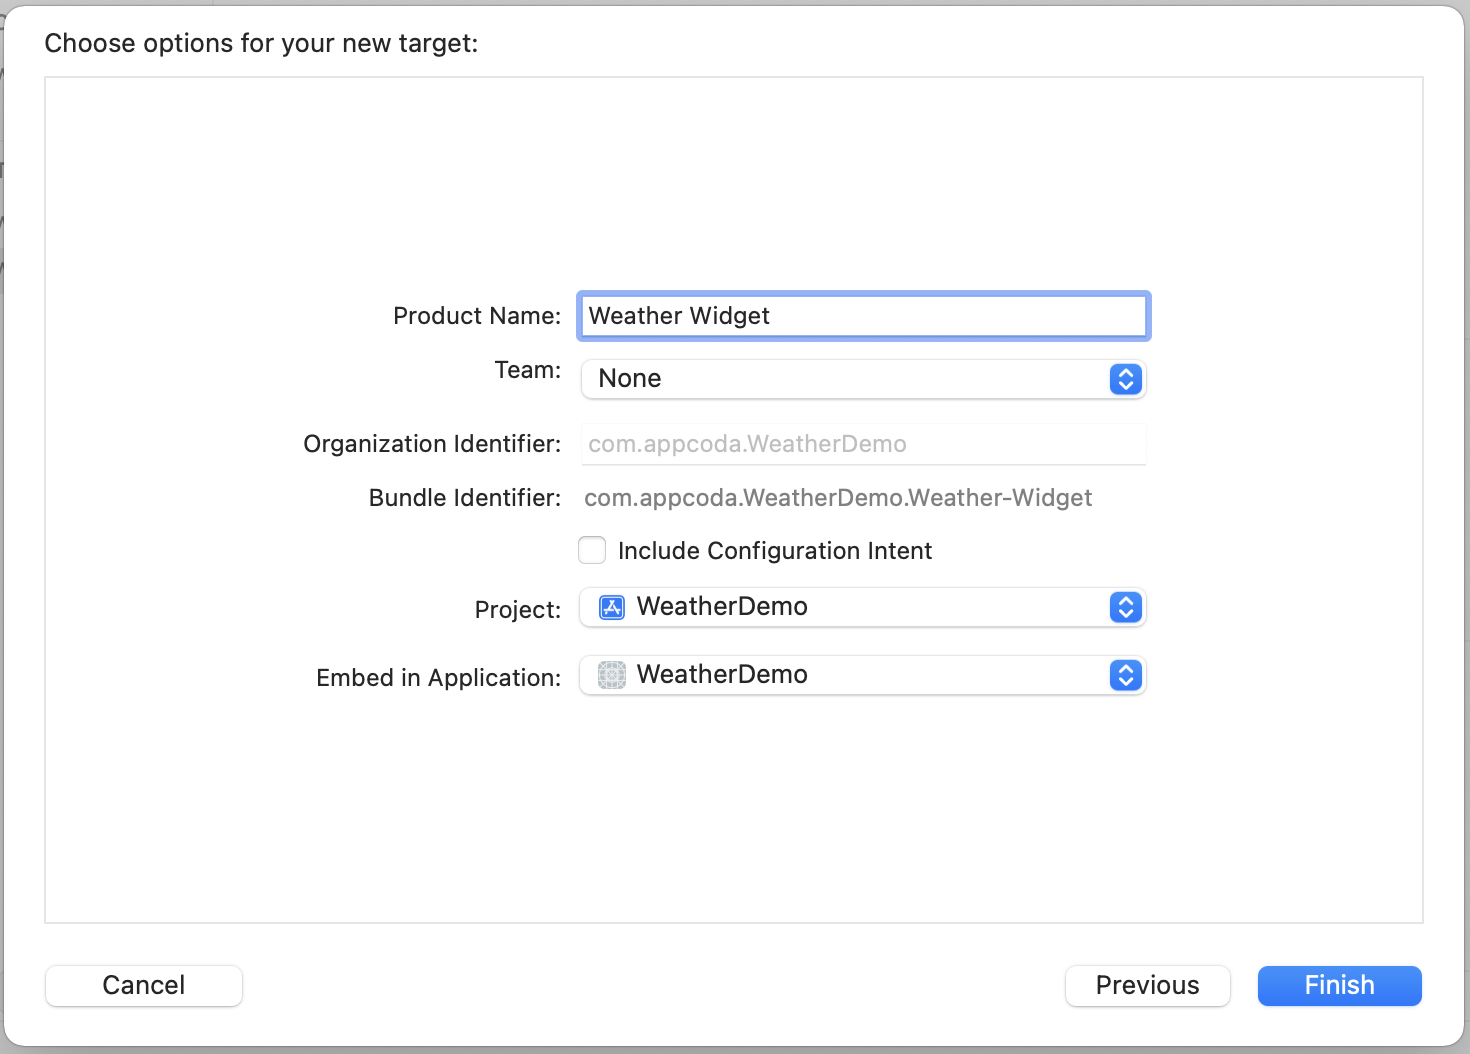
Set the Product Name to Weather Widget and leave the rest of the settings as they are. Click Finish.
At this point, you should see a prompt asking if you want to activate the Weather Widget scheme. Press Activate. Another Xcode scheme has been created for you and you can switch schemes by navigating to Product > Scheme and then selecting the scheme you want to switch to. You can also switch schemes from the Xcode toolbar.
Next, select WeatherDemo from the Project Navigator. From the list of available targets, select Weather WidgetExtension. Make sure that the deployment target is set to 14.0. Then on the General tab, press the + button under Frameworks and Libraries. Select WeatherInfoKit.framework and press Add.
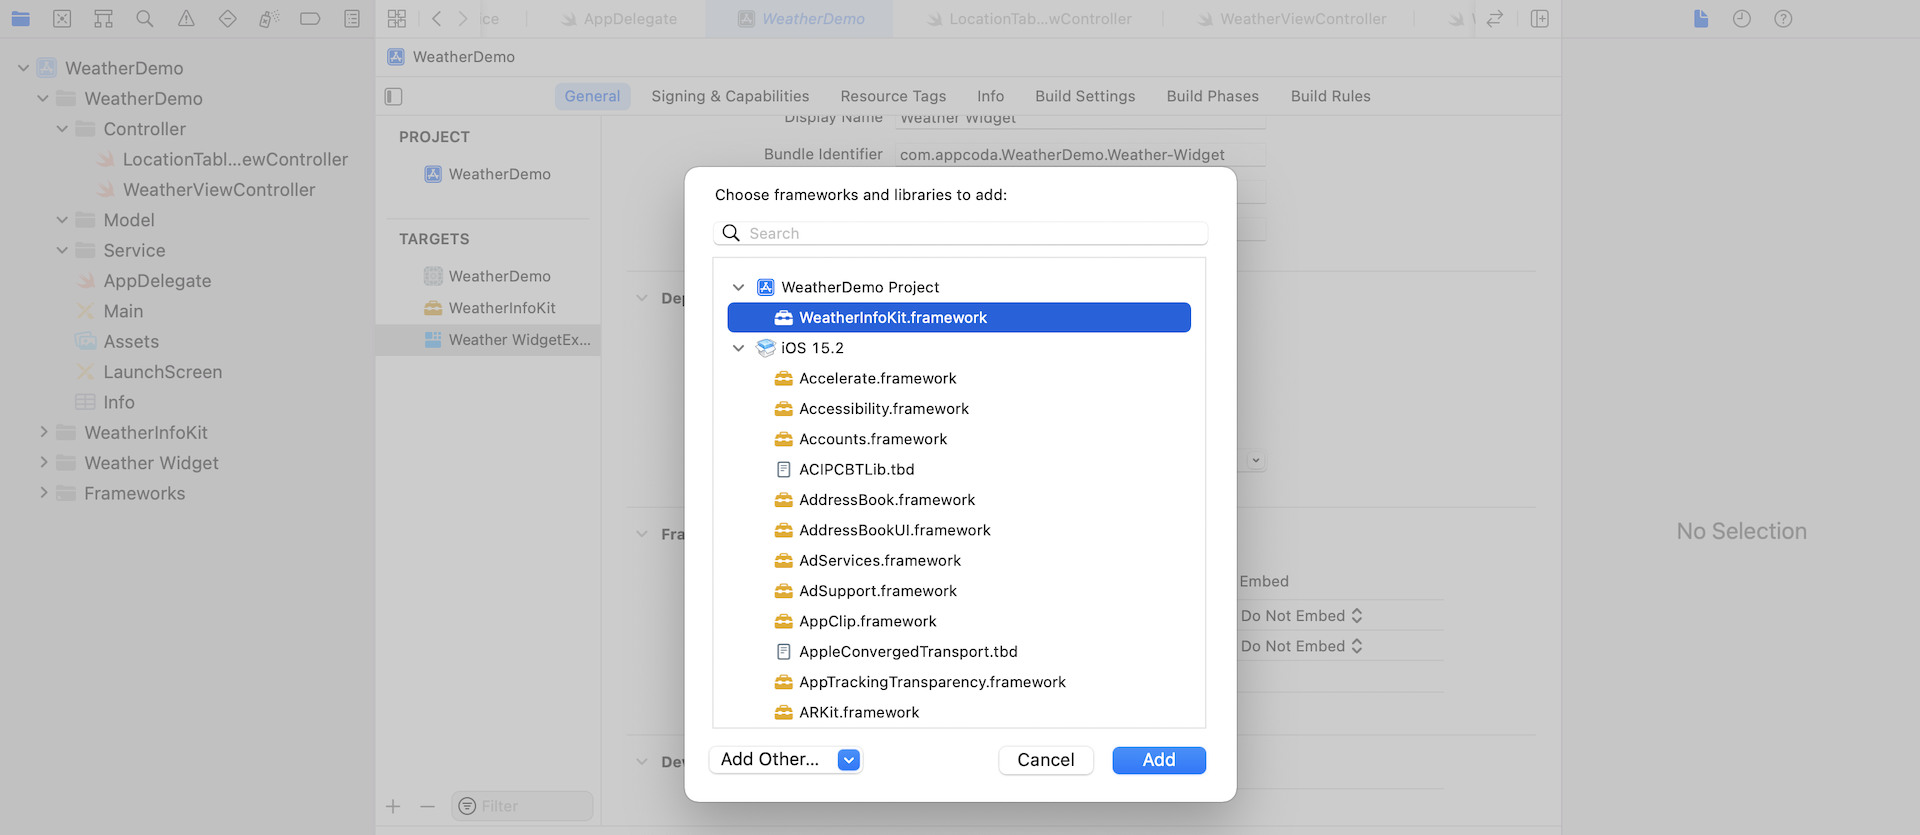
With the framework linked, we can now implement the extension.
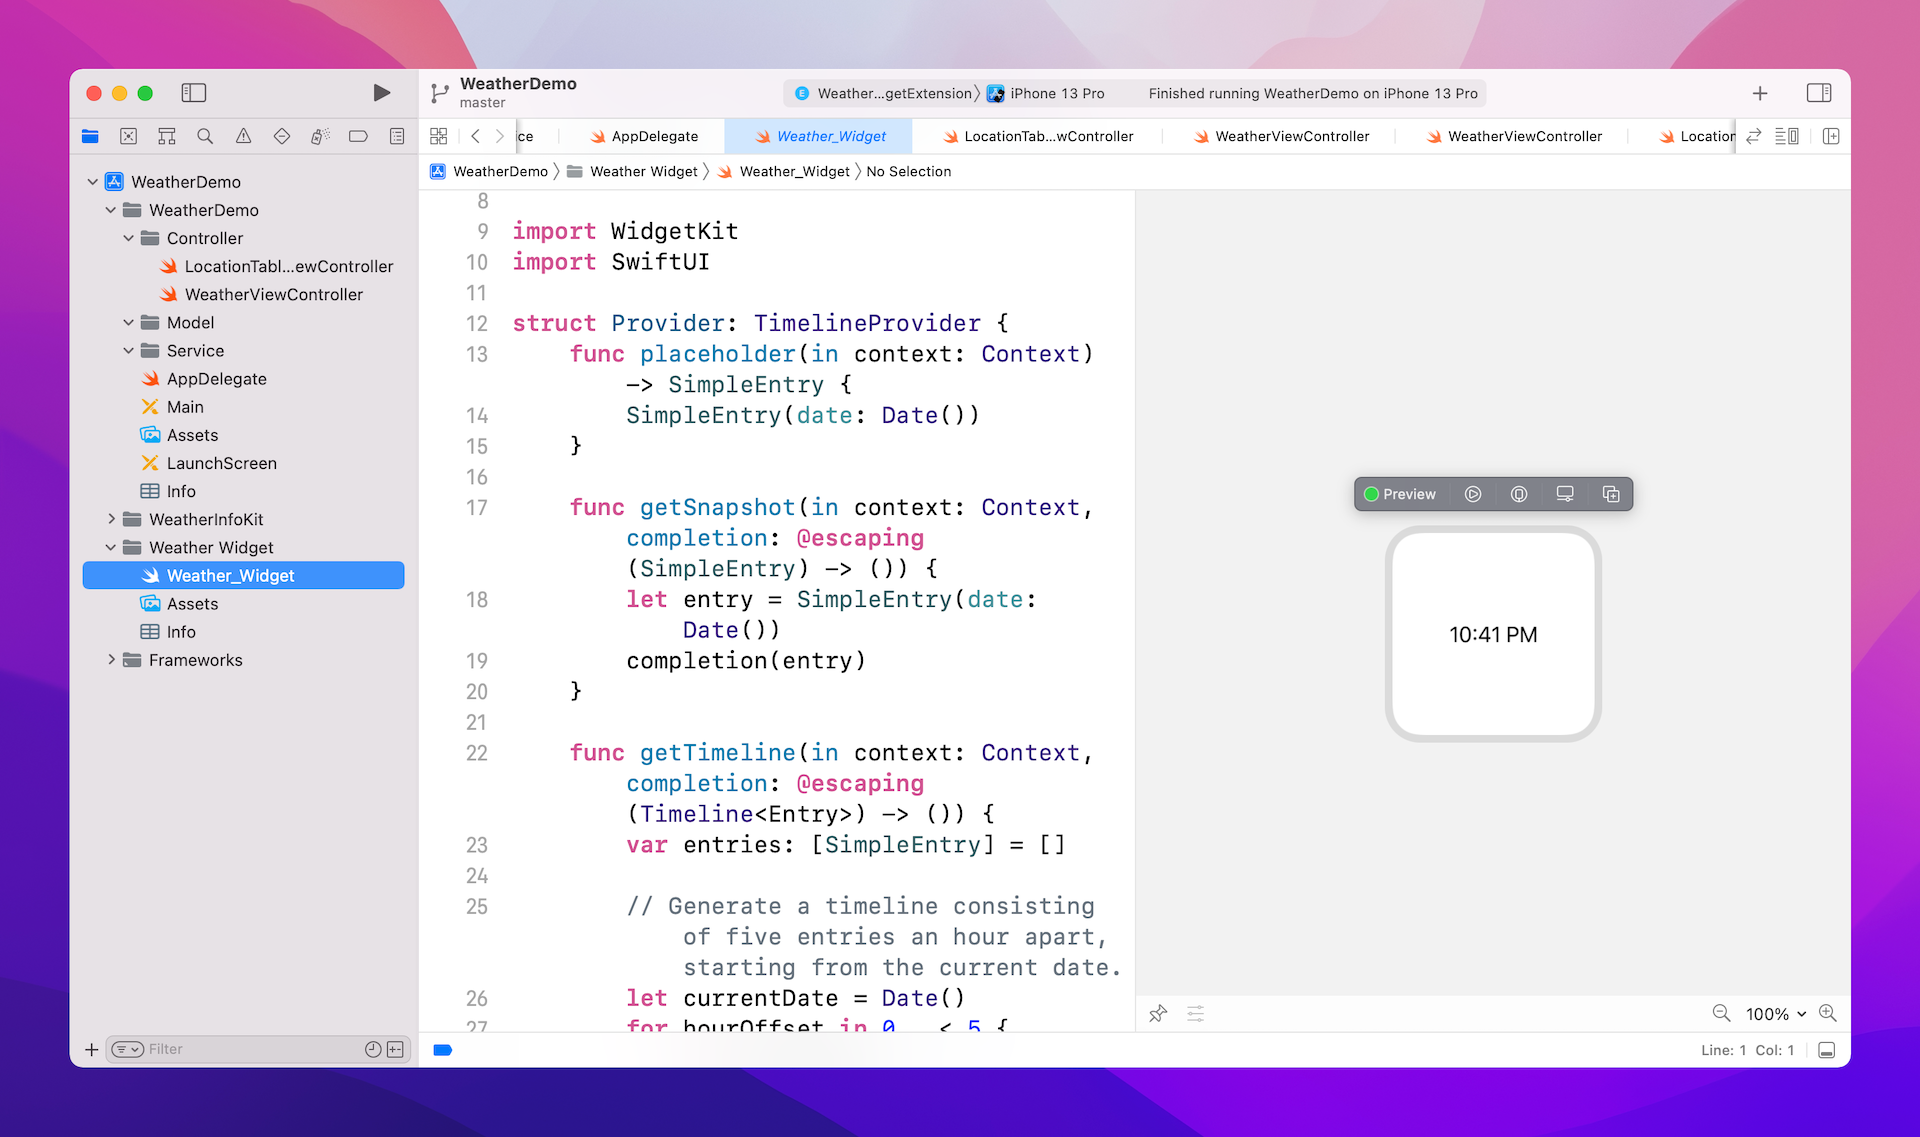
In the Project Navigator, you will see that a new group with the widget's name was created. Starting from iOS 14, you will need to use SwiftUI to create and design your UI. If you are new to SwiftUI, it was a new UI framework introduced in iOS 13. The framework is intended to replace storyboard. Early adopters of the framework already use it to create UI for the entire apps. Right now, you can choose to build your app UI using storyboard or SwiftUI. However, for developing widgets, you are required to create it using SwiftUI.
Open the Weather_Widget.swift file under Weather Widget. If you haven't tried out SwiftUI, the code may look a bit new to you. It's still written in Swift but you will need some time to get used to the declarative syntax. The instant preview feature is one of the powerful features of the SwiftUI framework. After you open the widget file, Xcode should automatically show you a preview pane. You will need to click the Resume button to enable the preview. Once done, Xcode will execute the code and display the UI of the widget.
Key Components of a Widget
There are three key components to a widget:
- A configuration that sets the widget's name, description, and defines the SwiftUI views that show the widget's content.
- A timeline provider that drives the process of updating the widget’s view over time. You have to remember that widgets are not mini apps. They are just views provided by the main app for displaying the app's content on the Home Screen. Widgets are not supposed to update every second but should be updated at a certain points throughout the day. This timeline provider defines when the widget should update its content.
- SwiftUI views used by WidgetKit to render and display the widget. As mentioned earlier, you're required to develop the views of widgets using SwiftUI. You can no longer use storyboard to design the widget's UI.
If you've looked into the code of the Weather_Widget.swift file, you should be able to the @main attribute. This attribute indicates the entry point for the widget extension.
@main
struct Weather_Widget: Widget {
    let kind: String = "Weather_Widget"

    var body: some WidgetConfiguration {
        StaticConfiguration(kind: kind, provider: Provider()) { entry in
            Weather_WidgetEntryView(entry: entry)
        }
        .configurationDisplayName("My Widget")
        .description("This is an example widget.")
    }
}
To define a widget, you need to create a struct that adopts the Widget protocol. Xcode also generated some boilerplate code for the weather widget. The kind constant defines the identifier of the widget. In the body, the code configures the widget's name and content to display on the Home screen or in Notification Center.
There are two kinds of widget configurations provided by WidgetKit: StaticConfiguration and IntentConfiguration. The main difference is whether it allows user configurable properties. The StaticConfiguration object is designed for a widget with no user configurable properties, while IntentConfiguration is for a widget with user configurable properties. Say, if you are creating a package tracking widget, you may need the user to provide a tracking number. Or your stock widget allows users to track the stock price of a particular stock. In the case, you use IntentConfiguration, which relies on a SiriKit custom intent to pass the user properties (e.g. tracking number / stock code).
Now let's change the display name and description of the widget by updating the code like this:
struct Weather_Widget: Widget {
    let kind: String = "Weather_Widget"

    var body: some WidgetConfiguration {
        StaticConfiguration(kind: kind, provider: Provider()) { entry in
            Weather_WidgetEntryView(entry: entry)
        }
        .configurationDisplayName("Weather Widget")
        .description("This widget is designed to display the current weather information.")
    }
}
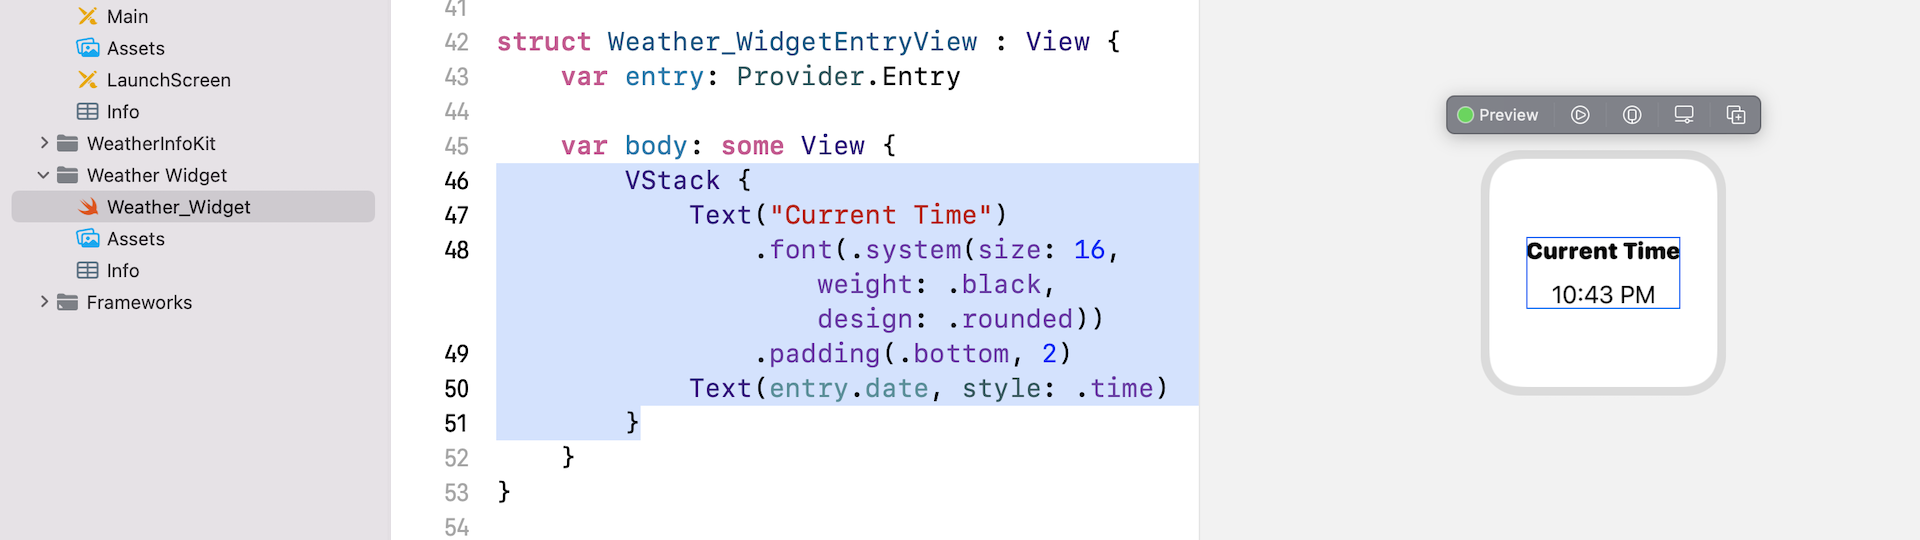
The look & feel of the widget is defined in Weather_WidgetEntryView. By default, the code is generated to display the current time. Let's modify the code like this to add a text label:
struct Weather_WidgetEntryView : View {
    var entry: Provider.Entry

    var body: some View {
        VStack {
            Text("Current Time")
                .font(.system(size: 16, weight: .black, design: .rounded))
                .padding(.bottom, 2)
            Text(entry.date, style: .time)
        }
    }
}
In SwiftUI, you use the Text view to render to a label. Both .font and .padding are known as modifiers. The font modifier is used to The VStack view is designed to arrange multiple views in a vertical stack. As soon as you make the change, Xcode should show you the UI in the preview pane instantly.
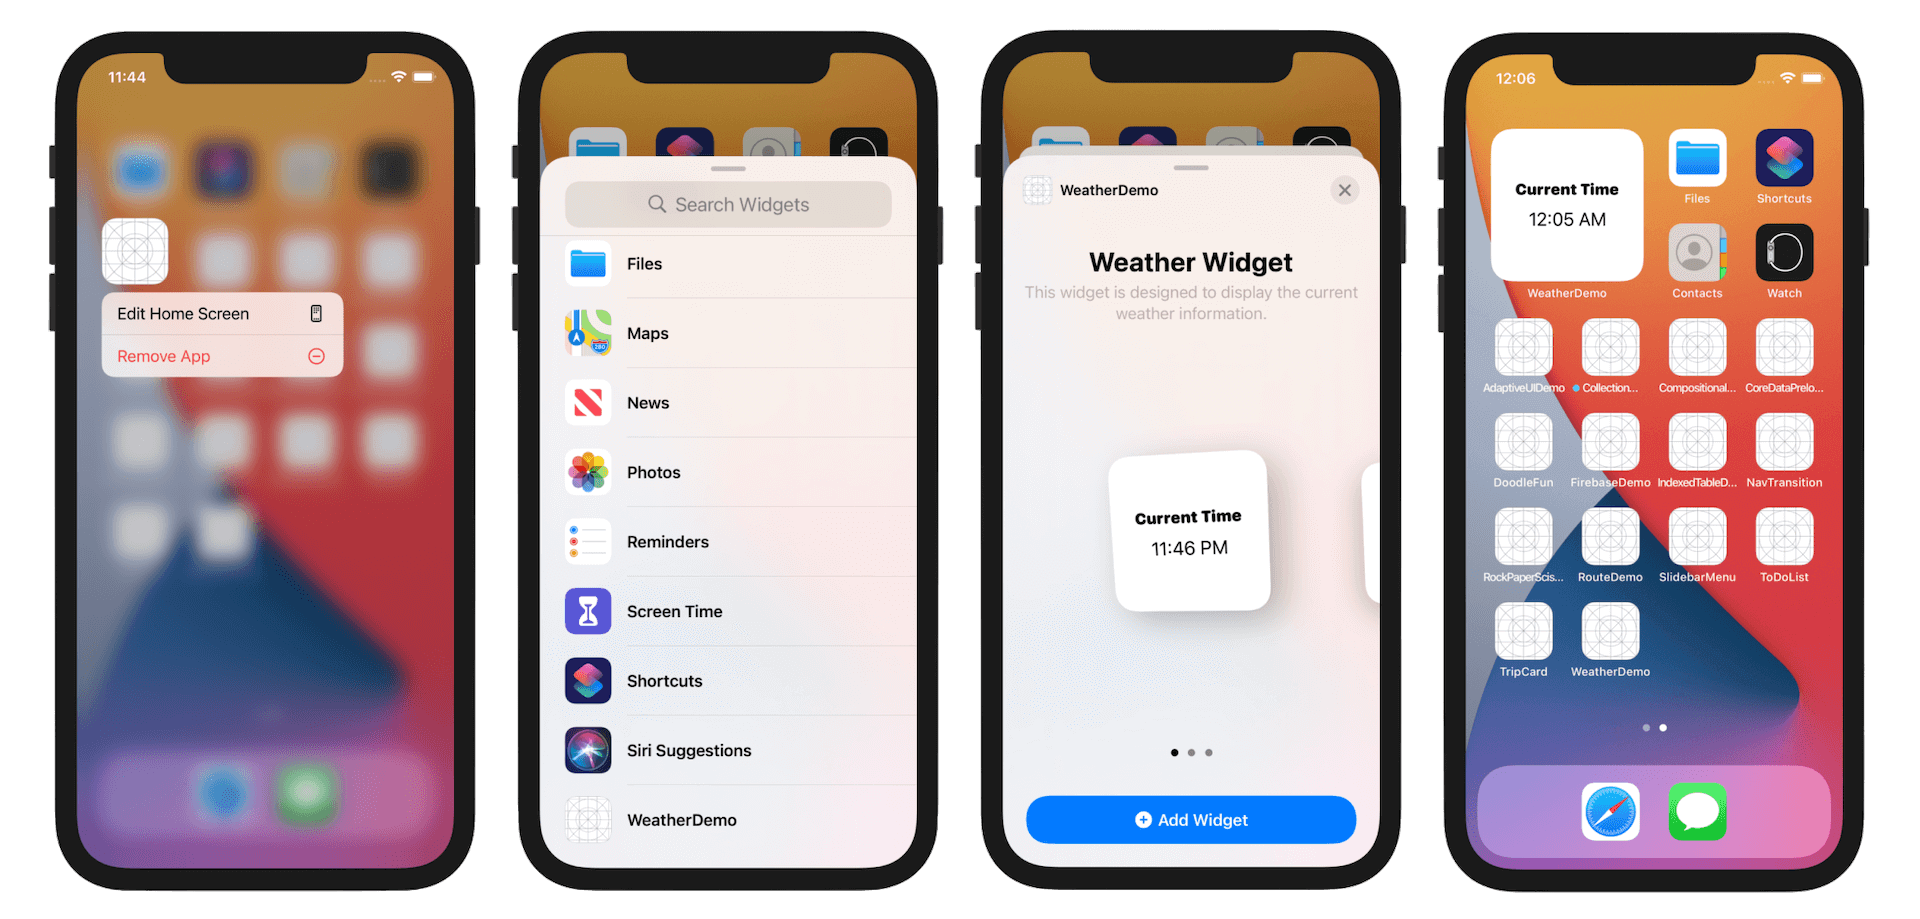
Let's have a quick test before redesigning the widget. To test the widget, you can run the WeatherDemo app and then add the widget manually. You can tap and hold an icon, and then choose Edit Home Screen. In the top-left corner of the screen, click the + button to pop up the Widgets menu. From here, you can find all the available widgets including the WeatherDemo widget. Select it and you will see the widget preview including its name and description. Widgets can come in three sizes: small, medium, and large. You can pick the preferred size and add the widget to the Home screen.
Optionally, you can control the sizes that the widget supports by attaching the .supportedFamilies modifier to StaticConfiguration like this:
struct Weather_Widget: Widget {
    let kind: String = "Weather_Widget"

    var body: some WidgetConfiguration {
        StaticConfiguration(kind: kind, provider: Provider()) { entry in
            Weather_WidgetEntryView(entry: entry)
        }
        .configurationDisplayName("Weather Widget")
        .description("This widget is designed to display the current weather information.")
        .supportedFamilies([.systemSmall])
    }
}
In the code above, it configures the weather widget to support the small size only.
Implementing the Timeline Provider and TimelineEntry
Now that you should have some basic understanding of widgets, let's convert the boilerplate code to create the weather widget. As emphasized earlier, widgets are not mini apps. They are not designed to run around the clock but should be updated at a predefined interval. For example, the weather widget can be scheduled to update the weather information every hour.
The WidgetKit framework provides the TimelineProvider protocol and the TimelineEntry protocol to achieve this type of scheduling. By adopting the TimelineProvider protocol, you tell WidgetKit when to update its UI by providing a "timeline" of events.
A timeline is an array of objects conforming to the TimelineEntry protocol. Each timeline entry has a date, and you can specify additional properties for displaying the widget (e.g. weather data).
WidgetKit requests for timeline entries in one of these two ways:
- A single snapshot, representing the widget's current state - the
getSnapshotmethod ofTimelineProvidershould be implemented to provide the snapshot. This method is usually called when the widget is first added to the Home screen. - An array of timeline entries including the current moment and future dates - the
getTimelinemethod ofTimelineProvidershould be implemented to provide these timeline entries. WidgetKit asks for these events after the widget is added to the Home screen, so that it knows when to update the widget's display.
Let's first talk about the timeline entry. The timeline entry is an object conforming to the TimelineEntry protocol. In the generated code, you should find the SimpleEntry struct which adopts the protocol. The basic requirement of the protocol is to specifies the date to display a widget. Optionally, you can include the data to display in the widget. For the weather widget, other than the date, the timeline entry should also include the weather data and the city. Thus, let's rename SimpleEntry to WeatherEntry and modify its content like this:
struct WeatherEntry: TimelineEntry {
    var date: Date
    var city: String = "paris"
    var weatherData: WeatherData
}
To use WeatherData, you need to import the WeatherInfoKit package. Insert this line of code at the beginning of the file:
import WeatherInfoKit
With the change of the timeline entry, let's continue to implement the timeline provider. In the generated code, the Provider struct adopts the TimelineProvider protocol. We will keep its name but modify its implementation.
First, let's deal with the placeholder method and update it like this:
func placeholder(in context: Context) -> WeatherEntry {
    let weatherData = WeatherData(temperature: 0, weather: "--")
    return WeatherEntry(date: Date(), weatherData: weatherData)
}
As the name suggests, this method returns the placeholder version of the widget. Here we just put in some dummy values. Please note that this method call is synchronous and should return a TimelineEntry immediately. You shouldn't make network call here.
The next method of the TimelineProvider protocol that requires implementation is getSnapshot. This method is called when the widget appears in transient situations. One example of this type situation is the widget gallery. A snapshot is required to display the preview of the widget. Therefore, the caller expects the method to return the result quickly. For our weather widget, we will present some static data like this:
func getSnapshot(in context: Context, completion: @escaping (WeatherEntry) -> ()) {

    let weatherData = WeatherData(temperature: 30, weather: "Sunny")
    let entry = WeatherEntry(date: Date(), weatherData: weatherData)

    completion(entry)
}
The last method to implement is getTimeline. As explained earlier, this method is called when WidgetKit needs to know when to update a widget. It returns an array of timeline entries for the current time and any future times to update a widget. If you need to make any network calls to retrieve the required data, you can put them in this method. For our weather widget, we will make use of the WeatherService API to retrieve the latest weather information like this:
func getTimeline(in context: Context, completion: @escaping (Timeline<Entry>) -> ()) {

    // The widget is scheduled to update every hour.
    let currentDate = Date()
    let refreshDate = Calendar.current.date(byAdding: .minute, value: 60, to: currentDate)!

    let city = "paris"

    WeatherService.sharedWeatherService().getCurrentWeather(location: city) { (data) in

        guard let weatherData = data else {
            return
        }

        let entry = WeatherEntry(date: currentDate, city: city, weatherData: weatherData)
        let timeline = Timeline(entries: [entry], policy: .after(refreshDate))

        completion(timeline)

    }

}
The widget is scheduled to update every hour. In the code above, we create the Timeline object with the weather entry and a reload policy. For the reload policy, we set the value to .after(refreshDate) indicating that the widget should be updated every 60 minutes. Theoretically, you can set the refresh date to reload the widget every minute. However, it's up to WidgetKit to decide when to perform the update.
Other than .after, you can set it to .never that tells the system not to reload the widget automatically. The other policy you can use is .atEnd. This is the default policy which tells WidgetKit to request a new timeline after the last date in the array of timeline entries you provide.
Building the Widget View
We've completed the implementation of the timeline entries. The widget should be able to retrieve the weather information when it needs to. However, we haven't modified the UI to present the weather information. Right now, the widget only displays the current time. Update the Weather_WidgetEntryView struct like this to display the weather data:
struct Weather_WidgetEntryView : View {
    var entry: Provider.Entry

    var body: some View {
        VStack {
            Text(entry.city.capitalized)
                .font(.system(size: 16, weight: .black, design: .rounded))
                .padding(.bottom, 2)
            Text(entry.weatherData.weather.capitalized)
                .font(.footnote)
                .padding(.bottom, 2)
            Text("\(entry.weatherData.temperature)℃")
                .font(.system(size: 20, weight: .black, design: .rounded))
            Text(entry.date, style: .time)
                .font(.footnote)
                .padding(.top, 10)
        }
    }
}
We added a couple of labels to display the weather data. All the labels are embedded in a vertical stack (i.e. VStack). Optionally, we use the .font and .padding modifiers to change the font style and add some space between components.
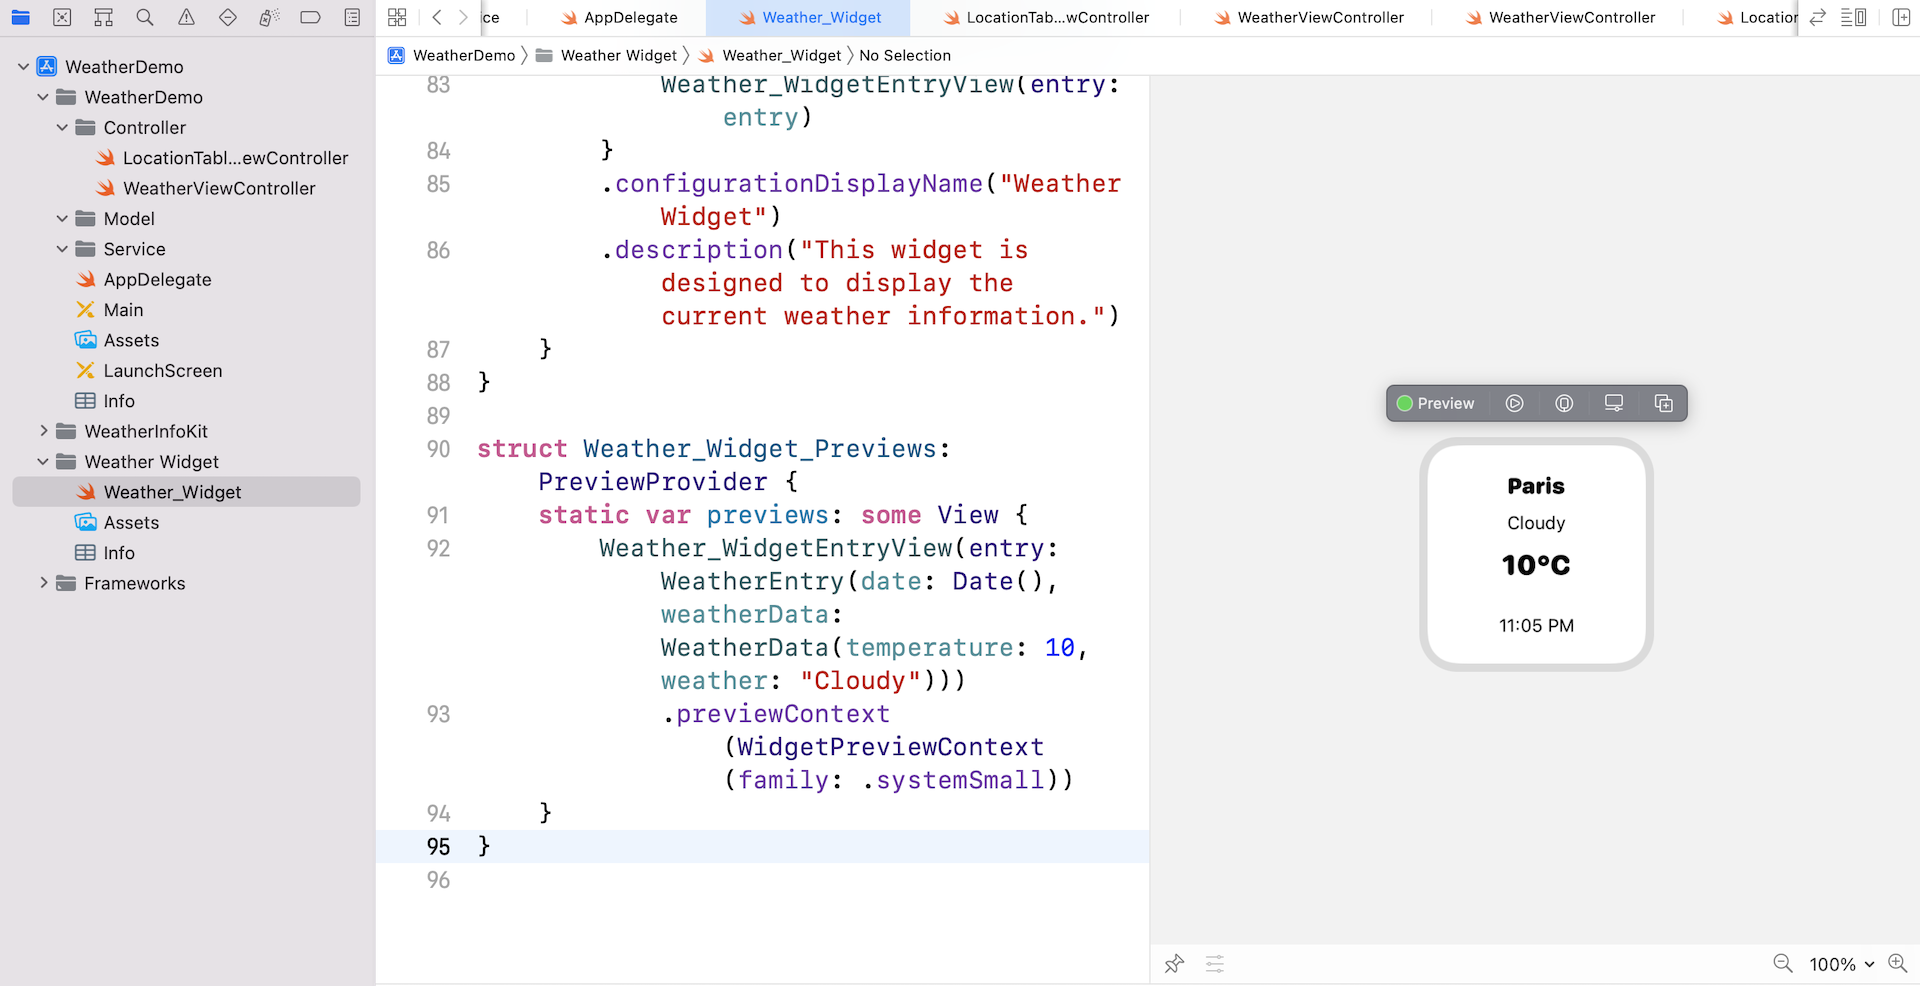
Since we've renamed SimpleEntry to WeatherEntry, we also need to modify the preview code like this:
struct Weather_Widget_Previews: PreviewProvider {
    static var previews: some View {
        Weather_WidgetEntryView(entry: WeatherEntry(date: Date(), weatherData: WeatherData(temperature: 10, weather: "Cloudy")))
            .previewContext(WidgetPreviewContext(family: .systemSmall))
    }
}
For preview purpose, we just instantiated a WeatherEntry with some sample data. Once you complete the change, you should be able to see a preview of the weather widget.
Now compile and run the Weather WidgetExtension on the simulator. You should see the widget added to the Home Screen but it ends up with this exception in the console:
2021-02-03 15:58:29.728157+0800 Weather WidgetExtension[99777:15789209] App Transport Security has blocked a cleartext HTTP (http://) resource load since it is insecure. Temporary exceptions can be configured via your app's Info.plist file.
2021-02-03 15:58:29.728266+0800 Weather WidgetExtension[99777:15789209] Cannot start load of Task <0E2FB23B-4848-494A-8760-9ABC880EAE8D>.<1> since it does not conform to ATS policy
2021-02-03 15:58:29.733195+0800 Weather WidgetExtension[99777:15789209] Task <0E2FB23B-4848-494A-8760-9ABC880EAE8D>.<1> finished with error [-1022] Error Domain=NSURLErrorDomain Code=-1022 "The resource could not be loaded because the App Transport Security policy requires the use of a secure connection." UserInfo={NSLocalizedDescription=The resource could not be loaded because the App Transport Security policy requires the use of a secure connection., NSErrorFailingURLStringKey=http://api.openweathermap.org/data/2.5/weather?appid=5dbb5c068718ea452732e5681ceaa0c7&units=metric&q=paris, NSErrorFailingURLKey=http://api.openweathermap.org/data/2.5/weather?appid=5dbb5c068718ea452732e5681ceaa0c7&units=metric&q=paris,
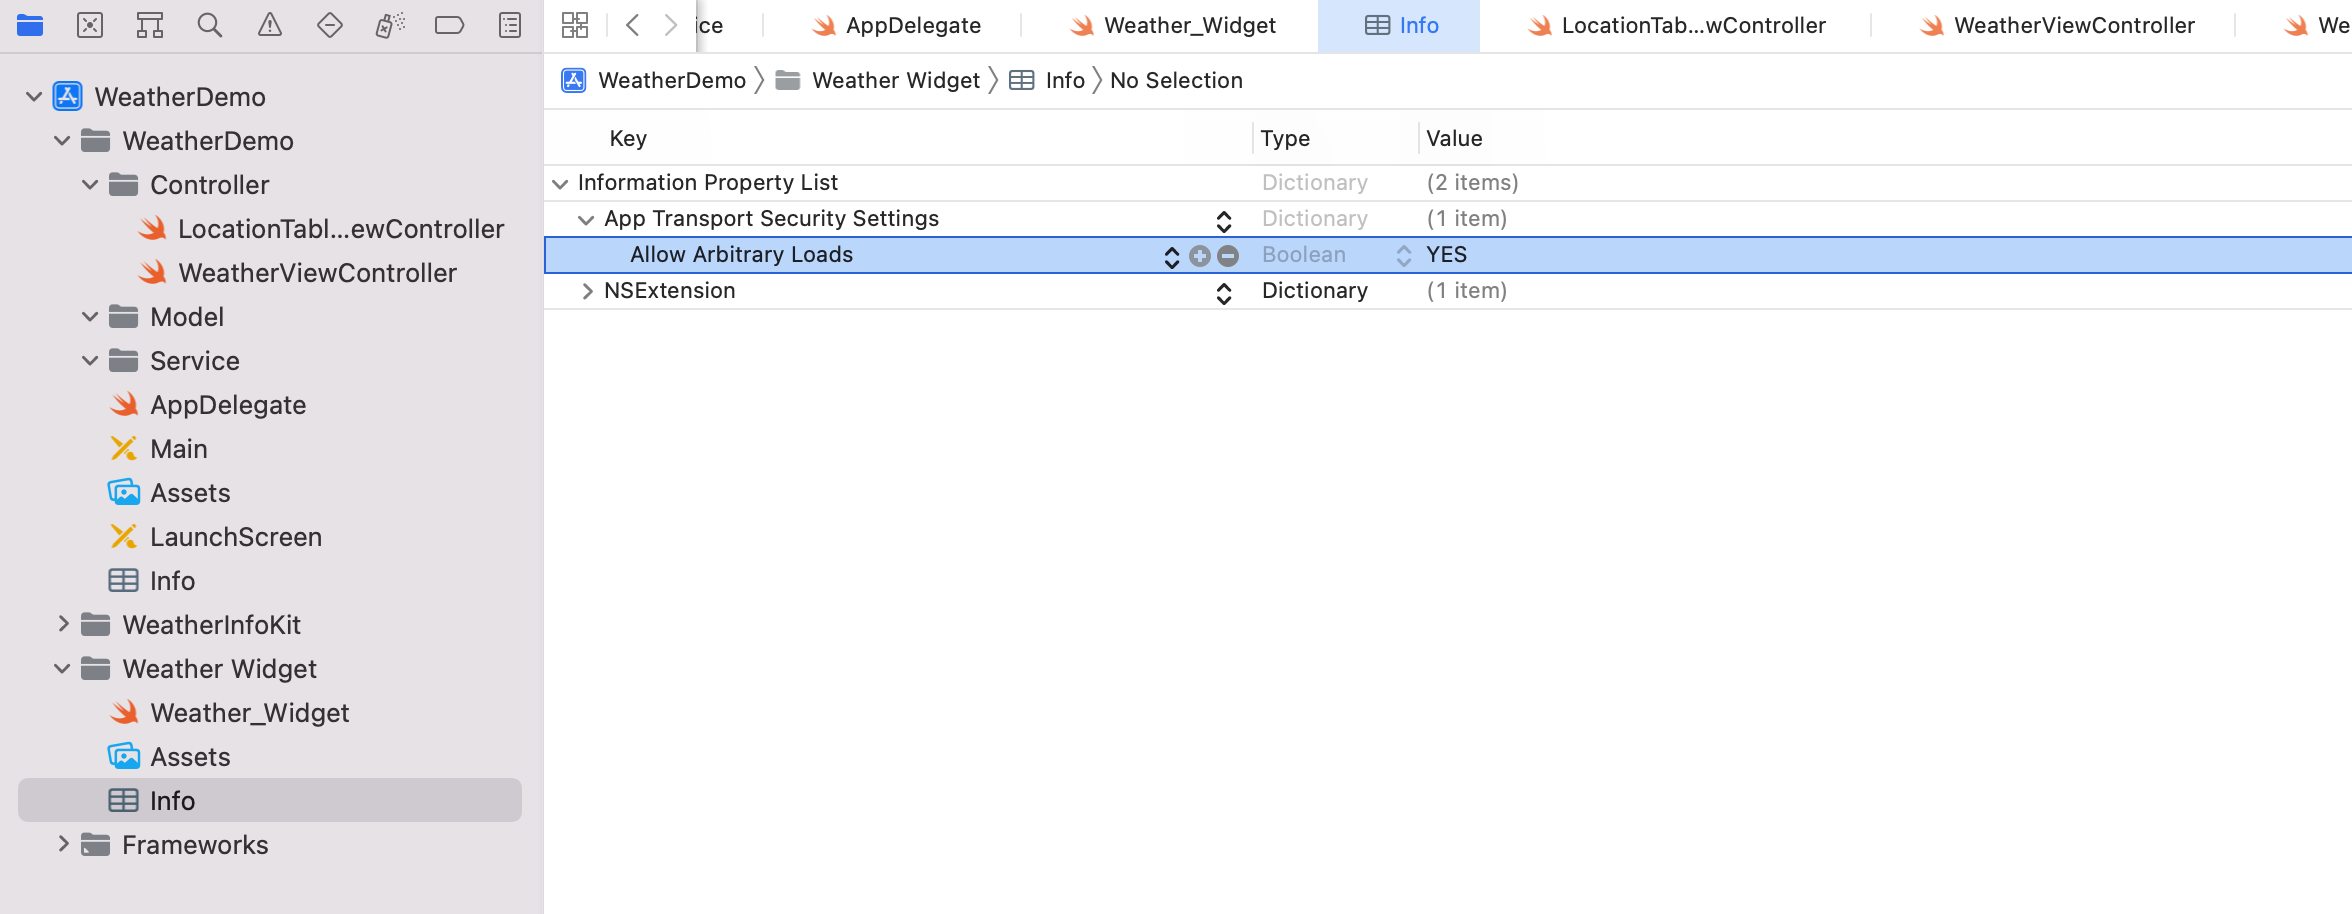
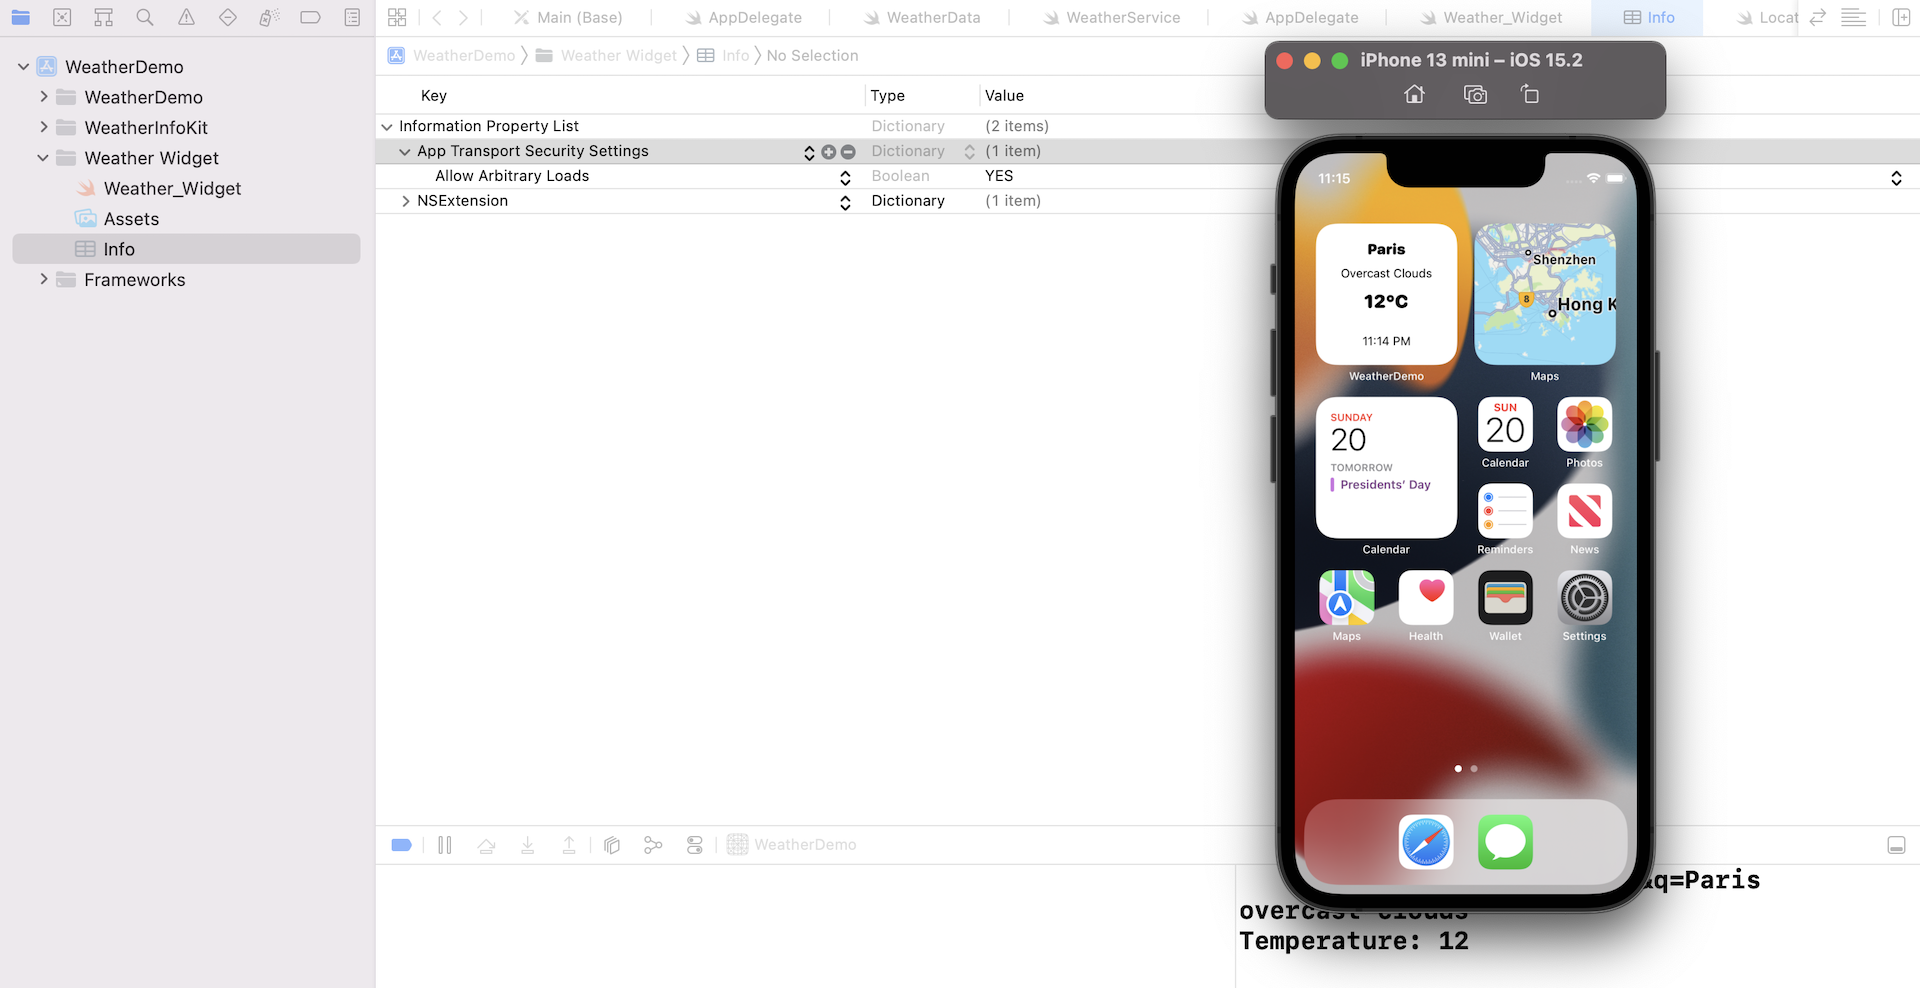
App Transport Security was first introduced in iOS 9. The purpose of the feature is to improve the security of connections between an app and web services by enforcing some of the best practices. One of them is the use of secure connections. With ATS, all network requests should now be sent over HTTPS. If you make a network connection using HTTP, ATS will block the request and display the error. For the API provided by openweathermap.org, it only comes with the support of HTTP. To resolve the issue, one way is to opt out of App Transport Security. To do so, you need to add a specific key in the widget's Info.plist to disable ATS.
Select Info.plist under the Weather Widget folder in the project navigator to display the content in a property list editor. To add a new key, right click the editor and select Add Row. For the key column, enter App Transport Security Settings. Then add the Allow Arbitrary Loads key with the type Boolean. By setting the key to YES, you explicitly disable App Transport Security.
Now run the app again. It should be able to load the widget. The weather widget should look like the one shown in the figure. When you tap the widget, it automatically opens the weather app.
Sharing Data with the Container App
The WeatherDemo app (i.e. the container app) provides a Setting screen for users to change the default location. Tap the hamburger button in the top-left corner of the screen and change the default location (say, New York) of the app. If you've done everything correctly so far, the WeatherDemo app should now display the weather information of your preferred location.
However, the weather widget is not updated accordingly. We need to figure out a way to pass the default location to the weather widget.
Currently, the default location of the widget is hardcoded to Paris, France. As mentioned before, your extension and its containing app have no direct access to each other's containers. You can, however, share the setting through UserDefaults. To enable data sharing you have to enable app groups for the containing app (i.e. WeatherDemo) and its app extension (i.e. Weather Widget).
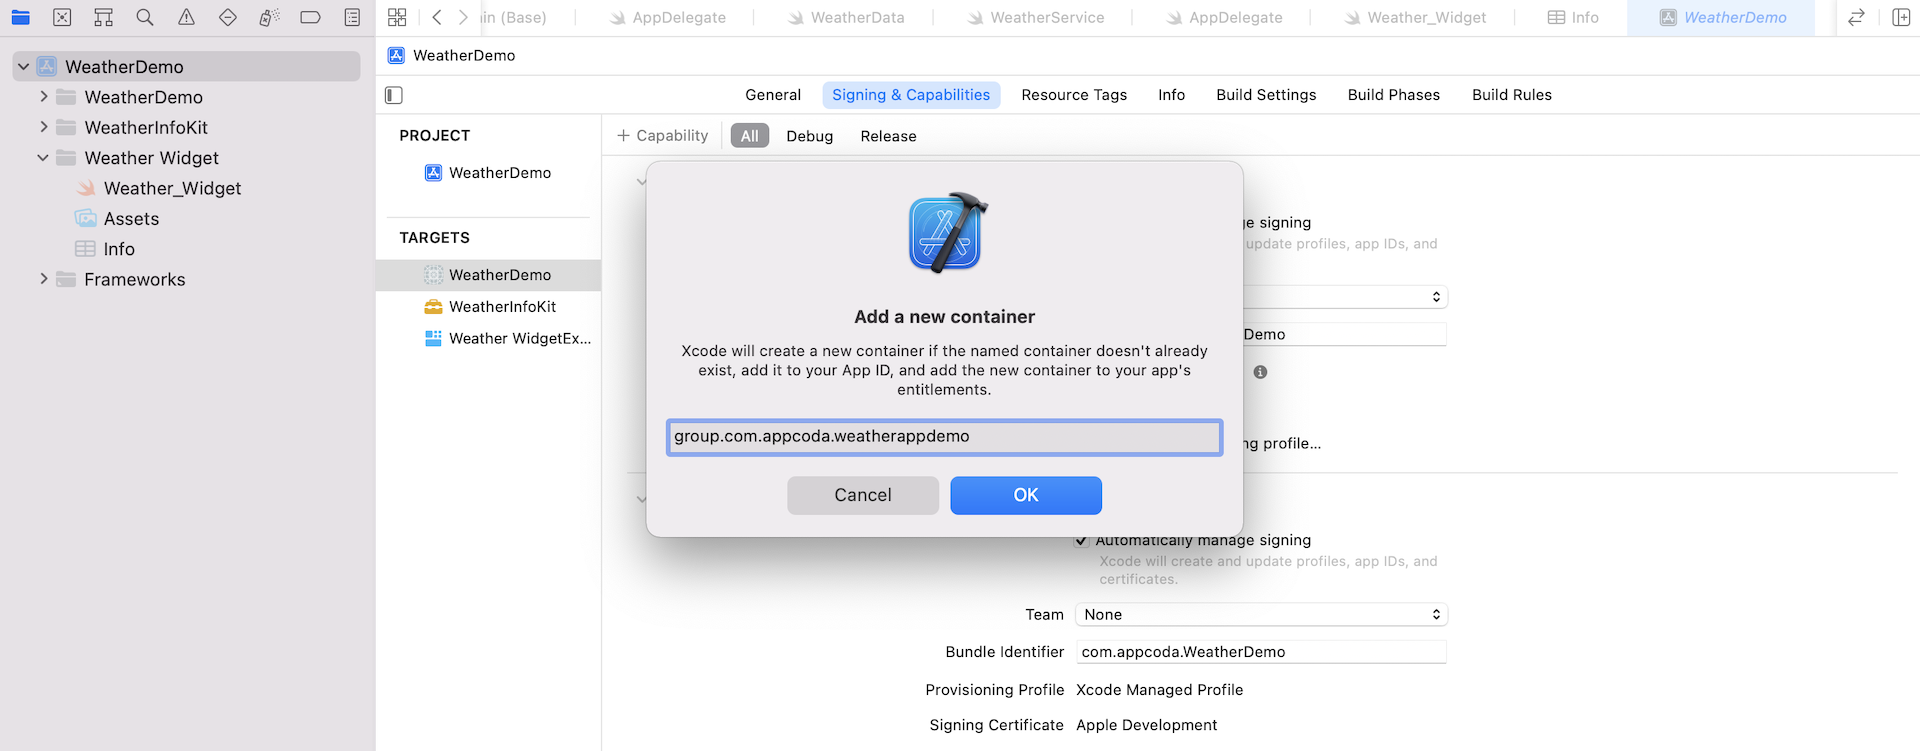
To get started, select your main app target (i.e. WeatherDemo) and choose the Signing & Capabilities tab. Click the "+ Capability" button and choose "App Groups". Note that you need a developer account to use this function. Next, click the + button to create a new container and give it a unique name. Commonly, the name starts with group. I set the name to group.com.appcoda.weatherappdemo. Don't just copy & paste the name. You should use another name for your app.
Select the Weather WidgetExtension target and repeat the above procedures to set the App Groups. Don't create a new container for it though - use the one you had created for the WeatherDemo target. In case if you can't see the app group you just created, hit the reload button to refresh the list.
After you enable app groups, an app extension and its containing app can both use the UserDefaults API to share access to user settings. Open LocationTableViewController.swift and add the following property to the class:
var defaults = UserDefaults(suiteName: "group.com.appcoda.weatherappdemo")!
The LocationTableViewController class is the controller for handling the location selection. To enable data sharing, we create a new UserDefaults object with the suite name set to the group name (Note: please change the name to your own value). Update the following method:
override func tableView(_ tableView: UITableView, didSelectRowAt indexPath: IndexPath) {
    let cell = tableView.cellForRow(at: indexPath)
    cell?.accessoryType = .checkmark
    if let location = cell?.textLabel?.text {
        selectedLocation = location

        defaults.setValue(selectedCity, forKey: "city")
    }

    tableView.reloadData()
}
We only add a couple lines of code in the if let block to save the selected city to the defaults.
Next, open Weather_Widget.swift and add the following variable in the Provider struct:
var defaults = UserDefaults(suiteName: "group.com.appcoda.weatherappdemo")!
In the getTimeline method, replace the declaration of city like this:
// Get the location from defaults
guard let city = defaults.value(forKey: "city") as? String else {
    return
}
There is still one thing left before the widget will be updated. You have to instruct the widget to update itself when the default city is changed. The WidgetKit framework provides an object called WidgetCenter that contains a list of user-configured widgets. You can use this object to request a reload of your widget's timeline by calling reloadAllTimelines().
Now switch back to LocationTableViewController.swift and add a statement to import WidgetKit:
import WidgetKit
Then insert the following line of code in tableView(_ didSelectRowAt:):
WidgetCenter.shared.reloadAllTimelines()
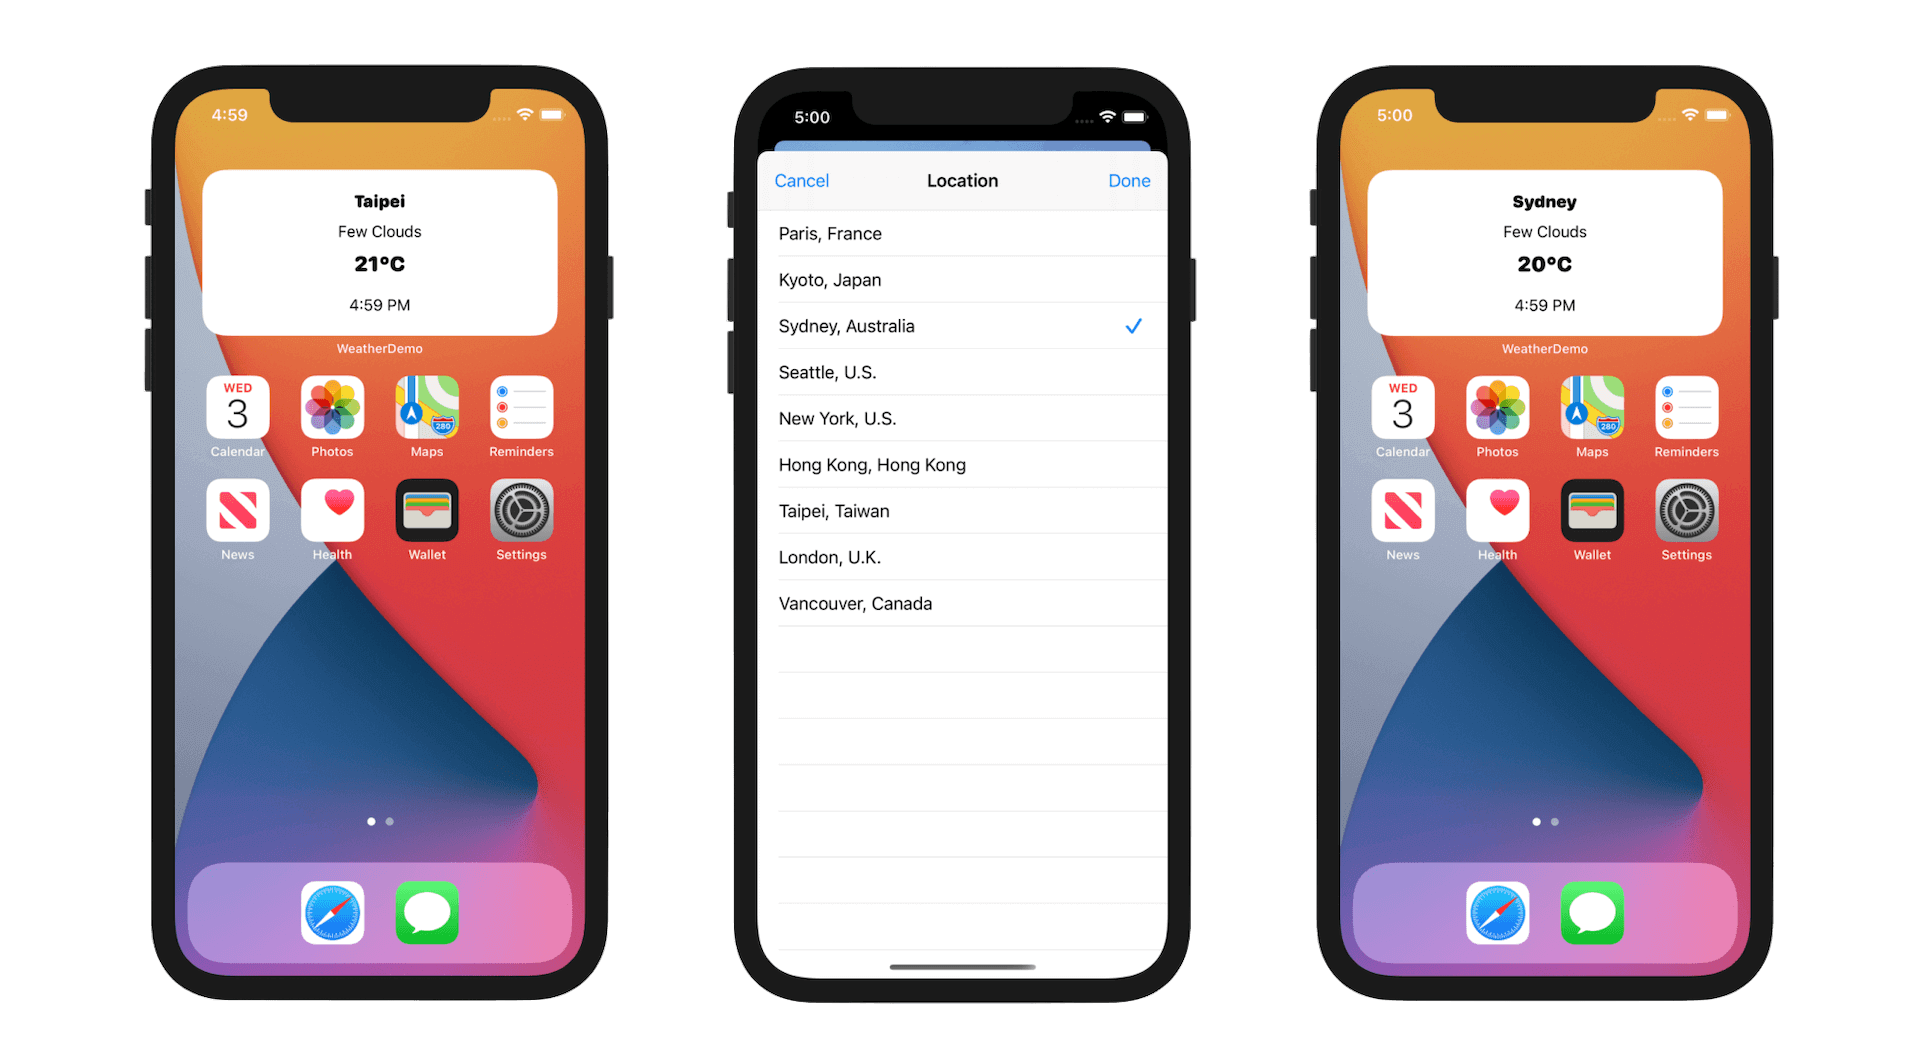
Now we are ready to test the widget again. Run the app and change the default location. Once the location is set, the weather widget should be updated according to your preference.
For reference, you can download the complete Xcode project from http://www.appcoda.com/resources/swift55/WeatherDemoFinal.zip.