- Made by AppCoda
- Contact us / Support
- Tweet this book
- Preface
- 1. Building Adaptive User Interfaces
- 2. Creating Table View Sections and Index list with Diffable Data Source
- 3. Animating Table View Cells
- 4. Working with JSON and Codable
- 5. How to Integrate the Twitter and Facebook SDK for Social Sharing
- 6. Working with Email and Attachments
- 7. Sending SMS and MMS Using MessageUI Framework
- 8. How to Get Direction and Draw Route on Maps
- 9. Search Nearby Points of Interest Using Local Search
- 10. Audio Recording and Playback
- 11. Scan QR Code Using AVFoundation Framework
- 12. Working with URL Schemes
- 13. Building a Full Screen Camera with Gesture-based Controls
- 14. Video Capturing and Playback Using AVKit
- 15. Displaying Banner Ads using Google AdMob
- 16. Working with Custom Fonts
- 17. Working with AirDrop, UIActivityViewController and Uniform Type Identifiers
- 18. Building Grid Layouts Using Collection Views and Diffable Data Source
- 19. Interacting with Collection Views
- 20. Adaptive Collection Views Using UITraitCollection and Compositional Layout
- 21. Building a Weather Widget Using WidgetKit
- 22. Building Slide Out Sidebar Menus Using Objective-C Libraries
- 23. View Controller Transitions and Animations
- 24. Building a Slide Down Menu
- 25. Self Sizing Cells and Dynamic Type
- 26. XML Parsing, RSS and Expandable Table View Cells
- 27. Applying a Blurred Background Using UIVisualEffect
- 28. Using Touch ID and Face ID For Authentication
- 29. Building a Carousel-Like User Interface
- 30. Working with Parse
- 31. Parsing CSV and Preloading a SQLite Database Using Core Data
- 32. Connecting Multiple Annotations with Polylines and Routes
- 33. Using CocoaPods in Swift Projects
- 34. Building a Simple Sticker App
- 35. Building iMessage Apps Using Messages Framework
- 36. Building Custom UI Components Using IBDesignable and IBInspectable
- 37. Using Firebase for User Authentication
- 38. Google and Facebook Authentication Using Firebase
- 39. Using Firebase Database and Storage to Build an Instagram-like App
- 40. Building a Real-time Image Recognition App Using Core ML
- 41. Building AR Apps with ARKit and SpriteKit
- 42. Working with 3D Objects in Augmented Reality Using ARKit and SceneKit
- 43. Use Create ML to Train Your Own Machine Learning Model for Image Recognition
- 44. Building a Sentiment Classifier Using Create ML to Classify User Reviews
- 45. Working with Image Tracking Using ARKit
- Published with GitBook
Chapter 31
Parsing CSV and Preloading a SQLite Database Using Core Data
When working with Core Data, you may have asked these two questions:
- How can you preload existing data into the SQLite database?
- How can you use an existing SQLite database in my Xcode project?
I recently met a friend who is now working on a dictionary app for a particular industry. He got the same questions. He knows how to save data into the database and retrieve them back from the Core Data store. The real question is: how could he preload the existing dictionary data into the database?
I believe some of you may have the same question. This is why I devote a full chapter to talk about data preloading in Core Data. I will answer the above questions and show you how to preload your app with existing data.
So how can you preload existing data into the built-in SQLite database of your app? In general, you bundle a data file (in CSV or JSON format or whatever format you like). When the user launches the app for the very first time, it preloads the data from the data file and puts them into the database. At the time when the app is fully launched, it will be able to use the database, which has been pre-filled with data. The data file can be either bundled in the app or hosted on a cloud server. By storing the file in the cloud or other external sources, this would allow you to update the data easily, without rebuilding the app. I will walk you through both approaches by building a simple demo app.
Once you understand how data preloading works, I will show you how to use an existing SQLite database (again pre-filled with data) in your app.
Note that I assume you have a basic understanding of Core Data. You should know how to insert and retrieve data through Core Data. If you have no ideas about these operations, you can refer to the Beginning iOS Programming with Swift book.
A Simple Demo App
To keep your focus on learning data preloading, I have created the project template for you. Firstly, download the project from http://www.appcoda.com/resources/swift55/CoreDataPreloadDemoStarter.zip and have a trial run.
I have already built the data model and provided the implementation of the table view. You can look into the MenuItemTableViewController class and CoreDataPreloadDemo.xcdatamodeld for details. The data model is pretty simple. I have defined a MenuItem entity, which includes three attributes: name, detail, and price.
If you open AppDelegate.swift, you will see the following code snippet:
lazy var persistentContainer: NSPersistentContainer = {
    /*
     The persistent container for the application. This implementation
     creates and returns a container, having loaded the store for the
     application to it. This property is optional since there are legitimate
     error conditions that could cause the creation of the store to fail.
    */
    let container = NSPersistentContainer(name: "CoreDataPreloadDemo")
    container.loadPersistentStores(completionHandler: { (storeDescription, error) in
        if let error = error as NSError? {
            // Replace this implementation with code to handle the error appropriately.
            // fatalError() causes the application to generate a crash log and terminate. You should not use this function in a shipping application, although it may be useful during development.

            /*
             Typical reasons for an error here include:
             * The parent directory does not exist, cannot be created, or disallows writing.
             * The persistent store is not accessible, due to permissions or data protection when the device is locked.
             * The device is out of space.
             * The store could not be migrated to the current model version.
             Check the error message to determine what the actual problem was.
             */
            fatalError("Unresolved error \(error), \(error.userInfo)")
        }
    })
    return container
}()

// MARK: - Core Data Saving support

func saveContext () {
    let context = persistentContainer.viewContext
    if context.hasChanges {
        do {
            try context.save()
        } catch {
            // Replace this implementation with code to handle the error appropriately.
            // fatalError() causes the application to generate a crash log and terminate. You should not use this function in a shipping application, although it may be useful during development.
            let nserror = error as NSError
            fatalError("Unresolved error \(nserror), \(nserror.userInfo)")
        }
    }
}
It already comes with the code required for loading the Core Data model (i.e. CoreDataPreloadDemo.xcdatamodeld).
In the MenuTableViewController.swift file, I also implemented the required code for retrieving the menu items:
// Load menu items from database
if let appDelegate = (UIApplication.shared.delegate as? AppDelegate) {
    let request: NSFetchRequest<MenuItem> = MenuItem.fetchRequest()
    let context = appDelegate.persistentContainer.viewContext
    do {
        menuItems = try context.fetch(request)
    } catch {
        print("Failed to retrieve record")
        print(error)
    }
}
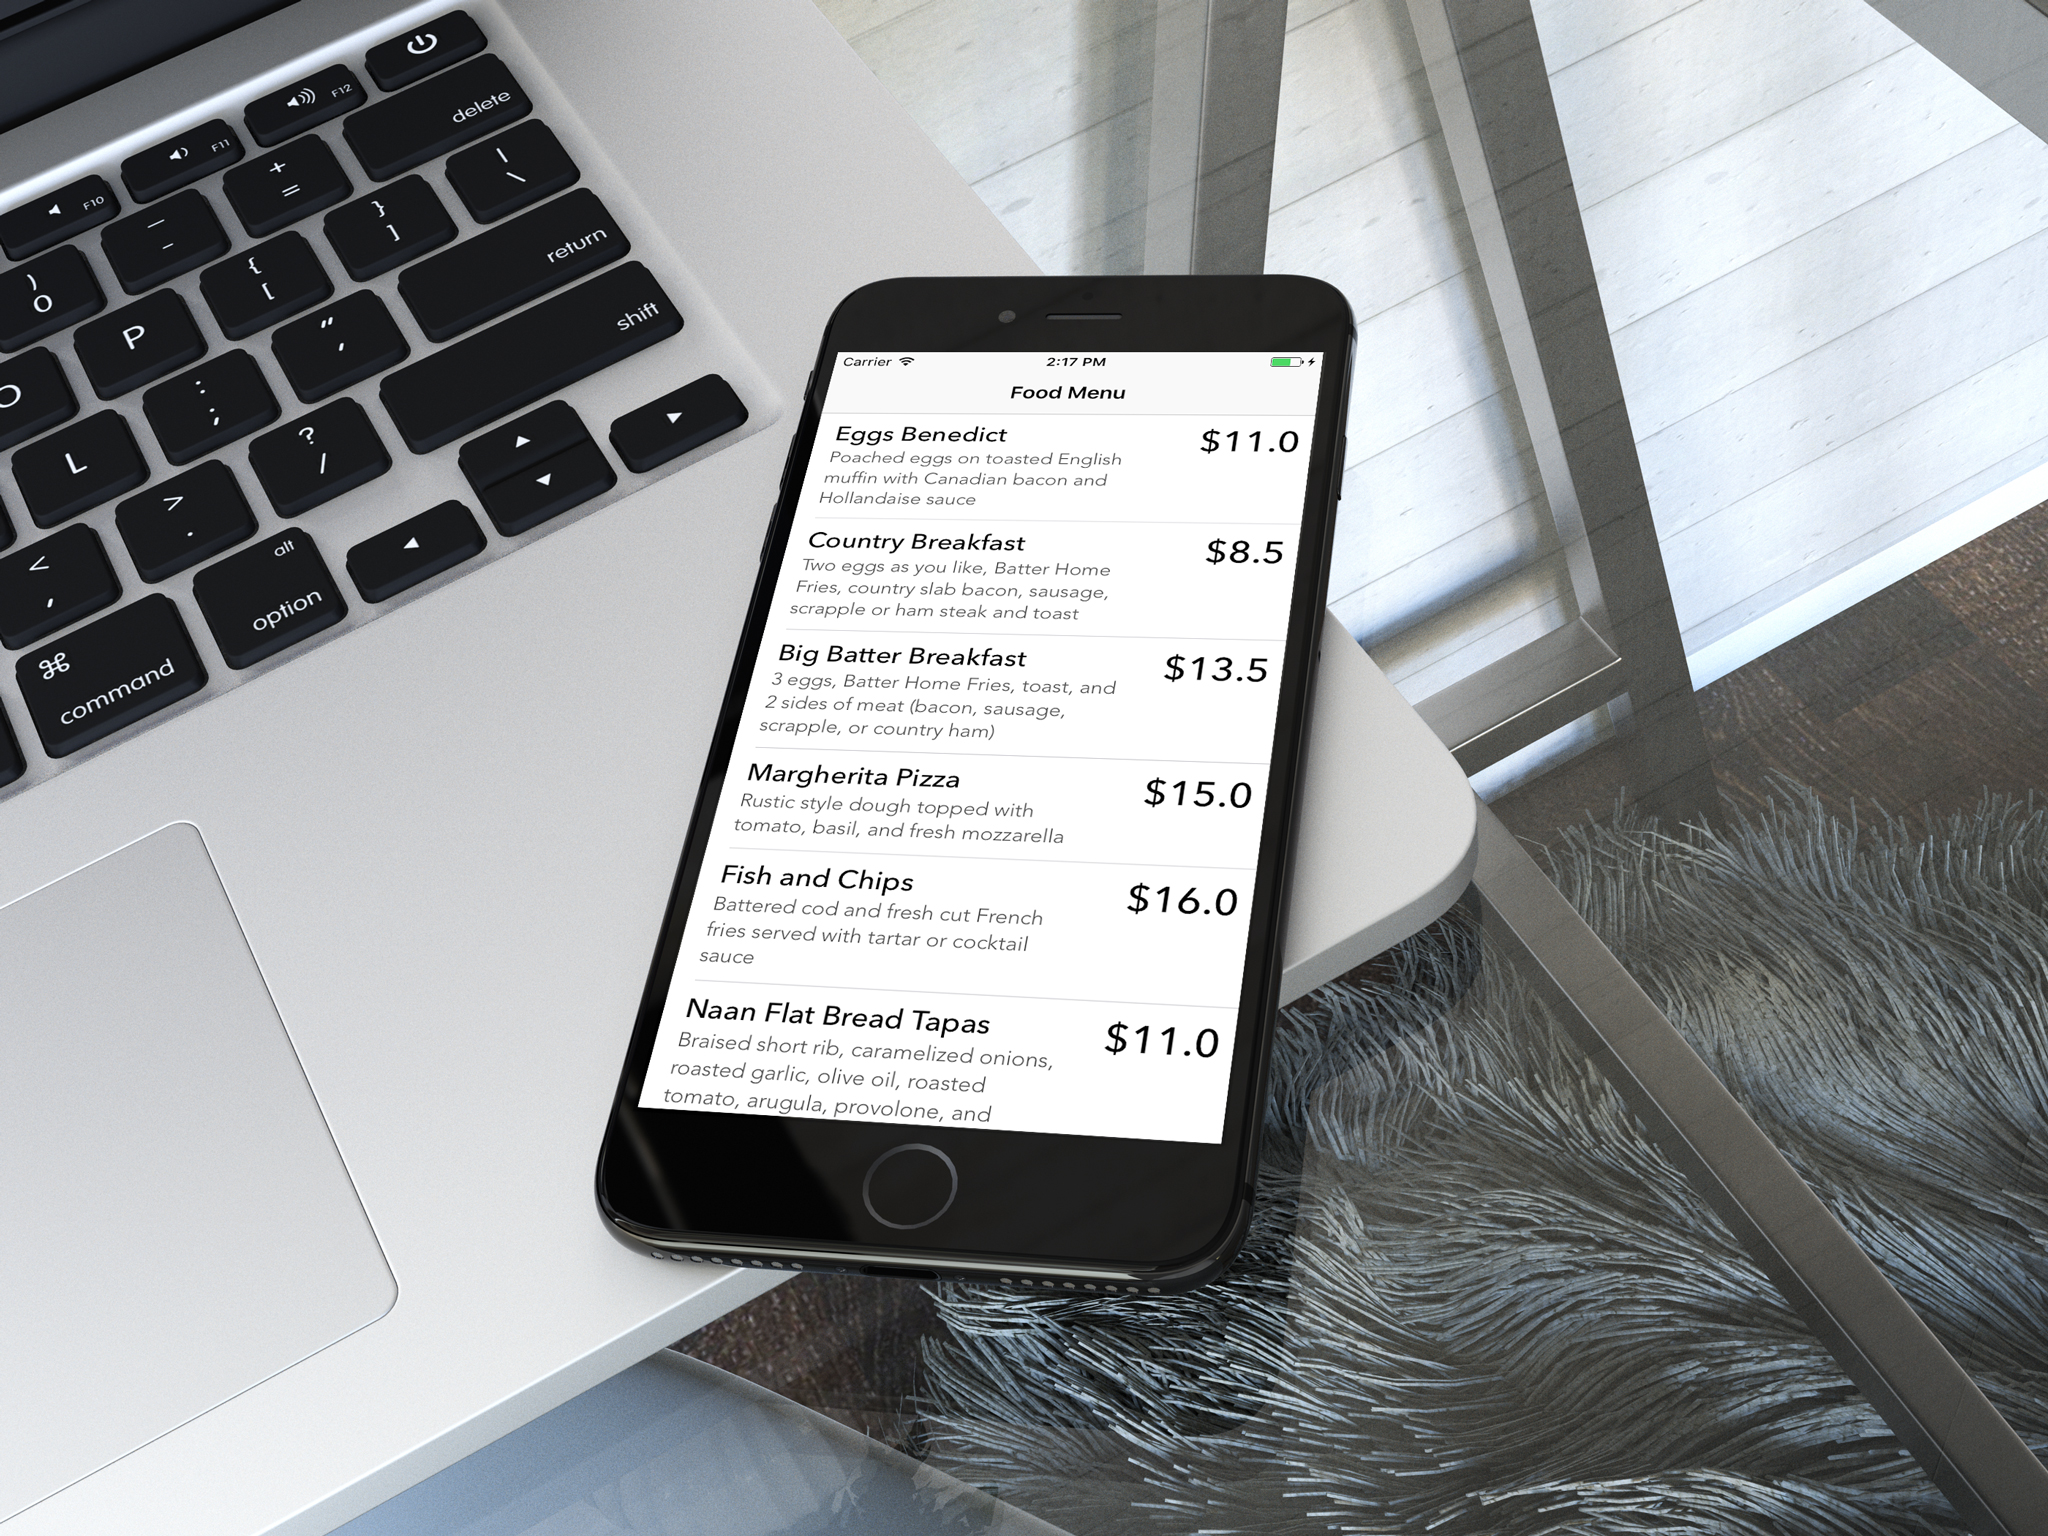
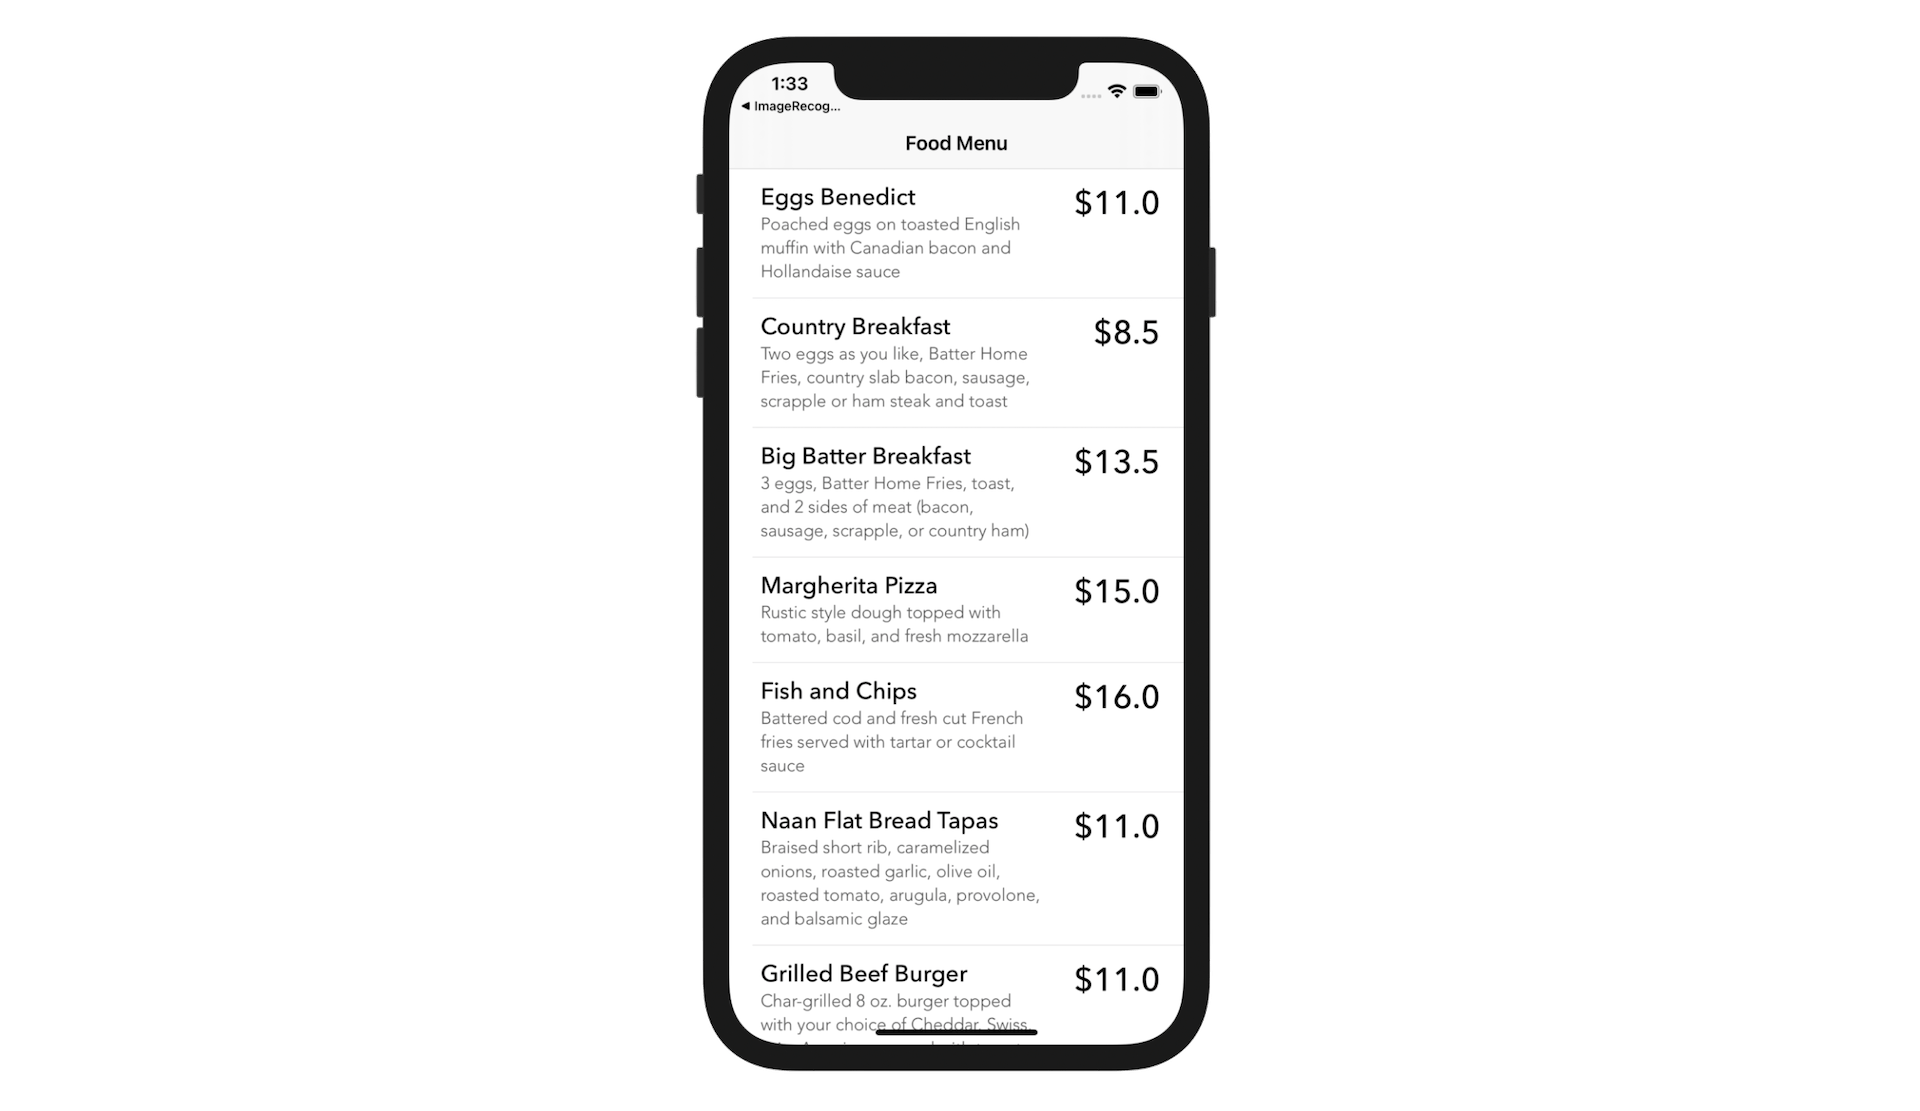
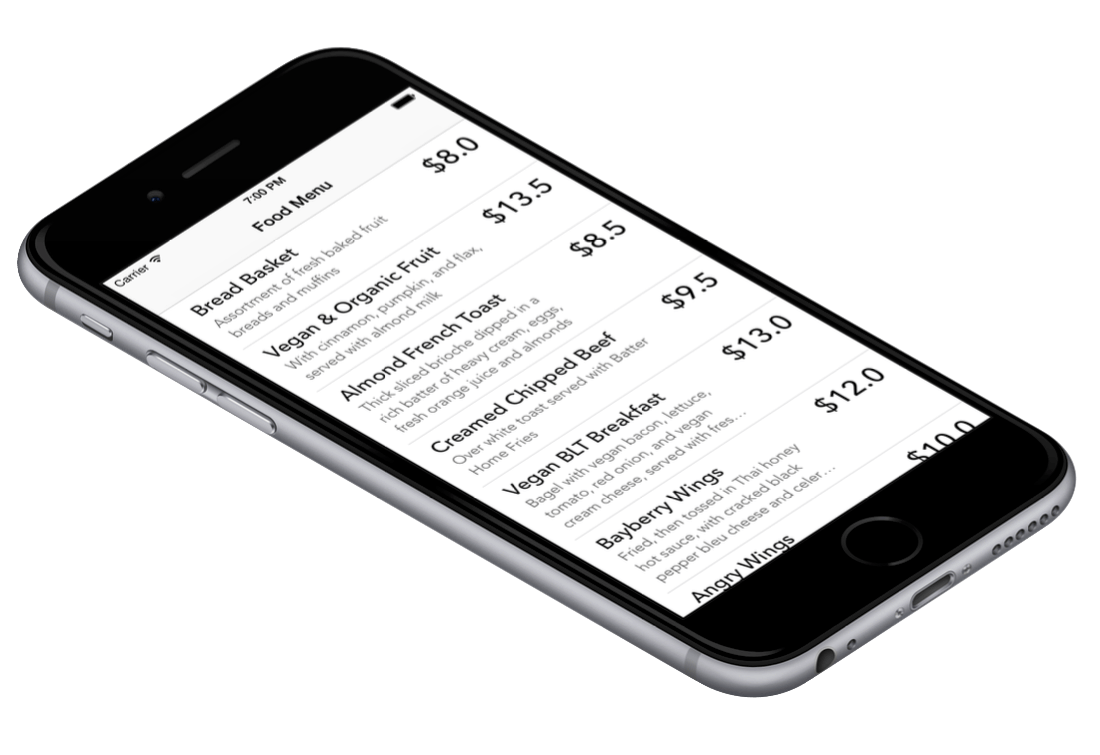
The demo is a very simple app showing a list of food. By default, the starter project comes with an empty database. If you compile and launch the app, your app will end up a blank table view. What we are going to do is to preload the database with existing data.
Once you're able to preload the database with the food menu items, the app will display them accordingly, with the resulting user interface similar to the screenshot shown below.
The CSV File
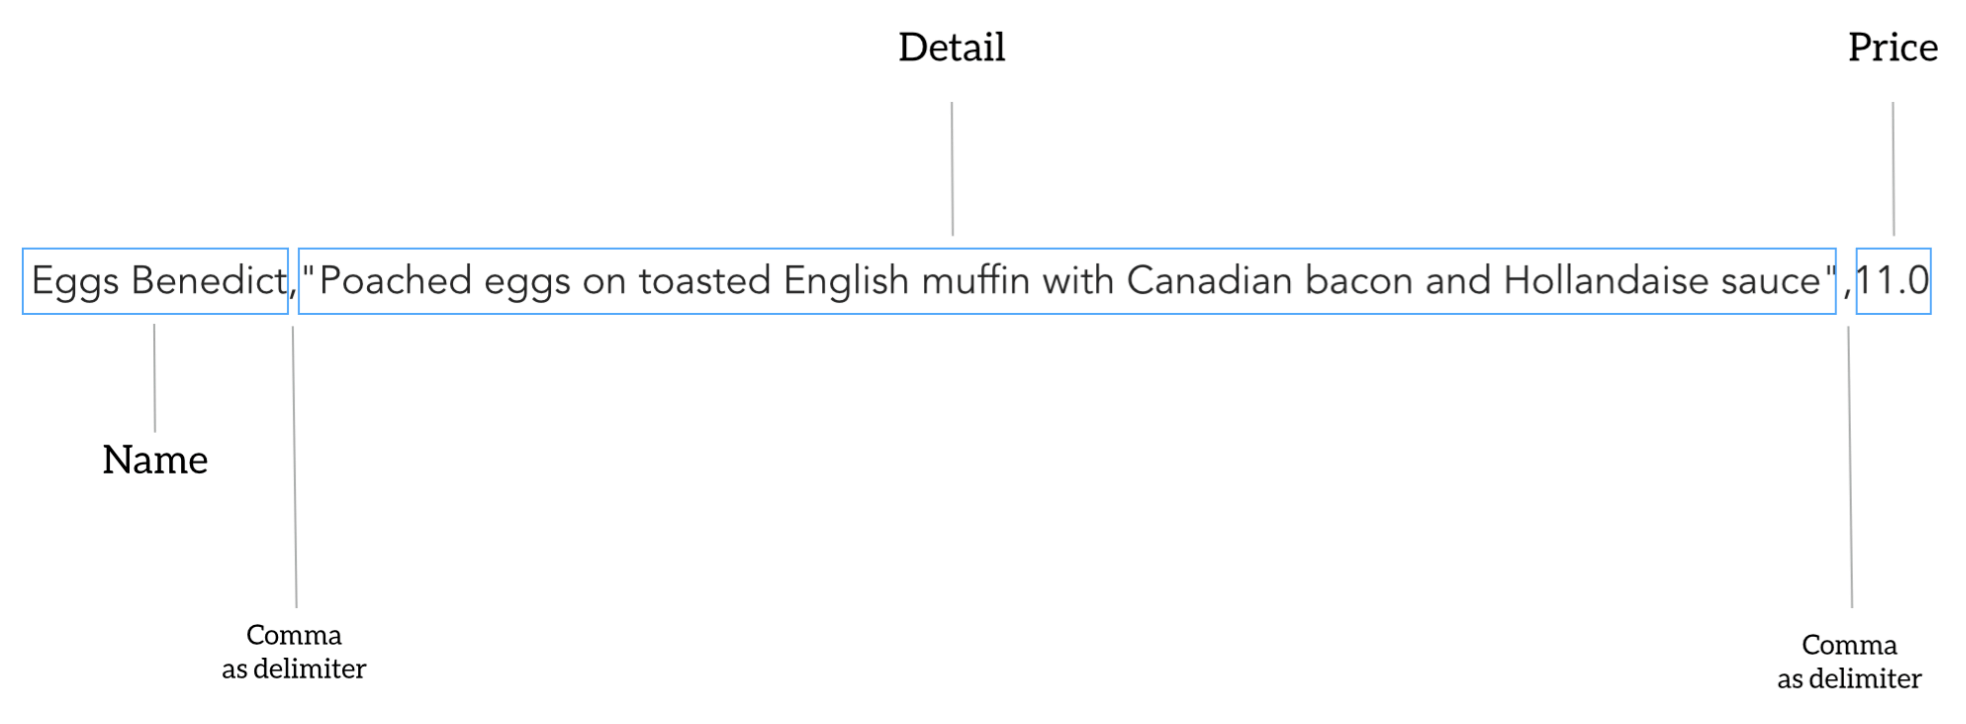
In this demo, I use a CSV file to store the existing data. CSV files are often used to store tabular data and can be easily created using text editor, Numbers or MS Excel. They are sometimes known as comma delimited files. Each record is one line and fields are separated by commas. In the project template, you should find the menudata.csv file. It contains all the food items for the demo app in CSV format. Here is a part of the file:
Eggs Benedict,"Poached eggs on toasted English muffin with Canadian bacon and Hollandaise sauce",11.0
Country Breakfast,"Two eggs as you like, Batter Home Fries, country slab bacon, sausage, scrapple or ham steak and toast", 8.5
Big Batter Breakfast,"3 eggs, Batter Home Fries, toast, and 2 sides of meat (bacon, sausage, scrapple, or country ham)",13.5
Margherita Pizza,"Rustic style dough topped with tomato, basil, and fresh mozzarella",15.0
Fish and Chips,Battered cod and fresh cut French fries served with tartar or cocktail sauce,16.0
The first field represents the name of the food menu item. The next field is the detail of the food, while the last field is the price. Each food item is one line, separated by a new line separator.

Parsing CSV Files
It's not required to use CSV files to store your data. JSON and XML are two common formats for data interchange and flat file storage. As compared to CSV format, they are more readable and suitable for storing structured data. Anyway, CSV has been around for a long time and is supported by most spreadsheet applications. At some point in time, you will have to deal with this type of file. So I pick it as an example. Let's see how we can parse the data from CSV.
The AppDelegate object is normally used to perform tasks during application startup (and shutdown). To preload data during the app launch, we will first create an extension of AppDelegate with a method for parsing the CSV file:
extension AppDelegate {
    func parseCSV (contentsOfURL: URL, encoding: String.Encoding) -> [(name:String, detail:String, price: String)]? {

        // Load the CSV file and parse it
        let delimiter = ","
        var items:[(name:String, detail:String, price: String)]?

        do {
            let content = try String(contentsOf: contentsOfURL, encoding: encoding)
            items = []
            let lines: [String] = content.components(separatedBy: .newlines)

            for line in lines {
                var values:[String] = []
                if line != "" {
                    // For a line with double quotes
                    // we use NSScanner to perform the parsing
                    if line.range(of: "\"") != nil {
                        var textToScan: String = line
                        var value: String?
                        var textScanner:Scanner = Scanner(string: textToScan)
                        while textScanner.string != "" {

                            if (textScanner.string as NSString).substring(to: 1) == "\"" {
                                textScanner.currentIndex = textScanner.string.index(after: textScanner.currentIndex)
                                value = textScanner.scanUpToString("\"")
                                textScanner.currentIndex = textScanner.string.index(after: textScanner.currentIndex)
                            } else {
                                value = textScanner.scanUpToString(delimiter)
                            }

                            // Store the value into the values array
                            if let value = value {
                                values.append(value)
                            }

                            // Retrieve the unscanned remainder of the string
                            if !textScanner.isAtEnd {
                                let fromIndex = textScanner.string.index(after: textScanner.currentIndex)
                                textToScan = String(textScanner.string.suffix(from: fromIndex))

                            } else {
                                textToScan = ""
                            }
                            textScanner = Scanner(string: textToScan)
                        }

                        // For a line without double quotes, we can simply separate the string
                        // by using the delimiter (e.g. comma)
                    } else  {
                        values = line.components(separatedBy: delimiter)
                    }

                    // Put the values into the tuple and add it to the items array
                    let item = (name: values[0], detail: values[1], price: values[2])
                    items?.append(item)

                }
            }

        } catch {
            print(error)
        }

        return items
    }
}
The method takes in three parameters: the file's URL and encoding. It first loads the file content into memory, reads the lines into an array and then performs the parsing line by line. At the end of the method, it returns an array of food menu items in the form of tuples.
A simple CSV file only uses a comma to separate values. Parsing such kind of CSV files shouldn't be difficult. You can call the components(separatedBy:) method to split a comma-delimited string. It'll then return you an array of strings that have been divided by the separator. For some CSV files, they are more complicated. Field values containing reserved characters (e.g. comma) are surrounded by double quotes. Here is another example:
Country Breakfast,"Two eggs as you like, Batter Home Fries, country slab bacon, sausage, scrapple or ham steak and toast", 8.5
In this case, we cannot simply use the components(separatedBy:) method to separate the field values. Instead, we use Scanner to go through each character of the string and retrieve the field values. If the field value begins with a double quote, we scan through the string until we find the next double quote character by calling the scanUpTo method. The method is smart enough to extract the value surrounded by the double quotes. Once a field value is retrieved, we then repeat the same procedure for the remainder of the string.
After all the field values are retrieved, we save them into a tuple and then put it into the items array.
Preloading the Data and Saving it into Database
Now that you've created the method for CSV parsing, we now move onto the implementation of data preloading. The preloading will work like this:
- First, we will remove all the existing data from the database. This operation is optional if you can ensure the database is empty.
- Next, we will call up the
parseCSVmethod to parse menudata.csv. Once the parsing completes, we insert the food menu items into the database.
Insert the following code snippets in the AppDelegate extension:
func preloadData() {

    // Load the data file. For any reasons it can't be loaded, we just return
    guard let contentsOfURL = Bundle.main.url(forResource: "menudata", withExtension: "csv") else {
        return
    }

    // Remove all the menu items before preloading
    removeData()

    // Parse the CSV file and import the data
    if let items = parseCSV(contentsOfURL: contentsOfURL, encoding: String.Encoding.utf8) {

        let context = persistentContainer.viewContext

        for item in items {
            let menuItem = MenuItem(context: context)
            menuItem.name = item.name
            menuItem.detail = item.detail
            menuItem.price = Double(item.price) ?? 0.0

            do {
                try context.save()
            } catch {
                print(error)
            }
        }

    }
}

func removeData() {
    // Remove the existing items
    let fetchRequest = NSFetchRequest<MenuItem>(entityName: "MenuItem")
    let context = persistentContainer.viewContext

    do {

        let menuItems = try context.fetch(fetchRequest)

        for menuItem in menuItems {
            context.delete(menuItem)
        }

        saveContext()

    } catch {
        print(error)
    }
}
The removeData method is used to remove any existing menu items from the database. I want to ensure the database is empty before populating the data extracted from the menudata.csv file. The implementation of the method is very straightforward if you have a basic understanding of Core Data. We first execute a query to retrieve all the menu items from the database and call the delete method to delete the item one by one.
Okay, now let's talk about the preloadData method.
In the method, we first retrieve the file URL of the menudata.csv file using this line of code:
Bundle.main.url(forResource: "menudata", withExtension: "csv")
After calling the removeData method, we execute the parseCSV method to parse the menudata.csv file. With the returned items, we insert them one by one into the database.
Lastly, update the application(_:didFinishLaunchingWithOptions:) method like this to call the preloadData() method:
func application(_ application: UIApplication, didFinishLaunchingWithOptions launchOptions: [UIApplicationLaunchOptionsKey: Any]?) -> Bool {

    preloadData()

    return true
}
Now you're ready to test your app. Hit the Run button to launch the app. If you've followed the implementation correctly, the app should be preloaded with the food items.
But there is an issue with the current implementation. Every time you launch the app, it preloads the data from the CSV file. Apparently, you only want to perform the preloading once. Change the application(_:didFinishLaunchingWithOptions:) method to the following:
func application(_ application: UIApplication, didFinishLaunchingWithOptions launchOptions: [UIApplicationLaunchOptionsKey: Any]?) -> Bool {

    let defaults = UserDefaults.standard
    let isPreloaded = defaults.bool(forKey: "isPreloaded")
    if !isPreloaded {
        preloadData()
        defaults.set(true, forKey: "isPreloaded")
    }

    return true
}
To indicate that the app has preloaded the data, we save a setting to the defaults system using a specific key (i.e. isPreloaded). Every time when the app is launched, we will first check if the value of the isPreloaded key. If it's set to true, we will skip the data preloading operation.
Using External Data Files
So far the CSV file is bundled in the app. If your data is static, it is completely fine. But what if you're going to change the data frequently? In this case, whenever there is a new update for the data file, you will have to rebuild the app and redeploy it to the app store.
There is a better way to handle this.
Instead of embedding the data file in the app, you put it in an external source. For example, you can store it on a cloud server. Every time when a user opens the app, it goes up to the server and downloads the data file. Then the app parses the file and loads the data into the database as usual. I have uploaded the sample data file to Google Drive and share it as a public file. You can access it through the URL below:
https://drive.google.com/uc?export=download&id=0ByZhaKOAvtNGelJOMEdhRFo2c28
Quick note: If you also want to host your file using Google Drive, you can follow this guide to create a public folder to store your files. Once you create the public folder, you can use the following direct link to access the file:


https://drive.google.com/uc?export=download&id=[folder_id]

Please replace [folder_id] with your folder ID. You can look up the folder ID by clicking your public folder. The URL will be something like this:

https://drive.google.com/drive/folders/0ByZhaKOAvtNGTHhXUUpGS3VqZnM


In the example, "0ByZhaKOAvtNGTHhXUUpGS3VqZnM" is the folder ID.
This is just for demo purpose. If you have your own server, feel free to upload the file to the server and use your own URL. To load the data file from the remote server, all you need to do is make a little tweak to the code. First, update the preloadData method to the following:
func preloadData() {

    // Load the data file from a remote URL
    guard let remoteURL = URL(string: "https://drive.google.com/uc?export=download&id=0ByZhaKOAvtNGelJOMEdhRFo2c28") else {
        return
    }

    // Remove all the menu items before preloading
    removeData()

    // Parse the CSV file and import the data
    if let items = parseCSV(contentsOfURL: remoteURL, encoding: String.Encoding.utf8) {

        let context = persistentContainer.viewContext

        for item in items {
            let menuItem = MenuItem(context: context)
            menuItem.name = item.name
            menuItem.detail = item.detail
            menuItem.price = Double(item.price) ?? 0.0

            do {
                try context.save()
            } catch {
                print(error)
            }
        }

    }
}
The code is very similar to the original one. Instead, loading the data file from the bundle, we specify the remote URL and pass it to the parseCSV method. That's it. The parseCSV method will handle the file download and perform the data parsing accordingly.
Before running the app, you have to update the application(_:didFinishLaunchingWithOptions:) method so that the app will load the data every time it runs:
func application(application: UIApplication, didFinishLaunchingWithOptions launchOptions: [NSObject: AnyObject]?) -> Bool {

    preloadData()

    return true
}
You're ready to go. Hit the Run button and test the app again. The menu items should be different from those shown previously.
For reference, you can download the complete Xcode project from http://www.appcoda.com/resources/swift55/CoreDataPreloadDemo.zip.
Using An Existing Database in Your Project
Now that you should know how to populate a database with external data, you may wonder if you can use an existing SQLite database directly. In some situations, you probably do not want to preload the data during app launch. For example, you need to preload hundreds of thousands of records. This will take some time to load the data and results in a poor user experience. Apparently, you want to pre-filled the database beforehand and bundle it directly into the app.
Suppose you've already pre-filled an existing database with data, how can you bundle it in your app?
Before I show you the procedures, please download the starter project again from http://www.appcoda.com/resources/swift55/CoreDataPreloadDemoStarter.zip. As a demo, we will copy the existing database created in the previous section to this starter project.
Now open up the Xcode project that you have worked on earlier. If you've followed me along, your database should be pre-filled with data. We will now copy it to the starter project that you have just downloaded.
But where is the SQLite database?
The database is not bundled in the Xcode project but automatically created when you run the app in the simulator. To locate the database, you will need to add a line of code to reveal the file path. Update the application(_:didFinishLaunchingWithOptions:) method to the following:
func application(_ application: UIApplication, didFinishLaunchingWithOptions launchOptions: [UIApplicationLaunchOptionsKey: Any]?) -> Bool {

    let urls = FileManager.default.urls(for: .documentDirectory, in: .userDomainMask)
    print(urls[0])

    return true
}
The SQLite database is generated under the application's document directory. To find the file path, we use FileManager to retrieve the document directory of the application.
Now run the app again. You should see an output in the console window showing the full path of the document directory like this:
file:///Users/simon/Library/Developer/CoreSimulator/Devices/7DC35502-54FD-447A-B10F-2B7B0FC5BDEF/data/Containers/Data/Application/505CF334-9CC4-404A-9236-4B88436F0808/Documents/
Copy the file path and go to Finder. In the menu select Go > Go to Folder... and then paste the path (without file://) in the pop-up. Click Go to confirm.
Once you open the document folder in Finder, you will find the Library folder at the same level. Go into the Library folder > Application Support. You will see three files: CoreDataPreloadDemo.sqlite, CoreDataPreloadDemo.sqlite-wal and CoreDataPreloadDemo.sqlite-shm.
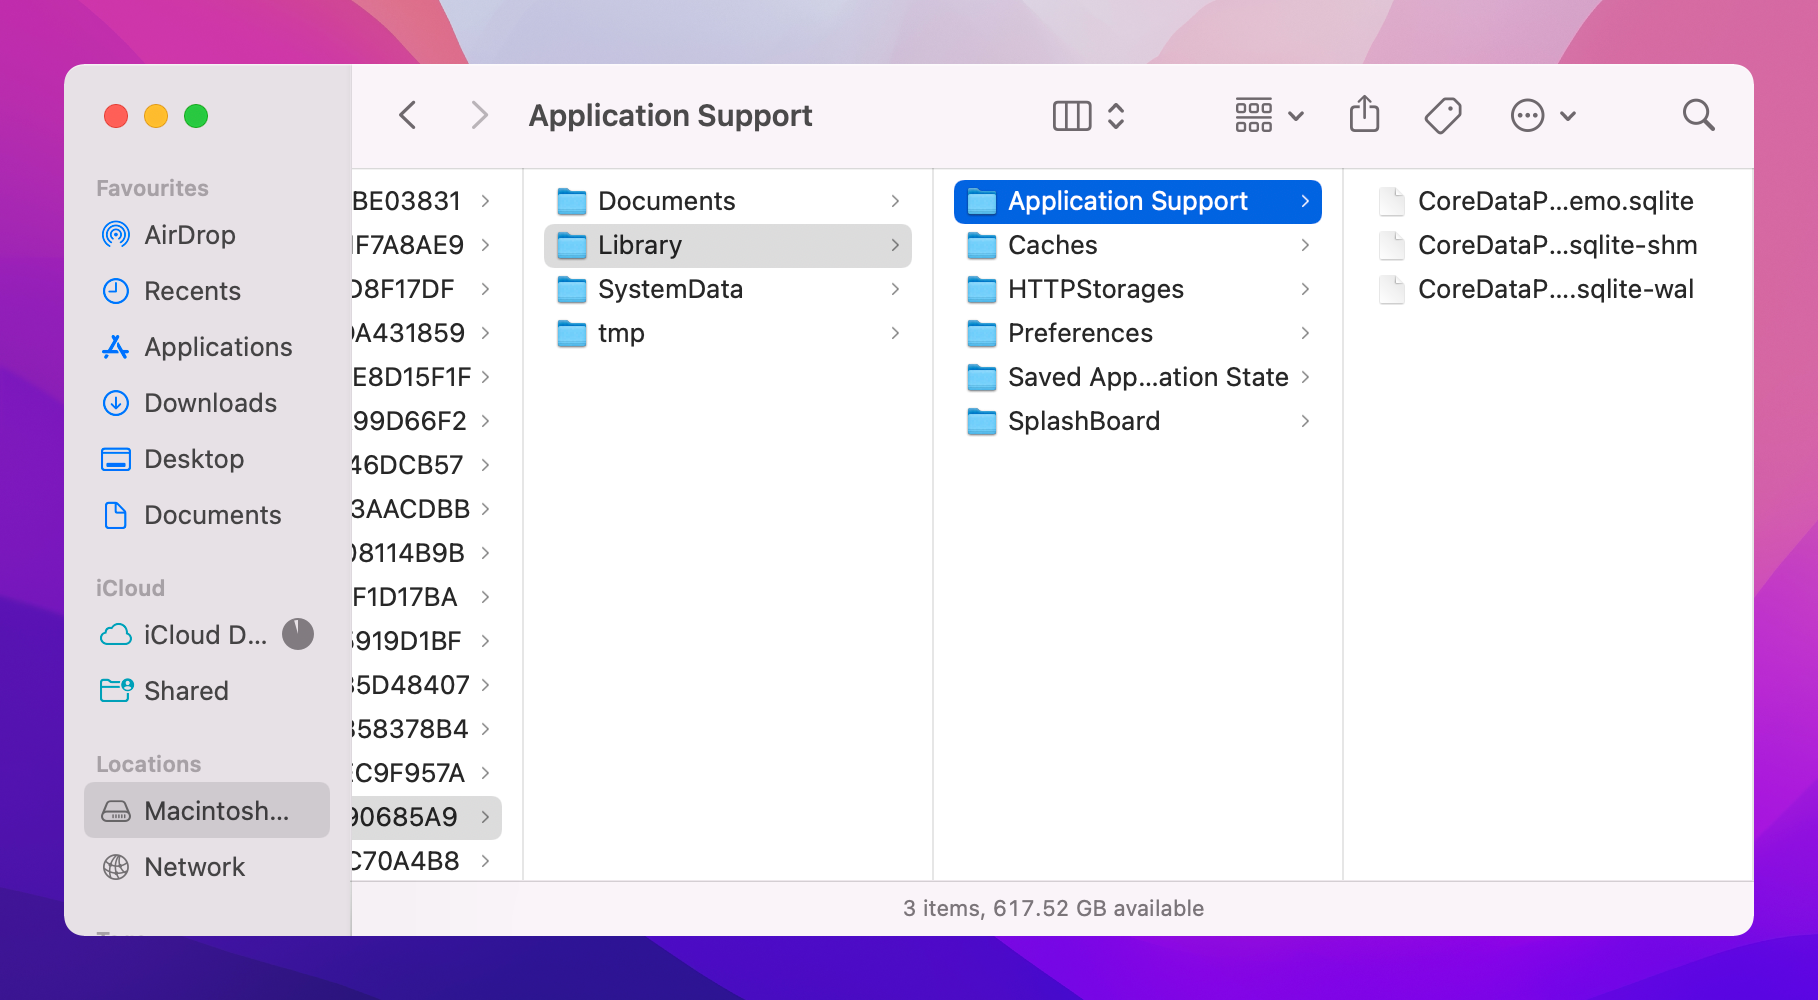
Starting from iOS 7, the default journaling mode for Core Data SQLite stores is set to Write-Ahead Logging (WAL). With the WAL mode, Core Data keeps the main .sqlite file untouched and appends transactions to a .sqlite-wal file in the same folder. When running WAL mode, SQLite will also create a shared memory file with .sqlite-shm extension. In order to backup the database or use it to in other projects, you will need to copy these three files. If you just copy the CoreDataDemo.sqlite file, you will probably end up with an empty database.
Now go back the starter project you just downloaded. Drag these three files to the project navigator.
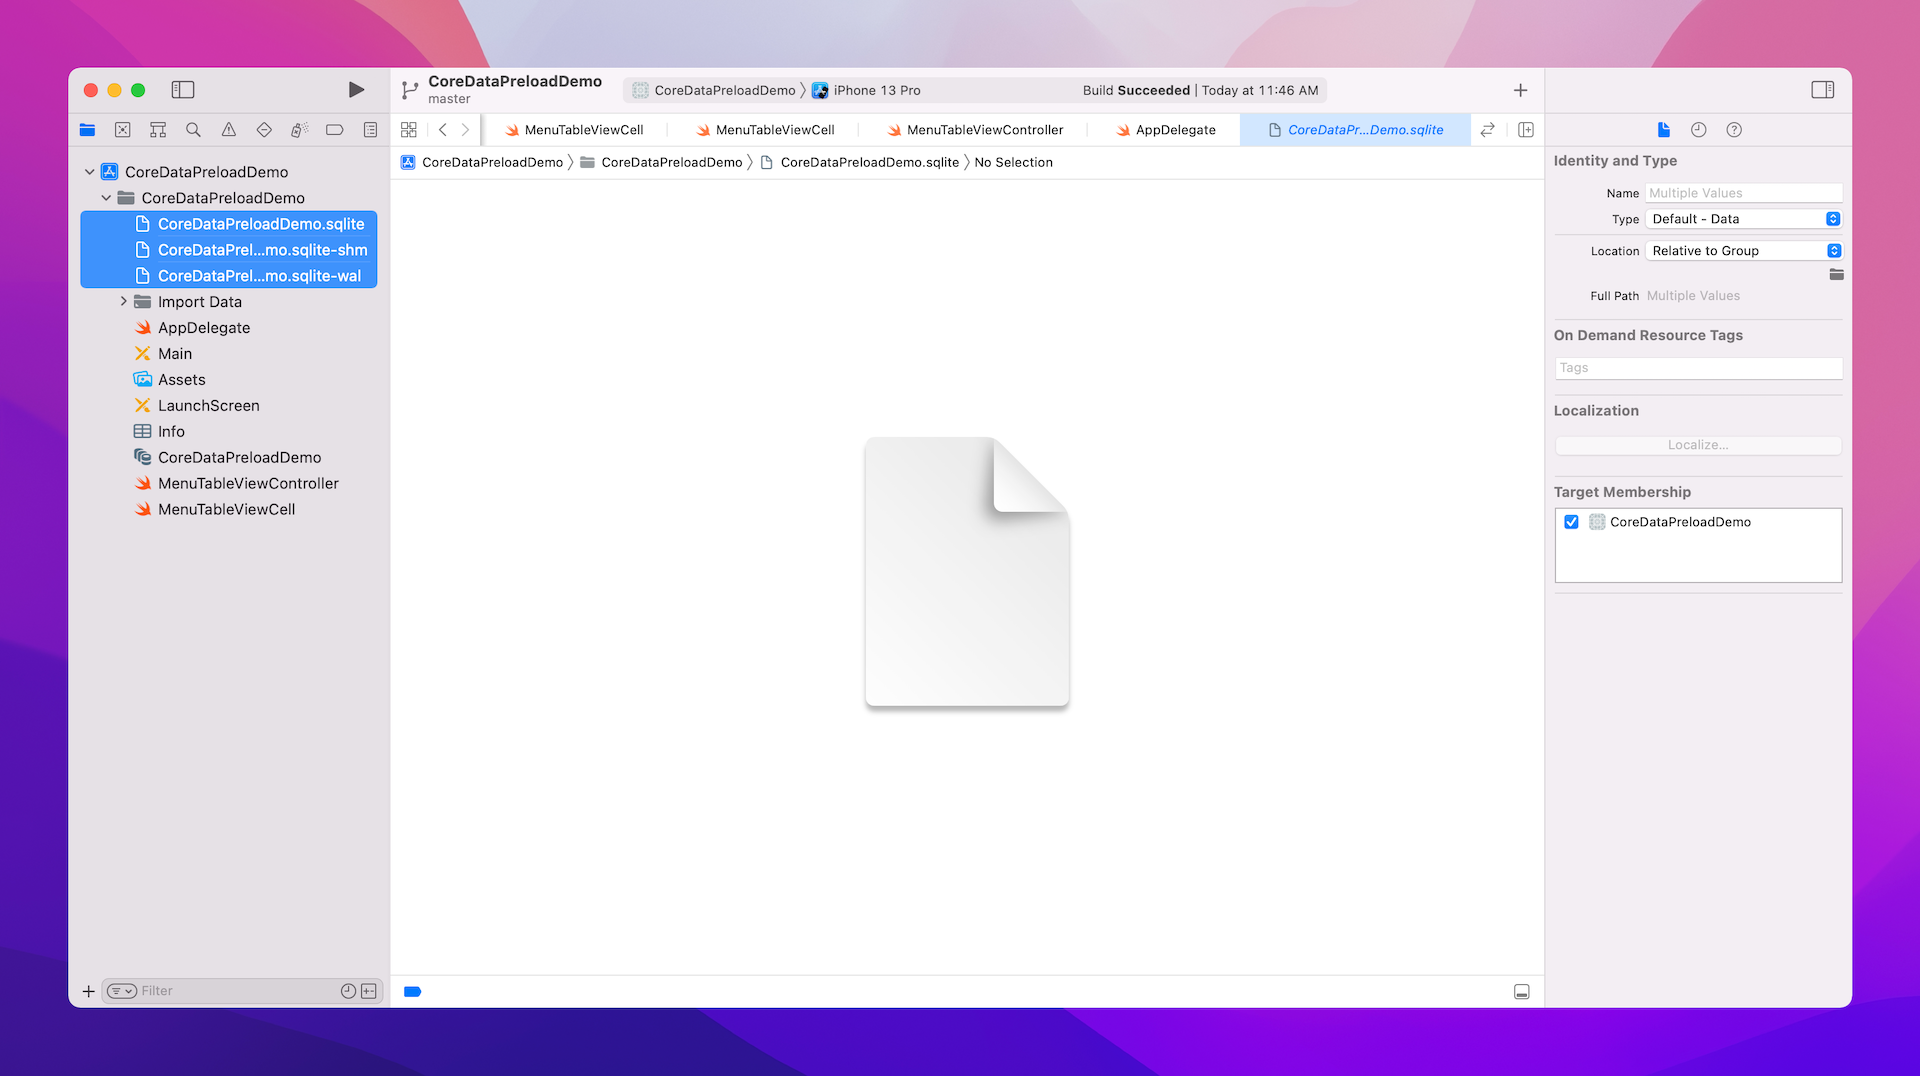
When prompted, please ensure the Copy item if needed option is checked and the CoreDataPreloadDemo option of Add to Targets is selected. Then click Finish to confirm.
Now that you've bundled an existing database in your Xcode project, this database will be embedded in the app when you build the project. But you will have to tweak the code a bit before the app is able to use the database.
By default, the app will create an empty SQLite store if there is no database found in the document directory. So all you need to do is copy the database files bundled in the app to that directory. In the AppDelegate class, modify the declaration of the persistentStoreCoordinator variable like this:
lazy var persistentContainer: NSPersistentContainer = {

    let directoryUrls = FileManager.default.urls(for: .documentDirectory, in: .userDomainMask)
    let applicationDocumentDirectory = directoryUrls[0]
    let storeUrl = applicationDocumentDirectory.appendingPathComponent("CoreDataPreloadDemo.sqlite")

    // Load the existing database
    if !FileManager.default.fileExists(atPath: storeUrl.path) {
        let sourceSqliteURLs = [Bundle.main.url(forResource: "CoreDataPreloadDemo", withExtension: "sqlite")!, Bundle.main.url(forResource: "CoreDataPreloadDemo", withExtension: "sqlite-wal")!, Bundle.main.url(forResource: "CoreDataPreloadDemo", withExtension: "sqlite-shm")!]
        let destSqliteURLs = [applicationDocumentDirectory.appendingPathComponent("CoreDataPreloadDemo.sqlite"), applicationDocumentDirectory.appendingPathComponent("CoreDataPreloadDemo.sqlite-wal"), applicationDocumentDirectory.appendingPathComponent("CoreDataPreloadDemo.sqlite-shm")]

        for index in 0..<sourceSqliteURLs.count {
            do {
                try FileManager.default.copyItem(at: sourceSqliteURLs[index], to: destSqliteURLs[index])
            } catch {
                print(error)
            }
        }
    }

    // Prepare the description of the Persistent Store
    let description = NSPersistentStoreDescription()
    description.url = storeUrl

    // The persistent container for the application.

    let container = NSPersistentContainer(name: "CoreDataPreloadDemo")
    container.persistentStoreDescriptions = [description]
    container.loadPersistentStores(completionHandler: { (storeDescription, error) in
        if let error = error as NSError? {
            fatalError("Unresolved error \(error), \(error.userInfo)")
        }
    })
    return container
}()
We first verify if the database exists in the document folder. If not, we copy the SQLite files from the bundle folder to the document folder by calling the copyItem(at:) method of FileManager.
We then create another description object of the persistent store and specify the URL of the database. When we instantiate the NSPresistentContainer object, it uses the specified store description to create the store.
let container = NSPersistentContainer(name: "CoreDataPreloadDemo")
container.persistentStoreDescriptions = [description]
That's it! Before you hit the Run button to test the app, you better delete the CoreDataPreloadDemo app from the simulator or simply reset it (select Device > Erase All Content and Settings). This is to remove any existing SQLite databases from the simulator.
Okay, now you're good to go. When the app is launched, it should be able to use the database bundled in the Xcode project. For reference, you can download the final Xcode project from http://www.appcoda.com/resources/swift55/CoreDataExistingDB.zip.